Transcripts
1. Introduction: Do you like dogs? Do you want to
learn to draw dogs? Well then this is
the course for you. In this course, I'm
going to teach you how to easily start
by sketching a dog, by simply splitting a dog's
face into simple shapes. You will learn how to easily find the construction
of the dog, adding features and
shading later on, it's going to be
like an icing on the cake when you have
your construction ready. We're going to go through
several different breeds. You can see that you can use the same technique
to draw any dog. You will also learn about how to add shading with a pencil. You're going to learn about different strokes and how to add details to
your final drawing. And last, but not least, you are going to learn how
to draw a dog out of Kells. And easy technique that
will break your fear of drawing and free you to
draw anything you want. Sign up today and
discovered the secrets. How to draw great dog portraits.
2. Materials: So to draw this first dog, I'm going to use a
very sketchy style. So you can just warm up and it's going to
be a quick sketch. So I'm going to
use these pencils. I'm going to start with three B. I recommend you invest in
such pencils like e.g. a. Kohonen is a good brand. And I'm going to use
this one is three b, I have a to B. For B, it's this number
here that says for B3, B or whatever, this is
seven b and this is eight. And this is to be, why is this important? Each one of these bands
have a different strength. Like e.g. you see, if I draw with two beam, this is the strength. You see that when
I draw with for B, it gets a little darker. And if I draw with eight B, these drugs are
even darker line. So we are going to use this different
numbers of pencils to draw shading with
different strength and you need a nice eraser. This is also a cautionary
tale, good brand coffee. Now, why do you
need a good eraser? It has to be a little hard. You make sure that you clean up this line by just erasing
here somewhere so you have white space to erase because they don't they don't mess up your
drawing too much. The more UV rays, morning paper will get my stop. And this one is very good
at erasing while without messing up your sheet of paper and you're drawing basically you want to
have a clean drawing. So these are the materials and I'm going to use those
for the whole course. So I'm going to start with that, except for the second dog, what I'm going to use
even colored pencils, but I'm going to talk about it. Then. Now, let's start
with the first dog.
3. Drawing Techniques : So before we start working
with a real picture, I want to show you some
ways we are going to use the pencil to draw
lines and shading. So take your pencil, it needs to be shocked. Well, so we're going to use the top of the pencil to
draw lines like that. And to draw surfaces that
are stronger in color, intensity of the color
of the blackness. Then we're going to use
the side of the pencil. So you link the pencil
that way and draw a lighter around or the area
that you want to shade. Well, you want to convey an idea of just a tone of
shading like that. And then you move your
hand from the wrist down, you see how likely I move it. There is another way
to convey shading and this is to draw lines like this. You draw perpendicular
lines like this. And then you lean the pencil
a little bit and draw a line almost perpendicular
on this line. But draw this straight lines one after the other is a little bit
more challenging. You will need to have
more training for me and it's cool we have hours training to do this,
shading, these slides. So in this video, I'm just going to
use the shading. That is where the
leaned hand like that. You see that we can
use the shading and if you want to shade
it a little darker, we just go over the area
and add another tone. Like that. I would like you to practice
this technique a little bit. So you're ready when we start and you'll find it easier
to work with them. So this is just a
short exercise of how we are going to
use the pencil to combine the idea of different shading within the
same target, the same image. Now let's go ahead and
draw the real dog. See you in the next lecture.
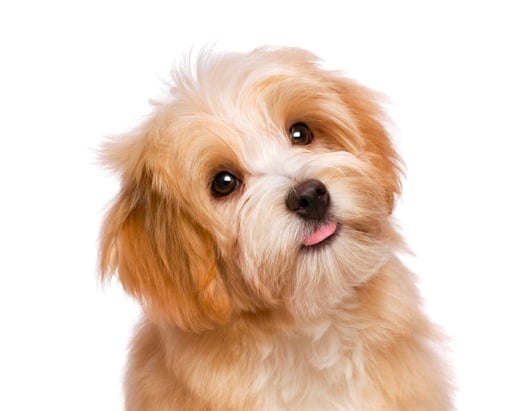
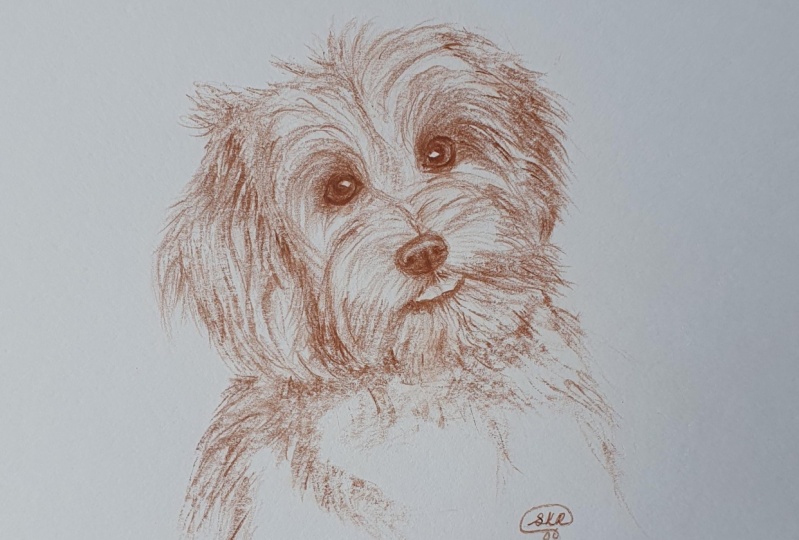
4. Dog 1, Introduction: So let's start with this cute dog and do
a sketch like that. It's going to be a light
sketch so you can warm up and start easy with some
kind of a fluffy dog. And through the process, I'm going to take you from
three different steps. How to split the head
into simple shapes. So you can easily later find
the proportions of the head. We're going to draw the
dog with simple lines. And after that, we're
going to add the fluff for the dog and the features of the dog or refining
it step-by-step. So we will finish a simple
sketch looking like that. So let's get started.
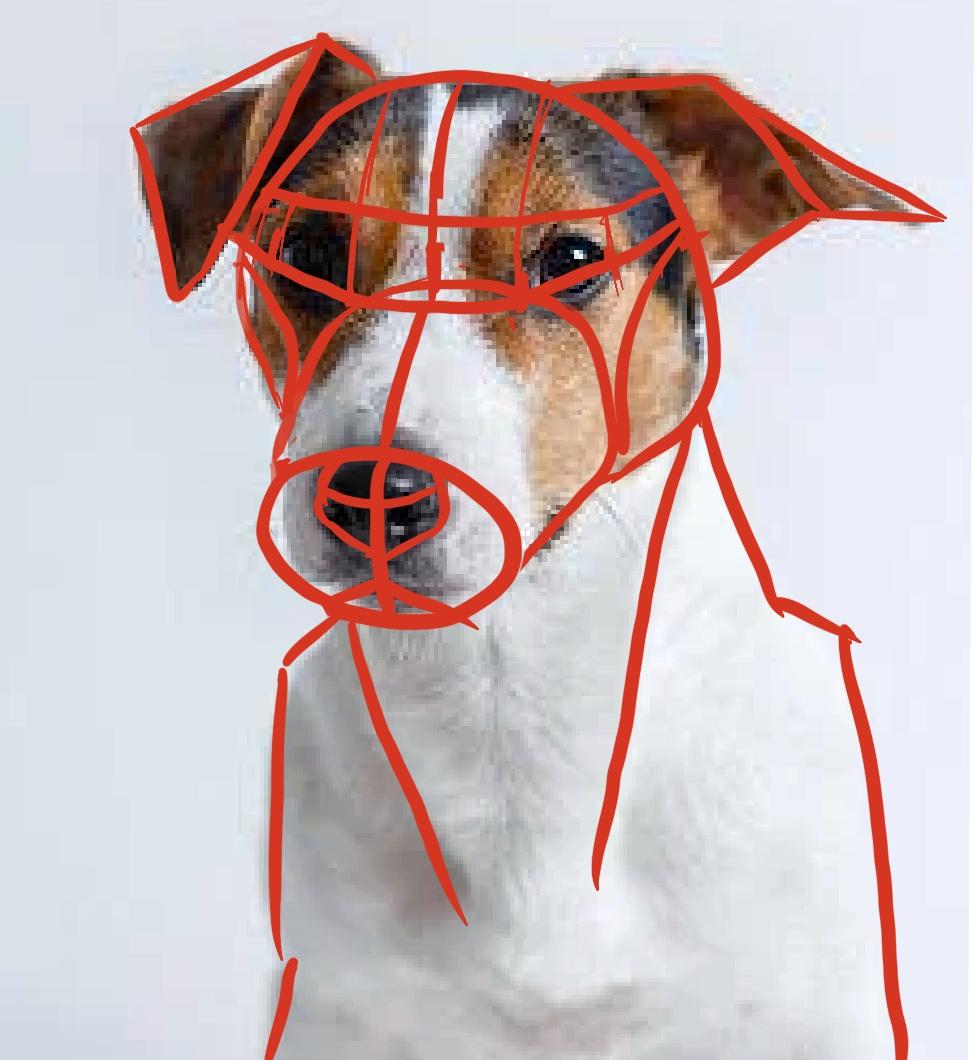
5. Dog 1, Sketching of a Fluffy dog: Let's start by drawing a
sketch of a fluffy dog using basic shapes to define
its head structure. Let's draw the sketch of this
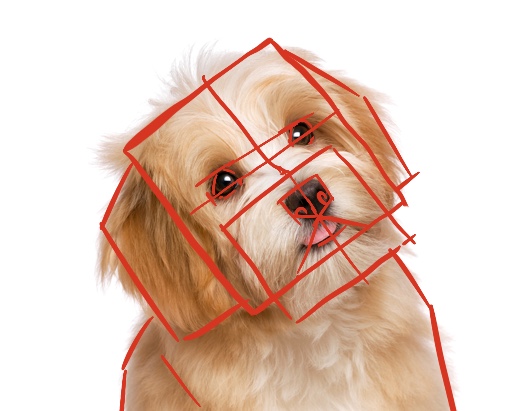
cute dog to look like that. We can summarize the head of
the dog with simple shapes. Like the head can be contained
within a rectangular. So we can make a
kind of like a robot of this dog to use
as a help lines. The lower part of the
head of the dog where the gnosis is also
another rectangular. The years can be described
as a small triangle. And another rectangular. Draw a line, the split the face
in the middle. From this line, the face
will be symmetrical. Now let's find the position
of the eyes on both sides of the line. We've dealt lines. We can even define the nodes and the space
between the eyes. Use the rectangular
as a guideline and round the shape of the head. Around the corners,
and near the ears. Around the shape of
the nose as well. Let's find the
position of the nose with a basic simple sphere. Let's define the mouth as well. With two lines. Draw a line above
the rectangular of the nose To find the
position of the eyes. Now let's draw the eyes by
drawing around spheres. Draw the pupils
to make sure that the dog is looking in
the right direction. Start adding more details to the rest of the
shape of the head. The eyebrow areas, dots from the to help lines from the center. Draw a sphere to signify where the eyebrow
area is going to be. Slowly. Start adding more
details and be more observant. Add some chunks of
hair on the body. Now, let's start
erasing the help lines. We don't need them anymore. We'll start working on the nose. Now, you can start to
be more observant and see how the shape of the
nose is actually going. One nostril on one side and the other nostril looking
on the other direction. The nose is not
completely around, it's a little bit longer. So observe the shape and try to come as close as possible
to the nose of the dog. Start adding some chunks of hair around the mouth, the chin. So you get closer and closer to the shape and
look up the dog. Let's now go back
and work on the ice. That the most important thing, what the softer pencils such as HB, start adding contours. On the eyes. Here it is again time to
be more observant and see that the eyes are
not completely round. It is important to achieve
this cute puppy like look. Now start adding
more chunks of hair. Follow the image and see where you can see
visible chunks of hair and add them there with a few strokes,
start erasing. The help likes to
have a clean image. I'm using two different pencils, ADB and Tooby, to achieve different look and different
intensity of the pencil. With a1b0, I work
on the darker area, such as the ice. Just intensify the color there. And I'm going to use the
same pencil for the notes. See that there is
a visible shading of the nodes on the
lower part of the nose. The nose is brighter on the upper part where
the light is falling. I'm going to have the
little mouth that is underneath the tongue and start adding more
chunks of hair. And following the
image and seeing where the areas are darker and
where they are lighter, where I can see visible
chunks of hair there, both shading and some hairs. I'm going to shade
the area around the eyes so the eyes can pop out and the volume of the dog can be more
significant and more visible. I'm going to shade the ears. And you shade something. When you tilt your
pencil a little bit, you don't draw with a
pencil straight on. Use the pencil very softly
to add the shading. As I said, tilt of the
pencil. To add the shading. You see the difference between
the shading and align. Adjusted the ear. If the ear sense too short, as it looks like in this case. Here you can adjust
an ad, changes, add more details, and refine In jump from
one spot to the other. Don't get stuck in just one
area until it's finished. That's how you're going to
lose sight of the hall, which is not good for the
image, for your picture. So I'm just adding more details. And this process can continue for a long
time until you know, how finished and how polished
you want too drunk to be. Personally, I enjoy to have the drawing and
being more sketchy. It looks more alive
and more hand-drawn. I don't want to have a painting or drawing that looks
photorealistic too much. I mean, that's why you draw. I'm going to leave the
body just as a sketch unfinished to make the head pop out and look more as an art. N. Now we are done.
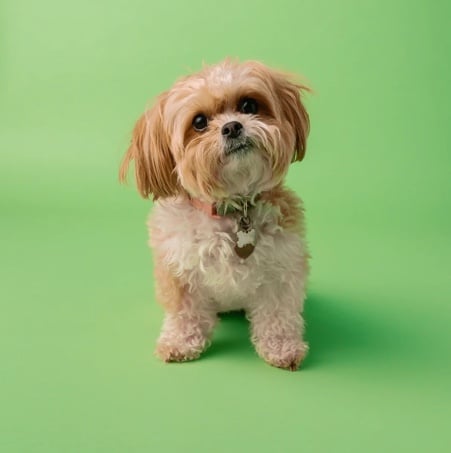
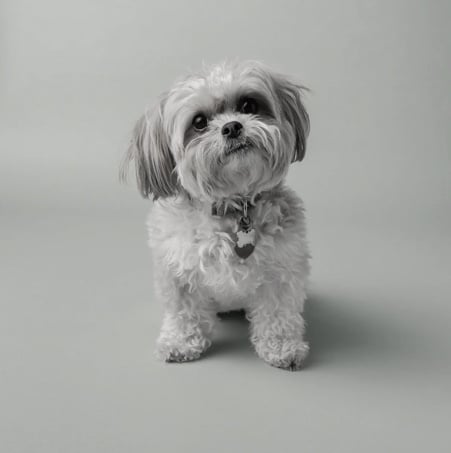
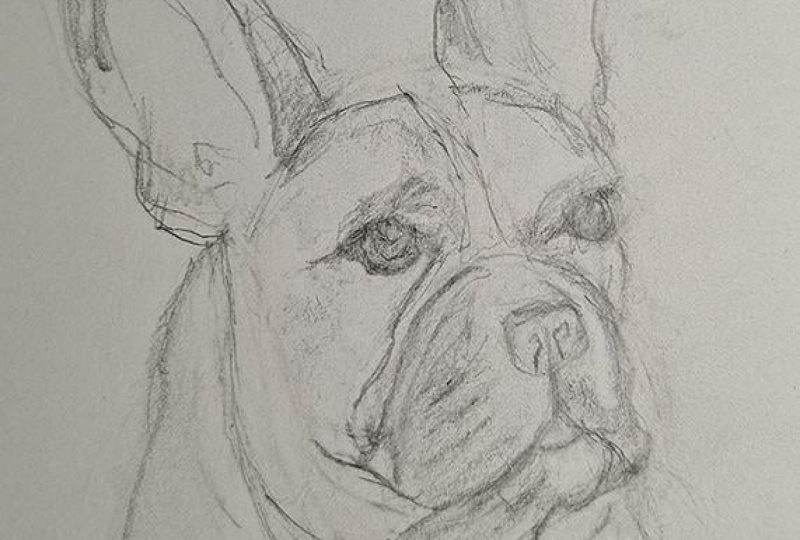
6. Dog 2, Introduction: So this is a short
introduction of the steps we're going to go through to draw this cute dog. We're going to use
the picture of the dog as a reference
to draw the dark. So we're going to go through
three different stages. Finding the construction of this dog that I'm going
to show you step-by-step. And I'm going to show you an introduction video
of how to draw and find this help lines which you will use as a
base to draw the dog. Then we're going to
delete the help lines and start refining the
features of the dog. And when we find
the construction and the right proportions
of the face of the dog, we're going to go
ahead and shade a dog. And for this dog, I'm going
to use colored pencils. So if you have your
children's pencils, big dose, I'm using just cheap pencils that I
bought in the local store. It doesn't have to be too fancy. I'm going to use the
brownish color of it. If you want to use that
preparedness to have a patent. And now let's go ahead
and show you how you can find the
construction after dark. In the next lecture.
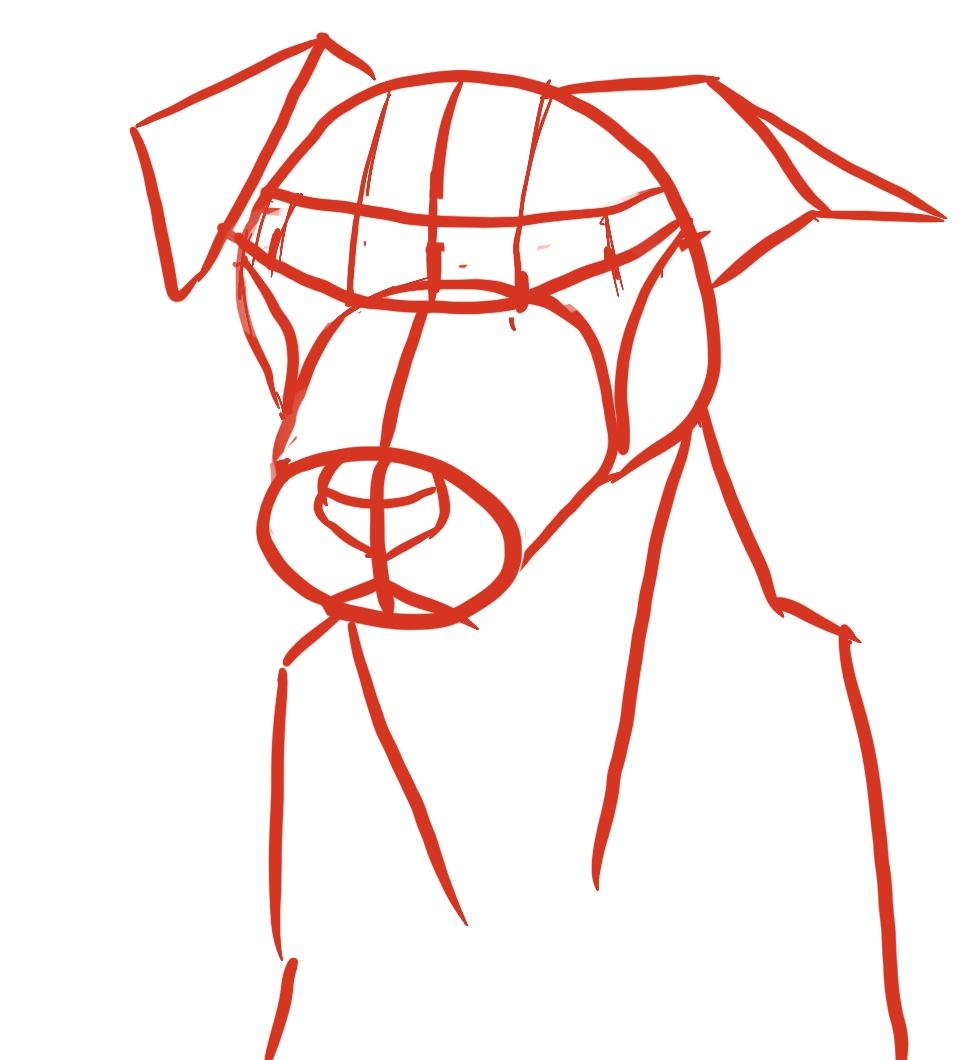
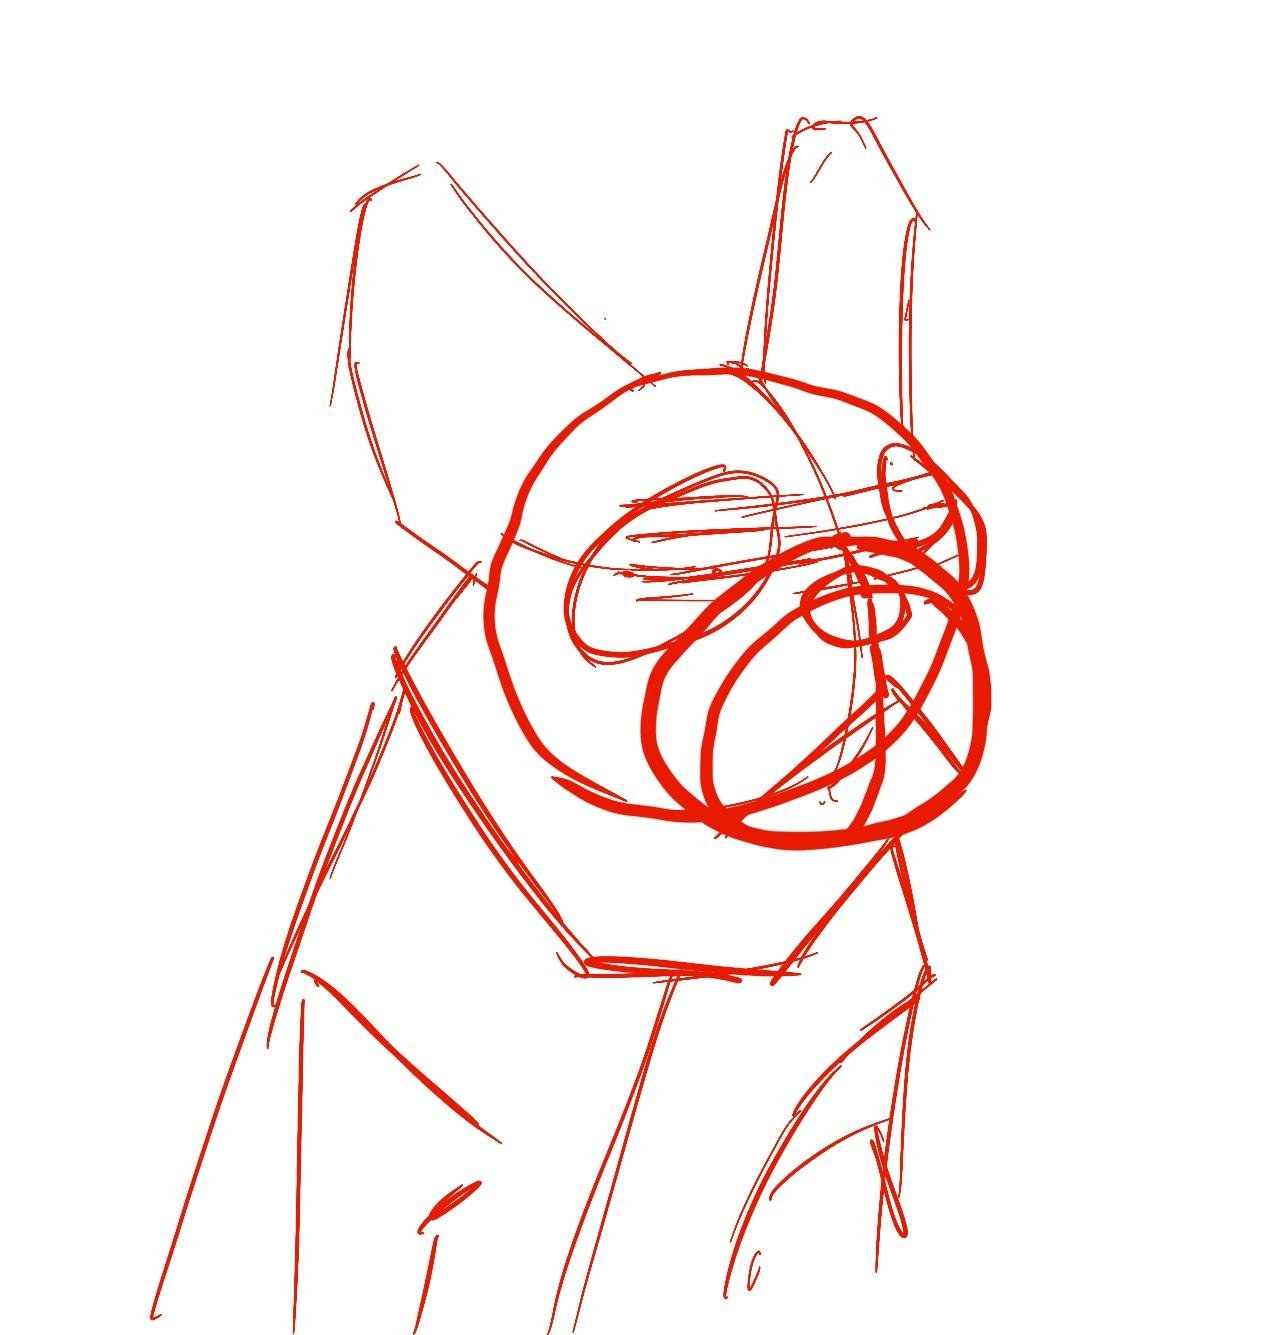
7. Dog 2, Construction : Now let's go for
another type of dark. So let's draw a
different type of dog. And this time I'm going
to summarize its shape, its head with round shapes
instead of squares. Just to show you that there are different ways you can
see the shape of the dog. So let's assume this upper
part of his head is, the skull is one
shape around shape. And the nose here that
is sticking out is another more elliptic,
elliptic shape. So we have a part here. You have to also see that three-dimensional
within the picture, or a bar of the
nose that is also a round shape like that. So we can see the years as a triangular shape here that
connects with a square. And we can see even this part of the year like a
triangular shape. And this one connects
with the rectangular. And now let's find the neck. We have these lines
here on the neck. And these lines here that's signified this
shape of the neck. And the body is more of
a like a rectangular. So pretty much that
summarize the dog. Now, let's find the
middle line here. It's going to be
approximately here on if you can start
with the head, the null suggesting
what is the middle line here on this part of the dog? And it connects with the
nose approximately here. Connect that makes
up the middle line. Now, let's see
where the eyes are. So you just add a line to
connect where the eyes are. So you try to connect that part of the eye with
that part of the eye and go past this parts of the eye to
get some more correct line. And you see that the
line is not straight. It's kind of a round,
round that line. Now, let's signify and find
even where the eyebrows are. You try to connect this
area with this area. And you just draw a line. Here are approximately
the eyebrows and we have one part here
that is the cheek of the dog. As you see. We draw in doubt and we saw me draw that on the other part. What else can we add here? Well, we can add
where the eyes are. So we can add a line
from here and we measure how long is approximately this line
from the middle line. It's going to be different
though because we have a slight perspective and
three quarters for this dog. So you approximate
and you measure the line according to
other measurements, like the nodes e.g. and where this corner of
the eye, where does it? And according to this picture. So you study the
picture and these are basically the help
lines that we need. I'm going to include this model, these lines in the file to
help you draw your dog. As a first step if you need it. Because now we're going to draw the dog without this picture. We want to learn to
eyeball everything. And let's continue
that and start drawing the dog according to how I
split the face right now. See you there.
8. Drawing the Second dog: So let's start drawing this dog now without having the
picture underneath. We will still have to look
at the picture of the dog, but we have a blank sheet
of paper to work with. So let's start with
one sphere for the head and one
sphere for the nose. A little longer stretched
out sphere. Okay. Let me bring out the help lines
that we drew for the dog. So let's draw the sphere where
the nose is going to be. The nose and the mouth. This is a three-dimensional
dog, after all. And the nose and the mouth are actually another
dimension of the nose. Let's bring out the help lines for the eyebrows and the eyes. And let's draw the space
where the chicks are. Three-dimensional. Space that is going to signify
the cheeks and the ears. One rectangular shape and
one triangular shape. You see that I already started drafting the shape of the ears. Now that I did this scheme after dog with shapes,
it becomes easier. Now, let me hide
again the scheme and try to just look at
the picture of the dog. When you want to draw
portraits of animals, you have to get used to eyeball all these shapes
that I started with. I draw it first and imagine
an invisible lines going from one shape to another
and connecting them with other invisible lines. That is basically the
secret for drawing. So let's just go ahead with this dog without having the help lines in front of us. Just for the sake of it. You can go back and
look at the help lines, or you can even use them
already for your drawing. Draw them before you start
drawing this portrait. If you have difficulties to
do that yet, it's gonna come. Don't worry about it. It's just a matter of practice. Great. We are ready with
the construction. Let's start polishing
a little bit. Now using the help lines, we are going to be more
observant of the dog. Where is one shape
according to the other? Using the help lines
of where the ice and we are going to draft
the eyes and the nose. I have drawn help lines
for you as well on the scheme for the dog just
to make it easier for you. But you can draw as many shapes and help
lines like that when you draw anything really to help you go ahead
and find the shape. And now, let's find the mouth, where the mouth connects with that shape that we have
in the side, the cheeks. And let's do that
for the other side. Connected this cheek. Where does it end? It ends exactly where three quarters of these nodes when the nose is sticking out. And that connects to the other part of the
mouth, the other chick. Now let's find the
top of the nose. You'll see that it is
approximately that space that I've drawn on there
with the red lines. I'm keeping everything
very rough. I draw with rough lines. I don't try to be precise about his health lines because
these are just help lines. Don't try to do perfect
circle or perfect whatever. Just try to find the shape. The dog. When you find the
shape of the dog, everything else is going
to be really, really easy. So now what I'm doing
is trying to find where this brown shape
phase is after dog. Just to help me to discover
or how big the ISR. This is constant measurement, constant measuring and
sometimes eyeballing. You're not going to be right. That that's okay. It's good to be wrong sometimes. So you will know what
you're looking for. The most important thing is
to be analytic about it. Ask yourself questions,
how big is this? According to the nose? Or compare it to the
ears, measure one, I comparing it to
something else. So now the observant
and try to find the, the eyes basically
where they are located and be observant of
the pupils of the dog. To make sure that we have
the right proportions. They may not be
top-notch to start with. That's why you're a beginner. You are not you're not
expected to do super work. I mean, not even I do for work. You have good days and bad days. It is how you train your eye to see different proportions,
different shapes. Okay, so you see that step-by-step
using the help lines. We are almost there. With the construction of
these dogs had it looked, it looked like
unbelievable, right? That you will find
this construction. Now, try to see more details. Break it down. Like this chick, e.g. where does the mouth and what
else do you see on the dog? Yes. Add a little texture on the neck or texture and try to
find what the legs start. We're not going to
draw the whole body, but there are small, small details on
the dog that will just give you more
perspective of the whole, of the whole head. Okay, so we're pretty
much done here. Now, let's start erasing
lines that we don't need. Let's clean up or a drawing. Erase the help lines. Erase the helpline
that helped us find the position of the
eyes and the eyebrows and start drawing more details. Now here I'm trying to draw
where the black spot is. It is not true in
dimensional space. It's just giving me more suggestions how big this
black spot of the dog is. Defining even more of the
ears and deleting more lines. Cleaning up your drawing. Let's delete more help lines. We don't need them anymore. And that's why I'm telling
you don't be too to precisely the help lines
trying to do them to even or just one
helpline, just discover. Use this as a
discovering process of your job because you're
not going to lead them and you have an eraser, right? So you will always be
able to erase and refine. And let's clean up the nose. Use the goods eraser because your eraser
needs to be cleaned. If your eraser is not clean, just erase on an empty sheet of paper or somewhere
on a table. So you don't smudge your
drawing, that you see, that it starts getting dirty on one side and
destroying my drawing. So I'll have to
redo that nostril. This happens to all of us
and sometimes we get lazy, we get caught in the process. We don't see that. Or pencils, sharp or
erasers are not clean. But this is important to have
nice flaw in your process. So we're done with
this construction. Let's continue with the rest of the drawing in
the next lecture.
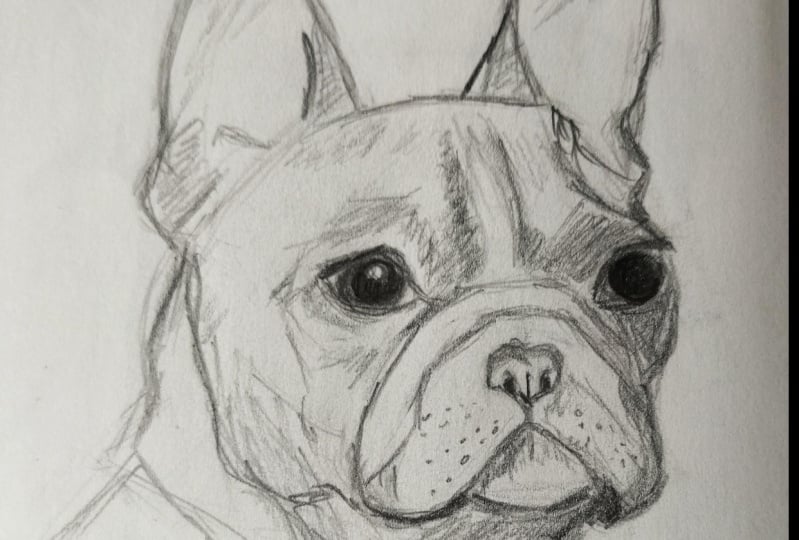
9. Adding details and shading : Welcome back. So now that we have or sketch a rough sketch of the dog with everything placed
where it should be. The construction
of the dog's face. It is time to start
adding the details. And this is just the
icing on the cake because we basically have
our dog, they're done. So what we need to focus
on is some details. And the eyes are the most
important part of the dog, basically every
creature, because the eyes are the window
to our soul, so to say. And so this is true of the dog. So here, be more observant of the picture of the dog
and see what you can see, what you can distinguish
in this picture. So let's start with
thicker pencil. Add a tone of the
overall eye shading. And because we are going to do just black and white
plus one other color, we need to focus on the strength of the
tone of the pencil. Start adding more
and more shading. Add more details in
the pupil of the dog. And let's go with the
other eye and do the same. I'm having fable pastel pencil, which is pretty dark. And if you use normal pencils, you can use eight bits, e.g. for the, for the eyes, which is a very thick,
very soft pencil. And the harder the pencil, the less strength there
is in this pencil. So eight B for the darker area, or HB, or to be for
the lighter area. So I'm adding one
town at the time. So being more observant, now, you see that there is a
shading on top of the eye of the dog because of the light falling in
from the other side. So try to add all
of these details. Whereas this shading
placed how does it, how farther away
from the eye it is? Now, I'm going to add this darker area
under the dog's eye. They there's a little
bit black area. So there is two parts of it. One is that the dog has black
and white and orange area. And another is
delighting coming from one side and adding more
shadow for certain areas. So try just to copy where the shading false,
following this picture, following the
picture of the dog, and add the darker areas the way you see it
from the photograph. This is where you're actually becoming more and
more observant. Now I'm going to go back adding some more details
even on the nose. But I'm basically jumping
from one place to another, trying to compare
the strength of the shading in this
particular area. You see that one, either one that I'm working
on now is pretty much dark with a more with a pencil that is
more tilted on the site. I'm adding larger
parts of shading. When you tilt your
pencil on one side, the tone becomes softer. And if you work with a
point of the pencil, you can add more sharp details. So whatever you want to
make softer shading, just tilt your pencil and work
with shading in this way. Now, I am going to
follow the shading of this dog from the nose because the nose is kind
of it's not flat. It also has a
three-dimensional shape. So I'm going to be observant here as well and
add the shading. Whatever I see the shading
is and have lighter shades. Shading on top of the nose. Just follow the way I
do it at the moment. But at the same time, ask yourself these questions. What am I doing? What am I doing it for? And that's why I'm explaining to you how I go about
in the process. So you can not only just
repeated the steps, but you can learn the process. And you can ask yourself the same questions whenever you have to draw a
different kind of dog. Because the point
will discourse is not only to draw just as dark, it is for you to learn
the principles and techniques of how you go
about when you draw any dog. So here you see, I've added shading, whatever. I see that the nulls shading is, and now I'm adding these
small shade under the mouth, no lower lip where the two
chicks of the lips split up. And I'm adding slightly
some small far. I'm not going to draw all
the firm because if you draw all the four of the dog
is going to be too much. It's different between
photograph and a drawing. Also, I want this drawing
to look more sketchy. I want it to look as if it's
starch from the human hand. And it's not just a
copy of a photograph. This is something
that is my taste. Whatever you learn this
principle, these techniques, and how to be observant, you may want to choose
your own kind of style. Maybe you want to
draw all the hair. I'll look for the job. There is nothing
wrong with that. It's just, I prefer to
have the dog sketchy, so it feels more
alive to me anyway. So here I focus on
the dark spot of the black Spot up the dog and try to find where
the spots are darkest. I start with them first. So I can later on just add
more shading to those parts. At the same time as I add more shading to
the lighter parts, which will have the darker
shading parts even stronger. And it will keep the difference between what's
darker and lighter. So now I'm adding even
more shading on one of the I because it's
in the shade part. It is where the light
is not falling, so it's going to be darker. So I'm just
intensifying that part and just continue doing that and jump from
one place to another. Now, I'm going to
shade that year. As you see, I tilt the pencil a little bit to add
a more even tone. So whatever you want to have, a shade shading for the dog, you can just tilt your pencil. Now, let's clean up, clean more of the help lines, refined the final lines. You need to come closer
now to completion, even though it is, we've just drawn the nose
and the mouth and the eyes. This dog is coming to look
like the dog that we want. And now I decide to
use colored pencil, one orange and one yellow, because this dog has
three different colors. So I thought, well
that can be fun. So just use yellow
and orange pencil to add this orange area. And we're going to work the same way that we did
with the black pencils. No difference there. I'm starting with
observing where are the shading parts of the darker
parts of the orange area? And it's here on the cheek, the one that we already signified even before
there is a chick there. So I'm even using some black or brown pencil actually here to
get it even darker. I want this dark areas to
reflect the volume of the dog. These are volume
defining shapes. So when you put them there, it just makes the dog look
more three-dimensional. Otherwise, you can at least you can even stay with that sketch. That's not bad. It still looks good. But the more observant you are and the more light shading
you add to the dog. Observing from the picture
where these areas are, the more your dog
will look like it is a three-dimensional dog because the photograph
is also an illusion. It's a two-dimensional
photograph that is the illusion of having
three-dimensional Doug. And it's the same
thing, the drawing. What are you trying
here is to convey an idea of
three-dimensional shapes. And all you do that
is through measuring an observation and
adding shading. Basically. Now, I'm using this
puzzles there like for kids, set pencils. And I'm trying to just observe what kind of color it is around this area
does and drawing, comparing it to
some other color. And just even use reds. And I said already
orange and yellow, but use violet and black, reds and browns to add
more depth to this. Darker areas where, where, which are in shade. So here I'm using violet
color to add more darkness, more shading to these
areas of the dog. And you can do that too. Don't be afraid if it's orange. Just use the orange, add lags at yellows and do whatever feels good
to you because eventually you're going to
use your own perception and your drawing will be
different than my drawing. And this is just good because you are developing your
own style as well. This is what you want. You don't only want
to draw in any way, you want to draw the
way that you feel good about and find your
own technique. And the thing is that
your technique is going to change as so as mine. I tried different approaches. It is like trying,
trying things out. That's thing is, when
you are a beginner, you think that there
is only one way of doing things and that's
what stabbing you. There is not only one way, there is multiple ways, million ways of doing things. But as soon as you find the proportions of
anything, I mean, you're free to go, you're
free to experiment, experiment with shading,
experiment with texture. Now, I want to have this part of the black spot of the
dog feeling more light. I mean, how would you do that? You do those parts lighter. When you have similar parts
of the dog, dark, darker. Contrast is basically
the magic key. To have something appear lighter contrast
of the same color, like adding more details or more contrast to one thing
and having another spot lighter with a pencil that has lighter color will make one thing appear
lighter and darker. You think it doesn't make sense. But when you draw, this is something
you're going to wonder, how can I make a
black spot that is lighter in certain areas and
darker in certain areas, appear different in lighting, is basically adding contrast, having dark pencils and leaving some areas light with the
same pencil when you draw. So I'm jumping from
one place to another because I want to have more
details again in the eyes. Now I'm going to focus on the other important
area of the dog. And here I'm going
to be more precise. And that is the mouth. Like I said, the eyes and
the mouth is somewhere. We add more details. When we sketch. Again, I'm jumping
back and forth. Because sometimes when you go
from one place to another, you see what you need to do with the other area of your picture. So you need to darken it there or some more
details there. After a certain, certain place
at a moment of your image. It will give you
suggestions what to do next and you will
not have to wonder. So that's why if you
find it difficult to continue one area, just leave it, go and
work on something else on another area of the
picture and then go back. And see how do you
feel about it. Use your, really, your intuition Muslim to know what
you have to add, what kind of color
you need to add. Because that's how your picture, your dog comes to completion
one bit at a time. It reveals itself like
a puzzle, really. You know what you
have to do next. So I'm going to add
some for this area. And just to add more contrast, as I said, I'm wondering, how can I add more contrast between the black and the shading and the
black in the light. While adding maybe
some four chunks will give that illusion. Because everything we draw
now is just an illusion. We are trying to convey
the idea of a real dog. So let's polish a little
bit the ears as well. Now with a slightly tilted
pencil, Let's add shading. Inside of the year. You'll see that it is, the ear is brownish, It's also orange, but it's
also very, very dark. And the fact is that, okay, I use kits, pencils because this is something
that you will have available. And the color on these
pencils is not as intense as if I would use
very expensive pencils. So what I want to convey here
is that the ear is dark, there is depth in
there in this shading, and it is not the center
of my composition. The center of my composition
is the eyes and the nose. But I still want
to have a year's have some finished touch to it. So I'm going to just
suggest that there is shading in there
and I'm going to continue with the mouth. And the mouth is where a lot of details
live for this dog. And I'll add more
chunks of four. I will be more precise
and more observant. And here there is a
little black spot and also the part is also in shade. So I'm just adding light shading with the
side of the pencil. Again, talking about
the technique here, how to add light shading. Just tilt your pencil and
draw lightly on top of that. So here there is
some black spots, like gray spots on
the nose of the dog. Small details that are now
important here because this is what we see when
we see this, this dog. And we add some whiskers, even though we don't clearly
see them on the picture. We'll just add them because they add more texture
and more life to a two or a dog's face and refine a refined the lines and the other urine you
see I'm I haven't even left the other years
so far unfinished. And I'm just going to refine it with the color line and
just add slight shading. I don't need to make
it as dark as it is. You see on the picture, it is really dark. But the thing is that if everything is just even
tone on your picture, your pictures, that's
looking boring. So choose a variety, choose where to add
accents with means about where to work more and
which areas to live. Kind of unfinished. Because actually
those areas that are unfinished will have your
picture centered butter picked. People will look
at the dog's face and they will not be disturbed. But also it will have
more life to it. It's going to feel sketchy. It comes to fill handmade. And basically that's
what you want. You want the viewer to see
your sign in the portrait. And if you are, if you have a preference, actually two more
finished details. We'll go ahead and do that. I mean, this is basically
just interpretation from here on where you can add more. You can work more on this dog. You can add more for chunks. I mean, the experiment. Why not? What we did is
actually finishing or a dog stage of the sketching. When we found that outlines, when we found the
position of the nose and the eyes and
everything else. And then you had a clear
canvas to go and experiment. And this is one way of doing it. So this is your dog number two, and I'm glad that you follow
me here in this tutorial. Buy from me.
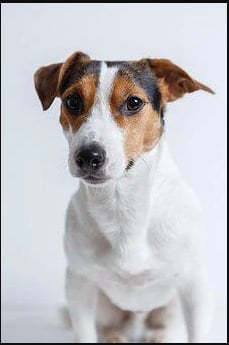
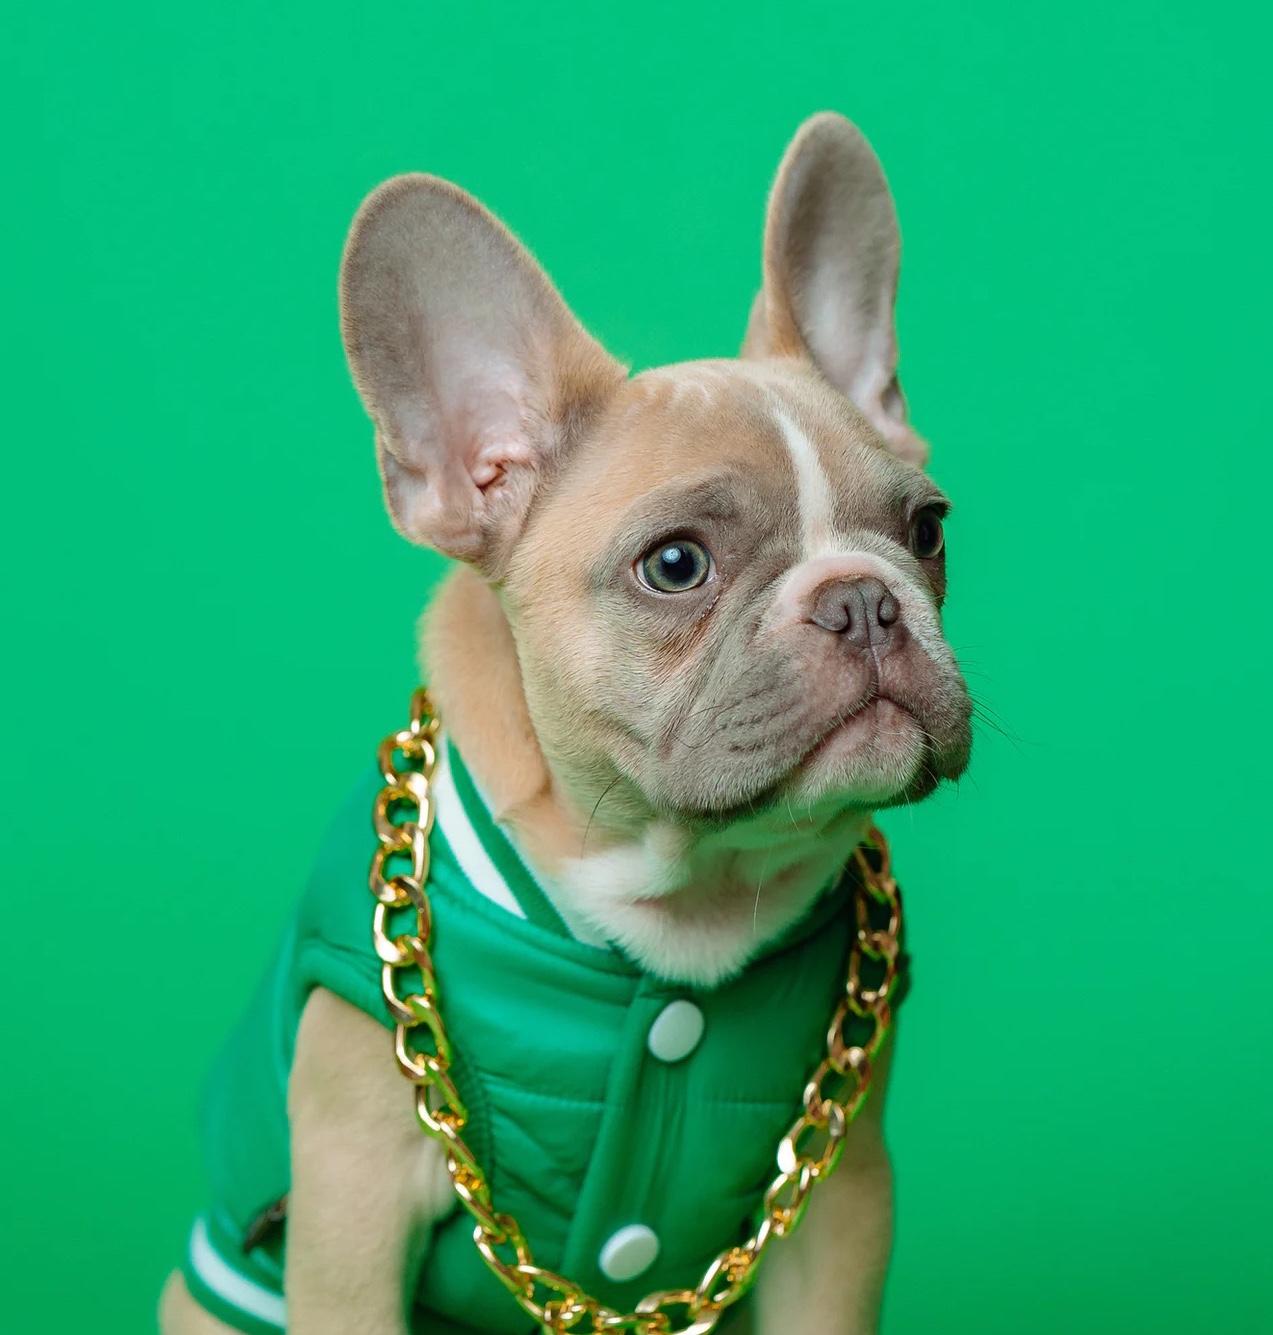
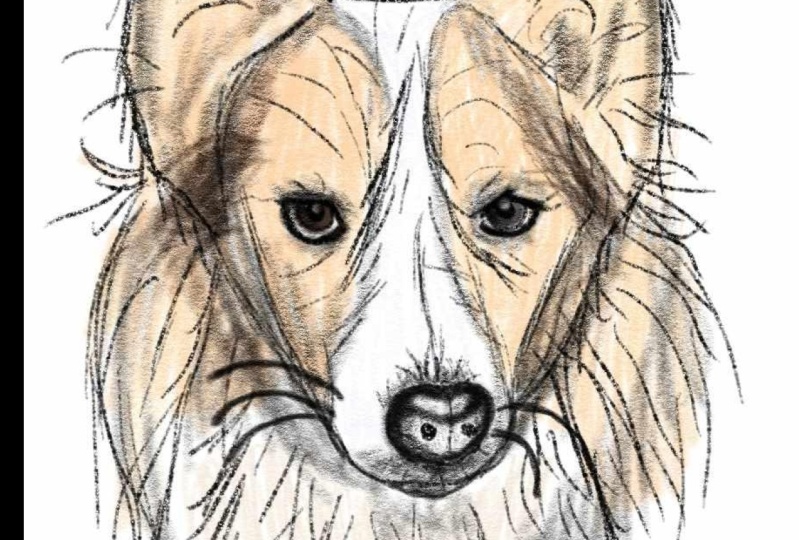
10. Dog 3, Structure: So welcome back to
another fun tutorial. We're going to draw
this cute guy here. So let me give you those tips of how to summarize the face
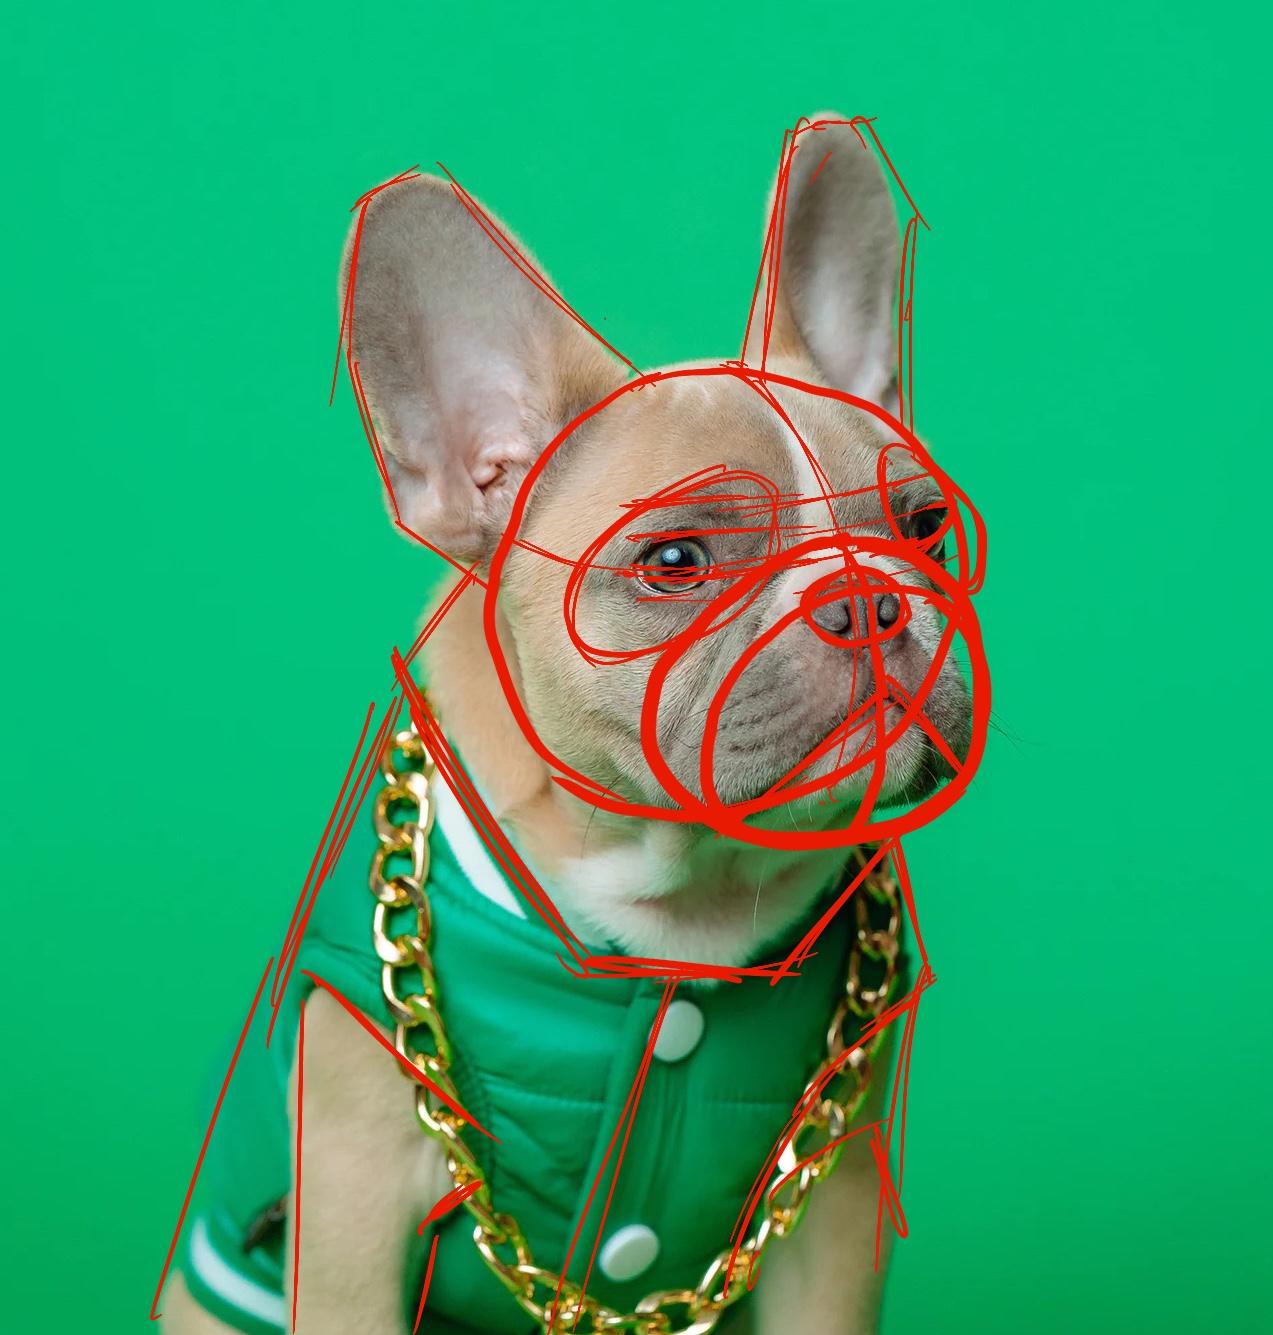
into simple, basic shapes. As you see, we have
different dogs in different perspective and it can be a little challenging. So I'm using Procreate here just to show
you how to do at, but later on, we're going
to do it again on paper. So this is just a guideline
to use where I can use the picture to show you
what have you learned. We see one big shape
here of the head, One round shape, right? Of this main shape. And we have another round
shape here of the nose. And we can split this head
when this white spot here, it's showing us what to do next. So we're going to split this round shape in the
middle following this line. And this is going to be, this symmetry happens for
either two eyes are placed and the two shapes of the mouth. But you see that one shape, one middle line goes all the
way through one sphere here. And we have the second
shape that is a little bit forward again from the nose. And it is
three-dimensional shape. So we have the nodes here
and we have another shape that signifies the
front part of the nose. And it has an own middle line, which goes from
this middle line, this point here,
to the nose here. And another middle
line that you can follow from this part
of the nose here. It goes from the
nose to the mouth. And down here. Again, this is just summary. Don't have to be super precise. Because as you see from
the previous lectures, we are going to delete
those lines later on. Another thing that the ice. So we have this part
of the eye here that pose another round shape. We're taking this part of
the eye here and connecting dots and go through
that point here, connecting dots
and round that up. The disappears in this direction because the head is a sphere. It's not a flat surface. So everything is going around this sphere
in ellipse shapes. So where's the eyebrow? The eyebrow is here
approximately. And we have the other line. And we can also have
another line that signifies the eyes
from here to here. And from here to here, you can have as many
lines as you want. Now, here are we
having the ears? So let's have them like in this kind of
a rectangular shape. And this one like that,
a rectangular shape. And we can just have the neck over here like
we did for the last dog. Like that. Just very roughly. Where does it end? Rough it out. I mean, it is
approximately like that. And now let's focus
on the face again. Why do we have here we
have this Around space, around the eyes of this dog. It's kind of has this sad look. So I'm going to add two spheres, just signify that this shape that builds the sad
face of the dog. Got to put it in there. We have the nose here, so we have this
fear of the nose. And the line that
splits the chicks is, I'm going to have these lines
for the mouth like that. And if I turn off the picture, we got something like that. From this part, we can
start building on our dog. You can add more lines
here for the legs. Maybe just the line
for the Cloud. We're not going to draw
so much detail here, at least not in this
lecture because this chain is way
too complicated. It's going to take more
time to do correctly. Then the dog itself, we just like that the dog is having this look
at these clouds. Just find your own pictures of alpha d2 to drop. Signified. Here is a leg. And basically this is what we all we
need to start with. I'm going to put this drawing without the dog and the dog. So you can have it and
you can draw just this, use it as a guideline. Or when you start your drawing. If you find it too difficult
to find it yourself. But I encourage you to start blank on a blank
sheet of paper with a pencil and start
eyeballing it as we are going to do
in the next lesson. I'm still use that drought us that on your on your
sheet of paper. If you feel insecure and start building
your job from there, it's going, you're going to
find that this is easier. With every exercise. You're going to find out that
it gets easier and easier. So now, let's go to
the next lecture and start working with a pencil
and a blank sheet of paper. Having the dog picture just as a reference and going through the same steps without having to use the
picture underneath. So I'll see you there.
11. Dog 3, Drawing from scratch: So let's repeat
the steps we did. And now drawing it on paper with just using the picture
as a reference. So let's start drawing this cute dog and
grab your pencil. Start word, um, maybe
two or four B cells. Soft but not too soft as ATP. Why do you need to do
is break down this dog, the dog's face in simple shapes. So I'm going to take the
whole head and I'm going to continue within
this sphere to find the position of the face
in the middle of my paper. And I'm going to roughly
sketch it on the body. Pretending God, his neck
is just a rectangular. His body is another rectangular. At this stage, I'm just doing the placement of everything. And I can eyeball where the
legs are approximately here. And now, let's go
ahead with the head. There is another chunk of
form of shape for the nose. And everything is
two-dimensional. And that's why it's important that you
break it down and you think of the dimensionality
of the face. So I'm going to use another
sphere approximately here. Draw it very roughly
with many lines. It doesn't have to
make perfect spheres. Now, before we add more details, let's place the ears. Because when you
add more details, you might need to
readjust those details. So I'm going to approximately
measure how big the ears are in
comparison with the hat. So they're kind of like approximately as long
as this distance here. So I've measured it, right? That's because my sons of volume has been
trained by drawing a lot. This is going to
happen to you as well. If you draw a lot of drawings
and I'm going to draw a line to the neck for
the next year and it is a little bit higher
than the first year. So it's approximately here
and I'm going to contain it within another
rectangular, very roughly. Just sketch where
its position is. And now let's go ahead and built up the whole face
little by little. So let's find the
middle line of domains. Fear the head of the dog, as we did on the schedule. And pretend that you split
this sphere in half, where you can find the symmetry from that line
on both sides of the face. And we have the flat side
after the dog's nose, as well as the shape. Signifying that this
is also another shape and it builds a cylinder. And as we did before, the cylinder has one
middle line that splits the upper part of the
nose and another one that splits the flat part of the nose where the mouth lies and the
center of the null slice. Now let's go ahead
and find the eyes, where the lines where the
eyes are and the nose. Finding the position
of the nose. Why am I sketch? I change parts of
what I sketched. Because if you don't have
the picture underneath, you have to always compare one measurement
towards the other. So when you find e.g. the position of the eyes, you can immediately
jump and say, well, where is the nose compare
to that line of the lines. Measure it. If you have two on
the picture and add it on your image,
on your drawing. So now I'm trying to discover
the face and slowly I start actually
adjusting the shapes the way I see them on the image. So now that you have the
proportions almost there, now start being more observant. Let's define where the mouth
is and add some wrinkles. You see the wrinkles
on the picture. And you're not gonna
hit every measurement, right the first time. I mean, I still don't I still
have to readjust but put whatever wrinkle or line you see there on the
picture for it wrong, even. The secret to drawing is basically the secret
to measurement, comparing measurements
one way or the other. Now, let's see where the
office and it's easy to find it now what that we
have the middle line of for this part of the cylinder. And now let's define
the mouse even. Where is the nodes located? I'm from that, let's find how big part is the part
on the right side screen, right side of the nose. It always comparing,
always readjusting. Now let's find the eyes. We are, we are aiming for
finding the pupils of the dog. So I'll draw them around. And you see that I sketched so roughly and I jumped from
one place to another. And I encourage you
to do the same. Just jump from one
place to another. Never finished. Just one thing. Because if you do that, you're going to lose
sight of, of the whole. And it's easy from
that point on, if you lose sight to
make something bigger, something smaller, to lose
sight of the proportions and proportions in this
stage is all that matters. Forget about drawing clean, clean drawings, clean lines. All you care about at this stage is finding
the right proportions where everything on the face is compared to something else. Something else on the face. That is what you are
looking for at this stage. Now, let's use the white
line to draw the middle line there and continue adding
more details on the eyes. Are the correct proportions? Yes, the same as they are. The help lines has helped us find out the help lines that
we did in the beginning. Let's jump on the
nose a little bit. Where is the middle
line up the nose? Now be more precise. Where this small
holes of the nose, the nostrils, starch being
more observant at that stage. Now it's time to go slowly after some
details at the mean. So compare it to the picture. Use the guidelines that
you already set in there. And just add detail after
detail one step at a time. Don't don't worry,
don't freak out. If your measurements
are not correct. At this stage, you can readjust your rent,
your measurements. You have an eraser and
you can readjust it. And I measure like
how many times the ear is in
comparison to the face. Measure while using your pencil and putting your two fingers. Using the pencil as a measurement
as a measurement tool. Another thing you can use
is actually a measurement, tape or a measurement, a real measurement
to measure the eyes, the face, and nose, how they compare to one another. So now I'm start adding, starting adding some details. The mouth, the wrinkles. This dog has a lot
of wrinkles here. There was one the rayon go over here and there's one chunk of flesh coming down from
this part of the mouth. That position of the mouth. I add this in there. There is another wrinkle. Coming from top
of the nose down. So I measure, I measure even dot y dot
wrinkle is added in. And now I start deleting
the lines I don't need. Let's clean this
up a little bit. Saw. Delete, erase the lines. I mean, I say Delete
because I'm so used to working
digitally now on. But working on paper is
the best way to learn because you train your
brain to commit mistakes. Believe me, the mistakes you do are really the path to
your learning how to draw. Because it is not about only one single drawing
of the dog, right? You want to be able to draw
any kind of dog all the time. So the only way to do that
is to learn this process. So it sits in your, in the back of your head and you're brave
enough to do it. And now I start adding
details and you see the placeholder of the ears
that are doing so much help. We know kind of like the
proportions of the year. So let's delete even
around the nose, all the lines that
we don't need. We don't have to
get confused now, readjust if I have two. So the nose is
sitting a little bit too much lower down
and it's to untidy. So I will read you the notes. You'll see that even
I make mistakes and I don't delete
the notes completely. I leave a little
bit shading from the previous nodes
because the placement was correct that the notes
that I did was too messy. So I deleted with lighter lines. Now I can redo it. So I encourage you
to do the same. If you follow my steps. This is a good habit for you to get used
to, to make mistakes, to delete, and to redo, and to become brave, brave in your drawing. Brave in your approach. Not to be afraid to put
the lines in there, to be even uncertain,
unsure about yourself. So now I will do the same
for one of the eyes. I see that I need to pull the
eye closer to that wrinkle. And I see that I have done a little bit just to a
millimeter, really. I further away from that
wrinkle of the nose. So I bring it up closer. You can either leave it as it is because the difference
is so, so tiny. But at that stage of
my drawing skills, I have become picky and I
want things to be precise. And again, I'm not afraid to delete and you
will be there too. I encourage you also to delete. And when you delete something, you can now draw it
cleaner on top of them. So now I'm completely sure
the I is going to be there. So I start adding more darkness, more blackness to the pupil because you see how
blew his eyes are. And we are drawing
with a pencil, so we'll have to simulate the blue color with lighter
shading of the pencil. Let's delete some lines here again and clean up or a drawing. So you see we are coming
closer and closer to the face. Now, let's define the eyebrows. Eyebrows, and of course
not just around shape. They have a different
kind of shape. They are more fleshy or
they are more chunkier. But we have the place
holder for the eyebrows. And now it's easy to do. And I'm refining more
and more of the head. The head is not
completely round. Ucb has this chunking
is to do it. Join connects to the head. So I'm adding those lines in
and becoming more and more observant and cleanup,
cleanup, cleanup more. And then the wrinkles. And I'm more chunky mass
to this part of the dog. And I'm going to round the neck and find where the
clothing as of the dog. And now I'm going
to erase that part of the neck because I see
there is more flesh to it. You see there is a big chunk of flesh underneath the dog's face. In comparison to how big the head has become
on the paper. We're always in comparison to other parts of the
head or of the body. And I'm rounding the mouth. Jumping in the neck again. You see, I jump off always
from one detail to another. Never. Just finish one part and leave the rest of
the part untouched. You are doing
measurements here still. Even though you're going to more subtle and more
precise details of the head of the dog. And now we have the
face constructed. Let's move with the shading
on the next lecture. See you there.
12. Dog 3, Refining and shading 1: Now let's start to
refine and shade a dog. I'm going to delete lines
that I don't need anymore. Clean up as much as
possible while still keep some help lines
available for me to see what other
shapes and surfaces are in how the
construction looks like. And I'm going to grab a pencil. Hb, darker gray, darker lines to draw it in the
ice and the darker areas on this dog
like the pupils. I'm going to let the
white spot here. And it is good to draw from picture because here you
can be observed on them. You can let the image guide you for the shading
and lighting. You don't have to
discover this yourself. It's good to have
an image that's y. And don't worry, if you don't get it right
there. The first time. When you draw, what you do
want is awesome to train your ability to observe. There is some white
glands of the other. What I mean that is hidden. And this is also, this part is also save it. So I'm going to add, I'm an extra shading here. There is some white area
just below the eye. Now use every detail
to enhance the dog. I'm start, I'm starting slowly to add details
on these drawings. Following what is in the
image where the wrinkles are, how the form is
behaving on the head. Following the
shapes of the head. Note that I said there is a
surface that is flat here and then it rounds
up the head upwards. I can add that because I have observed it and I have accounted for it with
another surface. And now I can shape
up the nose as well. Clean it up, lift. Perfect. Personally, I prefer the
drawings to be rather sketchy. I do not like photorealistic
to photorealistic drunks. It is a preference
because I mean, otherwise, you will
take a picture, right? So I like to feel that
discovering process, the stroke of the
pencil on my drawings. And it's up to you
how much you want to add to the details of this. I'm just drawing of
yours and what kind of style you're looking for. In part, in this video. Of course, I'm showing
my preferences. And I hope you enjoy job because it's very free and
very liberating. And I find it very pleasant. If you don't have to do to
photorealistic drawings. You can feel doesn't
tivity and the shirt, the feeling of the pencil
under your fingers. It is pretty nice. So from different places
I'll do some slight details. And this is around the nose, the mouth and the
eyes, and the rest. I'll just live
slightly unfinished. And now there is. Two shapes here, one for this mouth and one
is another skin. Going behind here. I'm not a dog experts, so I don t know the anatomy
of the of the dogs. That's why I need to
be more observant. And here I need to
shorten the neck. So after this surface, there is immediate
thought of the body. So the body has
been too low down. The head needs to
be chunkier here. So I'm changing dots. It's not a big deal. That's what the
drawing processes. I'm not going to
draw the chain goes, so we're just drawing them. Took the dog here. I'm adding some texture
of the form and the mouth here to enhance the texture of the
dog and the forearm. And then I'm drawing
some volume. When I took the tensile, the light is coming
from this side. So we need to shade this part
of the dog a little more. It is slightly darker,
shading to it. It is difficult to come for different colors if you draw
just in black and white. But it is all about observing, which is darker,
which is lighter. And just apply that. Let's focus on the cute dog. Ice. And there is a surface here below. Not it's darker. It's on white spot here. Make sure your eraser is clean. Roberts, a little bit on the surface of a table
or another paper. So it doesn't leave some
dirty spots on your drawing. And it has this puppy. I'm perhaps when you do shading, gradually, RStudio,
very, very unlikely. And if you have two, you add another layer. And I'm going to go back
and do some draw the ears. So I lose a little bit sight of what I'm doing
and get a perspective. That is kind of shapes here. I'm not going to draw the
ear to precise because I want the center of the attention to be on
the ice and on the face. And I'm going to leave
the ear slightly. I'm finished to have this artistic look that
I've been talking about. This one here. There is a shading going this
way or why do is observe? Know how the shapes aren't? What I want to add
a new alarm to make this shading just with
the tip of the pencil. Then you can go ahead and
shade different areas and see. If you want to add more shading towards the drawing will
lead you to see how much you want to add and
how complete you one of my gut and how sketchy really, you can leave it pretty sketchy, like delta, it's
already a nice picture. But I'm going to continue here around the eyes
to get more texture. And around the nose. I'm going to leave this
some whiskers as well. I'm going to draw
those and they have some very specific direction
on this bread there, like in a line that gives
them a lot of character. And you see that you've done see all the adults that are
kind of hidden in the form. So they're not random dots. And I'm going to add more
shading and more color to signify that the far as
two different colors. That means I'm going to add shading around where
the two colors meet. That's another trick
that you can use. If you don't want to
shade everything, because you don't have to. So time for a little break, go grab some coffee
or tea or whatever. Go drink a refresh, and come back to continue with
a drawing. See you there.
13. Dog 3, Refining and shading 2: So let's continue with
our refining the dog, I hope you are refreshed. And now I'm adding more
shading to parts of the face, focusing on the eyes, still. Small wrinkles here of this dog. That gives it this
specific popular look. And let's clean the white
area between the two colors. And continued even, even here. I'm adding also the
shading underneath the mouth to give more volume to the dog and enhance
the lighting. I'm correcting the
chin because there is another shape going in here
and it is a little shorter. So doing that as well, and it looks more rectangular
rather than around. Drones off a little
bit of the texture. To make the textures pop out. Don't have to draw all of that. Again, the eyes are the
most important to you. I'm enhancing even this wrinkle. It is important for the
character of the dog. Just wait it out. What do you want to,
what characterizes this, this breed and what will
be good to add on now, because there's so many shading. If you start staring at a dog, the shading is enormous. And if you're going
to do everything, mean the dog will
disappear and shading and what kind of lose the
charm of the drawing. You have to wait out. What do you want to enhance? And why do you want
to add more shading? Now, I want to phase out, so I'm going to add
extra shading under the chin to put it in shade, in dark and make, make it more three-dimensional. And you'll see how step-by-step
This dog becomes Smith. I mentioned there is a
little white area here that this describes this kind
of rectangular chin. And I'm going to erase
it and then come for it. And see his little mouth here. And I'm going to shade
a live births the neck. And slightly shade
this part of the dog. Because it has one volume here that now becomes more
three-dimensional. Every shape you add, it makes it
three-dimensional and real. I mean, even though photograph is actually a
two-dimensional image, it's not three-dimensional. It's an illusion that this
image is three-dimensional. What makes things look three-dimensional as the
lights and the shading. The more your work
with the light, the more this image will
look two dimensional. This is the secret
really up drawing. Being God, becoming good
in absorbing the light. And connected to the shape. First, you have construction, and then you'll have lights. Because data set. And the rest is just manner. What kind of manner you
want to convey to dragging. Now I'm going to make
this button here. Justice at this dog is actually having
some kind of cloth. And I'm not going to draw this. I'm going to completely
live at very sketchy to make the
head pop out even more. And look sketchy and nice. Now I'm even going to
enhance some features with just thicker lines that will create
interesting surfaces. Look for not only
to make an image, a picture of a dog, but to make an art piece, to make something that is
fresh and interesting. If you draw all the lines, they become too boring. So just when you have the construction
of the darker, again, allow yourself to be autistic and to draw interesting images. Well, I think I'll stop here because I'm pretty
happy with this. And I hope you enjoyed
this tutorial. See you around.
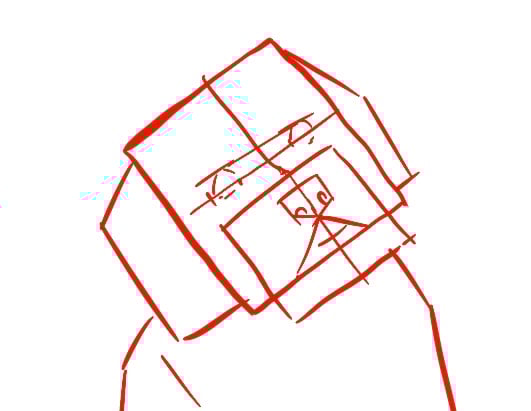
14. Dog 4, A different technique : Welcome back. In this exercise, we are going
to have a little more fun. And what I M with this is to
break your fear of drawing. And the more
techniques you find to draw that makes you free
from this fear of drawing, that you have to
make a clean line, the better you will become. So I'm going to use a bullpen
where we cannot erase and we're going to draw
a dog out of chaos. So let's show, let me show you the technique
we're going to use. That's it. Just draw thick lines. That is what we
are going to use. And we're going
to find the shape of the dog by squinting. And we're going to draw e.g. darker area. By drawing workout inclines
in this direction. You see DI shaping. You're going to see it, especially when you
squint your eyes. Now I don't even have a
picture of the dog and it kind of starts looking
looking as as a doc. So you can use a pencil
for that as well. But I encourage you to use both been where you cannot erase. So let's start with the drawing
and let's have some fun.
15. Dog 4, Doodling the dog: Okay, let's start
drawing this dog. Now. Squint your eyes. Let's turn the picture
into black and white. If you can see the image blurred without turning into black
and white, That's okay. You don't have to do it. But just for the sake of
getting easier on you, I'm going to turn it
into black and white. And I'm going to
drag the focus down. Now. Start doodling by finding
just the proportions. How big is the hat? And roughly doodle
just the shapes. You don't see any details now. So you're not distracted. For a drawing eyes or
drawing. Anything else. Just try to find the proportions very
roughly by doodling it. Where are the shape of the eyes? They just dark dots. Signify them, like dot out. And it is good to have a dog that is fluffy
for this occasion, because it's a lot of four. And it gives you the
possibility to do the, this kind of dog without
thinking too much of the skull. The structure of the body
fluff is easier to do and it's easier to train yourself to see shapes with fluffy dog. So you see that I'm jumping from one part of the
body to the other. Just noticing how
big the head shape is and finding the darker areas like the necklace up the dog. I'm just doodling out dot and continue on with the four
and the fluff of the body. Very roughly. I have no concrete lines now and counters
everything you lose. Everything is just shapes. It is easier to do that with a fluffy dog because it
doesn't have called, you don't see a rough shapes and scowl and muscles and so on. It's a lot of form. So this is a very
good exercise for you to train yourself to
just see the shapes. And now I'm going to
unblock the image and start shaping some
details like the eyes. Look how nice it is to see
the dog again, to see, well, especially for you that
don't have glasses, you don't know the feeling of how good it is to see better. Again. Three, find some details, and the eyes and the nose
are the most important. We have already a
placement for the nodes. We have this darker spots
that we already drew. So just be more
observant here at the nostrils and add some
features of the nose. The way you see it
on the picture. You have already the place
holder of this, of this dog, without even going for the shapes that we used to
do in the previous lectures. So let me add some for around the mouth and be
more concrete here. When the shape, we started adding details
because you see that we already actually
have an image of a dog without any
effort just to freely, without torturing
horse cells with complex shapes and complex
really perspective and rules. Product. And this is basically what
you want to accomplish. You want to be more easy
about your drawing. You want to have
more fun with it. Because when you have fun, you are going to stick to it. And you don't want to be drawing only one picture for
the rest of your life. You want to be able to draw many pictures and to be
able to stick with it, you have to find a way to serve yourself with where
you are at the moment, because with every new drawing, you're going to be better. So you will have to find
a way to get there. And the way to get there is to go through such techniques
that I'm showing you here. Where you feel easy, you feel relaxed. You feel that You can make the
mistakes you can do out. There is no right and wrong. Everything is about training your eye to see the
proportions and whatever method you find.
That's good for you. Myself at school, we were
trained even to draw with cigarettes with now I don't encourage to
smoke, I don't smoke. So find maybe an elements in the drawing on the sand, e.g. just to find the proportions, just to make the process easier. And now I can really define a little bit
more some elements, some darker elements because
this is image of contrast. We only see black and white. Here. We want clearly to add more darkness to the
darker element two, and more lightness to leave
the elements that are white, brighter, to be more bright, so focused on the
shading of the eyes. You see that. You see
how the shapes are, where the light areas are. Here are the blurred
image again, and it's much easier to see. Now I'm shaping again more
the ears and adding more for, more shading to it. Let's go back to
the clear picture. And you see that this year that is on the outside that
is behind, it's darker. It has more shading to it. So I'm just going
to add more four. And using the
metadata I showed in the beginning with
adding shading that works with the
Bolton as well. You lean your time at the site and we'd lose
hand, loose wrist. You just draw lines as a
shading instead of just lines. It's very, very easy. And if you've gone through
the process where the pencil, that's not going to be too
hard for you at the moment. But you can also draw
the ears by doodling. Continue the doodles. It's going to look good anyway. The dog will come
to live anyway, no matter what method you use, as long as you work with
the light and the shading, the dog will come
to life and it will look like the dog that we are drawing because we already
have the construction of the dog by doodling out
where the shading from. This point on, it is
just about details. How many details
you want to add. You see that the dog
is already there. So I'm going to add
actually more shading on the spots where the dog
is touching the ground. Underneath the feed water. I see the shading there. I see some shadows
and darker areas. So it looks like the
dog is sitting down. Every time you see an
area where there is a contact or surface of contact, I have some more details to be more shading because that
will give your viewer the illusion of perspective and the illusion of the dog
sitting on the ground. So adding more doodles there, and I'm adding another
layer of doodles. I, as I told you, it's the same principles here. You just add another layer of doodles on the
area where a darker, you'll see that the
light is coming from screen to screen, right? So I'm going to add another
layer of doodles of chaotic lines on the
screen right side to convey an idea for
that side being darker. Adding some more
details on the four here and coming really to
completion of this dog. And I'm pretty happy with
the picture right now, so I'm going to leave it there. And if you've come to that, I congratulate you for
completing this fun image.
 Maria Avramova, Illustrator/Animator/Filmmaker