Transcripts
1. Introduction: Most artists, new or
veterans know that drawing hands can be one of the most challenging
things to master. It's the part of the
body we syrup the most, which should be the
easiest to draw, but it's usually the opposite. These lessons will guide
you to deconstructing, understanding and
dry hand anatomy so that you can
overcome the challenge. You'll learn how to draw
hands different poses, and learn which technique
you can use for each type of pose so that you can draw hands that are realistic
and proportionate. I've been studying and drawing figures for over 20 years and learning from master artists and practicing from live models. I'm passionate about teaching because I love
helping my students achieve their goals
like getting into the art schools of their dreams. And I believe figure
drawing is one of the fundamental milestones
of learning art. Because when you're
able to confidently draw a figure and hand
out of your head, you can draw
practically anything. In the next set of lessons, I'll teach you all
about hand proportions for shortening and how to draw
hands difficult position. You'll learn how to draw
realistic hands based on gender and age by the
end of this course, to grow confident in your drawing
techniques and never shy away from
drying hands again. I can't wait to see what
you create at the end. So please show your artwork
with the community. See you in class.
2. Hand Anatomy 101: Shape Analysis: It's time to talk
about hands and how to draw hands proportionately
and with action. So let's get started. Right now. You see an example of
a hand from the front. So the first thing we're
gonna do is we're going to talk about proportions. When I look at this hand
and I want to break it down into very
distinctive shapes. The first and largest
shape that I see is this. If I can think of the
palm as a piece of toast, some bread when you slice it, it's a little bit
round at the top. So in that sense it reminds
me of a piece of toast. I'm just going to remove
this middle line here. If we think about
breakfast or a second, we can think about toast and sausage and the rest
of the fingers. We don't want our fingers to
look like sausages because sausages are very
round 360 degrees. It is route all the way, right? Whereas if you think
about fingers, I'm a bit of a quarter. And so this corner is really
where your nails bar. You can't see it in this current image because
it's from the front, but you can see it a
little bit with the thump. So that is a really
important distinction between a finger and sausage. You can see that one side
of the finger is more of an angle and then the other side of the
finger is more rounded. The other shape
that is added onto the palm is actually
a triangle shape. So let's call this nacho chip. So we've got a slice of
bread and we have notching. This nacho chip. Is that muscle. It's married, very fleshy, and a lot of people
forget about this muscle. Now on top of the nacho chip, I'd like to draw
the fingers next. But instead of drawing
the fingers as individual fingers like this, instead of drawing the
fingers individually, what I tend to do is
I try to look for the proportions of the
fingers compared to the palm. So if I look at the length of the palm and the
length of the finger, I can see that the finger is less than the
length of the comp. So I'm gonna take this distance
and I'm gonna mark it. Then I'm going to find the
tops of all of the fingers. And I'm basically going to
draw a curve like that, almost like you're
drawing a mitten. And why this is important
is because fingers are much easier to draw when
you can think of them as positive
and negative space. The space and here is negative. The space in here is positive. Once you figure out your
positive and negative space, It's gonna be much easier
to divide that mitten into fingers because all of our fingers can move
independently from each other. What is really helpful
for me is when I look at how they
align right here, they're aligning at the top. This curve is a really
good indication of where I want to
start my fingers. And I can also think
about proportions. If you look at where the thumb lines up with
the rest of the fingers, you can see that the
thumb lines up with the first or the bottom joint
of the index finger. Now that I can draw
out the thumb, Let's have a look at the
thickness of the thumb versus the thickness of the
next biggest finger, which I'm going to say
is the middle finger. These three fingers here, the middle finger, index finger, and the ring finger are all
pretty similar in width. So the thumb is the thickest. The middle finger is
usually number two. These are really tied
for number three, and your pinky is
the smallest digit. Now if I turn off
my actual picture, you can see the proportions
of a hand mapped out. And of course you don't want
to forget about the wrist. These lines here on the hand are really how the hand folds. It's slightly different
for everybody, but you can see that
these lines are almost like traces of in lines. And you can see that
they follow the curve. So they follow that piece of
toast all the way around. So let's do a similar analysis
for this hand over here. Instead of tracing it, Let's go back to those shapes. So we have our toast, we have our natural chip, and we have the
individual finger shapes. The triangle shape. I can see in here. Then the piece of toast is actually on the side right now. Then the individual fingers. What I would do in this
case is I would, again, if you look at the distance
between here and here, compared to the pong, same as in the other hand,
it's slightly shorter. And then let's look at
making this into a mitten. For example, if I traced
the outside of the hand, I can start to see my negative space versus
my positive space. Big Sur. Well, here is also
negative space. This is a really easy
way to think about how to deconstruct a hand
and make it very simple. I can see that just using
negative and positive space, you can have a very
accurate drawing. Okay, so now we're
done with the analysis and let's try and draw
these spray cans.
3. Hand Proportions by Age & Gender: We're gonna start off by
drawing on Mary's simple hand. Palms up. We're going to start by drawing
a piece of toast. So that toast is going
to be rounder at the top and more
square at the bottom. Then we're going to
add on our nacho chip, it's kind of halfway. And then from there we are
going to draw our mitten. So I'm gonna measure the
top of the finger here. And the guest the top of the index finger and the
ring finger and pinky. And I'm going to start
to trace out my shapes. Now I have my mitten shape. And then the next step would be to actually find 1 third of the distance between
your index finger and the top of the palm. And this curve will be
where the tip of your film. If I wanted to draw them. That's kind of how I would
measure everything else. You notice that the thumb is
the only fingered that has a pointy edge to it
because the thumb actually points in a
different direction than the rest of your fingers. You can actually see that
the tip of the thumb is pointing here on one side and fleshy or on the other side, bone ear on one side
and fleshy the others. The next step would be
to divide up that mitten shape into positive
and negative space. So look for the negative space
in between your fingers. If you're using your own hand
as an example, that's good. You can also use an example
that you find online. But this hand I am just
drawing out of my head based on the proportions that
I am familiar with. It's funny because some people, their ring finger is longer
than their index finger and other people
their index finger is longer than the ring finger, but it can go either way. They're very, very similar. My index finger is actually
longer than my ring finger. What about yours? I'm gonna make my index
finger bit longer. And right now I'm
drawing a male hand. So male hands tend to
be stronger and more muscular and the fingers
are generally thicker. And when I'm drawing outlines, I tend to use more angles
instead of curves. There are some lines in
the hand, of course. And now I'm going to
draw in the wrist. When you're drawing
in the risks, remember that it's
a cylinder shape, but as it attaches to
the palm of the hand, it's wider and then it's really, really thin right
below it and then it gets thicker as it
goes into the arm. Now, what I'm going to do is
start to draw in the drinks. I want to make sure that
those joints in our round. If I made these lines flat
like this or straight, It's gonna make that figure
will feel very flat. So you want to
make sure that all of the joints that you draw are these little creases in the fingers and make sure
that they're nice and round. This is the basic proportion
of an adult hand. If you want to make it look
more like a male hand, again, you want to
make it stronger. Maybe the fingers are
easier and less pointy. Whereas if you're
drawing a female hand, you might want those fingers
to be slightly more slender. Let's draw a female hand right beside this
and see how we can change the proportions
just a little bit to make it feel
more feminine. We're gonna start off
with a piece of toast. I'm going to make it slightly
smaller than the male hand. Then I'm going to draw
my nacho chip halfway through this. And I'm just going
to let it rest. Well, now I have my three basic shapes and then I'm going to
find the fingers. So if you want the fingers
to feel more feminine, typically want to make
them a little bit longer and a little
bit more slender. I'm going to on purpose, I'm going to make the
fingers little bit longer only because of
longer fingernails. Again, and I'm gonna
draw in my mitten here. Then find 1 third
a bad distance. Draw a curve, and
now I have my thumb. You'll notice that
for female hands I'm trying to make them
slightly more slender, making the fingers lot longer and less
thick than the male. Keeping in mind your negative
space and positive space. Negative space in here, right? In-between all of
your fingers and your positive space as
the fingers themselves. All right, so now
I'm going to draw in the creases on
all of the fingers. Again referencing my
own hand for a lines. Then I see a hint of
a fingernail here. And I'm just going to add fingernails to tips
of the fingers. Just going to adjust
machine just a little bit to make it ever
so slightly slender. So I'm basing this
handoff with my own. Hands, have so much
personality in them. You can express so much in the shape and the
lines of hands. Very similar proportions, male-female hands just
slight tweaks to them. Okay, so we have our male
hand and our female hand. Let's try and draw
a child's hand. A child's hand follows the same principle
as an adult hand, except the proportions of the palm and the wrist
are very different. Let's start with our toast. I'm going to draw it
smaller this time. So there's a small
piece of toast. And the only difference
is that with a child, their wrist and their palm
are almost the same width. Like if you look on
this hand over here, you can see that the
wrist is a lot less wide. Whereas with this one, the palm and the wrist are
very similar in width. So you can see the
difference in proportions between this hand so far
and this one over here. The other thing that
children's hands have are much shorter fingers,
stubby, short fingers. Again, I'm going to
draw in a mitten shape, then on the thumb. So children's hands are stub ear generally they're kind
of like the male hands, except smaller and
shorter than stubby are intentionally make the fingers stub. This cuter. If we look at everything
together and you can see that a child's hand and an adult hand are based
on the same proportions, except the palm tourist ratio. We're gonna get into more detail on drawing
hands in the next lesson.
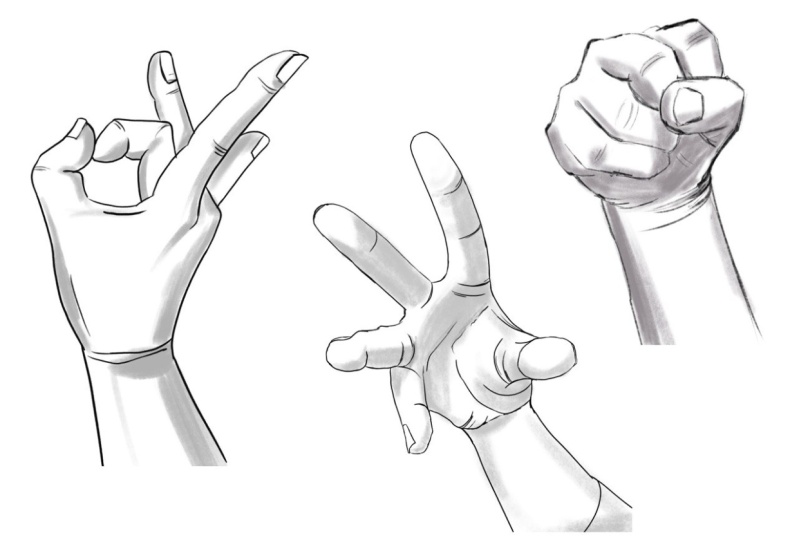
4. Drawing Hands in Difficult Positions: Let's start drawing hands. I'm going to choose
a photo to start. So here's the photo. We can do a little bit
of analysis on it. So if you're working digitally, you can definitely place it
on your canvas as you can then take measurements
and you can kind of work a little
bit more organically. I think about a lot of things
when I start drawing hands, I think about gesture
or my action. That's kind of like the
first thing I think about because this tells you a story without your
gesture or your action, you don't have a story. Think about is this hand
and aggressive hand. Is this hand a happy hand? You might think I'm crazy, but it has something to
do with the gesture. What is the hand expressing? This is a sad hand. Is it a lazy hand? Is it an energetic hand? This one looks like it's
about to flip something. The action is really important. What is the gesture
of this hand? Maybe it's like this. The hand is bending
backwards and sometimes a gesture could also
lend itself to a shape. So what is the
shape of the hand? Is it like this? How would I express the gesture in one line or more lines? Usually I start with one line. So let's say that is
my main gesture line. If I had another line, I would probably put in the
circle or the negative space. And then from there I can
find like a triangle. And then from there I might find an alignment between
the two fingers. So these are things obviously I'm drawing
on top of the picture, but you should be able to draw these lines without
drawing on the pictures. I'm going to start by
putting in my action line. You're just sketching
at this point so you don't really have to worry about getting your
piece super accurately. What I'm trying to do is just abstracting the hand
into different shapes. That lends me to
the second thing. You want to think
about your shapes. So your gesture is going to lead into your shapes now
that you have a line, what are some of the
shapes that you see? I see square. I see a triangle. I see a triangle here. I see a triangle in
the negative space. I see a heart. These are all shapes that
you can start to see. Shapes are flat, so every
time the hand turns, your shapes are
gonna be different. But shapes are a really
easy way to say. I see a triangle, oh, I see this triangle inside
the negative space. And then if you know
how to draw a triangle, you'll be able to figure
out your alignments. Gonna map in all of my shapes. I have the circle there. I've got a bit of a square here. I have a triangle here. Your gesture helps
you find your action and your shapes help you
get an accurate drawing. Because like once I
have the shapes in, these are very abstract shapes. That doesn't look like
a hand at all, does it? But it sets me up to do my
forums and my line drawing. So when you're thinking about
shapes, think abstract. Now I'm going to
choose another color. So once I have my shapes in, the next thing I'm
gonna do is start to define the structure
on the hand. Usually I start with the
area around the knuckles. If I find that the
knuckles in there, then I can start to
draw the structure of the hand, the wrist. And then from there
I can start to find or carve out these fingers by drawing in the shapes first, just copy your
negative shape and then turn those
into other things. Working abstractly really helps me with my accuracy for drawing. It's not as intuitive as like
just drawing an outline, but it definitely helps me
think about it in a fresh way. You can kind of see
like in this picture, the index finger is really big because it's
coming towards you. This finger has most
of the gesture in it, so I'm just going to draw
it as a cylinder that's kind of bending a
little bit and then putting in those lines
for the structure, connected it to my knuckle. Then this finger also
has a bit of a gesture. Then if you're drawing nails, you want to follow the
direction of the cylinders. If these are all
curving this way, then your nails should
also curve this way. I'm gonna try to
intentionally make one side more fleshy and then
the other side warm, bony. I relate everything
to each other. Once I draw the knuckles, I can see that the
knuckles are aligned. So you see that the knuckles, this knuckle here is
aligned with this. Check your alignments
like if I put an angle between my two fingers and
then I check it online, I can see that I drew one
of my fingers too long. I can also check for spacing. So for example, the
space between here and here is similar to the
space inside the hole. If I can relate
those two things, then I can apply
it to my drawing. So now I can fix this. So I'm gonna make
this finger smaller. Then I can kinda see
that my pinky just sticks up over that line here. So you can double-check. And then I can
also double-check. For example, my wrist feels a lot smaller than in the picture. The picture, I'm
going to say that my wrist is about
the same thickness. I would say maybe from the top of the finger to the whole. If these two
distances are equal, then I'm going to
apply that to my hand. From here to here is
equal to here to here. So I'm gonna make my
wrist a lot, a thicker. When I'm drawing, I'm
always comparing, always seeing like
what can I align, what can I use as a
unit of measurement? This right now is the shape. Really just like using
the Shape Method. We haven't really done
a lot of forms yet. I'd like to put more emphasis on the bones or the bony
parts of the hand. And the nice thing
about digital is that if I feel like the hand
is a little too fat, which I'm getting the feeling I can make it slightly less. Now that we have these inlets, draw some contour lines. So make sure that you draw the joints of the fingers,
how it's turning. Then you can see there
are some bones here. If you wanted to
draw the structure, you can just kind of pencil
in this trapezoid shape. Then the wrist can be a
little bit blocky at the top, curved at the bottom. You can draw some lines
to express like tension. So for example, the skin
here has a lot of tension. Then in terms of shading, if you wanted to give it really, just like a really
quick shading. And we're working in two values. I'll take the G pen. Like a gray color. You can ask yourself, Okay, where's the direction
of light coming from? It looks like it's coming
from the left-hand side. And you can see that there's
a highlight right here. Whenever you see a
highlight in the middle, it means that there's
two light sources. There's light coming
from one side and coming from the other side, or the light is coming
from right on top. In this case, the light is
coming from right on top, but there are parts of the hand that are a little bit darker. So for example, the fingertips, you'll notice that the
fingertips are usually darker on the hand
and that's because we have more blood vessels
in our fingertips or our fingertips are more red
than other parts of the hand. So you can always
emphasize that by making the fingertips a little bit darker on the palm of the hand. So it doesn't really apply
for the outside of the hand. It's really on the palm of the hand and the
tips of the fingers. If you want, you can give it a little bit of shading here. I'm gonna make the fingers intentionally a little
bit darker at the top. I'm just going to clean
up some of my lines here. I think a lot of the
times we don't really think about gesture
when it comes to hands, we just kinda draw it the way we feel like it should be drunk. In terms of the structure, like if you were applying
for animation or something, then you can kind of draw
some more contour lines. When you're thinking
about contour lines, you have to go from a finger, which is a very organic
looking cylindrical thing to a box. So if I had to draw
the finger as a box, even a box going in
perspective like 2 perspective or 3 perspective. That's where you would
find more structure. Cylinders are also structural. I could kind of draw a
line down the middle, but you want to think about
your fingers as boxes. If you're struggling with
perspective or if you want to show the contours even more. So this highlight here, I'm taking that as
the corner of my box. The thumb, you can see the corner right there where
it starts to shift color. So shadows are going to give you a really good idea of where
that box starts to turn. I'm going to go put
in those lines here. You can leave these
lines out if you don't really care about the structure.
5. Drawing a Foreshortened Hand: This hand is a grubby hand, and it's also in perspective. So how do you draw
something like this? Think about it as a
structure drawing. So let's go back to the action. If I was trying to figure
out the action of this, I would probably like, I feel like these two fingers
are the most dominant. Then you can correlate how your fingers are interacting
with each other. And like this shape here
versus this shape here, you see how they
echo each other. Those are things
that you can think about when you're
thinking about gestures. Because sometimes just a
gesture isn't quite enough. You have to think
about the relationship and the alignment
of certain things. So alignment is super important. And that's where In your
shapes come in handy. When you're thinking
about your shapes. Your shapes will help you
with those alignments. So I'm going to draw some
lines here to create that alignment and
do a little bit of analysis on how I want
to draw this hand. If we just look at
the gesture of it, kind of looks like a spider web. Sometimes I'll sketch
that out very, very lightly in pencil so that I can draw on top of it
more confidently later. Feel the roundness of the
palm and then how long those fingers are and how they relate to
each other in space. There's my thumb. We can also draw in the
pads of the fingers. This goes here and this
two, this goes here. There's really no right or
wrong way to draw hands. This is just kinda
how I like to think about it because I like thinking about gesture and positive
and negative space to me that really, really helps. But if you find a method
that works for you, keep doing it, whatever,
whatever works for you. So I find that when
I abstract a hand, it helps me draw
the hand a lot more than if I try to make the hand looked like
a hand right away. That's one of my
tricks, is if you abstract a hand
into just shapes, It's way easier for you to try it because your
head is not thinking, Oh, you have to draw a hand.
Do you have to draw a hand? This doesn't look like a hand. He's supposed to be a
hand if you hear yourself saying that and getting
frustrated with your work. But if you start off thinking, okay, it's not a hand, I'm just drawing
triangles and circles and squares and then it will
look like a hand later. That's more of a freer
approach in my opinion. From here, I'm going to
start drawing in my shapes. So keeping in mind the
negative shape first. Negative shape is
something that we ignore. All we see a lot of the times is the positive shape,
the subject matter. But your negative shapes will help you see what
you're not looking at, what you're not looking for. Notice how it's little bit curved when a reinforced
those curves. You can see with
this finger here, this segment is longer
than this segment, and this segment is
longer than this segment. So it's actually
foreshortened by quite a bit. Make sure you capture
that relationship here. I really liked
putting in that curve because it just adds to the expression of
the hand a lot more so you can exaggerate
those curves. I can see now that if I draw
in my negative shape here, that my finger is off, this finger should
be curving as well. Follow that circle, and
then work my way down here. I can see that I should've
left a bit more space. Sometimes your gesture is off, but if you think about
it as your guidelines, then it's not too bad because you can always
adjust it later. Start with my negative shape. Okay, so now that I have
those fingers drawn, I can start erasing my
negative space lines. Check to see if your
fingers feel dynamic. You might your fingers to
feel dynamic and not stiff. Make sure that the
thumb is like super wide compared to
your other digits. It's like two times the pinky. Got to be really wide. I start with the digits first. We start with the fingers first because the skin
in-between the fingers, I can always connect later. But the key here
is negative space. When you're not sure about the positive stays work
on the negative space. And if you're not sure
about the negative space, work on the positive space. Think about your shapes. If you're not sure how
to draw something, think about like, okay, what shape is this closest
tos the closest to a circle? Is it an avocado shape? Think about that and just like simplify it for
yourself in your head. I'm going to draw some
of these lines in now. Sometimes you can just see
a little bit of that nail. You can just see
a tiny bit of it. So I'm going to try
and sketch that in so that it's as
round as possible. Now let's put in the wrist. It's bendy there and I'm not sure if I want
to put that in. This is where I can make
a decision and say like, like a villain and the villains
like casting a spell and there's like magic shooting
out of his fingertips, then the arm could be
super foreshortened. So if I wanted to, I could make the arm-like super foreshortened
if I want to. All right, so for example,
here's my villain. And he's like reaching. You can change the perspective of things if you wanted to. I think I'm gonna choose to
exaggerate it a little bit, not quite that much,
but just a little bit. Make this finger a
little bit thicker. Bring it around. You can
almost draw a full circle. I'm gonna do some
light shading on this. Gonna turn off my
gesture for now. What I do when I shade is I squint like I have
to be squinting, otherwise I can't really
tell what I'm doing. And when I squint, I can
see that all the fingertips are lighter and everything below the fingertips as darker. Who's just like the opposite
of what we had discussed. The fingers that
are closer to you, the fingertips are
a lot lighter, so I'm going to
leave those and I'm just going to start by isolating the parts that are light and shading the rest in. Once I start to
shade everything in, you'll notice I'm
just using one color. I don't want to
over-complicate the shading. So when you're shading, just think about is this part of the shadow or is it
part of the light? If it's kind of in-between, you can decide whether
you want it to be shot or whether you
want it to be light. So for example, I'm leaving intentionally
just like leaving a hard edge and choosing not to worry too much about
all of those details. I can see with this finger here and his finger has
little less shadow. There's a cast shadow
here along the palm. For the thumb, I'm
going to just kind of shade the bottom
part of that circle. And then if you squint
and look at the palm, you'll start to see there
are some darker shapes here. So I'm gonna just color this in. Color that in and
then color this in. And now and following the
contours of the hand. There's a bit of a shadow there. Then for the wrists,
I'm gonna keep things. It's simple. I always choose to keep my
shading very simple. And then that way it's
not as intimidating. You can always add in
more accents later, but for now I'm gonna
keep it too toned.
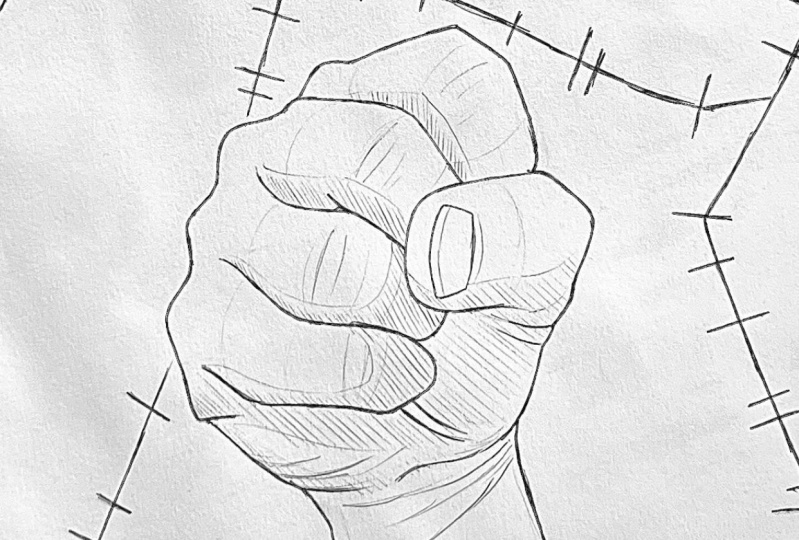
6. Drawing a Fist: Okay, So the gesture
for this fist is very circular
and pretty simple. Sometimes I all include the thumb as part of
the gesture as well. I definitely see the oval
once you have that circle in, you can then sharpen it to make it more geometric
looking because the geometric shape has more information
than a round shape. So what I might do is
just kinda squared off. So this is the nuchal,
this is the top. This is also a knuckle. This is the fault. So 123. It's very obvious to me that this part of the hand and say the index finger knuckle is
aligned with my thumbnail. If I draw in the shape of the thumbnail
which is right here, I can kind of map out where
I want my thumb to be. Then I draw the thumb
because it's like the biggest shape that I
see right now is why I always start with the
biggest shape because I find it's just so much easier that way gives me better context because if I
start with a small shape, it's a lot harder to make sure that
everything is accurate. Some work big to small. And now what I'm
gonna do is start to find my other fingers. You'll see that
there's fingers like this finger here is funny. The middle finger is
overlapping the ring finger, but then the ring
finger overlaps the middle finger later on. So it's this like
squishing action here that I'm going
to try to capture. Keep in mind where
those angles are. And you can also like square
out the hand if you want. You can draw each finger
as rectangular prism. If you're drawing traditionally
and you find that your proportions
are a little bit off when you're
doing your line art. You can fix it. You basically
have a second pass at it. Now for the line art, for this particular hand, I would definitely
focus on overlaps. Because when you have
something that's like compressed or very compressed, you want to make
sure that you are showing as much
overlap as possible. Have a look at the lines
in between these fingers. You'll notice that some of them are like for this
one, this line here, you barely see it and
then there's an accent and then you barely see
it again with this line. There's a heavy line, there's a little
triangle of darkness. And then this line overlaps it. This is almost like an S curve. You'll see that these lines
have thicks and thins. They're not just one weight. So pay attention to that
because that's really, really important
for the line art. I want to try to mimic how those lines are
behaving in real life. So thick to thin, thin to thick, back to thin. Make sure you're emphasizing those angles as much as you can. Make sure I get this
S-curve in here. When you're doing analysis, you're hearing me think and
talk about it right now. But when you're. Working on your own hands, try to analyze why things
look a certain way. What's in front
and what's behind? What can you leave out? And what lines must
you put in and what lines are not as
clear in the picture. Okay, so next I'm going
to draw the thumb. My thumb looks super
thick, super wide here. Sure that the thumb
is overlapping. The rest of the fingers into
show more of that overlap. You can make the line
underneath the thumb darker. That's what I'd like to do is
I always like to emphasize the lines that are
right above shadows. I made the wrist really thin. I did that intentionally
just to make this fist stick out a lot more. But there are some things
you can do to kind of keep the integrity of the pose, but also change it
up a little bit. But what I can do
here is I could probably do a bit
of a mess transform and I can kind of adjust
certain things to me. It a little bit center. Okay, So again, for
some simple shading, what I'm gonna do is
I'm going to squint. I'm drawing and shading
with the same brush. By the way. Just deciding what part of
my hand do I want in shadow. I know that there are
some parts that are darker and some parts that are
lighter within the shadow, but try not to worry about that. Just try to simplify
your shading. Try to think about okay, if I had to decide what's in
shadow and what's in light. Like. How do I express that
through very simple shading. Squint. It's easier for me
to group certain things. You can do like three
more hand drawings, just you can choose any
reference picture and just draw three hands
using this method, try to analyze the gesture. Try to put the shape on top, add some simple
shading if you can, just like one value is fine. If you're shading in pencil, try to shade in the
direction of the form. So let me demonstrate
what I mean by that. This is the thumb and I'm gonna try to draw one finger here. These are both deconstructed
fingers as forms. So when you're shading this, you can ask yourself, okay, how do I shade this cylinder? Well, you shade
the bottom of it. Once you think about
it as a forum, it's like, Oh, I know how
to share your cylinder. How do you shade a
sphere like this? Add this fear to the cylinder and you get
this type of shading. Here with the cylinder. You would shade this
part of the cylinder. Then this part of the cylinder. And if you're shading
across the form, make sure you don't
shade flat like this because it's going
to flatten that shape. You want to shade. Curved, curve it in the
direction of the form. This is crosshatching.
By the way. What I did there was I
added a bit of an accent. So you can see like
all you really need is little bit of shading
and a little bit of accent. If I wanted to accent the thumb, we can kind of accent
this nail here. The bottom of this thumb. If I was to accent this circle, I would accent the
bottom of the circle. So you can choose to
do that if you want. Ideally, you would
want your line art to give more information
about the shading. So for example, use darker lines when you're
expressing shadows. Use lighter lines if you want something to go
into the distance. Like I'm going to
make islam even thinner, like super thin. And now it's a lot more
distant than it was before. So think about the
types of lines that you choose to use and
all of your pieces. And hopefully that was helpful.
 Winged Canvas, Classes for Art Nerds