Transcripts
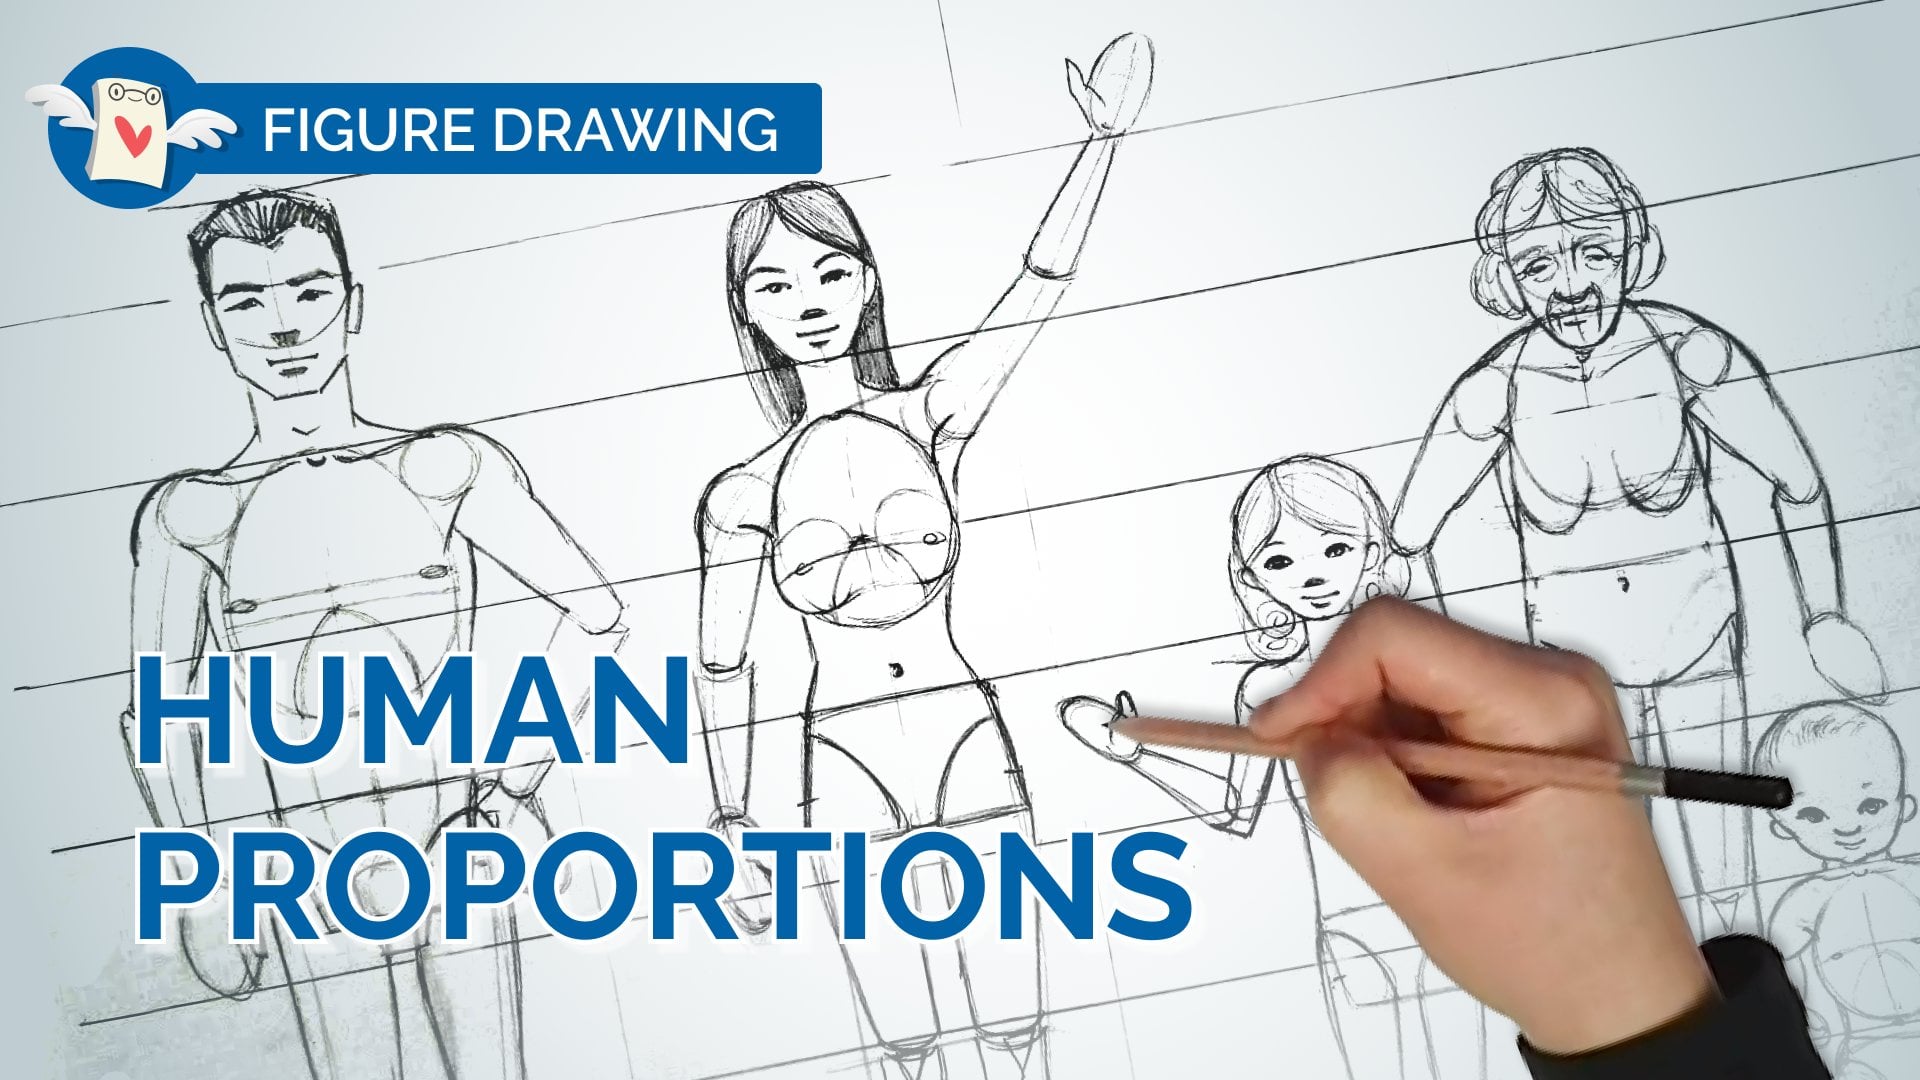
1. Introduction to the GSL Method: When most people start
drawing figures, they usually begin with
the head or the outline, which can result in wonky
proportions and stiff poses. Instead, the GSL
method will teach you how to draw a pose
from the inside out, starting with the
action or the gesture with some practice and some understanding of
human proportions, the GSL method of figure drawing
will empower you to draw people and poses without
relying on extensive reference. All from your imagination. I'm your instructor fade Lu. I'm a figurative artists and
founder of winged Canvas. I've been studying and drawing
figures for over 20 years, learning from master artists and practicing from live models, I develop the GSL method
for figure drawing, which has been instrumental
in my professional practice. So I'm excited to
share it with you. I'm passionate about
teaching because I love helping my students
achieve their goals. I believe that figure
drawing is one of the fundamental milestones
and learning art. Because when you're able to confidently draw a
figure out of your head, you can draw
practically anything. In the next set of lessons we'll go through what the G, S, and L stands for and how to start and finish drawing oppose. Using this methodology,
we'll draw one male and one female pose together along with clothing on
top, step-by-step. There will be other lessons and practices on the GSL method. But this one is the introduction which is suitable for beginners. I'm excited to see what
you create at the end. So please share your
artwork with the community. See you in class.
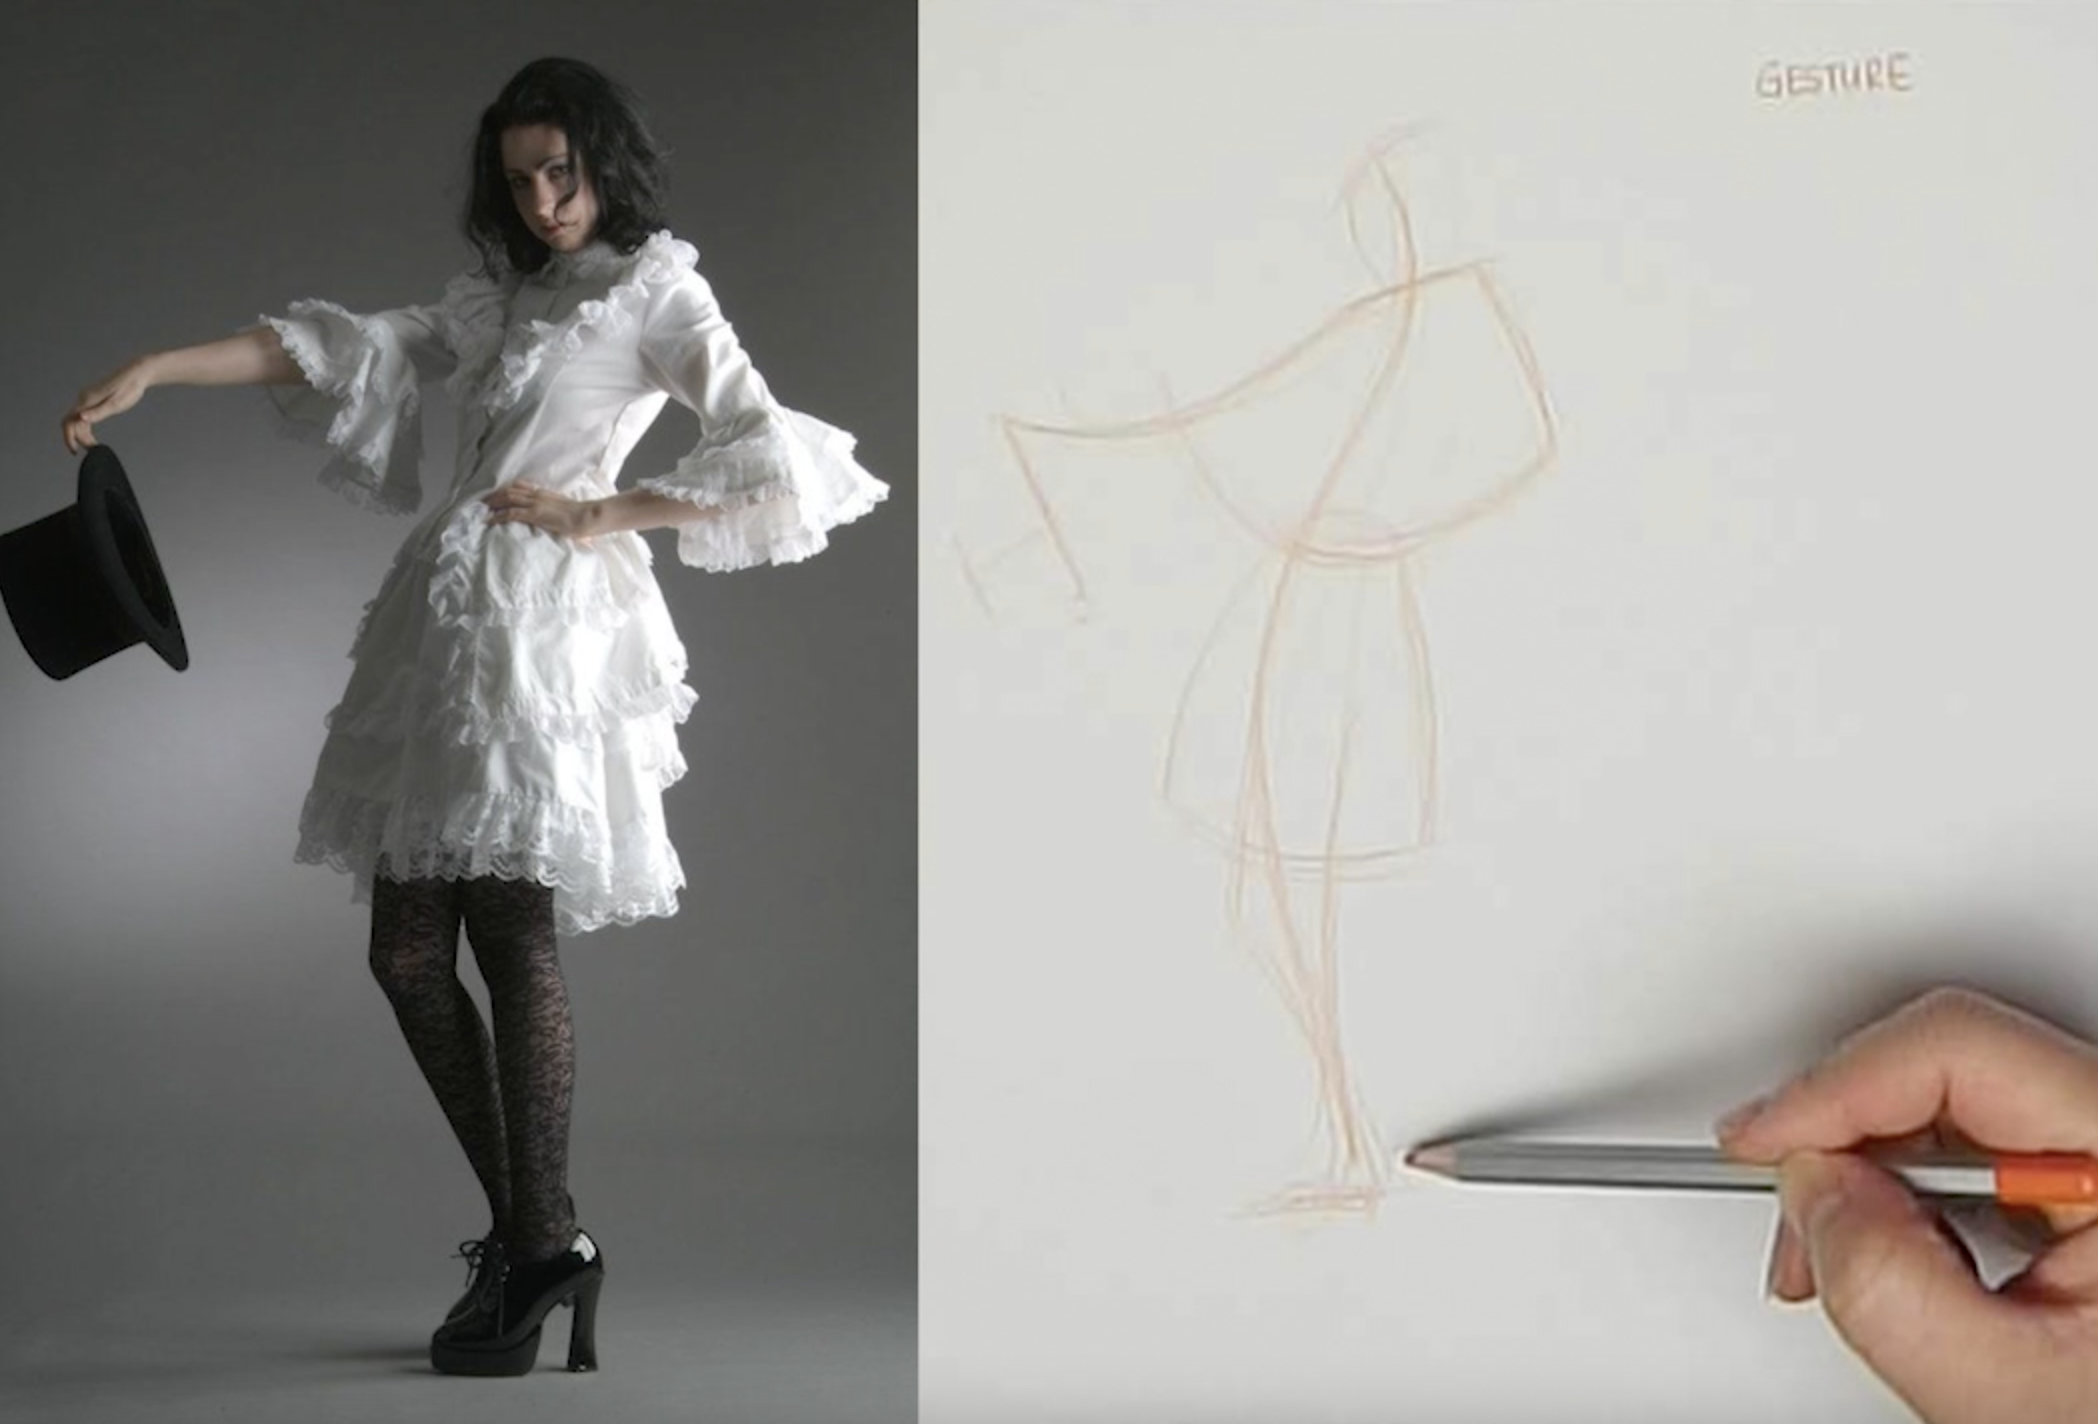
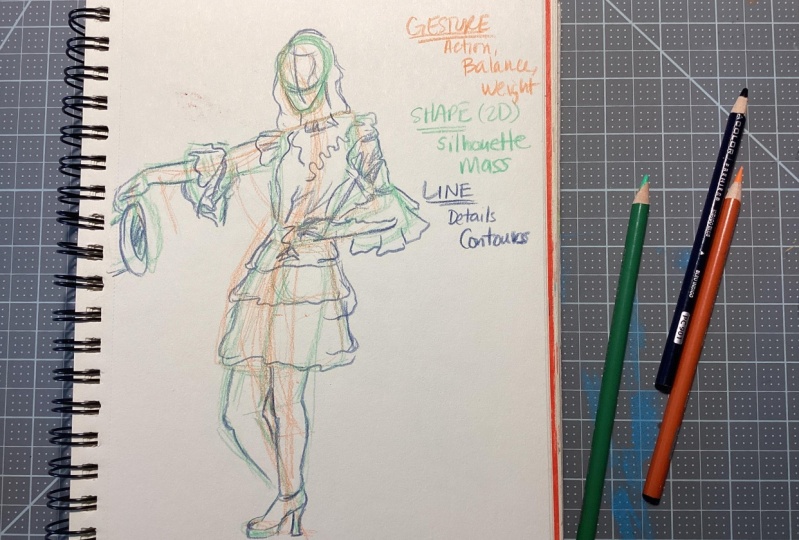
2. Drawing a Woman - Pt 1: GESTURE: What we're gonna do is
we're going to use a method called the gesture
shape and line method. Let's draw in different colors. The reason why I want
to draw on colors is because we can actually
draw them in layers. So the first thing
we're gonna do is we're going to draw our gesture. For my gesture, I'm
going to use an orange. And let's just try and look
at the s-curve of her body. Does this, don't worry
about this being perfect. Just try to capture the essence
of her pose in one line. Now we're going to
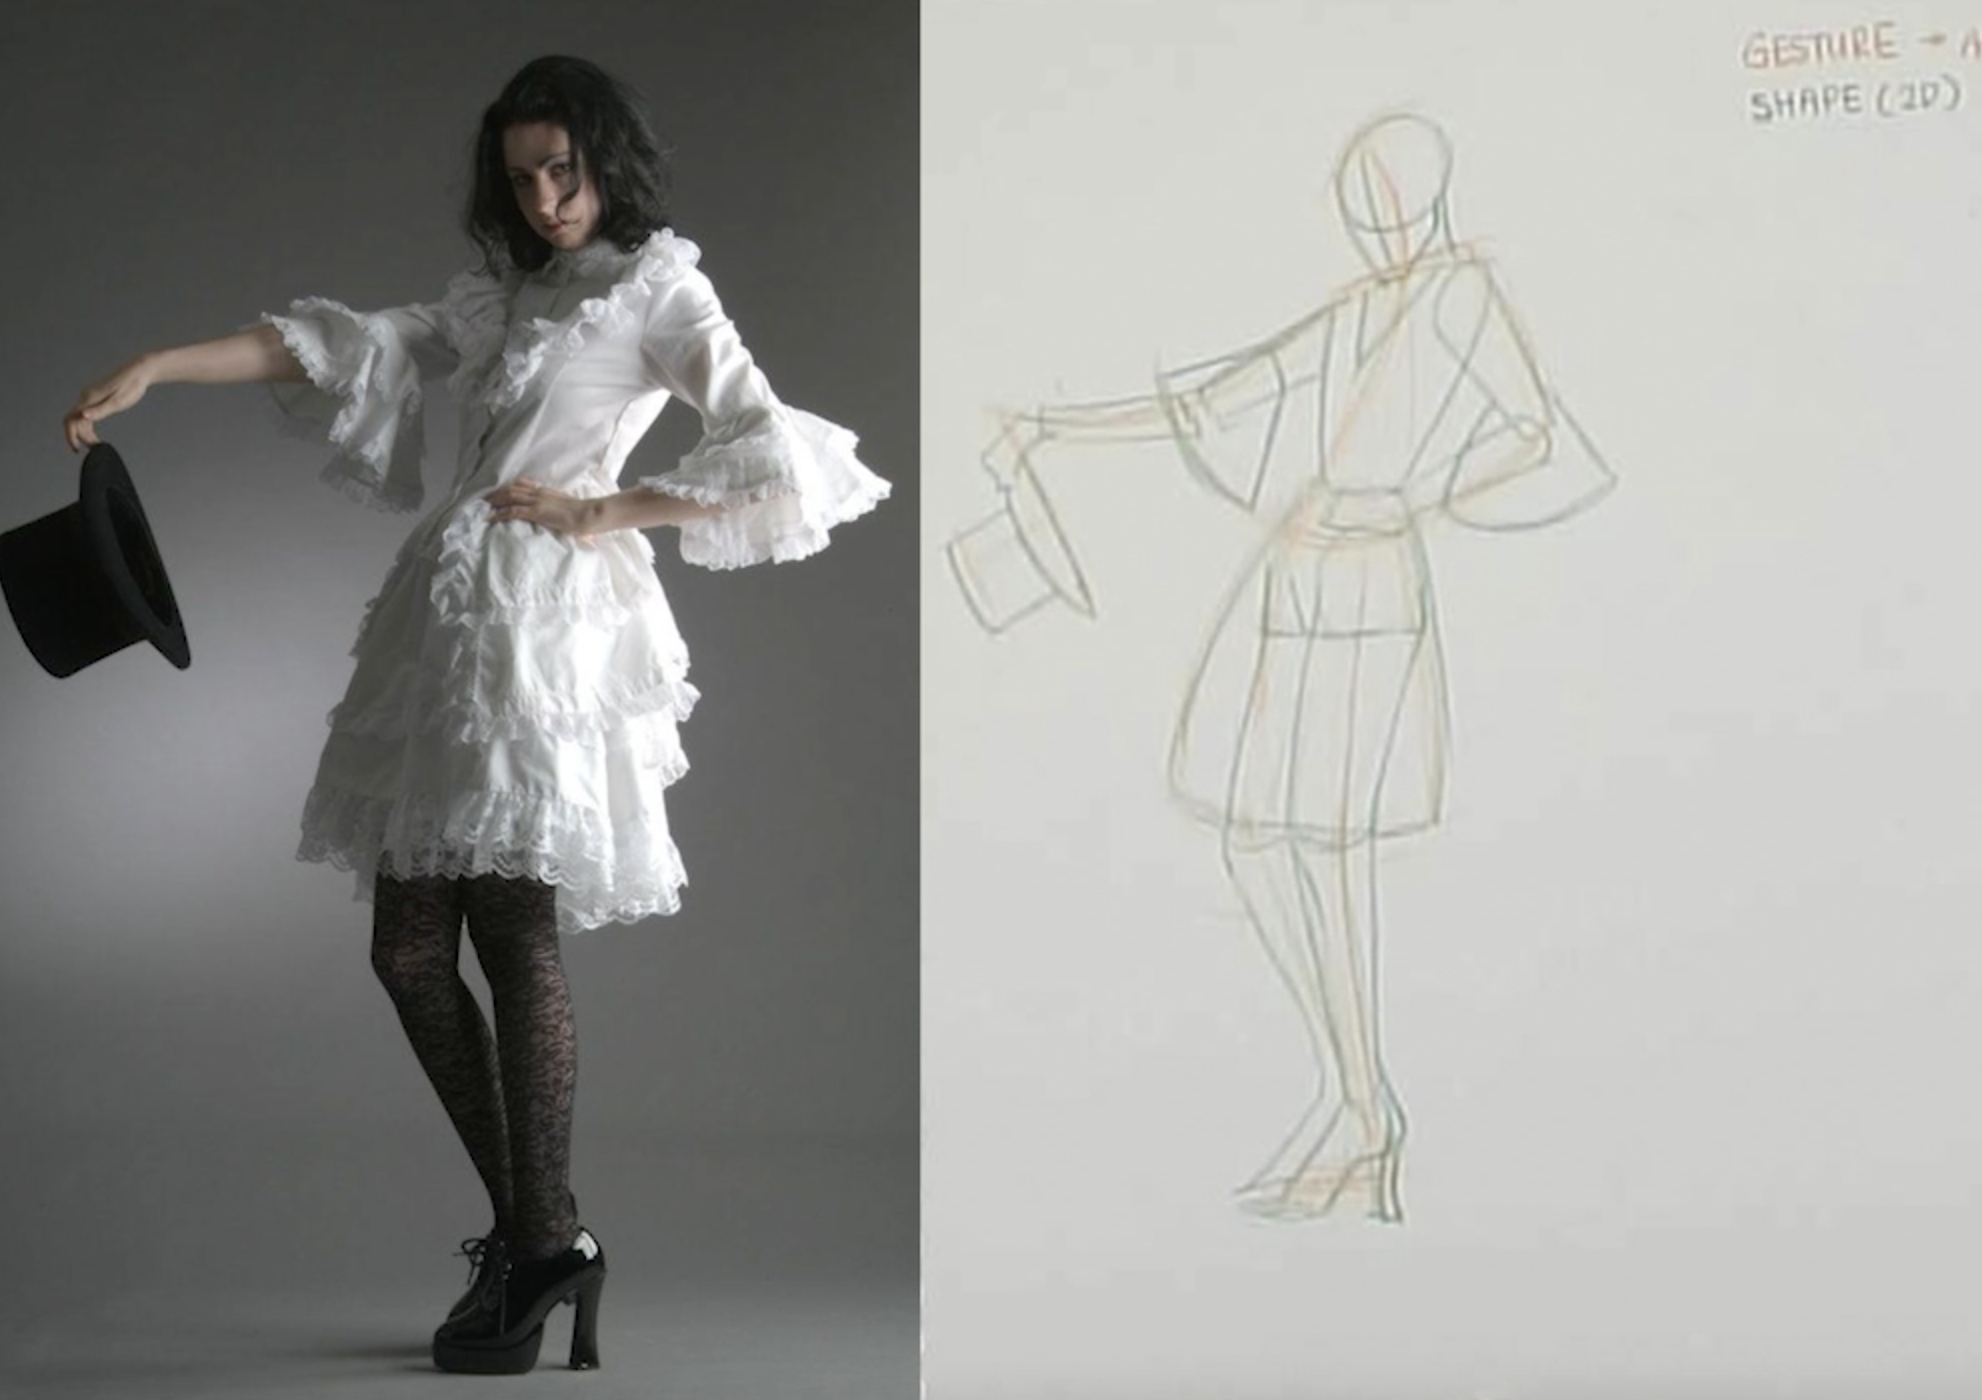
find her shoulders. We're going to find her hip. Now let's draw her arms. Her other arm. I'm I'm really not going
to draw them bend in it. So you want to have the
arms as fluid as possible. Her hat also has an angle
which I want to capture. Then I can kind
of look visually, look for the relationship between her a hand
and her Top Hat here. You can see her hand
connects to her sleeve here. It's almost like one curve, which is why I'm drawing
it as one curve. Now I'm going to draw
the curve of her dress, which is down here. Then I'm going to add
this shape to my gesture. Now you can see there's
one length that's bent. Then there's another
one that's straighter. And her head is also
kind of tilting forward. That's my gesture layer. So I'm going to write
gesture in orange. If you're doing this in
pencil, that's okay. You can just draw a little
bit darker every single time. So take this opportunity now to double-check
your proportions. Okay, So if you look at
her head and the view measure how many times I can
fit her head in her body. It should be about seven. Just measure that out. 3.5554566767, heads. Great. If your head is too big or too small now is the
time to adjust it. You want to also double-check like if you have a
look at her hips, this whole dress section is
bigger than her ribcage. This section is bigger
than this section. Have a look at where
her hands are in relationship to
her body is about a third of the way on her body, not including her head. Just like look back and forth at the reference and
at your sketch, double-check your
proportions here before you go any further. The other thing you
might want to check is that she's balanced, right? Because she's leaning forward and her head's leaning back. But you want to make sure
that her body is balanced. If she feels like
she's falling over, then you might want to adjust her leg to come back
a little bit more. Make sure your figure
feels balanced. So the gesture part, you are looking for the action. You are looking for balance, and you are looking for weight. These are all things that
a gesture will inform the gesture will tell you which weight to her
leg is carrying. Like for example, she
has her weight on her straight leg and her curved leg doesn't
have as much weight on it. Balance. Are these curves all kind of balancing
each other? And do your lines
informed the action.
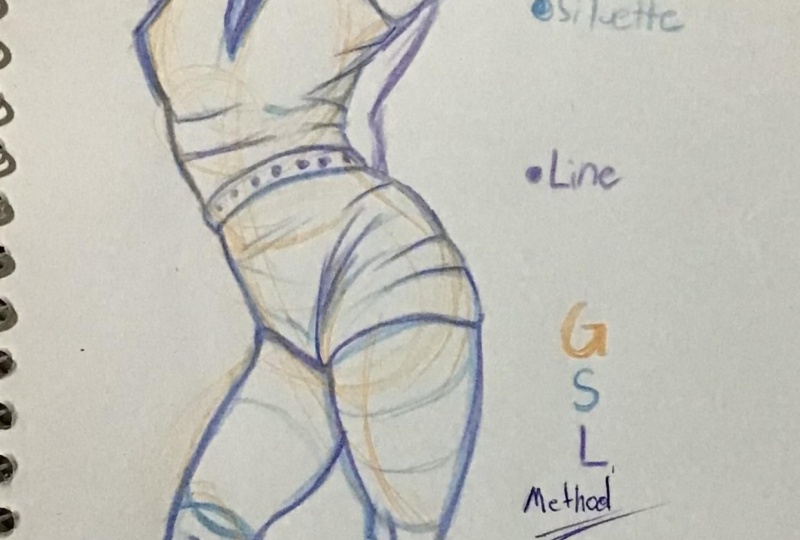
3. Drawing a Woman - Pt 2: SHAPE: Now the second thing we're
going to focus on is shape. Only 2D shapes. And let's start to draw in
the shapes of her ribcage. Use simple shapes here. Shape of her ribcage for torso. Here I'm really going to just draw like an hourglass shape. I'm only using the shape
of her dress for now. If you wanted to
look for her hips, her hips are kind of
like a tapered shape. This way. If you want to
sketch in her hips, you can put it inside her dress. Then you can start to put
in some other shapes. For example, the
cylinder of her arm. Using the negative triangle are the negative shape
inside here also fine. Her arm. Kinda how it overlaps. If you want to draw
the frills and you can also draw that as a shape. You guys can see this arm here. If I break it up into half, then I know where
her upper arm in her lower arm is, right? So if I break it up into half
and I draw these shapes, really, she's got two big
coffee filters as her sleeves. Her top hat. Just
like a semicircle. Square. When you think of shapes like shapes are a lot less intimidating than forms. We all know how to draw
a triangle and we all know how to draw a square. So it becomes a lot. It's easier to think about when you're trying
shapes of heads. I always tried to draw
like a ball and shield. In this case, I would draw
the ball and the middle line, and then I would
draw the shields. Long that ball like this. Then this part is always tricky. We don't know what's
going on back here, so we can only guess. What we're gonna do first
is let's figure out where her knees are in the hips. Because she's standing
three-quarter view. And you kind of see
like one of her legs is actually it's completely
from the side. I'm going to imagine that the top of her leg is
here coming from her hip. And then it connects
to her calf. I'm not gonna go crazy and
draw the calf muscles. I'm really only going to
draw a tapered cylinders. Just tapered cylinders,
don't worry, we'll add the muscles on after. Just draw a tapered cylinder. And then for her
other leg comes out. This leg I drew kind of bent, whereas her leg
is very straight. Now that I've noticed
that mistake, I'm gonna try to fix it. This leg is nice and straight because
she's wearing heels. Her foot is going to
bend a little bit funny. Then I'm gonna work
on her other leg. Here, the bends a
little bit more. Once you have both
of those legs in, I noticed that I'm missing the negative shape kind
of in-between her legs. I feel like I didn't quite
draw it straight enough. Sometimes if this happens, then you might need to have a
look at your gesture again. I want to put in that
negative shape first. So maybe all kind of
put in, in that shape. And then that will
help me inform. My legs are little better. With your shapes. You are looking for silhouette.
4. Drawing a Woman - Pt 3: LINE: Okay, so now let's
do our line work. This is where you get to have a little bit more fun by
drying in those contours. You can kind of draw in
the frills of her dress. Putting some of those details. This is the part
that we usually do. The first in a big fresh
because it's the most fun. But this is actually
the part that we should be doing last. When you're drawing line. The line should be fairly
close to your shapes. But it's adding detail
to those shapes. And here's where I'm going
to add the calf muscle. The outlines of her shoes. In the line part, you can
start to put in some of the folds of the
clothing if you want, if you want to be a little
bit more descriptive, you can kind of
see my approach to drawing clothing is
really to start with the shape and understand how
it wraps around the body. You don't even have to draw
the hands in too much detail. Here. I do want to do a few of these
just so that you guys have a method to work on some
of your own figures. Here I might draw
like a center of her body just to kind of show
that she's facing the side. Her hat is really
part of her story. If you're an animator and if you want to get into
animation or illustration, storytelling is one of the most important parts
of figure drawing. Like you might think, Oh, I need to get good at figure
drawing for my portfolio, but what they're
really looking for your portfolio and in
your figure drawings is, are you communicating the poses? Are you able to
exaggerate the poses? Do you understand
how Figure Drawing relates to storytelling like all of these things that we
don't really think about. Does she look like she's just posing or does the
pose look natural? When you're drawing line, you are really looking
for details and contours.
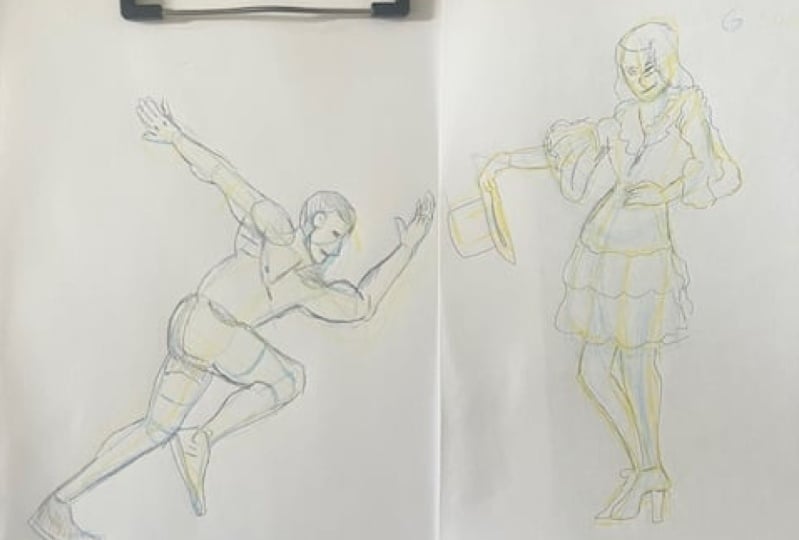
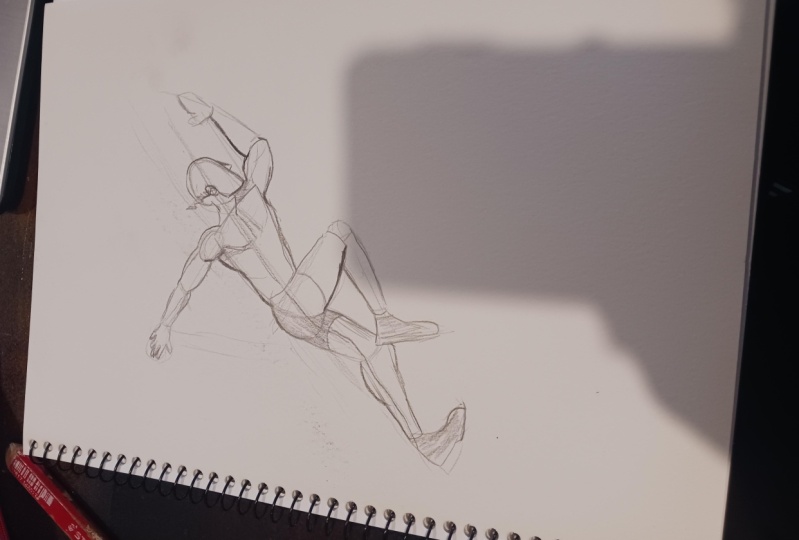
5. Drawing a Man - Pt 1: GESTURE: Now let's draw this figure
in the same method. So he's like running
as fast as he can. He's taken off, there's lots
of momentum going here. I think this would
be a really good one for us to practice. See if you can start to find
the gesture of this image. If I look at his gesture,
it's very diagonal. See if you can match that
angle with your pencil. Kind of like this. Sometimes it's better
to draw the angle first and then draw the
curves along that angle. Very obvious angle there. There's also a really
obvious angle with his arm. Then from here, if you'd look at the distance of his shoulder, like where his butt and his leg is and then
his other leg. It's kind of in the middle. Like so his his leg
is about there. Again, I'm going to kind of match this leg here. Have a look at the
negative space between the elbow and the leg. Try to be aware of
that negative space. Draw the angle of the feet. Then I'm going to use that to inform the angle
of the other foot. His head is generally pretty
close to his torso there. Another thing you might
want to do is have a look at some
vertical alignment. So if you look at his hand, notice how it aligns with
his foot that's in the air. If you look for
those alignments, you can have a visual
reminder of okay. His, his hand aligns
with his foot here. There's a slight
bend in this leg, just a slight bend. Where does that then go? It's like a little
bit below his foot. Okay. So my foot's a little bit low. So these are all
of the things that you can think about
when you're doing your gesture. Where are you? Where do you think his hand is? Whereas the other hand is, etc. That's my gesture. I can make it a
little bit darker. Now you can see
I'm adjusting that diagonal line to kind of make it a little
bit more movement, more curvy instead of
that straight diagonal, the diagonal is there to really help you
with your angles. The other gesture I see
is really in the chin, like this is the outside of the chest and goes into the head and then
there's like a jaw here. I can fix that in my shape.
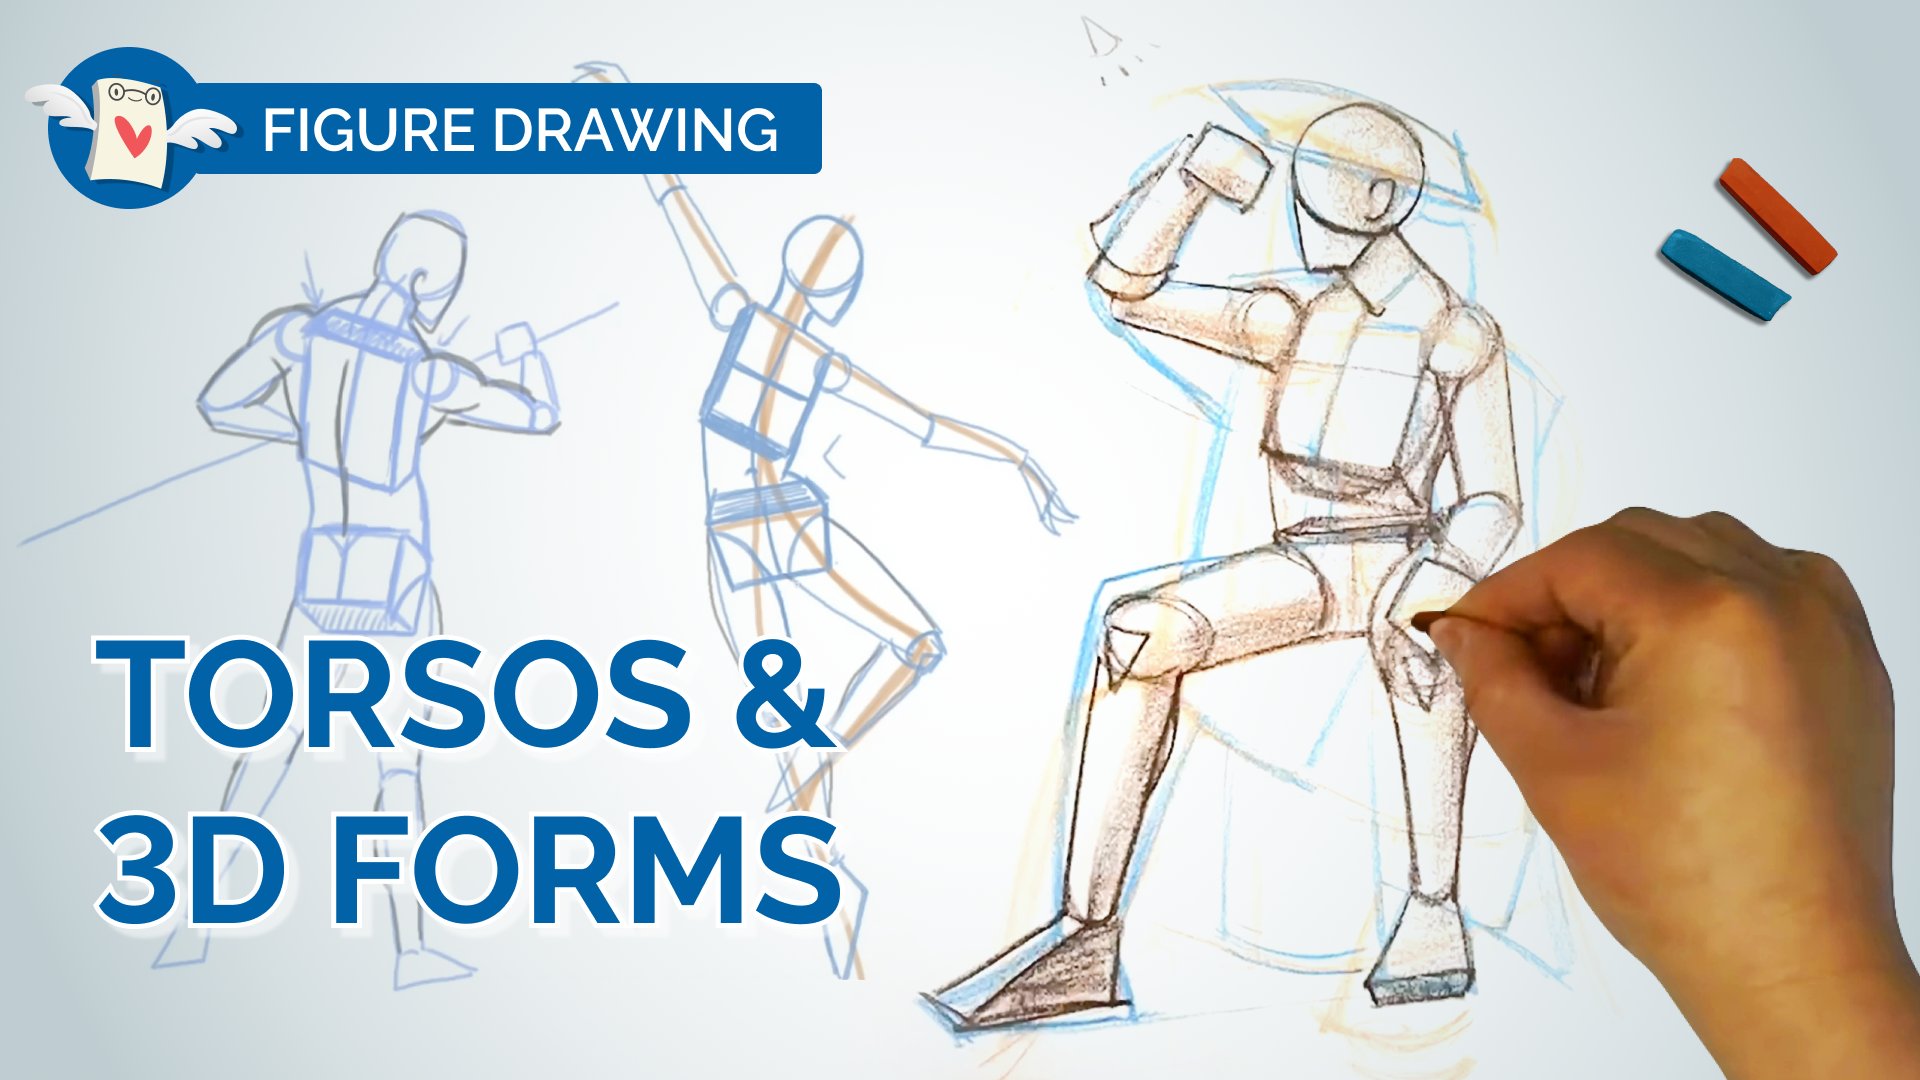
6. Drawing a Man - Pt 2: SHAPE: Now back to shape. If you'd look at the
shape of this guy, you'll see that his torso is very broad at the top
where his shoulders are, and then a little bit more
narrow at the bottom. So male torsos are like this
upside-down trapezoid shape. Let's start by drawing in the
basic shapes of his torso. Then his, his leg. You can see a circle here. And then from there I can
draw in the tapered cylinder. His leg, his calf. Don't worry about all the
wonky lines for his calf. Just draw them as a
tapered cylinder. Nice and simple. Do not over-complicate
the shape part because the complicating
is for the line part. So save that. Keep the shapes really as geometric and
as simple as you can. Paying attention to
where his knee is. So his knee is a little bit past his foot that's up in the air and it's got a
little bit of a bend to it. You also want to
double-check that his legs are the same length. So that this length and
this length are the same. This length and this
length are the same. Look for that negative
space in the middle. Make sure that that
negative space looks like the negative
space that you see. But obviously in
a simplified way, very simplified equate. Even though his shoulder
here is part of his anatomy and we don't
really want to do too, too much rendering here. But I think his shoulder
is really important because if I overlap
this circle, I know that this arm is
in front of this arm. Right now. I feel like
that circle is pretty important in terms of the
information that it gives me. So I'm going to put
that in and see like my forms are little bit different than
the initial gesture. I'm changing the angle, adjusting it a little bit
as I go for his hand. Okay, don't worry so much
about making his hand perfect. Just draw his hand as a mitten. Imagine he's wearing winter
gloves like winter mittens. Just draw it as mitten shapes. Now we're drawing the head. So try to find the ball
and shield if you can. This part right here, that part of his jaw
goes right into his ear. It's really important that
you put that in there. You'll notice that
I didn't really draw the torso and the hips. Today we're just focusing on shapes because I think
if you can draw this, you can easily turn
this into forms later. Master your shapes before
you move onto forms, because forms are really
hard at this point. The other thing I can see is
once I have this big shape, I can look for other shapes. Like I can kind of
see a shape in here. I don't know if you
guys can see that. It kind of goes
along his nipple. You can kind of put his
nipple in any shapes that inform other shapes
or alignments. Those are the ones
that you want to keep. For example, the line
of his shorts here. We can put those into
a secondary shapes.
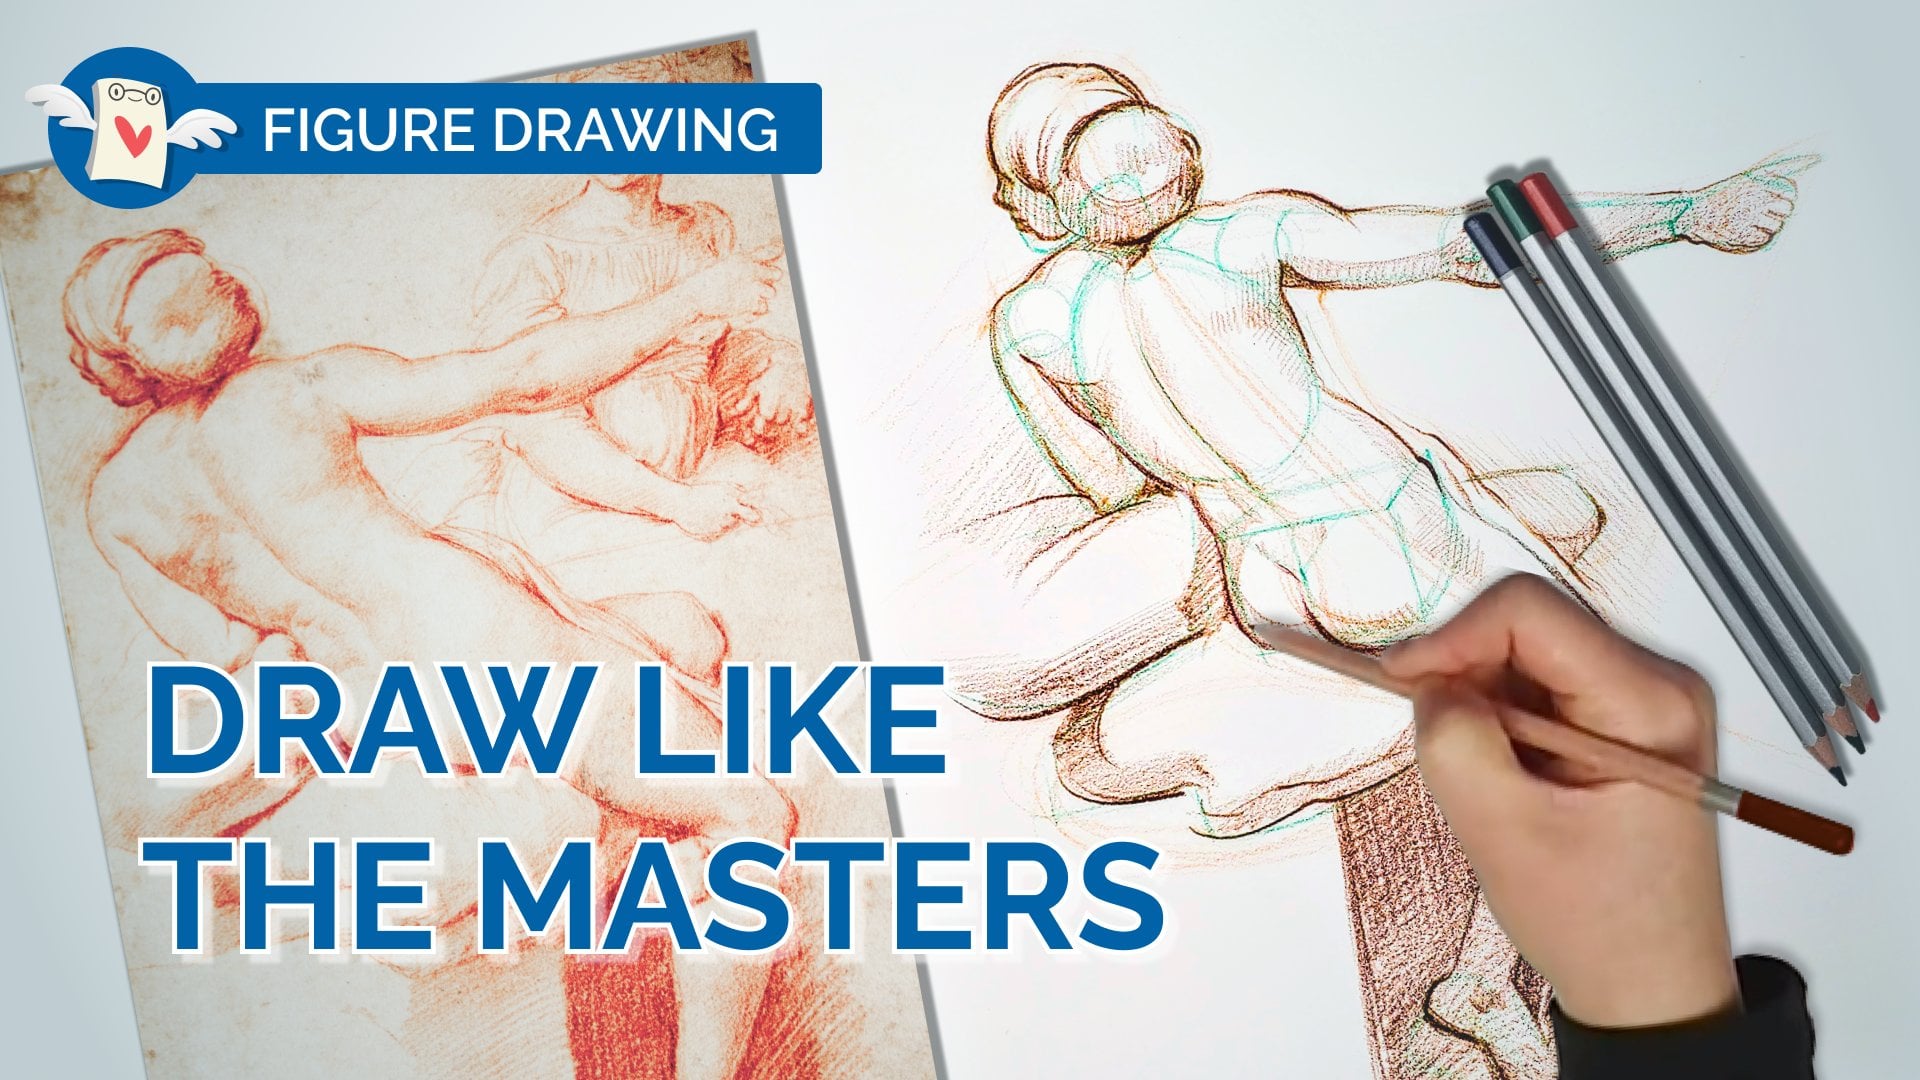
7. Drawing a Man - Pt 3: LINE: Now, let's do the line. When you're using
mine in general. Lines can inform rhythm, it can inform depth. So when you're using line, you want your lines to
be able to breathe. If you think about cartoon
lines versus realistic lines, cartoon lines are the same
weight all the way across. If you want your figure
drawings to feel realistic and feel really beautiful and
stylized and effortless. Like these are all things that come with letting lines brief. What I mean by that is
when you're drawing lines, pay attention to where you
want to use darker lines, where you want to
use lighter lines. If you look at this
reference picture here, you can see that he's
got darker lines along the bottoms of his arm and
the bottom of his feet. Why? Because they're in shadow. If I'm going to use thin
lines and thick lines, I wanted to be able to place
them in the right context. For example, like look at
this big bulging muscle here. If we draw that big
bulging muscle, we can make this line
a little bit darker. You can see this line on top is darker than the
line on the bottom. When we're drawing our lines. Really want to make sure that you're looking for
things like overlaps. This line is
overlapping this line. And look for lines that
are darker versus lighter. So this line is darker, kind of all along
the bottom here. It's nice and dark. You can put in his abs
in some detail here. Choose your lines carefully
so you can kind of see like he's got bulges here that I've left out in my shape, but I can always add them in after the mental
little bit after. Sometimes I'll use the line
to draw the shadow as well. For this one. For example, if I wanted
to shade in this area, I can just quickly shaded in
with some very simple lines. Now for his leg, have a look at which
line overlaps. So his calf is
overlapping his thigh. That's really important. Because if his thigh was
overlapping his calf than the perspective of this whole
leg would be incorrect. So pay attention to those when you're
thinking about line. If you think about
everything at once, like if you tried to
just draw the outline, you'd have to think
about the proportions, the gesture, the shape, the line all at the same time. And it gets really
overwhelming and confusing. And it's hard for us to process all of that
information at the same time. But if you can simplify
it into three steps, just focus on your gesture
for the first step, like Don't look
at anything else. Just draw the action. Because if you're poses
missing the action, it doesn't matter
how accurate it is. It's going to not
look very good. It's going to look
stiff and barring. Your action is your number
one because it tells a story. It's telling you the
most information. You want to make sure
that if anything, that you get that gesture rate, your shapes are arguably
the second most important. Because your shapes are going to really get you
your proportions, is your figure male or female? It's going to inform
all of those things. Shape. This is why we have
this hierarchy. It's gesture, shape,
and then line. Once you have your shapes
and then you can start to make more informed
decisions about your lines. Where do you want
them to be thicker when you want them
to be thinner? What type of line do you want? Do you want to outline the
shadows and shame them in? All of those things
can be decided later. That way. There's less, less chance
of being overwhelmed. When you're drawing arms. Arms like forearms. Sometimes the forearms are
wider than the upper arm. Right at the elbow, like it gets a
little bit thicker, especially on very
muscular people. Then if you drew your
mitten, it's very, it easy to turn your
mitten into a hand. Which is again like if you're
trying to draw a hand, you're probably looking for the line and not really
looking for shapes. But if you drew a mitten, you're drawing
your shapes first. And then you can draw
your line on top, which becomes a lot easier. Again, this works
for everything, not just figures, it also
works for our animals. Works for any type
of complex drawing. Again, this is my GSL method, the gesture shape line method. What part of the figure do you guys have the
most trouble with? Is it how do next
sit on shoulders? Is it like anatomy? Honestly, anatomy is not as important as most people think. Because anatomy is really learning the shapes and
learning those muscle groups, which is less important than like storytelling and gesture.
 Winged Canvas, Classes for Art Nerds