Transcripts
1. Introduction: Human Proportions: Have you ever tried
to draw a person but they look like a girl
instead of a boy. Or they end up looking like
a child instead of an adult. That's all because
of proportions. In this series of lessons, you'll learn how to draw accurate human proportions using a set of guidelines
and measurements, ensuring that you'll
be able to draw realistic people of
any age or gender. I'm your instructor failed Lu, I'm a figurative artist and
founder of winged Canvas. I've been studying and drawing
figures for over 20 years. Learning from master artist and practicing from live models. I'm passionate about
teaching because I love helping my students
achieve their goals, like getting into the art
school of their dreams. And I believe figure
drawing is one of the fundamental milestones
of learning art. Because when you're able to competently draw a
figure out of your head, you can drop
practically anything. In the next set of lessons, we'll go through the
methods of measuring and drawing human proportions
step-by-step, learning simple male
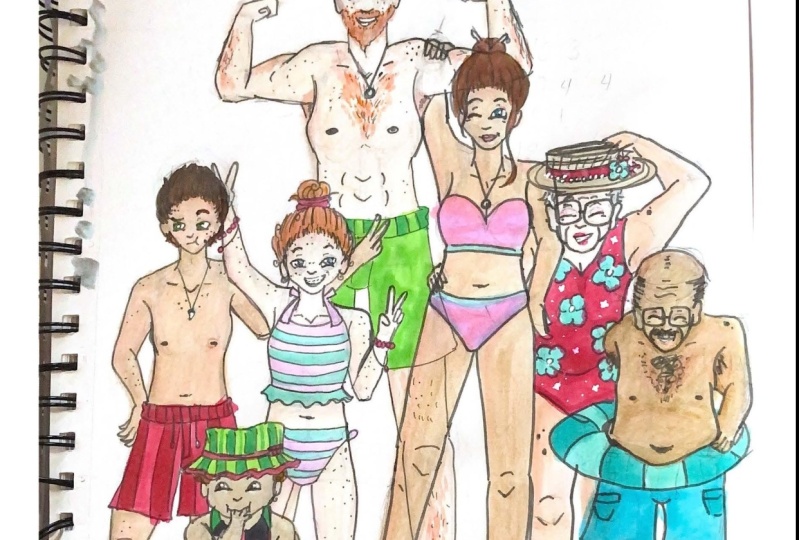
and female anatomy, as well as how to draw children, babies, and the elderly. Our final project will
be a large drawing of five people of different
ages and genders. And you can follow along
with me step-by-step. Even if you're a beginner, I'm excited to see what
you create at the end. So please share your
artwork with our community. See you in class.
2. Understanding Human Proportions: We're going to start by talking
about human proportions. This is an example of how
I like to think about proportions and how to measure
proportions effective 11. Back in the 50s and the 60s, there was a man
named Andrew Loomis. And Andrew Loomis was really the authority on Figure Drawing. And so a lot of the diagrams
you're seeing today are from his books
back in the sixties. They thought eight heads
is the ideal proportion, but really ideal proportions are about seven heads for an
adult and sometimes 7.5. If you're on the shorter side, I would say maybe you might be between 6.5 heads to
seven heads high. I've measured myself,
I'm about seven heads. If you're a little bit taller, like let's say your 61 or 62, you might be 7.5 to
eight heads high. It's eight heads high. Congratulations, you
have heroic proportions. We're gonna talk about heroic
proportions in a second. Keep in mind they are idealised proportions
of male and female. But it's a really
handy guide to just help you locate some landmarks and some basic proportions for
idealized male and female. This is an example of ideal proportions
at different ages, a one-year-old might be foreheads high relative
to their body. Whereas a teen,
let's say six heads, a 10-year-old is
seven heads high. Well, that's actually
not correct. A 10-year-old is
probably only about 5.5. Hi, again, these are
idealised proportions. We talked about human proportions
and heroic proportions. And if you guys are ever
doing fashion drawings or drawings on
about superheroes, you might want to
consider making them eight or nine heads high. If you were like making a, let's say a sculpture of students or some other
Greek god from mythology. You might want to make him
this heroic proportion. This is a sample of what
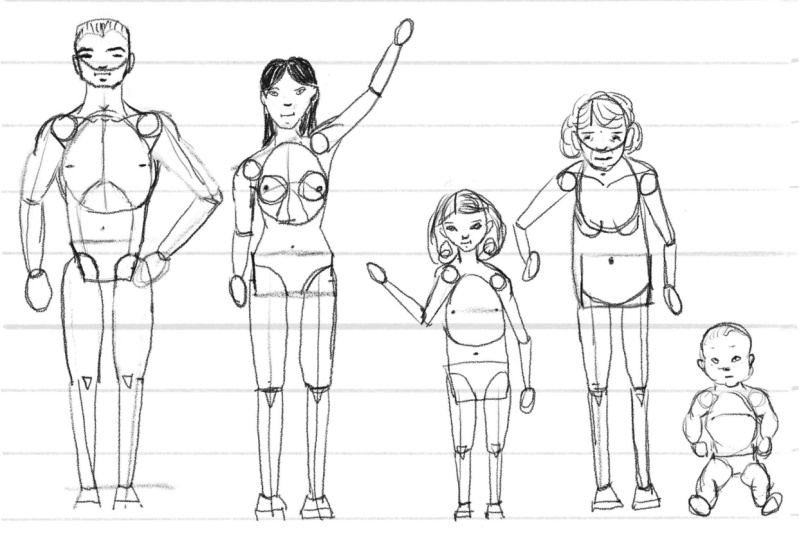
we're gonna be starting with. If you struggle with proportions
like most people do, this is a really
good starting point. We're going to draw
a male or a female, a child, and BB, I'm Amy. So one thing I wanted
to point out very early on is simple facial proportions and how faces differ in
people of different ages. You can see that for
younger children, especially little kids, their eyes sit much
lower on their face. Whereas an adult, or even
if you look at you guys, your eyes sit in the
middle of your face. If you want somebody
to look younger, bring their eye level down
a significant amount. This is a demo that I did in my figure drawing
class last term. And it really shows the
breakdown of the shapes, like our torsos and our hips and everything
else on our bodies. They're the same in all people, except the proportions
are different. If you guys notice the size of the head on this
little girl here, look at the size of
the head compared to the size of her ribcage. Can you see that they're
almost the same size? So that is how you would draw child proportions
is at the head and the rib cage are
about the same size. On little infants, heads are
bigger than the ribcage. So depending on the
age of your subject, you can exaggerate
these proportions to make somebody appear
younger or older. This is a drawing of
somebody who's elderly. And if you'll notice the gesture on her is a little bit curved, punched over what happens
as people get older. Our proportions might
still be seven heads high, except we start to shrink
a little bit up here, like right up here in this area. So our shoulders kind of
go halfway on the head. We're losing the neck a little bit and we're losing
a little bit of height. And then the last couple of
things I want to show you are how our bodies
are all different. You guys probably all know that females have more of
an hourglass shape. So if you think of a Coke
bottle like one of those, a classic Coke bottles, that's sort of the
idealized female shape. However, not all females
are shaped like that. If you're a swimmer or you
work out your upper body, you're probably more of the
inverted triangle shape. Your shoulders are broader because you work
out those muscles. So typically, if you are female and you have an
inverted triangle shape, it makes you look
a little bit more masculine at the
top, for example, the inverted triangle is more masculine proportions
and then the right side up triangle is more of your classic female proportions where the hips are much wider. So same thing goes for men. The classic male form is sort of that
upside down triangle. But again, there are males who have the opposite effect
or that rectangle one, most teens, they're
still growing muscle and working on
upper body strength. They might be the rectangle. Just keep in mind that
people are different. And what we're learning
in this class is typically like your
average person. How you exaggerate those
forms are totally up to you. These are some good examples
of different body types. So you can see the
forms are all similar. Just the proportions
of them are different. Here's a good one
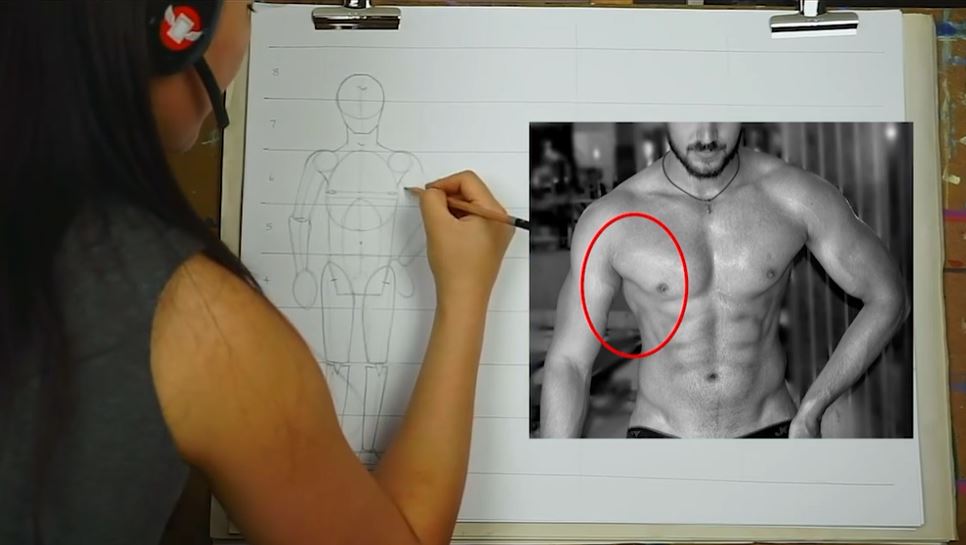
on male body types. Like what a bodybuilder
might look like versus what an idealized
figure might look like. You can see the differences in proportion depending
on who you're drawing. So if you look at
the proportions of the idealized male
figure and look at the space on either
side of his head. What I'm measuring right
now is the width of his shoulders compared to
the width of his head? How many heads wide
are his shoulder, if I could probably fit
three heads in here. I would say the
shoulders on males are approximately three times
as wide as his head. Now let's look at the
bodybuilder here. If I go and I measure out how many heads I can
fit in his body. Like at the widest
point of his shoulders, I would say maybe four. If you're drawing like
an animated character or like a monster, and you give them like a tiny
head and huge shoulders. That's really going to
exaggerate the body proportions.
3. Drawing an Adult Male: The first thing we're gonna
do is we're going to draw eight lines going straight
across on our page. We're gonna do a
step-by-step proportion drawing to divide your page up into eight. It's
pretty simple. You draw a line where
you want the top to go and where you want
the bottom to go. And then you're gonna
find the middle. Right now I just have
three lines drawn. Then you're going to divide this into half again and
then half again. So you're gonna drop
total of eight. Your lines don't
have to be perfect. I think mine are a
little wonky in places, but at least you
have a guide now. Then what you can
start to do is you can start to write
the numbers in. So I'm gonna write 12345678. We're gonna imagine a
male that's maybe 511. So if you're six feet, you might be closer to the
7.5 to eight head mark. We're going to draw a head right at right at the halfway
point at the 7.5 right here. We're going to start by drawing a circle and you want
to make sure that the entire head fits into
this one of these sections. You're going to draw the circle about two-thirds of
the size of one. These two-thirds draw a circle. When I draw a circle, It's really the fear of
the head on the skull. I'm just drawing the top part. And then for the bottom, I'm going to draw a shield. You can see on male faces they're going to be a little bit
more chiseled. Draw a center line. Your head should be
the same size as one of these sections on your grid. If you look at his ribcage compared to the
size of his head, I would say that his
ribcage is approximately 1.5 times the
height of his head. Okay. We're gonna take our head
size here and we're going to draw the rib-cage to the 1.5
times as long as the head. So I'm gonna go ahead and
give him a neck here. And if we're drawing males, we want to ensure that the
neck is nice and thick. Okay. Don't give them a
really thin neck because then he's gonna start to look a little young
or a little feminine. You can also give them
like an Adam's apple to kind of reinforce the
idea of the male body. Now we're going to
draw our ribcage. So I'm gonna start at
the bottom of the seven. I'm going to draw an egg shape. You want to make sure
that the egg shape is 1.5 times the size of the head. I'm going to use my fingers and I'm just going
to measure 1.5 and draw my EKG right here. If you look at the sternum, this is the sternum
of the ribcage. You can kind of see that
there's like an opening that starts about halfway
on this egg shape. If you want to put that in, I usually find like the
halfway point which is here, then I might start
at a little bit lower than the halfway point. But if you wanted to express
the ribcage in more detail, you can draw an
opening like that. If you look at hips and
just hips in general, they are a very strange shape. It's very hard to simplify this into a shape that's
easy to draw. What I do is I typically will draw like a rectangle
that's slightly tapered. I'm going to leave a space between the ribcage
and the hips. I would say maybe like the
opening of this ribcage here. If you find half of the ribcage
a little less than half. Start the hips at about this distance and make
sure that the hips are not wider than the red cage. The hips are generally approximately the
size of the head. But I'm going to draw them as a tapered
rectangle like this. Male hips taper this way. Whereas female hips
taper the opposite way. Between the box, the
bottom of the rib-cage, we're going to draw
a belly button. Right in between
these two shapes is where you will find
your belly button. So if you know where
your belly button is, then you should be able to place the ribcage and the hips. Let's draw the leg
opening. In this box. We're going to turn that tapered rectangle into like
an underwear shape. Makes sure you leave enough
room in between the legs, especially for males, there's a little bit more room in there. You see the legs connect to the hip socket at
the side of the hip. They don't connect
from the bottom. So a lot of mannequins will connect to the
legs at the bottom, but that's actually incorrect. So you're going to make two
little ticks on each side of your hip box and that's where your legs are
going to attach. From there. We're going to kind of pencil in our legs from where they start to where you
want them to end. We're just going to
draw two straight lines all the way down. And then in box number one, we're going to leave
some room for the feet. The leave about a
third of the box. I'm just going to draw a
line like that and that's where I'm going
to place my feet. So this part is pretty important because if you look at a leg and you look at if you look at how long each
section of the leg is, you'll see that
your lower leg and your upper leg are exactly
the same in length. So where are you made that tick is where
you should begin. And at the top of your
foot is assuming where, where it should end. Find the middle point
between here and here. And you're gonna mark That's where your knees are gonna go. My approximate halfway is
about the top of my two. What I'm gonna do
is I'm gonna draw a little triangle shape like
an upside down nacho chip. Once we know where
the needs are, then we can start
penciling in the legs. I like to draw
them as cylinders. From the inside of
this underwear shape. I'm going to draw
my first cylinder to my nacho shape. There. I'm gonna do the same
thing on the other side. If you guys are drawing two
of anything like if you're drawing legs or arms or
anything that is side-by-side. I recommend you
draw them together. Because you could do see
if I draw them together, I can see, oh, this leg is too skinny and this leg
is a little wider. So that gives me the
opportunity to fix it. Then I can see that my
kneecaps are kind of on the outside of the legs, so I'm just going to move
them to the middle here. Then from there I'm gonna draw the bottom section of the leg. You're going to draw the legs as two independent cylinders. And make sure that the
bottom the bottom section of the leg is less wide than
the top section of the leg. Let's draw in the feet. And the feet we're
going to draw in as they're like
trapezoid shapes, except they slant a little
bit more on the outside. Inside. Then I'm going to turn them
into almost like a wedge. In perspective. The feet right now
are pointing forward. You can kinda see that
there's a big space. There's a big space between
the ribcage and the arm. It's quite a big space. If Skelly was able
to make a fist, he could probably fit
his fist in here. So it's about the size of like a clementine or like an
orange, a small orange. So what I'm gonna do
is I'm going to draw a circle like a spacer here. On males. I might want to draw a bigger
circle then on females. But these circles
spacers are quite important because if
you don't draw them, then it looks like the
person has no shoulders. Now what we're gonna do
is we're going to connect the neck to the spacers. Then we're going to
connect the shoulder, the spacer to the
top of the ribcage. And then if you want to
put in a chest plate, you can draw a horizontal
line that's like just above the opening
of the ribcage. And you can place
the nipples towards the outside of the
ribcage like that. Next we're going to connect
the ribcage to the hips. For males, it's typically
pretty straight like this. If you're wondering
where the abs go, they kind of go in between. They stuck, they sort of start
in-between the rib cage. And then they go to the
lower abdomen like this. That's where your app plate. It's fun in males. Notice where your arm
goes when it's straight. Mine kind of goes to about a third of my thigh when it's
just kind of hanging out. You can see on Skelly here
that if his arm is straight, it goes his hand touches about 1 third of the
way on his upper leg. This is a handy
thing to remember. If you want, you
can kind of draw the hand like an oval shape. Your hand is typically
the size of your face. If you look at the size of my hand and the side of my face, you can see it's my face
minus the hairline. You want to measure out like
if his hairline is up here, then his hand should
be about that size. If you make somebody's
hands too small or too big, it's going to start
to look cartooning. Next, I'm going to
connect the shoulder, the arm, doing exactly
what I did for the leg. I'm gonna find halfway. Mark the halfway point. Then I'm going to
figure out what I want the other arm to do. If the other arm is bent, like let's say it's bent like this and he's got
his hand on his hip. Then the hand might be
a little bit higher. So go ahead and pencil in
where you want the arms to go. Then we're going to
start drawing the arms. I'm going to make his
shoulders actually bigger than that spacer. Just imagine he's got muscle
in the deltoid up here. Then I'm gonna do the exact same thing
that I did for the feet. I'm going to start to draw
these tapered cylinders. There's one. Here's the other one. Don't worry about these
cylinders actually closing. They should be open. When the arm is bent. You can see that the top of the forearm is wider than
the bottom of the upper arm. Now we're just going to
leave the hands as ovals. For now. We're gonna talk more about
hands and feet later, but for now we're just worried about size and proportions. So typically males have a little bit more muscle
on top of the ribcage. If you wanted to, you can kind
of draw that muscle here. We're going to add that
muscle onto the side. So it's kind of like
coming through, That's almost like back muscle. So we want to make that triangle shape a little bit more evident. Then you can go ahead and
give them some muscles. Can give them like bicep,
maybe larger deltoid. Then if you want to draw
a simple face on him, you can put the nose right
on top of that circle. Kind of give them a
mouse by drawing a line, putting a bit of shadow
underneath this. And then make sure you put his eyes in the
middle of his face. Because I'm drawing a male, I'm going to make his
eyes more angular. Him like thicker eyebrows. When you're drawing ears, ears line up with the top of the eye and
the bottom of the nose. Then if you want, you can give them some hair. If you're still catching up. You can add the
details on later. Make sure you've given
him an Adam's apple. The last thing I'm gonna
do is I'm going to draw this little dip here. Right up here. It connects to the collarbone which connects to your shoulder. So that's really the
top of your ribcage. There's like a little dimple which then connects
to your collarbone, which connects to your shoulder. If you want to put
that in, that's a pretty important land markets. Well.
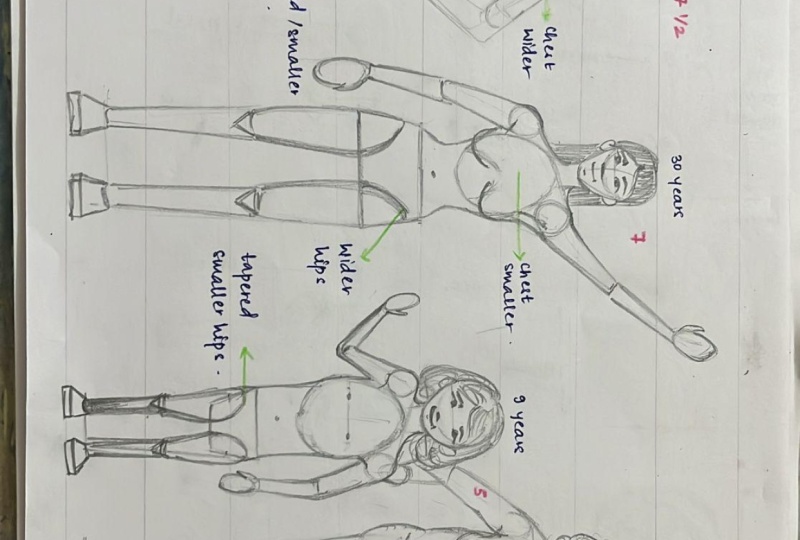
4. Drawing an Adult Female: Now let's draw the female. We're going to draw the
female seven heads high. The first thing I'm gonna
do is I'm going to draw my head inside this space here. And again, I'm going to
draw a ball and shield. That ball is going to be two-thirds of the
size of the head. Now for the female, when we draw the
shield on the female, it's going to be less, less angular and
kind of more subtle. When you're drawing female
heads and female bodies. You may not put as many angles. You might put more curves. Once we have the head in. Now we can start to
put in our ribcage. So again, I'm going to leave
some room for the neck. Female rib cages are about 1.5 times the volume of the head. I say volume because it's
I filled the head with sand and then I pour that
sand into the ribcage. It will fill that
ribcage 1.5 times. You can see that the
ribcage on the female is significantly smaller than
the ribcage on the mail. If you make the ribcage
on the female too big, then she's gonna
look little Manley. Okay. There's my rib-cage. Then I have a handy line
right here where I can draw the opening of the
ribcage on her. Once I have that drawn in, I'm going to connect the neck to the top of the ribcage
and I'm gonna make her neck much thinner
than the male. If you look at Skelly, you can kinda see
that the width of his hips and the written
width of his ribcage, his ribcage is wider
than his hips. If you are drawing a female, if Skelly was female, his hips would be wider
than his ribcage. So we just want to make sure
that if this is the width of your ribcage than your
hips are slightly wider, I'm going to leave the
same distance between the ribcage and the
hips as about the neck? Maybe a little bit
more than the neck. It's a little bit
different for everyone, but females typically
have more space between their ribcage
and their hips. I'm going to draw her hips. The volume of female hips are approximately the
same size as the ribcage. Here on a male, the hips are about
half the size of the ribcage or the
size of the head. On females, the hip is larger than the
head and about the size of the ribcage or
the volume of the room cage. I'm obviously, I'm exaggerating
this just a little bit. To demonstrate the differences between male and female bodies. We're going to turn this
into an underwear shape. I'm going to put the spacers
and by the way, the spacers, it depends on how your
shoulders are moving. So you can kinda see on me, my shoulders move
independently from my ribcage so I can do this
and my ribcage is not moving. My shoulders are moving
independently from my ribcage. So to demonstrate this, let's draw a bit of a
diagonal line here. If you want your shoulders
to be doing that, then you basically
would put your spacers to fit here, right? So this thing can
move independently. Then what I'm gonna
do is I'm going to connect the ribcage to the hips by drawing a
slightly bent line. To kind of emphasize
that hourglass figure. You can put her belly button
right in the middle too. Now let's connect her legs. I'm gonna do the same
thing. I'm going to draw like a tick right in the middle. I'm going to draw. Aligned to the bottom. Then I'm going to start
putting in the feet. Just kind of like where
I want the foot to go. Marking the middle between the top of the foot to
the top of the legs. So it's kind of in the
same spot as the male. The middle is a
approximately here. Then I'm going to start to
draw my tapered cylinders. You want to make sure that
the bottom of the leg is a lot smaller than
the top of the leg. And then also when you're
drawing legs and arms, obviously arms are a lot
thinner than the legs. Your ankle here, like
this width here, might be suitable for your arm. But don't make your arms
thicker than your legs. Because then your figure is
going to feel really strange. You want to keep that in mind? I'm going to draw the
upside-down nacho shapes for her knees like that. You want to make sure that
when you're drawing feet, that you're drawing
them as trapezoid shapes with a little
step at the bottom here. Now let's make her arms
doing something interesting. So she's got her her
shoulders lifted off. My shoulders are lifted. Maybe I have my
arm up like this. So I'm going to maybe draw
her arm up in the air. When you have your arm
in the air like that, your other arm is sort
of counterbalancing it. I typically when I draw
the gesture of the arm, I'll draw it as one
line like this. Then again, we know
where the hands go. The hands kind of go about 1 third of the
way on the thigh. The hands again are
the size of the face. So you want to
make sure that you have one arm length, correct. Before you use this to
measure the other arm, if you're not sure how long
to make the second arm, draw the first arm according to the
proportions that you know, then translate that
into this arm. So I'll show you how. I'm going to divide
the top part of the arm from here to here, and I'm going to
find the middle. Now I know how big each section of the arm is going to be. If those are the size
of my cylinders, then I can use that length
to figure out this length. I'm gonna say the arm
ends about there. And maybe the hand is up here. How do you connect this
arm to the ribcage? The arm actually has a muscle that overlaps the
arm at the top. It's kind of like
your armpit muscle that's on top of your armpit. And you want to make sure I'm going to give her a little bit
of back muscle here. You want to make sure that this muscle is
overlapping the arm, the arm does not
overlap the ribcage. The ribcage is in
front of the arm. So next we're going to connect the neck to the middle
of this ball here. Then I'm going to give
her a bit of a muscle. So this is your deltoid muscles. So your deltoid
muscle is responsible for lifting your
arm up and down. You can see as I lift my arm, you can see that the
muscle is flexing. And then when I put it down, the muscle is no longer flexing. So if this arm is lifted than this muscle
should be flexed. And if this arm is relaxed and this muscle should
be a little flatter. So now we're going to
draw the chest plate on the female, generally, the nipple line on the mail sits higher on the rib-cage
then on the female. Okay. So you can kinda see
the nipple line on the nail is just above the
bottom of the sternum, the middle section of
the ribcage sternum. So on males the nipple line
might be a little bit higher, but on females it's
a little bit lower. I'm going to use this
line as the example. And so what we're gonna
do is we're gonna draw, we're going to draw two ovals
that are slightly tilted. Then I'm going to use
that oval kinda draw. Bottom of the chest here. The bottom of this circle here, you can use as the
bottom of the nose. And typically I'll just
draw like a little like a little Shaded half circle
or semicircle there. And then I'm going to draw a
line for the top of the lip. And then another line
for the bottom there. I'm basically
drawing a wider line and then a less wide line here. And then find the
middle of the head. You can give her. It's make sure when you're drawing the
faces on females that you're using less
angles and more curves. I'm just going to draw
her hair like mine. Give her some hair. Then I know that she's kinda
got these ovals as hands. So if you do want to give
them in more detail, you can kind of draw
her hand as admit, you can just draw a thumb. So don't worry about
drawing all of the fingers. But if you do want it to
look more like a hand, you can give her ASUM. Just draw a mitten.
5. Drawing Children & Babies: So just to make it easy, we already have the head
sizes relative to this. So we're gonna start right
here in Section five. Okay? So we're gonna start again by drawing the
ball and shield. And remember that when
you're drawing children, the ball can be a little
bit bigger than the shield. Because remember that image it showed you in the
very beginning where the eyes actually sit a
little bit lower on the face. So typically when you're
drawing children, whether they're boys or girls, they're not going to
have these square jaws. So typically children have slightly more subtle
jaws like this. You can see that this
space here is quite a bit smaller compared to that
on the adult faces. If I divided this section
five into four equal parts, the circle, it will
probably be three-quarters, and the jaw will be one-quarter. Whereas adult proportions is more like two-thirds, 1 third. Now on children, children's rib cages are a
lot smaller than adults. But because we're not
drawing like an infant, we're gonna make the
ribcage just a tiny bit bigger than the head. So I'm gonna start about
1 third of the way down. To leave room for the neck. I'm going to draw my egg shape. That egg shape is gonna be
pretty similar to the head, but just a little bit bigger. You can kind of draw
their hips as just a box. Okay, so neither
tapered this way or tapered this way because
typically young children, they haven't gone
through puberty yet. So they're pretty similar like boys and girls have
pretty similar proportions. I would make the hips slightly
smaller than the head. Remember how big the female
hips were compared to, and the little child is closer in proportion
to male bodies. In that this, the hips are pretty much
smaller than the head. We'll put a little
belly button in here. I can kinda see that my
hips are off to the side. I'm just going to
quickly fix that. Next we're going to draw
the underwear shade. Again. We're going
to turn this box into an underwear sheet. This is the easiest
way to draw hips. Again, we're going to
find out where the legs actually connect in
the socket here. We're going to bring
it down to bottom. I know I haven't
really talked about foot signs in relationship
to the rest of the body. But you just want to make
sure that the width of your foot is wider than
the width of your hand. On my male figure here, like my foot is looking a little bit small so I can adjust that. But when you're drawing children In typically have smaller hands and
feet than adults do. So you don't want to give children like
really big feet are really big hands
because then they start to look like adult, maybe towards that, that
type of proportion. So I'm gonna leave some
room here for the feet. Let's draw in the legs. So I'm going to find
the halfway point, which actually sits
nicely on this line here. And then I'm going
to draw in the legs, round off those
cylinders like that. And then draw the bottom section connecting all the way down, make sure that the bottom of the legs are significantly
smaller than the top. I haven't drawn the calves
in any of these legs. I'm leaving it out
because calves are pretty complicated and you shouldn't be thinking about it
when you're doing just a proportion
drawing calves you can add on later once you know
the orientation of the leg. So you're just going to draw
them as tapered cylinder. This is the best and easy. Approach to drawing legs. Now let's add in
his little feet. This could be a boy or a girl. Typically, children have very similar proportions
to each other. Because we made her
shoulders going this way. Let's do the opposite for the child and let's
try that out. So I'm just going to
put a bit of a tilt in the shoulders in the
opposite direction. If you're drawing boys, maybe the shoulders a little
bit wider than the girls. But again, like children have very soon in
our proportions. You can always change it later. I'm going to put the
little spacers in their little nacho chips
where the knee use. If you connect the
ribcage to the hips, we're generally just going to make it a pretty
straight line. That then you can go ahead and make the hands do
whatever you want. So again, we're going to start with maybe the hand that's a bit more
neutral but you know, where, roughly where it
will go on the body. So also arms have a bit
of a curve to them. Like if you tried to put
your arm down naturally, it has a natural curve. It doesn't really like if
you make it super straight, it doesn't feel natural. So you might want to add
a natural curve there. If I put my hand in here, I want to make sure that
the hand is little bit smaller than typical
on an adult. This hand I might do
this. It's coming up. His arm, bent like that. I just want to make
sure that the length of the arm is the same on both. So I can measure it. Figure out where halfway is. Halfway up there on my pencil. I can go ahead and
make sure that the arm is the same length
for both arms. If you don't do that, then
it starts to look weird and one arm looks much
bigger than the other. Now I'm going to turn
these into cylinders, make sure that these
cylinders are thinner. Okay. The legs, again, the top of the
forearm right here, is going to be wider than
the bottom of the upper arm. If I divide this into half. Sort of drawing top
part of the arm here. Above this. How to connect the
arm to the ribcage. It's disorder the same. We're going to draw a little
curve from the bottom of the middle of the circle
spacer, right over here. We're going to connect
it to the rib cage. Then we're gonna
draw a little neck. Make sure when you're
drawing children that you give them very small Next, then we're gonna connect
the neck to the shoulder. I can start to outline the
arm just a little bit. Then if you want to figure
out the nipple line for children is pretty much halfway on that egg shape. So you can draw a
line on children, the nipple line sits a little
bit away from the edge. Whereas like on a male you can see it starts to kind of come out and almost touch the
edge of that, the rib cage. Whereas on children
it's a little bit more in the middle here. Closer to the middle. Then if you want, you can draw the elbows as war square sheets. This again, if you're
drawing children, I'm going to lighten up this
line here at the bottom. Remember that's
where the nose goes right at the bottom
of this circle. If I'm drawing a child, I want to make sure
that the line of the eyes is closer
to the bottom. Then the middle. I start from. The middle and then I bring
it down just a little bit. Put the eyes in here. When I dress
simplified mountains, I just draw the opening of the mouth and a little
shadow under the lower lip. Then the ears sit between
in the eyes and the nose. When a face is looking
straight at you. Let's give them some hair. I think I'm going to
turn it into a girl. The eyes look kinda like girls. Give her some clients. You can kind of
make up a hairstyle or personality for your
child, him or her. Then also when you're drawing
eyebrows on children, try not to make them super dark. And try to make them like
sit a little bit of more, like add more distance between
the eyes and the eyebrows because it's going to make them look more innocent,
more childlike. Again, you can see I'm
just drawing mittens. Her hand is like this. The thumb would
be on the inside. And then I can divide the
oval shaped into a mitten. Here it looks like
a lobster claw, but you get the idea. All right, now let's
draw a newborn. So newborns are about
three heads high. Their heads are so big that and then their arms and legs
are like not working yet. They can't carry the
weight of their body yet. So I'm going to start
in section three here. And I'm going to draw a face that's very similar
to this kid here. Big circle, a very small jaw. Also baby faces are not
really pointy like this. They've got he's
got baby cheeks. I don't know if you guys
have seen baby cheeks, but their life, they kind of stick out
at the bottom here. So they have all this
extra fat at the bottom. And it's like this is how
you would draw a baby face. The bottom of the
circle is here, so the bottom of the
nose would be here. Baby mouths are like super
small, super-duper small. Then the eyes on
newborns are not like your regular eye proportions
there like super short. Baby ears. Again, they sit very, very low on the face. If you're drying babies, please don't give
them dark eyebrows. Like I would say, maybe 0.1% of babies are born with
like actual dark eyebrows, but just give them like, just like a tiny dot
above their eyes. Like that, that maybe we'll give the babies and baby hair. So just a little bit at the top. Babies also don't have necks
that are long like this because their heads
are so big that they have roles in between their
ribcage and their neck. So you don't really
see their neck as much as you would on a child
that's a little bit older. I'm gonna start the ribcage. And I'm going to draw
the rib-cage pretty much in this next section. In here, but I'm going
to make the ribcage a little bit smaller
than the head. On purpose. I'm gonna
make the ribcage. Again, it's that egg shape, but it's going to be
slightly less wide and slightly shorter than the head. Okay, So baby hips, baby hips are also very small, kind of like your child
proportions here. But just like a
little bit smaller. So the hips are going
to be I would say maybe like two-thirds the
size of the ribcage. Again, leave a little
bit of a space. We're going to draw
the hips here. This baby is not really newborn. He's maybe, I don't know, maybe a couple and a couple of months old
because newborns newborns would have even
smaller hip and rib cage size. Now on really little
children and babies, their legs and arms are
not full length yet. So they kind of look
like these weird curves. I'm going to put a little
spacers in here and make sure the spacers
are not too big. Because if they're too big, then your baby starts
to look older. Tiny, tiny little spacers. And what we're gonna
do is we're gonna make the arms kind of curved. Then when you're drawing like
baby legs and Babi arms, bringing his hips up
a little bit more. This is gonna be a baby boy. When you're drawing baby legs, Babi arms just draw
lots of roles. Like we're not even
going to draw cylinders. I'm just gonna draw roles. All the good fat babies. Also babies have a
much bigger space in between their legs. If you want, you can
kind of draw like a bulky diaper if you want. But baby legs typically are
very short, very curvy. And then if you want to draw their feet because they
can't really stand yet. I'm just going to
draw these little, little tiny ovals as their feet. Then you can, if you want, you can kind of draw
like a little toes. Here. The babies really like
lying on his back. He was he can't stand yet
because it's heads too heavy. So now for the arms, what we're gonna do is
we're going to draw lots of fat on the shoulders, lots of fat around the neck. The shoulders would
actually be a little bit higher here I gave
him too big of a neck. These are also nice and fat. And then give him
tiny little hands. You can draw in the nipple line. But in the belly button. Just going to lighten his
bird cage a little bit that I can draw the top
of the sternum. Because babies have
baby collarbones two. Then I'm going to connect
his arms to his torso. They're gonna draw
all two diaper.
6. Drawing the Elderly: Elderly people are also not represented wealth
in figure drawing. Grandma would probably
be about six heads high, maybe 6.5 heads high. And she also won't
really have a neck. Because when you look at torsos of a typical adult and
a typical someone, it goes a little bit older. So let's say this is
your average adult here. Let's say this is the head to torso relationship and then
this is the shoulders. When you're drawing
somebody who's older. Older people typically have longer faces and their
shoulders are like here. You can see it's generally
the same proportions, except the back is
hunched a little bit, so the head is actually
overlapping the ribcage. In a lot of cases, we're going to have to assume that when grandma
was 30 years old, she was probably
seven heads high. Now they're Ground laws
like 80 years old. She's starting to
shrink a little bit. So I'm gonna make her
like 6.5 heads high. Just gonna put it right here. Older people generally tend to have longer faces
than younger people. I'm going to intend
incidentally make her face longer than she would
be when she was 30. Okay. Bye longer. I don't mean make
the head bigger. I just mean make the head
worn narrow, slightly longer. Just because somebody's
older doesn't mean that their skeleton changes at all. Their skeleton is still
exactly the same. It's just that their spine is a little bit
more curved. Great. If you've looked at
ID cage where you put the ribcage on the
younger version, we're going to put
the ribcage in the exact same spot on grandma. That means that her ribcage is going to be behind her head. Now I'm going to draw her hips. Her hips are exactly the same. Increases in strong. I think I made her rib
cage a little bit too big. I'm just going to make
it a bit smaller. So her hips, remember
her hips are going to taper outwards. Same underwear shape. Except when you're
driving older people, older people will start to
lose some of these curves. They're going to be
a little bit rounder in the middle
because as you age, you know, your skin
gets a little looser. Things don't kind of hang out the way you want
it to hang out. And typically, older people generally are a little
chubby or it's supposed to, you're supposed to be chubby
when you're older because it's actually like if you're
old and you're too skinny, then it's actually not healthy. I read that somewhere. So I was like
Grandma, don't worry. You're supposed to be chubby. Going to draw her legs. And I'm going to draw grandma
just like a little bit lighter because she's
gonna be behind the kids. Really, the only thing that
changes is the shoulder area. So we're going to focus on
the shoulder area here. Older people tend to have shoulders that are a
little bit more droopy. I'm going to draw her shoulders
as a curve like this. And then I'm going
to draw my spacers. Spacers are going to
be a little bit lower. You can see here
the spacers kind of line up with the top
of the rib cage. Whereas on grandma here, they're lower, much lower. Then we're going
to continue this. It kinda has her arms
around the kids. This by now we've drawn five bodies. So you should start to
get the hang of how to draw the same shapes, just slightly
different proportions. Here I'm going to draw the, I'm gonna make this cylinder like shorter because
she's gonna have her hand on top of this
little girl's shoulder there. And then she has her other hand on top of the baby's head like she's
gonna pack the baby. Now I'm going to
put in the legs. I'm going to draw the legs
in the exact same way. Older people probably have
more weight in there. Is there a little bit
rounder in the middle here? So what I'm gonna do is I'm
gonna draw her belly button. I'm going to put in
a little bit lower. And I'm going to draw
in like a belly. Because older people, again, they're a little bit rounder. Also, the nipple
line on grandma is going to be pretty low
because as graphite, gravity is not our
friend unfortunately. So I'm gonna put her nipple line like come below almost like at the bottom
of her ribcage here. Again, the older you are, the lower down your
nipple line is gonna be for male and females. Want to put the sternum in
kind of in the shoulders. You'll notice that
you see the top of the shoulders of a lot more. If you're drawing
Grandma's face, you want to make
sure that the eyes sit higher than halfway. Because when you're
drawing, for example, an average adult, the eyes sit
in the middle of the face. Whereas when you're
drawing somebody older, Kenny, first of all, the eyes kind of tilt
down a little bit. And also bigger
eyelids, bigger nose. Because your nose and your ears never really stopped growing. When you're drawing
an older person, you want to make the news and
bigger and the ears bigger. There's gonna be some wrinkles. Can add some wrinkled there. What does grandma
hair looked like? Probably like some kind of one thing about older people is that they have like this part at the bottom of their arms starts getting
like really loose. So the arms are going to be
a bit more begi, at the up. Just lose her skin. Then you can also do
something where you make the belly kind of overlap. The legs. This kind of overlap is very
common in older people. The belly overlaps because
the skins, it sir. Try to keep your lines like try to keep your original shapes. If you erase. Put it back in gently
so that you can kind of see where you started. That's really going
to help you in the long run because
you have a benefit. You notice that today we
didn't do any outlining. Until the very end. We drew all of the shapes and learned how they
interact with each other. And learned how each body is made of the exact
same elements, but just different proportions.
 Winged Canvas, Classes for Art Nerds