Transcripts
1. Introduction: Arms are full of dynamic
muscles and curves, which can be really fun to draw, but also challenging if
you've never done it before. If you've ever done an arm
that ended up looking weirdly bumpy or looking like a
sleeve of a big puffy jacket. This class will help you. In this series of lessons, you'll learn the anatomy
of arms and how to construct their structure and
muscles using simple forms. Foreshortening can also be the most intimidating part
of drawing a human figure. But after this class, you'll feel confident
about applying what you know to drive
foreshortened arms. I'm vain blue, figurative artist and instructor
at when Campbell's. I've been studying and drawing figures for overdose 20 years practicing from live models and learning from
master artists. I'm passionate about
teaching because I love helping my students
achieve their goals. And I believe figure
drawing is one of the fundamental
milestones of buying art. Because when you're able to competently draw a
figure out of your head, you can draw
practically anything. In the next set of lessons, I'll teach you about the
anatomy of arms and how you can draw them
so that they look realistic,
proportionate, and 3D. You'll draw along with me as I break down the structure of the arm as we shape the
contours into different poses. And you'll learn
what for shortening means and how you can foreshortened arms depending on how they're positioned in space. This can help you draw
anatomically correct arms. Even if you're a beginner, I'd love to see what
you create at the end. So please share your
artwork with our community. See you in class.
2. Arm Anatomy - Simple & Complex Forms: Let's spend some time
talking about arms. Because I feel like when
you are drawing arms, a lot of the times we'll
just kind of draw bumps. I know a lot of beginners, what they'll do is they'll
draw arms like this. Bump, bump and bump. It's not the right
approach to draw arms. I'd like you to think of
arms not as these bumps, but as a chain. If you think about a chain, how a chain works is
it interlinks and that's all actually how
your muscles work as well, not mechanically, but
that's how they appear. If you look at
this example here, you'll start to see that
link kind of goes in here. And then here it's like wider
skinnier, wider skinnier. Here. It's the opposite here because it's
tilted a little bit. This part is going in. And then this then this. Depending on how the
arm is like in terms of orientation right
here you can see the arms changing. Here. You'll see the
link kind of going in here and then it's
coming out this way. I know this might be a
little bit confusing, but think of it like this. So if I look at the
outline of this, it feels very different
because it has opposing lines. If I want to simplify
this into forms, which is what we
ultimately want to do. Just sketch along
with me if possible. Let's simplify this into a form. We talked about
this being a link. Now let's simplify an
arm into cylinders. This is the shoulder joint as
it connects to the ribcage. Here's a rib-cage. There's the shoulder. Now let's draw a cylinder for the arm that goes down this way. I'll draw another cylinder
that goes this way. Remember to draw the tops and the bottoms of the cylinder. So never again draw
arms like this. Try to think of the tops and the bottoms
of that cylinder. Because this doesn't
have enough information. It doesn't tell me
if the arm is going back or if the arm
is coming forward. What's going to tell me
is overlapping lines. If I have a line
that goes like this, then I know that the arm
is coming towards me. Here. It's going backwards. But if I don't have
that information, then I don't know which
way the arm is coming. I can just see it
as a flat shape. Once we have the cylinders, Let's put in a hand. This is an arm as a simple form. A cylinder is a simple form. We're going to try to draw
this as a complex form. We're going to do another
drawing right next to it. So same thing, we're going
to draw the rib-cage. Then we'll draw the joint. This joint here is
your shoulder joint. Then behind this is kind
of your shoulder blade. That's behind your ribcage. It actually draw this
as a dotted line. But a lot of times
people don't draw that shoulder spacer
and then they attach the arm right to the ribcage and that
doesn't look right. So you have to make sure
you put that spacer in. So now what we're
gonna do is we're gonna draw a complex form. So we're going to start off this cylinder as a round shape. We're going to taper
it a little bit. But now we're going to flatten
the bottom of the arm. So we're going to flatten
it into more of a square. It's going to start
off cylindrical and it's going to end squarish. Then we're gonna do the
same thing for the bottom, we're going to
start cylindrical. We're going to end
as a rectangle. Can anyone guess
where my POV is? Did you say my POV is here? Would you say my POV is here? Would you say it here? When you're thinking
about your POV, look at the tops
of these cylinders and this one's going up. This one is going up. This one is going up, but like this one is going down. It's going in the opposite way. When something turns, like, let's say this is a coin. If I'm looking straight
on at the coin, I just see the edge of it, but as that coins starts
to get further into space, I start to see either the
bottom of it or the top of it. There's the top and
there's the bottom. Same thing but this arm, if you imagine this arm as shape or as spheres
or cylinders, you can kind of see this
is where the cylinder becomes straight and that's how you know that
that's the POV. This is complex form. This is simple form. You've never done simple
forms start here. Simple forms are hard enough
to try to get the hang of. So don't attempt complex form until you understand
simple form first, the nice thing about
complex form is that it offers you different
ways of shading. So let me demonstrate
what that means. So if I was to shade
a simple form, I would shade it like this. I could connect those
two simple forms are good for like maybe drawing female bodies because
our bodies are a little bit less angular
than male bodies. Complex forms are
really good for anatomy because here's how I
would shade a complex form. My cylinder would be round and then the bottom
would be more flat. When I'm shading it, I have a
lot more variety of angles. You can see that the
complex form looks a little bit more human
than my simple form. I realized I didn't
draw the hand. Let's sketch that in four hands. I'm gonna start off by drawing kind of like a thick
piece of toast. Now let's try to draw one of these arms by figuring
out where the cylinder is in the arm and then
applying this kind of chain link idea to the anatomy. And I'm going to follow this
third example here because it mimics this similar
type of shape. And I start off with
my simple form. We're going to draw our ball. Just lay in the
shape of the hand. I feel like I made the
cylinder a little bit small. Now let's add on the anatomy the first big muscle
that we see here. This is called the deltoid. The deltoid muscle. We can find where it
attaches on the arm and then let's drop
in that muscle shape. It's very much like a teardrop
shape, like upside down. Then this here is like a natural split between
the bicep and the tricep. Your bicep is usually
bigger than your tricep. This guy has huge
triceps as well. But your bicep is here. That's like when you
see someone's arm and they have this kind of
muscle, that's the bicep. It's the one that is most
likely to be flexed. And then as you'll see,
the tricep is a little bit higher and longer
than the bicep. Muscles will always
expand and contract. So it's always contracting on one side and expanding
on the other side. The next thing
we'll do is we can divide this muscle group. There's muscle group here and then you'll see that there's a tendon that attaches
this arm to this arm, attaches the upper
arm to the forearm. And it starts kinda halfway
up on that upper arm. And it's a lot more
geometric looking. It's kind of like a
shape that looks like this. Put that in. You can put in the elbow, which is right in between your upper arm and your forearm. And now, don't worry
about all of these lines. We're going to ignore
those for now. What I do want us to look
at is the overall shape. That muscle group that makes
up the forearm. From here. I think I made my forearm
a little bit short. Then. I don't know if you guys can see the squareness of the forearm. But I'm going to go for
my complex form here. And square that. I think I made my bicep
a little bit short. So I'm going to extend it. If you wanted to label this, you can label this deltoid. This is your bicep. This is your tricep, elbow. Forearm. If you want to
attempt the shading, the first thing
you want to do is establish a light source. Light source, it is over here. I'm gonna continue
shading in the blue, and I'm just going to
choose a color that's more neutral but a
little bit darker, not going to go full on dark. Maybe reduce my
opacity a little bit. Let's think about how each
form would be shaded. So if it's a round shape than the shading is gonna be
kinda halfway on that. So let's shade this form first. I'm using kind of a rough brush. It's a default brush, but I'm using a rough
brush at 50% opacity. So we got that shape in. Now let's shade in the forearm. So it just has a little bit
of lighting on the side here. And then the biceps,
similar kind of form. All of these forms would have a little bit of shading
on the right side. You can express some of these smaller muscles by just putting in a
little bit of shading, but I wouldn't go too
much into detail. But here I mean, you can, but we don't really
need too much. You can express it with just
a little bit of shading. You might notice the
arm gets a little bit darker as it moves
towards the bottom. And that's just because anything that's closer to the
ground is gonna be darker. What you can do to express that, if you're working
digitally, it's quite easy. You can just select your arm. Is. I'm going to use
a gradient tool. Make sure it's foreground
to transparent. I'm just going to do this. There you go. So now I have a little
bit of a gradient. I'm probably going to remove
some of that gradient. Here on the hand. I'm gonna do it
with an air brush. You can see once I
start to remove that, it gets really bright. Maybe I don't remove
it at full opacity, or I actually select the
color and then just go a little bit higher on that and then just
paint on top of it. Because I think if I want
to preserve that gradient, then I can't go full out white. If you're shading
digitally and you'd like that gradient look, you can like select every
single part on its own. You can do the same thing. So you can add that gradient
just a little bit on each of the muscle groups if you want your shading
to be very precise. But instead of using the
gradient tool all the time, you definitely want to know
where the shading goes. The gradient tool is
a great digital trick because it saves
you a lot of time. But that's kinda how I would
shade and draw an arm.
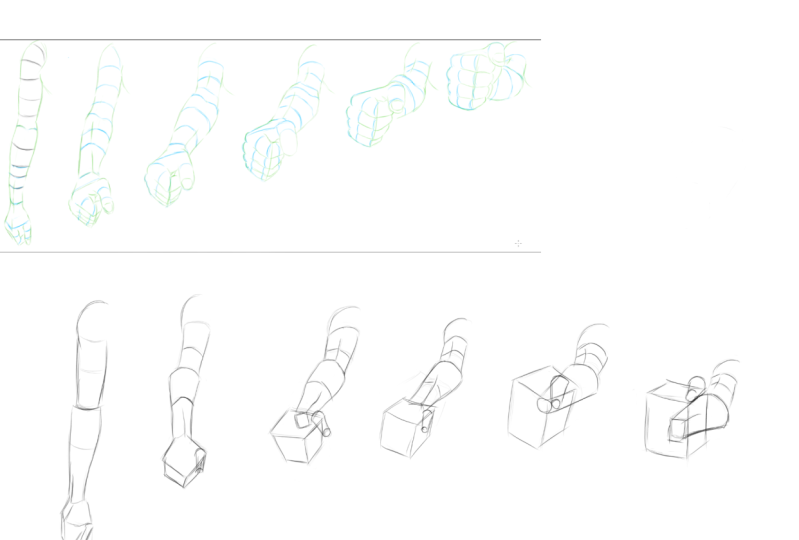
3. Drawing Foreshortened Arms Part 1: We're going to attempt an arm
in different perspectives. What we're gonna do is create a new layer on top
of this picture. And we're gonna
call it contours. And then we're going
to actually draw the cylinders or those curves. Tops and the bottoms
of the cylinders. We're going to draw
those right on top so that we can start to figure out how the arm is foreshortened and what happens to those lines when
they're foreshortened? What I want to do
is start to look at the lines of the arm and
how it's moving in space. And when it becomes more geometric versus
when it's more round. Some of this might have
to do a bit of guessing, but think about
like if this person had lines like drawn on their
arms, how would they look? So if you're an animator, you'd be pretty
familiar with this. But the first one, this is pretty easy. We're tracing and
doing a little bit of analysis. Next one. I can see it starts to
get more geometric here. Do you see the shadows? Starts to become more geometric. Here it's flatter. Here, it's around her. Here it's more geometric. You can go all the way
down to the hands as well. Remember as the arm
starts to come forward, your contour lines
are gonna change. They're always changing
and this is what makes figure drawing
so difficult. Notice how big the hand gets once it gets
really close to you, you don't even see
the arm anymore. So these ones are
gonna be tricky. Really try to think about which part of the arm
is more geometric. Sum which part of the
arm has more angles? If you look at the shadow here, like see this shadow here. That shadow is a really good
indication of your deltoid. Can see your deltoid
and there's your bicep. G actually see the bicep
going into the deltoid there, whereas there's not as
much information when the arm is just kind of relaxed. Keep that very geometric. I can't really see what
his wrist is doing, but I can imagine that it's
pretty geometric like here. It's kind of behind his hands. It's a little bit hard to see. Emphasized the
roundness of the hands. We're just drawing
through our forms. We're not drawing any of them, the outlines, but we're
actually drawing. So I'm going to
erase this because it's technically an outline. We're just drawing
through the forums. We're drawing the contour lines. I turn that layer off, you can really start to
see how these lines move. I'm going to reduce the
opacity of this picture here. Let's try to draw the forearms, try to keep those forms in mind, those complex forms
in a different color. It's really hard not
to trace the outline. I'm going to
challenge you not to draw the entire outline, but just to draw the contours that will
make the most impact. I'm using broken lines. So anywhere there's a corner, you can emphasize that corner. So try using broken lines because they're a little
bit more descriptive. I just helps your peace
breathe a little bit better. You can see the part that
becomes more geometric. I'm gonna put a line through it, trying to think of where
I want to break my lines. Instead of breaking your lines, you can also do like
thick and thin lines. So sometimes your lines can be thicker and areas
and thinner and areas. I tend to make them thicker
when they're closer to the bone and thinner when they're
disappearing into space. This is true structure drawing. What you guys are doing is like most people draw
the outline first. When most people draw, they are not drawing the pink
lines that we're drawing. But those contour lines
are more important sometimes than your
actual outline. That's why we drew them
first is because it's really telling you
what the arm is doing, where it's bending,
where it becomes more round and more geometric
has arms are very organic. The only way to get
better is to study how they start to turn in space. I do want to draw his
fingernail because I think the fingernail like if you
look at the fingernail, it changes direction as
it moves into space. So I think I want to
capture that as well. So anywhere where it's straight, draw a line around it or like right on it to show
where it's turning, where it becomes more geometric. And this is true for all bodies. There's some parts that
are naturally softer and some parts that are
naturally bone ear. So your hips or
your ribcage will be bony ear and your
stomach area is flashier. You'll see it a lot
on fingers as well. So your fingers on the
outside of your hand are more angular and then on the palm of your hand
it's more fleshy. Your fingers also
do the same thing. It's a pattern that you
see in the human body. The other thing that you could
put in if you wanted to, is a bit of that chest muscle. So you can kind of see
it if you want to give a little bit of
context for the body. And kind of how the arm relates. Also the shoulders. Now that it's coming towards you like the proportions
are really skewed and things also are overlapping a lot more so your lines
can kind of overlap more. So here I see that the deltoid overlaps the shoulder
as it's coming forward. Make sure that when you
put your lines down that you're putting
in those overlaps. What form is overlapping? What try not to just
make it very ambiguous. Trying to show where
those overlaps are and draw with intention
instead of just like, Oh, I'm just going
to trace the lines. I'm putting in some
of these verticals through my arm just to show
where it's flattening out. The contour lines do that. It's showing you where it's flat and where things are round. So this one is the hardest one. It's really hard to see
what's overlapping. What I'm going to have to guess what the
shoulders doing here. I forgot to draw the
chest plate here, so I'm gonna make sure that
I do that on all of them. Just kind of draw in the armpit and the
side of the torso. This is a really great
way to study anatomy. You can do this with
any type of pose, but I find it
particularly rewarding to draw this foreshortened view. And then if you do
a little bit of analysis like what
those shapes are doing, and how to draw them
as simplified forms. Because right now what
we did was we drew the contour line and then
we traced what we saw.
4. Drawing Foreshortened Arms Part 2: If I was to analyze
these arms even more, how would you construct
this arm with forms? What I'm trying to do
is I'm trying to draw the fist as one form. And then the arm behind
it is a cylinder. And then the arm behind
it again is a cylinder. A cylinder here. And then there's
a cylinder here. That cylinder is
attaching to the cube, which is the hand. There's a little bit
too much to draw this form like right in
the contour drawings. So I'm trying to
do it separately. Now you can see the hand and the cube
has now changed, right? So if you look at the cube now, it looks more like this. Whereas that cylinder, how does that cylinder
connect to the cube? When cylinders are
foreshortened, they get smaller as
they go away from you and larger as
they go towards you. I feel like this part
would even be smaller. I'm going to do this each
time and try to see how these shapes change as the
arms changed direction. Here, the thumb, I didn't
draw the thumb in these, but if you do want to draw them, you can draw them as a cylinder. You can kind of see what I mean from the arms that
we drew in the beginning, that we're just kind
of cylindrical. So for this one, it's very, very cylindrical. This was your bigger
cylinder like this. You can draw the complex
shape if you want. But as the arm starts to turn, these forms start to exist
on top of each other, then it becomes
really challenging. But if you can still
see those forms, like try to look
for them and try to kinda understand
them in a 3D sense. That you're not just relying on outlines when you're drawing arms or when you're
drawing objects. As the arm comes towards you, the forearms gonna
get larger and then the hand is
going to get larger. So anything that's
coming towards you is gonna be much bigger. And the cylinders
that are moving away are gonna be much smaller. Is I feel like I need
to make this cylinder even smaller just to
kind of exaggerate. I'm trying to carefully look for my cylinders that
are going into space, so I want to make
sure that all of my cylinders are getting
consistently smaller. I can see, for example, that this one is not as
small as the one before it. I have to make sure
that the forearm is getting smaller and
smaller than that, I'm consistent with
that transformation. Then here you can see it's
smaller on this side. And here it's larger
on this side. So I, for consistency sake, I think I have to make this
part a little bit smaller. That deltoid is looking like, it's making things bigger. Went to redraw this part so
that it's more straight. There's a bit of
an overlap here. I want to make sure I
capture themselves relapse. I'm just going to
simplify the cylinder. It's a little bit
confusing to keep it. A complex form. Here, the forearm is
getting a little bit thick. It's hard because
you have to make a consistent throughout, right? You have to make that
transition very seamless. Cubed is going to be
very, very distorted. This is like three-point
perspective. Here you can see that the cube is getting dramatically smaller.
 Winged Canvas, Classes for Art Nerds