Transcripts
1. Introduction: hey, hey! Doing its Clayton here from how to draw comics and dot net and welcome to my skill share class on drawing the female head from the top down and bottom up. 3/4 perspective. In this demonstration, I'm going to show you how to construct the female head, place the facial features and create a finished line drawing off the female head from these two specific angles. They're extremely dynamic and kind of tricky to do out, which is why I have decided to focus this particular listen on this topic that you get a ton of value out of it and that you learn a lot. Thanks so much for joining me. Let's jump straight into it.
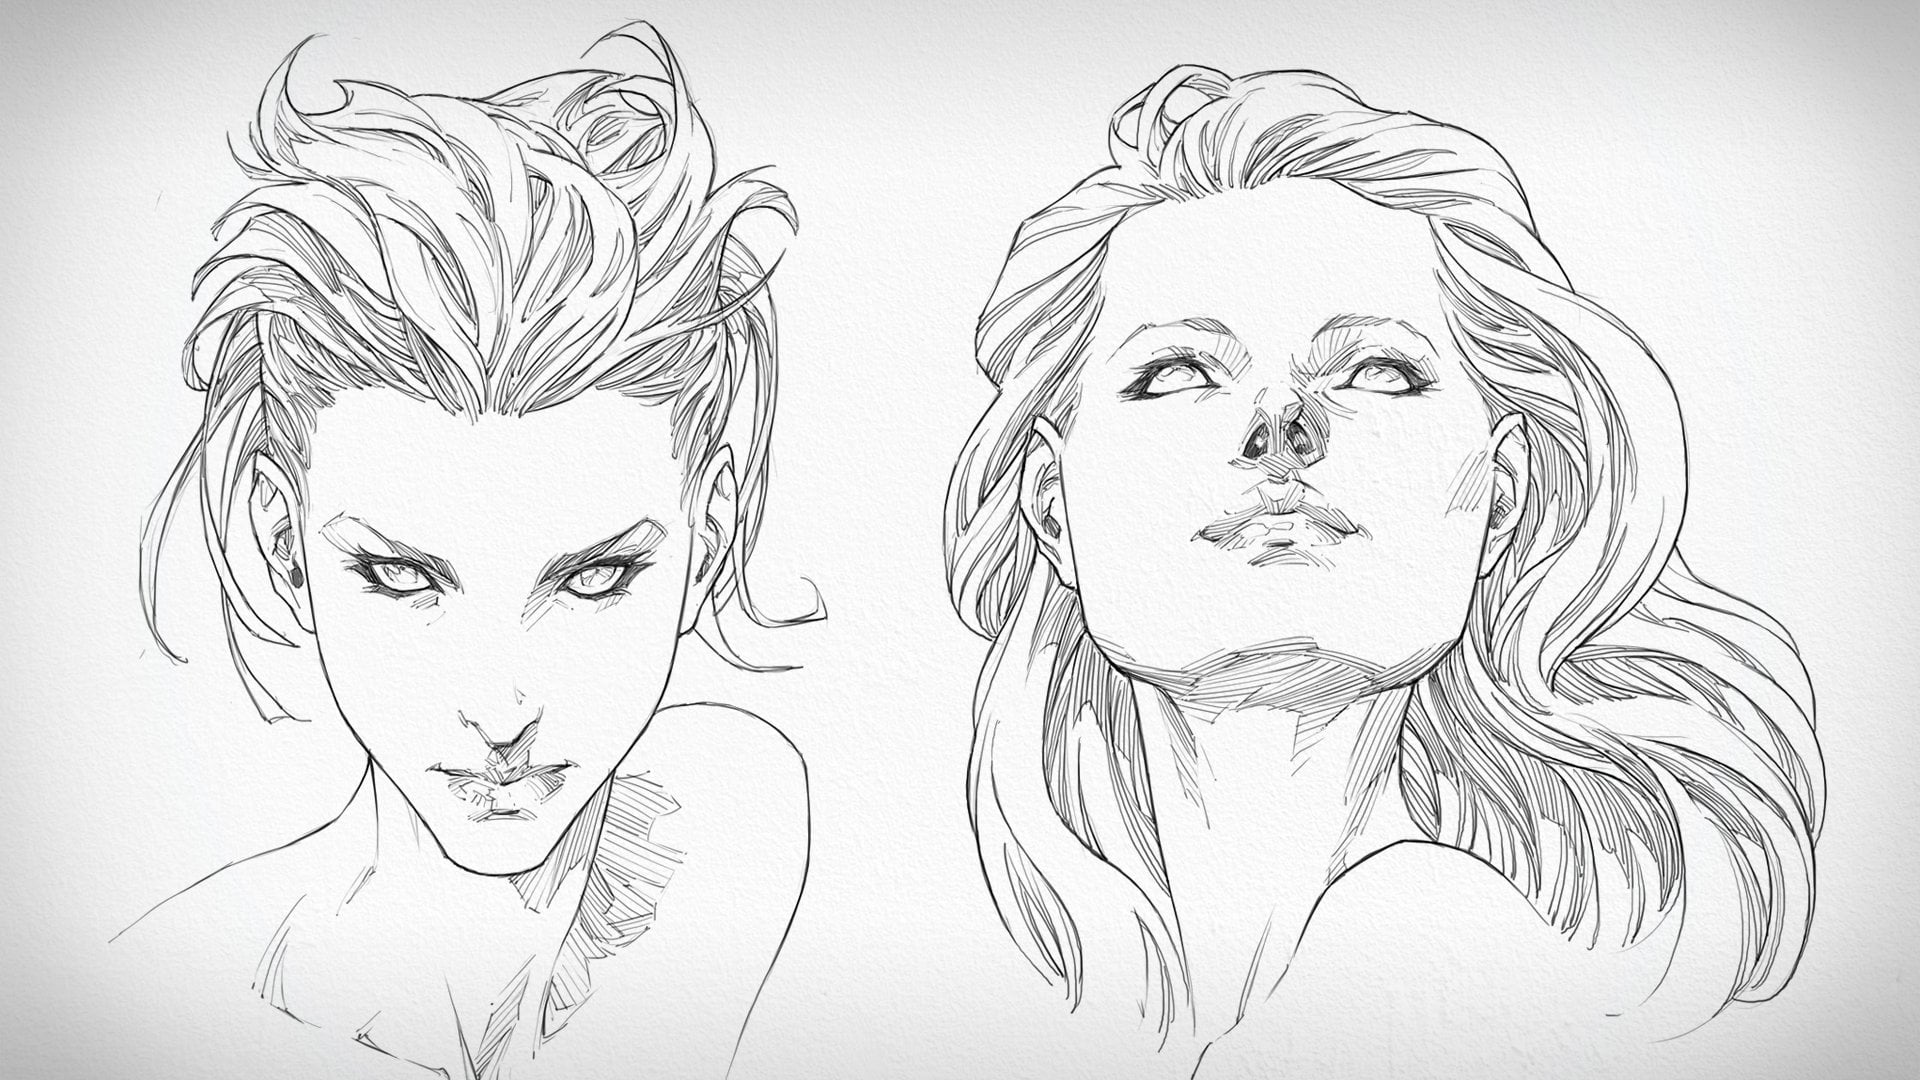
2. Downward Three Quarter View of The Female Head: a case, so we're going to start out with a sphere for the cranium. It's going to allow us to figure out how big the head is going to be and where it's going to be placed on the page from There will draw a line straight down the middle of the face all the way down to the chin and will place in the jaw line, then put out where the facial features are going to see it now because we are looking at the female head from the top down, 3/4 view here. What we going to see is a slight for shorting of where those facial features are placed now over to the right here. We're drawing the female head in the opposite direction now. So now we're looking at the bottom up, 3/4 view, and as you can see, we took very much the same approach. We started out with this fear be placed in the middle of the face, then the jawline, and you'll notice that the jaw line between these two very different points of view has significantly changed in terms of its shape. That's an important thing to keep in mind. because as you look at the head and you begin to turn it in these different views of perspective, what you'll find is that not only does the shape of the George Change but also the shape of the head itself begins to distort. It's no jumping under the facial features here, and we've got the eyes placed in on the top down, 3/4 view of the female head who've got the nose. And then we've got the lips, and what you'll notice is that we are now looking at the mouth of this character, and we can see less of the top lip and a little bit more of the bottom lip. You'll also notice that we cannot see whatsoever the bottom plane of the nose because of the angle that we're looking at the head on here, the geometry, all the knows. Its structure is literally obscuring our view off that bottom plain, and you'll also notice that the eyes have changed shape, too. That combined. What I'm trying to tell you here is that when you begin to turn the head in space, every single aspect of it the shape of the head, the facial features and the shape of those facial features where they're positioned will be distorted and foreshortened within that perspective. So there's a lot of things that change and often times what will make you most effective at being able to draw the head in all these different dynamic angles. And there are many of them is not just understanding what the facial features and the shape of the head looks like in these angles individually, but also understanding that three D geometry, understanding the forms that you're dealing with and sometimes we're going to be talking about forms here on a very subtle level. You know, if you think about the three dimensional forms of the eye, for example, on healthy, I fits onto the face underneath the read to the brow and then the noise and how, as we look at it within this particular viewpoint, we can see how it the tip of the noise low is down toward the top lip lower than it would otherwise be sitting. If we were looking at the head straight on, and certainly lower than if we were looking at the head in the other view that we've done up here, where we're seeing it from the bottom up perspective. And then, of course, all of the facial features combined are going to be lowered as the head tilts down would and we start to see those facial features, and the distance between them grows smaller and smaller and smaller toward the bottom of the head. But then, in opposition to that, what will end up seeing is them spreading apart as we look as we get closer to the top of the head. So again that four shortening is going toe occur, and sometimes there's not an exact method. There's not going to be an exact measurement system that you can use in order to really nail that. Oftentimes you'll just have to use your eyes in order to make thes judgments, You'll have to ask yourself whether or not that looks right to you and the way in which you'll begin to become more more familiar with it so that you don't have to think about it so much is just through repetition. And every time you draw, for example, the eyebrows too close to the eyes in this particular perspective, because they have shifted significantly here again in the top down view off the female had the eyebrows are going toe lower toward the top of the eye itself, and we're going to see less of that underside plane around the brow there. But the distance is, too, what you should be taking that brow down and the distance between the top of the I. There isn't 100% like I know. I'm not sure myself exactly where that should be. So I'm using my own eyes. He had a judge whether or not that looks right to me and it looks OK, but inevitably, I'm going to make mistakes as well, and I've been drawing for a very long time now. But I'm making less mistakes than when I first began, of course, and it's through those mistakes that you're able to catch yourself off God, especially when you find that hey, maybe you didn't execute that particular part of the drawing in the right way. And when you're able to catch yourself like that, then that automatically causes you to pay more attention to those specific areas within your drawing that you could improve upon. There's a very good chance that the next time you draw the female head. In this particular point of view again, you'll be very conscious of the mistakes that you made that last time, and you be conscious of them in a good way in a way that causes you to pay attention to them this time so that there's a significantly less chance over you making that very same mistake. And of course, we've gone ahead here and we've drawn in the hair on top of the head, and we've gone over this in previous lessons. It's very much the exact same approach that we went over for the previous head tutorials. You know, we started out with a very basic, very rough idea as toe what the shape the hair style was going to be. And then we began working over the top of it, splitting the hair up into finer and finer clumps and adding a little bit of texture to it through the rendering. So now I'm going in, and I'm starting to add in the line weights around the face just to make sure that the facial features air standing out and that the overall shape of the jaw line there is also standing out in a nice, vivid way. This is really just for aesthetics. So the structure is done. The placement of the facial features has been worked out, and all in all, the drawing is essentially done. So now what we need to focus on is making sure that we're presenting it in the best way possible. And that comes through the additional details that we're going to start putting in here to really wrap this illustration up. You can see that I'm adding ism, additional rendering around the hair there just to really get that separation occurring within the complex, intricate composition that we've got there for its style. And this could be something which does take practice is, well, all of this takes practice and dedication, and I think that what the most important thing is in order to be effective at practice, he's toe had that dedication that drive to continue working on this stuff each and every day, because the more that you can practice, you know, don't just stop it. One head sketch from the tops. Three top down, three Court of you do five of them do six of them in a single session and really try to improve upon each one as you go through those iterations. So get him adding line waiting around the hair here, and that's going to help me to gain some clarity on the separation and the layering off the hair to give it that extra level of depth and three dimensionality. Those line weights really just placed in with a combination of the amount of pressure that I'm applying to my stylist as I work in the size of the brush that I'm working with and combined those true elements the size of the brush and the amount of pressure that I'm applying it going to help me to capture the kind of line that I'm looking for within the drawing. And if the line needs to be a little bit DACA or a little bit heavier, well, maybe it needs to be lightened up. All of that is going to be controlled. Three. The amount of pressure that I'm applying, the harder I pressed down the dock of that line is going to be It's going toe, let out more density. It's as if you are working. You know, we are working in clips studio here. Otherwise, no one is Minga Studio. I haven't upgraded to the new version just yet, a bit behind the times on that one. But even though we're working digitally, it works in very much the same way as a traditional pencil would. So the How do you press down with a traditional pencil? The harder your line is going to be, the darker it will be allowed to. You press the lighter it's going to be. It's actually quite simple to get your head around Loch early, because there's a lot of complicated aspects to drawing that we have to keep in mind other than that. But again, I found that a certain level off artistic intuition kicks in after some time. After some repetition, you begin to figure out what level of pressure need to apply to your stylist. In order to get the line that you're looking for, you begin to recognize that what the aesthetics are within your line work that you want to consistently capture from drawing to drawing. And here's something interesting. I noticed that the draw line off this particular female head wasn't quiet looking correct. You know that she needed to come out just a little bit further there, and I found that the side of the face, the far side of the face a just looked a little bit flat. It didn't have enough shape to it, and pulling the chin out a little further really does add that additional interest to the shape that was previously missing. So now we've got that nice contour running along the side of the cheek there, then around the mouth and you can see there's that nice curve there. And then that line transitions into the Chena. It gives it this extra level of three dimensionality were ableto get a better idea of what the structure of this face and tails were, describing it more accurately as well. And if it wasn't for my ability to spot this mistake out just through my own, I gained that artistic intuition just looking at the drawing, analyzing it a healthy amount. You know you don't want to over analyze your work because that's just going to make you feel insecure. It's going to make you feel too nervous to experiment to really put yourself out there as an artist, but you do still wanna have a certain I guess I would say, Rather than judging your work, you more monitoring it to ensure that it's coming together in the way that you want it to come together. And by doing that and by becoming better and better doing that again, that's a skill in and of itself. All these different components that make you into a great artist require practice, and sometimes it's to do with the drawing directly. Sometimes it's all to do with your mindset.
3. Upward Three Quarter View of The Female Head: So now we're jumping over to the second head example here, where we're looking at the female head from the bottom up, and I'm placing in the eyes to begin with. You know that I love to begin with the eyes of said it in the previous lessons within this head, Siri's. The reason that I love to start with the eyes first is because they're the windows into the soul of the character, feel like it really gives a life to them and helps me, even as the oddest, to relate with them and get some idea as to who this character is going to be. Before I even finished drawing out their face. Now what you'll notice is in comparison to the previous head that we've done up, and this is where we really are going to begin learning a few things. A few distinctions between the two different views here that we're looking at. You'll notice that the brow now sits much higher above the I Bowl, and we can see a greater amount of that underside plane that underside brow ridge. And that's important to take note of, because again, the dimensions of the head, its structure is going to morph and change and shift. As we begin to view the head in a variety of different perspectives. Advantage point is truly going to shape and almost a literal sense. Our depiction of how this head is going toe look, you noticed that were also able to see the underside plane of the noise. There we can see the nostril opening and that structure off the tip of the noise as it comes in up and under the front of the nostril there and then travels down into the top lip you notice is a smaller amount of space between the top lip and the bottom of the noise. There is well now, which is very interesting. We can also see more of the top lip and a little bit less of the bottom lip that now, again, this is very important to keep in mind because now we're looking at these facial features. Not only do they look different and relation to one another, and the positioning has changed, but you'll notice that in comparison to the previous example that we drew out, this shape is also significantly different. And this is just something that happens, you know, we're thinking about the forms of the facial features themselves here and how they're going to be distorted by the different perspectives and viewpoints that we're observing the head on. So these transitions, these three dimensional transitions that we're talking about and this is really a three dimensional look at the female head here, So that's what we're trying to represent. Understanding it in that same context is naturally going to help us be able to depict it more accurately. So now we're working on the hair here, and just as before, we're starting out with a very simple basic line, drawing just a captured style. And we've lightly drawn in roughly how the hair is going to be positioned, the direction in which it's going to flow in. And with that information, we have enough there to begin articulating it to a finer degree of detail to a more refined a level of articulation, and we will go over in just a second. But for now, I'm really trying to refined the jaw line here, and, as I said, the jawline is going to significantly change in terms of its shape as we begin to look at the head from the top down or bottom up perspective, and we're going to see the underside plane of it, just like we can see the underside plane of the noise. So we have to someone be able to understand how the bottom of the neck connects to the base of the Jewell connects to that underside plane off the face then so I like to think of the face is very much like a mosque that kind of sits on the front of that initial sphere that we began with for the cranium and then kind of connects onto the neck as well, because there is some thickness to the face and we can see that thickness in the way in which I've darkened the corners of the joy. You know, there's a slight ridge that defines the jaw line there that have given a denser amount of rendering just to get it to stand out a little bit more. And could you capture it shape to draw attention to its shape? Now, this particular shape for the July and can be very hard to capture in an accurate menace. So sometimes you gotta just experiment until you strike upon the correct shape that you're looking for, and you'll notice if you go back through this video that I did erase it just a few times there in order to get what I was looking for. So jumping back into the hair here and as I said previously, and with that basic sketch down, it's very easy to just start working in the details and the additional complexities that the hair entails, such as the texture of the hair and the layering of it that the depth that's going to come with that. And in order to capture that depth, I'm always incorporating, rendering and strategically placing it in a way that not only captures that texture but also helps to shade the larger forms that the overall hair style consists off Snam adding in those line weights. And this is the same process that I go through for every drawing that I create. I start out very lightly. I get those foundations in place in the facial features, make sure they're positioned right. The reason that I start out light is because I want to make sure that everything is just in the right spot in the place that it needs to be. And before I solidify it with these line weights, because if I place in the line weights right off the bat and I really start to refine the drawing and something needs to be changed in these latest stage is going to find that I'm erasing and adjusting a lot of detailed work that took me a significant amount of time to incorporate that I could have just refined later on with a more accurate representation of the head that I wanted to go for by first fixing those mistakes in the initial draft and then going over the top of it and really bringing it through to a finish. As you can see I'm doing here and in placing in that rendering again, really trying to in this particular head example show you how by using more rendering and adding in additional density on additional level of density to those hatches. You can not only shade the hair and describe the forms and the textures within it, but you can also take down the level of value. All the overall tone is ahead and make it look darker, and you can see that this particular characters. Hair does appear to be Dr Maura Brunette Shade than the previous head example that we did up over to the left, where we can see a character who has a significantly lighter hair style so kind of going back into the previous example that we did up. And I'm just adjusting again the shape of her face there because I don't quite think it's it's looking right, and I'll do that. I will tend to do that. I'll kind of take some timeto zoom out a little bit and just observe what I've done to make sure that what I've ended up with has the presentation that I'd like it tohave and here I've noticed just through can't looking at it with a little bit more of a critical eye. I've noticed that the top of her head there have forehead, needs to come out further and again. This is all about capturing the correct shape for the head and all these different perspectives, and sometimes what I'll do in order to help me make sure that I have captured the correct shape. Iso oh flipped the canvas around oh, mirror the canvas in case I will be looking at the image in the complete opposite direction and mega studio, a k A. Clip. Studio paint has a very useful tool for being able to do that on the fly there, which you confined over to the right hand side of the screen there, just underneath the Navigator window in that bottom row buttons. And by doing that, I'm able to get a fresh perspective off the drawing, and I'm able to spot those mistakes had more easily so that just about wraps up this lesson . I hope that you've enjoyed it and that you've got a ton of value out of these two female head examples. They are very tricky to draw up, and they're going to require a lot of practice. So what I would encourage you to do is to go back through this video again, maybe a couple more times, just so that you can become familiar with the overall structure of the head. So there's that foundational structure that we initially started out with, and then how to divide it up and for shorten the positioning all the facial features in order to get their placement correct in the first place. before we even draw them in and then notice how the shape of the head itself and the facial features within it change and shift. Because that's key to being able to present the head on this particular these particular points of perspective in an accurate way that looks convincing to your audience. I hope you enjoyed this class. Thanks so much for watching, and I'll see you in the next lesson.
4. Outroduction: thanks so much for watching this skill share class. I hope that you learned a lot. I know that for me. When I first started out drawing the female head on these trickier angles, it was very difficult for me to understand exactly how to take the female head and the default proportions that it otherwise have learned in the standard front, side and back views and then foreshortened them in perspective. So again, I heard that you learned a lot in that this class really helped you out in doing that to make sure that you're able to implement what you've learned here, Stay tuned for the next video because I'm going to give you an assignment that's going to help you put everything you've learned here into action.
5. Assignment: your assignment for this class is to draw up a top down and bottom up, 3/4 perspective off the female head using the same methods that I showed you throughout this class. So we're going to start out with a very basic foundational structure where we're going to begin with the sphere to establish the cranium and also the size and the angle at which the head is going to be presented at. From there, we're going to draw out the face all the way down to the chin of the length of the face in thes different angles. Keep in mind will be very different. We're going to see a much shorter perspective all the face when we're looking at it from the bottom up view and we're going to see an elongate, an extended version off the face when we're observing it from the top down perspective and then we're going to place in the facial features now, like the front of the face itself, are also going to see some four shortening in the areas in which their position the proportions of the head overall, if you will will also see their shape begin to moth the shape of the facial features, but also the shape of the head itself, specifically, when it comes to the shape of the jaw line. Now again, I would highly recommend that you go back through these lessons and observe very carefully exactly how the Jolan, the shape of the head and the shape of the facial features individually are going to change within the specific viewpoints. Look at the differences in the distinctions between the two that's really going to help you out. It's going to help you to pay attention to exactly how each one of the attributes on the female had should be drawn within these two very different dynamic points over a year. Do this a few times. Draw out each one of these views a number of times Draught once tried twice than three, I'd say and highly recommend that you draw it out up to five or six times and try to do it all in one session so that you can look at and observe the areas in which you may have messed up or made mistakes so that you can fix them and slowly improve with each iteration . Within these practice sessions, that you're drawing off the female head in thes points over the U. And then what I'd highly suggest you do is that you repeat this same practice session for at least a week. And what you'll find is that three that repetition each and every head that you draw in these points of view will significantly improve. And you will see that improvement. As long as you're paying attention to the areas of improvement that you can make along the way post your projects and your progress in this class bowler. Good luck. And until next time, keep on practicing, keep on creating. And I'll see you in the next skill share class. Thanks for watching.
 Clayton Barton, Harness the Power of Dynamic Drawing