Transcripts
1. Introduction: Hello and welcome to ECE
drawing cartoony Robots. My name is Christa,
and together we'll see how easy it is to learn. We will start with the basics. A simple robot. Draw some cute dots. See how you can take
inspiration from your favorite robot and
add to your own design. Then draw three
different battles. Going through hints and tricks to roll your drawing skills. We will create robots with jobs and imagine their
backstories to expand the world they live in and see what can be changed to make
a more interesting picture. I see myself as a storyteller. I think any medium can be
used to tell the tale, can be a boot again, or an animated story. I worked on
multivariate projects. Having fun and just playing around to be a great way to free yourself and create something
marvelous and person. This is the beginning of a
great journey into your spine.
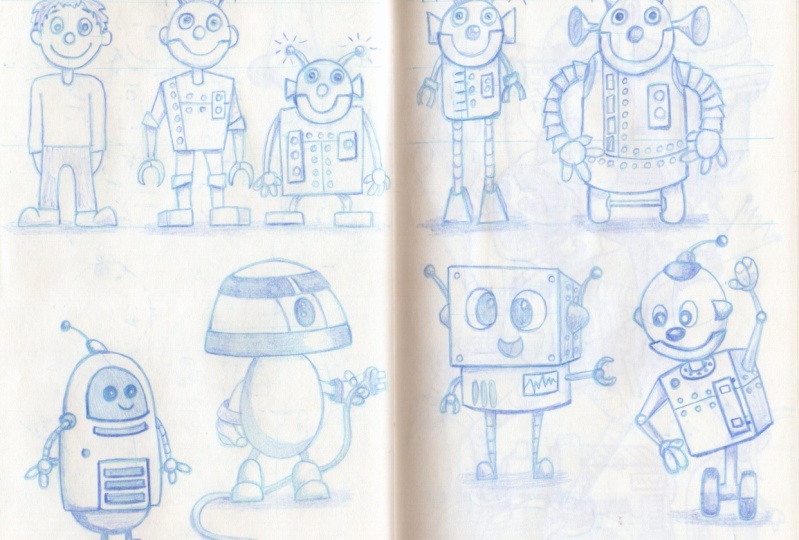
2. Your First Robot: So before we start, I'm just going to tell
you that I will do the first sketches with a blue pen to make available
in a rough sketch. And after that, I'm going to use a black pencil to show a more cleaner
line and some details. If you don't have this, they don't want to use it. You can use a pen or
a marker or crayon. It doesn't matter as long as you are sketching and
drawing and having fun. Also, we are going to do
a little bit of a warm-up by doing small doodles, maybe some circles and
some lines like that. Then you can draw a circle,
square and triangle. So this is to
loosen up your hand and to fire up your
nervous system so you're ready to go
and start drawing. If you have some
other pattern you want to draw, yes, go ahead. It doesn't matter as long
as you loosen up your hand. So we're going to
start by drawing a simple cartoon human. Starting with the head, circle, little neck, body. A pair of shoes. Of course, arm somehow. Instead of him by
the side like this. It's throwing up
some guidelines. They're easier to
place the nose, the big eyes, pupils. Still a big smile, two ears. Don't worry about wobbly lines. This is just a sketch. Sideburns, little bit of a messy hair. When I talk about robots. And it is a course that will
include Android's droids, etc, all kinds
different sci-fi terms. The phone London showing
little bit shape of the hand, trousers, shoes. Yeah, quite rough like that. Let's say that we
are going to make this guy who is standing
here into a robot version, can draw some guidelines from top of the herd
and from his feet. We can also do about
from his shoe, one from his waist. We would do the same. Roberts also going to have a
little bit of a neck. Here. We'll have torso. Now of course they
should have some legs. I'm drawing these characters
quite straight ahead. You should have some sheet. Let's do these feet tall so that they are a
little bit angled like that. Of course you can do
something that is join. It's nice to say that it's very
good that you start to add voice to this character. Because it will help you take this character to new places that you've
never thought about. I quite often do
this when I start drawing sketches
for my, my books. Eventually does
this character is going to start to
talk back to me. This is way too easy. This is a very easy way to get the very nice
flow into a story. And I highly recommend
you to start communicating with
your characters because they are
probably going to save our interesting
things to you. So with the robot here, I'm
going to draw that the jaw is separated from the
rest of the head. Like this. It's still
a big smile. Though. It also will have
ears like this. And I love wonder if it should
have some kind of antenna. We can make just maybe too
small. I'm telling us hero. Almost like an insect. We can also add that there might be some, maybe some light. There's communication
going on up here. Of course, the robot
should have arms to do the same with
the joint here. There's angular
piece to his arms. His arms just a
little bit longer than his human counterpart. And dog instead of hands, maybe he has some kind of close to circular
shapes like that. So as you see, the robot
is quite, humanoids. Does kind of the same
proportion as the guy, but it looks
completely different. Because of all these small
mechanized part, parts. Here. Maybe we should
have some buttons, lunge, draw robots, else
play around with very simple things that
you can add to it. Some small gadgets, some
buttons, maybe some labs. Whatever you can imagine that the robot has
attached to it. And done, I think I will make a little line going up here. And then another line
here. Line up here. These are sort of the
methyl sex cells that are forming the torso
alone that we can add. Small bolts or rivets. Show him where the robot is
fused together. There we go. The basis for your first robots. Let's clean these characters up. I started with the human. I'm just going to go euros
quite rough and wobbly lines. Have a given your
character's name. Please do. I think these two characters
are Rufus robots. I'm not sure yet
who has which name, but it will come
clear quite soon. Let's just make it very simple. Shade to the hair. Loss is gonna do this. This shape before they are. It looks like this
little bit bigger. To form a very
simple explanation of how the error is looking. It is looking in
a cartoonish way. Print out the sweater, the farm, and you can draw
S2, little nail there. His finger, number, trousers, shoes. And as you'll see, I'm not drawing something that is
hundred percent perfect. That's quite important when you start drawing is not trying to find a perfect line or
anything else. Play around. Console. All of those things
will come later. This is just about
you loosen it up and letting your mind and
your hand work together. It's going to make a little bit stronger lined under the null so it pops
out a little bit. Strings from the eyes. Slightly. Probably add some eyebrows too. You should add some
strings underneath his feet that will connect
him to the ground. And you can also add a
little bit of a shade. Something very simple like this. You can always go forth
and back on your drawing. If you need to strengthen
certain lines. There you have the human
that's called him Rufus. And that means that
this guy is Robert. His mechanized version. Both Burson power,
friendly and smiling. I'm probably both of
them are very happy to help neighbors with
different kinds of shores. As you see when I
draw the pupils, I'm leaving a little
bit of light in them. This is a way to give the character a little
bit more of a life. I can show you that what
happens if I fill this in, we get more of a stair
and a little bit more of a almost like that ice could
be fitting to this robot. If you prefer to have it
that way. Small beam. It's also going to have a neck. We can also add a little
bit of detail here, like a ring with Nick is
attached to the torso. His clients for the torso. When you draw, please add some music to wherever
you are sitting. It actually helps your
creative process. Just imagine that you
might be listening to cut off the verdict. If you know this group. We are the robots. Or maybe you're
actually listening to classical music like Beethoven or maybe some
music or whatever it is. Because the music will that
affect your creative process? Always tried to listen to different kinds of music
when I'm creating things. It helps me a lot. It could be very upbeat
music, very fast. That's actually
speeds up my, my pen. There we have the legs. Don't worry. If the
lines are getting a little bit crooked.
It's justifying. The feed is clunky feet and us with this character,
Let's go ahead. And so strength underneath. And you see it attaches
itself to the surface. We can make some shade there to be adding my little
wobbly lines. And as you see when I
connect these shadows, it feels really that
are standing in the same same area, same space. There we have them,
Rufus and Robert. Good work and see you
in the next lesson.
3. Two Alternative Versions: So let's go ahead and make some variations of
the first robot. We can make the first
one quite short. I'll still going to
use the same bits and pieces of the first row. So it will have basically
the same head hair with the happier the two eyes like that. But we are going to
make him quite stocky. So his main body, we'll be almost like
a square like this. And he will have some small
arms sticking out like this. Let's do that. Instead
of having clause, he will actually have tiny, tiny heads with small fingers like that. Then we can make the
arms multi-joint it almost like a sort of
a cable that can bend. Making markets like this. Then we can have
a very flat feet underneath them like this. Somebody tiny legs. This is so great when you're
making robot designs, is that they can really pick and choose and mix everything
up quite a lot. And it still doesn't look
awkward in other way. Because if people do
this with a human, it will change the way you
look on it quite a lot. This is like now this doesn't
look sort of realistic. Robert You never
know because Robert, you can mix and match
as much as you want to. And they also play a
role. Because that's a very important aspect
to your creative process, is that you really
feel you're having fun and you're free and loose because if there's
too much to bulbs, then you put too much
of different rules the top of your process, it actually gets too heavy. Us to remember that what
you're doing right now. It's actually both building your skills and having a
really good time doing it. Strengthen dislikes
just a little bit. Inside here. We can still
use this little elements. We can put it on this side. Maybe add another button or indicator or whatever
it is like that. Then we can maybe have
something a little bit bigger. Maybe sexually, some kind
of something for a slot, for a key or something. Don't always have to explain a circular wireless when
you are drawing it. It can come later on. You have been talking
to your character. What's going on here? I think that's enough.
Actually. Little rivet points. Then it can start to think
about what name is Robert us? Maybe it's just Robert to who knows the same, but some kind of
voice in your head. Imagine what the difference of voices between the
two, these two robots. Maybe they should have the
same voice. Who knows? Done the simple Thomas the beams. When I was a kid,
this was one of my favorite things to do, people throwing
robots and then I drew a lot of racing cars. That can, you'll spend hours in my room making up all
kinds of strange designs. Sometimes the robots were
racing, racing cars. There was always a very
tight, tight battle. That's actually a thing
that when you grow up, you kind of lose
this seriousness or playfulness a little bit. I don't know what age you are
when you're watching this, but if you're still
a good deal of, you will have no problem
finding new things. When it comes to the
characters they sold and what kind of profession
they have or whatever it is. But maybe when you were
a little bit older, can feel a little bit unusual. As soon as you start to
practice these things, everything will
come back. For me. I always have a great time being so-called slightly
shield, immature or whatever. People can tell
you that you are. What does the else the way I am? I love playing around
and making gags. Thinking of workplace. So I think it's all strings over here to connect the
character to the ground. Just a little bit of shade to
like with other characters. Connecting them very
slightly so they are standing next to each other. Not forgetting the eyes. There you can see I left a
little bit of this lighting is ice and they do
look quite different. There's no right or wrong. It's just tried to
find a way that is fitting mostly to the
character you're working on. And that's why it's important when you practice is that you try different things and
don't worry about outcome. Everything is going to
be great eventually, as long as you're
practicing and having fun, let us do some shade
to underneath here. That was strengthening
this slide. You'll see that done
the legs goes in behind the torso. I
will do the same. I2. Just a slight shadow. Strengthening dislike. The receiver gets some
more depth to character. And then we will do another
variation of Robert. Maybe he's actually
the same height. This other characters
approximately. Draw him up here. Starting some
guidelines that are, it's more easy for you to find. The placement of
the face details. Easier to place the eyes. So they are more the same
distance from the middle. Here's just one. We will note down
those beaming lights. You'll still see the difference. Works better or not. And with this character, I think he's torso
will be quite compact. Bone. They're looking like this. And then he will
have very long legs and feet that are almost
like, almost like triangles. You see, I don't want
them really to touch. So don't want a nice touch. What I'm going to do is just subtract the line
just a little bit. So there's some room between the feet or wherever you
can call this robot parts. Never feel to be a
stranger with your eraser. It's a good friend
for your process, which you feel
something that's feel that something is changing,
please go ahead and do. Because every time you take out your drawing pad on your pen, it's supposed to be very
playful and a lot of fun. With the legs. I will do the same
line as this here. It will be joined
parts like that. Yes. Bend the legs. And then he will have
very small arms. Let's make some kind
of risks there. And then we'll go back to this, the sign that he has. Cloth like that. Yeah. Some more things to the lines. Then we can continue to add
detail to this character to believe should have those plead parts. Of course, the small rivets. And we will add more
detail with that. The black pencil will probably call this character
Robert three of them. Since we decided that
this is the second part. And maybe Rufus actually
created all of these robots. Maybe as we'll see, school assignments to create
something technical back home. Or maybe he's this
guy who really wants the world to be a better
place, a cleaner place. So we invented these robots for cleaning up the local park. Who knows? I'm sure that you have an even better story
forming in your head right now. I'm just adding a little bit more strength fundamentals here. Little bit more here too. You see the nose is
popping out a little bit. More. Contrast and strings
you give to a certain area. The more our eyes are
drawn to that place, it gives more focus. And it's quite often that you
want the focus to go up to the face in the character. So the alternative parts, a little photons. Terrific, terrific. I would do the shading here to slightly more
strength of the knee. Fear. Can also add a
little bit to strengthen the knees his whole life. But when you have I'm methyl
parse that looked like that, you can always add just
a little bit of shade. One side and a little
bit of a line here. Give it some more volume. The same here. We can actually really awesome the
other part like this, showing that there is some
kind of reflection going on. A little bit of shade on this side too.
Just a little bit. Of course. Lastly, the
shadow on the ground. There we go. The first robot
with the two variations. Good work, and see you
in the next lesson.
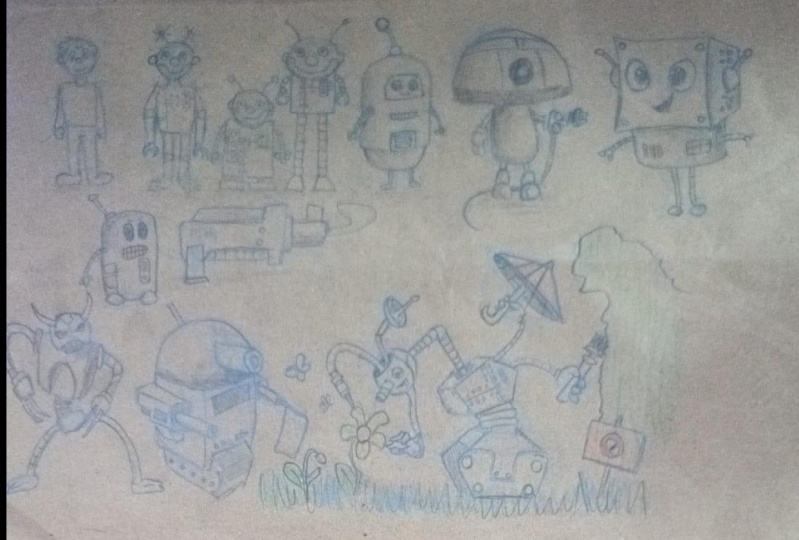
4. Thumb Bot: I thought we will draw
three cute robots. And we will start
doing a phone box. Something looking like. We can start by drawing a rectangle shape,
something like this. On top of that, we
can add round shape. They're really not the
wrong shape up here. So it looks quite symmetrical. Instead of drawing like in the last robot that
we were having a guideline somewhere
around here to show that it's the
frogs front view. We will just move it
just a little bit. This guideline to decide
something like this. Starting into this direction. And then we will add
sort of a window up here, a little display. When you draw something cute. Remember that it's good to
have a big round shapes. Using this guideline, we
will draw a couple of eyes, big ground-based like that. Then we can leave little
light in the eyes like this. Just draw these lines a
little bit more distinct. So now I know what I'm doing. I'm from this outer shape. Let's make that a
little bit clearer too. As you see, I'm not using this guideline I had
here for the rectangle, but I will use it
down here instead. I'm going to do a
little bottom shape. And then be sure to have
arms for this little fellow and we should place them
somewhere around the hair. Maybe. I'm of course the other one will
be on the backside somewhere around here. The start of the arm. Draw this out. Just a little, little bit of a
sticking out like that. Of course, his hands
shouldn't be very big. They are quite small. And he only has three fingers. This arm is coming out here. Then we have another Have
there been both three fingers? Yes. He or she should
have some legs too. This should probably
be quite small to looking a bit like the arms. Something like that. With
very, very tiny feed. Yeah, that looks
good. This robot should maybe have a
little bit of an antenna. Let's make a little base
for the antenna there and then apply your popping out
with a little receiver. That looks good. Can we just start to have a
little bit of shade here? I thought this thumb
should have a few. It would be quite a few
details on this bottom, so we should keep
it quite clean. Maybe there's a
little hole here. And I'm going to loud, maybe a little button
or a hole here. There may be a small
detail here on the front. Maybe something
that is similar to this shape but a bit smaller. Maybe there's some kind of
ventilation here in the front. Can get quite overheated
when it's doing its shores. Yeah, I think this
looks really good. Can I just add a little
bit shader on the slides? Yes, that's a good start. Let's continue with
the black pencil and write those details. So the big eyes with
that little light, giving the robot
some extra life. The little mouth can start to imagine this
little fellow is sounding. Maybe his voice is quite booming actually,
you don't know. Maybe that's a big surprise. And then we can go
and do a little hand the attachment for the arm, outline for the body. So what kind of function do
we think this thumb but has? Maybe he's a city planner or maybe he's helping out
sorting your mail. Maybe it just walking around and being cute and
holding up the morale. In some far off place. The little legs. We will add some strength underneath the feet to connect
him to the ground. Of course, we should do some
a little bit of shade here. Doesn't have to be a
lot, just a little bit. The ventilation part where maybe you have some
other idea what this is. Feel free to fantasize
it really else to add Much better backstory and you will find more details on the next time
you draw this character. Maybe you'll do a
different kind of posts showing what kind of
purpose this machine has. Just going to add
just a little bit of shade to this slide. Also here, a little
shade on the Nissan. Giving it a little
bit of volume. We can go out and make dice
a little bit stronger. The more black here. So the focus goes to the little
display here in his face. There you go, thumb, but it looks very cute. Good work. I'll see you
in the next lesson.
5. Mushroom Head: So the next robot, I want to do a little bit
of a different head shapes. So let's go ahead and do
a half circle like this. Remember, you can have
your lines quite rough, but worried about drawing something that is
perfect the first time. It's not about that,
it's about breakfast. So a half circle like that. It will be almost
like a mushroom. So let's call this
robot mushroom head. We can make it, can do it the same size, almost like the other ones. So they are standing about the same height from the ground. Let's do a quite a fat body
with a circuit like this. Drawing lines up underneath
the mushroom head. This robot will be
more of a frog view. Of course, it should
have some small arms. Maybe the arm is a little bit
bigger in the end and then you have humps like that. And draw one on this side too. And I think this arm and hand is more leaning
against the body. We'll start by doing
a circuit like that. Fill them this bolder lines. Then I'm going to
draw a thumb finger and then we can add just a little hint of
another finger there. Yes. Just like that. See this hand looks much
bigger than other ones. So I will just make
sure that the sound is a little bit bigger. Because as you see,
you can always change whatever you're
drawing at anytime. Let's add fun. First. His fingers. We can do like with
disrobe at all. So that is all I
have three fingers. We'll throw another one. There.
We have the entire hand. And then done it
should have some quite big round legs and feet. So it's almost like like the legs over the protection
of a hockey goalie. So this foot is drawn more from the frog level millstone in this foot just a little
bit to the side. Some small legs going
up to the body. Let's go ahead and draw
some lines. For a shade. I think I will actually
borrow a little bit of the loop from a
quite famous robots. I think you will probably
see who's, who is this? Let's start by doing. A line down here. Imagine that the robot is
looking in this direction. I have some curved
lines like this. Another line up here. Then it will be more mine. There will be some smaller
curb lines there. Another will be a
big round. I hear. You maybe see what kind of
robot I was thinking of. And instead of doing
Yellowstone one light point, and I think we should
do two for this one. It will be a small
one in the center. And on the bigger one
here, just above it. Then of course, should be
the rest should be shaded. This is just to make an example to see that
there are different ways of putting reflections
and sparkle in the eyes. I'm just going to
fill in this slide is just a little bit, this line. Little b, little bit
darker on this area. So as you see, you can borrow different shapes
from characters you love and just place them on
a completely different body. It's great fun and great way
to play around with signs. So I think perhaps start there and let's continue
with the black pencil. Want to do the head first? Fill in these details. Make sure that you slice the focus of the drawing. I don't think I
look up black here. We can add a little
bit of shadow too. But not as much
at the same time. We don't want to steal focus
from the from this area. And don't worry if you go outside alignment,
you're shading. So there you go. There you
have the mushroom head. Finish up the rest of
this little robots. Well, we know the profession of the robot that I'm
doing this shape from, but what kind of profession do you think
this little guy house, maybe traffic controller, maybes to some kind of Navigator on the spaceship. Mounting these dark parts, you have to collect the
little robot to the ground. Nobody else do the little bit of shade to move courses. Those little wobbly lines can do a little bit to show you there underneath the head. A little bit on the side
here too. The loveliest. Draw a little line there. Showing the end of the shade. Can do just a little bit
darker to this you can do to show that the shade is on top of something that is
more of a reflection. To make this head pop
out a little bit. Of course, we should add a little bit of strength
underneath there too. This you'll see now the
head is coming forward. Nielsen a little
bit more strength on the eye or whatever
you can call it. An eye on the robot. Maybe it's a lead sexually. I wonder what this
little guy is holding. I'm wondering if it's actually holding a
little bit of a chord. Control, something that
is coming out like this from behind his legs. A little bit of a
courtier up here, of course it should be. Yeah, it will be a short
directionally that is holding. Maybe this actually
is professional. He's running around
and making sure that all other robots are fully
charged, functional. It's coming out a
little bit more of details to this code. Make it a little bit thicker. And the same with
this little guy. Just imagine what kind of sound is coming
from this little guy. Mushroom head. There you go. One mushroom head. Good work. I'll see you
in the next lesson.
6. Cube-RT: So the last robot here that are included in the
acute sexual or four, we're going to do a different
kind of shape or head. I think of it. We'll
make it quite blocky. So let's go ahead
and do a square. Then it will not be
total from the front. So we will turn down just
a little bit to this side. Of course, the site
will be showing. To get a little bit of
perspective for the head. We will make this line just a little bit
smaller than this one. So this is going to be
a little bit bigger. So let's do a very
simple shape like this. This robot will have very
big eyes, big around. Q ties like this. And, um, it will be a little
bit cross tight, I think. The same with this
one. Let's leave a small twinkling buys. Super big like that. Normally when you leave a little reflection in
the eye in the ice, they should be on the
same side because it means that the light is coming from a certain direction. But now we'll actually
just leave them on the opposite sides. And you will see that
the rubber balloon, even more wild and cross-side should have just
a little mouth for two. Should be smiling. Happy robot making some small
bolts in the corners. I'm here on the side. It should have. Maybe
there's some sort of a year. There's something wrong and speaking out from
the side like that. It may be from this place. It, it actually has turned us draw a little on
Tumblr like that. We'll strengthen their
lives a little bit. There could be middle line here. And then we can
have smaller bolts are smaller, rebuts their side. Bit of a rough lines and just imagine that you have
guidelines over to this side. But maybe you will see these other sort of here
sticking out just a little bit from that one you
can have the other two goes a little bit too messy. You'll see, don't worry about that you're making mistakes. It just means that
you are learning strengthened and
isolated bit too. There you go. For
this little guy, I think the body's going
to be quite round. Stocky. Sales to imagine that the object is down
here is like a cylinder. This we are going
to place some arms. I think the arms will be looked. Very stiff. That's going out
from the body like this. Yes. Also very tiny hands and maybe has some tiny, tiny claws. Not very scary. Then we can make join select that
as the same here. If you have a
guideline to decide, dorms starts a little
bit behind the body. This one is going down
a little bit like this. This is the same with
this little round head and those little cloth. Those small joints. Of course, we should
have some kind of legs. Maybe we should
continue to have them almost on the same
cranial level. That means that is feature
be somewhere around here. Means his legs are quiet. Quite long compared to his arms. Feels fine. Well, he's
featured also be very small. So let's go ahead and just
do very, very tiny feet. With this one also, I'm
having this more of a frontal view and this one is turned your slide deck a little bit to the side. Just to give a little
bit of variation. You can of course, turn the feet complete
on the sidewall. So if you want to
or if you want, both of them are straight
from the front like that. That's completely up to you. On this little fellow, maybe there should be some
slots on the side here. And you should have a
little bit of a moment are also small lump. And there should be some
kind of graph like that. How long this one we can have the light coming
from this direction, then it means this side
will have a bit of shade. And the same for the body. And also we should
have a little bit of shade underneath his head, also, a little bit of
shade on his legs. So let's go ahead finish
this little guy up. What kind of name do you
think he will have or she? I think the name I have
in the head is of course, sort of a broad pulse. So maybe the name is Cuba. And it's spelled like this. Q bar t, Gilbert. I'm sure that you have I have a different
name in your head. So please go ahead and
name your character. Start to imagine some good
backstory for him or her. For maybe it's
something maybe it's just a machine. So there you go. Dark, big eyes. The mouth. Cheat a little bit too, also, a little bit
weaker shade on the ice. Let's go and do the outline
for this guy, the silhouette and the professional
for this guy. What do you think? Maybe it's actually a
professional dancer traveling the galaxy giving his
performance to big crowds. Or maybe he's just handling
the popcorn in your house. The popcorn
supervisor. Who knows. Let's finish up. Arms. The little details on his body. We can also say this
just a little bit. Just make sure that you
don't see it too much focus from the face and the ice. This little wobbly. Why? Long legs? Maybe you have legs that can
be extended real really far. Because the house is working. They have the popcorn
on the top shelf. Since this guy is
quite small, yes, to stretch those little legs. Remember to add some
weight underneath the character to connect
him to the ground. Also do a bit of a shade that you'll see like maybe start a
little bit too strong, so don't be shy. And redo the shade. And this time I will be a
little bit lighter on the hand. That's called out those
little wobbly lines that are my favorites. Little bit more strength for the shade just
underneath the robots, giving it more focus.
Where he's standing. Some shade underneath the body. Strengths wind up this line two. You see that immediate
There are some depth to it. And then we do the same here. Shade for the body. Going back also and
remembering that outline. And then I will add some
extra weight on the list, the head hair hopes. And as you see, don't worry if the lines are
getting BOB layer or you think something
is I'll do place, you can always redo it later. This is just about practicing yoga draw this line is stronger. You see that the heart
is pumping out too low. You have sort of three section, the head, the body,
and the legs. And there are different players. Go ahead and do the
shade err on the side. There you go. Q but Rabat,
the popcorn master. Great work, and see you
in the next lesson.
7. The Shredder: So next, I thought we should
draw battle, draw it. Just to show you that
you can do something more dynamic with your drawings. Imagine that you will have had a torso waste part. Now everything is quite lined
up like this, quite static. So instead what we
will do is that we will tilt the
parts a little bit. Starting with the head, tilting it this way. Drawing this half circle
shape, guidelines like this. And done the torso we will
tilt and other direction. So it'd be a little
more this angle. And, and waste parked. We will have like this. Now all of a sudden
you have almost like a snake shape here. This is much more dynamic
compared to that. Something's marry straights. Both are correct, but
it gives you a drawing. Different kinds of energy. So let's go ahead and Let's go ahead and define
your Robert parts. I thought the head should
have maybe some teeth. So let's add a
little bit of mine. Their teeth can
come out a little bit, something like that. And maybe a little bit of
a bottom. You're aware. We can make this
robot quite angry. So let's go ahead and
draw some angry eyes. We can also add a little
bit of a detail here, almost like an arrow going down, strengthened or
lines for the torso. So almost like
shoulder pads here. The waste. There, you have your base for your
first battle, draw it. Of course it should have
some kind of weaponry. So let's go ahead
and start to draw. So arms could be
those multi jointed. Well, did you want
digital forms? Very flexible? Let me talk. A little bit of the wrist. Here we can have a saw blade. Let's make it a little
bit oval-shaped. Since it's pointing to the
little bits out towards you. Since it's a sole blade, we should add some
teeth to them to it. Make these quite rough. Because we can add some
rotational lines there too. So it shows that it's spinning. Yes. It looks good. And if you don't want to add the web bills
to these droids, of course, you can do something
completely different. You can maybe have a water
hose or something like that. Maybe it's watering the plants. Please feel free to change
up your your droid. Of course it should
have another arm and let's go ahead and make it make darn more
dynamic in this way. Don't do steel,
both bars, norms, our belts, but they're not
dumped in the same way. So it's a good way to make sure that your
drawing is not to static. Course. It's more like a
low number on this side we can some big class like this. Yes, it looks good. Then of course we
should add some legs. Since this is sort
of a dramatic pose. Let's make the legs quite
stretched and open like that. We will add some metallic feet, some joints. There can be some claws sticking out of the
feet to like this. Yes. Of course. The winds to the leg to know where it
will have other leg. Quite done. Something like this. Maybe this leg is rotated
the morph towards, you know, of course, how close to the foot down. A little bit of shade. And then of course
we should have a little named for this guy. And this guy is
called the shredder. Yes, that looks bad as with
this little symbol up here, we can do the same maybe
with the torso to that it has sort of an arrow
going up like that. So let's go ahead and fill in the lines and do the details. Starting with a lawyer. If you feel that there's
something missing or something, you should be changed, please go ahead and do that. Don't feel that your first
sketch, lines are final. Can always go forth and back and shame swings that
you adopt. 100%. Happy with joining
us about exploring. Of course, having fun. He's been biggie green. Maybe it's a bit
aggressive today because he has to go to the
dentist Who knows. For a robot, I think it's
not called the ductus is probably should be a
service repairman. Maybe. We can just strengthen
the lines up here. Almost mimicking some
sort of eyebrows to give more weight and
attention to his face. If you want to see really a difference between the pulses, you can of course
draw this robots. But in the way we described
in the beginning, just having him standing
straight up like that. It will be quite
different character with a different intent. Because when we draw
these characters, you should really feel free
to experiment with them, both about how they look, but also how they stand
and what they are up to. Of course, we are going
to add those darker lines underneath the feet to connect the character
to the ground. Giving the robot some weight. Quite rough with
the lights today. And those rough lines
can make the robot more in the actual, almost like there's some kind
of blur to his movements. Let's go ahead and do a little bit of
erasing. Erasing there. Let's go ahead and make a little bit of
speed to displayed. So draw some lines
along this oval shape. They can do a little bit
of this zigzag pattern. We'll strengthen the sort
of the front of the tooth. Nobody should ever
quite some speed to your spinning blade. Of course, we should add some
shading to this one too. We can start by doing
just a little bit of shade on the arms. We can imagine that the light is coming from this direction. So let me shade underneath the body parts to shade
the side of the head. Let's go ahead and spread from the lines on top of the tooth. The tooth line made a bit of shading
underneath the head too. Of course. Some
shade to his torso. I think here we can go ahead
and shade the whole section. Make it a little bit dark. Strings for this line over
here also. So it pops out. Same with the legs, a
little bit of shade. And then some shade all
the Rome of course. You can feel free to experiment with your
shading and see what happens if you draw a
very strong shader, a very soft one. Or maybe you don't
have any shade at all and we'll see what
happens to your drawing. I started a little bit
of strength to the feet. We can do a little
bit of line texture for his blade or his talents. There you go. One battle droid, there's rather good work, and see you in the next lesson.
8. Pew Pew Peter: So the next battle, draw it, I thought would be
a bit more static, almost like a tank. Let's start by drawing a cube. Merging that precede a cube
a little bit from above. It will have these proportions. Well, I could walk like this. Instead of having a cube, it will be a row,
rounded and stuff. So let's go ahead and
draw a little bit of a shadow shape on
top of the cube. Something like that. We should have sort of a track. I think. I started a little
bit of a shape here. The track will come out
from underneath here. Same here. Follow these. Parallel to each other. Will go up the robot
on the backside, but on the front side of the
track will be more visible. Yes. That's a good start. Control some real stare. A few destroyed, should of course have wept. Let's draw up sort of a big
candle. They'll decide. Quite a big lump. Let's go ahead and draw a box on top of this one to the side
of the other cube. And as you'll see, I'm just
experimenting and feeling my way towards the shape
that I feel is interesting. Don't worry about everything
is supposed to be correct after perspective, et cetera. This is a cartoon character
and they don't have to be perfect and not cells. It's more about
finding a fun shape. I wonder if shouldn't
be a very big gum here. Let's go ahead and draw a circle to start to tell him pipe alone. We will have Kelvin pipe going out to here and then draw another circle
showing the front. And as I said in the
previous drawing, if you don't want
to draw, you can draw something
completely different. Yes, go ahead and
let your imagination find what is right for you. So there you have the
main shape for the codon. Can of course, something
more on the knees here. Feel free to go forth
and back until you feel that you want to find
what you're looking for. If you feel that there
are too many lines that are interrupting your
what you're looking for, please go ahead and erase them. We can draw some detail here. No idea what kind
of function it has, but I think it looks good. Now when we have placed
Academy can continue to draw the rest of the
lines more defined. The tracks. The
little, little wheels. I have no idea the size
of this character. So maybe it's
really, really huge. When it comes rolling in, everything is shaking or maybe it's quite tiny and it's just
this little squeaky noise, almost like little rats. Have the belt for the track. Erase dislike to
just a little bit. Some shape for the
front of the candle. Like this. With what should we do? I think it should have just
one big I think in the front. Somewhere around
here. Sticking out. Can actually go quite far. The eye itself almost looking
like you count them two. Here we can add. Here
we can add a pupil. Quite a steric character. We can just add a little, little tiny, sort
of an untold layer. Let's add some details. Maybe it should have some kind of almost like a mouth here. But it's more like
a grid, an opening. Yes, just like that. And then we can maybe add
a few details down here. Not a little opening. There may be some a
few bottles like that. Yes. It looks good. And then
we can add maybe another. Notice that the weapon
here, weaponry. And maybe that is
more like a smaller What if we go a little bit different shape on this side so they
don't look too similar. And just for a gag you maybe
instead of firing a shot, maybe a little sign comes out. A little bit of a flag. Maybe all this one,
it says pew, pew. Maybe it's a very humoristic
robots. Who knows? Maybe this robot is
called pew, pew Peter. Yes, I think this
is a good start. And let's go ahead
and define the lines. Can start with the
front of the cannon. If you want your
cartoon robot to be. Taking, maybe a little
bit more serious, of course you can remove this. Maybe there's some sort of
Miss Lisa loss or instead, so it's totally up to you. Then when it comes to drawing cartoon stuff. Remember that? The more defined
details you draw, the more sort of
realistic they go. They list the less CO2
and any become too. So there's always
a balance there. Trust me, even draw some crack on the side of their notes. I'm sure you there too.
Just a little bit. Most of the QC the
frog slightly. One, of course.
Some contact lines to connect it to the ground. Yes. Do my job. What kind of places this guy
had been stationed? Maybe it's all very far away. Place in the universe. Maybe it's actually a
discovery robot dog. It has weaponry, but
it's just for precocial. Never used it. And that's why it's added these things to
just have a little bit of fun, but it's all patrolling. I do hope this is the
spending for pew pew. It doesn't mean anything else. Well, anyway, I hope you
can get off by my mistakes. Because there's a very good
thing that you don't take. These exercises too serious. It's more about relaxing, having fun, and playing around. Because that is
the way I see it. It's the best way to learn. Good adds a little bit of
strings to the bottom part of this robot's name. Of course, we can
add a little bit of shade underneath it also. Doing so, very, very
rough, wobbly lines. And maybe it has some
little battle scars. Can just add a little bit of
a texture to the side here. Maybe even shaved
the hub slightly. Of course. I'd say
to the whole side. Imagine that the light is
coming from this direction. Should be the answer
part a little bit too. Maybe it has a few scratch some bumps the front side
to know them a little bit. I don't overdo it too much because else's will be
overtaking the picture too much. But it looks quite
worn out as being old. Employment for quite some time. There you go. Po2, Peter. You're sort of semi
humoristic battle tank. Great work and see you
in the next lesson.
9. Slim Sally: For the last Robert,
I thought we will do something a little bit wacky. We will do just a little
bit of a fun shape robots. Almost like a square with
the round top, little feet. Just doing this very roughly. Then we will have
some small eyes and a little crooked. Drawing some teeth shapes, strengthening two lines
just a little bit. We will have a little
arm on this slide. The little hand as doing
a round ball first. Number fingers to draw
these swollen joints two. Then on this side, the arm. And then instead of a hand, we will draw a huge weapon. Let's go ahead and do. Start with a rectangle like this called the
hilt of the weapon. But where do you normally
hold your grip of the weapon? There we go. Grip other weapons. On top of this, we will
draw a bigger shape. Now they're ready to Angular. Almost rectangular. It's a
little bit of a circle there. And then go off this slide like this little NGO. And remember the line here, top of the weapon. George, so too little they can do marking here. The belly of the gum. Then of course, we
will add the barrel to sticking out like this. Can you tell the
top of the barrel? Since it's a futuristic go, we could add maybe a little
display in the back here. Some kind of reading diagram. Maybe maybe they are small
bottles or small lights. So you see the gun is
bigger than the robot. Some kind of pattern here too. What kind of name should
this little guy hub? So maybe this robot
is called slim Sally. Sort of a nickname that
is kind of ironic. Of course are the little bit of different details
to the robot too. A set of lights
here to this slide. A little on Tombow.
Do the base first. Little cute, quite aggressive
robot with a huge garden. I can even show that
the gun has been fired, So we'll start a little bit
of smoke coming out of it. Just a little bit like that. So let's go ahead and
fill in the details. Maybe start to
imagine what kind of backstory the risks
to slim Sally. Maybe it's not the
robots real name. Probably may be
asked to nickname. Who knows. I'm going to show you this because
when you do cartoony things, you can always really play with your fantasy and just make it really crazy
and big things. And it still works because it's a cartoon that's going to add a little bit of strength to conduct a rubber
to the ground. Just do a little
bit of shade here. Go hurdled. Fix the eyes. Make sure there's a lot of strengthened
contrast to the ice. So the focus goes there. A little bit of
shading to the side of the robot. Just a little bit. Of course, like with other
robots, with weapons. If you don't feel like
having a weapon in this one, you can do something else
that is over-exaggerated. So maybe the robot is
holding a huge glob. Maybe it's the baseball game. Doing a little bit of cheating. Small, just a little bit of vapor going out there. We should add some
shade to the go-to. Since we're drawing
it from the side, it's very nice to shade, so give it a little
bit more volume. So I have to figure out the
real name of this robot yet. Make sure that you write a note. So you remember it.
Because it might be fun to draw different
versions of this. One. Can be a huge flame thrower or huge missiles ulcer
or maybe a very, very big Saud. Who knows. Let's try a slight shaver. Strengthening a few lines to
give them a little bit more. You can of course, extend the shades
to go further out. Showing that the goddess also having a shade
since it's so big. Let's be a little bit
gentle on your head and see how much
strength you faltered. But the most important when you draw a shade like this is that if this shade has the same
strength as this one, it means that the character is almost tilting
over like that. Now we see that the shade
is stronger on this side. So this character is
more rooted here. So there you go. Slim Sally. The big gun. Probably a very friendly robot. I can have a bit
of a mood swing, a little bit of a temper. So great work and see
you in the next lesson.
10. Gardener: So next up, we're going to draw a gardener, gardening robots. And I will start by doing a
very simple ground lines, since we're going to draw
out some other object, some details on this picture. So I know where
everything is located. And then I'm going to
just do a very rough, very rough start
doing some circles. I think this robot
will have tracks, like a tank,
something like this. Then it will be sort of a
metal case on top of that. The other thing, that main
body will be tilted a little bit like this. This mid-section can be almost like an accordion
that is flexible. Done, we should have a hat and I think I will place it
somewhere around here. Can do a round head
to start with. Then of course it
should have a neck. Maybe this lecture,
some joint apart, they're attached to main body. As you see, I'm
lifting the pencil go, I'm trying to find
interesting shape. Because not all drawings
have to be preplanned. You might be looking to
draw a certain figure, but on the way you find
something more interesting. So don't be afraid of letting your pencil on your
mind wander free. She wants us to be
Roberta's to be connected to the tracks. We just do something
like this down here. Not too big bolts. The tracks, of course
there should be some wheels like this. Then there could be a few
smaller balls down here. I think this looks good.
It's a good start. Well, let's try to focus on
the face of the gardener. I'm just gonna do
some guidelines. So just imagine if
you have the bowl and you have it tilted a little
bit downwards like this, you can add some eyes. Wonder, I think I
will be almost, almost like a magnifying unit that it can extend
it out like this. And on the other I can be
I think it can be shocked. Like he's squinting
with his eyes. Can do diastole
little bit bigger. So the robot is looking
very intently at something you should do a little mouth. Maybe paresis, tongue
extended like that. What is he looking at? Let's do the pupil here. It's looking at solving. I think it should be a flower
comes out from the ground. Maybe some very special flour. Tomato, quite big. I feel like that. Can add more details later
if you want to. And then we can do some leaves
for the flower as well. That's a good start.
Then of course, we can add maybe a
little hand here, little thumb and fingers. Having a pair of tweezers. I think it's called in English. So maybe he's about to collect one of these
small leaves here. Since it's a robot,
you can touch on that and maybe this arm is actually coming
from out of his head. Like this. Making do that. It's like a jointed yeah. I'm from the top. We can have can do a little opening up
here, a little bit. From there, we can
have another arm. Let's do some kind of
strange device that is going to place a little, little dark droplets
here on the flower. Just a little strange device can do the same sort of
arm as the other one. Is kind of a cable coming out, coming out of his head. And we can also have
maybe a little bit of a satellite dish also
extending from his head. Like that. Yeah,
that looks good. We can also do this kind of bolt bolted
metal plates on this one too, like with the last robots. I think a little bit of
texture to the head. Kinda define this part's
a little bit better. It's almost like little tank. But it doesn't got to
know what those are, anything that's a peaceful tank. Decided to make a great
effort in the garden. Just gonna do a few lines. They're small, curves. So it feels almost
like it's feels like it's flexible. Looks good. We can add a little bit
of small things here too. I'm repeating a little bit from the last drawings we made. You'll see how you
can incorporate them in different ways. The Austin little
bit of shade here. Here, number to track. Of course, there
should be these lines where the trucks going down the wheels, the small ones. I think this looks good. To know that little bit detail to
the ground to just doing so. Small girls straws
here and there. Maybe a little smaller flower here that is slipped,
blooming yet. So it's just a little like that. I think this is a very
interesting start. I hope you think you'd like to. And what kind of name do
you think this robot has? Maybe it is called R2 Daisy. Amanda percent sure
that you can find a more interesting names. So please go ahead and add
a name to your drawing. I think on this side we
will have another arm. Maybe a little bit bigger, have even gone to
hold something. Maybe it has some
kind of device. That is, it's like it's
almost like a scissor. Maybe we should draw heads here and there's this like a device that is cutting
the cutting edge. Something like that. Those lines too. Yeah. Let's see if
we can trim that. Somewhere around here. We can just draw maybe
some small leaves like that and mix them with
some rounder shapes too. Little, of course, there
should be some cut up leaves falling out
from the show. Remember to make noises
when you're drawing. Don't be afraid of doing that to actually
helps you a lot. Finer up your imagination. So there we have
hedge character, and I'm wondering if we
should have some kind of sign because a
lot of gardens, there is a sign somewhere
plugged in all the ground. Can add a small sign it. A few more. Little girls, girls. There's lots of
good that all lines are going in the same place. So I will move this
line out here. So it gives this a
little bit more room. I'm just going to all here. This can also be a little
bit shaded by them. Just a little bit. We can draw this burning symbol here. Then you can imagine what is not allowed in this part of the garden or a park
or whatever it is. Maybe it's dogs are not allowed or maybe aliens or
cars or whatever. We started this, you can add quite a lot of
backstory to your drawing. So I think it's maybe
a quite a sunny day. Maybe the robot is holding
up little umbrella. So I'm kinda like this. Maybe even more. So it's holding a
little umbrella higher. Finger a little bit. If it's raining or maybe
it's a very sunny day. Kinda arm going
into the main body. That looks good. Let's go to touch up the flowery
us a little bit. If you want to, we can add maybe little bumblebee seals
cruising a little bit. Maybe it will sitting
on the flower and now it's running away. We can add some butterflies also like that. So let's go ahead
and define the lines and see what else we can
find in the drawing. Because sometimes when you have a rough sketch and you
start to clean it up, you can find more
details that you think is interesting to add. So always see your
drawing us sort of the living object that it
can be changing at anytime. Those little bolts or rebuts. Small wells can also add just a little bit
of shade on this side. Strange liquid device. So done. Imagine that when
you're drawing this picture, what kind of music
would be fitting? Maybe it's just
some ambient nature sounds or it's more like a machine. Machine park, different
kinds of robotic cells. So please go ahead and when
you practice this drawing, changed the music or to
sell to different things. And see what will
happen to your, to your drawing and also
to your drawing style. Because it's quite
often that very upbeat, very fast music is quite completely
different than playing something very soft, mellow. And sometimes when I draw, if I'm in a hurry, I usually play very fast and quite heavy music, so to say. And it helps me speed
up the process. But at the same time, Stan, I can't do
something that is very, very precise because my
hand is on like overdrive. The little bit of shade here, so the arm goes underneath. Some shade here too. Little bit. The bumblebee, the
butterflies mature. What kind of sound
the butterfly makes? Maybe there's some silent
flapping of the wings. The nerve cord, of course, add some details. Maybe there's a hole here. Those small details to the body. Now just a little bit
of shade to the side. Of course, when you draw this, maybe you don't
like these tracks. You can of course have legs. Were maybe it's
actually stationary and it stands on the ground. So feel free to come up with something
completely different. Because it's only you that knows what is best
for your drawing. The tracks. A little bit. Small. Share it on here. This accordion
showed this point. Umbrella. When you draw this, and maybe you're not
going to draw butterfly, Sarah, maybe you want to draw something
completely different. That changes the
size of this thing. Maybe the robust not
actually looking at flower. Maybe it's actually
looking at a house. So it's very, very
huge, enormous. Or maybe the robot
is very, very tiny. This is actually us,
the smallest sprout and you draw the butterfly. Maybe this big. So feel free to experiment. Parental strange device. Then they can add sort of
vibrational lines to the side. It looks like it's
moving him vibrating. The symbol. You can have something
else there if you want to. Maybe is a little texts, maybe a little poem, more. Symbol of an ice cream. A few. Grocery stores. Don't do the hedge. Little bit of shade
here in the background. Means to sign is showing you more clearly. Yeah. Something like that.
Small leaf parts. Just making maybe one hold. We can also add a little bit of shade underneath the umbrella. Just a little bit. Then we can add small line Sara. I want to focus the goal here
in this picture so I will strengthen the
lines rounder face, The flower, giving a bit more. Contrast. The flower here, just a little bit. There you go. Your gardening robots. Or two days they see or whatever you want
to cold, call it. Please go ahead and
experiment a little bit with the different kinds
of tools for the garden. You can of course, change the background to
something else. Maybe it's on a
desert island and we just found the first
sampling of a coconut, or maybe it's snow. So please feel free to fantasize and find
something new and exciting, good work and see you
in the next lesson.
11. Car Mechanic - Part One: So next up, we're going
to do a mechanic. Will be a robot that can
fix this fixed cars. Let's start by drawing
a sort of a bean shape. On top of this way I
will do like this. The long hair. Very
simple guideline here. We got to put a bow
from this robot. Hello thing, this robot
will be more feminine. So let's do some full lips. Like this. She will have some metal hair. No robots can still
have heard do so. Don't be shy to add soda or human characteristics
to your robot. Like this. Other soil, the Harris here. Of course, this robot is going
to have set the big eyes. When we took some lines here. Pull the hair just a little
bit closer to the face. Another line here, joining with the with the mouth. I think this robot,
He's called Monica. Monica mechanic. I'm sure that you have maybe a different
name in your head. Some more definition
for the ice. And don't be shy to make some changes you
to feel they are not the lines are not
in the right place. Because I don't want this line
to go up into this slide. It will be used to too
much emphasis on this. So I removed this one, then I would put the ester
little bit more forward. Like this. Much better dimer
dynamic number. We put two bolts
there. Let's see. The rest of the body is going to form underneath their head. Maybe there's some neckline. I think this is a good start. And add just a little
extra line here. Would be like a little buffer. So for her, her legs
are going to be placed. So let's add one link coming out here with some
joints. For our knee. The rest of that
going down here. Nothing a bolt here
where our ankle is. Her foot maybe she has some kind of
rubber soles for her. Mechanical. Like but I think this
looks interesting. Let's go ahead and
do the other bone. We can place to other
foods maybe around here. The two bolts. Her knee. Goldenberg by going
in London, Mr. Now, let's make some sort
of a triangle for her feet. Then we will place the
other one up here. Will go out something like this. Just let your hand and your mind wander across your paper and see what
else shapes you can find. This is what I'm
doing right now. Most of the time it's going to be what you're looking for. Don't worry if you don't find the right shape character idea, you can always redraw
them the next time. They're going to be. Very good. It's all about practice. Like this. We'll put a little bit of shade on
the lethal later also. Before we add the arms and
other things like that. I thought Patricia, dad, maybe a car on this side,
somewhere around here. So let's just make a simple box. So this is the front of the car. This is the slide. And we can add to headlights. This will be a very
simplified car so that we will add the bumper. I think it's called, we call
them cow catcher since we know we're maybe
it's called thunder. Thunder percent sure. Anyway, this part of the car go up front shape. This little thing you think behind this
is the radiator. Believe it's called the throat and a little
bit to the side. Here we will show a
little bit of the wheel of course to side. Like this. Very simplified car, very roughly drama. The same folder we fear that should be also
the other wheel or something like that. Of course there will be some
shade underneath the CO2, so we will just call it the lead of the car. I'm sorry if I know all the
technical terms in English. Let's see. It's called the hood of the car.
That is optimum. Of course. So Monica can look
inside the car. If you feel it's more fitting, you can draw some other object
here that she's fixing. Maybe it's actually a spaceship, or maybe she's fixing some
other kinds of machinery. We also have a little bit
of the windscreen here too. This is more like more
of a symbolizing a card and being a
completely technical, perfectly drawn car, it will still serve the same purpose. Because you will understand
that this robust, this fixing the car. And let's continue by
drawing one. Our arms. Keep almost the same kind of details that she has on
the nice that there will be some metal rings ring new thing here. There she has her I
think she will be holding some part of the car here that she's looking, looking at her fingers. We can just draw something that is maybe a little bit abstract, that there's some kind
of cylinder she's holding a little hole in it. Then there will be some kind
of something sticking out. Because everything you draw
it you don't have to explain. Can let the viewer
actually fill in the gaps. Once you have put
them in your drawing. Then of course you should
be looking at this object, leaving that little sparkle
in their eyes open. Here again, you see there are a little bit too many lines
going into the same place. So either I can lift
this higher or I can make it lower level would
make it higher this time, so it doesn't become too
close to this object. There you go. Then she should be maybe
holding the hood open. Something like this. We can do this. Mostly jointed arms. There we go. Holding up the hood. Hello, wonder. Walmart is on this side and the other one should
start somewhere on here. Doing that three-part joint. It's like that. No wonder what she will be
holding in this hand. Your hands should be holding maybe a welding device. So this is the handle. Will be sort of a pipe. The muscle from here, this should be a
flame like that. There should be some
kind of tube or a pipe going maybe from her back that is feeding the gas welding device. We can do this kind of zigzag pattern on this one
that it shows that it has some protective metal
casing multiple separated a little bit from
this arm so you don't have the same kind of texture. So good start. Hello. I'm wondering
if she should have. Maybe she has some kind of torchlight that is also mounted on her her arms. That'll be even more connection
to the to the car here. And then you draw this, try
to imagine what kind of noises that are going around
in the hair of workshop. If there is a lot of bagging, thumping and or maybe
it's very quiet. If it's a very smelly workshop, lot of oil and smoke. Or maybe she has a
very clean place. And I think she should have
some kind of tool belt here on her side of our body. Let's draw up some kind
of area. Come here. Little b. I'm holders. The first one she has. I think there is a screwdriver. Flatworm. No. Next told her maybe
a little wrench, wrench like that. In the third one. She
can have a hammer. So now these tools are
not very futuristic. Maybe you can imagine drawing something that is
more like a laser tool or something that is
very, very high sci-fi. Also the little
some bold section. So to showing that there's something that
is attached to her body. I think this is very good start. Maybe you think it's
very strange that I can repeat that it's about to start is that it's a very good
reminder to say they steal a starch that you don't think of trying to finalize something. Because this is
just an exercise. This is about experimentation. Staying open-minded, not trying to take it too serious that you have
to finalize something. Yeah, and, um, we
could maybe add even more objects
to this drawing. We talked earlier about what kind of cells
that might be here. So let's draw a little pillar. Along this pillar. There might be a speaker. Speaker. And it's also going to be quite the background so it can make it a
little bit shades. From this beaker. There
might be some music coming. Let's go ahead and
draw some notes. Can make some volt blue line here showing the music is
coming out of the speaker. So she could listen
to, I don't know, some kind of heavy metal or smooth jazz or maybe she's
into elevator music. To try to imagine what music that is flood, flooding out into this workshop.
12. Car Mechanic - Part Two: I think on this slide we can add maybe some
kind of an impact. Start by drawing simple box. Some details to it. You'll see I have no
idea what I'm doing. I'm just lifting my my
mind and my pencil. Wonder, it will eventually
find something there. There you go. That
very strange new part. But I think you can work. It will add flavor
to this workshop. From the ceiling, we can have some odd objects hanging down. Maybe there's a funder here. I don't like this. Maybe it's like this old school
burned a task is too big. Then of course there
should be some kind of rope by dialing down that is holding it up a little bit to
shade to this one too. And in this kind of cold places, maybe she needs
some air freshener. I don't know which part
of the world you're from, but Sweden is very popular. This thing that is called a wonder about the
wonder tree with some strange Santa Monica is maybe having this tree here. It's going to smell like sort
of vanilla in the workshop. And I'm just going to show
you something that you can add to a drawing if
you don't want to draw too much detail, some objects, because it
could take some time. You can make it maybe
a little silhouette and the background showing
that there is a lot of motor parts or
it's kind of a messy. So what you can do is you can draw a simple outline like this, made of both sharp
objects and soft curves. I'm here in there.
You can actually draw some more details
to the silhouettes. Going outside, a
picture like this. And then you can shave the
background up to the shoulder. Silhouettes. Move it like this. Can I hold a sudden? You have a messy background, giving some more depth
to your drawing. So let's go ahead and use the black pencil
to draw some more details. Some more definition
to your drawing. That's going to start back
here with the fender. Borda, count, catch her. A little bit of a rope, they're strange, challenging part. Not hundred percent sure about
this engine part is cold, but let's call it a LeBron. She's repairing the floor burn. Since it was broken out a little bit of
weight to the anion. A little bit of shade to here. Let's go ahead and draw the details for Monica. My father is actually
a very good welder and you tried to teach
me this profession, but I don't know why it
didn't work so well for me. I messed up quite a lot
of I think it was I'm a small drew more interested
in drawing them, welding. But I have tried
it when it works, it's really fun actually. Let's do this zigzag pattern. I don't know what kind of
professionals you have dried out or what it is
you're working with. When you draw these
robots in this course. I think it will be good that you add something from
your personal life. Because you will have
some great knowledge that you can add to your drawing that will make it
more interesting. And is the same. If you have a great interest in the hobby, you should add that
to the drawings to. When you practice and draw a
different kind of variants. They would come out some very interesting and
exciting versions. We can shade the whole lips, make it making them a
little bit more distinct. Point behind her binder party. So what kind of things
that are going on in, in your head when
you're drawing this. Robots. Take a break from time to time. When you're drawing and
just for a few seconds, think a little bit to what's, what kind of thought
that goes in, goes through your mind. Because it could be kind
of interesting things that you can add
to your drawing. Or maybe not this one, but the next one and take a pulse and they also make
a little note somewhere. You've remembered.
Until the next time. I always have a
paper close to me. At almost all times
somebody else writes maybe a little scribble, scribble and maybe draw
a very rough sketch. So I don't forget
the day that I had in my head at the moment. Because the mind is always working and sometimes
it makes very, very interesting and funny. Should we call it
so just jealous. I can tell you that I'm not
very good at fixing cars. I don't know how it
is when you bots. I can feel my guess and I'm like Jim refilled the oil,
but that's above it. A little bit of
shade to the bumper. With the wheel under here. You don't have to draw it very strongly to add
some shade to it. So I've actually draw these tires that are
a little bit flat. This indicates that
this car probably I've been standing here in the workshop for quite a while. So maybe Monica has been quite
busy with other projects. Now it's finally discourse
term to get fixed. So there you have the car. We have the lab form. Now if you feel that you have
more room in your drawing, maybe you have more
space up here. Please add more arms and
different kinds of tools. Do you think is
necessary for her to do her work properly? So maybe this is not called
a tool belt or maybe it's actually called
the tool palette. Maybe this part is actually
the something that she can detach and change
to something else. A little bit more weight to her head until her
facial features. So we get more attention. Going up to her face. Have the freshener. Maybe there's something
kind of writing. There are only two gelatin. Draw this pillar in the
background with the speaker. Shaded. Number notes. Maybe you can imagine what
kind of song does this. Coming out to the speaker. Feel free to sing along? Can draw this shade a
little bit stronger, so it is not the same as
the one on the background. So the color is showing
that is closer to you. Let me cancel strengthening
of the slide to ****, of course, very, very gently. Go over your little garbage pile or whatever it is
seen that background. Then you can cheat a little bit. Don't worry about
staying inside lines. Practice. Training your
eye and hand coordination. Can use to add maybe a
little bit more string fear. Yes, like this. There you go. The car mechanic, Monica, great work and see you
in the next lesson.
13. Dog Walker: So let's draw a
robotic dog walker. We will start with
the main body. Spooky. Little bit
further out like this. It will have little head to square shapes. I think it will have a round. Down here. From there we
should draw some wheels. Touched. We understood the body. Crooked legs. For me to have McCall
line for the ground. Since we're going
to dog later on. Let's go ahead and do some
details for the face. I think it should
have a little nose. Just a little while.
And then we can add some big mustaches. Read Hilary, the long ones, and then big eyebrows. So for this robot, you
will not see the eyes. What do you think
we can add later? Four. Add four, so that the robot can
see it's come up. Roll the rest of the
head. Somebody, Tim. What's going on? What
we can do is that we can maybe have some kind of cable going out from
the side. I'm from there. There is sort of almost like a camera
going down like this. Some time the rings
have a little bit. Pupil should have
some kind of mouth. Maybe it's always smiling. Somehow. You have a mouth there. They can go up and down. And I wonder if you
should do this. Robert a little bit British. Adding this quite
typical British chat. I think it's called
a bowler hat. This little round
thing is going to be a little bit dark later on. And since it's a British robots, maybe it's a little bit
more fancy addressed. With a fly. You probably have
some kind of suit on. Go ahead and draw that. Quite fancy dog walker. And since it's British, we can add some
other attributes. Another attribute to him, he's holding a cup of tea. The suit on, I think
this is called cuffs. Little hand. His phone. Teacup. Since the t is warm, you have these films
coming up from it? Yes. At the moment there is a thunderstorm
going on outside. I don't know if you can hear it, but it's quite a different
mode to this picture. I thought first at
the background noise for this would be that the
robot is out in the park with bird noises and very
tranquil experience. But just use my imagination and not listening to the store. So I keep this drawing
not too dramatic. And on the other side of the head would probably look
a little bit like horns, but we can do like a small monitor
sticking out like this. The small screen. And there they can be
some kind of almost like a sound pattern. Of course. In the other hand, we should have where he is holding a dog leash. But I wonder if you should do the dog leash a little
bit more for touristic. So imagine that is holding
maybe some kind of remote or maybe a rod of some kind. From here. It could be just almost like a little antennas sticking
out and done beneath him. Of course, we should have
the dog and since we are sort of in Britain, we can do sort of a bulldog. So we'll start with the
big off wrong shape, another half rho shape here. And then it should
have a big nose. I don't know if it's
called Under bit, but that's what's
holding Swedish. His Laurie always sticking
out just a little bit. Let me kinda the tooth. And then we can herbivores
these two dots for eyes. So it's quite have
a blank stare. Texture to the nose to rebuts. The mouse is a little bit dark. We can leave just
a little bit of this light up here showing
that it's reflection. Subtle hears,
something like this. We can do. Now their ear
on the backside like that. Alright. So like in front of the dog
and then it will have I don't think
it will have legs. This dog, you probably will
have tracks. Let's go here. You'll make a little bit almost like a mountain down here. Tracks. Going down
to the ground. We will make a set
of tracks for this. So what do you think
a good dog name would be for this Robert? I think of a call
him Buster, 3,000. Lawyer, reliable. Little bit. Blank stare. Let's go ahead and add some
small wheels here. It looks like it
looks very funny. I'm just going to
draw some rough lines here to show where
the ground is. Maybe he's actually staring at a small tree here.
Let's go ahead. Draw a little tree. Don't have to draw
all the branches. It could be just a few of them. Of course, some few leaves. Maybe it's early spring and the tree is
just coming alive. The few few girls, girls here on the ground too, to plant a tree in the ground. And well, when it
comes to dogs and trees to know or probably
what's going to happen. It has to relieve itself. But maybe it's not doing
it the normal way. Lifting the leg
since he has tracks. Maybe it has a small
shelter or small door. There's a little tube coming out from there. There's a little muscle number. We just make a few droplets
going down like this. There you go. The robot, robotic dog is
doing his business. Can actually do a small
monetary or two on the side. Mimicking this one. Another thing, this
kind of pattern to it. So maybe it is dog walker is monitoring what is
going on with a dog. Then we probably should
do sort of an attempt to hair coming out from the head. Then there should be
some connection here. But instead of us drawing a line from here to there
that is kind of boring, can maybe imagine that. There is almost like a leash. And you can do sort of a electric wobbly line between these two places. And of course, with
some sound effects. We can also add a
little bit more detail to the face of the
dark line here. We can add some rivets. Let's try to explore
and see what kind of shapes that looks good. When it comes to this robot dog. Because you can add
a lot of details, but sometimes you
go real overboard. And maybe this part doesn't
have the rivets at all. It's more simplistic. So I think this is quite
a good start. Making bad. Maybe another arm here
for the dog walker. Recourse. When you
have a teacup, you should probably
have a saucer also. Let's go ahead and drill simple salts or
some other shape. A little bit of a
line here showing that there is a depth to it. Then other thumb on top. Of course, something. I think the name for
the robot is g of x, l, k Butler edition
because it starts to feel almost more
like a butter done the dog walker add some zeros to his suit. As you see, it doesn't have to be a very balanced drawing. That could be different
things on different sides. So he has two arms on this
side and your swan here. Let's go ahead and do
some petals to the wheels to reminds me of when I
learned how to ride the bike. Those extra wheels
mounted on the bike, they looked almost like this. Contact to the ground, a little bit more of
a shade of anything. Of course you can add
some more details. Maybe there's a bag here. I'm just gonna draw
a symbol of a dog. So maybe it's a little treat bag that is lying on the ground. Since the robot is busy breaking his tea. He loved to Tara. Could of course also
be a **** bag or there's some tennis equipment. Whatever you think is
fitting for your drawing. So let's go ahead and add more details,
some defined lines. What kind of voice do you
think this robot has? Is almost sounding human? Or is it very, very robotic? Somebody going to add
some black details to his face with the mustache
and the eyebrows. Zelda, the bowler hats. So when you start to
clean up the drawing, feel free to make some changes. So always good to force, go forth and back
when you're drawing. Because it might be
that you see that There's something that should
really be in the picture. Or maybe you moved an
object and you have to make this angle, this camera thing. So it actually looks at the
dog instead of underground. So don't let those first-line
and define everything. Everything can be changed. Everything comes down to
that you are having fun. We're actually sitting
down and practice. Because I, I hear quite
a lot about this, that you have talent
in certain things. I'm not so sure
about that actually, I think it's more about that you have a passion for things. Since you're
passionate about it, you will spend a lot
of time doing it. For me. I like to sit
and do the lunge row and imagine strange bars
are strange creatures. Whatever it is. And the more time I spend doing it, I think the better it gets. And also it's about making mistakes because you
learn a lot from that. Sometimes when you
sit them draw and you feel that, oh my God, what happened to this actually
leaving a couple of days, you realize that oh, right. Now I understand that should
have been this way instead. So getting things
right the first time, it's not always optimal. Could actually be
good that you make. So column mistakes. So don't feel frustrated that everything is
not going hundred per cent to plan because it's actually good for
your development. Whatever you are doing. Can you feel, what do, can you smell the the tea? What kind of flavor
Do you think it is? Maybe it's our gray or
something more fruity. Draw some shades for this. Wrong. About some of the robots. A little bit of
shade underneath. The suits, strengthening
this line. So it pops out more. And as you'll see, I always do some exaggerating drawing and sometimes they go outside
the line, but it's okay. Because for me this is an experiment and just having
fun and drawing something. I never drew this
character before. So I'm also learning, I'm trying to find out what's going on with
this character. We can also shade
the shop the wheels to make them a
little bit darker. And as you'll see, I have
angled. We'll see a little bit. So instead of when you see them from the
side and up like that, if you see straight ahead
and looked like that. So there's almost a
little bit in-between. Because both these shapes can be maybe a little bit
boring for your pictures. Always good to have a
little bit of perspective. Drawing something that is. So what I've been between Caltech to the ground to shave mostly. Are there some grass?
The doggy bag? You can add some
weight to the Buggles. So drawing a little bit darker. Then we will do Buster 3,000. What kind of voice
comes out to this one? Maybe done is actually
this wavelength. There's a monitoring
the dogs voice because it's a robot
so it doesn't have to open his mouth to do alloys. Shade a little bit to the leave this right. There. You can go forth and back a little bit because
the more strings and contrast you add two
different characters. They will have different value. If you really want to, people to look at the dog more. Initially, then you should
add more weight to the line, some more contrast to the dog
compared to the dog walker. Because that's actually how
our brain is functioning. Looking at the biggest
contrasts. To start with. Hello, to dismiss, roughly drawing a street. We can say that slightly
too, but not too much. You don't want to treat the dominant,
dominate. The drawing. Can also add a little bit of
shading underneath the head, can actually shade
the whole side here. Slightly. Let me see if the
head is showing better. Strengthen the light underneath
there to know the trucks. Besides little bit
to shade here to the right of underneath it's showing you
it's connected to the ground and quite heavy. Don't imagine going out
for this kind of dog and it won't a young
pup in your lap. You have to really be
prepared to going rough, rough, rough with
this robotic voice. Doing this electric,
electric leash. We'll just add a little
bit more strings to the, to the Dodge. Because I want you to
look at this place. His staring eyes maybe really
loves trees. Or leaves. Can also add just a little bit more
strength to the robot, to Robert face there, butler. So that you can see that you
can add close to your robot. It doesn't have always to be. Metal, could be something. So I'm kinda harder material. So don't be shy about
trying different things. You think might work. Maybe it's made out of something material
almost looking like ice, or maybe it's more like non-organic robots
made other cucumber or whatever it can be. So there you go. Your
robot dog walker GBS. His dog, Buster, 3,000. Good work and make
sure to practice this with different
kinds of variations. I'm very happy that
you have taken this course and I hope
you had a lot of fun. And please, please,
please show your work. They're going to be great.
 Christer Hägglund, Illustrator / Author / Game Developer