Transcripts
1. Intro: Hello, welcome to Isa, drawing cartoon the monsters. My name is Christa, and
together we will see how fun and easy it
is to learn drawing. Starting with classical
movie monsters like Dracula, Frankenstein's
monster, and the man. Then we will add
some backgrounds. How to transform simple
shapes into whack-a-mole. See how easy it is to
change the size of your monster by adding different
objects to your drawing. Adding fun backstories and
voices to your monsters. And lastly, draw some
dragons and dragging. I see myself as a storyteller. I think any medium can be
used to tell the tale, can be a boot again, or an animated story. I worked on
multivariate projects. Having fun and just playing around can be a
great way to free yourself and create something
marvelous and personal. This is the beginning of a great journey into
your creative world. I'm happy to be your guide. Let's get started.
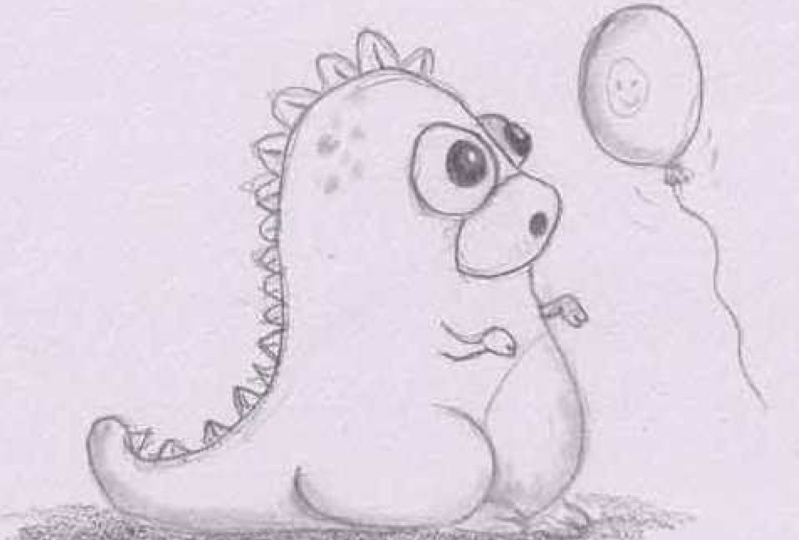
2. Dracula: So before we start, I want you to loosen
up your handle. It will be by doing
small doodles, maybe some circles and
some lines like that. Then you can draw a circle, a square, and a triangle. So this is to
loosen up your hand and to fire up your
nervous system so you're ready to go
and start drawing. If you have some
other pattern you want to draw, yes, go ahead. It doesn't matter as long
as you loosen up your hand. So the first bolster we're
going to draw is Dracula, very classical movie monster. And I think we should start
by doing an egg shape. Something like this. Very simple egg-shaped. As you'll see. I'm drawing
first with a blue pencil. And then I'm going
to fill in the lines and make finer details
for the black one. If you don't have this or
if you prefer to draw with a pencil or a marker
or pen or whatever, cranial, please do as long as you're drawing,
it doesn't matter. So we start with the body and we're going to put out
neckline, something like this. And then we're going to draw out his waistline,
something like that. Then we're going to add and nose and I think it will
be quite pointy and sharp. And then add two
eyes around them, hypnotic eyes and eyebrows, something like that. And a big smile, big mouth. And then of course his fangs. So this is going to be Dracula, but not a super
scared of Dracula. Maybe is more into
drinking juices. He loves fruit, etc. Then we're going to
add a pair of airs. Airs. And I'm just throwing
normal ears for you to see how the character
is changing if you actually make them
pointed like this. Because when you are
drawing a monster and you have something
similar to a human, if you're sharing something
that is sort of not human, it gets weird and scary. It's more like a bat like that. And I'm going to do the
flaps over his color. Sticking out like that, Almost mimicking his fangs. His costume with some buttons. I think one is enough,
one button there. And I think he should
have some kind of maybe there's some kind of medallion or
something like that. You can find out later on. And you draw more
details on them. And then we should have his legs and his
standing quite wide. Turned down his shoes. Quite pointed shoes. Yeah. Something like that. Maybe we will draw a shoe
laces on him later on. And maybe lead means that
maybe he has not tied one of his shoes. They
looked like that. Maybe he wasn't a hurry to use line or maybe it
got her in her Raven. He was posing for standing
posting for this lesson. Then we're going
to draw his hand. And as you see, I usually draw
the circle to start with. It will be his, his
poem like that. Then I will just add
fingers on top of that. Something like that. I usually draw something that is
showing the thumb line. And then I draw a
line showing this. So it's symbolizes the
depth of the poem. It's the same with this also, is that I usually, when
I have a cartoony ear, I asked draw, something like this and then be
opposing the other arm. Maybe he's taught me more with
this arm and done his hand will face more or like this. So this is the thumb
going up like this. Long finger to
something like that. Draw that line here to
specify this later on, but me draw with black. And with cartoony characters. You can not go off course,
draw five fingers. But it's much easier and
faster to draw four fingers. They look more cartoonish. If you do it like this. You can try different versions. Both four fingers
and five fingers. Let wonder if
something is missing. Maybe he should have his, I think you should have
some kind of Khepera. This is the classical
version of Dracula. The Count Dracula. I think this looks
good. There you have the foundation of
your first monster. And then we're going to
continue with the black pencil. So let's start to define the
affiliate in the little bit. Not very realistic, more like someone put the
triangle on top of him, I can feel him. Shape two shape. And as you see, if I feel in this line, start to show that
this area is actually more on the backside
of the head. I will just make two
versions of this. You can see the difference. This one I don't
feel in this line. So this is more protruding
out sticking out of his head. Not real on the front
but more on the side. I'm not going to fill
in this line either since it's going to be
part of the trousers. We will go down to his shoes. Maybe a little bit
of a feeling of a toe there at the
end of your shoe. Don't draw very simple leases. Something like that.
Don't continue with his other shoe.
Little bit there too. And I'll fill in this. She releases. I can continue with the cape to the cake. You don't
have to draw it. Very, very strong because
that's actually what is this back? Because
it works like this. The stronger line, the stronger, stronger contrast to draw. The father outer butt pop
out towards you. Stood arm. If you want to, you can
draw more sharp nails. Something like this here, sticking out a little bit. So it looks a little
bit more scary. The other arm from the rest of his fingers. This shape again, let's do
got very shocked at what. And underneath, so this two color line flaps, little u or medallion. I don't know what it is. Try to experiment with
this shape and see what you can find out what
is best for your Dracula. His waist, the nose, smell. Maybe smile, smiling
even more like this. More like a green
things is teeth. Done? His Maria rounds, very strange. Very happy. If not please. Eyebrows. They don't have to
be exactly the same shape. It can be a bit different to give him a different
kind of personality. Let's draw this a
little bit stronger. If we want to make the nose
stick out a little bit, make sure that you put a lot
of weight here. More black. You'll see that it's more
protruding, sticking out. Strengthen this line
too little bit. If you want to, we can blacken
his costume a little bit. Worried about keeping inside
the line or anything. This is just practice. It will find your best way
of shading and drawing. And as you go along
and practice, because you will find your
way of expressing yourself. That's quite
important because you can always mimic someone. But eventually you will
start to find your own where you're drawing. And that is very, very exciting. Now his costume is quite black. About that. Some more weight to this hand
or strings, I should say. And obviously it's protruding
more sticking out. And to add weight
to the character, you can always draw black lines. Underneath the feet were
shoes. In this case. As you see, it's actually makes the characteristic
to the ground gives him more of a weight loss. I will just make a
very rough shading underneath like this. And as you see, I'm very rough. Use very wobbly lines. And this is a very good way to, for you to start
drawing actually because just play
around another phone. Does the most important part. Having fun. Yeah. Maybe a little bit more. Black for the body. There you go. Your first
cartoon, the Dracula. We started with a simple egg-shaped and found
this little character. Good work. See you
in the next lesson.
3. Frankenstein's Monster: So next up is
Frankenstein's monster. We're going to start with
the same simple shape. We're going to find
our neck line. Wherever I like this. I'm done. I think we'll have a
little bit bigger head, so just follow the
lines up like this. It's about a little
bit more room. And, um, we will have the hair will have
a quiet messy hair. Something like this. Yeah. Little wild and crazy hair. And we will this is the
thing we can start doing, is that if you try to find
the middle of the face, just draw a line like this, then this must easier to start
finding the position for. Let's say that we
have the nose, hair, a little bit of a potato. Done two eyes. Like this. With this guideline, it's much easier
for you to place the eyes with the same
distance from the middle. We'll have quite big
ears. It's the same here. If you want to have
them quite some third, each other, you can always draw a cross-section of a line. Then it's easier to, for you to find the center of the ears. There's always a lot
of different ways to do the same result. So if you want to start with
the guidelines, please do. Let me, I've done
it several times. You will actually see
these lines in your head. Let's go a few, Linda,
just a little bit more. I think we will make him
a little bit surprised. So we will draw around the mouth and then and
his bottom lip like that. It's not maybe the
smartest pollster. So we will arms. I'm just going to put them
by his side, like this. Disposable, be a little bit more static than the one on Dracula. Legs is the same here. If you have a guideline on the
middle and you want to put the legs so they have
the same distance, so they are a little
bit more symmetrical. This guideline can help. You. Should have the waistline. Probably somewhere around there. They should have very big
shoes. Like in the movie. He's stomping around
with his feet. He also feel around to sense how big your
shoes should be. We're going to add to the shoe. Same here. Don't worry,
we'll fill it in. Both sides. Then
we go to add ads. You'll start with
a sarco like this. Then you can draw from this. Two fingers should be enough. It'll ignore other hand
are assembled on the side. One can now just a little line here to, to show a little bit on. What I understood is that in
classical monster movies, everybody wear some kind
of suits or a costume. We will add little
suit for this guy. Drawing. We shave color, we'll go outside. The body a little bit. Slab. Same on this side. Yeah. Scotland define the
lines a little bit better. There'll be many, many versions of
Frankenstein's monster. So this is just a start. If you prefer. Some other version
of this creature. Feel free to draw them. This is more like Boris
Karloff, Frankenstein. Then we're going to
add some metal bolts sticking out from
his neck like this. And you can do the same once
you draw a little line here, which evolved to have
them on the same level. I draw this one so it's actually showing the side a
little bit on this one not to get your picture not
too symmetrical, but start to Find
the hair more color, more black later also. Maybe has a little bit
to some sideburns. This nose, eyes. Yeah. That's a good start. Now we will continue with
the black pencil. I'm defining the character and give more strength
to certain parts. But we'll start with the face. With the nose. The nose is quite simple. You have two half circles. Then we have this little
wavy line in-between them. You have a half circle
up top here to give the nose some volume. Eyes. And I'm leaving this
little spot here. So the characters
have more life. A little bit of reflection. You can experimental have them both with this little light, this little reflection
in the eye, or colored them
completely black. The cota will look
quite different. When you have a very dark
completely black eye. It looks more. Dovish tried to experiment
with these motions. Let's do the ears. Ear shape. Try to imagine why
he looks surprised. It's always good when you draw, that you fantasize so little dialogue with yourself
about what you're drawing. Maybe you found out
that they switch to daylight saving time. And he didn't realize it. Nice whole days, a little
bit messy because of that. Maybe he lifted me look
outside the fridge. It gone. Sport the morning or maybe totally forgot
that it was his birthday. So he, he's above
shocked and surprised. Like Lyme. Give a
little bit more weight to the next line. And then you see the
head is popping out. Forms. Wigs filling in this line since the body
and the legs are one piece. His shoes. I don't know if you can
hear it in the background, but it's very stormy
today. It's very windy. And maybe it's a good
background voice. When you draw monsters. Then we're going to
black kinda souls. Give me more black to
this slide. This slide. More different
initial or strings to the mouse. Same with ice. Also. Draw the focus up here. You see the more
dark in this line, the more focus goes
to this place. And also the most pops
out a little bit. A little bit more, a
little bit more black to get a nice silhouette. Yeah, it looks good. We'll still have a little bit of shade underneath the character. With my warmly lines. Connect him to the ground
with strong black lives like this is a habit character so should be grounded. And there you go. Your first Frankenstein's monster
eye, it looks great. So we started with the
simple egg-shaped, same as with Dracula. We add a little
bit for volume for the head and be made pose
a little bit more static. I hope you're having fun, continued to practice with this and see you in
the next lesson.
4. Wolfman: So our third classical
moles will be the wolf man, whoever's start with
the egg shape again. But imagine that you are
going to bend the delete bit. I will start to
draw it like this. But what we will
do is to bend it into almost like a bean shape. Something like this. Course we're going to create a stronger didn't that make
posts for this character. So there you have
your basic shape. From there, we will have arms
sticking out this slide. While I'm on this side. And I'm not drawing them
in the same kind of pulse. And done we're going to have the house
somewhere around here. And since the wolf
man is quite hairy, hair-like that done, we will help them knows he has a little plug-in, diagnose. Them. Will have quite open
eyes. Like this. It'll be a little
bit cross-side. Draw your pupils little
bit more centered. And then of course, very, very big eyebrows, huge
bushy eyebrows like that. Then we will have
some ears for him. They will be almost the
same as with Dracula. Imagine that you
have human ears. What we're going to make them
a little bit more dog-like. That little shape here
to remove dislike. A little bit too. Big mouth. Like he's growling. This. There's two
ways of drawing. There are many ways
of drawing teeth, but I'm just going to show you a little bit difference when it comes to cartoony characters. If you draw the teeth
extremely sharp, looks much more aggressive. Or if you draw the teeth a
little bit more rounded, it doesn't look as scary. Then this case, I would
prefer his teeth to be a little bit more round like that. A little bit of
darkness bar, mouth. And of course we
should put some legs, placed them very wide apart. To make this pulse
very dramatic. Jorge. Two big feet. He doesn't have
where in his shoes because The Wolf man is having his pull salts like that. Here. Yeah. Just like that. I think
I will do this v, dv and a little bit bigger
so it fits started one. You can always do like this that you measure won't beat and
compare it to the other one. Hello, let me know
that you can add a little bit more spice to
the shoe and other foot. Something like that. We have
some kind of short dome, has these cool colors. He will have this kind
of pulls fold up. Like very aggressive. Like this. Lender can add sharp Laos. This same here with the foam. Continue with all their fingers. The little finger. So he's very, very angry. We will harvest
waistline. Please. Make sure your stroke. Two bottles that are maybe has a belt to belt buckle. Of course, you can do those
things for the trouser. Or you go, pays for your Wolf band. So let's start to fill in. The lines will block. We will start with the nose. His eyes. Remember to leave, leave a little bit of
sparkle in the pupils. The eyebrows. Maybe he's angry because
someone told him that he should probably
pluck his eyebrows. Else well, below those. Cleaning up the earth is
hurt us out a little bit of Strauss sticking out a few places. His big ears. And also did with Dracula. I will draw a line here. So this here is actually more on the backside of that
compared to this one. Lowest experimental. See what is best. If you've got a small part
is covered like this. Or if you want to
have a complete lie. Big, bow. His teeth. What will fill him? Smoke? Less. You'll see the teeth
are not very even though I liked this kind of way. Gibbs sampler and wild
appearance to be a bit more. Strengthen the nose on his eyes. So the focus goes up here. It's quite common when you
draw something that you go forth and back between
different parts. As you add or subtract,
subtract things. From the other three fingers. The little bit of
strength. The fingertips. Body. Look, draw this line completely all the way across done the disorder will be
too far behind his body. So it's just this little part
down here that is combined. Fingers. A little bit till spring. More dark under the fingertips. Waistline. His belt. I can make it maybe
a little bit bigger. A little metal part. Well, we put the
belt in its place. I can also color this
a little bit darker. But what does torque is the eyebrows because we won't
have the attention up here. Showing a short tall his trousers. What do you can do
here if you want to, is to make the trousers ripped. It looks almost like
his fetus grow. Destroy the trousers like that. Don't do the refeed. The nails. Just a little bit of shade. Since they are so
big and fluffy. Maybe that's just
locked. His eyebrows are going to be plucked. It's maybe they want
to cut his nails. And he is fighting for his life because they
think it's very scary. Little bit shaved their number. Of course we will draw
string Folder nice his feet to touch
him to the ground, to shade underneath him. Of course, the wobbly lines. I can try this out
and if you feel that it's not your style,
don't have to do them. It's just a way for me
to describe my drawings. That's why it's nice to always try different
drawing techniques. Look at different teachers. You will find and adopt different things from
different people that will, eventually, it will make
your own unique style. Just a little bit stronger. Then you can just imagine
what kind of noisy makes it scary growl? Or is it more like
a little puppy or maybe easiest to
talking gibberish? Who knows? But this can actually help
you when you're drawing a character to find
something interesting. The character a little bit more around the eyes,
a little bit bigger. You get the focus
up in the face. There you go. Your
first both, ma'am. The classical Wolf Man. Good work. And I hope
you're having a lot of fun and see you in
the next lesson.
5. Dracula Background: So let's start to draw a background for our
Dracula character. You can imagine that
he's standing on, let's say a graveyard. That the sets, that atmosphere. We probably start
with headstone. When you're drawing. I can suggest to you to listen to different
kinds of music because that will actually change what you're drawing
or the way you're drawing. Can you imagine if
we would listen to various Gary music when
you listen to this, when we draw this or river listened to some
upbeat pop music, it will be quite different. If we go through. So let's store little
hill like this. Under recent round. The tilt that stone. Like this. We can draw a
little frame. I think. Nobody else do some
small wobbly things. That is symbolizing text. Yeah, like that. Then they can just draw
some patches of grass. Maybe a little flower,
a little while. And then we will, from behind here we can draw
a tree curving up like this. Crooked tree that will
continue outside. The picture. Drawing. Curving back like the more curve. And normally you make them
the scary or they look just a little bit black arrow. Yeah. Something like that. Along the ground here
we can maybe a little, maybe somebody
dropped their sword, draw a simple shape. The ground. Maybe it's striking those who know, who knows what's still have
this example of the air. So I will just erase a
little bit from that. We can draw a bath maybe. Yeah. So you have one wing here? Body years. Something like
that. Yeah. So you see you can always
go back to a drawing and reshaped something
or completely change it. I'm done. I think on this side should probably
have another little hill. The big bucks. Something like this. This one, we can draw another headstone to
this more like a cross. Of course you can draw your lines like this if you
want to. If it's easier. You can always erase this
later if you want to cross. You can put a circle here. Maybe. We'll make the letter T can write something
else if you want to. I was kinda make this
cross just a little bit more decorative. Just adding some
shapes like that. We can do the patch cross here to not have to draw every single
breast or you can just draw something that
symbolizes cross. Your mind will fill in the rest. Yeah, like that. Then we should have a big, big full moon here. I think. The cross is covering
torsional solvent. If you see on the Moon, there
are some weak spots on it. So you can do the same here. Could be small, like creators. Like that. I think I will do some more
ornament sold across. As you'll see, I'm
just playing around, just letting my mind
taking the pencil forward. As I said that a few times
earlier in my courses, there are no right or wrong. It's just about drawing
and having fun. Very good way to learn. I think we should have a
few more bad sexually. I can have one more to the
saying goes the same way. This one is the party. It could be some parts that are also working
for Batman always. Like it stopped
in the background for this picture, this drawing. Then we can have a small
bud here. And this area. Yeah. Quite spooky. I think I will fill in
this tree completely. Like a silhouette. Maybe a little bit more
of Two more brushes. We can maybe add
something down here. But needs to cross. I think we should put
scalier, America Tuna Scope. You start by drawing a circle. Then you just add little
shaped like this. You can draw a line up. Here's the nose, ice
socket, eye sockets. And under Kenya's
throw another line underneath there and there
you have your teeth. Very cartoony style, a
little bit of shade on them if at all so little. So you can add some, maybe there's some small
stones or pebbles. Some crossover too. Another storm or to
stall stall there to fill out the ground. Yeah, I think this
looks quite good. Can always fill in with more bats or maybe
you don't like bad. So one times something else. Maybe there's some
clouds here instead. Yes, feel free to experiment. Suppose time to fill in
the lines with black. Get started with your tombstone. As we'll see. It's actually a bit cracked
or broken near all. So you can add maybe a
little cross. A small lump. Go gently with a strength. Since we're drawing
on the background, you don't want these
lines to be much stronger than the lines on the
foreground with the character. Because that would mean
that the background is more important than the
character in the middle. So try to draw a little gentle. I'm just going to fill in the
outer lines for the tree. Start with, if you feel you can always add
some more branches. Let's try to draw the brushes. Random, random shape. Of course, if they
get too symmetrical, it looks kinda weird
and not at all. Scary. Feeling like
across little bit. But you will have
the sword here. It couldn't be in a shield or maybe someone dropped
there. Coffee mug. You never know what you can find on the grounds of a great job. So just imagine, I fantasize. See what comes out
from your pencil. It's going to add a few lines
that connects the shadow, the character, with
the background. So they are integrated. The first path here. Mr. same thing, don't
make them too dark. Shade this one a little bit
with black across the origin. Little bit more important
than the reshape. It a bit more collected
two, that are cooler. And don't worry about if
the lines are getting very wobbly or if you
shade outside the lines. This is about experimenting
and learning. Letting your mind be
free with your hand and pencil. Like that. The very young the cross. Since this one is closer
towards the moon, it should have a little
bit stronger contrast, stronger outlines, some more details to the grass. The decorative part. Don't imagine that I'm not 100% satisfied with
the look of this. Maybe I actually want this
part to go all the way around. And I don't like to t. Maybe I will do some other
symbol instead. I can always go
back and redraw it. The same with this. Maybe I want to add
something more. If you like to try it, you can actually go
back to the symbol or the juvenile order to the
ad hair and maybe you can actually add a little
triangle there. Just a little one. These
two objects are connected. Gives a little bit more
depth to the scene. Quite big teeth, eye sockets. If you want to sculpt
to look more evil. Just imagine that it
looks almost angry that you add a shape that
is more centered like this, almost like if you have
algebra also get angry, are angled down
towards the middle. Some shade. Steel click contact
with the ground. Feel it's actually there. You can always add a little
bit more here and there. They also imagined that
is astounding on the, on the pathway that
is full of pebbles. And thus were disorder
usually just add some small marbling lines
connecting the two areas. Number of them. Young too, young Klee, drawing some very vague
creators like that. So you have some textures. If I go ahead and strengthen
these lines a bit too much, I actually have to go back some more strength to
the character too. So this doesn't take
over the picture. Same with top of his head also. Understood that. So getting to black, a little bit of
black to his cape. There we go. One graveyard
background for Dracula. What if he was in
some other place? Maybe standing in the
kitchen or candy factory, or maybe he's on the beach. Continued to practice
and draw Dracula and add different kinds of backgrounds and
play around with it. See what you will find out.
6. Frankenstein's Monster Background: So let's continue with
Frankenstein monster. And what should he
have for background? Maybe we should do the
classical laboratory for him. We can start on this side by drawing from workbench. Let's make a rectangular shape. And then on top of that, that will be the top of
the bunch. Like this. Probably should be some
kind of drawer or drawers. So we'll do a handle. The circle, ring like this will be an
old-fashioned hubble. You can draw a smaller
rectangular shape like this. This is one. For the other one. This one can be bigger
so it's actually going outside of the picture. There. Circle. The ring. Yeah. Something like
this. I'm done. I'm not so good with
technical terms when it comes to laboratory equipment. So I just call
everything lab stuff. We can start by doing a shape
that is almost like an egg. Comes up to top. So this is going
to be some kind of flask bottle like this. I'm inside, there should
be a liquid and it should be moving a little bit
wavy line like that. Then they can draw on not
too small bubbles like that. Next to this. While we can
have like a glass jar. Also be the top that is a
little bit thicker like this. And this one should be inside. Another mental
fingering over here. You'll feel it's Sterling
inside a metal holder. And then we will do more blue line or currently
line going like this. Inside.
7. Wolfman Background: So let's start drawing the
background for the wolf man. And I think he will be, I think it will be standing
in some kind of wood forest, which will start by drawing. That is standing next
to quite gnarly tree like this wavy line. This slide. Other prongs
going up like this. That's a good start. And also if we want to push
this further back, can always remove a bit
of a line down here. So the tree is actually
starting back here. Instead. Draw some more brushes. Make them go outside
of the picture. Small one that is broken off. We can have a little
a little hole here. Maybe some little creatures
living down there. I will just draw some lines symbolizing texture
on the tree bark. We can have the problem. She's going out to black shapes. The trees. Maybe it's around a little bit gross. Maybe. The home life that maybe just one route is
going forward loop bit. Yeah, that looks
good. If we want to, we can make more trees
in the background. Make them smaller. Well, they are, they don't
have any leaves or anything, so they are probably quite dead. Or it could be late. So they don't have any leaves. Even though the tree here, you just see, if I draw
the lines two similar, it doesn't look so exciting. It's much more exciting if the lines are not
following each other. So I will do drawing
it like this is that the evil is going brushes, it's going behind his character. Coming up here. We'll clarify this slide a little bit better. Yeah, this looks much better. We will define everything with
the black pencil later on. But what I will do
is just to mark that this tree is further
out and auditory. So these are disappearing
a little bit. Maybe there's some fog going
on there. The background. Even the little tweak coming
out from the slide here. What does remember here? There is actually a little leaf, but it's probably not so much alive. He's not gradient at least. So it's drooping like that. On this slide, I think we
will have our tree stump. The tree is broken up like this. Let's styling little bit where
the tree has broken off. Some roots. Here I think we will add. I think he actually
has a teddy bear placed it next to
the street. Street. He has placed it here
next to the tree stump. Two circles. Circle and the males
didn't lay eggs like that. His arm has slumped
forward a little bit. So you have the lungs here. The eyes on his ears. The wolf. Man will never
go anywhere without his, his little bear. Few strokes here and there. Some pebbles, small rocks, some texture with the tree bark. Random Lauren's work this
to symbolize the market. Up here. I wonder
if we should do, should be some clouds maybe. And then we have a full moon. Wonder if we should
add the moon. That is a little bit behind the tree stump like that. Then we can add some
clouds coming you. It is also behind the Wolf Man. We can erase this. Let's clean up the
picture a little bit. As we did with the
Dracula picture. Just add some small
craters to visualize, visualize so that it's the Moon. Some clouds or maybe they even
go outside of the picture. Tried to make a connection
with a line in the background. So you'll feel the ground coming from one
side to the other. Maybe add some more trees here. Customary wage shapes. Maybe we'll play around with the lines cell the
string for the longest later. No worries. Just do some gnarly
tree lines there. Yeah, I think just
looks quite good. I'm from beneath here
we can draw more gross. Know, some random shapes. Because sometimes
when you draw a girl, so you can do it to really
show there is a big shape. And sometimes it's just
enough to draw one line. Ms. Good to mix them up. For some random random
shapes from this slide too. So small pebbles. Maybe another little twig. Yeah, I think this
looks very good. So let's continue with
the black pencil. We'll start on this side. I love to start with a tree
that is closest to us. To find right strength
for the background. I love to use. Small blue lines. Show where the trees touching
the ground. The store. I think that's a quite
enough for strength. A little bit of shade to it. Quick rough lines. Nobody can likely this whole
little bit of black there. Continue with the park lines. Draw this very much so. Round them a little bit
on top of each other. They will form quite lice. Bark texture like that. A nice shade for the trees. Going behind the character. And continue on this slide
to be light on your hand. Because if these
lines get too strong, they will take steel focus
from the main character. Imagined that these trees
are a little bit in the fog, are a little bit blurred. Same with this one.
Light, dark lines. Then again, I will ask
what kind of music you're listening to when you're
drawing this picture? Is it helping you to
find the right mood? Yeah, like that. Then we will do a little
bit of this foregrounds. Girls. Twig, maybe it's a Braun, she didn't know where to
scales girls sexually. Belief that is dried up or
it can even make it more. We pick more curled. A little bit of shade and light contact
line to the ground. Can try to make it even
stronger and see what happens in connection
with his foot. Draw just a little bit stronger. See it's popping out more. If I add a little
bit more to start to have almost the
same value as that one. And it looks better. Can do the outline
here to strengthen it. See that there's a leaf. Then collect the two objects with a little bit wobbly lines, lowered fields that they are
on the same cradle surface. These tools can be single lines. We'll do the other tweak. Maybe as being playing
fetch with a tweaks? I do. He's chasing the twig
himself or maybe he has a dog
somewhere who knows? A little bit of
shade on strength. So the contact surface, the contact line to the surface, a little bit of a blur
lines towards the objects. The other side, the
grass in the foreground. You can use feel free
to see what kind of shapes, forms you prefer. How strong they are
supposed to be me. Because if I draw them much
too strong, steal away. Strengthened focus from,
let's say the fourth term. The purple. This one I
will shade a little bit, a little bit wobbly. Wives. To breathe hard work if you would draw every
single pebble stone on the pathway like that. So it's just about adding small pieces that I was going to symbolize the whole area. And your brain will fill in
the rest. So don't worry. The tree stump, most of the plane. The tree stump first. Sue feel buried, sitting around a little bit of context to
the ground for the roots. Here, we can also
add small pebbles. Maybe a little bit of grass. Hello, more strokes. And that little line the
background that says that these two
parts are connected to each other through the teddy bear. This big ears. If you prefer to have a
bunny or another animal. Animal here, please
do, do it instead. It doesn't have to be a bear. Maybe in your picture
he actually put up his smart tablets
against the Stamp. Who knows, shaded a little bit for it to get a
little bit of volume. Also add some contact
lines with the ground. Hello that also will do a shadow where it's sitting against a stone. Just like that. Round a wobbly lines
symbolizing the bark. Like that. Some shade, a little bit more strength to the silhouette of the crystal. And that's the same
with these trees here. I will just shade them. So it is three young play. Very, very soft. Outline. Girls tells her to
go to the moon. Showing up behind
the tree style. Moving to Marie, Young. Lords for the clouds. I like that. Look.
Craters on the moon. Looks good. A little bit more strength from the teddy bear, so It's more connected
to the walls. Just a little bit. And when
you have drawn this and you feel that these lines
are almost the same value, whether they are getting
tangled up with the background. Just go back to the main
character and strengthened the lines till you feel they are separated from
the background. Probably don't have to draw them super, super, super strong, but it's good to go forth
and back in your drawing. I'm trying to find the
right value for each part. I think we are done
very good work. And what if the
wolf man, balsam, owner of a hair salon instead, what kind of picture
would you draw done? Or maybe he's barking
in the car repair shop. Maybe he's a firefighter
and he's out saving kitten, kitten from a tree or
putting out the fire. Just practice with this drawing and do different
kinds of versions. And see you in the next lesson.
8. Circle Monster: So I thought that we should
draw three kinds of monsters, starting with basic forms. The same shapes we
did in the warm up. So it will be a circle, a square, and a triangle. And let's start with a circle. Go ahead and make a
wobbly circle like this. Imagine what will happen if
you put a bag like this. Legs, feet. Just doing the
basic shapes first. Trying to find the main shape. From this shape, we
can add some toes. This slide. Yeah, looks good. What kind of phase should have? We should have one big guy. Quite big pupil. Maybe. Well, nice
shot like this. I think most of you should
have some kind of underwear. He could even have
a wife wrote this. Maybe someone walk, it has
woken up to bolster early on. He's just in his underwear. Not sure what is going on. Now, we can add some teeth. Well, small one there. Yeah. Quite as
symmetrical. Character. Holding arms, hands. That's usually just bolts first. There too. You can add the other fingers. Same on the other side. Maybe this hand is more. Fingers are more
spread. Like that. They have some ears. Here's like that. Since
it's some bolster, you can always add
something more. Maybe yes. Two sets. So ears like that. Looks good. Maybe some little
bits of hair on the top. We can add some scores, maybe a little bit. In the Hiss for Thomas
foreheads could put a band-aid that. Please go ahead and add
some background for this character.
Where does it live? Is this don't put a
bug in the closet or maybe he lives
in the workshop. What kind of job does he have? What is his favorite food? Does it like to play tennis? You see afraid of kittens. Anything you can find
that is interesting, please add a third character
while you're drawing them. New things will pop up and
you will add more things to this little guy. Or maybe he's a very big guy. Maybe he's taller than
the skyscraper who knows? Little bit of darkening
in the mouth. Yeah, I think it's time to
add black to the character. Can start with here. Don't worry about wobbly
lines as you'll see, I usually draw multiple lines. When I do my sketches. This is not going to be red the artwork.
It's just practice. You also play around
and have having fun. I'm finding new lines
and new ways of drawing. A little bit of shade
on the Band-Aid. As you'll see, when
you start with a simple shape,
anything can happen. When you play around
with your lines down. It will be probably
quite hard for a person to actually imagine that
you have drawn this just for us from
a simple circle, showing a little
bit of like that. So they're like input
some torque on the knees, feet to contact
him to the ground. A little bit dull shade too. Yeah. Looks good. Thumb. Is their
fingers same here? We can just put some
small nails there. And also you can make some small to show the
knuckles because this small lines, Hello. Draw his ears. Almost like little horns. Few lines as small. And as you'll see,
I'll look super careful to draw
the lines Exactly, exactly the same place
as the blue lines. Steals the following by
instinct and adding a little, a little bit more
area to the mouth. Strengthening the lower scores. A little bit of shade
to his wife, wrong. Goals, other little
bit of shade too. This part of the underwear, mature what it's
called in English, called it a sore in Swedish. So there you go. You learned a new Swedish word. Earliest, a little bit of
shade to his legs, too. Little bit, little bit more strength around the slice.
9. Square Monster: So let's go ahead and
make a big square. A wonder if we should do some
kind of squid bolster this. So we should add some
tentacles to this thing. Can start outside like that. I'm just magic make the top corner so this
square a little bit rounder. So let's go ahead and add
a tentacle out here. Also. We can maybe show, show. Well done, nice there that
it has this suction cups. I'm also do well on this side. Maybe this one is more curl. This should be
holding something. Maybe it's holding a lollipop. When it does become a
big piece out of it. Yeah. It's along the top that is colored in
different sections. We should add more tentacles. Somewhere, maybe quite small. It's really good
to various sizes. The shapes so they
don't get too similar. Because if you're drawing
a bit too static, it gets a bit boring. Straight to find your lines. Snorkeling around like
that till you find. A good variation. Should
add ice to this thing. Role while he is a little bit cross-side. A mouth, maybe his tongue
sticking out. So delighted. You think this popsicle, or what kind of candy
you want to draw there. Feel free to experiment. A few more tentacles to form up. So the base is filled
them down there. Maybe this one is you're
scoring like this. We can also add maybe, yes, Actually some kinda legs
to just very small legs. So he's not really 100% Squibb, some shoes like that. It's cool. It's a little bit lumpy, can put out some spots. Don't make all of
them the same size, the same strength to wear
them a little bit in shape, some kind of pattern. I think this looks quite
nice. Let's go ahead. Fill in the lines with black and leave a little bit of room here. The pupils to add a
little bit of sparkle. Give the character more life. And that's the same with
this wrong bolster. Try to imagine what kind of character disease is it
working in the bank? Does he have a candy problem? Maybe it's a very good
gardener who knows. When you start to find this. Find the answers to
these questions. You will automatically
start adding details, some objects to the drawing. So when you practice this, please add something new. Each time. We'll see what
happens to the character. Tom, the percent happy
with this tactical. So that's a little
bit more heights. Curtain, a little bit like this, fits better for me. And as you see, I
only made the details from the underneath the
tongue to go on this side, but your brain will fill in. But if there are suction
cups on one town to call, these will be all of them. So just adding this detail gives a lot of depth to
the other tentacles. You can, of course draw more suction cups on
your tongue to calls. If you prefer that. This yellow awesome example
that you can use to help the brain move along and adding things into your picture that is
not actually there. Some shade to the lollipop or Popsicle or whatever it is. I can add a little
bit dull shade on the disk to come to her. Level, do the top a
little bit more wobbly. So it doesn't look
too much like. A square. Fill in these sports. Remember to vary the shape. Size, strings a little bit
so they don't look the same. And also I will shade
this part a little bit. Another topic console so the soft shade to
give it more volume. Legs with a very
overall blue socks. Maybe this guy is
standing outside the store waiting for his
favorite magazine to come. Maybe it's official magazine
or maybe it's about clocks. Little shade, little bit more, or contact the new shoes. You can always
extend this if you feel that you want to shade, to go all the way Altera. But the main string solutions
should be erroneous feed. You can always go
forth and bargains. A little bit more shape there. I'm also going to draw
some stronger lines. Tentacles, so they pop
out a little bit more, little bit more string fare. So the focus goes up to his ice. Can show you the legs
a little bit also. So they go underneath the
tongue pickles. There we go. One square, squid,
candy eating monster. It's the triangles
turn next time.
10. Triangle Monster: So let's do the
triangle bolster. Go ahead and draw a triangle. Roughly. Something like this. Two big horns. Very big homes. Make them a little
bit of symmetrical. Can even carry out this one
a little bit more like this. And I wonder if this milestone
should be harry. Let's do. Instead of doing an outline, we will do silhouette, bed, although hair and stuff. Please continue to do
some wobbly lines. It's probably never seen a
carb and its whole life. So maybe some of the hair is sticking out quite
a lot like this. Instead of having two eyes, very big guy in the
middle like this. This can also be a
little bit crooked. You see the horse are a
little bit crooked this way. So we can draw the
eye in this way. Instead of having the
pupil like cumulus do, we can do it like cats
or snake have them. This almond-shaped. As with other eyes, please
leave a little bit of light, a little bit of
reflection in the eye to give them bolster
some more life. What kind of mouth
shut this monster? You think he's a singer? Or maybe it's a mute. Or she could be. Maybe it has quite a big mouth. It's quite wobbly like this. There's two teeth showing that. It looks quite okay.
Maybe a little bit more. Hair on top. Going even
outside the picture. Now the little bit of a lip. Looks good. I'm done
instead of legs, maybe it has like arms standing
like this on the surface. If you draw little fingers like this, maybe these are more wrinkled. Big your fingertips. So males, one thing that is very fun
when you draw monsters is that they can be
anatomically very wrong, but still look very correct. This is a great way to
just play around a lot. Feel that there's
certain rules or principles that you need to
follow his, justify them. Play around with your minds
and your imagination. Always remember to think a little bit about the character when you're drawing them, about their background,
characteristics. Shades, forms. Course that will help you. I hope you find the
character value that your imagination run free. Instead of looking
sort of grumpy, I can change it to smile
and stuff like this. That's a huge difference. So I think I prefer this
monster to be a little bit, little bit happy. So let's go ahead. The black lines spot where
the horns this time, single line like that and then some shade slew. Please continue to try to make this silhouette or the character
without drawing a line. To show the edge joint to play around with the
hair as much as you can. That will form the
silhouette instead. Slipped the hairdo,
go up into space. Well, let's start
sketching character. I love this part. Just
playing around with the line. See what you can find them. Not taking it too serious. When you draw the hair. Tried to make some
lines stronger in someone's little
bit lighter so you get the variation. Something like that. Control. This is the top part. Withdraw the other lower
lobe beneath this line. So you've got more like
him. Sort of an eyelid. Fill in the pupil. Go back to a little bit
more of a sparkler, a little bit. Crooked teeth. Show you them. I
asked a little bit. The lips. A little
bit of texture here. Can always show you the mouth. Slightly same with the
bottom part of the lip. Give it a little bit
more of a volume. Brinkley, feet, hands, He's wobbly, crooked TO fingers. Remember to add a
little bit of strings. Sure what a monster is in
contact with the ground. Getting more weight. We are doing. So shade. I'm a bit stronger like this. Now you can add some strings
to the hairline stuff. I've done the theorem to
show that the Harris more in front legs like this. And then they can also
add a little bit of shade arrow. Just a little bit. Yeah. Looks quite good. See if I can bring out a little
bit more light here. You can always do
without this to make the most use to
fill in everything. Done, you have a different kind of appearance to the character. Looks a bit more. Maybe a
little bit more seniors. Since we're doing
that, we can also add a little bit of wanes. Just imagine that there are
almost like tree branches. Shade this part a
little bit too. Yes. Good work. I hope you're having fun and see you
in the next lesson.
11. Tiny Vs Huge: Slug Monster: So in this lesson, we're going to draw a monster. Make it both huge. I'm very, very tiny. Let's start with the monster. We can start with a simple
oval shape like this. And I think it's going
to be more like a slug. So we're going to make
a little bit of a tail. This slide. I'm also going to be quite fat, so let's add a little
bit of shape down here. It's going to be quiet
while blood is shaped. So play around with allowing
that you feel comfortable. We'll have the tail go
up just a little bit. And then the slag
will have some eyes. Maybe it will have three eyes. Little bit different shape and form pupils. Leaving that little spot, a little spot and I, to make it more alive. Herb mouth is quite open to all big tooth like that. Fill in the mouth. Little bit. Kinda make the lines
show better for, you know, when I know a little bit more about how the monster
is going to look. Quite flat. Surface
connecting to the Earth. Done we will have
two small arms. Let's do the circle.
First. Fingers. The other three fingers. The arms hanging a little
bit down by the body, can also add some more fat here underneath the
arms sticking out. Showing that the monster is quite stocky. Like that. Clarified the shape of
the mouth from the tooth. Then we can add maybe
some texture too. The side here, some spots, little bit different shapes. Maybe two up here. Maybe a few spots
here on this side. Yeah, I think that's enough. Since it's a snake and bolster, it should probably have
some Google around it. Draw some wobbly lines, showing that it's some kind
of liquid, some kind of goo. Can add a little bit
too few points that are like small splashes.
Something like that. Let's go ahead and work with
the black line, like pencil. Starting with the mouth. Will not make this too black. Since the mouth is quite big. So it doesn't take over the
whole face of the slug. Leaving that little
light during the pupil. Cannot just a little
bit of shade here. Hello, hi side. A little bit. Climb. Can add a
little bit more of a wobbly lines here if
you want to make it more. Fatty. Just a little bit of strength from
down here underneath the monster until a little bit too wild here
with the black soft. Erase it a little bit. The arms and hands dangling. Else. Though it looks almost
like you're surprised that we have caught him in doing something about maybe
it's on a shortage. What is supposed to do now when he's either whether we're
very big or very, very small. The small freckles can
move on to something here to select that little bit
of shading underneath. A little bit. We're going
to do the goo here too. Maybe he's not a slave list. The normal bolster body itself. I don't know. There you have to add a little bit of
shade here and some lines. There. We have one monster. Now we're going to make
it a very big malls. To just start with this slide, I will draw a building. So I will do a rectangular shape slide, something like that. And I'm a little roof. This building, maybe
a little chimney, smoke like that,
and draw a door. It was going to
specify the voice a little bit more clear. I have the little door
with a round window. We can add those
to the building. Can start by doing
some guidelines. In this building
you can, of course, out of the bottle details if
you want to make flowers in the windows or cartoons or people standing
looking at the monster. Please go ahead and do that. Herb. Hello, this is material
that is a bit smaller. So shade for the house. Standing on the ground. Now you can see the
monster is huge. So you just make the house a bit more concrete. Hello In this little
smoke, a little trail. And as usual, don't
worry about that. The line is supposed to be
extremely straight or perfect. This is the acyl exercise. It's about finding exciting
details and adding to your imagination a little
door and the little handle. The ground. The limit to a
little bit of shade here. I'm a little bit of strength. Underneath the house. We can just add a silhouette of a person looking
at the bolster, the Austin Building
in one window. Now the bolster is huge. Let's see what we can
do to make it tiny. So on this side, we will make something that
is about the same size as this small oval shape, like dance. Show that. So on this
side we will draw a coin. I don't know which
country you're from, what currency you have. So please feel free to displace the
currency of your coin. Let's make this
very simple outline over some kind of face. Not very detailed,
very rough like this. So you can understand that too. There's a figure here. Add some wobbly lines here, describing that there's
some kind of text. It's just a symbol anyway. So just on the edge. I'm going to make
these markings. Some coins. This texture on the side. Like this. You can love golf course, just draw a symbol error, maybe just $1 sign or euro or
Ruby or whatever. You like. Nails to add the
little shade here. That's the contact
to the ground. Take the black pencil, fill in the lines. So this is just a way for
you to add objects around your character to give it
the size you're after. It could have been anything. Instead of a coin, maybe
there's a strawberry or a little bogged down
or whatever it is. Just a reference points. Something like this.
Where wobbly lines. I'm showing some
kind of face there. When I do these lines
to very roughly. We can eat them. Shade this part. Let's
talk a little bit. Shaded told me for a little bit and also
a little bit on top. A little bit of strength, fair? Shade. There you go. You have two objects
next to the bolster. One that's showing
that it's very huge. And other one is showing
that it's very tiny. So you just imagine
that the cover this up. The monsters are
really, really big. It's huge. Or recovered this up. And it's a really, really
tiny monster that is just going after little
candy in your house. It's a huge difference. And this is a very nice way to play around with
your character. Giving it different
characteristics. Fill in the lines a
little bit better. Moving to focus up to his or her face appearance that there you go,
play around with this. Please add some voices
to your characters to, because it's always fun to
mimic and give it more life. I'll see you in the next lesson.
12. Tiny Vs Huge: Ant Monster: So let's make another try at
super big and super small. Imagine that you
will draw kind of a start with one circle
for the back body. Now the circle for
the main body. The head a little bit bigger, round, shaped like that. So in relationship
with the coin, we know that it is quite small. Because small draw eyes can be googling. I like that. He's staring out into space. Bow with some teeth. So maybe this is
not really allowed. It's more like an adult Monster. Two antennas, quite big wells throughout the body. Not withdraw. Some arms. Sale is quite open. Normally I draw, I have a very close grip like
this when I draw, but then you can't see anything. So I tried to help by hand as much out of
the way as possible. That is why I dropped a
pencil, a blow. Sometimes. We can have the
other arm, I'm home. And then this one, it's going to have a tight grip. I think it should be
holding a little stick. Since we're still comparing
it to the coin next to it. This will be a bird little, little stick, right leg. And it has some kind of boots. I think that is
opening the frog to me has some kind of tunnels. Close. Number has
another leg here. Other shoe? Yeah. Like that. We couldn't even
erase this little line here. The real the start of
your little Gloucester. Gloucester. To find the lines a little bit better
with the black pencil. Leaving that little
sparkle in the eye. Can even make this a
little bit more circular. Like that. Long his tentacles or on tunnel sits because
of blastocoel antennas. This one is on top here. Another one is going behind me, but there's some kind
of pattern there. Yeah. I think we can make the mouth a little bit bigger, a little bit more strength. It'll body weld arm. To give it a little bit
more and bolster field, you can of course add some sharp tunnels like this body. It looks like he
has some kind of wrinkly socks on top
of the shoes too. Number two, terminals
sticking out the leg. As you see, this is
on top and this is going behind the socks. Cut open shoes. The tolerance limit will add some strings
underneath his feet. His other arm and hand. This sticky that is holding us. Come back to this object really little to shade and also share your daughter. Tara. Know, this little monster is standing next to
the coin screaming. Whatever you think is screaming. Babies, Charlotte, she would, maybe it's a jolting
for pizza. Who knows? It's going to add
a little bit of shade beneath his body parts. So little bit to give it. Give me a little bit though. You can also say this
part's a little bit. There you go. What little? 0 and also bolster and what will happen
if we actually will change this slide to something like a forest or a mountain side or
something like that. So let's go ahead and draw
some very small trees here. Are even smaller one
here from pine trees. Like this may be
in the background. Even have a molten like that. With the snowline. Close. Control some clouds behind her to maybe
make some small bushes. Then we will draw a
very rough silhouette of a forest in the
background. Like this. I think you've covered
this part all of a sudden you have a huge monster. Let's fill this with black to. It means that this
little stick is actually a tree smolder. A sudden you have
quite a huge monster. So what? We're going to shade
it a little bit later also. So a little bit little bit of shading to give it a little
bit of contrast. So you actually see
these two trees this fall. We can also add a little bit
of shade to multiple side. So that's the little
bit of ground here to where it gently. Other lines to the clouds here. Also behind like that. Look at this, this really,
really big screaming. Period. So wherever you
think he's screaming, maybe it's asking somebody
who dropped the tree. This tree. Where is the home the. So there we have another
example of how you can change the size of your monster. And also it will change the characteristics
also from being this little too huge monster. I hope you're having fun. Please practice this with different voices and see
you in the next lesson.
13. Tree Monster: So I thought we should draw
some kind of tree monster. Let's start by drawing the body or the trunk
of the monster. Some curvy lines. Then we can do some kind
of ritual early roots. Almost like tentacles. Decided to making this
a little bit bigger. Yeah, that we can herb. Not at first appear. There, you have your main shape. Then we can add a
lot of ice here. Round, round or oval while small ones like that. Then we can have a big mouth. Maybe there's a tongue sticking out a little
bit like this. Free monster is
screaming or shouting. And then we can add maybe a pair of little arms here. Something like that. Almost like closest fingers. Do the same on the other arm. I think close to the head. Yeah, I can even make
it more symmetrical. Bit more lovely. To see. You can always reshape
whatever you are drawing. Trying to find what is right for what you're
looking for in your drawing. Do this a little
bit more twisted to kind of Timbuktu wish. You'd liked his kind of shapes. You have seen this movie is doing the eyes. Eyes can be looking in
different directions. So you don't know what
is going on there. What is staring at small walls. The top can just be a
little something like this. To show that it's
more like a tree. The little bottle they put
first, the bark lines. Random lines. If you prefer to do some other kind of tree that has a different
part, please go ahead. Maybe it's a birch tree
that has more spots. Maybe you have a fire favorite
tree where you're living. They want to incorporate that into your drawing.
Please go ahead. Just go out the little
line for the summer. So there you go. There you have your basis
for your tree monster. Let's go ahead and
use the black pencil. And as we talked about
in the previous lessons, try to imagine what kind of personnel to this tree moles
as the cradle of life. Sounds. Maybe this tree
monster is actually mute. So even though it looks
like it's screaming, He's actually silent.
Silent scream. Some black to the mouth. Well, this monster I'm
making toothless because I added a tongue here
and I wanted to time to be more dominant. Started a little bit of shade
on the Mr. Tongue to this. Because when the more
objects you add, the more focus goals to
each individual part. And if you just
have one big thing sticks out more clearly, I think I will go ahead
and not the parcel dew little bit more of the
home, even wobbly lines. It's almost like it's
shaking. Same up here. We'll do the Ruth tentacles. A little bit of strength, older leaves here to the bark. Some simple lines.
Let's play around. See what you can find. Maybe you prefer to have fewer
lines that are more dark. Where are your preferred to
have even more crack sounds? Lines going to shade
it on this side. Give it a little
bit more volume. Just a little bit. Don't
have to associate this part. Some strings to a few
of these bark lines. More strength to the eyes. Disappear with other lines. Because the eyes are
important and destroying. And of course, a
little bit of shade. The ground. Yeah. I think just
looks quite good. One screaming mute tree monster. Now wonder what else we can
actually add to this picture. What if it actually is screaming so loudly that the
leaves are falling off? Let's draw some small leaves
and try to randomize them. They are falling and are tilted
in different directions. What we can do is just
to draw one line. And then you draw some
circles like that. That's quite simple
way to draw a leaf. Some of them are a
little bit bigger, some are a little bit smaller. Maybe the trees
actually screaming because it's actually
losing its leaves. Who knows? Or maybe it's
opera singing tree. And it takes the high note
and it makes the tree, it makes the leaves fall off. Some leaves like that. Maybe a few small wells up here. That should be enough. I will feel in them just a little bit. Not too strongly. You
don't want to take focus off the tree bolster. Let's fill them in a little bit. Some can be a little bit
stronger lines but not too much. Remember, you can always go back and redraw a tree monster. If you think that focus of
go too much to the beliefs. You can always go
back and strengthen. Some of the lines like this. Screaming too high note. Hello, wonder if we should add maybe the tree
monster has some kind of babies, some saplings. So let's go ahead and
do a little miniature. Maybe this one just
have two eyes. This one that's maybe a
little bit softer lines since it's a baby. Standing next to the tree. Can never even make
smaller models. Really, really tiny dots. These maybe have
not even eyeballs. They asked have black
dots us as ice. Standing slightly
behind the tree. Of course, add something here to be a little bit
bigger than this one. Started to have
more than two eyes. Yeah. It looks interesting. So did a tree motor is
some kind of parent? Maybe we should imagine that this little sapling
is holding something. Maybe it's holding a sign. Just a little bit. Little sign. You can see this
thing going up here. I'm on the sign, you have a leaf. Maybe it's a part of it, is called picket demonstration. We can add the sign here too. And it has the same
symbol, belief. Then we can start to imagine
some kind of backstory. Is it a picket for
saving the leaves? Maybe sexually, the
tree monster is this kind of monster
that eats leaves. The small saplings want
to save the leaves because they are not
the same as the parent. Let's fill in the lines. To leave. A little bit tough, show you. They're just a little bit
connecting it to the ground. Connected it to the big guy. Because young children, small sapling here
in the background. If it's a demonstration. Can imagine how these
little guys are sounding. Have very light voices. Maybe they are not
screaming something. There may be a singing. Maybe they have a little picket sold free or leaves free or leaves. We want leaves. Make sure that this tree
has the most weight. There you go. Your tree monster. Please practice with this. Play around with the forms. Make sure that the little guys around it or doing
different things. Maybe the guys are
playing hockey or there may be
watering the big tree. Maybe they are not.
Leaves are falling down. Maybe it's snow or candy. Just try to imagine
different scenarios. And good luck. I'll see
you in the next lesson.
14. Dragons: So in the last lesson, I thought we should
draw some dragons. Why not start with
quite cute dragon? Start with the body. Will look almost like a
beam. The little tail. Make sure the belly round them. Big. Number, a little slow. And big eyes can be
quite launching. Something like that. To make a character Cute. You should have a very big role. Geometric pots, like
big round eyes. Whereas soft round corners, usually quite a big head. And when it comes to dragons, there are quite different
depending on where in the world you're from. I'm from Sweden. So traditionally,
our Dragons for depicted to have no wings. It was more like a serpent, like a big snake. I think. Most common in Europe is
that the dragon has wings. Breathing fire. You can of course, add some
flavor to this drawings. These dragons, the bundling from wearing
the world you're from. So cute feet. Leg, the back side
of the leg here. This part of the
bell is little bit different colored on
from the main body. This dragon should have
very big eyes, were big. Bowls. Just start to imagine what it is looking at. And maybe he tests a little, little mouth like that. But making some small arms. Pause. Just for a small bump. The other one like
that. The dragon should have some kind of scales. So let's go ahead and add scale to the back of
the body and the tail.
 Christer Hägglund, Illustrator / Author / Game Developer