Transcripts
1. Introduction: Hello and welcome to
my Skillshare course. I'm Kelly and I work here in my studio on the family
farm in Cambria, which is in the
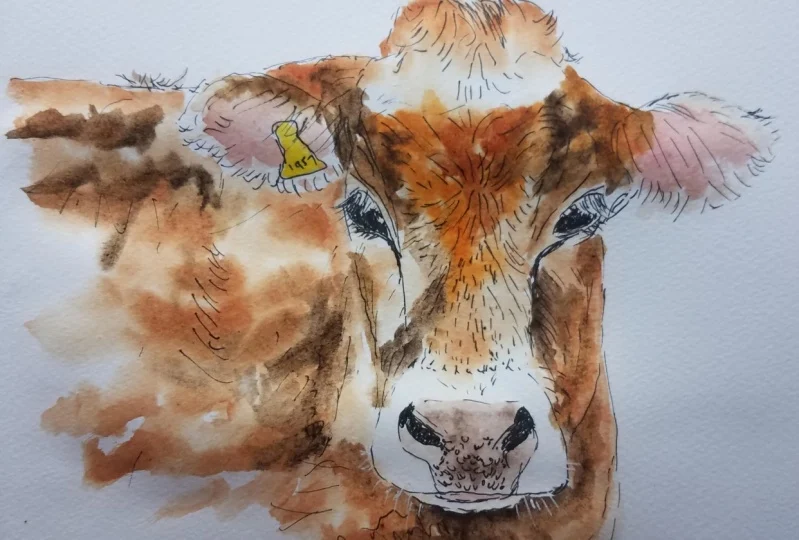
northwest of England. In this tutorial, we're
going to be looking at how we draw and
paint a cow's face. Starting off with a quick,
simple pencil drawing, looking at the measurements and getting those
measurements in with the pencil before we go on
to doing our ink drawing. And finally, putting on some nice washes of color
with some watercolor paints. For all of us without drawing
whether we've been doing it for a long time or
whether we're a beginner. A very important
thing to consider is that we are
using our eyes and really observing what
we're drawing and not relying on our mind
to fill in the blanks, which it quiet often does. One of my pet peeves as
someone who's around animals every day and as someone who's been on a farm every
day of my life. And be very, very familiar with cattle is when people draw
them as if they're soft, fluffy, object as if
they're a cartoon. And as if there are stuffed toy, even when their intention is
to draw them realistically, it's absolutely fine if
your intention is to do, to do a cartoon character,
that's absolutely fine. But when you're trying to
do something realistic and it ends up looking too soft. It's really because
they have not observed and they've not thought about the fact
that this is a very, very powerful heavy animal. And you've got a
massive school there. There's very little
flesh between the skull and the
skin on top of it. If you knocked on the
forehead of a cow or a horse, so you put your hand
on it, you wouldn't see how solid it was. And you want to try and convey a little bit of that in
your painting and drawing. And understand where
the eye sockets are and how these are attached and all of that to make it a little bit
more convincing. And although it
is much easier to draw things that
we're familiar with, by the same token, we can
really make mistakes when we're overly familiar
with things because our brain fills in the blanks. This is why children draw the sky as being blue and
the grass as being green. Because your brain is just telling you that's
how it is your eyes. If you stop and look at
the grass in the sky, we will see a lot
more color in there. You'll see a lot more variety in the greens and the blues. And there'll be lots of grays, yellows and pinks and peaches and all sorts of
other colors in there. So it's that we're trying to stop when we're
new to drawing and painting is don't let your brain unconsciously
without thinking about it, fill in those blanks. Use your eye. Itchy eye, that's important. Stop, think and look again at what you're
doing and rely on that. I I hope that makes sense. I hope I'm not waffling
too much there. And we'll go on now and do that quick pencil guidelines
and look very carefully at those measurements.
2. Measuring: Before you begin your drawing, you really need to have a bit of a study of the subject that
you're going to be doing. In this case with an animal, it really is absolutely
fine to work from a photograph because
of course they don't stand still
when we want them to. So you might struggle a little
bit to do them from life. If you want to study
them from life, gets a little sketch
book and do lots of very quick two-minute sketches, then you can perhaps put
those together later on. But for this exercise, it's absolutely perfectly fine
to work from a photograph. So get your photograph
in front of you and you don't necessarily need
to print this off. You could just have a look at it on your tablet or your phone, your laptop, but have a really good study
of your photograph. Now first thing is
with this one is I think there are one or two
things I might leave out. So if you look carefully, you can see that
there's the bell here underneath the
mouth of the cow. Now, this line is
quite a distinct line, the bottom lip of the cow. And really the bell here is
going to distract from that. So I would leave that out. If you want to put that in,
that's absolutely fine. But I would leave that out. And if you're going
to leave the bailout, then you also want to leave this bit of book
all that's showing here on this part of the
belt that's attaching it. So again, with this a
little bit of book or here, you're not seeing
that nice line of the cheek and the line
of the shoulder there. So by taking those away, you'll make that a
lot more defined. Now you might want to take out the ear tags and just draw the years without them or you might want to leave them in, that's entirely up to you. I think with this one,
it might be nice to. These are a bit messy. We've seen in the back
of an ear tag here. And again, that's
distracting from the line of the ear because
the line of the ear, it goes around like
this and you've got this very angular shape here
that distracts from that. So I will probably
leave these out and maybe leave this one in for just a little splash of color, put in that yellow in there. But we'll see we can
decide that later on. Once you've thought about
what you might want to leave takeout and have a look
at the measurements. Now, measuring is something
that comes to you with time and we all have our
own ways of doing things. Some of us prefer
to measure by eye. Some of us prefer to actually measure
things with a ruler, and some of us do a
combination of both. You'll find once you start drawing and you get
partway through, perhaps if you go
off for a coffee or something and come back
ten minutes later, you'll notice things jumping out to your eye that
aren't quite right. And at that point, if you stop and check your measurements, That's always a good idea
because your eyes very good at picking out when you've
gone, gone wrong somewhere. So at that point you
probably want to do to actually
measure with a ruler. And it's not something
I do very often. I like to do things by now. And again, it's a good idea. And with a photograph, obviously that's much easier
than again with something that's in front
of you are living object. So if we look here, so perhaps the measurements, we might have a look at the top of the head there and we've got four centimeters
across the top there. So that'd be a good
one to start with. But as well as doing
just the measurements, it's a good idea to
compare as well. So if we look at it there where they're across the nose there, across the top of
the dark color, but it's also four centimeters. So we know when we come
to do our drawing, this line and this line, I've got to be the same length. And then if we look
at the ears, again, they're not much more
than four centimeters. So as well as doing
actual measurements, you need to be doing comparisons,
comparisons as well. And that way things
will line up and look pleasing to the eye. Things won't be jarring. Now I've tried to get to
photograph where the cow is, pretty much straight on, but of course she's
slightly that way. It's very difficult
to take an image of an animal where
they're completely pull them onto the camera. So you always need to
bear that in mind. Just think maybe she's
a little bit angles. You can see we're seeing
much more of a cheek on this side than we are
on the other side. So the eyes and things
like that are going to be slightly different. They're not gonna
be just submit, it's not all going to be
completely symmetrical. And as well as doing comparisons
with your measurements. So like I said, that's
four centimeter. That's the same as that
may be similar to the ear. And, and maybe that goes into that two or three
times, whatever it is, you can do all that as well as that look at
where things line up. So you can see that
the edge of a head, so this is a big
bone under here, which is often covered with a little bit of fluffy
hair on the top. So where this term, where this changes shape here, this corner, if you
go down from there, you come into the
corner of the eye. So again, if you've, you know, you've got things
in the right place, if you do, line things up. So again, let's have a look
to see what else we can find. The bottom of the mouth, the nose here, again
lines up with the eye. Lining things up and
checking them against each other is just as
important as measuring. So we won't really talk
much about the rest of the body will just
lightly put that in. It's mainly the
face that we want to concentrate on today.
3. Anatomy: Again before you start
doing your drawing. And once you've thought about all those measurements
and where things line up, have a really good thing about the fact that
this is a 3D object, is a living animal. It's not a flat 2D thing
that we're looking at, a 2D photograph which
has flattened it out. But if this car was
stood in front of you, It's very much a big mass and it's a big
animal, and it's 3D. And we need to get
that impression into our drawings and paintings. So don't try and flatten it out like the
photograph has done. Try and bring it back to life by thinking about it
as a 3D object. Now one way that's very, very easy to do that
with animals is to look at the
direction of the hair. This is why I've picked a short haired animal
like the cow here. You can really see on here
where all the hair is going. Unlike a lot of
horses and things, we've got a little
bit of a star here, whether the hair is going out, so that makes it a nice shape. But look very
carefully at old days, if it was a flat object, the hairs would
all just be going straight in one
direction or whatever, but they're not they're
going around the bone. So you imagine we've
got the cheek here and the hairs are going around it, they're
attached to it. You look at your own hair, it's going around your skull. It's not just all in one
direction, one line. So by getting the
hairs in the right, going in the right directions. So if you see here
the coming this way, because the nose is
coming out towards us, it's not a flat objects. You can see those hairs. And if you get an another going around here and they're
going around here. So you don't want
them all going like this or flats or
whatever you want to make them go around
around the skull. And so that's
another thing I want to talk about before
we start the drawing, is really think about
that skull underneath. This is not a cuddly toy. It's a big, heavy animal. We don't want to
do a painting that looks like a fluffy cuddly toy. Want to give that impression, this sense of this big, heavy animal and that comes from the skeleton and the
skull underneath there. You've got to follow
that around and you've got to show
it in your painting. Even if you're doing
something like a highland cow that's
completely covered in hair. And it's very
difficult to see the, imagine where the
skull is underneath. You really need to think
about it and try and pick it out to make your paintings more
believable, more accurate. So look at where the
eye sockets are. So we can see here, we can imagine
underneath here you've got a massive eye socket. And you can see that line
there again with the hair. The hair is going
around that eye socket. We can pick out the lead there. But the AI isn't just this area, this isn't just the height. This is the eye.
All of this area. If you think about
that skull underneath, you've got that
eye socket there. We know this is very hard here. We know that that's a massive expansive bone
there and down to here. Whereas this is much softer. Look at these being softer
lines and things like that. So really think about
how things are built, how it's made up, and that will really, really
help all of your drawing. Not just with animals,
with people as well and with any animal, like say, horses and cattle with
short hair like this, much easier to pick out the skeleton and to
think about that. But when you're doing something much with much more hair
like a sheep or whatever, you still need to
think about it. And you still need to
have been believable. You'll often see sheep drawn. If you imagine how a
child draws or shapes, I'm just going to draw
on the back of here, a child draws a sheet like
this with the legs like that. Now, they're not necessarily
line up with the shoulder. So your skeleton is under there and it has to be lined up. Your leg has to be lined up with the shoulder and all
this kind of thing. So really look at where, imagine where that skeleton is underneath and here you can
see part of the shoulder. And then you've
got the leg coming down here on this side. So you know that the leg on this side is coming in
down in this direction. But like I said,
we're not doing that, but it's all things you
need to think about when you're drawing and
painting animals.
4. Pencil guidelines: If you're not confident
about your drawing, maybe you're a beginner. One of the easiest ways
to work is to actually do it exactly the same size as
it is on the photograph. However, it is nice to
work on a larger scale. It gives you more
scope for adding colors and movements and getting all these hairs and things in and making a little bit
more dramatic perhaps, if you want to scale it up, obviously instead of this
being four centimeters, you could do it
eight centimeters. But the main thing is
to make sure you scale all your measurements
up by the same amount. So for those of
you that want to, I would I would perhaps advise going a little
bit bigger than this. I'm going to do it the
same size because it works for the cameras setup
and everything I've got here. So rather than measuring
with my ruler, what I tend to do it
with measurements. If I'm measuring,
which I don't very often do is to do
it with my pencil. So go across there
and see how far across you come to there. So that's the measurement
across there. And then a very important
measurement, of course, is from the top of the head to the bottom of the bottom lip, they're ignoring
that bell and that's exactly the same
length as my pencil. Just put some guidelines, guide marks in the Tirol
going to be erased later on. Then we need to
look at this line, how far across we're coming with the ears whereabouts
those hours. So if we look at where
the center of these out, this is slightly
higher than this. So if we line up from
one to the other, It's not easy to see
with a rule there, but you can see there's more of that one showing over the top. Again because I had
slightly tilted that way. Perhaps. Another met we'll come down to the
eyes from there, see whether corner
of the eye starts. So if we look from
there to there, it's going to be
about here somewhere. So probably much
lower than you would imagine from there to there. Slightly different but not
much, slightly higher. And this measurement here, we'll go in, out a little bit. So the schools, this shape, it comes out and of
course, but like I said, we've got the eye sockets so we could think
about whether I stock it is It's
here very lightly. You don't need to put that in, but that's just
to say, you know, that is where they are. Um, we've put the bottom lip in, so let's look at
the measurement of that is just about there. And then the top lip. Okay. And then the ears. So let's look at those. So they're not starting. This is a mistake
people often make, is to stick these on
the side of the animal. So the draw the face
and then they pop v is on the way in, a cow's ears are attached. We've got this big
piece of muscle here because they move them. This part of the ear shape that we think of that
we associate with a cow isn't attached
to the head directly. We've got this shape in-between. So we need to get that in. So let's start and
actually joined some of these dots will be easier
to, for me to explain. So the little dip
in here, again, it's not easy to see that
because of the hair, but it does dip in
the school there. And then we're going out to the eye and right the way down. So you go out around where the cheek is and
then it goes out again. Right across without mouth
and then your bottom lip. Around there somewhere. This side we're seeing more
of the side of the face. So it's out and up. Two lines there. We've got
the line coming down from the right and then part
of the cheek there. And the school gone over the
top of the eye socket there. So it has to go around it and
then they see it goes out. So we've got this bit here. Then we need to measure the ear. So it goes out to here. So you can spend a
bit more time than I am on checking
these measurements. I don't really check
measurements anyway, but that's just me. But when you're learning,
it's a good idea. What I do is correct things when they're not looking right and check them then again, you've got that bit
where it attaches. I'm hoping the pencil
will show up here. I'm doing it quite lightly because we want to
put the pen on. And you just want
to indicate where the back is there because
of course you don't want your counter look like it's not attached to his body, his head to its body. And the shapes onto here
are quite distinctive, but we're just putting
them in quite lightly. So think about the eyes now. So you've got the
socket go in there, then you want to. So if you look, the lid here is right next to the
base of the ear there. And you don't want to
put loads of detail in. We'd already put whether corner was so we know we've
got that right. You want to do the detail
really with your pen. So again, the slightly
different don't just assume both eyes are
gonna be exactly the same, same size, shape, everything
because of the angle that it's only very
slightly different. You can hardly tell, but just
really think about that. So you've got that really
big eyeball in there. You want to indicate that on the side of the head
obviously because they want to see predators
from around. So again, that's another thing. The eyes aren't on the front of the head there on the side. And you've got all these
shapes going down here, which you can indicate. Because as you're drawing
with your pencil, you can reinforce
force and you're telling your brain
where things are going, all going to help once
you start coming to put your pen lines on. So if we look at that,
it comes around there. And that again is
because that's where the socrates and then infer the cheek and
out as I said before. Now this line across here, it's a line of color rather than a line of the actual
shape of the animal. So be careful to make it
look like it's joined up. This is coming over here. It's not we don't want it like it's a stuck on
knows if that makes sense. So think about your hairs
coming over there like that. So let's go slightly
further out. And if you put
those nostrils in, that's really going to help us get the feel of
the animal there. You just need to place
them at the moment. You can put all the detail in the shadows and
everything in later on. Again, there's a
little deeper there. This is very soft. This here. You imagine touching that. This is a thing about the
skeleton and everything else. Imagine touching that animal and where it would feel really hard here and where it
will feel really soft. And then that's all
going to kind of show through in your painting, a new drawing if
you're aware of where things fit and how they feel, It's going to help get
that reality into that. So she actually looks
a little bit sad on this pencil drawing so far. We'll carry on and
see how that goes. Because I'm feeling
that I've done probably enough pencil
drawing and I'm going to come back with
a pen and we'll talk a little bit more
about the drawing process.
5. Ink drawing: Before you start
your ink drawing, be really confident that you've got your
measurements right? Because of course
we can't erase ink. There are things we can do to cover it up if we
really want to, but it's much easier to
get it right first time. And the thing is if
you've got your pencil drawing accurate with
the measurements, and it makes the pen
drive and much more fun because you can be
a little bit more confident and just
enjoy the process. Knowing that as long
as you stick within those little guide
that you've got there, it's going to be looking okay. So I've got a uni
PIN fine liner. And this one is a
size nought 0.5. The main thing is that it's
waterproof and fade proof. So that means we can
put some water over the top of it with our
watercolor paints. The way I work, it might be different
to the way you work. There's no right or wrong way, so don't worry about that, but I tend to start at
the top and work down so that my hands not
sitting on the ink. Once you've completed
your ink drawing, do let your ink dry for a little while before you come
along with your eraser, get a nice soft, clean eraser to get rid of
those pencil lines, but do just give it a
little time to dry. It doesn't take long to dry, but we can't be inpatients
sometimes and think we'll just go straight ahead and erase those pencil lines and end up with a little
bit of a smudge. So I'm going to go ahead
now and do the drawing. I'm not going to talk
through the whole process. Like I said, we've got the
measurements in there. So this is just about putting the hairs and things
onto the animal really. So if we start at the
top and we look at those hairs a little bit scruffy and that's going
to give it some character. So you just sit in them on
top of what's already there. And of course, this could
take quite a long time. And you've got some
little flicks. So at this point I'm standing up because it keeps your wrist a little bit more
movement and you can get some of those flicks
and things in. You can move from his
shoulder a little bit more. Your drawing can be a bit more dynamic than if you
were just sitting down. Because when you're
sitting down, you tend to tighten
up your wrist and your writing as
if you're writing and everything is tight
in here and you don't get the same movement
into your drawing. We've got some hairs
growing over here. So don't think about the
color at this stage. We've got these are longer
hairs on the top here. I need them to come
a bit further down. Actually. They need to be coming to that round
about here somewhere. So you've got these long
runs on the top and then shorter hairs
in different colors. But it's not the color we're thinking about when
we're drawing. You might want to
think about some of the shadows in here. It's very dark because the light is not getting
under that hair. But don't worry
about the colors. Worry about where things are actually sitting
on the animal. So these are shorter
hairs underneath and they're going over the bone. So if you look at
the shape here, these are going over the
bone of that eye socket. Around the ear. This is pretty much all muscle. This part here because
it moves the ear. So understanding and knowing these things is
all going to help you to make a much more
convincing painting. Again, that's going around
the school or that Heather. And you don't have to put every single little hair in
detail in that you're seeing. It's just that the ones
that you do put in, you want to get them in the
right direction to give us that feel of the
shape of the skull. So don't worry about putting every single little last herring that you can see
on the photograph. He would drive yourself mad. It's making sure that the ones that you do put in are
in the right direction. So when we go over to the ears, we've got this
really long hairs. Quite scruffy. If it was
one of our cows where you have just holds
times here at home, which are the big black
and white cattle. So of course,
they're not just as, as hairy as this in the ear. And ours are actually
clipped very regularly so they don't get us areas. This look at that now we've got a funny tuft of hair going in
different directions. So that's just peculiar to this actual animal and makes up the individual
character that it's got. The moment it might
look a bit funny, we just got all these lines. So you'll notice I'm not doing an outline like we
did with the pencil. I'm just putting these hairs
in and following the shape. And we'll do the
same on the back. And we can put a line in x. It's much darker, it's
much darker color. And we're not actually going to be putting loads of
detail in there. We're just going to give
an impression of that there's one or two hair
sticking up in the Sunday. You can see that don't want to spend a lot of time
doing lots of detail, but just one line
there can just help show that you've got things
going in the right direction. So I'm going to
stop littering on now. I've left this out. I haven't forgotten about that. I think I want to
leave it out now because I had
forgotten about it. So let's leave it out. So I'm going to stop littering on and I'm going to carry on. I'm putting some
shadows in as I go. We can put some more shadows
in later on with a paint. So just really following the
shape of the animal around, getting those hairs in the right direction and
gradually building it open. This is going to
take quite awhile depending on how much detail
you want to put in there. So I will fill in the
rest of my drawing, but I will come
back to you when we come to putting the paint, Tom.
6. Colours: Once you've completed
your ink drawing, you want to get your
colors together. So mix-up a few colors, the ones that you think
are going to suit the photograph that you've got. But don't overdo it. I had plenty of water
and use plenty of water when you work in because we want the ink drawn to show through. When you're doing line
and wash or income wash, whatever you want to
refer to, tell us. It's your drawing. That's the main part. You've spent a lot of time doing that detailed
drawing with your ink. You don't want to obliterate
it by putting on too thick, too heavy paints
and making it too complicated and putting
lots of color in there, your shadows should
be already there with some of the line
work that you've done. So we really want to keep
it simple because that's what line and wash or ink
and wash is all about. The colors I've got here. We've got raw
umber, burnt umber. This is burnt umber with some French
ultramarine intimate, that nice blue gray of the nose. And then we've got
some raw sienna. Raw sienna, sorry, I'm
just thinking into that. I've put some of the umber as well to make that
little tan color that's on the top
of the head there. And then we needed
some pink fur on their lips and
inside of the ears. I have added a little
touch of yellow into that to make it
more peachy because of pH is more of a flesh tone than just using the pink off that Pam and the brushes that I've got here that we're going
to apply the paint with. I've got a number six round
and a number ten round. You just work with
whatever you've got. And I'll just pop
those out of the way.
7. Applying the paint: I'm not going to put the
backgrounds in of the grass, but if you wanted to, That's
something that you could do. So to begin with,
I'm going to get a big brush and wet the
whole of the animal. So very lightly. Just going across
the whole thing. And be mindful about where you are and the heat in the room
that you're working in. Because that will make a
very big difference to how much water you put on how quickly it's going
to be drying out, as will the type of
paper that you're using. This that I'm using is
a Bockingford block. And it will absorb
the water quite quickly because it's very
hot in here today as well. So you need to probably
work quite quickly. So you've always got to adjust your watercolors to
the heat of the room, to the amount of water that
particular brush holds. The type of paper
that you're using. And that's something that
really can't be taught. That something that you need
to learn by mistake, really, by practice, to get to
know your own materials, which is something I have talked before in the past
quite a bit about. With watercolor. You need to keep using
your own materials, getting used to the amount
of water that you put in on and applying
with your brush. You don't want puddles. You just want it to be damp. And you could just leave it
a little moment to sink in. And you'll see,
I've just let that go all the way down there quite loosely so we can sort
of fade the Calloway there. So once you let that
sink a tiny bit, you don't need to sink too
much because this is dry here. It's not going to go out away from the cow he paints
are going to stay within the cow as
long as you've kept within that line
with your water. So to begin with, we've got
that tan color on the head. I might not even use my
smaller brush, to be honest. I'm just going to let the
colors move into each other and have a look
if it's anywhere else, It's a little bit lighter on
the top of the back there. And in here, just
add a little bit. And we're going to let the
colors mixed together a bit. It is quite light in places where the
light shining on it. So and of course, where
it's much lighter, where it's white almost because it's got a lot
of sunshine on it. I think. You can lift colors away
with a tissue if you get, you know, if it's
moving over that area. So if pop the tan colors in, and then we're gonna go
with the color that's overall. Most of it. Getting these colors
under here is going to make the head stand
out from the body as well. Because of course that noses muscle rather is
very white there. And just let these colors
fade off here at the edge. This is drying quite
quickly already, which in some ways is quite good because it means that
notch kind of bleeding into each other as
much as the mind. You know, you don't want it
to come all the way over the year there. I'm
sorry, wrong color. So just a nice light touch. And then a little bit darker. Now you need to either have all these colors, the
same consistency. I'll be going slightly
thicker each time. So when thicker, I'm
in more pigment from your paint and less water. And I've made a mistake here. You'll see that it's supposed
to be white here and here. So what I'll do is I'll
just clean my brush off, get rid of the excess water
and just lift that out. You can see there
where it's white, white hair at the top there. So it's easy to just remedy
whilst you're working. Wet in wet. But don't forget that
whoever is looking at your painting later isn't going to have this particular
cow in front of them. So they're not gonna
know that it didn't have brown hair all the
way to the top if you actually prefer
it to look like that. So just look at the way the
light is bouncing around. You might want to
take one or two more highlights out with your brush. Like here, scroll a
bit of a highlight going down the cheek. So he's not going
completely back to white because the cow isn't
completely white there, but it's just gives
that impression to the sun moving around it. And of course, these colors will dry a lot lighter
than the going on. So don't worry if
at this stage you thinking it looks
too dark and flat. And you can reinforce some
of those lines out there. We've got the
shoulder going out. You might just want to follow some of those lines vary
slightly with your brush. Giving that impression. And then the thicker
color we'll go with next, rather than the colors
of the nose and things, and we'll put those
in the shadows. So this is the same color
that we're going to be using on the nose, but we're going to use this
for some darker areas first. And again, that will just
bring it to life a bit. Make it more 3D by having
those shadows there. But don't overdo it. Just look at where it's darkest. By getting it dark under here. Again, you pop in that nose forward and some pink. That's quite bright
at the minute, but you might want to knock
that back a little bit. I think that those
areas have dried out. Now that one hasn't dried out actually as much as this room. So you could just
sort of go around the edge there with a
damp brush trustee. Less than that a bit. Make it a bit more subtle. The quiet pink in there. Don't forget they're a
little bit transparently. D is so thin that the sun will be shining
through those a little bit. And just that tiny touch
of pink onto there. And then we need to think about this gray color for the nose. So it's a bit of a cheat way
of making graze these just using brown and blue together. But it's something I do
quite a bit because it's, because it's a bit of
a quick cheats way of making a nice gray. And I've kept it a little
bit on the brown side, perhaps should have
been a bit bluer. If you look at the nose there, it's quite blue, isn't it? But it's quite
harmonious painting to have it all. The browns. If anything, she looks a
little bit angry, Doesn't she? I think that's to
do with the shape of how I've got her eyes. Just dabbing where it's
a little bit darker. And you can keep
doing this and just watching it as it dries, keep adding a little bit extra. I'm building it up. In any mistakes or anything
you wanted to alter, just do it with a damp brush. If you want to
lift anything out, get that sum there. Because I've done this
very, very quickly just to show you the general idea. And you could do it
more slowly than this. So if I'm gonna go
back to the ears, now, can you see
how this has moved? Write out this pink. So let's get rid of that
pink from the edge day keep. We need to preserve
some of these white, white of the ear here. And then I'm gonna
get my smaller brush. I'm just going to
touch of cadmium on and put that in there. And that kind of brings a whole thing to life a
little bit, doesn't it? I did not touch of yellow, so I forgot to put the
ear tagging this side. So I went ahead and
popped it in that side. And I'm going to
leave that at that. I think that's enough. Paint. Again, your personal
style and how you draw, how much detail you want to put in is a very individual thing. So I'll leave that
entirely up to you. But just work wet
in wet if you can. If you're confident
enough to do that. If not work wet on dry, you could do one
layer at a time, put your lightest
brown on first, let it dry, and then
do the next, etc. So you can spend more time putting detail in with
your pen if you wanted to, as well as an awful lot of detail here in the nose with
all these little lines. Lot more detail around the eyes, every little hair
that we've got there. So that depends on your style and how much
detail you want to put it in. I want to keep things
quite loose and just get a general
feel for the animal. But if you wanted to do
it more photo-realistic, you could put all
that detail in and spend a long time doing
your pen drawing, and then just put these
few colors over the top. Okay, So I think that
concludes the painting. Like I said, you
could put the graphs in if you want it to.
8. Conclusion: I hope you've all enjoyed that tutorial and learned a little
bit of something from it. For those of you that enjoy
painting and drawing animals, that it's been useful to you. I look forward very much
to seeing your work. It's always surprising
how we've all got the same photograph and we all end up with different work. We all see color differently. We all make different
choices about how much color
we're going to add, how much detail
we're going to add. So just a few lines. Sometimes can be
very expressive, or you might be the type of person who wants to put
all that detail in. And that's all part of
developing your own style. And with these tutorials, with all my
Skillshare tutorials, I just really want to
give you hints and tips of the basics. I don't want to
influence your style too much because that's
part of who you are. And if you're a very detailed
person, that's fine. If you want to go very
abstract and you want to be very loose, that's also fine. It's reflecting you. So don't be thinking
that you've got to draw as much detail as I
do or as little as I do. I really look forward to seeing
those and I will give you feedback as soon as I can
once after you've uploaded. In the meantime, if I've
omitted anything that you really want to ask about whilst you're doing your
drawing and painting, please do contact me. You can do that
over Instagram or you can do it here
on Skillshare. And of course, all
my details are also over on my website. If you want to go
and have a look at my work on there as well. I think that's everything. Enjoy your drawing and painting, and I will be back again very soon with another
Skillshare class. Thank you for watching
and bye bye for now.
 Cally Lawson, “Paint like no one is watching"