Transcripts
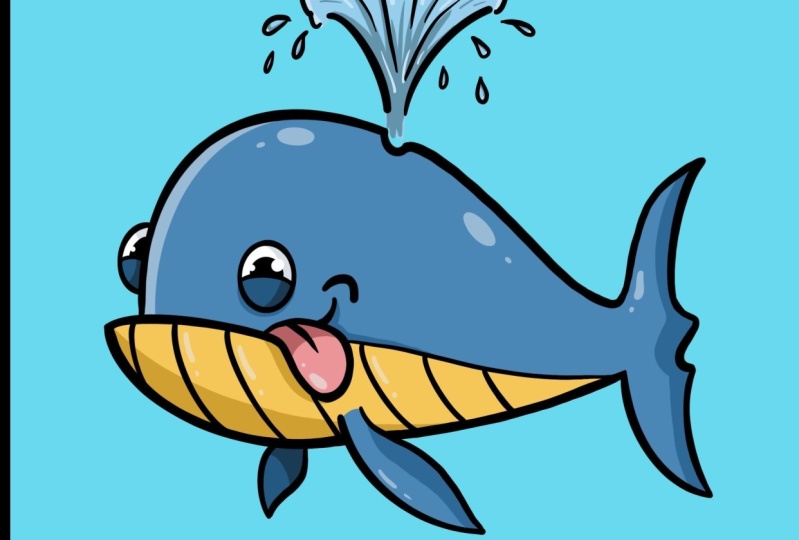
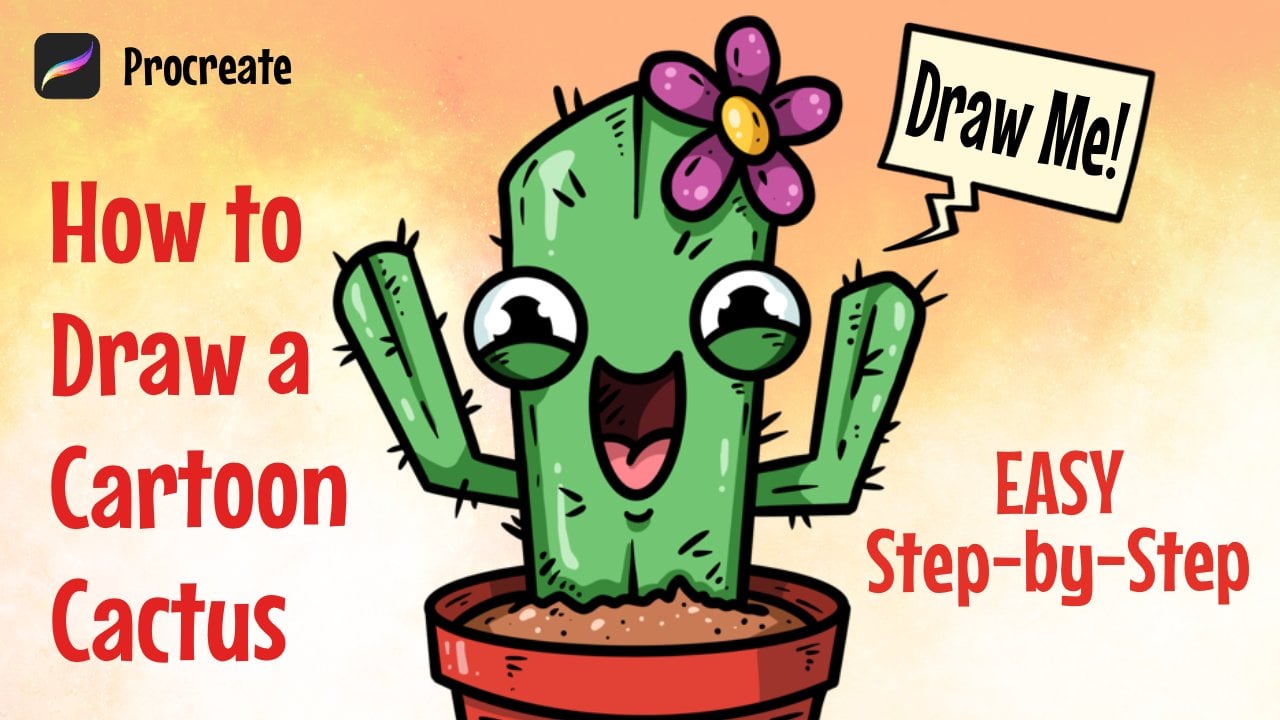
1. Introduction: Hello and welcome
to another video. My name is Jay and n. In this class, you
will learn how to step-by-step draw
this cartoon will, in Procreate, you will learn
how to create a sketch, how to get a 3D effect, trace the sketch to
make the outlines, color it, and create the shadows and highlights to
complete your creation. I hope you are excited to learn. Let's get creative together
and have some fun.
2. Creating Canvas: And so as always, we're going to start by
creating our canvas. We're going to click into
place in the top right corner. Then we're just going to keep it simple and click on square. There you have your canvas.
3. Preparation: The first thing that
we're going to do is we're going to
create our sketch. Before that we're
going to our layers, which is the two squares on top right corner next
to our color palette. So we're going to rename our layer by clicking
on our Layer. Click on Rename,
and call it sketch. Now we're going to pick a color to create our sketch width, I like to pick a color that is a color that is easy
to trace later on. I like to use, for example, a bit of a red brownish color. You can also use blue or purple, whatever it is that you like. It's just for the sketch. Decide for yourself. So the next thing we're
going to do is we're going to select our brush. We're going to be doing that by clicking on our brush panel in the top right corner next to
the Smudge Tool over here. Click on that one. And I'm going to be
using the pencil. You can find that in your sketching if you
click on sketching. So for example, in another one and you'd go through sketching. You can scroll around
a little bit and there you have
your six B pencil. I like this pencil
because it's a bit of a sketchy brush that is
easier to trace later on. If you want to use
your own brush, that is totally fine by me.
4. Sketch Body: So what we're going to
do next, we're going to decide our shape. For our wheel. We're going to draw
a big oval circle first because we're going to decide to shape and
it's gonna be kind of like a stone or
something like that. Just keep sketching
like this until you feel like nice shape. No Mori. Digital Art. So we can always erase and delete things
that we don't like. Until you have a shape
like this, like a, like a stone that you find in the rivers and
things like that. Like nice oval, rocky shape. What we're going to do next
is we're going to create detail from the oval shape. We're going to create a little, little, little edge like this. Just a little line like this to create the bowl of the tail. Just sketch it in a little bit, make it a bit
thicker if you like, if you want to etc,
it a little bit more. You just add that
to your circle. You see it starts
to have the chill. From there. You do
the same thing. You go up and create lines
up here in a sketchy way. You don't have to
have every line perfectly in the first time. You can just sketch it in like this until you have
like a nice shape. From here, we're gonna create a little bit
of a pointy end. Same thing, we go down. You see the tail is getting a nice shape here in the middle. Like we have to
imagine that this is continuing like this. We're not going to
draw this part, but we have to
imagine that that's where the tool is going to end. For the bottom, the same thing. You just create a
nice till like that. Just keep it going. If you are not pleased
with some lines and always revisionist
a little bit, work it out a little bit
until it's nice for the eye. That's why we sketching. We make a nice sketch layer
so that we can make mistakes. We can create our
shapes perfectly fine. Sketch it on in here. You see this is a nice
pencil to use for NIH shapes. Make mistakes. The thicker lines represent
the forms that I like in our lives we going to erase later on to see the
sheriff's way better. You see here we have our tail. Now. We have the wheelbase
and a tail. And I see that my whale
was not really centered, so I'm going to center
it a little bit. We can do that by clicking on the arrow in the
top left corner. And then you can move
it around a little bit. Okay, so now it's centered. What we're going to
do next is we're going to create defense. You have to decide where do
you want and do you want to really close to the
front of the body? Like because it's
gonna be a cartoon. So you can decide a little bit yourself where you want them. I like it a bit centered in
the middle of the, the whale. So if you have the
wheel buddy over here, like draw a little bit of the lines of the 3D effect
that we're going to create. And if you see this, I've put it a little
bit off centered. So like for example, this is probably the center
of the wheel. You see why the plus, you see like this, the
center from there. I like to create a little
bit of the fin over here. We do that by creating
this nice shape, just an oval or like analysis, nice rounded line
on the outside. And the inside is going
to be a bit of a form, like a wave-like form wave. And it's going to end in there
like a little wave you see orally or in Hill mountain? A little bit like a hill
mountain shaped like that. See what I mean? Like a
nice curved line here. And then another nice curved, wavy line on the
other side that's creating the effect of the fin. Now we can add this, connect this to each other and saying from the other side
and make it a bit thicker. So we know that's
gonna be our line. Now for the 3D effect, we're going to also draw the fin on the other side of the wheel, which is a bit
smaller because we want to create the effect
that it's further away. So we do the same thing, like a nice oval, nice curved line over here. But because the ending is somewhere here in
the wheel itself, we're just going to
withdrawal like this. We're not making
the Way of Complete like all the way like that, but just a little wave
to the center over here. Alright, so now you
have done that. We have basically the bottom of our wheel already.
It's very simple. It's an easy illustration. I hope you can all follow along. Alright, so now we're
going to draw the ice. Ice are very simple. We're
just going to draw circles. If, for example, you
see the 3D effect. If you want to draw the same
thing as I did, go ahead, just make a little bit of
like a line like that to, to create that feeling of depth. I want to create the eye
a little bit over here. And the other one is
going to be a little bit on the other side,
but not completely. So we're gonna still see it, but we're not going to
see the fool of that side because it's gonna
be a little slightly curved on the other
side of the wheel. For this one, we're just
going to draw a circle. Like circles were
easy to draw for. If you don't know, you can just draw sketches like
that if you want to, but if you want to
draw a perfect circle, what you can do is like
you can do this and if you hold the
pencil on the screen, it will create a circle. Well, it's not
perfectly circular yet, but if you want a circle, you can just tap your finger, boom, and it will be a circle. Now it's just a perfect circle. If you want that to
make a perfect circle. I said perfect circle
1020 thousand times, but you get the. Get the gist of it. Just like
that then if you wanted to, if he doesn't want to move it, you can see this Added shape
in the top from the center. And you can just move it to
a location where you want. But once you let go, That's
not possible anymore. It is possible but you would have to use the selection tool. So if you, for
example, not pleased and you accidentally
click out of it, you can use the freehand
selection tool that is next to the arrow over here in the
top corner, top-left corner. You can select your circle, but you will also select a
little bit part of the sketch. That's fine. And then you click from
the error from there, and then you can move
it around as well. Very simple, very
easy. So you can place your eye perfectly
where you want it. Now, on the other side, we're also going
to create our eye. First. We're going
to finish the will completely so we know
exactly where it is. If you feel like
you're lying is too thick, don't be afraid. You can always erase it. Erase it with whatever pencil
you want to erase it with. Just erase some
lines out there to see better where your lines are. Then. Keep on sketching from there. On the other side
what I already said, we're going to draw the eye slightly in the
curve of the wheel. So just like that, you see, like that is where the
eye is going to be. That screening, that nice
3D effect that it makes it, that makes it a little
bit more alive. Alright, so now we're
going to create the eyelids that is just
half a circle like that, like a curved line. Both of them over
here and over here. From there, like half a
circle to create the eyeball, color it in because it's
gonna be black later on just to have a
circle and color it in. Same thing on that side, half circle and color it in. Alright, so now we're
going to create the mouth. I want the mouth a
little bit out there. So you see to create a little bit more
of a fishy feeling, you can do that by
just going over the line, just like that. And then finish it to the
bottom of your wheel over here. So we'll just go with
a line in there. We're going to create
the mouth itself. We're going to make him
happy. We're gonna make them smile a bit in a
goofy, cartoony way. Perfectly fine. Just with a
curved line, just like that. And if you didn't want
to erase the parts of the world that you
don't like anymore. Just create. Just erase it
with your eraser brush. There you have no mouth. Now we have our
mouth. We're going to create a tongue to get a little bit more
goofy in is out of our creation. We're going
to create a tongue. So what I'd like to
do is just from here, from the line client
kind of under the eye, we're going to create an
Bowie, Bowie, Bowie line. Like a curved line from the, I will create a curved line
over here. On the other side. We're just going to finish it
until it becomes a tongue. The tongue hangs
out of its mouth. We erase the parts we don't like to see really well where
our tongue is going to be. You see, Very cool. We have created our tone. This is a nice way to sketch. You can erase and create like, Oh, I don't like this line. Well, I made a mistake. And a little bit again, no worries. It's all totally fine. Do whatever you want.
Just feel free. Anything in the
curve of the mouth, I like to create a little bit
of that 3D effect so that there's like
literally you can see that the curve of the mouth. All right. We're going to do next is
we're going to create a line from here to there
to finish the well, because of the bottom
of a well often is a bit of a different color.
They have a different color. On the bottom of the creature
of our, of our mammal. Finished the line a little
bit like that, a bit thinner. Just like that. We're not going to illustrate
the line later on. We're not going to
trace it, but we're going to color it later on. That's why I keep it a
little bit thinner so I know that that's what
we're going to do. You see your Wills
already really nice. If you, for example, find
that your wills to flat or anything and you want to create a little bit more
shape out of it. Click on your arrow
and then you have the warp tool in
the bottom-right. And if you click on war, you can miss form. You can change the form of your creation a little bit more so you can play
around a little bit, play around with the squares. You want a little bit more
of a bigger, bigger look. You want a bigger head?
Do you want a bigger tub? He wanted to be a bit smaller, for example, that can be too. And then you just create a
different shape like this. So we're gonna keep it that way. You can play around with
it as long as you want. Don't worry too much about being too fast with your illustration. Half patients and create a nice sketch because the
sketch is literally the, your sketch is
literally the base of your entire creation. So you want this to be the most perfect you can be going
through with the tracing, will go to trace our sketch. The sketch has to
be the most work.
5. Sketching Finishing touches: Okay, so now we're going to
create that dent that wheels have in the top of
their back, I guess. I don't know where
the water comes out, that water sprouting that they do in waters
and stuff like that. We're going to create a to, what we're doing is just, we're going to create
half a circle just like that and erase the
parts that you don't like. So just like that half a circle, that's creating a little
bit of a hole there. A little bit of a dent
because it's like from the side so you cannot really see the whole very well, but we're still going to
create it as if it's there. Alright. So now we're
going to create the water sprout and
coming out of our wealth. So I like to do is first we're going to lower the
weight a little bit from warp. You cannot lower it because
it doesn't react that way. So you have to go
back to uniform. From there you can move your illustration
again, complete. Now you want to go a little
bit more downstairs. We have also a bit
more space to create that water sprouting fountain.
The knee, what they do. Alright. Now the wheel is nice,
centered in a good position. We're going to create
our water spreads. What we're going to do is
we're going to create again like overland or a curved line. Coming from the top, from
the bottom up to the top, like sprouting out like that. You can do it fast. I got to create a little bit more of
that effect if you want. If you wanted, you can also just sketch it in there nicely. Create some lines. That's Chris, the effect of the sprouting. You see. Now you see the water
is going out there in a nice separation like that. Then at the top we're going to create like half
circles like that. Kind of like a cloud like this. Because that's the top
where everything is going to separate
and falling down. Like that. Do the
same over here. Distribution. Just like that, That's the top where everything falls down. We just create some
lines to create the effect of movement,
just like this. And then some water
drops that fall down. Water drops, you
can basically draw a little egg-shaped
things that are instead of like an oval line. You create more of a
pointy and pointy end. So I have a circle, pointy end, something like that. You see nicely. I create some drops coming, following down
from our fountain. Maybe a little bit
to the side as well, to create a little bit
more splash effect. Splashing really nicely. So I create a little bit
more curves over here. Maybe I don't want this line
because I want it to be more spread it and
not so together. Now we have our fountain. We're going to create the
lines of the bottom of our will because whales
have these lines right? So we're going to decide
where they're going to be. Just sketch it in
there from the top, curved to the bottom so that I don't do it straight because it's going to look really fake. We're going to have to
go with the 3D effect. So do it a little
curved like this. Create the lines look
curved like that. If you find them too far
apart and you have to just go on to the
next one is clip it a little bit here and just draw some lines like
that that go into the forum. The shape of our
creation. Like this. This is a little bit
closer to each other because the moment
things go into a turn, it is seemingly closer because it creates that
effect of yesterday's far, but because of the curve
and because of the angle, it shows that it's a
little bit close together. So that's why this one's
orbits closer than this. And you want this to
be separated more to give that effect of 3D. Alright, so now
we have our line. You're creating a little line
in our tongue like that. And there we have our outlines. What we're going to
do next is we're going to trace our image. And from there we're going
to color it, give it jumps, give us some shadows
and highlights, give it a little background. And from there
we'll be all done.
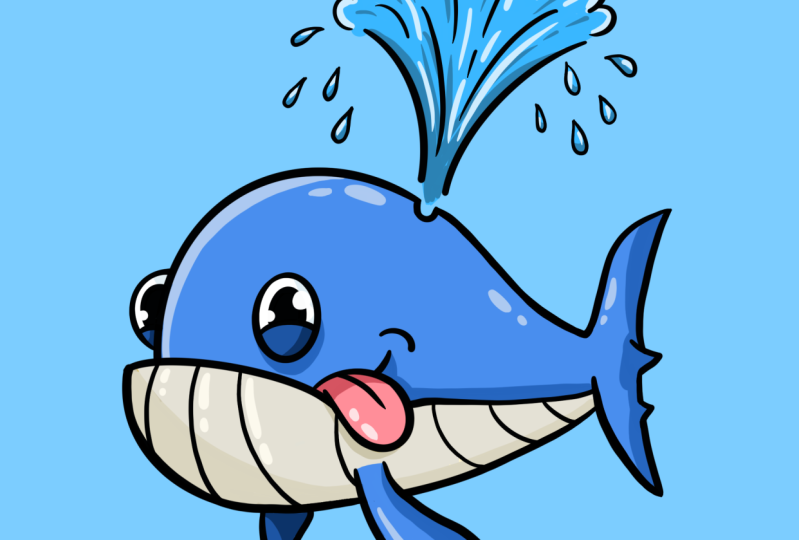
6. Outlines: What we're going to do
next is we're going to create a new layer. That's gonna be the
layer for our outline. So we're gonna go do
that by clicking on the two squares in the top-right
corner. Click on that. Click on the plus right here. Click on the Layer,
click on Rename, and call it outlines. And then just click on Enter. And our later is named. The next thing we're going
to do is we're going to lower the opacity of our sketch so we can see better and we can follow our
lines perfectly fine. We're going to be doing
that by clicking on the end of our sketch layer. Then you see the
opacity popping up and multiple other things that were not needing right now. And if you slide the bar from
the opacity to the left, you see that the opacity becomes lower and lower and
lower until it disappears. But we're going to keep it
around 40 that we can see perfectly where the
lines are and can create nice smooth lines over it. So what we're going
to do next is we're going to pick our brush. So if you go to
your brush library by clicking on this
brush tool over here. And then I like to use the, if you go to inking, that is one under your
sketching panel in the brush library and
go to Studio Pen. That'll be the brush I
like to use for this. It's a nice strong brush that
doesn't have any freckles. And Frank Olsen, I don't
know how to call all that. Just take it as it
is. Alright, so what we're going to do next
is we're going to change the color from this red or
whatever color you have been using for your sketch
layer to black. So we're clicking on
the color palette. And if you go to your
disk and you swipe your, this, your color palette all the way down.
That will be black. You can know that it's black if you go to your
values and click on your values and it is all zeros over here. That
means it's black. You can also go to
your values and slide RGB, it all the way to 0. So if it's 000, that also
means that his black. All right, I want you
to have your brush. You have to determine decides what kind of
size do you want to use. Do you want a thick outline? You want a thinner outline
that's totally up to you. I like a bit in the middle. So we have to see a
little bit what I like. This a bit too thin, maybe maybe a little slightly thicker. That would be good. Bit on the thicker side,
but not too thick. Decide whatever kind of
brush size you want to use. If you want to use
a thin one that is like this, that's totally fine. Whatever you like, whatever
style did you have that you want to add
into your creation? All right, so as
we're going to, we're going to trace our image. We're going to start with
the eye, simple life. Remember what I taught
you if you hold it, you can create a nice circle or oval or whatever it
is that you want. Go over the line like
this and hold it. And then if you click on
Edit Shape by letting go, if you, so for example, if you trace the image
and you do this, you can click on Edit
Shape and top center. You see these blue
things popping up. That means that you can change a little bit like the
size of the dimensions, things like that until it's
perfectly how you want it. So just do that a little bit. If it's already good from from your brushstrokes and
keep it as it is. If you don't eat any changes,
that's totally up to you. Alright, so when you have that, just let it go to
your brush again. Create your nice line.
Same thing goes for lines. If you, for example,
don't want like a, like a line like that. Because it can be, sometimes we are a bit
shaky and recreate a little bit scribbly
lines and you want a nice smooth line. You can create an
oval like that. And it'll be smooth and you
can shape it and format. And if you let go at a chimp comes there
again and you can also place it wherever you
want to decide for yourself. You can make it more oval. You can do whatever
it is that you want to create that perfect
shape that you need. Alright, but minus
Good luck that. So from here we're going to
create our eyeball like that. You know now how to do
all those things and just color it in. Just like this. Alright. You see this shape
is like a nice oval, like nice curved shapes. So we can go from
all the way here. There's hold it. See, that's quite a
nice curved line. You can click on
Edit Shape and shape it into exactly the wheel. The wheel form that you have. There you go. Here. Same thing. Have a moon, half a circle, and then just create
until you're satisfied. Alright, so does that. Then the other side of
the eye, same thing. We're going to make it a little bit bigger
because I feel that our eyes falling
a little bit away because of the
thickness of our line. So if you see that
you have done that, you can go a little
bit out there. See what I did? I
did a little bit further than our sketch
and that's totally fine. You can make revisions and
anything you want later on. Now while you're doing it, be free, like don't make, don't worry about
making mistakes. Everything is totally fine. You can change anything in
anytime because it's digital. We can make as many
mistakes, as many. Changes as we like. All right, so then
our pupil eyeball. There we have our second i. Now, this part of
the mouth is also a bit curvy so we can
do the same thing. Go all the way there. Let go. We have our curved line. Okay, so once you have
this curved line, we're gonna do the same
thing on the bottom. You see on the finished start to become something new so we can draw from the
fin all the way to the corner over here. And I see because of this, this is the reason why
I like to click on Edit Shape sometimes
because I didn't add it. Close it out perfectly. You can click on Edit Shape
and then just format. If it wants to react. Sometimes it does though
this is not perfect, then you just form it until
the perfect position, until you're happy
with your line. And you see the line is
going all the way from here until they're
perfectly fine. Let's create our tongue. Same thing, just trace. Because this program
doesn't react like this if you want to do it like
that and make it smoother than just make a square
or something like that. Because it thinks that
you are trying to do something like creating
a shape in this case. And so what I would prefer, just make a tongue
in one movement on if you want to use the
tool that I just told you, you can just go halfway there. Now you see you got
to have a curve. For example, you can do like half a circle from
here and add it, then added shape
and then make it a little bit more
into the shape of the tongue until you're totally satisfied
with your linings. And then just finish
it like that. Little bit of ADG line is not
so bad every now and then. Just creates also a little
bit of life and realism. Alright, so not tongue
stripe like that. Also thing if you
want a pointy line, like if you, for example, pressure really hard and
you keep pressing it, it will not create a 0.29. You have to use your pressure. So what I'd like to do
is just press hard, press software like less
pressure group and create this pointy lines where you can create a nice thick
and thin contrast if that is what you prefer. I prefer that in the tongue because I erased my tongue and
accidentally made a thing. What you see, boom,
there you go. Pointy line, very nice. Like that. Alright, so
we're going to finish them off like this, half a curvy line like that. And then have a
moon, same thing, just let go and you
have your mouth. So another half of
our wheels done. We're now going to trace
the back part of the wheel. Same thing, curvy line. But because over here you see that you cannot just
do a curvy line. Because the thing is about this is we're going to create a whale a little bit
like that, right? We're going to in a
different direction curve. This program doesn't
respond to that, so we have to be a little bit more careful
with our lines here. We cannot have the cheat codes. We cannot cheat with this lines. Just follow it slowly, relaxed the word
too much and boom, you see it goes
slightly into a curve. Same thing for the other side. Slightly in a curve and then finish at the top.
Just like that. If you don't connect super well, you can always draw what I do a little bit more into
it, just like that. Now you see we have
our will shape. What we're going
to do next is to detail this just the same thing. Just follow your
lines like that. Let's start with the bottom. There. We can do it. Same thing over here. We can do that. I'm not satisfied with that one, so I'm going to create a
little bit more like that. Alright, I don't like
my top fin so much because I feel like
I made it too thin. So I have to repair it a
little bit. That's okay. Just erase it and then just keep on going until you have it like a renowned
struggling a little bit, but it's okay because
that also shows you that even after
all my experience still can make a lot of mistakes and it doesn't mean that may that may motivate you to also just let go of
trying to be too perfect. All right. Just like this. Erase some parts that I
don't want. Let's do much. Just like that. We repaired it and it
looks a lot better. Okay, so what we're going to do next is we're going
to draw our fin. Erase a little bit of lines over there so we have
space to draw our fin. Then same thing what we can do with all the other things
that we have done. Just boom, we create a thin. If you want to create
a little bit more of a Of a curve, you can
always change it by doing the changes
then the other side, because it's a way for
just follow along. And then create a
nice pointy end. There you have our fin.
Then this one same thing. Curved line and boom. We have our friend
from the back. Now we have the entire
wheel already ready. We just have to do the fountain and the lines, often the bottom. I am going to do the line here. It's gonna be a
little bit thinner. So just draw a thin line. Goes through here to create
a separation of coloring. And then we're going
to draw lines. I like to make these lines
of the belly a little bit thinner because they are not
really so extremely strong. So you can use the same brush or you can just lower the size of the brush. I used the same and just
use like less pressure. So I just logged on,
press my pencil so hard that it just creates these nice
lines right in there. Just like that. You see I went out a little bit
and therefore we can edit and then it is gone. There we have our lines. Let's go do our fountain. Next. We can turn to screen a little bit so that you can
see exactly how to do it. Perfect vision to make
the nicest lines, okay, so like a nice curve. Just one and do the
other direction. Just like that. This
lines here and there. Then we're going to create the cloudy texture from the top. We can do the same
thing by drag. Create a perfect oval and
holds and Hoop. Hoop. You can also just be
free if you prefer, just to draw like that,
that's totally fine. But sometimes I feel
like it creates a little bit more perfection
into our illustration. It's totally fine. Whatever you feel
like you want to do that's totally up to you. And your style. And drop. Same thing. Just
create the drops. They don't have to
be too perfect. Just trace all your drops like that. Just like that. We have the outlines
of our entire wheel. Now we can take our sketch layer away and we can do that
by clicking on that, the checkmark over here, and then just click it
and it will be gone. Now you see we just
have the outlines of our wheel and we can
start to color it.
7. Coloring: To color our illustration, we first have to create
another new layer. Go to your Layers panel over
here in top right corner. Click on the Plus. But we're going to create our colors under our
illustration on your outline. So we're going to drag
our layer by holding it, by clicking and holding it and dragging it
under outlines. So that will be
under it from there. And we're going to click
on our Layer and click on Rename and rename it color. There we have our color layer. The next thing that we're
going to do is we're going to use the reference. This means that if, for example, if you go to the layers and I click on the outlines layer, which is where the selection
is of reference the same where place where you
can click on Rename. On the bottom you find reference
or the reference does is that if you want to call
her something specifically, the lines will
block off the rest. So if you click on
Reference, for example, and you go to color and you
pick a nice blue color, whatever color you want to use for your well, be creative. You can use your
own and you will drag it if you hold the color. If you see this blue circle in the top right corner and
your holes and you drag, you see this popping up. And if I let go right now, that will mean it will color it kind of like paint back
in the day on a computer. Remember that, that
you can just drag and drop and color the
section that you want. For example, if I would not
have selected reference, which I turn it off
and I go back to color and I will
drag it in there. It will color my entire, my entire screen because it
doesn't recognize any lines because it goes focuses
on this layer only. But if I click on Reference, that means it will mask
off everything else. And you can just color in
what you want to call her in. At least if there's
lines that block things. But for example, if I would
want to call it a section, you see that also my fin
would be colored but we wanted to fend to be a
different color than the belly. But you will see later
on we're going to also color a little bit by hand. And that's totally
fine. Okay, So make sure that the
reference is selected. You will see it that
it's selected by that. It says reference under
the outlines layer and also that it has a checkmark
next to reference. Go to your color.
Choose a nice blue, whatever kind of blue
you want to use. You can also use purple, red if you want to create like a wheel completely in
your style, in your, in your the wheel
if your dreams, let's say I don't
know. Be creative. Use your fantasy. You can do whatever you want
to make the nice colors, whatever I'm gonna
do a traditional We'll just for the
sake of this video, but you can do
whatever you want. I'm going to pick
this nice blue color. We'll like that. Also what I
want to explain a little bit as if you color and your
hold and it will call her. And you see in the top you
see color drop threshold. Now at 92%. If I would put a 100%, it would also call
her my entire screen. But because my lines
are very thick, the threshold goes
really, really far. But for example, if
you use too low, that will mean it
will choose to do two colors further away from the edges and it will
be looking less nice. So you have to go a
little bit between, like in the eighties or
nineties is good enough. So make sure that your
percentages right. Sometimes people have
really thin lines and I think like why is my
color and why does the entire screenshot to
color then you just have to hold a little bit less. Like the things don't
call her too much. Just experiment with that
and you will see yourself that it's pretty easy to use. Alright? So now we have
colored our will on the top. We're going to call
it the eyelids. The eyelids are also blue, but they're gonna
be a bit darker blue because I want to create a little separation of the
eyelids and the wheel buddy. Just drop it in there. Same thing over here and you see that it creates a little bit of a nicer effect that it's
like, yes, it's part of it, but it creates a little
bit more darkness, a little bit more separation of the colors, which
is really nice. All right, so now
we have our tab. We'll body, we're
not going to use too much colors because it's obviously not that
big of a creation. So for the bottom, I
like to use a beige, yellow color where you have to test it around a
little bit like this. Actually. Choose for yourself what you want to
use for the bottom, I like to use this
Bish yellowish color and just drop it in
every part of the wheel. The Finnish also going to be colored what we're going to be using this blue later on
to draw this by hand. We have the bottom of our will. So it's basically almost done. What we're going to do
next is colored at tongue. Same thing. I liked a little bit
of a pinkish red color and just color it in like that. You see pinkish
red. Totally fine. You can use whatever you want. Just a bubblegum or something. You can make it purple totally up to you. Have fun with it. I'm gonna do a traditionally. Now I'm going to call
it finished by hand. So you just click on the
Brush, click on the color, and instead of dropping Here's just gonna call her by hand, if you'd like to draw
the entire thing by hand, totally be freebie. You are meant to be whatever. It's totally up to. You. Have fun with it, enjoy yourself if you'd like to
draw the traditional way, sometimes I like to drop and sometimes I like to call
it really depends on. If I need to do
something quickly or if I just want to
have fun with it. Because strong behind, of
course has it's fun to. Backfill, is a little bit darker because
it's further away. I want to create a little
bit shadow in that one. So I'm going to use the
same color as the eye. So you can, for example, if you want to use
the same color, you can like hold your
finger on the screen and this thing will
pop up and it will select the color that
you want to use. On the bottom over
here you see that the color that you're
using right now. And on the top you see the
color is going to change into, so if I can go for this black one, it
will turn into black. If I would pick the black color, it
would turn into black. You see, if I will
go to this pink, it will turn into this pink. But for this case I want to use this blue vector
is colored blue. Boom. This is like you
can do it this way. Or by hand. It's totally up to you. Whatever you feel like. Whatever is the most fun. Just seeing like because
it's slightly bit darker, it creates that effect that it's a little bit further away. All right, now we have
the colors of the wheel for the sprouting is the same thing because
it's all open. We have to call
her at ourselves. We're going to pick a lighter blue color that is
not the same as the wheel. Like that. We're just colored in by
hand. Just like this. Coming out of this hole. And then just color
it all in nicely. Worry too much. Can draw a little
bit of half a circle there to finish it off. Don't worry about
rushing anything, just be calm and cozy
and have fun with it. And remember that it's all
about enjoying yourself. Just having fun, creating something new that
you don't know yet. What did you do know,
but you just want to learn somebody else's towel
or whatever it is Situ would like to do In coloring all the drugs does
that same thing. They're closed off.
So we can also drag about because it's so small and close together and just decide
to call her it by hand. But sometimes if you have a really big project
and you have so much color as you don't
always want to color. You just wanted to pop,
pop, pop, pop, pop, pop in and pick
all the colors and just drop it in there
to have a lot of speed. All right, so you see now we are a fountain, we have a whale. The only thing that we
still going to do is we're going to create shadows
and highlights. And also create a nice background
as if it's underwater. Splashing water.
Spongebob style. Logic. Also I wanted to
color in this white, it's going to stay white. So if you go to value and
you click all these paths, so there's 123456 numbers. If you do 123456 f's and click
on it, it'll become white. You can also turn
the RGB sliders all the way to the right and 2505250525050 to
55 to 51% of them. Then it will also be white and then just drag it in there. And drag it in there,
you don't see it. But if we change our
background color, which is what we're
going to do next, you will see that now
the eyes are white.
8. Changing Background Color: For the background
color, very easy. We go to the squares in the top-right
corner to our layers, to our layer section and
click on background color. If you click on
the white screen, this thing will pop up and you
can choose your own color. So choose a nice color, like swimming in the water. So for me, I'm just
gonna do a blue, lighter blue,
something like that. Whatever it is that
you think isn't nice and recognize blue color, purplish blue, like that. So I'm going to keep
it at this and you can decide for yourself what kind
of color you want to use. There you go. We have our background.
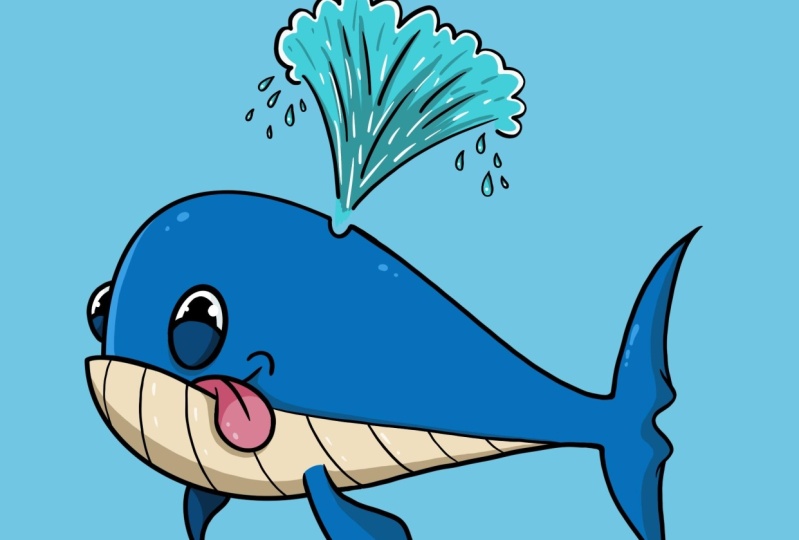
9. Shadows: Now we're going to
create our shadows. We wanted to create a
little bit more depth. We're going want to create a little bit more feeling and make this illustration
a little bit more life. So we're going to add
highlights and shadows. So we're going to
create a new layer. So go to your layer
section again. On top of this color layer, we're going to
create a new layer. So click on the Plus, going to rename it and
call this shadows. Here what we're going to
draw all our shadows, okay, so what we're going to do
next is we're going to, with our fingers select where
we wanted to create shadow. So we'll click on this blue and we're going
to pick a darker blue. So go through a disk and pick a darker blue or whatever
color that you're using. Pick a darker color
by holding it in, They're going to your
layer panel and making it slightly darker so that the
color section is the same. It's just darker, so we're going to create a nice
shadow out of it. All right. For the shadows. Just the sides where your
shadows are going to be. I feel like the
sun is coming from decides or light is
coming from here. So here's going to be light. So the shadows are going to be a little bit more on this side. Behind here. Some
shading over here. Just be free with
its back of Earth. Fence over here. Just like this. Not too much because it's a
very simple illustration. We don't want to create too
much effects and everything. So we're just maybe
finishing this line over here to create a
little bit more depth. Maybe under the eye or
something if you like. Like this. You see we created already a
nice, a bit of depth. Now for the belly, we're
going to do the same thing. We're going to
click on the belly. Whatever color you have and pick a slightly darker color
of the belly to create a nice shadow for the bottom because it's
like on the bottom I like to create a button like
completely shut out like this. What I did here is I just marked where I want
my shadow to be. So unlike a line and then I'm
just color it in just like that to make it
easier on myself. Same thing over here. Colored in. You decide
wherever your shadows are. A ton of course as well. Because the tongue creates also a little shadow. Just like that. Now we have our shadows
of the bottom part. Now we're going to do the
shadows of the tongue. Same thing. Click on the tongue, Hold it, bigger color and
make it slightly dark. Half of the top is going to be dark because it's
close to the mouth. So there's creates
the most shadow. There you have the
part of the tongue, eyelids and the thin same thing. Create a little bit darker. You just decided
to do that because the black part of
the body blocks out the nut part of the defense or you create a
little bit more shadow there. Same thing here, and
same thing here. Now we have nice shadows. That's basically the shadows
that we're going to use. Do we want to use
shadows on the white? Yes, let's do that. Click and hold the white
and you see that we are going to be like it's a bit harder to do
so I'd like to do a little bit of a dark grayish, greenish blue for this. So a grayish blue to
create a little bit of shadow off the ice
of the white part. So it creates also a bit
more realistic effect. Alright, so now we
have that part. We are going to
still have to create shadow of our fountain. Same thing, hold
it, make it darker. In this course, I
just like to draw some lines from splash
lines like this. C. And then just on the
bottom over here, every drop I created
delivered darkness. Just bought a very
simple illustration is not too much stuff going on, so we're just going to
keep it simple as well. Have that little bit of splash lines out of there to create a little bit
more of an effect. Just like that. You see, it already
is really beautiful. Okay, so what we're going
to do next is we're going to create our highlights.
10. Highlights: So for the highlights again, we're going to create
a new layer on top of the shadows layer by going
to our layers section, clicking on the plus,
renaming it and calling it. Highlights are easy. What we're going to do next, It's the same thing as
we did with the shadows, only now opposite direction. So we're going to hold
on our illustration and you'll see the same
thing only now we're going to make it lighter. We're going to keep
it in the same color section months later. So just the edge over here. I'm going to draw
a light over here, just like some lines. Maybe over here,
just a circle to create light
reflection over here, some circle to create
light reflection. There you have it already.
It's not that difficult. It's crazy on light reflections wherever you feel
like it's necessary. And there you have it. Okay, so same thing for the tongue hoop. Hold it selected, change
the color to a lighter. Included some nice reflect
nice reflection in there. For the bottom part as well. Almost white probably up. I'm already satisfied with that. So basically there's two.
Well, the only thing that we have to do
is do the fountain. I like to just keep
that to white. I guess Let's see.
Click on that. Very light blue edges like this. Just the edges. Some reflections. This crazy effect of that, it's splashing and
that is separating. You see some lines and stripes
over here, just over it. Don't worry about it too
much. There you have it. In the drops, some
small reflections. Reflections, reflections,
nothing too perfect. Reflections. Just like a little
dot that shows light. There you have it. Your entire wheel
is ready to go. The last thing that I
wanted to do is I want to create some reflection
into the ice as well. What we're going to do is we're going to our layer palette. And we're going to click
on outlines and create a layer on top of her outlines, which is on plus, and
rename it to finish. Then we can draw over outline. So what we're going to do
is we're going to draw a bigger circle over here
with white because not blue. So I want to use a whites
only go through value and put everything on 255. Then it's white. And then we can just create a nice
light reflection on the one side a bit bigger and on the other side a smaller one to create a little bit
more of that effect. Okay, Same thing here. The
other one you don't see. So it's just like this. You have your entire wheel.
11. Thank You!: Thank you all so much
for taking the class. I hope you'll learn
something from it. And most of all that you enjoyed creating
your illustration. I also would love to
see what you created. So please send me your
beautiful artworks and give this video
a little review. And I would help me out
a lot and help others to see what they can
expect from this class. If you want to know a little
bit more above my work, please check me out on
Instagram where I post almost daily new
and fun creations. You can find the
link on my profile. Thank you, Have a wonderful day, and I'll see you
in the next video.
 Jeroen Van Wel, Let's get creative!