Transcripts
1. Introduction : Hello and welcome
to another video. My name is Jane, and in this
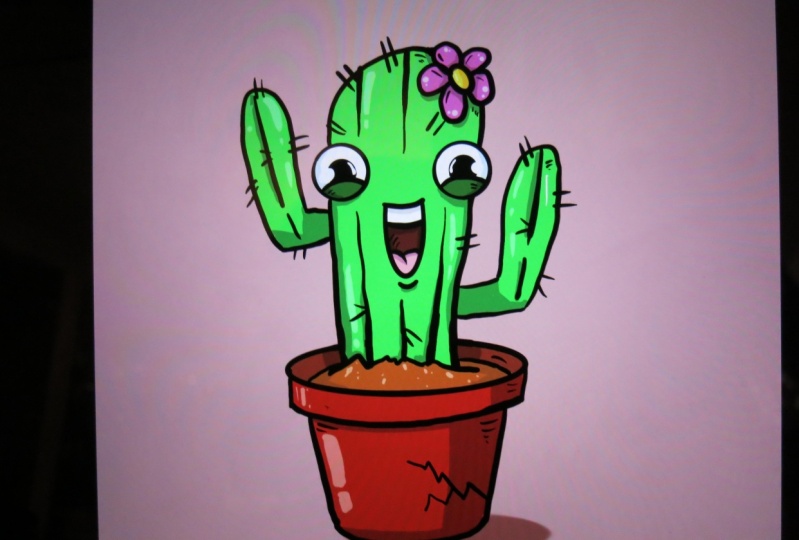
class you will learn how to step-by-step draw this
cartoon cactus in Procreate, you will learn how
to create a sketch, how to get a 3D effect, trace the sketch to make
the outlines, color it, and create the shadows
and highlights to complete your creation. I hope you're excited to learn. Let's get on with the class.
2. Creating Canvas: Alright, so and as always, we're going to start by
creating our own canvas. So we're going to the plus in the top right
corner to do that, click on the plus and
we're going to just keep it simple by clicking
on the square. And there you have your canvas.
3. Preparation: Then the next thing we
are going to do is we're going to select our
brush and our color, and we're going to start
sketching our cactus. So what we're going
to do is we're going to the Brush Library, which is in the top right
corner next to the Smudge Tool, the little hand with
the finger over here. If you click on that one, here, you have your
brush library. And if you don't
go to sketching, and then click on
the six B pencil. So to six B pencil over here. If you click on that one, That's a nice brush to start
making our sketch width. And then we're going
to pick our color. I'd like to pick a color that is easily traceable for later. So what you wanna do
is you don't pick too much of a dark color
like black or anything, because later on we're going to create the outlines
with a black color. So I would say like a blue or a red or
something like that. It's easily traceable
and easily fixable. Later on, I'm going to be
choosing and blue color. Make sure that your
pencil to select it. And then we're going to
decide our size of our brush. Because it's a nice
sketching brush where you want to look
not too thin of a line so that you don't see anything
you wanted to brush that is visible for you. I like a real thick
ones so we can sketch and make things
really visible. You can decide for
yourself what you want. Don't make it too thin because we're going to make a nice, beautiful sketch out of it. You decide for
yourself what kind of thickness, what
color you want. And then we go to the next step, which is creating our sketch.
4. Sketch: The first thing we're
going to do before sketching is we're going
to rename our layer. This we will do it is because I want to keep everything organized
so we can later on, if you want to change something, you know exactly where
all the layers are and so you know exactly
where to find it. So we're going to be
doing that by going to the layer section
next to the color, next to the eraser.
Top right corner. If you're going into
little squares, click on layer one, which is now called layer one. If you click on that, on the top of this pop-up screen
that comes up, you can click on Rename and
then change it to sketch. That's all there is to it. Now, let's go on
with our sketch. Alright, so now we're
going to create the shapes of our cactus. So just follow along. I'm going to create
like the cactus itself. So just create a nice
like the length of the cactus itself in
a nice roof above it. Like you can make it
a bit squarish if you want to create a little
bit of a different style, Let's, let's, let's do that. Let's have a little
bit of fun with it. A little bit more
of a house look. I'm going to make it a bit more rounded later on
when we're going to create our outlines
and everything. But for now, we're just
gonna go doing it like this, so that you get this
nice long shape. A bit of a pointy end to it. Just like this sort of a
little tower like that. You see, that's
gonna be our cactus. And what we're
going to do next is we're going to draw the part. We're going to keep
it very simple. So the cactus is
going to be in a pot. So if you just draw the
circle like half of a circle, like you can imagine a circle here where it's going to sit in. So just draw a circle or an oval like this
in the characters. Then grab your eraser and erase the back part
because we're not going to see that
because it's going to be behind the cactus of course. Just like this. And erase a little bit
of the bottom part of the cactus as well because
it's going to be in dirt. So we're going to create a
little bit of dirt There. We are going to be
doing as much as creating some wavy
lines like that. It's gonna be the dirt. Just like this, very simple. Some lines. And I create a lot of lines
in our sketch because I like later on we can decide what lines
we're going to use. Like for example, if
we would pick a black like this is a nice line
that I want to use. C, you see, that's the line and all the other blue parts
are going to be deleted. But that's for the
outline layer. So don't worry too much about
your sketch is gonna be messy-looking and cool
looking to, you will see. Alright, so now to
finish the pot, like to draw two lines
on each side here. It's going to be the top part. And then do the same thing, like just that oval-shaped, the same as this one under it. Like that. Like that. Alright, so now we
have created the plot. We can also finish the part
on the inside a little bit by creating a little bit
of an overlap here. And an oval line there. I got. So that's gonna be the
inside of the pot so that it creates like a length
in the pot itself. Right now, I see that I made the cactus a
little bit too big. So what are we
going to do is look if you also made it bigger, if you didn't
understand problem. But I want to create a little
bit of a pot under it. So I also want to create
some space for that. So we're gonna go
to the arrow if you have made it
too big as well. Make sure that
uniform is selected. Everything stays in shape and everything gets
decreased equally. And just make it
smaller, just like that. And put it nice and dissenter. Now we've made it smaller. We see that all the shapes are still intact and everything. And we're going to go create
the rest of the part. We're going to be doing that
by creating a little bit of a slight line that is
a slight diagonal. So not straight like this. Because otherwise it will
look too unrealistic. We're going to create a
diagonal line just like that. And just like that, you see two diagonal lines to create a little bit
of that pot shape. And then you see this oval
line, this curved line. We're gonna do the same thing in part to create a nice 3D effect. So zoom in a little
bit if you need to. And just create a nice
oval line like that. And now it's in a pot. See,
we have created into part. If you find that your
image is a bit too low, then you can go to the arrow again and put it more centered. Now it's centered again.
It's perfectly fine. Okay, So like fixed everything a little bit and make
everything smooth. Just like that. We're going to fix the lines
later on. Perfectly fine. Alright, so now we have the
pot and we have the cactus. We're going to create the
arms of the characters. So we're going to do the
same thing as we did here. We're going to create some nice spiky lines, just like that. Two lines on the
site as the base of the arm that goes out
and then it goes up. And it's gonna be
kinda similar shape as that but smaller. Like this is the main part, is the smaller part as
it has two little arms, we're going to create
another one on this side. You see like right now, you have created a nice arm
of the cactus. If you'd just like to have
one arm that is fine. Too many people draw cactuses
with just one outing. That's cool to me. Just do whatever you feel like a school. I'm going to draw the other one. It's gonna be a little bit
bigger than the other one. Because we have to make it also a little bit more realistic. Like plants don't grow equally. Because that's how
nature does things. So we're going to just create a little bit of a bigger
size arm on that side. A bigger one, smaller
one and domain one. And now you have basically all the shape of our
cactus in the pot. So what we're going
to do next is we're going to draw the eyes. Well, there's two very simple. We're going to draw two circles on each side of the character. So draw a circle here. Make it as big as you like. You can make your own
style if you want to. Totally up to you Just another
circle on the other side, you see the lines of the
cactus are a bit in the way, so don't just grab your
eraser, which is this part. You can also decide the brush
of the eraser if you feel like whatever brush you want to use for erasing, That's
totally up to you. And just erase the part
that you don't need. Doesn't like that. Erase everything smoothly. So it looks like just like two
little circles coming out. Alright, we're gonna make a
little bit of a happy cactus. So we're going to create
the eyelids like this. If you create two
nice curved shapes like this in the ice that
will create the islet. You'll see that's gonna
be the bottom eyelids. And if you didn't
create the pupils, if you zoom in a little bit, which is just two circles
or half a circle, and color it in. And
another one here. Also, if you made a
mistake, you want to raise it with two fingers,
it will go back. And if you don't want to get back to where you
were because you erase too much with three
fingers, you will get back, forward, backwards, forward,
backwards, forward. Very easy. Many of you know this already, but just for the people
that don't know, because I'm mostly making
videos for beginners. So stick tune with that. Alright, so now we have the ICC. It already looks a bit curious. When we gotta make a Smiley
mouth and happy mouth, you will see that it
will really create that like that's joy into the ice. It will create together with the mouth and the form and
the shape and everything. And it will really create a
nice happy little cactus. Alright, so create
a little oval line that smiles up for the mouth. Just like that. If you're just like it like
this, that's fine to me. But I'm going to make it bigger. Make a mouth a little
bit big like this. Like a long oval shape. Goes down like this. Long oval shape. You see now we have created a
really happy cactus. So we're going to draw the
tongue right now that there's two little ovals or too
little curved lines. One that goes like
here and the other one crosses like a little
bit there to create a line that goes a little
bit down. Just like that. See, let's raise it a little
bit more if you need to. And this is how we create
nice sketch lines. You see, now we have our
cactus, it's tongue. He's happy. Everything
is in a part. He is enjoying himself. He's saying hello to
everybody out there. He's a jolly cactus. If you need to revise your lines a little
bit, just work on them. Don't worry if you need to erase some lines because
you don't like them, you can do the same thing. Don't worry too much about it. It's digital. We can make as
many mistakes as we want. There you have it. Our beautiful cactus, okay, right now I want to give
it a flower on its head. So what we're going
to do is we're going to create a circle line here. That's gonna be the
center of the flower. And then just create flower petals rounded
like when you were a kid, I remember like, just like, whoop, look like that. But make them exactly
how you want to. That's totally fine. Let's
give it a little flair. You see, now it has nice, nice flower on his hat to
make them even more happy. Then erase all the parts
that you don't need, the lines that you see the
flower perfectly fine. Just like that. If you want to erase, like for example, create more space, you can make it a
bit smaller again, to create a little
bit more space. Otherwise it gets too close
to the edges in my opinion. So you want to create it
in a nice centered way. So little bit of space
here, a little bit. Suppose you're a little
bit of space here and a little bit of space
on the bottom as well, so that everything
looks smooth and dandy. Alright, now you see we have
created the entire cactus. All of this missing is its needles and maybe
some lines and things. And maybe we only want also
to create a crack in the pot. So let's create a
crack in the pot. So resuming under
pot by pinching, you can pinch in and
it will zoom in. In this part we're going
to create a little crack. Cracks are kinda like
roots of a tree. It's funny how the universe makes everything very similar. Our veins, everything
looks very similar. How things break, things
like that. It's really fun. So just create a line
like stiff, like this. Like that. It's very likely that you see like
little triangles, boop, boop, boop that are different in size,
different in shape. And another one that
comes out here. Now if creates a separation
like that effect, if something breaks and a
little one, and beside here. And now we have created a
nice little crack in the pot. Alright? You see now our cactus
is almost done. We're just going to
create the needles. So what I'd like to do is
we create a little line, like a little line over here to create a little bit of depth. Like this part is
coming forward. You see we create
a nice 3D effect. We can do the same in the middle of the characters over here. Some lines creation of depth. If it's going like in a bowl, in a circle to the back. And from here we can just
draw some like some needles. Select just the ones that are
in the bag just like this. Just some needles two together. Don't wherever you feel like you want to make them
bigger and make them smaller up in the cactus itself. Just like this arms. And just make them very random,
not too close together. If you do them all
together, it's going to look very ugly. So just and not too many either because the ice already will
show that it's a cactus. By just creating some needles, you don't have to
make many needles. Which you see that just
by creating some already, we have created a
really nice cactus. Just do it very
randomly wherever you feel like on the lines inside. You see I don't
like that spot but just like just play
around a little bit, just have a little bit of fun with wherever you want to play, your place, your needles. And that is basically
going to be our sketch. What we're going to do next
is we're going to create our outlines and
start coloring it. And let's call it a day.
5. Set Up Outlines: All right, So to outline
our illustration, we're going to first
create a new layer. We're going to the
two little squares in the top right corner again, click on the plus, and now
it's called layer two. If you click on layer
two and click on Rename because we're going to
keep everything organized. We're going to call
this outlines. And there you have
it. That's our layer that we're going to
use for our outlines. So the next thing we're going to do is we're going to create a different brush because we're going to make it a little
bit more clean looking. So go to your brush library
by clicking on the brush. And if you go to inking, and then go to studio pen, that's a nice thick pen. If you increase the size, you see that it's a nice line that doesn't have
too much freckles. Freckles is just very
straight and everything. So it's gonna make our
lines perfectly smooth. If you don't create
like a nice line, whatever you want
to illustrate with, not as thick to thin. Like this for me is perfect. That is like how
much percentage? Let's say 1414, 14%. If you want to use
that the same as I do. But if you want to
make a thinner line, that's totally up to you,
that's totally fine. If you want to make
a thicker line, that's totally up to you. It completely depends on your style and what do you
find pretty in illustrating. Alright, so now we're
going to change the color. We're going to not over
color it with blue, but we're going to
color it with black. If we go to the color section and just drag if
you are in disk, your pet all the way
down and it's black. Another way to do
this, you can go to a value and then you see it here in your hexadecimal all zeros. That means that you're using
black, or if you're RGB, or if your RGB is all 02, that means that you're going
to be using the black color. Alright, so now go to your layer section because
we're going to lower the opacity of our sketch
lines to see even better. So go to your layers
and then if you click on the N of the sketch, and this thing will pop
up the opacity with some other functions that
we're not meeting right now. If you slide this circle
from the opacity lower, you see that our cactus is lowering in opacity is all know, disappearance,
almost disappearing. We don't want not to
see anything at all. So we're going to use 4540, 50%, something like this. This is a nice opacity
to use for our outline. So if you're going to
back to your brushing, you see right now, it's very easy if you go to the right layer in
your outlines layer, you see that we can easily trace everything
perfectly smooth. So that's exactly what
we're going to do next.
6. Tracing Outlines: Alright, so what we're
going to do next is we're going to start
creating the outlines. So just go to your eyes first. Let's draw the eyes for soda. That is out of the way.
I'm going to teach you a little trick on
creating perfect circles. We're going to be doing that by holding a pen on our screen. And if you go all
the way around, see right now it's a bit like
like a like a shaky line, but if you hold it, you'll see that it will
turn into a perfect circle. It's not a perfect circle yet because it's a little bit
more of an oval shape. But if I click with my
finger on the screen, it will turn into a
perfect circle that is the same size in
every direction. And that's just
how you can do it. If you then they'll go easy,
edit shape popping up. So for example, if
you're not too happy with your circle yet, you can go to Edit
Shape and then like you can change it
around a little bit if you want to
change the sizes, it will not yet turned
into a circle anymore, but you see it's an ellipse. But if you didn't
click on circle again, it'll turn into a circle again. And then you can just move
it wherever you want. If you didn't place
it good or anything, you can just move
it wherever you feel like you want to move it. Alright, so there you
have the first i, now we're going to
the second eye, we're going to do
the same thing. So remember, just
holding the pencil on the screen when you create
a circle, hold it, let go. You see it's an oval, but
with the finger boom, circle. And if you're not happy,
you go to Edit Shape. Move it a little
bit until it's in the right place position
where you need it to be. Alright, so there
we have our eyes. So now we're going to draw
the rest of the cactus. So the same thing,
what we're going to do like with what we
did with the eyes. We can also do with
straight lines for cars. Sometimes we are a bit shaky and you want
a straight line, you see like I'm
shaky and I'm like letting all the way here
and I'm letting go. And you see it turns into a straight line, perfectly smooth. And if I didn't let go,
you can go to Edit Shape. You can even put it
wherever you want to. You see you can move it. You can turn out like
where you put the lines, you can move them around exactly where you want to position it. There. We have it
straight, nice line. By just go to the other side. We're going to do
the same thing. Drag it down, shake your line, shaky line, boom, straight line. We're just holding it. And then if you want to position and get better, I'm satisfied with it. You play around with
it, just keep on practicing and you
will see you will get a lot better
with this program. And things are actually
very easy and simple because that's the thing that
Procreate is trying to do. They try to create a program
that's super easy to use for illustrators and drawers
and artists and everything, so that everything
is so simple to use. Alright, now we're going to
create the dirt a little bit so that doesn't have
to be too straight. So we can just like, because dirt is a
bit more random, just create the shaky line like that to create like
a nice dirt layer. Alright, so now we have
the bottom of the cactus. We're going to do the
top of the characters. And also if you
do not want to do everything with these
lines and everything, you can also just be free and just illustrate
everything if you don't mind about shaky lines and things like that,
just keep on going. Don't worry too
much. Like really is not that big of a deal. Like shaky lines also create
a little life in your work. So if you don't, don't mind it so much, just keep on going. Don't
worry about it. But let's keep on
tracing an image. Like for example here I
don't mind so much that it's not shaky and also my
practice is a lot better. So don't worry so much
about shaky lines anymore. But just all totally up to you. You see now we
have created that. We're going to do the flower because the center
of the flower, I do want it to be a bit
more of a circle or an oval. What we can do is
hold it, let it go, and then go to Edit
Shape to put it in the perfect position
of our sketch. And there you see
perfectly smooth. And now we're going
to do the flower buds and just trace everything. You will get faster and better
at it with more practice. So don't worry too
much about everything. There you have our flower. It's not perfect, but that's the cool thing
about illustrating. If it is not super
asymmetric or anything, it creates a little
bit more life in a little bit more beauty
into your illustrations. At least I like it like that. Alright, so now we have the base of the cactus
and the flower. Let's do the eyelids.
Which is an oval. If you want to create
a nice oval line, same thing as with the
straight lines and circles. If you do this, it will create an oval and
then you can shape it. If you hold the pen
on the screen into exactly the same position
that you want it. Alright, same thing
for the other one. You have your eyelids. Alright, now then I same
thing you can hold. And then you create
ice and then color them in because we're
going to make it black, which is totally fine as well. Then color it in because
it's just going to be black. And there you have
our eyes already. Let's do the mouth.
Have an oval. We can hold, we can
add it to a shape. And then the same
for the mouth here. And place it nicely and
perfectly wherever you want it. Alright, so the tongue
same thing over line, curved line, helper, and
you'll have your nice tongue. I'm gonna give it a little
bit of a chin, but over here, just a little bit.
We didn't sketch it. Now we can add some
extra as if we want to. That's totally up to yourself. Okay, So the next thing
I'm going to teach you is like pointy lines. You see like a thin line going through a thick
line over here. We can do that because we want to create also
some needles later on, which are a bit more pointy. So if you don't put too much
pressure on the screen, you'll see the gelatinous
a lot thinner. But if you practice
a little bit, you can go create
a little bit of a line that goes
from thin to thick. So if you practice, I
go from thin to thick. And you see that it creates like a nice kind of needle shape. We're going to
practice that with these lines in the middle. Just like that.
Nice and EIDL loan, same thing as the top one. You can also go from
thick to thin if you want to go from thin to thick because I find it easier
to control my pen. If my pencil starts
from thin to thick because then the pressure later on it's not has to be doesn't have to be
changed anymore. And for me that's a lot easier, but you can figure out for yourself whatever
it's easy for you. Alright, so now we
have the cactus and the lines of the characters
to create the depth. We're going through the arms. Sometimes if you click twice, if you have the newer iPad Pros. And with the newer pencil, that means if you
can click twice, you get, you see it in
the top screen over here. That might my pencil
changes to an eraser, whoop, changes to an eraser. And if I do it again, it
changes to the pencil. And sometimes this
can be a bit annoying because sometimes
I'm illustrating and I played with my pencil or something and then go
like this and I'm like, Oh ****, my, my line is
now unlike an eraser, but excuse my language. Alright. So there you go. There we go. So just the lines. And we have created our arm. If I had a bit shaky and you'd like to some
parts of the lungs. You can also just illustrate
a little bit more. No worries. So beautiful imagery
for example, I don't like this line because
she went a little bit out. You can always erase things. See, I don't like my
eraser so much right now, but play around with things,
have fun with things. Don't, don't try to
rush things too much. If you really love
illustrating and tried to create the most
perfect image, you can. Don't worry too much,
isn't really just play around and just have fun. Because that's what it's
all about, just having fun. I learned that from Bob Ross. You really want to enjoy the
process of things in life. And that's what it's what I believe with
everything, by the way, not only with, with
illustrating an art, but also with life itself. You wanna really don't want, don't want to rush
things too much. You really want to enjoy things. It's always about
the process in life. So don't worry too much about
outcomes and being already better than everybody else are competing with
everybody else, but just let go and have a good time.
We're here to have fun. You see? Now we have created the
arms of the cactus. So what we're going to do
next is we're going to create the path and as long as we're
going to do the needles. But first we're going
to create the pot. Alright? I'm gonna teach you a really
quick a little trick. What we can do is if we create a new layer on top of
this outline layer, we don't have to rename
it because we're going to bring it back to
outlines later on. Then we can draw an oval
shape over our outlines. And because it's another layer, you will see like
an if you're done, click on Edit Shape and make it exactly how we need it to. Be. Sometimes Procreate
this a bit laggy, so don't worry too much, but it can lag a little bit. Alright, so now the shape
is in the perfect position. You see this line, we don't like this line. So we want to erase that line. So go to your eraser and
just erase the back part. And now you see we have created this nice oval-shaped line
by just erasing the part, that little part of our circle. So now it's like
perfectly smooth. So you see it's in
a different layer, but if you squeeze it together, like by squeezing
together like this, that was a bit slow,
but there you go. You see now it's part
of the outlines layer. So it's altogether
now everything is perfectly then the SPR
as we had it before. Alright, that was a little trick to
create a nice overlay. And you can do that also
with another things like use layers to make
your artwork better. Really don't be
afraid of creating different layers and then
later merging them together. Everything don't
worry, everything will be good because
it's digital. We can make as many
mistakes as we want. Alright, so we're continuing
with the outlines, two lines on each side here. Then we're going to
create this oval line or this curved line. That's gonna be the
lid of the pot. You see perfectly smooth. If you need to edit it,
you know where to do that. If you hold the pencil, the little information bar
comes up and you fixed it, you see nice lead. Okay, so same thing here. Straight line, straight line,
finished it a little bit. And then you see here
that we need to make this curve line again by going to this
side, to that side. And help edit shape a
little bit to make it perfect. If you need to. There you have your part. Alright, so we're
going to do next is to little cracks and needles. And then we're going to
color our illustration. Alright, so go to the crack,
just follow it along. Then to thicker practice.
Practice a little bit. If you need a little
bit more practice by creating thicker
or thinner lines, go do just do that
in another layer or another page or anything. Don't worry too much, like
learn by making mistakes. So thin, thicker, boom. If you make a mistake, you
can always go back by two. And if you went too
far with three, you can turn it back again. So thin, thick book. I also make mistakes
and that will happen forever in
your entire life. So don't worry too much
about being too perfect. Alright, You see there
we have our crack. Let's create the needles
so thick to thin. You can swipe. We'll
just practice it. Boom, boom. By creating a lot of pressure to low
pressure loss of boom, boom, boom, boom. Just fast. Don't worry about it. If you want to. Just
needles that are like just the same size,
that's also fine by me. Just make whatever
you feel like really, if you think it's better
to do it differently, That's good because
that's your inner artist telling you something. There we go. And just
create your needles. Anywhere. You have
sketched them. Though you have all the
needles and everything. But not too many, of course, because we don't
want to overload this illustration with just
needles and everything. Of course, real cactuses
have a lot more. But because it's
a cartoon we can create the way we
want to create. Alright, so that we
have our outlines. What are we going to
do next is color. It.
7. Coloring: So to color our illustration, we are going to again
create a new layer. So go to your layer section
and create another layer. But you wanna do it under the outlines layer
because we are going to color it so that the lines of the
outline pop up the most. If you go to sketch and
then click on the plus, then it will create
a layer in the middle of these two layers. It's called Layer three by now. But if you click on layer
three and rename it, we're going to call this color. And just like that, we
have our color layer. Now, the sketch layer
we don't need anymore. So we're going to
toggle the visibility that next to the n you see
this little mark over here. If you click on it,
it will disappear. So now you see the
exact outlines as we are going to be using to
color this illustration. We're going to first
learn a little trick. If you go to the layer section
and click on outlines, you see this thing pop up
again where we also rename. But if you didn't
click on Reference, which is the third of
third from the bottom. We can color things in our color layer and
make sure that you, when you color layer, What's reference does is it blocks out everything
that has lines, kinda like paint when you were on your computer back in the day when if you would have a Windows computer, you would have the
paint bucket, right? So if you didn't go to disk
and pick a nice green color, and if you then drag it
from the top by holding it, holding your pencil on the
color and dragging it, you can color things like boom, and it will color
things perfectly smooth if reference
would not be selected. So let's turn it
off for the sake of an experiment and you go to color and I'm trying
to color this. You will see it will color
everything because it doesn't get marked
off by the outlines. Reference makes a
reference to the outlines. So click on the reference. You will see that it's
selected that by if you've seen the layer
that the outlines, you see the little word
reference under it. That means that it's on. So then if you go to color, you see that it will
cover everything. So the next thing I
want to teach you a little bit about
the references. If you drag the
color in your hold the pencil here and we'll
color automatically. And in the top you
see a percentage. If you still have hold
your pencil on the screen, you can turn the percentage down by going to the left and you can
turn the percentage off. But if you go too much up, you will see that if you
do too close to a 100%, it will color everything again. And that's not what we want
because that's too much. We just want this. So if you keep it around 90, 89%, something like that, that's often good enough depending on the
thickness of your lines. So if your lines
are a lot thinner, you would have to probably lower the threshold a
lot more than I do. But if you have a lot
of thicker lines, then I have 90 is
perfectly fine. And you see that we can color
things perfectly smooth. Okay? So now we're going to select the perfect
colors for our cactus. Like, I didn't like
this green too much. I want it a bit more faded. Like that. I like it like this. You can pick your own colors. Really be creative. Choose your colors
for your character is the parts of the flowers. Everything. Have
100% fun with this. And just enjoy yourself. And then just drag
all the colors into wherever you want to. If you feel like,
I don't like to call it drop, I don't
wanna do it like this. I just wanna do it the classic
way. Totally fine too. We can do it that way,
see totally fine. You can also just color
by hand if you feel like if you want to have more
fun and enjoying yourself, but for the sake of the fast
and the speed of this video. So I can make this video
a little bit shorter. I'll teach you the
fastest way possible. But you can do it in
any way you want by hand or by drag and drop. Alright, so for the islets, I want to use the same green but a little bit darker
so you can just go to the disk again,
this little disk. And if you didn't just
go down a little bit, create a darker green. And that's going to
be for the eyelids. And again, you can also
manually color it. For now. I'm going
to just drop it. It's not too much anyways, there's not a lot of colors. And I also see I forgot
the lines from the pot. So if we go back to the outlines because I forgot those and have to fix that a little bit. That's the cool thing
about the illustration. You see I also make
mistakes and have to finish this lines. Totally forgot it. Totally forgot about
that. Well, that's okay. It's all fixed again and we
can go back to the coloring. Alright, so now we're
going to draw color. But I like a traditional path, a little bit of a cliche,
read terracotta color. So, but for you, you can make it whatever
color you want. You see, That's for me. And then for the back parts, I like a little bit of darker
because it's further away. And I like an illustration
is when something is further away to create a little bit
more of a darker color, to create that depth feeling. You see it creates a little
bit more of a feeling of 3D. Something is more in-depth
or something like that. There you have it.
Terracotta pot. Now we're going to
call it a dirt, which I'm going to just
make traditionally brown just like that. And then the tongue, I'm
gonna make a reddish pink. So if you go to read
and you want to, if you're following along
with what my colors are and just drag that color in
there for the throat, same color, but a lot darker. And hope, there you have it. And the flower and big, totally creative, really
have fun with it. I'm going to do like
a yellow thing on and a purple flower and you see how fast we can call it
something by using this. It is more fun by hand, but it takes a lot more time. Alright. There you have your cactus. I'm just going to color these
parts of the eyes white. Because if we're going to change the background later, if
I will show you like, you can change the
background color by clicking on background color. And you see this
thing popping up. You see that the eyes
are not colored and it will change into the
color of the background. For now, we're going to
keep the background white. We're going to later on
choose our own colors. But I want them to be white. So right now if I were
to change something, you see that the eye is white
and nothing will change. Doo doo, doo, doo doo disco. Alright. Alright, so those
are the base colors of our illustration. What we're going to do
next is we're going to create shadows and highlights. And then we will be done
with our illustration. It's a simple, fast way of making a nice
cartoon characters. I hope you're
enjoying it so far. Let's go on to the next part.
8. Shadows: So to create shadows, again, we're going to
create a new layer on top of this color layer. So go to your layer section
again and click on the plus, and let's rename
it into shadows. There we have it layers
ready for our shadows. Right now I'm going to teach you a little thing called
color picking. If you hold your finger on
a color or on the screen, it will change into whatever
color you're focusing on. So for example, or
you want to use this terracotta red color
and you hold your finger under your brush color in the top-right corner
over here you see it will change from
white to terracotta. And now everything
is terracotta. And that's totally
fine because we are to create some shadows and we want to create shadows
by having similar colors. So if for example,
what I mean with that is I want to create,
shut off this cactus. So select this green color, it will change it to green, go to your color section. Then I'd like to make
it a bit darker. But from this, this particular,
this specific green, I want to make it a
bit darker so you see, if I drag it down now
it's a darker green. And I can make shadows
perfectly fine in the chin, but then down, create some
shadows, nice and dandy. Screwed some shadows
on the edges. This sand is going to
create some shade on the part of the cactus
over here and over here, like arms are also going to get some shadow
because they're under site. So they're gonna shade
from the cactus itself. And also some shade on the
sideline over there to create the depth of our cactus. You see, if you just do this,
you have to do by hand, you cannot use a color dropper for this because if you do that, of course you will
color everything. We have to do it a
bit more selective. That's why I like I like
to call her first by dropping in and creating
the shadows. Later on. You see, we have already created some nice shadows in the
thing in our cactus. And same thing over
here on the top part, create some nice shadows. The flower also
creates a shadow, so we're just going
to keep it like that. And also decide a
little bit this slide I'm going to keep
for highlights. Alright, so there you see, our cactus already has
some nice shading. So we're going to also shape
the flower and the pot, and the dirt and everything. So let's keep on going. You see also our eyelids. I'm going to create
some shadow and so created a nicer dark greens for the, for the eyelids. Just to create some
shade on this side. There you have all the greens. Okay, so now we
go to the flower. Same thing. Hold your finger on the purple. Purple will be here now
and create a darker color. And then I'm going to
create some shadowing by just creating shading at the part of where
the center of the flowers. I like to do it like this. So let's creates a nice unity. It's cartoons, we can
do whatever we want. And then the top of the
leaves are going to be parts for the highlighting.
So that's totally fine. Okay, so now we have shadows
for our flower buds. We're going to do the center
of yellow a little bit, maybe a little bit
of an orange color. And there you have a nice
shadow of your flower. Alright, there you
have it already. The flower has its shading. Now we're going to
shade the tongue. Same thing. Go to the tongue, darker
color. And there you go. Shading, shading for the
throat or the throat. And just color it in.
See what I like to do. For example, if I want
to create a shadow, I first mark where I
want to have my shadow, so I create a line and then I just call her or
him until the line. That's why I like
to do what you can do however you want to do it. Alright, so there
you have it already, the shadowing is almost done. We're also going to
shade the eyelids or the white part of the eye. If you click on the white,
nothing will happen, but I'd like to create a
little bit of a blue shape. So grayish blue, not
too dark to light. You see nice to create also some reflection and stuff
in the eyelid or run. It creates a nice, a little
bit more of an effect that also the ISR 3D looking. Alright. So now
to the next part, the flower pot,
selected darker color. And then just want to create
some shade under this part, this entire lid is going to be shadow because it's a bit
higher than the other one. And that's fine. And I want to show you all
these parts smooth like that. And just color it
in. And you see, we have created a
nice shading of the pot like by
creating this nice, nice square light feeling. Alright. So the back
part, same thing, a little bit darker
because they're, the cactus creates the
shadows for that part. It already has a bit
of a shade in there. We have it already. The
pot is entirely shaded. Now we're going to do the send. Click on Send.
Just the back part because this part is
more light because it's in front and this
part is in the back. There. You have it a little bit more to
the front of your like, just totally cool. And now we have
shaded also descent. You see our shadows are done. And right now we are
going to the highlights.
9. Highlights: So again, to create highlights, we are going to create
another new layer. We're going to the
two squares in the top right corner and click on the Plus
above the shadows, rename it and call
it highlights. There we have it. Our
highlights layer is all ready. Okay, so you now know
how to make shadows. The same thing we're going
to do with highlights, but then to the
opposite direction. So if you, for example, select the green, the
green is selected. Instead of making it darker, we're going to be
making it lighter. So take it up and there you have your shadows or highlights, I mean, and just create some
nice highlight the parts. If you have a thick brush,
you can just do this as I'm doing this brush and
color some light parts. In there, you see one-to-many, just a little bit.
Have some fun with it. Just some highlighting parts. Like not too much it highlights,
but just a little bit. Alright, so then for the pot, same thing to be
opposite direction. I like to mix course to create a little bit more of that
effective reflection. Just like that. Same thing here. Some nice reflection into your pot right now
on the flower buds. The same thing. Lighter color
circles because like how I would like to see this is like if you have
a circular shape, you create a little bit more
of a circular reflection. If you have a longer shape, you can make a little bit
more for longer reflection. If you have a bit more
of a squarish shape, you make a little bit of
a squarish reflection. That's a good lesson to
learn so that you can make the perfect
reflections later on for your own illustrations seem like a nice little
reflection in here. Same thing for the yellow. We can almost do white. You go and your reflection
is all smooth and dandy. Now we're going to do a little
reflection of the sand. There's some dots everywhere to create some light effects. You see to create some
nice sandy texture. And now you have all
your reflections. All the thing that, the
only thing that we're still going to do is create a
reflection of the ice. But we have to create
a new layer for that because the black
is the outliner, we cannot create
anything above it. So what we're going to
do is we're going to do later section again and on
top of the outlines layer. So if you click on the
outline layer, my book, and you see that the
blue that it's selected, click on the Plus, rename
it and call it highlights. Ice. It's gonna be the
reflection of the eye, which we're going
to create in white. So zoom in on your eyes, make sure that your
white color is selected. If you want a white color, you can go to value. And if you see that
everything is f, f, f, f, f hexadecimal, or RGB, everything is all
maxed out to 255. That means that you
are using perfectly. Why do white? Why do, why do white? Alright? So what are we going to do? Is we're going to zoom
in on the eye and create a circle over the, over the black part of the
eye and just color it in. And then this one
is a bit bigger, and then another circle
that's a bit smaller. You see that creates a nice
reflection of the eye. We're going to do the same
thing with the other one. Bigger circle and
a smaller circle. And see right now
we have created our beautiful cactus is
all colored, all done. But let's give it some extra. So in the next one,
in the next part, the next part I'm going to add a little bit of
scribbles and some shading, shading and also a
nice background.
10. Add Background: So first we are going to
change the background. Well, we're going to
do is we're going to the background color and click on that and just pick a nice background,
whatever you feel like, they'll make it too dark
of a color because you don't want the
background to be more pumping out then
the cactus itself. The cactus is very greenish, so we have to pick a
perfect color for it. I like this kind of color. Not to lie to you see that the cactus is still pumping out while the base is also
nice for the background. So what we're going to do
next is we're going to create a shadow of our part. We're going to
create a new layer under our color section. So if you'd go to the
sketch and create a new layer on top of
the sketch and then rename it shadow pot. Go, we're going to create a
little shadow of the pot. So what we learned from
the other parties, like selecting the
background onto the background to your disk and then make it
a little darker. Now you see we have created a nice color that's gonna be a perfectly
shadow for the pot. So what we're going to do is we're going to raise
our brush a little bit and just color in a nice shadow
that is going under here. A little bit like
this. Just like that. A nice oval shape
under the part that creates a nice effect as if it also standing
on the ground. You see there you have it. Not a trick if you want to, for example, make it a
little bit more blurry. You can go to this magic wand in the left top corner next
to gallery does this tool. And down next to that
is a magic wand. And if you then click
on Gaussian Blur, you can blur it a little bit. You see, you can blur
your shadow a little bit. That creates also a
little bit more of a shading effect if
you would like to. It doesn't have to
be because cartoons often have just
trade strong lines. But for now, let's just keep it. And if you, for
example, an unhappy yet which you're shading, you can go to Transform tool with the arrow and then go to warping and can make it a
little bit bigger and shape it a little bit more into
the size that you want to. And that's totally up to you. Just play around with it,
have a little bit of fun. So now we have
created the shadows, the background, our
cactus is basically done, but I'm going to add
a little bit more, to add a little bit more
of a texture of faction.
11. Finishing Touches: To finish this cactus off, we're going to create
a new layer on top of like the highlights layer. So go to the highlights
layer and click on the Plus, rename it and call it
finishing touches. Am I running and goods
finishing touches. We're going to use the
color black for this. Make sure that your
studio pen is selected. And we're just going to
give it a little texture by giving it some
lines everywhere. Every, every where you want
to select some lines here, some lines there, some lines
here, some lines there. Some lines, they're
graded a little bit more. Give it a little bit more
of a texturize feeling. And just do it wherever
you feel like it's nice. If you want some
stripes here, some, some shading that's
totally up to you. Not too much. We're
going to keep it very short and keep it
clean and everything. Just in the eyes a little
bit from here, some stripes. You see that creates a
lot already a little bit more than we had done before. Just some lines, some
creating some depth in it. Just a little bit.
Maybe in the dirt, some dots to create a little
bit more depth in there too. You see it creates
already something unique, but you give it your own touch. And here we have our
characters already all done. Congratulations, you did it.
12. Thank You!: Thank you all so much
for taking this class. I hope you learn
something from it. And most of all, that you
enjoyed creating your creation. I also would love to see
what you have created. So please send me your
beautiful artworks and give this video
a little review that would help me
out a lot and also others to see what they can
expect from this class. If you want to know a little
bit more about my work, please check out my
Instagram where I post almost daily new
and fun creations. You can find the
link on my profile. Thank you, Have a wonderful day, and I'll see you
in the next video.
 Jeroen Van Wel, Let's get creative!