Transcripts
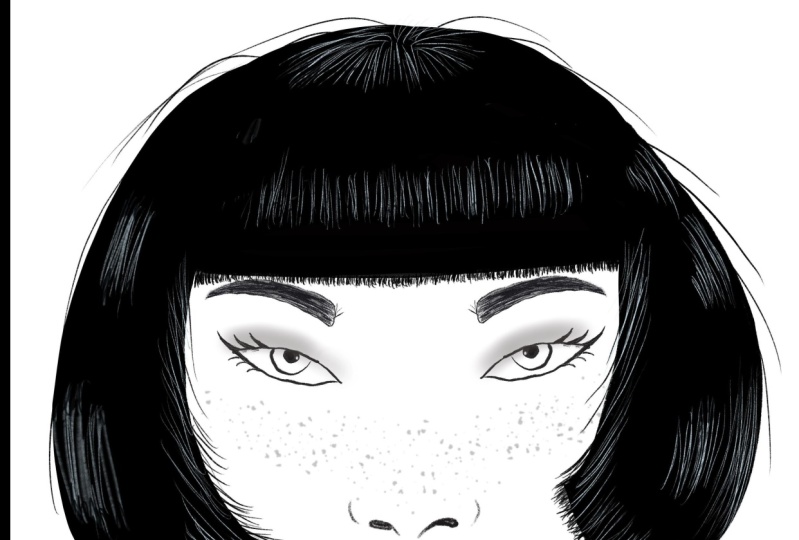
1. Intro: Hi, I'm Jay, and welcome to another video. For this time, I will teach you how to create black hair in a portrait. If you want to know how to make a portrait the easy way, please watch my other video where you will learn to do just that. And this time we will just be focusing on the hair. So before we start, make sure to download the files we're going to use for this class. You can find them in the projects and resources section under this video.
2. Creating Canvas: So now to start, we are first going to create our canvas. We will be doing that by clicking on the plus in the right top corner. And then again on the plus 100. Here we are going to choose our dimensions. We're going to pick 2500 by 2500 pixels, and the DPI is going to be 300. When you have done that, click on Create. And that's going to be the cameras we're going to use.
3. Importing Files: So now we have our canvas, we are going to import our files. So make sure you have downloaded, downloaded the photo, the brush, and a color palette. So to start off, we're going to import the photo. In this layer. We're going to add this tool on the left top corner. We're going to click on that. We're going to say Insert a File. Go to where your photo is. And we're going to import this photo. Now we're going to make the photo of it bigger so that it is perfectly centered in the middle. Like this. We're going to do layers. We click on the end of the layer. And we're going to lower the opacity to around, let's say 60 percent. Swipe the layer little bit to the left and click on Lock. And malware cannot touch it anymore and it will be just there. So now we're going to import the brush. If you open a blush brush library on this brush tool over here, and you swipe all the way to the bottom and go to import it. There you click on the plus sign. Go to import and click on the crispy brush. Now there'll be imported. Make sure it is selected. And now for the color palette, all the way in top-right corner where your color section is. We're going to click on that one. We're going to click on the Plus section, then pellets. So go to palettes. Click on plus, say knew from file. And click on highlights, black hair. That's going to be the color palette we're going to use. So highlights black hair. So now we have imported our files, we can start creating.
4. Outline : So now for the following step, we are going to create a new layer where we're going to draw the outlines. So we're gonna go to the layer. Click on the plus button, click on the layer, and click Rename. Now call it outlines. So now make sure that you have selected the crispy brush. We're going to pick our color. We're going to make it black. So make sure the RGB sliders are all to 0. So all these sliders are all 0. And that will create a black color. Brush is selected. Now, on the left side here you can see the brush size. So we're going to pick around 4% for this one if you like a bigger size or smaller size, go ahead. It doesn't matter if whatever you like best. And now we're going to draw the outlines of the face and the hair. So I'm starting with the phase itself. Just focus only on the face. Nothing else. Because we're only going to be focusing on the hair today. So for that we just need the outlines of the face structure only. So just make outlines of the face like I'm doing. And if you do not like something, you can always like when you scratch something, you know, like it tap with two fingers on the screen and it will remove. If you then decide you still like it anyways, you can tap with three fingers on a screen and it will reappear. So now we're just going to follow, don't worry about the earrings and we're just going to make them very quickly. We're not focusing on that at all. You can learn everything in my other video about portraits. So just really quick. Same with the hair. Just do the outline. The only difference is we're not going to go draw it all the way here. I'm going to make it a bit more artistic by creating a point-like in a half a circle movement. So just do that as well. Follow me on this one. And just make the outline is nothing more. Very simple. Okay, so now we have the outlines of the hair from this site. Let's first finish it like that very quickly. So now we're going to do the hair on the inside of the face. We will do that by going from inside the hair to India scalp by creating thick glass to thin lines. So the way you do that is by putting pressure and then put less pressure on the MPT to great tip because if you put pressure all the way, you just got a thick line, you see. But if you put pressure and less pressure, you create like pointy lines like this. Practice it a little bit on the screen until you, until you are satisfied with your lines. And when you have done that, we're going to draw all the hairs that are going inside the head. So all the roots of the hair. So we do that by very quickly. Make some small strokes, small and thin. So from thick to thin to create like small thin strokes, the only thing that you have to do is go a little bit in the flow of the hair itself. So the herd goes like that. So we go like also like that you see, just like that, just follow the flow of the hair and go into the scalp. We hear terms just very thin and fast. You don't have to do so precise because it doesn't matter too much. Because harris very messy. So if you draw it very messy, it gets a lot more realistic. Just make sure you make them thin strokes, then unsharp. They have to be sure because that's going to make it look like it's going to be very real. Like if I take the photo away, you see because of the sharpness, it looks like it's flowing into the hair. Like it creates a little bit of a fade. And that's exactly what we want to create. So just keep on doing that everywhere. Very quickly. Don't put too much time on it. Here can actually be very fast, like drawn. Because I like to do it very messy. And it still will look very realistic. You will see it later on into law. Can lectin the very good? Just follow the hairline? Plus here it goes a bit in accrual. So we're also gonna do it in a CRO, you see? It's like that. Like this cross we make by just making thin strokes like this. So thin curls then cross-link growth. By creating that over each other, you create the effect as it does really gross. And then of course, in the roots recreate the points and the thinner the hair, because here there's some baby hearse. You do is you just make very low pressure strokes. So like don't put too much pressure just like this. Follow the her through each other like that. Simple until you are satisfied. Alright. So I think that's it already. Let's see. Just like sticking it out a little bit. Not too much because we're going to come back to it later on. There's like that. So if I take the photo away, you'll see exactly what I mean. Like we have created all the roots of the Harris, where it goes from the hair to the face. So let's now do the eyebrows real quick. Like one thing I want to say about the eyebrows is like a lot of people draw eyebrows like this. And that's not how eyebrows work because hair is a bit messy as I said before. So here you have to draw a bit more like through each other, like it goes one direction to another direction. So you have to draw it also like that. So for example, if you see here it goes here a bit like this, and here it goes like that, and here it goes down. So just draw it like that. Just talk to each other in the same way that you have done with the roots. So from thick to thin, like small points, the points make it feel like it's like hair. And just fill it out correctly. Like that. You can leave some space in there to make it look more realistic. And you have to go a little bit back and forth like that. You see if I take the photo away, that is exactly how we want it to look. So now let's do the other ones same way. You see here you go here goes like that. You're hearing goes like this. You heard goes like that and your hair's goes like that. So you have to make it really like, as you see it in the photo. Here, it goes like this in a circular motion. But it never goes in the same direction because there is a very messy and always goes to all the sites. By doing this, we create a really realistic effect on drawing here. And just colored in. And the thinner the hairs, the less pressure you put. So like in the end they're so thin hair cell also the beginning, some terrorists. And that's that you see if you like the photo away. Too beautiful, I breath.
5. Guidelines Flow of Hair: So now we have the outlines of our photo. We're going to create a new layer. On top of the outlines layer. Click on it, click Rename, and call it Guidelines flow. So guidelines flow, we're going to pick a red color. So just make sure that the art of RGB intersection value is gone all the way to the right. And what we're gonna do now is we're going to decide the flow of the hair so that the hair goes like this. So we're just making guidelines for how the Harris flowing, Like that goes behind it here, here, over to there. Very quickly. Those spend too much time on it like that. And just flow is very messy. This is going to help us later on. You will see what you will see when we get there. Nothing that's it for now. Legal system curly lines hinder that. All right, so these are going to be our guidelines. So we're going to delay, we call it and click on the N. We're going to lower the opacity to like, let's say 30 percent. And let's make it invisible for now. Invisible.
6. Finishing Base for Hair: So what we're gonna do next is we're going back to our outline, outlines layer. So click on it. So then we're going to click on the outlines and click on Reference. So make sure reference is selected. So what we're doing next, disregarded, close everything out good. Make sure that your brushes on 4% or whatever size you pick to create the outlines. So close all the sections off so that there's no more space. And now just fill in their hair like this. So colored completely black. Like that. Just all black. So now I have done that. We're going to draw the stray hairs. So to do that is we're not going to put super thick pressure on it. We're going to put the low pressure and curly effects on the sides. And the thinner the hairs are, the less pressure you put sound like no pressure, a little bit more pressure. No pressure low with more pressure like that and just do that over an entire hair. So that will get like a lot more life and realistic effect. Very easy for its own curly hair sun to the tip. So it gets a little bit more artistic. No pressure, little bit of pressure, no pressure, a little bit of pressure. Also in the head you see there's a lot of baby has almost no pressure by creating goes first. Very simple, girly little bit over the chin. Sometimes happens to grid a little bit more realism like that. And if you take the photo away, you see that you have already created like almost everything. So that's that. Now let's go to the highlights.
7. Highlights : So to create highlights, we're going to first make a new layer. So go to your layers. And we're going to put this layer on top of the outline layer. Click, click on the plus button and rename it and call it highlights. So I gave you like a little color palette. So we're going to pick the little or the light blue, light grayish blue color in our color palette. So you can go to Palettes and selected. So we're going to open our guidelines flow layer. And that is the layer that we have created our flow because we're not going to use our photo anymore as our background. We now have to have some guidelines to create the flow of the hair with our highlights. So what we're gonna do next is we're gonna pick our crispy rush. Make sure to cross-site. Brush size is on 4% again. And we're going to just make the thin strokes like this. And like that, thin blue strokes close to each other then and in the same flow as our guidelines. So the guidelines call August, so you also go like that, which are flow like that. See, I like to pick a bluish color because why it is so boring, so blue is a little bit more artistic, so I like to do that. And you'll see that there's going to be a really nice later on with bluish-gray lot to blue. And just create thin strokes like this everywhere. Not too long, not too short. Then short strokes and re-render her an exact flow of how the hair is going. See our guidelines now make everything super visible because we have colored it didn't completely black. So this way, it's a really easy way for us to see where the airflow is too. Thin strokes close to each other like that. Not all out. So you don't have to do all like hair like this. No. Just thin strokes like this will be just fine. Because there's just going to be a highlight. So it like the Harris does still feel like it's black hair. If you do it everywhere, it's going to look like grayish or blue as the one we want. In this case. Just everywhere follow the red lines that we have created before to create the guidelines. There's simple this like this everywhere. No worry too much if it's messy or you want to do something perfectly, we don't get it yet. Believing in the next step at all, like come to a conclusion. It's very simple. Smile on that. Also be careful with the brush if you like. Make it too much to decide if you're tilted too much decided would be a bit more blurry so you don't have to do it all the way straight, but like keep it a little bit in a nice degrees so that the lines are nice, thin and sharp like that. And just keep going until you're satisfied with your lines. You can take the guidelines away if you want already, because now we already know the flow. So take the guidelines away. You see exactly like the line so far. If you zoom in, you see like ever doing a smooth already looks really good. Already looks like highlights. But we're going to make it a little bit more realistic.
8. Shading: And we do that by creating a new layer. So go to the layers and make a layer on top of the highlights, rename it, and call it shadows. Shadows. And click on the layer again. So click on the layer Shadows and click on clipping mask. So what this does is like, what this does is now it will only color departs that. Now what this does is that the shadows layer will now attach itself to the highlight layer. And we'll call it only departs that you have colored in the highlights layer. So for example, if I now would draw on this white section over here, it will do nothing. You see it will do nothing because that part is not colored, so it will cover only the parts. But we have colored in, in the bottom as you see, you see. So what we're going to do next is we're going to click on a brush. We're going to, we're going to pick a totally different brush right now, and it's already installed in your program. So don't worry, we're going to click on airbrushing and click on the soft brush. So airbrushing, soft brush. So we're going to click on that one. Then we're going to change the size to around 3%. So click around 30 percent. And what we're going to do next is we're going to go color or make the edges of the highlights darker. What this does is it creates an effect of like extra highlight in the middle. Just do that. There. You see, if you zoom out a little bit, you see that it looks like a lot more highlighted in the middle, while little bit less on the edges. And that's what we want to create because that will create like a lot more realistic effect in our hair. And it's also going to look a lot more artistic. So we're going to be doing that with every highlights. So we're going to do all the edges over here. Darker. You decide how much highlight you want to give. I'm gonna give it around this much so you decide if you want like a lot of highlights or like just a little tip like that, That's also possible. You decide that what you find pretty. And just do that everywhere. Where we're using the soft brush because it gives a fade. And because of the faded looks a little bit more realistic. Let's do that. Everywhere. I see analyses go look and how easy it is to make her Oh, easy it can be. And just do that everywhere. Well, I get that very quickly. I won't spend too much time on it unless you really, really need to focus. So there you have it. That's that's basically the black hair. Because black, you don't have to put a lot of color. Just highlight this enough in my opinion, because like in this way it creates a little bit more strength in our hair. So that's basically it. You see how simple it can be to make hair. So now I'm going to speed up the video. I finished a portrait. Again. If you want to learn how to make the entire portrait, please watch my other video and now enjoy the rest of the process.
9. Speed Art: What? Hello. Hello. Susan. Hi.
10. Outro: So this is how it turned out to be in the end. Thank you all so much for watching. If you have any questions, feel free to ask and I'll see you in the next video. Thank you.
 Jeroen Van Wel, Let's get creative!