Transcripts
1. Intro to Hand Embroidered Monograms: Hi, my name is Becca Ron.
Welcome to my studio. As an artist, I create work
using fabric and paper. I do a lot of fabric design, designing my own fabrics from paper illustrations
and hand embroidery. In this class, we are going to learn about stitching monograms. Monograms are basically
just stitching a letter. This class is going to focus
on embroidered monograms, but you will see monograms out
in the world on buildings, in mosaics, in lots of places, anywhere that somebody wanted
to sort of put their stamp. So the fun part of
this class is you get to design everything
about your monogram. I'm going to show you
how to source letters, how to transfer
them onto fabric. I'm going to teach you three different
embroidery stitches, which work great for
letters and lettering. And then you get to
make your own project, whatever you want to stitch. So let's jump in and stitch
some embroidered monograms.
2. Your Project: You project for this class
is a pretty simple one. You are just going to
stitch a monogram. I have a lot of examples out here of ones we're
going to stitch in class in the next few lessons and some that I've
made ahead of time. So in the next few lessons, I'm going to walk you through choosing the style
of your letter, transferring it onto fabric. There are three hands
on lessons to show you three different
styles of stitching, so you can pick the
right thing to go with the style of letter
you want to stitch. And then finally, I've got a whole bunch of inspiration
that I'll talk about how they're constructed
and so you can choose the style for making your
monogram anyway you like. So your assignment is to work with me through the
next few lessons, make all of those
design decisions, and then stitch
your own monogram on any kind of
project you want to. I can't wait to see
what you design.
3. Tools & Materials: So let's start out talking
about the tools and materials you'll need
for making monograms. First, you'll need
a pair of scissors, something to trim
threads with you'll also need a needle to do
your embroidery with. Now, these are my
favorite kind of needles, and I'll hold one up here
close to the screen. This is called a henle needle. Chenil needles have
a really sharp point and they have a nice big eye, so it's easy to thread, and I think they are
great to stitch with. Now, I have a couple of
different sizes here. The size of corresponds to the kind of thread
that you want to use, and we'll talk
about threads next. But a good rule of
thumb is to match the size of your needle to
the size of your thread. The two things should be about the same
thickness or diameter. I see beginners sometimes grab the largest size needle thinking it will make
their stitching easier. I think that's opposite the case that really a
smaller needle makes it easier to make some of
the kinds of stitches. So you'll need some
kind of a needle. Like I said, henle
are my favorite. You could also use ones that are labeled
embroidery needles. They will also work great. They just have a smaller eye. They're a little bit
harder to thread. Okay? Then you need some
thread to create your design. Now, a lot of you might be familiar with six stranded
embroidery thread, also called cross stitch floss. That works great. It is made up of six
individual threads. So you can use as many or as few as you want to when
you do your stitching. So you can make thicker
lines or thinner lines. This one's a great
choice. My favorite is something called
pearl cotton, and it comes on little
spools like this. They come in different shapes, and it's a thread
that's designed to be used just as one piece, so you don't have to
separate anything out. These are both the size eight, which is about equivalent to three strands of this
stranded embroidery thread. This is my personal
favorite to stitch with. I just really like the
way the stitches look, and I think it's easier
to work with than the six strands that you
have to juggle around. Um it isn't quite as
easily available. You can usually find it at your local craft store in kind of limited
color selection. But many local,
independent quilt shops carry it because it's great for doing
hand quilting. So you could use Pearl cotton, which is what I'm going to use for all of the examples
in this class. This is the same kind
of Pearl cotton thread, just a variegated color. Variegated colors are sometimes
a really fun way to add multiple colors to your design without having to change
threads all the time. So that's another great option. There are lots of other kinds of kind of specialty embroidery threads out there that you could also use that will
work great for this. So here's one example. This one is a thread called Eco vita, and it's a wool
embroidery thread. So this would be really
similar to working with either of the others
and would be a great choice. If this is your
very first project, I would stay away from any
kind of a metallic thread. Those ones tend to be much stiffer and
harder to work with, and it will be harder if that's
your very first project. So you can work up to
those fun metallics. One other optional
tool you might decide you need is
an embroidery hoop. Now, me personally
as a stitcher, I don't always like to
use an embroidery hoop, even though they're
kind of the standard. So your choice about using an embroidery hoop depends on the kind of fabric
that you're going to use. So the thinner your fabric is, the more likely you're
going to want one of these to help hold
it smooth and tight, and so nothing wrinkles up and you'll get a
much better result. But if you choose
a thicker fabric, like you were going to embroider
on denim or wool felt, which is one of the
examples I'll show you, those probably don't need an embroidery hoop as
much to be able to keep the fabric sort of out of your way to do
your stitch designs. So I always consider embroidery hoops an
optional accessory, and you can choose whether
or not to use them. I will kind of go back and forth in the examples
in this class, so you can see how it looks stitching with one
and without one. Alright, so that kind
of covers tools. Now, some materials. You need something to stitch on. So I'm going to do
some examples on this class just on some
plain cotton fabric. This is a cotton muslin. I had some leftover
from another project. So that's what I'm
going to stitch on. This light color is really nice for working on camera so you
guys can see my stitches. But you can stitch on
any color you want to. And I have a bunch of examples
which I'll show you at the end that are stitched on all kinds of
different colors. So a lightweight, kind
of quilting cotton or craft cotton would be a great choice for your
very first project. You could also use a scrap of other things leftover
from another project, make sure that
they're kind of in the light or medium
weight sort of category. Another great choice is
to use some felt fabric. Personally, this is my favorite kind of
fabric to stitch on, and I do a lot of
stitching on wool felt. These are just two
little squares of some wool and rayon blend felt. I will put some of my
favorite resources for the felt fabrics and the threads into the
handout for this class, so you can download that and see where to get all of
these cool materials. But felt is another
great option. One of the examples
I'll do later in class, I'll stitch on felt so you
can just see how that looks. You also could find a ready made something that you
could put a monogram on. So this is just like a canvas bag that something
I ordered came in, and it's just a
plain canvas bag, so I thought it
would be a great one to add a monogram, too. Um, you can stitch
onto clothing, bags like this,
premade handkerchiefs maybe that have been
hemmed already. Any of those things are
a great thing to use as a canvas to put
your monograms on. It's a little trickier
working on something like a bag like this because
it's got two layers. So I'm going to have to really
carefully work to stitch only on one part of it and not accidentally
catch the other side. So it makes it a little
bit more challenging if you're trying to choose something
for your first project. Okay. So that kind of
covers the materials. Now, there are a couple
other things that are really helpful
for doing monograms. Now, a monogram is a letter. So somehow you have
to get a letter onto your fabric so that you
can stitch over it. Now, you can go as absolutely
simple as a pencil, and honestly, I use this
method all the time. I print out a letter on paper, and I'm going to
show you how to do that in a lesson a
little bit later. I hold it up to a window and I trace onto my fabric.
It's that simple. Um, and I think that's a great way to kind
of get started. It's very low tech. Um, pencil is a good option. Unless you're using a
dark colored fabric, then you might have to dig
out like a colored pencil. Or this one I got at a quilt
conference that I went to. This is a chalk pencil. It works like a
mechanical pencil, so it has a little lead in here, and it has three
different colors. So there's a white, a pink, and a black that I
can choose from. This one is great
for transferring things onto darker
colored fabrics. So this one is made by se line, and I'll be sure
to include that in the resources download
for this class. There's another pen which I
have had great luck with. These are called friction pens. They're made by pilot and it
says right on it erasable. The cool thing about these pens is if you draw on
a piece of fabric, you can stitch over it, and then you just
have to heat it up and this ink will disappear. You could hit it with an iron or your hair dryer and that will make all of
the ink disappear. Now, I have heard some people say that sometimes these
inks will come back. Like, it won't
disappear permanently. I will kind of come back again, especially if your
piece gets really cold. I haven't had that
experience, but just, like, to be transparent, I have
heard that about some things. So that's a thing to consider. But they come in lots of colors, so it makes it really
easy to find one that shows up against the
fabric you're stitching. A couple of things
I don't recommend, and I wanted to pull these out because I see these show up on Instagram videos all the time is people drawing either with
ballpoint pen or Sharpie. There's kind of two problems
with both of these. First, ballpoint pen
is kind of like a gel, and it can smear, especially
if you're putting kind of thick lines onto your
fabric. It doesn't wash out. Not always. And so you can
end up with your letters, your markings, kind
of smearing over your fabric and ruining your design before
you ever get started. So I don't love ballpoint pen. Sharpie also has just as part of what makes
it a permanent marker, there's some acid in a Sharpie
and some kinds of fabric, the acid in the ink can actually just eat
through the fabric, and so you'll end up with
holes in your piece. So Sharpie also not a
great option for this. I wanted to talk about those because I see them
come up a lot. Now, one other tool you can use, and I'm going to
demonstrate this in one of the lessons a little bit
later is there is a product. This one's made by Silky. There are several
manufacturers that make it that is called It's a
water soluble stabilizer. And this one is self adhesive. So it works like a sticker. You can draw your letters. You can actually
put this through the printer and
print your letters. Stick it onto your fabric, and then you're going
to stitch right through this stabilizer. When you're all done,
it washes away. So I'll do a demonstration of that later on in this class, so you can see how that works. This is honestly my favorite
tool for doing monograms, and I think you
get the cleanest, best results if you use
something like this. Now, you don't have to have a printer to be able to use it. You can draw right on this
stabilizer with pencil. So you could trace over
letters from you know, another source with pencil, you could draw them
freehand and still be able to use this even if you don't have a
computer printer. Okay, so that kind
of takes care of all the tools and materials
you'll need for this project. In the next lesson,
we're going to talk about how do you
get the letters? Monograms are made
up of letters, and so how do you
get those letters in a place where you can transfer
them onto your fabric?
4. Sourcing Letters: Okay, for this lesson,
I've actually jumped into Adobe Illustrator
to show you how I create the letters
to do my monograms. Now, you don't have to have Adobe Illustrator
to do this project. Any kind of word processing
program that you have that you know how to use is going to do the same
things that I'm doing. So the tools might be in
slightly different places. They might work
slightly different, but you'll get the same
idea of how you can create letters so that
you're able to stitch them. So I just have opened up
a blank document here, and I'm going to put some
letters on the screen. So I'm just going to switch
over to my text tool. And I'm going to just put ABC. And those are pretty
small. Let me make them larger so that you
can really see this. And in fact, one trick I want to show you is
in my drop down menu, I can only make them
72 points tall. Who even knows how big that is? I actually can type in
this box and make them a number of inches or
centimeters, if I want to. So instead of 72 points, I'm just going to type
in two N for inches, and it's going to make
two inch letters. Now, it's switched in
the little drop down there that's equivalent
to 144 points. You can change all
of the units and everything in Illustrator
and many other programs, but that's just a
quick way to do it if you don't have
all of that setup. I've got two inch letters
here and I'm just using ABC. Your first thing to do when you're choosing
letters to stitch in monograms is you want to think about what kind of a
letter you want to stitch. So these ones, and this is just the font that
defaulted that came up, these are kind of thick, so it's not a single line. If I were going to stitch this, I would have to have
a couple of lines of stitches to make up that
letter, which is great. But that's the thing
to think about is what sort of letter do
you want to embroider? So let's give you an example. If I look at some
of the other fonts that I have in my system. I'm going to pick this
one called beloved. This, I think is
a great example. So this is, I think the easiest kind of
font to embroider is if you find one like this that has just a single thin line. So I could use this one
just exactly as it is, and I think these are
really nice clean letters. So that's one thing to choose. Now, there are lots of
narrow fonts like that. So if I keep that one, I'm just going to make
a copy of this and we'll choose another
one from my list. I'll see if I can find one
that looks like a script, maybe I think those are fun. Oh, here we go. There's
a great script. In fact, I've used this
one that letter B before. So it's a little
bit thicker line, but I still could
stitch over top of this with kind of one pass of thread. So that's one option
to think about. Now, another one is you might want to do
a thicker letter, and I'll show some examples of those up on the screen
kind of next to me, some stitched examples of these. But if you want to
do a thicker letter, then some things to think about are you're
going to have to do several passes of thread to somehow make up the
thickness of that letter. So here's an example of that. So these are thick, kind
of stencil like letters. I've actually stitched this one up as an example, as well. This one, I had to make several
passes of a chain stitch, which is one of the ones
we're going to learn in this class to be able to
fill in that whole block. So in this one,
instead of thinking about what the line would be that I'm going to trace over, I'm thinking about
filling in these shapes. Both are great options. Okay, so once you've kind of narrowed down the style
font that you want, you might want something
that looks like a script or an old English, like a calligraphy
kind of letter. You might want a basic block. Those are all choices up to you. Once you've made your decision, then you're going
to want to arrange them on a sheet like this
that you can print out. So this is where I use
that trick I showed you with being able to set
the size of the font. The next thing I think
about is what size? How big do I want this to go on whatever it is
that I'm stitching? So, for instance, if I
were doing a handkerchief, I might want a smaller letter, and I might make that
one only 1 " tall. If I were going to put a
letter like on a sweater, I might put it bigger. I might make one that's 3 ". So I can adjust the size
of these and print out a whole bunch of
different letters and different sizes on the
same sheet of paper. So for example, I have
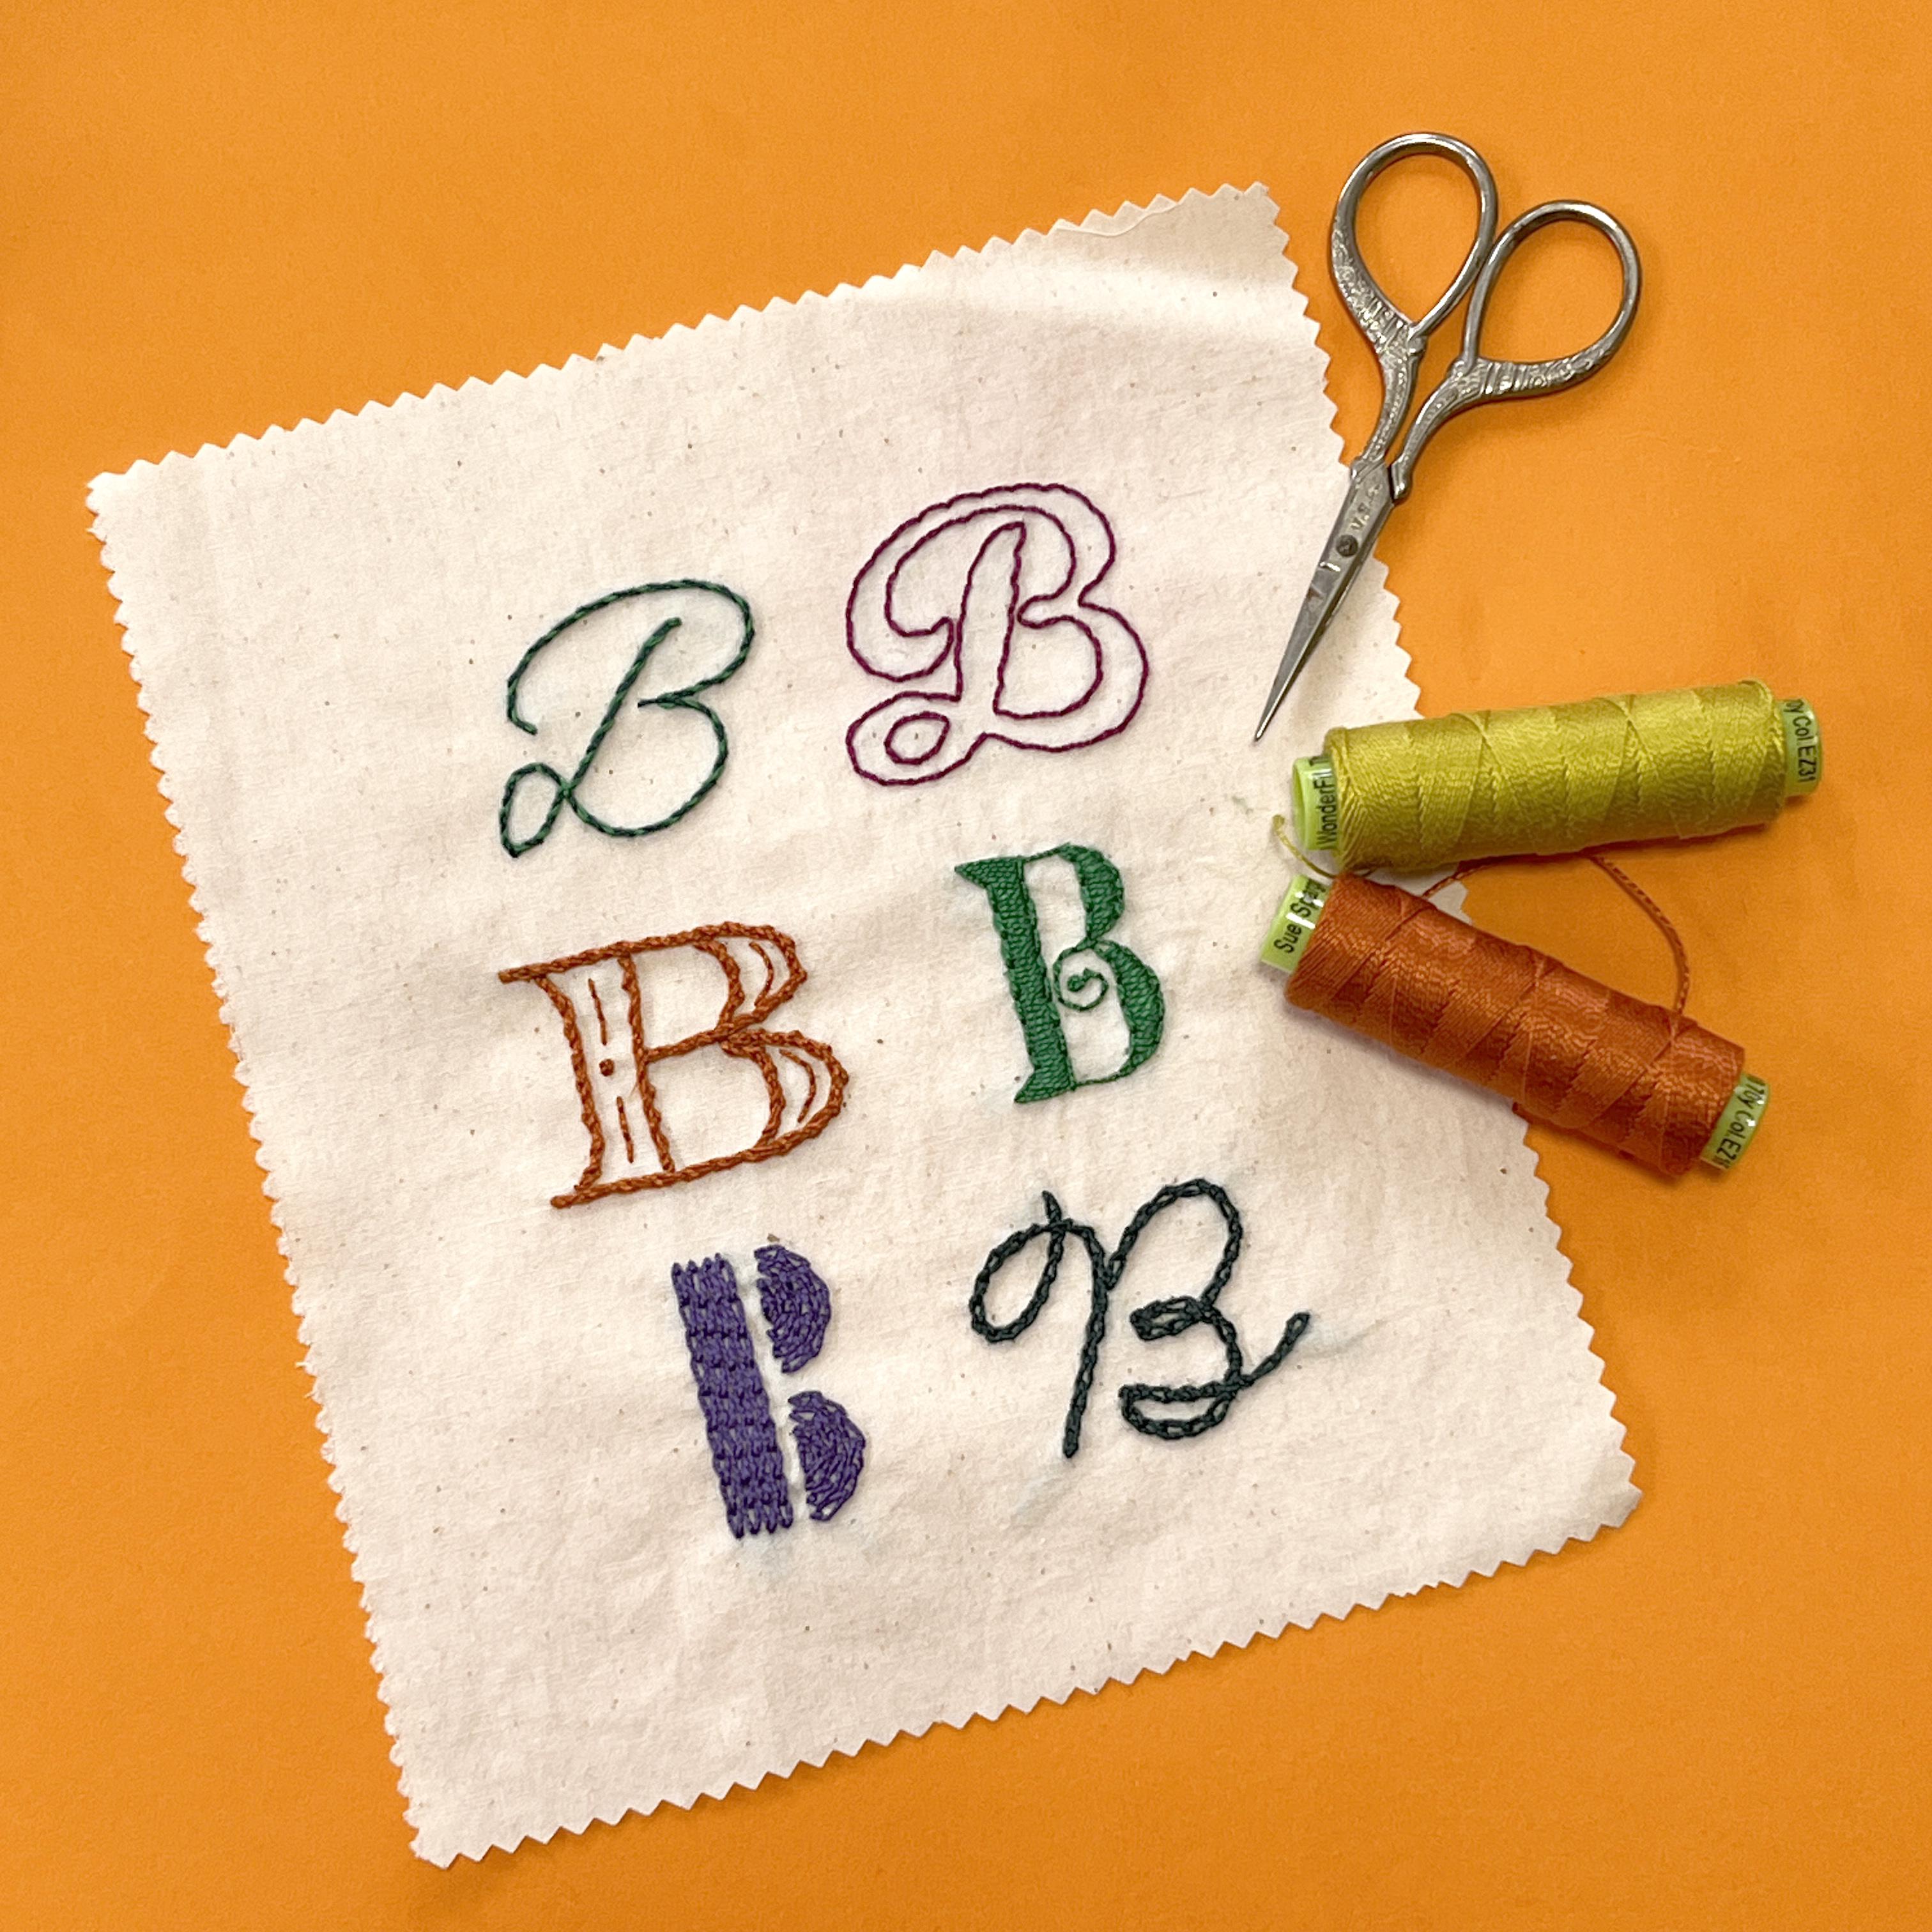
another window open. Here are some that I picked out to stitch a sample
with just the letter B, since my name is Becca, and I'll put a picture
of this sample that I stitched up on
the screen next to me. So I did a couple of things with these letters that you'll notice on this big kind of wide script one and on the
stencil shaped one down here. I actually created
an outline of those, and depending on the
program you're in, outline might be
one of the choices. The reason I did that is
that I wanted to be able to see the outside of the letter to stitch them a little easier. Um, and it gave me the option of being able to leave it open, like I did with the B on the
top or to fill it in solid. So that was just
a personal choice to be able to see the edges
of the letter better, you wouldn't have to
put it in outline mode, depending on what makes
the most sense for you. So I'm going to make a
sheet like this with all of the letters that I want
to use as my monograms, all the options, sometimes I do them in several
different sizes so I can actually look
at it up against the piece that I'm stitching
and make a decision. Now, if I'm going to transfer these using one of
the marking pens, the chalk pencil or pencil, I can just print
this on plain paper. If I'm going to use that
water soluble stabilizer, then I can print this directly onto one of those
stabilizer sheets. I'm going to print
this one both ways, and in the next lesson, I'll show you how to transfer these letters using
both of those methods. And just a quick note. If you don't have a computer
with a printer and you can't print out and use a graphics program
to get letters, you can find letters all
kinds of other places. I pulled a couple of
things just off of my bookshelf that I think
have some great letters. You could always trace over
ones like this from a book, from a magazine, from a card, anything like that, to get
some kind of a letter that you can use either on paper or on that water
soluble stabilizer. Can also draw your
own letters freehand. So I recommend making a
sketch on paper first and then transferring kind of your finished design
onto your fabric, just so you don't have a
bunch of extra pencil marks. So don't feel like you
have to have a computer, a printer, or any kind
of technical skill. You can also find lots of great letters from all
kinds of different sources.
5. Transferring to Fabric: Okay, so let's talk about transferring these
letters onto your fabric. So I have two
versions printed out. This is just on
regular copy paper, and this piece is printed on that water soluble stabilizer. Let's talk about the
copy paper first. I have a couple of pieces of just this plain muslin fabric. So I can transfer this just by layering it on top and
being able to trace through. Now, you can see these pretty easily here just on the camera. So I would be able to just trace around this with a pencil, a chalk pencil or one of those
disappearing ink markers. If you have a harder
time if your fabric is darker colored
or it's thicker, a great way is to just
take your printed sheet. I tape it up to
one of my windows, and I can't turn my camera
around to show you, but I'll take a still
photo of that just so you can see the
setup that I use. So I tape this with just a little piece of masking
tape up to the window. That way, I've got light
coming in through the back. You also could use a
light box if you have one of those or any kind of
something bright behind it. Then I can tape my
fabric on top of it. I usually use a couple pieces of masking tape just to keep it smooth and tight and then just trace
around it with a pencil, colored pencil,
whatever like that. I will do an example
of that and just take a still photo that I can
show you for that one. So if you're going to use the
water soluble stabilizer, you are going to
cut this out and stick it on like a sticker. So I'm going to I'm going to
do this version right here. I'm just going to kind
of roughly cut this out because I don't need all of the extra stabilizer. Okay. It has a paper backing. I'm just going to kind
of lift up an edge. And it peels away and it's got just this kind of
sticky backing on it. I can stick it now down right to the fabric
wherever I need it. Now, you had to be a little bit careful
not to get this wet. It will dissolve pretty
much right away in water. So make sure that you keep your project dry while
you are stitching on it, and you don't want to iron it
with the stabilizer on it. It will make a huge mess on
your iron if you do that. So kind of stick it down when you're ready
to start stitching. And then that's all you have to do to get this piece ready. So we're going to stitch right through the paper as
well as the fabric. Now you also can choose to put your fabric into a hoop
or not if you want to. So for this example, I'm going
to put this into a hoop, I'm going to loosen
this up a little bit. There are several different
kinds of these hoops, but they kind of all
work the same way. I like to put the plain
ring on the bottom, kind of center my
piece in the center. Then I usually put the
ring that tightens it up, whatever mechanism that
is kind of to one side. And since I'm right handed, I'm going to stick it
over on my left side. I feel like I catch the
thread or my cuff or anything else like that less if I kind of try to think about
putting it out of the way. So I'm going to roll
it over to there. I might need to loosen it
just a little bit more. There we go. I'm going to
press these two together. I like my fabric to be smooth
but not like a drum head. You don't want it so tight that it doesn't have
any movement at all. So if I look at it, I
want to be able to sort of move the fabric back
and forth a little bit. That way, I'm sure
I'm not stretching the fabric accidentally so
that when I take it out, my piece looks all
kind of crumpled or distorted because I had the
fabric pulled too tight. So I can give this a
little tighten up again, and this would then
be ready to stitch. I'm also going to
stitch one more example on a piece of felt fabric. So the felt is a little bit
harder to do the method where you hold it up to the light just because it's
so much thicker. And so I'm going to use the soluble stabilizer
for this piece as well. And I think I'm going to choose this kind of
stencil shape one. I think this will make
a really cute kind of a patch when I get
all done with. So I've cut out that
stabilizer sheet, and I am going to stick
that onto the felt as well. Now, a thing to consider
about your felt, I'm using a wool and
rayon blend felt. When you get it wet to
wash away the stabilizer, it can shrink your
felt a little bit. So if you're starting
with a piece of felt, you might think about just
rinsing it with water. You don't have to
wash it thoroughly, but just to give it a rinse
and then let it air dry. So if it's going to shrink, it shrinks before you've done your stitching and washing
away and not afterwards. In the next three lessons, I'm going to show you
three different stitches that you could use to
stitch your monograms. So we're going to start
with a backstitch, which is what this one is. And we're going to
do two variations, a plain backstitch and
a whipped back stitch. We're going to do
a chain stitch, which is this version that's
in purple right here, which is great for filling
in thicker letters or creating a thicker
outline like this version. And then finally, we're going to talk about a satin stitch, which is this version
that you can use to fill in other kind of
thick, solid letters. So in those next three lessons, you might want to
take a sneak preview, see which one you like best, and then decide which version you want to stitch
your monogram in.
6. Option One: Back Stitch: Okay, so the first stitch I'm going to show you
is a backstitch. Backstitch is great for
doing narrow outlines. So what I'm going to
do is this is one of the letters that I
transferred onto the fabric. This is just traced
with a chalk pencil. This was the one I did
up against my window. And I'm going to
basically stitch the outline of this
letter in backstitch. So I have picked a color. I'm going to grab a
piece of thread that is about 14 " long. And if you don't have a ruler nearby, you don't
want to measure it, a great way to get
the right length of thread is to pinch it between your thumb
and your forefinger. Measure back to your elbow, add just a little bit, and that's about the
right size thread. Now, you won't have
enough to go around your whole letter with
just one piece of thread. You will be starting
and stopping. Um, I think a lot of beginners often pull off a piece
of thread that is super, super long thinking they'll
make it easier on themselves. And really, the longer
your thread is, the more it's just going to get twisted up on itself
and tied in knots. And so you'll spend
a lot of time untying your thread when
you could be stitching. So I've cut my piece, I'm going to thread my needle. There are lots of methods
for threading needles, but I'll kind of show you
the way I usually do it, which is to pinch the thread down against the
tip of my finger. I just kind of holding
it with my thumbnail. And I'm going to bring
the needle to the thread. So instead of trying to bring
the thread to the needle, I kind of go the opposite way. So I'm bringing the needle over and then I'm just trying to slide the eye of the needle
over the end of that thread. And this is where
the needles with a bigger eye are really
helpful. Nope, didn't do. Okay. There we go. You also
can use needle threaders. They're all kinds
of helper devices, but you want to get
your needle threaded, pull a little tail through
the eye of the needle. So you've got just
a little bit there. We're not going to
double this thread up, and then I'm going to tie a knot in the opposite
end of the thread. So not where the needle is, but on the opposite end, I'm going to do just
an overhand knot, and that's a really simple one where I just take the
end of the thread, I make a loop around my finger. I'm just holding it
with my thumbnail. I'm going to take the
end of the thread, and I'm going to go under the loop and back up
through the middle. I bend that end down underneath and then back up
through the middle and that just ties
one simple knot. That should be plenty
for what we're doing. If you're stitching on a fabric that's really open, very loose, like a knit sweater or
something like that, you might need additional knots to help keep it from
pulling through. Okay, we've got our
needle ready to go. We can start anywhere
on this letter. I like to start on a section if there is one that's
kind of a straight line because I think it's
the easiest kind of to get started with a stitch. So I'm going to start
down in this corner right here of the B because that
seems like a great place. And I'm going to start stitching up this kind of straight line. So I'm going to bring my needle from the back to the front. Right on top of that line. So this chalk pencil that I used here also will
disappear with heat. So when I get all
done with this, I can take my hair dryer or an iron and these
lines will disappear. But I can stitch
right on top of them, and probably they'll
mostly disappear anyway. Alright, once I brought
my needle through, I'm going to pull it
all the way through until it stops at the knot. So I always start
my backstitch with one stitch going forwards that
kind of is a setup stitch, and it's setting up the
size of your stitches. Now, there's no rule about how big you make
your back stitches. You just want to be consistent. So you're trying to make them
the same size every time. So I'm going to make my stitch about an eighth of an inch long. So that's about that long. And I'm just going that
far down the line. Straight ahead, and I'm just going to pull
this one through. So this very first
stitch is just kind of a basic
one little stitch. Now, for all the rest of them, this is where backstitch
gets its name is I'm actually going to
go ahead on the line, and I'm coming from
the back because my needle is on the back
of the fabric right now. So I'm going to go one
stitch length ahead. So I'm leaving a little gap. I'm going to pull that through. Then I finish my stitch by going back into the same hole that
the last stitch left off. That is right there. So it's meeting up going
backwards with the last stitch. I'm going to pull that through. There are now two back stitches. Now, some things you'll notice. I'm hanging on to the hoop. I have my fingers in the back here that are
helping me guide the needle. With some practice, you get where you don't
stab yourself. In the fingers, when you have your fingers on the
back, you just learn, but it helps me feel
where the needle and the thread are and where I need to come through
to the front side. That's a thing I have
learned to do is just let my left hand help me and then my right hand is
doing all the stitching. All right, next stitch, I'm going to go ahead on the line. Leaving that little gap
that's a stitch length along. I'm going to pull
through, and then I go back into the same hole
as the previous stitch. Okay. Just go to
keep going that way. Ahead and then back. And I'm just following that
pencil line that I made. Head and then back. I Okay. Backstitch is really easy
to go around curves, so I'm just going to keep
stitching and go right around the top of that
section here on the B. I've got one more stitch
that'll take me to that corner. Then I'm going to
keep going around. I like to turn my work. I always like to kind
of stitch away from me. I find it helpful to just
give it a little turn. Coming back this direction. Give it another little turn. Oh, there's where it caught. It always catches on that. You just have to watch. I'm going to keep stitching
until I run out of thread. I'm going to keep going
around to the line. When I am down to about 3 " of thread,
I'm going to come back. I'm just going to speed up
the video in the meantime. I'll come back and show
you how to tie a knot. Okay, when you are starting to get about this much thread left, just about two or 3 ", you want to stop and tie a knot. Please do not keep
stitching until you're absolutely at the
end of your thread. You'll have a really
hard time tying it off. Okay, so I'm going to finish this stitch by stitching
back into that same hole. I brought my thread
to the backside. Now, in a thinner
fabric like this, we want to take a little
care that we're not making this knot show
from the front side, so I can't just, like, make a stitch into the back of the fabric here
because it will show. So what we're actually
going to do is tie the knot basically onto the back of
one of the previous stitches. So I'm going to look at where my threads coming
out of the fabric, and it's right here by that kind of extra on the back of
this previous stitch. So I'm just going to take
my needle and I'm going to slip through that last stitch. So I'm just flipping
underneath it. I'm going to pull
that until I have just a little loop
of thread left. I'm not closing
it up completely, but you can see here I've
got just this little loop. And now I'm going to make
two twists of the thread. I'm basically going
to take my needle and I'm going to go
through that loop. I'm just going from
right to left, through the loop once, and then I'm going to do exactly the same thing a second time. I'm going to go through the
loop again a second time. Now I've put two twists of
thread into that little loop. I made it on the back. Then I'm going to set this
down on the table. I'm going to take my left hand
and I'm just going to put a finger on either side
of that loop of thread, and I'm pressing it
down into the table. Okay? So I'm holding
it kind of stable. Then I can take my hand
that's got the needle in it, and I'm just going
to pull straight up. And what happens is,
that's going to pull a knot right down against
the back of the fabric. The reason I'm
holding it down onto the table is if I do
that up in the air, it's just going to
pull my stitches out, and sometimes it'll pull them
right through the fabric. So that's why I'm
using the table to help kind of
stabilize that knot. Then I can trim off end. I like to leave
kind of long tails. I don't want them to
accidentally pull out, especially if
something is going to get used or worn or washed,
anything like that. Alright, I can
start my very next stitch the same way we
started at the first. So I'm going to grab just
another piece of thread, and I'm going to start stitching just the very next stitch
and line and keep going. So I'm going to grab
another piece of thread. I'm going to stitch all the way around the outline of this B. I'm just going to speed
up the video so you can watch me do it while
you're stitching along, and I'll meet back when we get kind of to the end
of this letter. Okay, so there is my letter B, all outlined in backstitch. This could be a
complete monogram and I could stop with it
stitched right here. But I wanted to show you one
variation on the backstitch, which I think is a really
fun addition to this stitch. I'm going to swap over to a contrasting color and I have
this brighter green here, which I think will
look really nice. I'm going to grab a
piece of this thread, what we're going to do this
is called a Whip backstitch. So you start out with a foundation of backstitch,
just like we did, and we're going to add
a second color on top of this to kind of add a
decorative element to this. So what happens is
it's going to kind of make your outline
that you've created look a little smoother
first because we are going to basically put a thread twisting around all
of the stitches. But it also when you do it
with a contrasting color, adds a kind of fun like a candy cane stripe
to your outline. So here's how we start this one. I've got a contrasting color, and I'm going to bring my
thread up basically in the same place where I started
the whole B to start with. So I'm going to come
up at the same corner. So I'm just bringing
my needle up kind of almost in the same hole, and I'm going to pull through
until it stops at the knot. The rest of the stitches, we're not actually
going to stitch through the fabric again. We're just going to
twist the thread around the stitches that are already there. So
here's what I mean. So for this, I'm actually going
to flip my needle around. Instead of using
the sharp point, I'm actually going to do this
with the eye of the needle. The reason I do that is I want it just to kind of
slide underneath the stitch and I
don't want to catch on the threads or accidentally
split one or something. So I'm going to use
the eye of the needle. So what I'm going to
do is I'm going to go underneath that very first
stitch that I stitched, and I'm just going kind
of from left to right, and I'm sliding my needle under the stitch and
pulling it through. And that's going to
make a little twist of thread around that stitch. I'm just going to
keep doing that in every stitch going the same way, from left to right every time. Next stitch, the second one, I'm going from left to right, underneath the stitch,
and I'm going to pull. I want to pull just so
that the thread lays down flat and it's not puckering anything up or
anything like that. I'm going to do a couple
more and then I'm going to hold it up
close to the camera. Again, through the next
stitch from left to right, I'm just going underneath it. Pulling it through.
Go underneath. Pull through. And I'm going to hold this up
close to the camera, and you can see it's
starting to do that kind of candy cane or
barber pole stripe. I'm just going to continue
doing that around my entire shape is sliding
underneath those stitches. And I'll speed up the camera and then we'll meet back and
look at the finished result. A Once I finish my last stitch in a section, I've slipped underneath
the last one. Then the last step
is to basically just bring my needle
to the back again. So right next to the stitch and then I'm going
to tie a knot on the back. And I've got one more little
section right here of my outline that I'll do
that whipped section on. Okay, so now you've seen a backstitch and a
whipped backstitch. So if you stitch the whipped
part of this stitch with the same color as your
initial backstitch, it makes kind of a
raised rope like texture that also
looks really amazing. And then, of course, if you use a contrasting color like this, you get that kind of
variegated candy cane stripe. Now, I picked a really
strong contrast for mine so that you see
that twistiness a lot. You could also pick a
much more subtle contrast and get kind of a
subtler look to this. All right, so that's one option for stitching your monogram.
7. Option Two: Chain Stitch: Now I'm going to show
you the chain stitch. I'm going to stitch
this version on the water soluble
stabilizer piece that we prepared earlier
in another lesson. This one, I'm going
to grab another piece of thread and work the
same way to set it up. I'm going to thread my
needle and tie a knot. So this version we're going
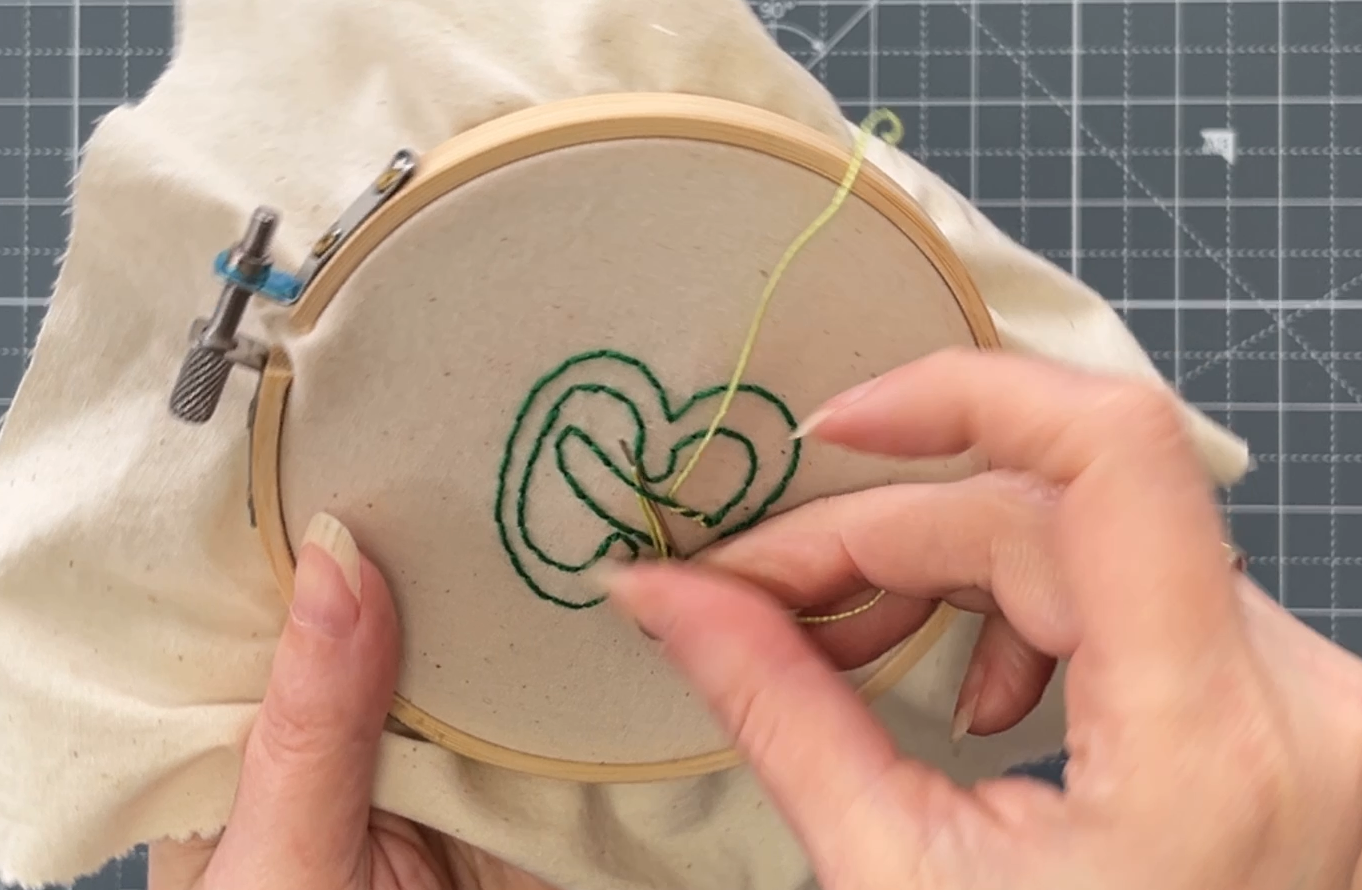
to do with chain stitch. So chain stitch makes a little bit thicker line
than a backstitch does. So back stitch is kind
of the thinnest version. A chain stitch, basically the stitches look like a
little teardrop shape, and so there's two
thicknesses of thread that kind of
sit side by side. So it makes a thicker line. So if you have a little bit
thicker letter like this, chain stitch could work great. So we're going to
start. I'm going to start up here on
the top of this B. It's all kind of one
continuous line, so I'm going to
stitch it that way. And I'm going to bring
my needle up kind of down the center of this line. Because I want to stitch down the middle of this thicker line. So I'm going to bring
my needle up and you'll see that I'm
stitching right through the fabric and that water soluble stabilizer
at the same time. So it makes it just a
little bit thicker. It's a little harder to push your needle through,
not too much. If you live in a place
that's very humid or wet, sometimes it can start to make your needle a little bit sticky. Um, and what I usually do is if my needle
is getting sticky, I just keep a damp paper towel or a washcloth on my
table next to me, and I just wipe off
the needle once in a while so that that
stickiness doesn't build up. It will pull a little
bit of stickiness from the stabilizer if you
live in a very humid place. All right, for chain stitch, we are going to do two
steps for each stitch. So the first step, we're
going to put the needle in place and do what
I call park it. We're going to park
it there, let it sit. We're then going to move the thread so that it's
in the right place, and then we're going to
pull the stitch through. Okay? So I'm going to do
these slow a little bit because you need to kind of
do both steps along with me. So first thing, we're
going to park the needle. I'm going to bring my
needle down right next to almost exactly in the same hole as my thread is coming up. And before I pull it through, I'm actually going to
tip the needle back up, and I'm going to bring the
tip of it back up through the fabric the length I
want my very first stitch. So I'm going to make
these about the same size as the back stitches I did. That's about an
eighth of an inch. And this is where it's really helpful to have a little bit of flexibility in your fabric because you're going
to need to move it around a little bit to be able to do that down up
motion with the needle. I've got my needle just taking
a bite out of the fabric. That's the length my
stitch is going to be, and I'm going to park
the needle there. I'm going to just
leave it alone. I'm not going to
pull it through. Now I grab my working thread, the one that's coming
out of the fabric, and I'm going to wrap
around the back of the needle from left to right. I'm just hooking the thread underneath the back
of the needle. From left to right. Once I've done that
little wrap movement, now I can push the needle
all the way through. You'll see as I start
to pull this up closed, I have a loop of thread
and my thread now, my working thread is
coming out of the middle. I'm going to pull pull
pull pull until I have a little teardrop shaped loop that is sitting right down on
the surface of the fabric. That is one chain stitch. I've seen people stitch this stitch in many
different ways. There are lots of
different ways to do it. There's a reverse chain stitch that you can go the other way. This is the way I like to
stitch chain stitch. All right. Your second stitch, you're
going to do the same way. You're going to start
by going down inside that first loop right next to where the threads
coming out of the fabric. So I'm bringing my needle down right there inside the loop. I'm going to do that same
motion where I go down, and then I pop the
tip of the needle up the length of my stitch. I got a little gap there. I park the needle
here and I'm wrapping my thread from left
to right underneath, and I'm pulling through. There are two little
chain stitches, and you can see how they're
a little bit thicker. They are pretty much covering up that thicker line that we
have on the stabilizer. I'll keep doing a
couple more slow. I like to take the
thread and just hold it out of the way while I
put my needle in place. I'm going down inside the loop. And up wrapping the thread
from left to right. Pull through. Until it lays down on the
surface of the fabric, we don't want this
to pucker up or fold the fabric when we
pull that loop tight. You also want it to stay
open just a little bit. If you pull it
really, really tight, it'll close up, and I still want to see
that teardrop shape. We'll do a few more
stitches slow down inside the loop of the
previous stitch, then up. Here's a couple of
things I'm doing. My fingers on my left
hand are underneath. I'm using my middle finger
to push the fabric up, which helps me get the
needle through to park it. I'm pinching the fabric
between my thumb and my middle finger back there, that's helping me make that down up movement
with the needle. Then I'm wrapping the thread
around and pulling through. Always think of this
stitch as two steps. You don't want to
forget to do that wrap part once you've parked it. So down into the fabric, I moved my fingers out of the way so I did
not stab myself. And then I'm pushing on
kind of the needle with my finger underneath to help
me bring that to the front. Wrapping left to right,
pulling through. Okay. I can see my stabilizer is just coming
unstuck a little bit. That's no problem. I can
just stick it back down. Okay, a couple more stitches, and then I'm just going to speed up as I kind of stitch
the rest of this letter. Down up, wrap. Pull. Down up, wrap, pull through. I Down up. Yep. Pull through. If you've chosen to use six stranded
embroidery flass and you're trying to use
all six strands, this might be more challenging. That's a lot of thickness to get through the fabric and
the stabilizer both. That might be a
thing to consider is to use a thinner
thread for this one. So I'm coming up to
a section here where the letter in criss
crosses over each other. I'm going to do the same
thing with my stitches. I'm actually going to just keep stitching and I'm going to cross right over that first
section that I made there. Okay My next stitch is going to come up just
on one side of that. Then I'm just going to stitch right over that line of
stitches from before. I could start and stop
it if I wanted to, but I like the way it looks
when it crosses over. I'm going to keep stitching.
I'm just going to speed up the video
as I go around. There's kind of a
design choice to make on this style of letter. Now, I can keep going with my chain stitch all the way
down to the bottom here, and then I can make a choice. I can either turn
around and come back up and have another
line of stitches, so it's just one
continuous line, or I could end my line of
stitches here and then pick up again kind of up at the
top edge and continue. I think I'm going to
do mine in two pieces. So I'm going to stitch
down to here and stop because I don't want it to get extra
thick right here, and then I'll start again
to do this last section. A Okay, I've gotten to the
bottom where I want to end a line on this one. So when I am ready to stop, I do my last stitch. My thread is coming out of
the center of that stitch. To finish this one off so
that it is a complete stitch, I'm actually going to
make one more tiny little stitch just to the
outside of the loop. So right across from where the thread is coming
out of the fabric, I'm just going to the outside of that last loop and making
a little stitch down. When I pull that through, it's just going to make
a tiny little tack down stitch on that
very last one. Now I can tie it
off on the back. The knot works the
same way as we were doing with the backstitch. I'm going to make a little
slip underneath that last one, go through my loop
twice, pull that tight. I'm going to pick up
a new piece of thread and I'm just going to
start my chain stitches again about there and work the same way till
the end of this B. I will speed up the video so you can just watch as
I stitch along, and then we will talk again when I get done with the
chain stitches. So I ran out a thread just a couple of stitches
from the end. So if you need to add more thread in when you're
doing a chain stitch, you just need to make that
little tack down stitch, like we talked about
back here that we want to stop the end
of a stitch with. And when you start your
very next chain stitch, you're just going to come
up through the center of this last stitch
that you made. And that'll just
make that join of the thread completely invisible. So I'm going to
bring my first just stitch up through the center of that that previous
loop we had. Now I just keep chain
stitching like I was before and that
will just hide that last little
tack down stitch and you can continue
with your stitching. Of course, I had to
run out of thread like two stitches from the end. That's when it always
happens, right? Okay. There's my last stitch. I'm going to do that
last little tack down stitch again to the
outside of the loop. I'm going to pull this through and tie a knot
again on the back. So chain stitch gives a really kind of fun retro
vintage look to monograms. They used to be very commonly chain stitch
embroidery machines, which is what they
used to do name tags on uniforms or monograms,
those kind of thing. So anytime I see a chain
stitch version of a monogram, it always, for me, has
that kind of retro feel. So there's our
finished chain stitch. Now, if you want a
little bit of fun, you also can do that
same whipped version that we did to the backstitch, only you can do it to a chain. So this version, this
large B that I did here, I whipped over top of each of the chain stitches
in the same color. You can see how it gives
it a really raised thick. It almost looks like a rope
sticking up off the edge, and you stitch it
the same way that you did the whipped back stitch. You'll come up and slip
underneath each of the chain stitches instead
of each backstitch. There's another variation
you can think about that you could add to
your monogram design. Now, we will talk
in a later lesson about how you wash
away this stabilizer, but for now, we'll call
this one finished. That's the second variation
for doing your stitching. In the next lesson, we're going to talk about satin stitch.
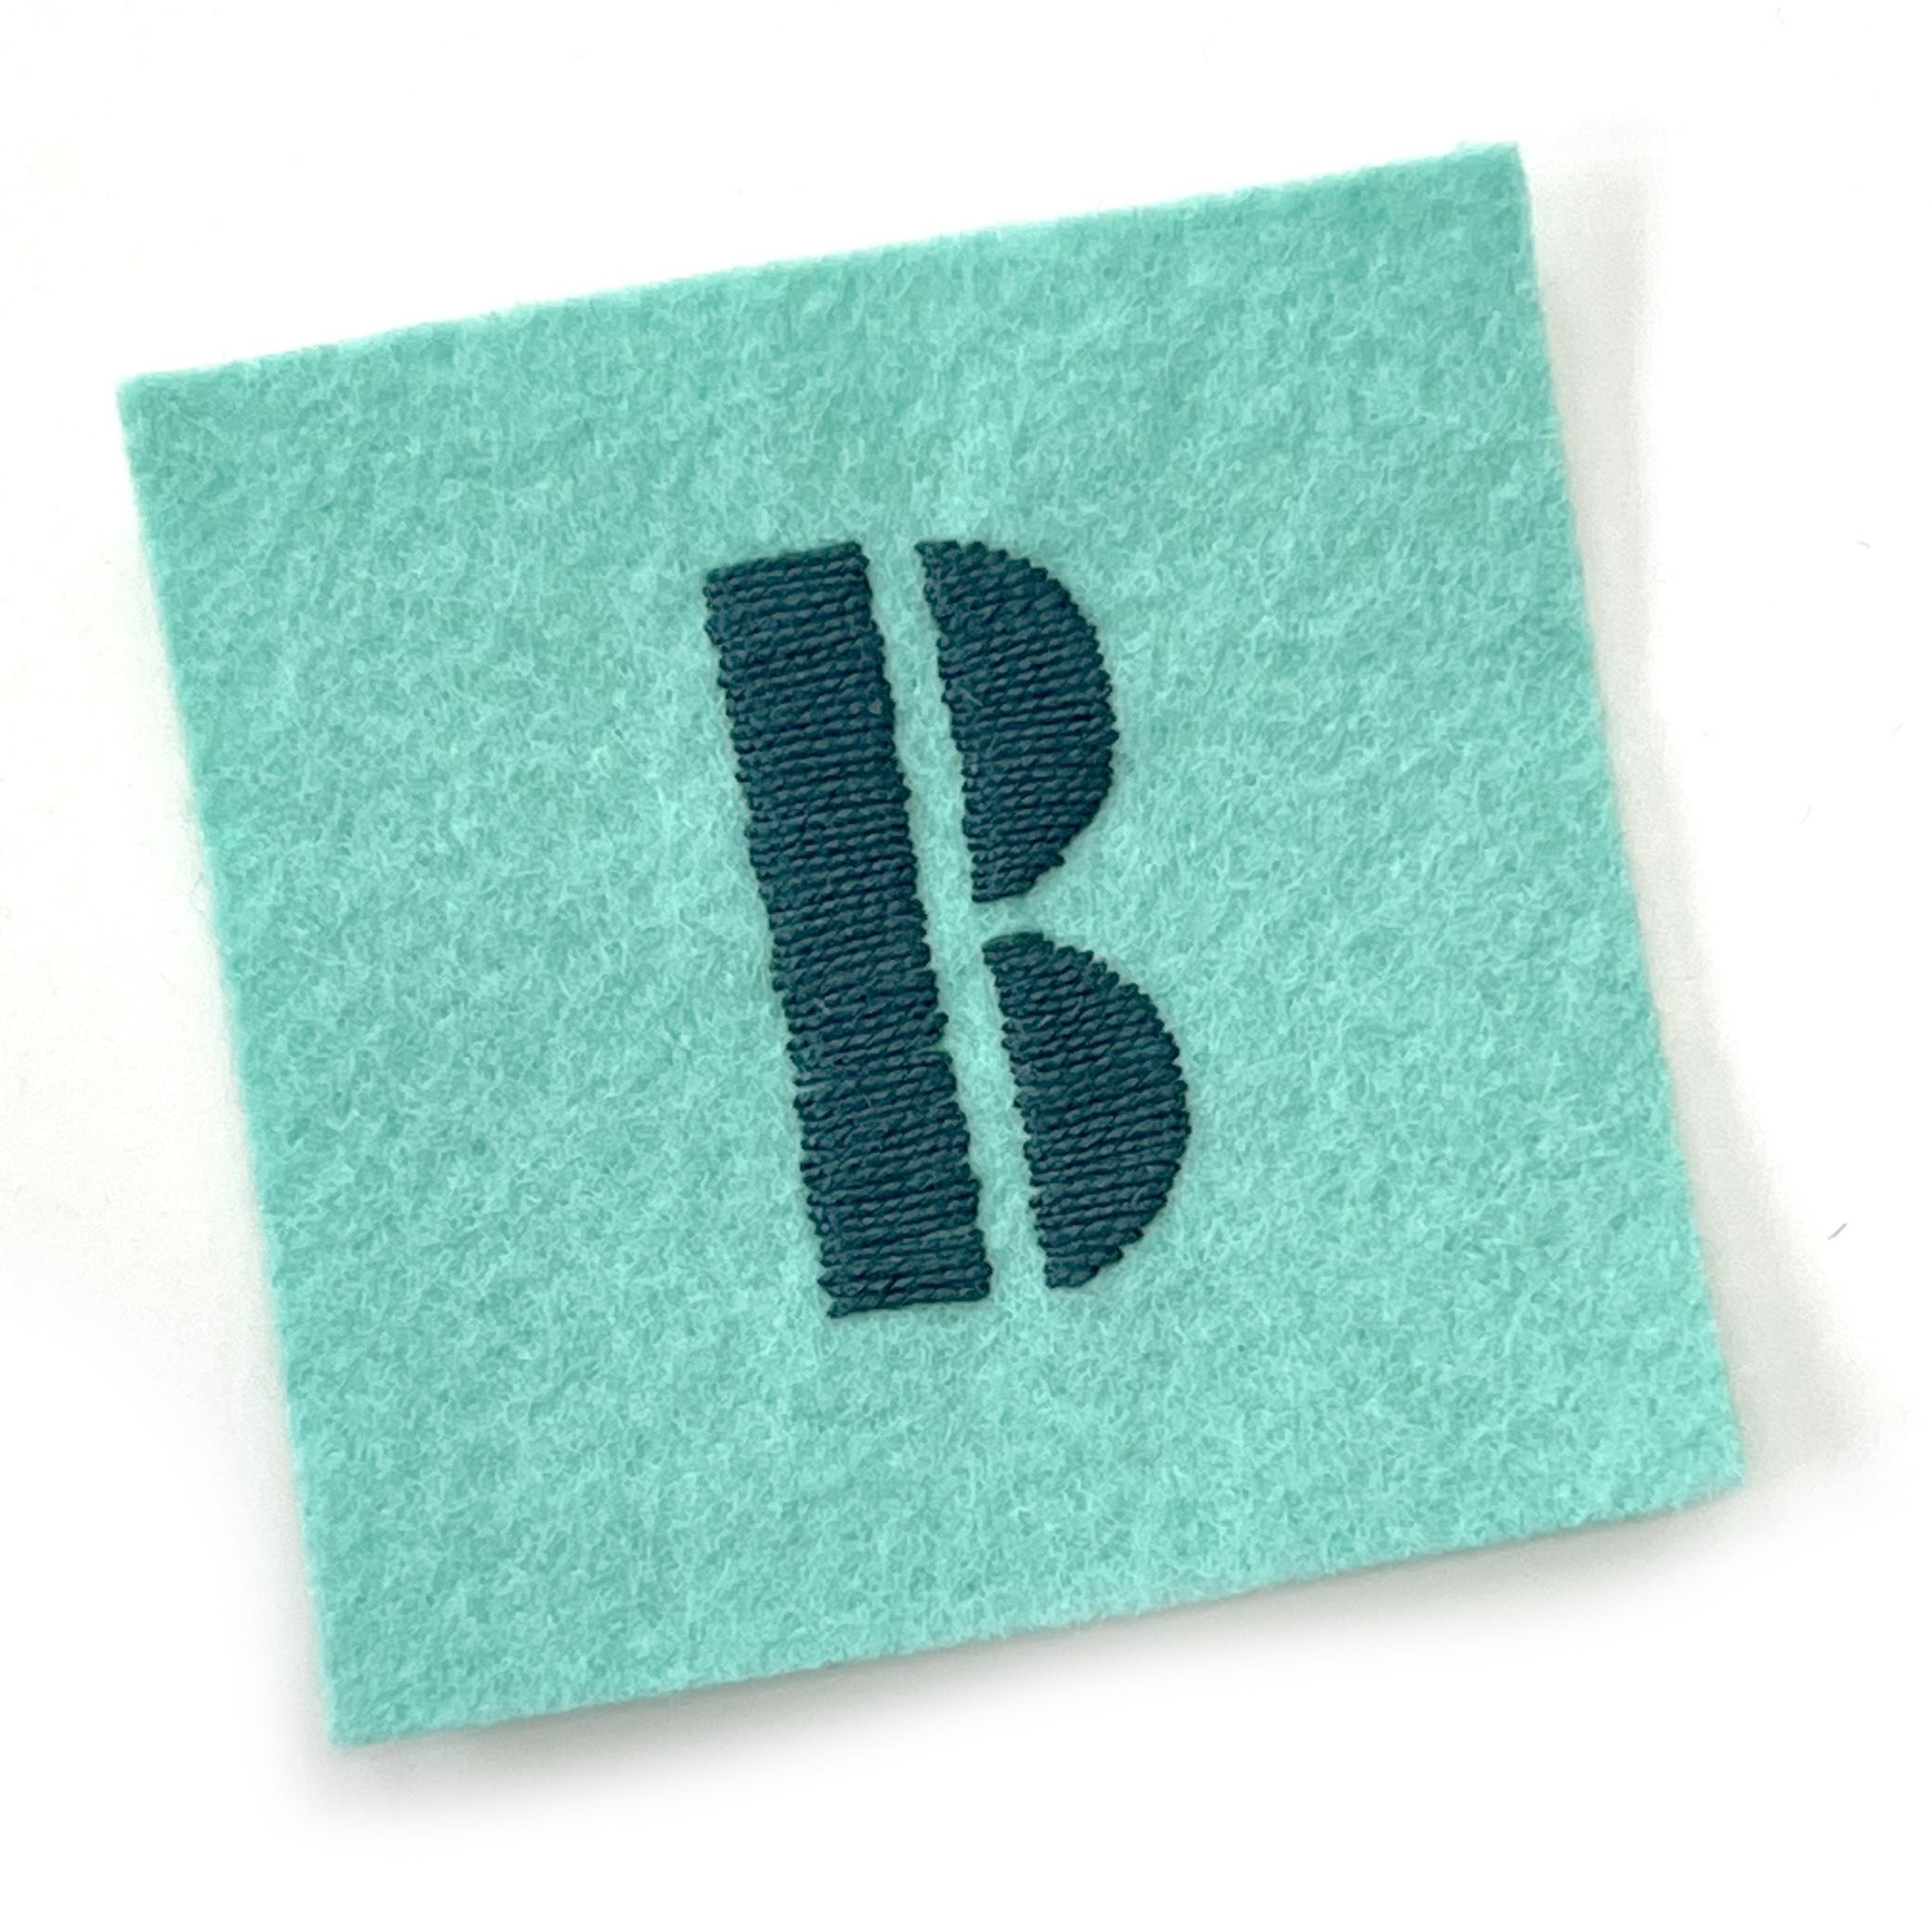
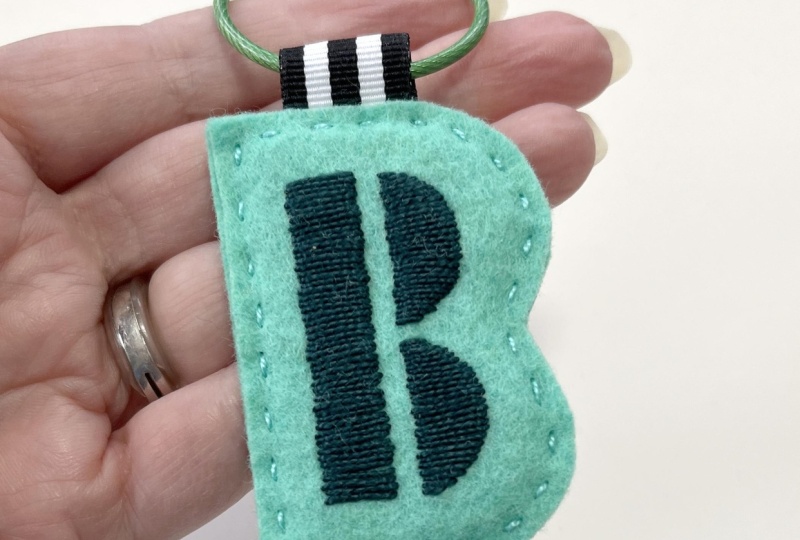
8. Option Three: Satin Stitch: Okay, for our last variation, we are going to
stitch this kind of stencil shaped letter
in a satin stitch. And I'm working on
felt fabric this time, so I don't have a hoop, but also using the water
soluble stabilizer on this one. It works great on many
different kinds of fabrics. So I'm going to stitch the satin stitch in this kind
of dark teal color. Grab a piece, thread my
needle and tie a knot, just like I started the
other two stitches. Satin stitch is used
to fill in areas. So for this one, you
want to use a shape, kind of a letter shape that has like big areas that you
need to fill in with color. So for example,
this version here, the back and kind of the front sections of the B
are done in satin stitch. So it's used to kind of
make blocks of color. So the first choice you
have to make in stitching satin stitch is what direction your stitches are going to go. Because basically, you're
going to lay down a bunch of stitches that are right
next to each other, almost as close as they can get, and they're either going
horizontally or vertically, or I guess you could pick
to go on a diagonal. Um, for this B, I don't want to make stitches that are this long
that go all the way from the top to the
bottom because I'm just going to have a lot of,
like, loose threads. So I'm going to do
all my satin stitches on this one going horizontally. I'm going to start on the
rectangular section first, and I'm going to
bring my needle up just at this corner down here. So I'm coming from the
back to the front. And I'm going to pull through
until it stops at the knot. So our first stitch
of satin stitch, I'm just going to
stitch straight across. I'm going to make
one big stitch. I'm going over to
the other corner and I'm just pulling it through. Again, we're just
pulling it until the thread lays nicely
down on the fabric. It's not puckering up and it's not making the fabric bend. Satin stitch seems really easy, and I think it's actually one
of the harder stitches to stitch because it takes a lot of practice to get
it really consistent. What you're going to
do is your next stitch is going to work exactly
the same as the first one, but you want it to be as close up against
it as you can get. If you can imagine, you're going to bring your needle up like half the width of your thread to the left side,
right like that. It's as close as I can get to that other thread
without overlapping it. I'm going to pull
through. Then again, I'm going to bring
my stitch down as close as I can get to that previous stitch
without overlapping it and pull through. Our goal is to get them to just rest right up against each
other with no gaps in between. I think this is
really hard to do. We keep stitching
exactly like that. I'm going to come back
over here to this side. I'm bringing my needle up right next to that
previous stitch. Then I'm going straight across. I I'm pulling through. And that's all there
is to satin stitch. We're just going to keep
stitching and fill in this entire shape
going that same way, making the stitches
the same way. I think that the trick to satin stitch is to just
kind of go slow and steady. It is really important where
you place your needle on satin stitch so
that you don't get kind of a wobbly edge as you go. And if you notice gaps
between your stitches, I think it's best to pull it out and try again
than to try and, like, work backwards and
fill in a gap or something. Okay. I'm just trying
to make it look as solid and consistent as I can. I want to pay attention since I don't have a hoop
holding this tight, that I'm not pulling so tight on the fabric that I'm
puckering this up. I don't want it to
fold up on itself. I can see a tiny little gap
at the top edge of that one. I'm not going to pull
that stitch out. I think when I put
my next stitch in, it's going to push it over. Okay, I'm going to stitch
the rest of this rectangle, just let the video sped up, and then we're going to
talk some techniques for doing these curved sections. Okay. Wow, it takes a lot of stitches to do
a satin stitch. So I finished the
rectangular part of this, and now I'm working on
these curved sections. And so the curves
work the same way. I'm trying to make the
lines parallel and also matching the direction I did the lines on this section. And so my stitches are starting on this line here,
the same every time. But I'm following
the curve around. So each of my stitches
is getting longer kind of more towards the center
of the curve that I get. So I'm going to finish up stitching these two
sections of the B with satin stitch and
then we'll meet back to talk about a couple of
variations you can do. A there's the satin stitched B. This could be complete also. But there's one other variation which I like to do
with satin stitch, which is to combine a satin
stitch with a backstitch. That's what's going
on in this one here is after I finished
satin stitching, then I went around
the outside edge and just outlined
it in backstitch. Especially if your edges
are a little wobbly, it gives it kind of a
more finished look. And since this B had a couple of really thin sections and
this little curly cue, the backstitch was great
for those as well. So that's kind of
a fun combination since you already know
those two stitches. In the next lesson,
I'm going to show you a whole bunch of examples. So hopefully you can get
some inspiration for your project of making your
own monogram for this class.
9. Get Project Inspiration: Okay, so let's talk about a few variations on
what we have learned, the different stitches and how you could combine
them together. So let's talk through how
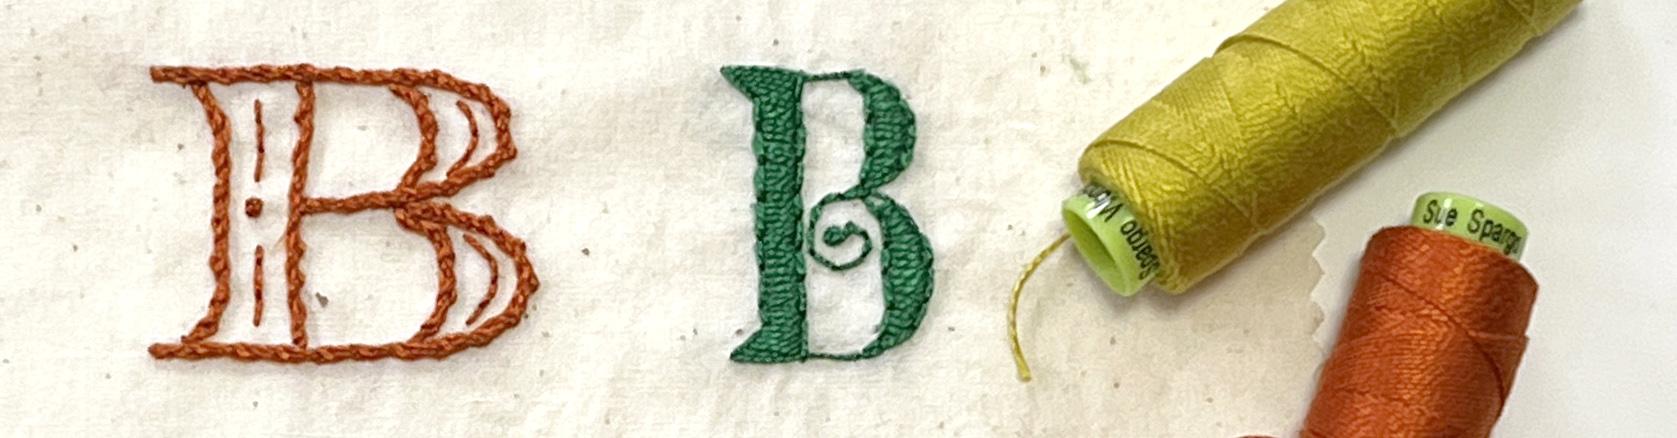
each of these are stitched. So whipped back stitch in two pretty close
together colors of green. This is a plain backstitch. This is a whipped chain
stitch and just a little bit of backstitch to kind
of accent this one. This is satin stitch,
outlined in backstitch. This one is just chain stitches. Lots of rows of them
next to each other. And then a plain
chain stitch just like we did with the other
B, that's the style. And then for fun, I wanted to show you some other
examples that I've made for other classes
and other kinds of projects. Here's a handkerchief. I just bought the handkerchief
already made, but it has a whipped
backstitch B, and then I put just a little
flower on the end of it. Something kind of fun and silly. This one I stitched on
kind of all the corners, so there are lots of
different examples. So here's again, a whipped
backstitch making the A. It's hard to see on camera. It's actually done in
blue and purple thread, but you don't see that
candy striping very much. And then I stitch
just a little flower vine over the top of it. This version is a chain stitch with a backstitch down
the middle of it. So I took both the chain, started with chain
stitch and then back stitched right down the
center of the chain stitch. So the chain is in pink and
the backstitch is in green. So that gives it kind of a fun, I don't know, braided
sort of look. We have another whipped
chain stitch or sorry, whipped backstitch
for that version, a really simple B, and then there's a kind of scripty R again in that
whipped back stitch. And then if you want to
branch out, of course, there are lots of
other ways that you can stitch letters
and monograms. I love this piece,
which I did as the title for another
class that I taught. These are just stitched
in backstitch, and I'm using the needle to
make the eye, which is fun. I was just a silly piece. These two were ones
I did for a class. This is done with a
technique called couching. That's a thick cord that we made a handmade cord
and couched it down. So that's another kind
of stitch you can use. This one I don't
remember the name of the stitch that makes
this little lattice. I think it's a knotted
diamond stitch. But it was a great way to
make the back of a letter B. It's a whipped chain stitch
here around the front of it, and then just some little
vines that go up through it. That's just stitch it
on a piece of felt. This tiny little monogram
piece I made a long time ago. It's a little hard to see, but this one is
actually stitched with silk thread on silk, and you can see it's a
very tiny little example and has a little peacock
feather behind it. That's all done
with satin stitch and chain stitch or backstitch, I think, satin stitch
and backstitch. Um I have no idea what it's for, but I made it a
zillion years ago and it was a fun little example
of another monogram. So hopefully, out of that, you got some ideas of what
you want to monogram. So your project for this
class is to stitch one. You need to come up
with what letter or letters you're
going to stitch. Figure out what kind of
a font you want to use or where you're going to
source your letter style. Find one of the ways to transfer the letter
onto your fabric, whether you use a pencil, a chalk pencil, the water
soluble stabilizer, and then do your stitching. You got to pick a stitch style and color and do your stitching. So in the next lesson, we're
going to talk finishing, how we remove the stabilizer and a few other things
to just finish up your monograms so
they look awesome.
10. Finishing: Okay, a few finishing
techniques. So I've got kind of
two different ways to finish the two different ways that we looked
at stitching. So this first piece was just drawn on with
the chalk pencil. Um, I can see the impression from where
the embroidery hoop was. So to get rid of that,
I want to press this. Now, the best way to press any kind of
embroidered piece like this is to grab a terry
cloth bath towel. It could be a hand
towel or washcloth, but you want terry cloth because it's got a lot of
sort of cushion, it's fluffy, and you're going to take your
embroidered piece and flip it upside down on top
of that terry cloth towel. And then you can press
from the backside. And what happens is the terry cloth has a
little bit of give to it, and so your stitches
won't get smushed down. When you press the iron down, they're just gonna sink
into that terry cloth. So it'll keep your piece from getting kind of
flattened looking. Alright? So you can
press the back of this. That will get rid
of that crinkle from the embroidery hoop. It will also make that chalk
pencil or the friction pens. If you used one of those, it'll make those things disappear. Okay, so that's a great
finishing for this piece. For the ones with the
water soluble stabilizer, the specific
instructions are read the package of the
stabilizer that you have. They all are slightly different. And so just make sure you read the instructions
on that package. In general, what you do
is take these pieces when they're finished and you submerge them in just
a dish of water. Cold water, I think, works best and just let it sit for it depends on the
kind of stabilizer. A half an hour to an hour, it could be even longer. And what will happen is that this paper kind of sticker
will dissolve away, just kind of um, melts, crumbles up, and
kind of floats away. And then you can rinse it
under some running tap water. Be gentle. If you're
stitching on wool, of course. You don't want the
wool to shrink. That goes for wool
fabric or if you've stitched with wool thread that we talked about
at the very beginning, make sure that you're
using cold water and not shrinking whatever
your finished piece is. Once those are done with
rinsing away the stabilizer, then you can just
let them air dry. I like to put them
on a tea towel just kind of by a sunny window
and let them air dry. And then if you need to, you can press it the
same way we did this one just by flipping it over and
pressing from the back side. That's about it to finish
your monogrammed pieces. If you are putting a monogram on something like a denim
jacket, for instance, I like to iron a little piece
of fusible interfacing to the back once everything is
all completely finished. And what that's going to do is just kind of trap all of
the ends of thread and kind of give it a little
bit of stability so that nothing pulls out or gets
loose as you're wearing it. If you're doing smaller
pieces for different things, that isn't as essential, but it's especially good on wearable pieces if you're
gonna wear your monogram. So once you're all finished, be sure to take a picture of your finished monogram project and post it in the project
section for this class. We all are really excited to see not only what you stitched on, but I want to see what
colors, what stitch style, what kind of a font you chose, because I think everybody's going to do something
a little different. So I have a plan for this bee that I stitched with all
of that satin stitching. So I'm going to go
finish this project up. I'm going to take a picture,
and I'm going to post it in the project section
for this class, too. Thanks for joining me for
these embroidered monograms. I hope you had a
great time stitching, and be sure to check
out the rest of my classes and come back
and join me again soon.
 Becka Rahn, Artist & teacher, paper & fiber art