Transcripts
1. Intro: Sewing Tie Dyed Toucans: Hi, my name is Becca. I'm a full time teaching artist, and I work here in a micro
studio in Minneapolis. I work primarily in
fabric and paper, using surface design
techniques like hand embroidery and printing
to create my designs. I like to use layers of recycled paper and embroidery
to add texture to my work. I teach here in my studio when I do online
classes like this one, but I also do lots of classes
at libraries and museums in my community and with
fiber art guilds and conferences
across the country. I've won a few
awards for my work, and I even co
authored a book about surface design on
fabric and paper. This class is two terrific
techniques in one, making tropical
tide eyed two cans, Try saying that
three times fast. I love to make tiny things, especially animals
because they have so much personality and they
always make people smile. I a lot of different creatures, but this class is extra
special because you also get to learn how to make rainbow striped fabric for
the two cans, beaks. We'll use a little
kitchen science and some everyday materials, so you can do this technique right in your kitchen safely. You'll learn some
hand embroidery and a little bit about
dying wool, felt. Of course, you can
use those skills to make many more different
kinds of craft projects. You can make a two can, even if you don't have any
sewing experience at all. This class is great
for beginners. What are you waiting
for? Let's make some tide eyed two cans.
2. Make Way for Toucans: The skills you'll learn
in this class are some hand embroidery and
how to hand dye wool felt. And we'll practice those
by making a felt to can class into two parts. First, we'll learn
how to dye wool felt. I'll show you two different
techniques to get bright saturated colors using a little kitchen chemistry
with acid and heat. Even though you'll need wool felt to do that part
of the project, I'll talk about all kinds of other alternate
materials you can use for other steps so that you can pull
things from your stash. For the second half,
we'll move on to sewing. You'll learn four different
embroidery stitches and I'll give you lots of
tips for sewing with felt. We'll talk about some of my favorite tools to make
really outstanding creatures, and I'll tell you about
my favorite materials for doing this kind of sewing. I hope you'll agree with me that these two cans are adorable. You can use them to
make quirky ornaments, pins magnets, or even sew a whole bunch of them and
make a cute tropical mobile. I hope that you have
so much fun that you will come back and
stitch a whole flock. We'll start out by talking
about the tools and materials you need to
complete your project. Tune into the next lesson and get ready to
gather your supplies.
3. Tools & Materials: Okay, let's talk tools
and materials First, I'm going to start talking about the materials you need to
do the sewing section, and then we'll move on and talk about the dies part of it. Just after that,
tools to start with, you will need a pair of
small sharp scissors. I like ones like this that
have really small blades. They make it easier for cutting
small pieces which we'll be cut out the pieces for
our two can scissors. You will need a needle. I will put an image up a little bit bigger on the
screen so that you can see it. But the needles that I like to use are called a chanel needle. Chanel needles, I have two things that really
make them awesome. They have a really big eye, so they're easy to thread
and a nice sharp point. That's why I pick
channel needles. You can also use an
embroidery needle if you have some of those that will
work great for this project. Then finally, you will
need a glue stick. Just a regular old
school glue stick. We're going to use
that to help baste or temporarily hold some layers together while we're
doing our stitching. That's it for tools. One other thing you'll
need to do is to print out the pattern
pieces for the two can. Now I have a sheet in the
downloads that you can download a PDF and print it just on your
regular home printer. You've got two
choices for printing. You can print on
just regular paper and cut it out like
you would any, a sewing pattern by cutting the pieces and pinning
them onto your felt. But I want to recommend one other material
which I think makes this project even easier and your results
turn out better. That's to use a paper
called freezer paper. Sometimes it's called
quilters freezer paper or quilters applique paper. It is regular paper on one side, but then on the other side
it's got a waxy finish. After you've printed on
the papery side of this, you can take this paper, put it on your felt fabric, and you can run a
warm iron over it, and it will adhere temporarily
this paper to the fabric. Then when you go to cut it out, you don't need pins or clips
or anything like that. I'll do a demonstration of
that later on in the lesson. But I wanted to
say, if you want to track down some freezer paper, I put some resources
in the handout, which is available to
download for the class. You'll need your pattern pieces, then you'll need
some felt fabric. I want to talk a
little bit about the kind of felt that you
need to do for this class. We need just four colors. You'll need some white, black, a little scrap of brown that's going to make the branch that
the two can, is sitting on. And a little scrap
of green because we're going to make a leaf
that goes on the branch. Now, the brown, the green, and the black, You
can use anything. You've got the white
I want to talk about. You need to have a
specific felt, that is, you need felt that's got at least 30% wool as part of
the fibers that make it up. You'll need to read
the label carefully. Most craft stores carry felt which is made from either
acrylic or polyester. That will not work
for this project. The E part of it requires
that we have wool fiber. In the resources handout, I have several places that you
can get wool blend fabric. It doesn't have to be 100% wool, just a minimum of 30% wool. You only need that
in the white because the white is going to be
the piece that we die. We're going to do tie die
to make the two cans beak. That part has to be diable. Now for the beak, you
only need a piece that's probably 6 " square to be
able to do the die work. I have a little bit
bigger piece here. Then you need one scrap that
will leave plain white. That will be the bib, the face, and the chest of your
two can then thread. I have two thread
options for you. You've probably seen six
stranded embroidery thread before and this is a great
choice For this project, you'll need just three colors. A white, a black, and then a color that matches
the beak of your tu can. It could be yellow,
orange, pink, blue. It depends on what you
decide to use for de colors. But you're also going to stitch the feet of your
Tu can with that. That might help you
make a color choice. For this class, I'm going
to use yellow because it's going to show up really
well when I'm stitching. You can use six stranded
embroidery thread or I'm going to stitch
my project using something called number
eight pearl cotton. Pearl cotton is another
embroidery thread. I like it a little bit
better because it comes as just one strand that
you use all together. I think it's a little stronger,
it's a little smoother. I like stitching with it. You can also get size eight pearl cotton
to do your project. It's going to look
pretty much the same no matter which
one you choose. If you have either
one of these in your stash, go
ahead and use that. You can even mix and match. Same thing with pearl cotton. You'll need a black, a white, and whatever that
bright color is to match your beak
and to make the feet. There's one more
scrap of felt here. This is the piece that's going
to go inside the two can, we're not going to see this. It basically is acting as something to be
a little bit stiff, to give it a little bit of structure and a little
bit of dimension. You can use lots of
different things for this. For my example, I'm going to use something called
stiffened felt. That is the same felt fabric
I talked about before, But this one has a little bit of starch or something
added to it. It's very thick and stiff. You can see I can bend it. Anything will work As long as you can cut it easily and
put it inside your two can. I will put a list of examples up on the
screen next to me. But you could use
some stiff and felt. If you can find that
at your craft store, and I'll put some resources for that in the
resources section, you could use a
heavyweight interfacing. You could use a
lightweight cardboard. I love to cut pieces out of the lids to
takeout containers, which are usually a
lightweight flexible plastic. Any of those things will work because it's
going to be hidden inside your two can and it's just there to give a
little bit of stiffness. We'll talk a little more
when we get to that lesson about the different options for that and what you can use. Okay, the last
material that you'll need is something to
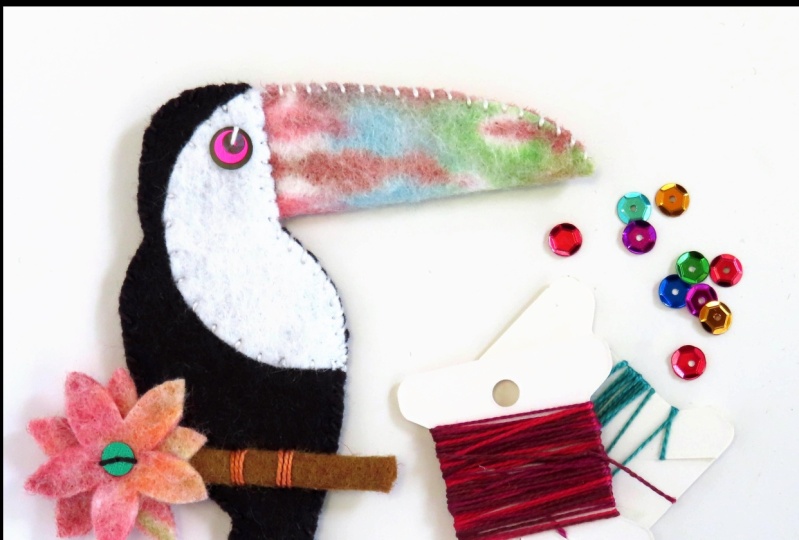
make the two cans eye. There are lots of options. My very favorite is I'm a junkie for sequins.
I love them. I love the sparkle. When I make the two can eyes, I use three different
sequins that are flat ones. I use two that are black, a large one and a small one. And then some a bright color to make the eye have
a layered effect. And I'll put a
picture of that up on the screen so you can see
what that looks like. Now, you might not want to invest in a whole
bunch of packages of different size of
sequence just to get the three that you
want to make the eye. And that's totally okay. If you can find a pack that's
got an assortment, great. Otherwise there are
lots of other options. You can use a small button, there's one with holes. This is one that's got like a little shank on the back of it. Either works great or you
could use a small bead. This is a little
handmade glass bead. All of these things should be
about a quarter of an inch. You can take a ruler and measure anything that's
a little bit shiny and bright colored because you're
going to put it against a black Tu can will work
great for the eye. There are lots of options
there that you can find. I'm going to stitch the
stack of sequins in the sample I do for this class because that's the
most complicated one, so you can see what
that looks like. Okay, now let's talk a little about the supplies that
you'll need to do the ye, part of this class. So we're going to tideye
that piece of white felt so that we can make the beak be a bright
color for the tu can. You can do that a couple
of different ways here. As some of the materials
that you will need, I use a recycled
takeout container to do my dying in because it's
a really easy thing to find. You need something that is
able to go in the microwave. Ideally a plastic or
a glass container. All of what we're going
to be doing is food safe. It's kitchen safe, so
you don't have to worry about ruining a container because you're
putting dye in it. We're going to use a couple of clever things to do our dying. You need a container
of some sort. You'll need a few rubber bands, and then you can choose your E. I'm going to demonstrate
using both methods. Either one you'll have a lesson to show
you how to use it. You can either use food coloring like you use for
making birthday cakes, or you can use my favorite old. It doesn't have to be either of these brands specifically. Any kind of store brand or anything like that
is going to work great. You just need something
that's got color in it, then you need a source of acid. Now the cool thing
about kolid is if you look on the label, the very first ingredient
listed is citric acid. And that is part of
what you need to do this dye process could or a similar powdered
drink mix works great. Food coloring doesn't
have any acid in it. If you decide to use food
coloring is your option. You will need a little splash of some plain white vinegar. Then I always grab a pair of vinyl gloves because could or food coloring are not
dangerous to get on your skin. But they will dye your
hands and your fingernails. And I don't like being
green and blue for days. After I do my project, I usually grab a pair
of gloves that should take care of all
of the things that we need to create our tide. You'll need a little
bit of hot water, like I mentioned
before, you will need to be able to put it
in the microwave. One of the important
parts of doing this die process is
you need to add heat. We'll talk more about
that in the tide lesson. But just so that you can
gather all the materials you need to do your
project once more. Here is a rundown on the screen of all the
materials that you'll need. You can use this
like a checklist. Pause the video here, and make sure you've
got everything. Then we'll move on
to the next lesson, where we're going to
start doing our tide.
4. Time to Tie Dye: Okay. Let's get
ready to tie die. You can see I already
have my gloves on. And again, that's
not because I'm worried about these
Yes. Being unsafe. It's because I
don't like to have my hands dyed blue and green
for the next few days. Let's talk a little
bit before we get started about why this
kind of dying works. In a little note or
two about die safety, we mentioned when I talked about materials that the reason
that this works is because you need acid
and heat to dye wool Fabric A only works on wool or other protein
or animal fibers. It won't work on
cotton, or linen, or bamboo, or any plant fiber. It won't work on any manmade
fibers like polyester. You have to have wool in
order to do this e technique. What wool needs in order to absorb the color is
it needs to have acid and heat in addition to whatever
you're using as color. We're going to add that in
a couple of different ways. The first thing I
want to do is prepare our fabric so we've got that
ready and out of the way. And then we'll talk about
the two different kinds of dyes that you can use, one or both, or mix and match
them however you want to. Let's talk fabric first. I have a square of wool fabric, and it's wool and
rayon blend, felt. And it's what I mentioned
in the resources section, the materials for this class, I have a square
that's about 6 ". This will shrink a tiny
bit when I die it. So I want to make sure I have
a big enough piece to cut out the beak and the flowers
that go with my two. Can I think this
is a great size. I like to de, small pieces
and do one after the other, versus doing a really big piece. Because as you are dying, you learn what techniques
work and what don't. If you do one big piece, you have one chance where if you do a
bunch of small ones, you get a lot of opportunities
to learn the best pattern, the way of manipulating
the fabric, I think that works for
these two can beats, is to make a bunch
of little pleats. And we're going to leave the
fabric so that it's all in one layer so that it's not folded over on
itself in any way. The way I do that is I lay the fabric down flat
on the table and I'm going to use my fingertips
to just make little pinches. And I'm making accordion
pleats by pinching the fabric. And you can see
I'm not letting it fold over or double up, I'm just pinching it
next to each other. I've got like a paper fan, little accordion pleats like. So I'm going to hold it with one hand and grab a rubber band. If I can just pick it up gently, I'm going to wrap
the rubber band around a bunch of times. It doesn't have to
be super tight, just enough to hold those
little folds in place. So I'm going to repeat that, do the same accordion pleats down the center and
at the other end. And I'll speed up the
video a little bit. Okay, now I've got my
fabric kind of bundled in three places now my felt
was dry when I started. I want to get this wet
before I add any dye to it, so you can run it underneath
the faucet of your sink. I have a container
of water here. I'm just going to dunk it in so that it gets a
little bit wet. And I will wring out the
extra so it's not too drippy. The reason you want
to get it wet, even though it
doesn't make sense when you start to
add the dye on it. If it's wet, the color
will tend to stay put where you put it a little
better than if it's dry. If your felt is dry, it wants to pull all of the liquid dye and it tends to make your colors look
a little muddier. Okay, I have it pleated, I have some rubber bands
around it and it's wet. I'm going to put it into my
microwaveable container, just a recycled
takeout container. And I'm just going to set it off to the side for right now. Okay, So let's talk de colors. I'm going to show you
two different options. They both work either
one and you can mix and match them if you want to use some colors one way and
some colors the other way, or do it all with one or the
other. All of those work. Let's start with old. Okay. I have a couple of small just canning
jars that are like jelly jars that I'm going
to mix up my Yes in. You can use any small
container coffee cups, yogurt cups, anything like that. They're washable so
you don't have to worry about anything getting
ruined by doing this. And I'm going to grab
some olade packets. Now like I said, you don't
have to use could brand, you can use a store brand,
anything like that. The only thing you
want to look for is on the label that it
contains citric acid. It's any a drink packet that has citric acid and you want one that doesn't have
sugar in it already. Sugar will just make
your project sticky. This is the cold that they
expect you to add sugar to. You can see it says
unsweetened drink mix. That's what you're
looking for when you decide what a drink
packet to use. I'm going to mix up a
couple of colors in Olade. Then I'm going to do
a couple of colors in food coloring so you can
see how both of them work. I think we'll do
these top two with Ola ad I have just
some plain water here. It's a little bit warm
because I think the, the powders dissolve a little
better when it's warm. And I'm just going to
pour maybe a four a cup. It's a few tablespoons
in the bottom. The amount of water
isn't important, just enough that you
can get it dissolved. I'll open up, there's one packet I like to
put the water in first, and then the powder
on top of it, I think it dissolves a
little better that way. Okay, I've got a spoon. Just give it a stir
and just try to get all of it
dissolved for kulaid. That's all you have to do or any other kind of drink mix is just dissolve it in some
warm water is all you need. Okay, I might give those
another stir after a minute. Those are ready to go. I'm going to set those to the side. Then we're going to talk
about using food coloring. Here are my food coloring
little bottles that came from this Mccormick
food coloring. Any liquid food coloring
that you use for doing frosting or that
thing will work great. These are just color, unlike the drink mix, these don't have
any acid in them. If you want to use
food coloring, you also need to add
some white vinegar. Just regular old white
vinegar is great. Instead of water,
we're going to put a four cup of white vinegar in the bottom
of these containers. Food coloring plus vinegar. Then we'll add some drops
of food coloring into this. I already have orange and blue. I think maybe I'll make a green. I can't tell you
really how many drops, Maybe ten or 12, until it looks like you've
got a nice saturated color. So I put about ten
drops of yellow, maybe two of green or two
of blue to make green. That looks pretty green to me. Okay? And in this one maybe
I'll just make plain red. And same thing I'll put about, I don't know, ten or 12 drops. You can experiment to see how much it takes for your
food coloring. Okay. Now I have those ready. Okay. So quick review. Food coloring, you
need to put with acid, so some vinegar could or any powdered drink mix
goes just with warm water. Okay, now I have my four
colors and I'm going to move those over and
grab my felt fabric. I like to use the
spoon to do this. I'm going to add to the color
to the felt in stripes. I like the spoon rather
than just pouring it on because I have a little
bit more control of where the color goes. I think I'll start with
orange. It's at the top here. I'm just going to pour a
little stripe of color on top. And I want to get enough so that the fabric looks like
it's totally saturated. It's got lots of color in it, but not so much that I have a puddle underneath
in the container. Because the more
extra E is in there, the more the colors
will run together. Okay, after orange,
maybe I'll put some red. You can see that
the color tends to creep past where you put
it. That's totally fine. It's going to blend
together right there where the colors match or
where they meet up. There's a band of red here. I'm going to put a band of blue. I love the blue raspberry
lemonade could color, That's this great
turquoise blue. Okay then let's see,
we haven't done green. I'll put green in next. You can use as many or as
few colors as you want to. You don't have to mix up four. Doing something in
just orange and white, for instance, works great. Don't feel like you
have to go out and get a whole bunch of different
colors if you don't want to, but I'm going to make this
one really rainbowie, since we have all
the colors mixed up, another nice thick band of red. Maybe I'll put blue
red at the end. Okay. If I can see some extra
E pooling up in the bottom. I'm just going to pick up my
fabric and I'm just going to pour this extra E. I would
pour it in the sink, but since I'm here at my desk, I'm going to just pour it
into my water container. Okay, it's pretty dry. I'm also going to do
one more thing which is to flip this over
so I'm looking at the underside of it
and make sure that I have enough color that made
it all the way through. I can see down
here at the bottom that it still looks
a little bit white. So I'm going to add just a
little bit more down here. Mostly because I like to have
my colors really saturated. I love to have a lot
of color in these. A little bit of orange.
Okay. Maybe I'll hit the center with a
little bit of green. It doesn't matter if it matches
the front part. Exactly. Okay. Once you have enough die so that it looks like everything's got
some color on it, the next step is to take
this into the kitchen wherever you have your
microwave and you want to microwave
it for 1 minute, You don't want to
go over 1 minute. You don't want to
accidentally boil this dry so that all the
liquid gets boiled off. You can burn the wool. Felt if you've ever accidentally
set some hair on fire. This smells just like
that. It's terrible. You don't want to do that.
1 minute in the microwave. I'll take a photo of that, since my microwave isn't right
here where the video is. Then you want to take it out of the microwave and set
it on the counter. And let it rest until it comes back down
to room temperature. I know that's the
hardest part is waiting, but you want it to have as much time with the
heat on it as you can. We talked a little at the
beginning of the lesson. In order for these
colors to be permanent, it needs acid plus heat. You want to make sure that
it's got plenty of time to be warm so that the colors can
really lock into the fibers. I'm going to go throw this in the microwave and we'll come
back in the next lesson and talk about how
you finish this up and get it ready to
make your two can Beak.
5. Rinsing & Drying your Felt: Okay, hopefully your felt
fabric is cooled off by now. The last step to get this
all finished up is to rinse out the extra die or the
extra food coloring could. Whatever it is you want to take your little
bundle of fabric to the sink and just
rinse it in rim temperature water until it looks like the water
is running clear. Then you can unbundle
it and unfold it. You get to see your tee. I have two examples here. And I just to put them on a terry cloth towel
so that they can dry, um, and that'll help wick
some of the moisture away. You can also put them on
like a wire baking rack, which is great
because the air can circulate around and they'll
dry a little faster. Usually it takes wool
felt overnight to dry. You have to have a little bit of patience, but it's worth it. I wanted to show you two
different examples here. Because when we
talked about dying, the felt, one of the steps
we did was to get it wet. Before we put the colors on, I wanted to show you an example
on the right hand side. This is the piece I dyed
in the last lesson, where we got the felt wet
before I put the colors on it. The one here on
the left hand side is one that I died
while it was dry. And you can see how much more the colors blended together. And it gets more of
a watercolory look where the colors are
sharper and crisper. On the one on the
right hand side, that's the difference
between wet and dry, if you want to do a
little experiment. Okay, to finish up sort
of our tie die section, I want to first recap. So if you want to do this again, just to remember the steps of
how you tie die wool felt. First, we want to bundle it up so that
you're keeping it in one layer to make
sure that the dye can get through all of the
parts of the felt. Second, you want to get it wet so that the colors can lock in to where you put them or you can leave it dry to get more
of a water color effect. Number three, you got
to mix up your Yes, if you're using could or
another powdered drink mix, you just need that
plus some warm water. And that's about a four
a cup of warm water. If you want to use
food coloring, you need to use a four
a cup of vinegar. So you've got the acid
plus the food coloring. Okay? You can use any combination of those
to make your colors. Spoon the color over top
of your felt fabric. Make sure that you don't have a muddy brown puddle in the
bottom of your container. And then finally, you want
a microwave for 1 minute. And be sure to keep an eye on your microwave so that your
fabric doesn't boil dry. When you're all done, you want to let it come
to room temperature, Give it a rinse and
then let it dry, then you're ready to go on
to making your two can. I wanted to talk about one
other thing just in case. If you don't have a microwave, you can still do this project. Another great way to
add heat to your felt is to cover it up with some black plastic and
set it in the sun. You can do it in
your driveway or on the sidewalk in front of
your house. Just wrap it up. The black will help absorb
the heat and you can leave it for about an hour
sitting in the sunshine. That will give it
enough heat that the dyes will lock in and
it will be permanent. Just as if you microwaved
it, there's a little tip, if you don't have a
microwave in your house, you can still do the project.
6. Placing Pattern Pieces: All right, we are ready to
start cutting out our pieces. You should have printed your
pattern pieces either on regular paper and you'll need some pins or on
this freezer paper. Now you can follow the instructions on the package of freezer paper that you get. But basically you can run it
through an ink jet printer, print on the paper side, and then we're going
to use the waxy or shiny side of it to iron
onto our felt fabric. The first thing I
do is cut apart the pattern pieces
based on what color. I know that these need to go on. Okay, so let's go
through my stack. Leaf goes onto some
shade of green. The bib will stay plain white, so hopefully you've got
a scrap of some plain white that'll go onto
the corner there. The branch goes on to brown
or it could maybe be gray. Anything you've got that
looks like a branch. The beak is the fun part. Both the beak and the
flowers you can cut from your tidy, felt this one. You want to spend a little
time thinking about what part of your tide you
want to use for the beak. I think I'm actually going
to cut these two apart. I'm going to take
a little time to play around with what part of it I'm going to use now as
you're thinking about it. The rounded part here is going
to be the tip of the beak. And this piece will
actually be folded in half. You'll see part of
it on the front and part of it on the back. I could put it over here and
use the orange and red part, or I could put it up here
and use some of the blue. That's up to you to decide. I think I'm going
to use this part here and I'm going to cut my flowers out of the blue
and red up there, okay? Then I'm going to
skip over this one. The front and back go on black. So I'm going to
put those pattern pieces against the black. And then finally, this piece, which looks like a two can, is the part that goes
on the interfacing. There are several options
you can use for this. I'm going to use
the stiffened felt. It's a much stiffer piece than the felt fabric we're
going to be sewing with. For that, I can use
the same waxy paper and iron it right onto this
piece of stiffened felt. I'm going to do that for mine. But if you don't have stiff felt or interfacing like this, you could also use a
takeout container lid. You can just trace
around this pattern, like use a pen or a sharpie
and cut out from a piece of the lid that gives you a nice stiff piece that
you can put on the inside, or you could use a piece
of thin cardboard. This is like chipboard. That's about the weight
of a cereal box. Cardboard isn't my favorite only because if it ever gets a
fold or a crease in it, you can't really
get it out again. And if it gets wet,
cardboard can get ruined. But if you think
yours is going to be in a safe place that
cardboard will work, go ahead and again, you can cut it out
and trace it onto the cardboard and
then cut that piece. Okay, when you get all done, you will have 123-45-6789 pieces that it'll be ready to
go for the next lesson. My next step is I'm
going to go over to my ironing board and
I'm going to use a warm iron to iron each of these pieces and stick
them to the felt. If you aren't using the freezer paper that can
stick down to the felt, then you can use pins to
secure these in place. And go ahead and cut
around the dark line, the solid line around the outside edge of each
of the pattern pieces. In the next lesson,
I'll give you just a few quick tips
for cutting to make sure that your pieces will fit together when we go to
assemble the two cats.
7. Cutting Tips: Let's cut out our pieces. You want to cut out each
one of these pieces along the solid black
line on the outside edge. A few pieces have
some dotted lines. Those are to help you with
placing things later. When we go to put
the piece together, one tip I want to show you is
the way you cut these out. I think you get much nicer
lines that are smoother, if you think about
holding your scissors steady but moving the fabric. Here's what I mean, I'm going to start cutting down
here by the tail. And you can see I'm rotating
the piece of fabric around. Instead of moving my scissors
as I cut this curve, I'm moving the fabric in the direction
that it needs to go. Okay, I think this helps you get smoother
curves as you're going around versus moving
your scissors every time as I'm going
to try to do here. And then moving direction
with the scissors, which tends to make
little tiny short cuts, which will give you
choppy or ragged edges. Okay? Again, I'm
holding my scissors. Study, and I'm just rotating the felt around to
put it in place. Okay? I want to cut these
as accurately as I can, because a lot of
these pieces need to fit together front to back. Okay, I want you to continue cutting out the
rest of the pieces. And I'm going to
speed this up so you can just watch me as I go, but we don't have to do
it all in real time. And then I'm going
to come back when we get to the flower, just to show you another couple of tips for when
you're working with sharp inside corners. Okay. I've got my leaf and
my flowers left. These ones I wanted to talk about a little
bit because they have some really sharp corners that
point towards the inside. My tip for cutting these is I'm first going to just
rough cut the flowers. I don't have this extra
fabric in the way. Then I make the flowers in a bunch of cuts that go
towards the inside corner. Instead of trying to get around with my scissors all the
different directions, I'm going to cut this
side to the inside. Then I'm going to
come over and do this petal and cut it to the inside. And you can see how it's
much easier to cut towards that inside corner
than try to turn your scissors around
in that sharp space. So I'm going to do
the same thing, this petal, and then cut in
towards the center here. Okay, so I'm going to
continue to cut out the flower and then the
leaf shape the same way. And I will speed up the
video one more time. Okay, the last step to
getting your pieces ready to stitch is that we need to
take off the pattern pieces. If you have them pinned, you can unpin them with
the freezer paper. The best way to
remove the paper from them is to lay the piece
flat down on the table. And I want you to peel
the paper away from the felt instead of
pulling on the felt layer. And the reason I do
that is I don't want the felt to
accidentally stretch, especially in some of the places where it's kind
of thin or small. So I'm just going to get
kind of a fingernail under the edge and you can see I can pull the paper back just gently and it comes
right off the felt. Now, the cool thing about these freezer paper pieces
is you can re use them. Don't throw them away. As you are pulling your
pieces off though, you can re iron that
waxy side by just putting it down
on the felt again and giving it another pass. With a warm iron, usually they will work
about six or seven times before they sort of lose their stickiness and won't
adhere to the felt anymore. So be sure to hang onto
your pattern pieces. We'll use a few for
placement in later lessons. And you can also re, use
them to make another two can go ahead and peel the
paper off all of your pieces. And then we'll be ready in the next lesson to start stitching.
8. Stitching the Beak: We're going to start stitching
the two can with the beak. The first pieces you need
are your interfacing piece, the stiffened felt or plastic or cardboard piece, and the beak. All the rest of the
pieces you can set aside for now, we
need those two. You need your glue stick. We're going to use
that to help hold the pieces together temporarily, to bate them in place. Then you need to choose
a color of thread. We're going to stitch the top
edge of the two cans beak. Now I'm going to stitch mine in yellow because I'm going to use the same color
for the beak that I'm going to use
for the feet later. I think this will be easy
for you to see on camera. Normally, I would pick
a color that matched the colors in my tie as
closely as possible. In this case, I think this orange would actually be pretty perfect because it blends in pretty well with
the colors in the tie. The color of thread
you need will depend entirely on what color
your tide turned out. Now I'm showing you examples with the number
eight pearl cotton. You also can use the
embroidery thread for this, you're looking for the color
to stitch your beak in. If you're going to use the six stranded embroidery thread, when you cut a piece of it, I would like you to
cut a to stitch with. But before you start stitching, you'll want to split
it into three threads. Bundles of three threads. If you try to use all six, it's going to be too thick. You want to split
it into 3.3 That's usually easy once you get it started to just
pull it apart. There we go, okay,
Into two bundles. The color thread that you
need for stitching, I said, I'm going to use yellow, your interfacing your
beak, your glue stick. And you'll need your needle. And I've put mine in
a little piece of extra felt over here so
that I didn't lose it. We're going to first base the beak onto this
interfacing piece. When I say based, what
I mean is we're going to use the glue
stick to temporarily hold it in place so that we can stitch it
without it moving around. The way we're going to
place this on here, the beak is going to wrap around the beak of this
interfacing piece. The top, the curved edge here is going to go about a
toothpicks width, about eighth of an inch away from the top
edge of the felt. You can see when I
lay it down there, if I put that there, when I grab the bottom edge and I'm just going to get
it out from under, I should be able to
fold it up in half. And you'll see that it should
match up with the top edge. That beak part of the interfacing piece
or stiffener piece, should be totally
inside the beak. That's what we're going
for. You also can look there's a little notch
on the top edge right here. The bottom of the notch should match up with
the top of the, interfacing the top of the head. Okay, One other
placement thing to check is you want to make sure
that the edge of the felt, the straight edge
here is pushed back as far as it can
right in that corner. You don't want it to
be out here somewhere. You want to make sure
that you push this back so that it rests as far
as it can in that corner. And it folds over like so. Okay, once you see
where it's placed, then you can open
it back up again. And I'm going to put a little
bit of glue stick just on the part of the beak here
and on the back side, front and back, you
can use glue stick, whether you're using
cardboard or plastic. It's just something that's
going to help hold the layers together for a minute until
we're ready to stitch it. Little glue stick
front and back. Okay. And then I'm going
to place this back so that it's about a toothpick
width away from the edge, it's back in the corner. And then I'm going to fold this up so that it folds in half. And I'm matching this top edge. Once you have that, you want to just press
down and hold it with your fingers for just
a few seconds and that'll let that glue
stick, grab a hold. I like this much better
than using pins or clips or something that gets
in the way is I let the glue do a
little bit of the work. Okay, that's holding
it in place. Now I want to grab some
thread on my needle, either pearl cotton or six
stranded embroidery thread. I would like you to grab a
piece that is about 14 " long. You don't have to grab a ruler. A great way to measure
that is to grab the thread in the tips
of your fingers and to measure it back to your elbow
and give it a little extra. And that's about the
right size thread to cut off there. I've
trimmed off a piece. Then you want to
thread your needle. I want to show you one of my favorite tricks
for needle threading. If you're not very good at it, this can be a real help. All you need for my
favorite needle threader is a scrap of paper
I'm going to grab. I have just a notebook back
here on my file cabinet. I'm just grabbing a
piece of notebook paper. I'm going to cut just a
little slip of paper. It's about, I don't know, a little more than
an eighth of an inch wide and a couple inches long. It's a little piece
like a French fry. Take that piece of paper
and fold it in half. You're making like a letter V. Then pick up the end of your
thread and you want to put the thread inside the
V and close it up. Okay, I've got my thread
down in the fold. Now I'm going to
take the ends of the paper and I'm going to put those through the
eye of the needle. You do have to have
a needle that's got a pretty big eye
for this to work, which is why I love
chanel needles. I'm going to fish
the paper through, which is much easier to pull
through than floppy thread. Okay. Then I'm just going to
pull on the ends of the paper when it gets up to
the eye of the needle here. If I give it a little wiggle and pinch it through my fingers, there we go, I have pulled the thread through the
eye of the needle. There's my best reusable
needle threader, right? There is a little slip of paper. They make ones that
are made out of wire and all kinds
of other things. I always break those. I really like the
slip of paper better. One other thing I want you to do before you start stitching is I did this while I was talking to you without
even thinking about it. Which is I want you
to take the thread and just run it
through your fingers, pulling it back from the needle. You can see I'm not pulling it out of the eye of the needle, I'm just kind of
pulling it back. This is called
conditioning your thread. And what it does is
it helps push some of the extra twist
out of the thread. It will help it
keep from getting knotted up later on
when you're stitching. So it's something I do by habit because I
sew a lot by hand, is just run it through
my fingers a few times. Okay. Then in the end of the thread that is
opposite the needle, so not the one through the eye, but in the other end, I want you to tie a knot. The knot I use is just
an overhand knot. You can use any kind of
knot you know how to tie. But overhand knot means I wrap it around the
tip of my finger, then I pop that
loop off the end. I grab the end of the thread and stuff it underneath
and through the loop, then I just pull that tight. That makes one overhand knot. 1 knot will be plenty
to hold onto this. Okay, I've tight a knot and
my needle is ready to go. We are now going to stitch the top curved side
of the two cans beak. The first stitch we're going to learn is called a whip stitch. I want you to bring your needle. We're going to start
right up here where the notches right where the curve part of
the beak starts. And I'm going to go
between the two layers. I'm putting my needle where
the stiffened felt is. I just want to go through
one layer and bring the thread from that
inside out towards me. When I pull that through, what's going to happen is
it's going to take the knot, it's going to stop at the knot. This way, the little end of thread I can just
tuck in between the layers and it's going to
hide my knot, which I love. I like being able to hide
the ends of the thread. Okay, now to do a whip stitch, the only thing you
need to remember about whip stitch is you always want to move your needle in
the same direction for me. I'm going to come from the back or the side that's away from me
and then towards me. The way I'm holding it, I'm
going to come from back here or what's on my right
hand side, towards the left. I'm going to move my thread over just so you can
see a little better. I'm going to take my needle
and I'm going to come through from that
side towards me. I'm an eighth of an inch. About a toothpick width away from where my
thread is coming out. And I'm about a toothpick width away from the cut
edge of the felt. That's how much I'm biting in is about a toothpick
there and I'm making my stitches about a
toothpick or an eighth of an inch or so apart. Okay. Once I got my needle placed, then I'm going to
pull it through and you're going to see
it's going to bring one diagonal loop across
the two edges of the felt. This is the perfect
stitch for attaching two pieces of felt together. It's great for going
around edges like this. Okay, I'm going to keep
going the same way. I'm going to bring my
needle from the back to the front towards me. I'm moving over about
a 16th of an inch, about a toothpick
width from where my last stitch was
and pull through. And I'm just going to
keep going the same way. I always remembering to
go from back to front or towards me is how I'm stitching this one,
how I'm holding it. One other thing you'll
notice is with my left hand, I'm just pinching the
two layers together that makes it easy for me to
get my needle through both. And I can see that
they're lined up, I'm stitching them
so that they're in the right place back to front or towards me every time. And it's going to make
this nice diagonal stitch all along the top edge. And I want to go all the way to the tip of the
beak, where that fold is. Okay, I can fit maybe two
more stitches in there. Then I've gotten to
that folded edge. Okay. Now we're going to tie a knot because we've made it all
the way to that edge. To tie a knot, I'm going
to make one more stitch, basically right in the same
place as this last one. I'm going to bring
my needle through that same spot one more time. When I pull it through,
this time I'm not going to pull it
all the way closed. I'm going to leave
just a little loop. Then I'm going to
take my needle. I'm going to bring it through
from bottom to top once. And then I'm going to do
the same thing again. Go from bottom to top, right to left twice. So I've got two twists and then I'm just
pinching the end here. I'm going to gently pull
on that with my needle. And that is going to snug a knot right down against
the edge of the felt. The last step. I don't want to just trim
this off right here, because then I'm going to
have this tail of thread sticking out, out in space. I want to do what I call
burying the thread. How I do that is I'm going
to take my needle and I'm just going to basically run a stitch in between the layers. So I'm going to slide it
between the layers of felt back into the beak, a little ways, it's about
a width of my finger back in there and it's not
showing from the other side. I'm just going
between the layers of felt and pulling that through. Then I can take my small
scissors and I can just trim the thread off right against the
surface of the fabric, and that's just going
to hide that end. Now I have a nice neat finish. Now we've finished the beak. Next we're going to
start putting together the face and the
bib on the two can.
9. Adding the Toucan's Bib: Okay, next we're going to add the two cans bib to the front. We're going to set
the beak pieces side. I want you to pull out
this little white, I don't know, half moon shape. And one of your
black body pieces, one of these will be the front, one will be the back. Okay. And you should have
two that you can set, so they're looking
at each other, so they're going
opposite directions. Felt is the same on both sides. You can flip one
over if you need to. Okay, We just need one of the black pieces
and the white one. As you pick up this one, you can see if you match it up, the straight edge here is going to match the straight edge on the front of the face. Then this little
curved part here should match the curved
part on the black. That's how that aligns. And we're going to layer that
up like that, same trick. We're going to grab the
glue stick and we're going to base those
two layers together. I've checked it to make
sure that it lines up. I'm going to put a
little glue on the back. I'm going to place
it back on top. The reason I use
the glue is that I don't have to worry
about it moving around as I'm stitching. Once again, I'm just
going to hold it for a few seconds so
that it grabs on. The next part we're going
to stitch is we're going to go around the curved
edge of the bib. We're going to attach
that to the black. We'll need white thread so you
can grab a piece of white. And the same way we
did for the beak, you want about 14 ". Again, measure from your
fingertips to your elbow. Remember to use your
paper needle threader if you need help
threading your needle. Okay, so I'm going
to thread it and I'm going to tie a knot in the
end, just like we did before. A little loop around,
stuff that through, and now I've got a knot. Okay, we're going to use a variation on the whip
stitch to do this. Stitched edge here on the white, it's called a stab stitch. It works pretty much
like whip stitch does. I'm going to hold my
piece like this so that I can stitch going
around this way. And I'm going to bring my
needle through both layers. I'm going to go from
the back to the front. I'm going to bring it up
about a toothpick width, about an eighth of an
inch from the cut edge, from this flat edge. And about that same amount in
from the edge of the white. I'm going to bring
it up about there. I'll hold that up close
to the camera so you can see I'm in a little bit and I'm away from the
cut edge a little bit. Okay, I'm going to bring
that through both layers. Now I have my thread
on the front. To finish this first stitch, I am going to stitch down right at the edge
of the white felt. This second part of the stitch, I'm only going through
the black layer, but my needle is just
resting right up against the white that when I pull it through will make a tiny little stitch
just right at the edge. I'm going to continue that all
the way around this curve. You don't need these to
be very close together so you can space them
about two toothpicks, width more like maybe a quarter of an inch or a little less. Okay, I'm going to
come up from the back. I'm just a little ways away from the cut
edge of the white. The first part of the
stitch comes through both layers and then goes down again right
at the edge of the white and stitch down. Okay, I'm going to continue,
I'll do one more stitch. Slow coming up through both layers and then down right at the edge
of the white felt. Okay, I'm going to speed up the video and just continue
all the way around until I'm almost to the edge over here
of this curved side. Okay, I'm almost
at the edge here. I'm going to make
one more stitch. Close to the edge again, I'm about a 16th of an inch. About a toothpick width
away from the edge. More like an eighth, maybe I'll make one more stitch right there and bring my
needle to the back. Now I am ready to tie a knot. We're going to stitch this other edge later on in the two. Can we only need to
do this curved one. Tying a knot here is
just a little bit different than we did on
the edge of the beak. This one we want to end up on
the back side of the felt. When I finish stitching, I'm going to flip it
over to the backside and I'm going to look at where the thread is coming
out of the fabric. That's right here at the edge. Going to make a tiny
little stitch on the back, right close to where that
thread is coming out. And I'm just taking a little
bite out of the felt. It's not going all the
way through to the front. We won't see this stitch, but it's biting in enough
that it feels like it's going to stay there,
it'll be solid. Okay, I've done
that little stitch that's right next to where
the threads coming out. I'm going to pull
that until I leave a small loop that's like what we did on the edge of the
beak. I've got this loop. I'm going to go through the loop twice, just like we did before. I'm going to go right to
left through the loop. I'm going to do
that a second time. Go on the same way from bottom to top or
from right to left. Okay, for this one, I think the knot is tidier. If you lay your piece down on the table and take two fingers and put one on either side of where the knot
is going to happen, Just press that down. This helps keep the
felt from getting accidentally pulled
through or stretched out. I'm just holding it down with my left hand and I'm going to
gently pull on the thread. And that should pull a knot
right down against the back. Okay. And then I'm
going to trim it off. I like to leave a
little bit of a tail because I can just
tuck that towards the inside and when we
put the two can together, it'll hide the end. But that way I know it's
not going to pull out. I like to leave enough thread that I'm sure it's
going to stay there. Okay, so now we have attached the bib to the front
of the two can. Next, in the next lesson we're
going to attach the eye. So be sure to find
your sequence beads, buttons, whatever
you're going to use to make the two cans eye.
10. Adding the Eye: Okay, we're ready to add in the, I've pulled out the bib pattern
piece because I have the drawn on in a little
dashed line and that will help us place it on the body
where it's supposed to be. I have a little bit of white
thread left in my needle. I'm going to use that to do the. I'm just going to tie
a knot in the end. Again, I'm going to bring over my assortment here
of beads and O, I'm going to use Q for mine, because that's my very
favorite way to do the, for these two cans. But I wanted to show you other options in case you
don't have sequence that work. You can use the pattern piece to help you figure out where
the eye needs to go. By just putting it back on
top of the white piece. Grab your needle and you're just going to take your
needle and bring it from the back to the front
and you're going to punch right through the
center of that circle. It might take a little trial and error to get right
on the right spot. I've got it right
through the center of the circle because
that's where I'm going to attach these sequence. Once I have the needle placed, then I can just carefully take the pattern piece
and pull it away. Now I know I have it just
in the right spot and I didn't have to make a
marking or anything like that. I'm going to go ahead
and pull my needle through till it
stops at the knot. Now I can attach whatever it is. You could put a button. There's a bright red button that I could stitch
on right here. It depends on what
button you have. Shank buttons have just
one hole in the bottom. You might need to do a couple of stitches to use
something like a little tiny four hold
button or a two hold button. We could use this
great glass bead would make a really nice eye. I could just make a couple
of stitches up through that, then if you want to use sequins, here is my favorite eye. I love doing them this way, is I'm going to make
a stack of sequins. I have a black one, which is a ten millimeter.
It doesn't really matter. It's the largest one. I'm going to put
the largest one on first and it should
be a dark color. Then I'm going to
put on a medium one. This is, I think,
a six millimeter. I picked bright pink because
I thought that would be fun. Then I'm going to put on a
tiny little four millimeter. You could also use a bead for the center one if you don't
have any really tiny ones. That one's also a dark color. You can see when I stack
them up like that, it makes a fun eye then
to stitch the sequence, I just make one stitch
to hold them in place. If we imagine that
this is a clock face, I like to make my
stitch so that it leans towards 01:00 And I'm just going to stitch all the
way to the outside of the whole stack and
pull that down. When I do that, I
think it makes it look like he has like a
little sparkle in his eye. That one little stitch of white there is my
stacked quin eye. You can make your eye
from whatever you've got. Then to finish that off, you want to bring it
to the back again. We're going to tie a knot again, just like we did at
the end of the bib. I'm going to make a little
bite into the felt, right next to where the
threads coming out. I'm going to pull that through
until I have a small loop. Pass the needle through
the loop once twice, lay it down flat,
put a finger on either side to hold that steady and give
it a little pull. Then again, I'm going
to turn it off, leave a little tail because
I know I can hide those on the inside there. I've got the eye.
11. Attach the Branch & Feet: Next step, we're going
to add the branch to the front of the two can
that we've been working on. The branch is made from
this little rectangle of brown or gray or whatever
color you want to use. We're going to use
the glue stick. Once again, the
branch we're actually going to make just a little
bit three dimensional. We're going to fold this or roll it up into thirds basically. I'm going to put some
glue stick on it. And then I'm going to
fold the long edge, one long edge to the center. Then I'm going to fold the
other long edge to the center. I'm going to roll it
up like a jelly roll. Like a Swiss roll, but I'm going to let the glue
hold it altogether. Okay? I'm going to
take my glue stick and just be generous with
the glue on the inside. What will be the
inside, the whole way. Okay? Then I'm going to
fold up one long edge, about a third of the way. Okay. Then the other long edge, I'm going to fold back
towards me. Overlapping. Okay, And then I'm
just going to hold it with my fingers and let the glue grab on
and hold it all. Fold it up like that. I wanted this branch to have just a little
bit of roundness, a little thickness to it. Okay? Once the glue is set
and it's holding in place, we're going to put the branch on the front of the two
can you can pull out, you have a pattern
piece that has some dashed lines marked on it that will help you
place the branch again. You can lay it on top. And now we're going
to put the branch I like to put the seam, can see that there's
a little bit of seam. I like to put that
towards the two cans body so I don't see it. And I'm going to
set that right on those dashed lines and then I can pull the pattern
piece out of the way. Maybe I'll set it
underneath that scooched, there we go, pattern there
is where the branch goes. It's a little bit diagonal. You can see, you can adjust
yours how you want to. I feel like it needs to
go up a little higher. Okay, your bird should be
centered in the branch. Now we're going to attach
the branch to the body. By stitching his toes, his feet. You probably want
to switch colors to whatever color you want
to stitch the feet. This could be any color
that matches your beak. I'm going to use yellow because it's going to show
up really well here. I'm going to pull off another
piece of yellow thread. Go ahead and thread my needle. We're going to stitch these toes by making some long stitches. This is the third stitch
that you're learning. Make some long stitches
over top of the branch. I've got my needle
threaded, my knot tied. We're going to two batches
of toes, two feet. I'm going to pull
over the sample one here so I can show you. We're going to make
a little group of stitches on the right side and a little group of
stitches on the left side. We're going to stitch
in two places. I'm going to pick this up,
I'm just going to pinch the branch onto the body. And I'm going to put one set
towards the right hand side. I'm going to come up
through the black felt right at the top
edge of the branch. I'm spacing this from the edge. This is maybe the
width of a chopstick. It's maybe half of the
width of your pinky. I'm coming out right at
the top of the branch, and I'm going to make a
long stitch over top of the branch and go down
right at the bottom edge. I'm only stitching
through the black, but I'm letting the thread
loop over top of the branch. Okay, there's 11 stitch. And then I'm going
to do two more, basically right
next door to that, as close as I can cozy that up. I'm going to bring it up
again at the top and stitch down one more time. Right at the top of
the branch and down. Okay. And then I'm going
to do the other foot. I'm going to space that maybe about the
width of my pinky. I'm going to come over towards the right hand side and I'm going to do the
same thing again. Might go over just
a little bit more. Okay. Coming out at the top, I'm going to make three
stitches over the branch. One, two, last one, okay. Then one more time, we're going to tie
that off on the back, so we've got the feet stitched. I'm going to flip it to the backside and I'm going to make a knot right here at the
bottom of the branch, pulling my loop loop. Going through the
loop once and twice, getting caught on the
tail a little bit. I'm going to put
my fingers either side so I can pull the loop down tight and trim off the end. Okay, so now I have feet and
a branch attached to my two can the next part we're going to put all of the
two can body together.
12. Stitching Around the Body: Okay, now it's time to put the front and
the back together. We need the other
black tu can part. And we need our piece that has the beak so we can assemble
these three together. First, we're going
to put the front of the tocan onto the
front of this piece. A couple of places you want
to look at to match it up. There is a notch cut out of the top edge of
the two cans beak. Your face piece
should overlap that notch that the top of the beak and the top
of the head match up. When you do that, if I flip this over and peak
to the back side, your interfacing
piece should be right in the center of the black felt. You can see as you look
at this upside down, I've got a black
border that I can see all the way around the edge, the whole way
around the two can. That's going to
give us a space to sew that we aren't going to
hit that interfacing piece. It's a little bit smaller. On purpose, you want to
adjust your piece so that it's as close to the
center as you can get it. It's even amount
all the way around. Then you're going to
take the back piece, the other black piece, and
we're going to match that up. I'm going to match
that to the front. I'm just going to check
it all the way around. I want to match the
tail, the front. Those two should
match up and stack on each other as
perfectly as you can. Okay, I always check
the fit first. Make sure I've got
everything lined up. And then I'm going
to use my friend, the glue stick again to
base those layers together. Okay, I'm going to
do the front first. I like to put the glue onto
the interfacing piece. I'm going to do
just the very edge of the beak that'll be inside. And then a little glue
on the whole piece. Okay, once again I'm lining it up that the top edge of the head is at the
top edge of the beak. And I'm flipping it over to make sure that I've
got it centered. And I'll hold that
for a few seconds. Once I've got it
where I want it, it's easy to adjust
before the glue sets, so you've got a few seconds
to move it around o then I'm going to add glue to
the backside because I want all these layers to stay lined up one with the other. Carefully line this up tail
and the front, and the back, and the top of the
head and just hold that in place. Okay. It's starting to really look
like a two can now, huh? All right, once we've got
those layers put together, now we're going to stitch the outside edge of the two can. And we're going to do that
in three different parts. We're going to start by
stitching the black part. We're going to start at
the top of the head. We're going to go
around the back of the head, around his back. We're going to sneak
underneath the branch, go around the tail and all the way up until we meet the
bottom edge of the bib. Then I'm going to switch
colors of thread because I'm going to stitch this in black
all the way around here. Now I want to switch to white, because I don't want to see
big black stitches there. Then one more section
we're going to change. We're going to do a slightly
different stitch when we hit the straight
part of the face here. We're going to make one
little variation there. When we get to that part, I'm going to start
with the black. I'm going to pull off a piece of black thread and go ahead
and thread my needle. And we're going to stitch this again using the whip stitch, which is the same one
we used for the beak. The very first one we did. Okay. And we're going to
start it the same way. I'm going to pick up and
pinch between my fingers. I'm going to start right
here at the top of the head, right where the
black felt starts. And I'm going to come
through again with my needle between the two layers so that I can hide my
knot in the middle. Okay, I'm coming through
the two layers and pulling, then I've got the knot and
the tail end of my thread. I'm just going to tuck
in between the layers. And now I'm going to
pinch the two together. And I'm going to
do a whip stitch. If you remember whip stitch, we're going to go the same
direction every time. And I'm making these
about 16th of an inch, about a toothpick width. The part I'm going to move
over and pull through, I'm going to move over, I'm biting in about a 16th
away from the cut edge, and I'm moving over
the same distance for each of my stitches. I think we're going a different direction than
we did with the beak. I think we did the
beak the other way. Whip stitch works. Either way, you can work right to
left or left to right. The only thing to remember is that you're
just going through the fabric the same
direction every time. Now I know that it's
really hard to see the black stitches
against the black felt, but it's the same stitch that
we did here on the beak, I should look like the same diagonal loops that
are going around. And I'm just making
my way around. I'm pinching the two
layers together with my fingers to make sure that
I've got them lined up. And I'm just going
to speed this up. You can continue stitching when I get here
where the branch is, I'm just going to bend
the branch out of the way and continue
sewing underneath it. And then I'll just put
it back where it was. So I'm just going
to push it out of my way so I'm not
stitching through it. Okay. When I get right to where the white
meets the black, right at the bottom
edge of the bib. I am going to tie this
off to tie a knot here. We're going to do
this the same way we tie a knot on the beak. I'm going to make
one more stitch right on top of the
last stitch that I did. Okay, there's my last stitch. I'm going to put one more
stitch on top of it and pull. So I've got a little loop. My thread is getting
a little bit short. I'm leaving a little loop open. I'm going to bring my needle
through the loop once twice, go in the same direction. Okay? And then I'm
just going to pinch the felt right there
and pull gently, that'll pull a knot right
down against the edge. And then I'm going to bury
the end of the thread inside. I'm just going to take my needle and put it between the layers of felt and I'm going to
bring it to the back side. Okay, Back a little ways into the body so that it
comes out again. And I'm going to pull my
needle all the way through. Then I'm just going to
trim off the thread right against the surface of the
felt that will hide that end. Okay, now I'm going to switch colors to do
this little section, the curved section
of the breast, the beak or the, the breast or the
bib of the two can. Okay. So I'm going to switch to white and I'm going to keep whips stitching until
I get to this corner. Okay, I stitched
up to the corner where the face meets the beak. Now it would be really hard to continue whips
stitching here and trying to stitch the flat
beak to the flat face. Like the angle doesn't
work very well. So we're to a different kind of stitch to do this last section. And it's going to help secure the whole face and
beak all together. We're going to switch over
to do a running stitch. And running stitch is like the most basic kind
of embroidery stitch. It's the one that looks like a dashed line and it goes up, down, up, down, up, down. Okay, I've got my thread
on the front side. I'm going to start
by making a stitch, going from front to back. I'm going to move over
about a toothpick width. And I'm going to go down and I'm going to go through
all the layers. I'm going through white, black, and even the beak. And my needle is
going to come out on the back side about a toothpick width away
from the black edge. That's my goal, is to have it come down in the front
and come out in the back. About the same place on the
front and back of the face. I'm going to pull that through, hopefully you can
see a little bit. There is now just like one
little dashed line stitch. Now I'm going to
do the same thing, coming from back to front. I'm going to flip it over so
I'm looking at the backside. I'm going to move
ahead the width, I want the stitch and
I'm going to go through all the layers through
the interfacing through, um, the black, the white. If you're using
cardboard or plastic, this one might be a little tough to get the needle through. You might need to punch a hole with like a pin or with your
needle before you stitch it. But now I've gone through
to the front and I'm in the right place lined up
with the line of stitches. Now I'll pull this one through. These few stitches are slow, but we're attaching all
the layers together. Now, I'm going to go
ahead a little bit. I'm going to go through
all the layers. I'm going to check where it's coming out on the back side, looks good, pull that through. I'm just going to continue
this back and forth. I'm peeking on the front and the back going right next
to where the eye is. My throat got caught
in the branch. There we go. And I'm going to continue this all the way
to the top of the head. It's about five stitches. Five or six. Okay. I think I'm at the top edge of the bib. I've got my stitches in place. I'm going to do one last knot, which I'm going to
do on the back side, the same way we've
been doing them. I'll take a little
bite into the felt, pass my needle through twice, pull that knot down, and then I will bury the end of the thread back into
the body of the two can and trim the So okay, there is our assembled to can. The last step is
we're going to add the flower and the
leaf to the branch.
13. Adding the Leaf & Flower: Okay, last step,
we're going to add the leaf and the
flower to the branch. You can decide where you
want it on the branch, but I like to put them over
on the left hand side. And so I'm going to put the leaf on the back overlapping
the branch a little bit. And then the flour
is designed to kind of stack up one flower
piece on top of the other. You alternate the petals so it makes this kind
of two layered flour. If you cut yours out of
your tight eyed fabric, you can decide which parts of it you want to overlap the other. I like the white
showing on mine. I've stacked them
up and I'm going to stack that at the end
of my branch as well. Now you can use a little bit of glue stick to hold
those layers together, but we're going to stitch
through all the layers and attach that all
together as one stack. You can do that in any
color you want to. I have a little scrap of yellow. I think I'm going to use that to stitch a center on my flower. I'll thread my needle back
with the yellow thread. Okay. Going to make
just like an X, a cross stitch through the whole stack of leaf
and flour all together. Right at the end of the branch, I'm going to pick this up and
pinch everything together, make sure it's all overlapping. And I'm going to go
through all the layers. Branch leaf flour,
flour and I'm going to one long stitch that way. Then I'm going to
just cross it over and make like an
X or a plus sign. You can stitch it
any way you want to. If you have an extra
button or a bead, you could use that
as the center here. But I've got a little
X of stitches, a little cross stitch,
like a bonus stitch there. Okay. And then I'm
going to tie that off on the back of the branch. That will not only
help the branch stay rolled up on that end, but attaches everything
together really simply. Okay, one more time. Bury the edge and then
I'll trim the other one. Thread always gets
caught somewhere. There we go, trim and trim. Okay, now you can decide
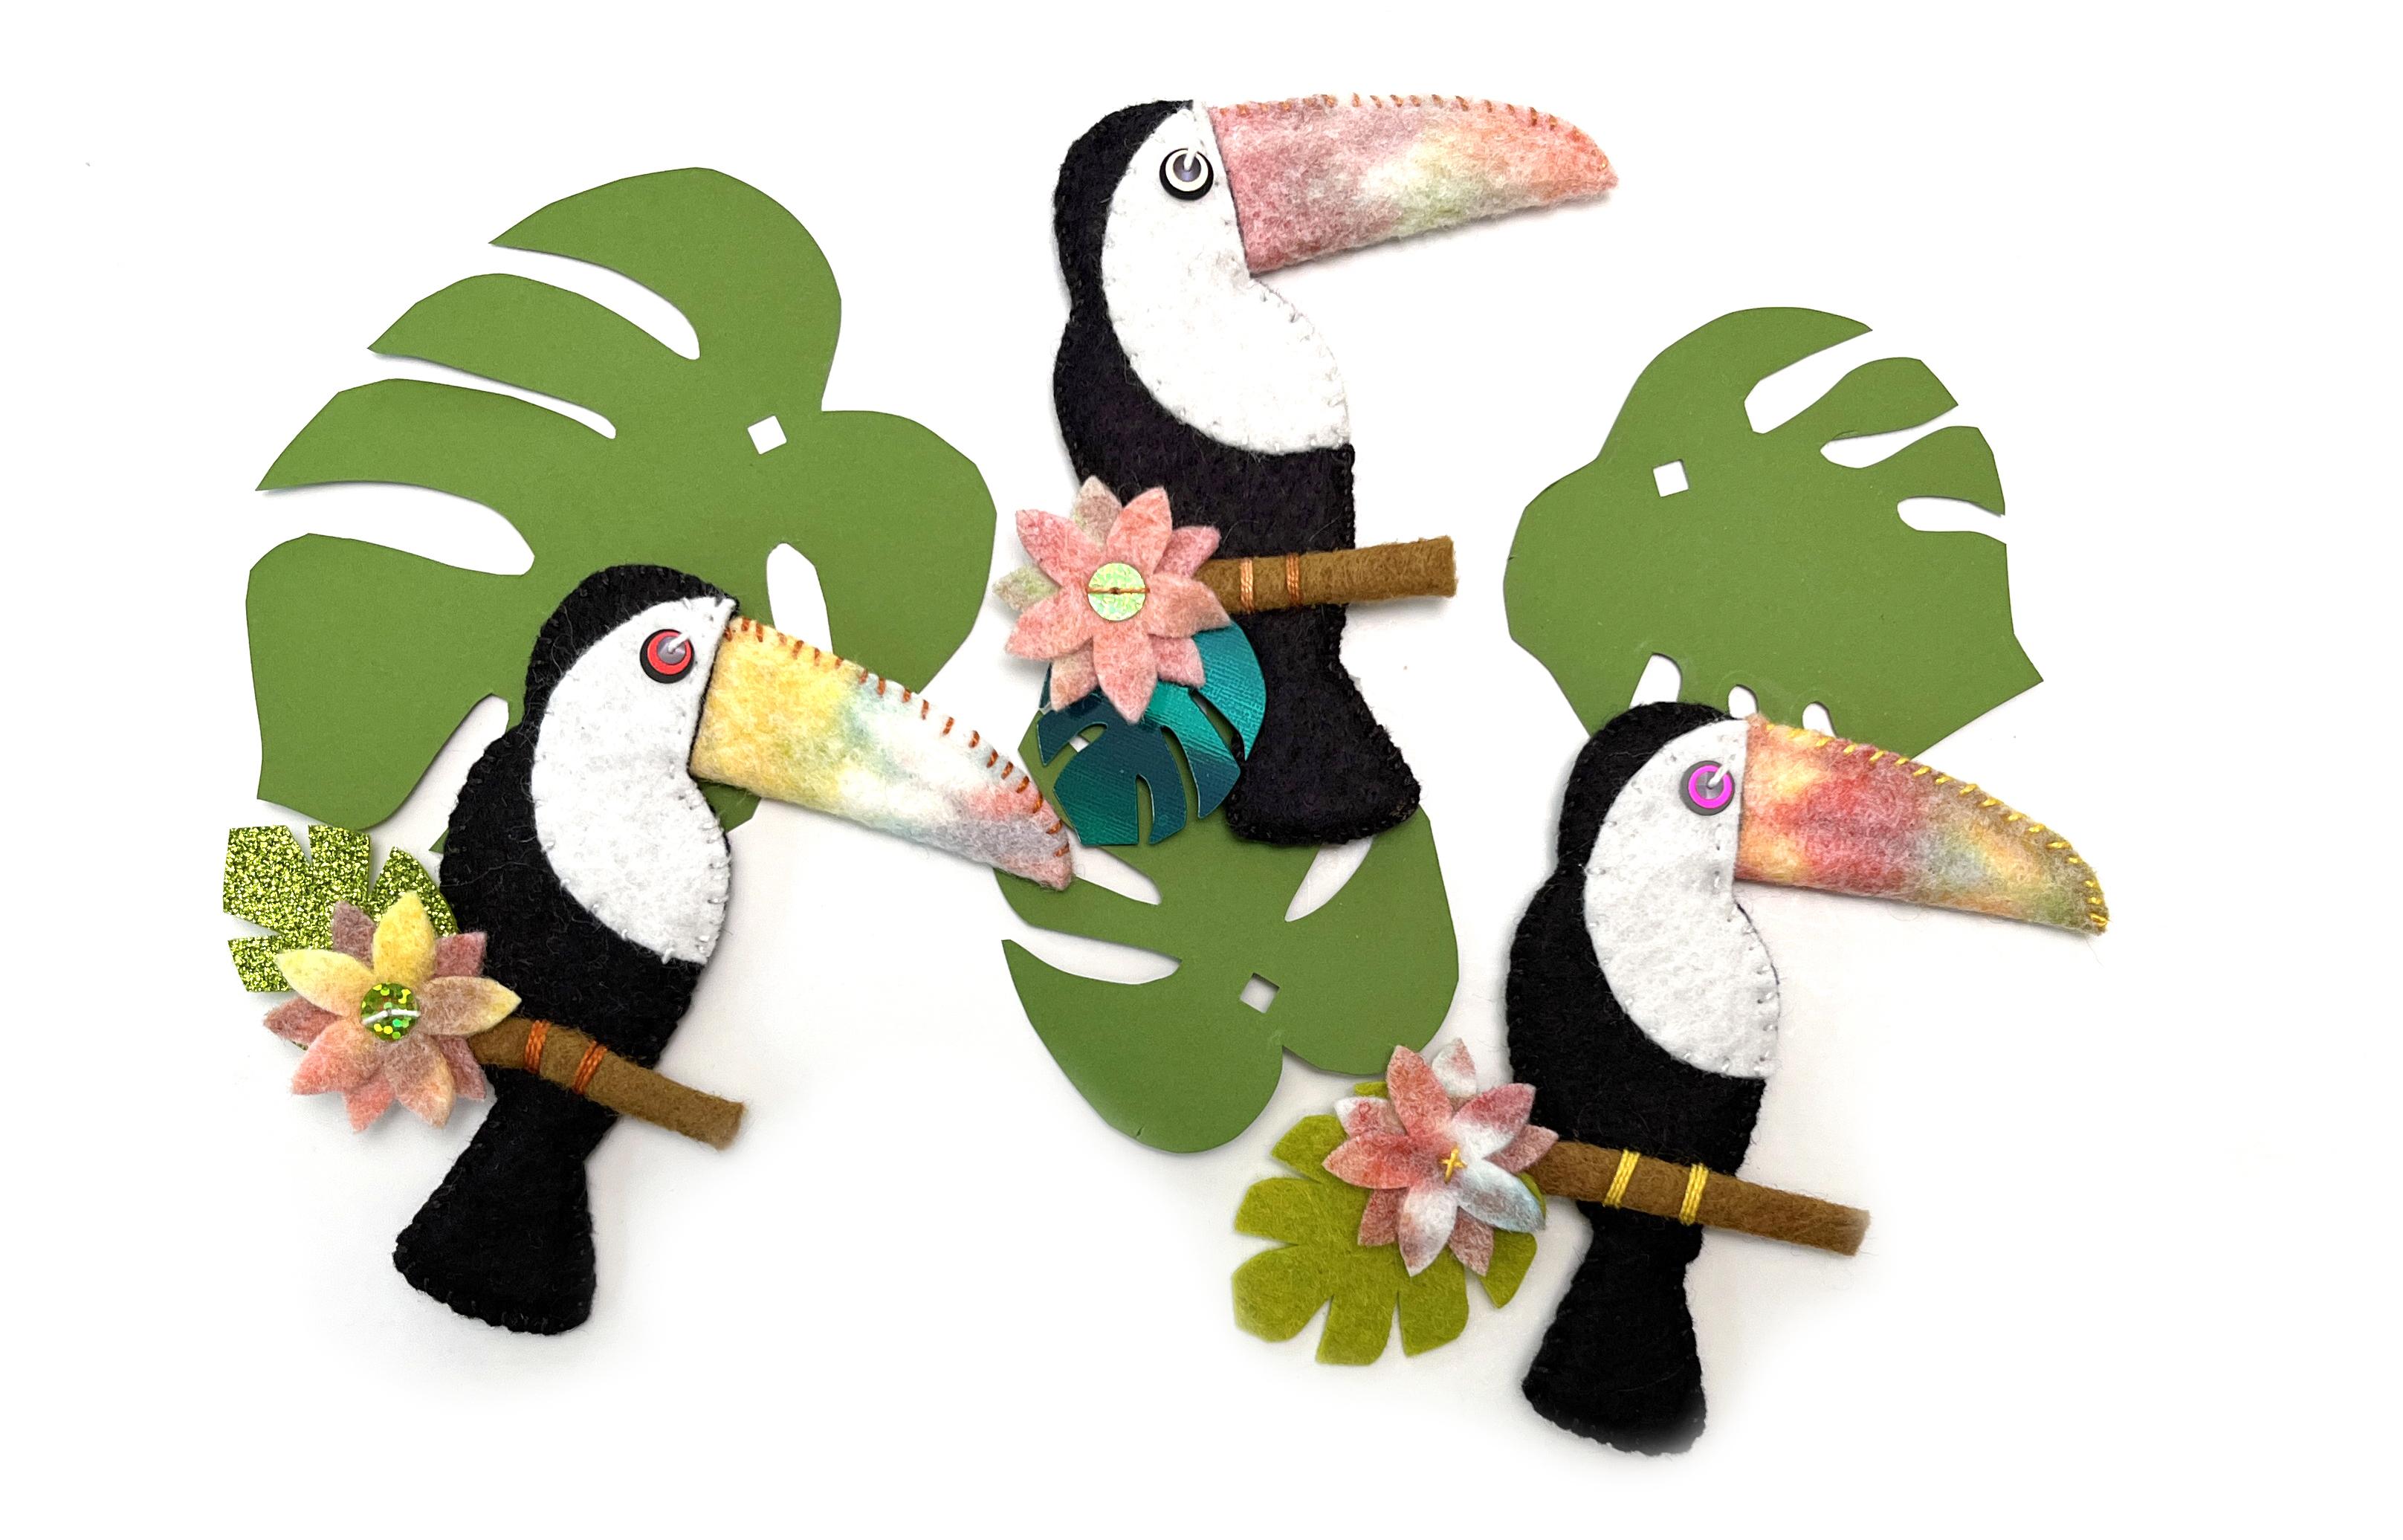
how to finish your two. Can I like to make these into ornaments like
that you can hang up? I have one in the plant
that's in my kitchen window. You can use them as a
holiday Christmas ornament. You can put a
magnet on the back. The simplest way is to take
a little scrap of thread, and I've got a
little yellow here. By turning it over to the back, make just a stitch
through the top of the head, pull through. And now I can take this long thread and just
tie the two ends together. Now I have a little
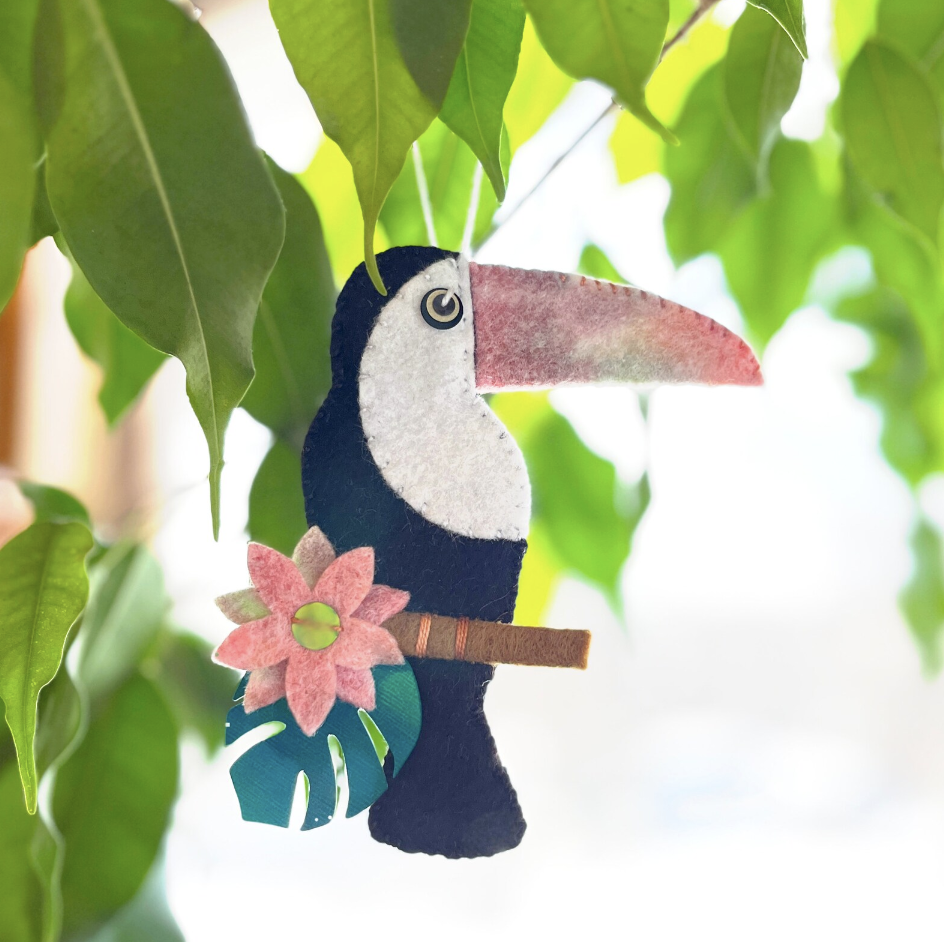
hanging loop. Okay, I'll show some pictures of other things I've made
with these two cans. You can add a pin to
put it on your coat, or even cut some larger leaves and put two cans and leaves together to make a fun mobile that you could put
in a kid's room.
14. Wrap up: So we were right. You can. You've finished
your two can now. So I hope that you will post a picture in the
project section below. I would love to see how
your tide turned out because everybody is going
to be wildly different. And be sure to share any
tips you have or anything you learned while you were
doing the tide of your felt. I hope you had lots of
fun and you want to make a whole flock of two cans after you've
finished this class. Remember the tie technique you learned and all of those
stitches that you did, you can use for all
kinds of other projects. I would love it if you
tagged me on Instagram. If you want to post a
picture of your tu can in progress of your tide while
you're waiting for it to dry, be sure to post a
project picture. Leave a review for class. And of course, if you want
to see anything else I'm up to and all kinds of
other things I've designed. You can always visit
my website at Becca Ran.com Thank you so much for joining me
to make tie to cans. And I hope you come back
for another class soon.
 Becka Rahn, Artist & teacher, paper & fiber art