Transcripts
1. Intro: Ciao, Amanda, mom. And they want to help people to connect with art and
creativity inputs in a playful and easy way with no judgment and
just good vibes. I love my students to experiment
the wow into the asthma, approaching art and
creativity with kids eyes it experimenting with different tools and
different solutions. Ideally, I like this
idea to to stick, to stick with you, but in a good way and come out
with even more ideas. This time, I provide you a cooling easy project
for Halloween that you can do in a traditional
way or on your iPad. I'll add a bonus. I'll add as a bonus of
personalization that wants to celebrate one of my favorite
artists, Yayoi Kusama. And following along, you
might discover a lot of shortcuts and tips and also a list of tool to
implement this project, but also to personalize
it in your own way. The idea is to color
your life with project, you can use the Uriel
life in your daily life, like for alanine right now. And I'm pretty sure this
will make you able to impress very important people, kids and with easy
projects actually. Because let's be honest, sometimes they don't expect
us to do something like this. These kids that you're
going to impress, that can be your kids or your sister, create
your neighbors. It gets in your community. But most important should
be your inner kit. From the iPad, the two arts
and crafts, or vice versa. With everyday tools around you. I want you to make
art accessible and reachable and
usable for you. Well, parents may have a slight advantage on
the starting point. If you are talking
and thinking about the mess the items around. But really the
tools don't matter. The point is just
to put yourself there with a positive,
positive attitude. Even the iPad doesn't matter. You can just have a look
and see the potential. But you can follow
along this class. I'm here to help you to
discover, get inspired, and create to my cart part
of your everyday life and bring smiles and
pride to your faces. So I cannot wait to follow your journey with this
project and the next one, see you in the next video.
2. Project : Hello In his coming. And you want to make
a quick project to decorate your house
or surprise friends. Here is something easy, quicker, and with
your materials, you can find at home, you just need five sheets of
paper, scissors and glue. If you want them, and also
a pencil and a ruler. Well, then we will create the digital version with the
iPad and the app Procreate. And you'll be able to
share your creation with as many friends as you like
everywhere in the world. This class is beginner
friendly and it's perfect to understand the basic of Procreate in the
concept of layers. In particular, if you follow
all the videos at the end, you will have a nice
project to hang in the picture to
share on social or to, or to e-mail or by phone, to hold your loved ones, to wish them happy Halloween. You can follow along. But what is more important? You'll have the tools to
come out with more ideas. Please share your project here
in the gallery or tag me. I love to see your creation. And don't forget to check the resources section
to access the freebies, including my free
procreate brushes and some Halloween
coloring pages.
3. Start with papers: Okay, let's start
with a new project. The first paper we need is the yellow one that I'm going
to use that to do the wall, basically the page
and to do the window. So to do so, I suggest
that even if it's used, I use paper form. It's okay. Actually, it's even better. It's more scary for Halloween. So I would do like this one
and myself with the ruler. And just take some lipids. Or obviously you can also see then you have the
window here. Okay. I would then go to
do the profile, the frame of the window to do so and to optimize
the black paper. What I'm going to do is to
start them from this burden. Like I'm going to
take around 1 cm. Anyway. This one doesn't
matter how it is up to you. Let's say that we do. Yes,
we're still perfect, I'm fine. So we do like the
three short one. Now. We do the three long
one on the side. So we still have a big chunk in the middle to use a for the cat. And despite there. So basically we
need six of them. Okay? So again, here you can use the Caesar visually if
you use bigger Cesar, I use my son caesar here. To show you that it's
very possible that this one long one. Now we can check how
long it should be. So I will just go a little
bit more on the margin side. So basically this one is
okay, but if you want, you can just take away
despite the awake. Seeing here. What I do usually is just to, to fold it and then cut it away. Same here. Obviously, you can also do
the three of them together. So in general, is this
one the language or cutting from the short one? I can just take the
water to get it away. So we have this one. This one. And this one for the friends. Yes, sir. Good. Now,
it's time to do the oh, this one might be a
little bit too long. So you can just shorter. I mean, we can still fix
it when we are doing yes. Okay. Then this but the
curtain the curtain basically, I'm pulling it up to
this one like this up. And I'm pretending to do the current time
like in this side. Say they will be like this. Yes. So I think it will be like this. Even when it's a
bit longer maybe. So let's go down here. Then. Again, remember,
it isn't true. And then we just suck you
for they're like we want. Yes. Pretty okay. It's okay. I'm going to pick this. Then
we have to do the moon. The moon, any scrap of paper
is from also the printer. We will just do the moon. As you like. Stick it here. Yes.
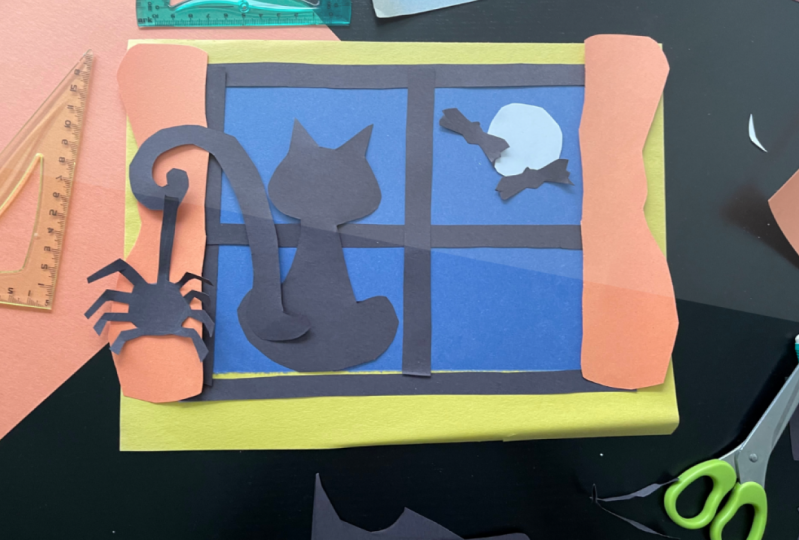
4. The characters: To do the cat will do first
step a novel like this. And then we'll do like a drop
without it, the top part. And we emphasize this part here. Then we will add here. And we should do the tail. So the tail, we can do
it in any direction. But let's say that we
draw the opposite. So like if I wanted
to go on the left, I do it here that
goes on the right. In this case, e.g. I think I wanted to try to
do it in the right. So I will do it like I
would start like this. We'll do this part. They needed to connect to the catheter. And then I will just
finish it like this. Then the queue despite there, we can do it even longer. Is Partha. We do again like an oval. Oh, maybe we can do it here, actually a spider because we, there is more space over. We do the eighth lag and the next and then they
start to look at them. Check. Because they told her
this time I would like to put it in InDesign. Hi there. If I'm cutting this brighter, faster sometime I do like this first I do the biggest bar, so I just remember to do eight. Like a crab. That's why they're okay. Maybe next time I will do like latency nerves spike there. Anyway. I lewin despite as I
cross them over crop. Well, it actually is pretty
long, but it will be fine. E.g. actually, if you
stick it on the door, I think it's fine to
leave it like this. So this one actually, I'm
going to leave it like this. Yes, I will leave it
like this, I suppose. And we just need the bat. So to do them, I think I'm going to do
basically just the sea, even smaller,
something like this. I'm going to have the file where you can dilute it a shaper and print them out and color it. If you don't have the bursa
colored paper like this one, be 1 bar to too bad. Let's look. You know, they're far away. So sometimes it can
just be a shade. It's okay. Here we are. So now we clean the desk. Somehow. The next step will
be assemble it.
5. Glue: Okay, Let's combine
together where pieces. We have to take
the glass window. Then we'll put the frame. Ms. Sandberg. I would put the first time
I will hide it prior to the day, pencil the backside. Now we'll decide
where to put the cat. Again. We can compose
the first image and deciding which I didn't
wanted to put this one. But I think in this case, I will just put it in this side. Because even if the spider is coming out, It's kinda funny. I think. Let me see. Yes, I liked the
spider to be in this side. And then the moon 0, you see the moon was
supposed to be here. Maybe. Let's put the moon first. In this case, I would
just put this part. I will leave the tail
able to move somehow. Like this thing is
still flopping around. This one. I mean, you can turn it this way so
it will even stay further. So it will even look
more three-dimensional. And actually, I didn't mistake, yes, it was better in this part. When it's done.
6. Ipad Time: So after doing our first
project in a collage way, now we can jump on, on our iPad. If you have it or if
you don't have it, maybe you can have a look where you will use the app Procreate. I would like to show
you in particular the use of level today. So let's start by open up
Canvas by pushing this plaza. And then here you
will see many option. What I wanted to
do is screen size. So basically it's
like here we have our picture, our paper. So what we did in delta
project was to give a color. So we will go with
the yellow color. Maybe I would like a
little bit lighter yellow. So I will just move
this one and go here. If you are not in
the same app to change a color is this icon. And you have different
way to get it. So you can use this classical
way, this disk way, where first you choose the
main color around here, and then you go through the saturation and
lightness and so on. The classic one. Or there are other
options, but for now, I guess we supposed
to stay here. If you are playing around
and then you'll say, Oh, no, I still need that color. There is an easy way to do it is basically just pushing here. You will just push here and the color will go back to
the one that you select, no matter in which level. But talking about the
level, what are the levels? You should push this icon
here, select this icon. And you will see here there is a background color that in this case actually
we are not using. And there is the level one. Level one that in our case is we can rename it and
call it directly wall. Then instead of, we could
paint on this level anything. But it's much better. And by the way, if
you do a mistake, you can just stop
back with two-finger. To do a new layer. Basically is lighting
the collage. It's like you are having different paper that you
can just stick on it. So we will add the new layer that we are
going to call a night. We will select the blue. Maybe like this one. I will provide you
the color palette. And we're going to, there are many
ways we can do it. One is the buy. Okay, I will first select
them like this one. How we use this brush? Oh yeah. Of course also you have
to select a brush. And I will provide you
also for free my brushes. This one, I really like
it because they are very similar to the colors that
kids can use on this project. Anyway, what I'm going
to do yes, sorry. I'm going to do first
is do the sketch. I will select the black
and then the six B pencil. And I will roughly
do this cat because also with the, the, the paper we did and the Caesar would not precise with
one to be precise, we can be precise, but
it's not the topic of this aluminum project. So let's start like this. Just sketch it and we
can sketch this one. And maybe we weren't actually
the window to be bigger. So what we can do is that selected because it's
the new level layer. And so we can just
make it bigger. Then in another layer, I will do the current time. In this case, I don't
do symmetry or, but if you want to do
exactly what we could do it. And then in another layer, I will do our
character, the cat. The cat. Okay, let's do it in this way. You can just do like an oval
here and then add the years. Then you will do like
a drop of a drop, but not I mean, you
could do a drop, but you can also don't
finish it that part. Then yes, you make
a little bit larger this one because
they are the leg. And then you can have the
actual, in this case, e.g. the detail could be
either in this side, will, in the water side. So this one is
something that we can make and change easily. You can do the spider. Just remember, spider
has eight legs. And this mono. And some bad that in this case
can be even more abstract. So we did our sketch. We can collapse it if you'd
like to sketch together. But what I wanted to
show you is that e.g. if I want to modify just the curtain because I see I'd like you to
do more precise. I can just cancel this level without any issue
because it's just here. So I can do like this and
modify this one like this. Okay, here we are. And then after I do this one, a lot of things that I
would like you to start to practice is to put it together. Things that are that
belongs together. In this case, you will select
the first one Scatter, then do this one and this one
on the right and group ID. And then we can rename it
and call it the sketch. Now what I do usually is like, I still keep a copy of
this one because I don't have any issue with the
capability of my iPad. If you have an older iPad, maybe you will just
collapse directly, but okay, let's leave this, I will duplicate it. I will flatten this level. So now they are
altogether because I'm unsatisfied with the sketch and I will disable
the previous one, so it's not visible anymore. By doing this one you're
able and disabled fix. Okay, Then I will go in, select this n, and I will see all this option and
select Multiply. And I will take down
this one like this, because I wanted to
sketch up to be just they're basically the sketch
is like what we did here. You remember with the pencil
that you could cancel, even just leave it.
7. Fill with colors: I will select them all
and above the wall, I will do my new level that now I can go the night, sorry. This one is actually
the real night. This one was the sketch. Okay. So for the night, I will
select a blue, dark blue. I will check. I think I will take a
dumb but to toughen up. Or you can also
select the dry ink. And then I will do this. I will just go
through my sketch. Do this one. E.g. I don't like this
part is too much, so I would just double-tap
like this, changed again. Do this. 11 is close and important is
that it's very closer. You can either color it and you can make your pencil
even bigger like this. But here we want to do
something a little bit faster. So I would just put the
band on the blew up. Then you will bring it
here and it will fill it. One thing that you
should pay attention is that if you use a brush, like in this case, with a
texture that I do like it. You see there is a texture on this brush is that
this one may happen. So in this case, you could either go
through and fix it by NDA or to minimize this effect. When you drop it. There is a threshold. So you still keep the pencil
there and you can keep it up and up, up, up, up, up. So I can just do it
like this, 0 e.g. this one is too much,
definitely too much. So I will go here and go down. And I see that 83% is the
best I can do up to now. But there might be something. So in this case, if there is, you just fix it if you wish. So okay.
8. Background elements: If you are a precise person
and you would like to have straight lines
and straight figure. I will show you how to do it. I will go ahead with
this one later, but I just wanted to show you
that you could do it also. So let's pretend this one is
the level of the night and by keeping the pen there
and as you can see, sooner, the line created
will be straightforward. That is also not that option
that is even more powerful. That is like if I do
a line and keep it there and I put my finger there, this line will just be positioned
at the certain angles. In this case a straight. If I want to be sure
that it's really horizontal, I just do this. And as you can see, and then you can just
cancel away the part that is not supposed
to be there. And of course, you
can just do this one. But as I told you, I prefer to keep it like
in a light full style. So I will go, I will disable this one in renewable and
actually I will also consult, cancel this one. And I will keep this
one that is more. Let's say peculiar. Then let's do a neutral level. Let's see. The next
level should be, I suppose the frame
of the window. So I will add another level, take the black in this case, and call it frame. And we can work on it like this. If you like. You can
even do directly a bigger line by increasing
the size of the brush. And then you can
know the outer bars. I'm keeping it very
loose because I actually hope that you're going to
do this one with your kids. And I hope your kids
are having a lot of fun in experimenting
with digital art. And the good point
is that there are no mess around the house. Wow. But again, if you want to be a little more precise, remember, you can just make it
straight and then fix it. But again, it's not my purpose
in this 11 finger is that I see that I would like
to have a black that is not so black is
too black this one. So what I can do is
go into frame window, select the level, then go a little bit lighter on
the color of the black. Maybe I will go here. And then I will say,
feel the layer. And as you can see, the black is not so in denser
and feels better to me. Now, let's add a new layer. And we do the curtain is Halloween. So let's go with some orange. Again, I will prepare the
color palette, but let's see. So I'm going to do
the Kirsten here. I already have
barely lose again. Okay? Now I can put the cat. Now, let's start with the moon. I will rename the level moon. I will choose, in this
case, a light color, like kind of you can choose a supervisor and to get the super white,
you just have to tap. Okay, it's not working. You just have to go
here in this side. And then you will do
the circle again. The circle, you can
do it like this and fill it as I will do. Or if you want a precise circle, you just keep it at
the end and you will have this notification
ellipse created. And it's fine. But if you want a circle, you just push Edit Shape. And actually I want the circle
to know why you didn't do, but it is a circle
so you can modify. Then. You can say, I want a very big moon
like this. Then this. But as you can see, there is an issue here. The moon is not
supposed to be in front of our frame because
we are inside the house. So the super cool things in
Procreate is that actually you can draw the layer that you like no
matter where they go, then you can just put them in the right position in
this case, for sure. Is behind the curtain. But the Moon has to be
also behind the window. So I will just keep it down, but is not behind the night. The moon is gone. I mean, unless you want it, of course. So I'll put it back here and this one should
be the position. So up to now we have all night
moon frame and curtains.
9. Characters and layers: Time to go ahead
with our character. So it's time for our cat. So the cat, we could use the same black
used for the frame by going on the frame itself
and selecting the color. This one could be an option. And it is an option
that I like it because it even I like to keep the color that we use in a limited number because
it's much cooler actually. But if you want,
you can of course, make it also a
little bit darker, a little bit lighter. Let's try with the same column. So I selected, you already
have the level of the cat. Always check where you are and if you do mistake, double-tap, use this arrow to go, to go back or forward
modification. And then I will just
do again first ANOVA. I will fill it. Then I will do I will keep
the body in the same level, this layer this time because I wanted to
keep it very easy. As you can see. I can
still see that it's a cat, but maybe less try to
see if I can make it. So I will select it and maybe
make it a little bit darker just to see if it's
better. Oh yeah, it is. But using it wasn't
the wrong position. The cat is supposed to
be inside, not outside. I mean, it could be an AVL also, but we want him to be between
the curtain and the frame. Okay. I wanted to do the tail in an altered level
because maybe you would like to put the tail on the left and not in the
right in this case, I will put it in the
right, I suppose. But as you can see
in the drawing, I put it in the left
in the paper project. So we'll do the tail. You can color it
or drop the color. I didn't mistake. Is it is
the noise the same colonize? Correct. And then I will do
it the same color because I want it to
be the same idea of a shadow on the back
light for an animal, I will just add the
level for the spider. Name it. Oh, I did a mistake. So go back, rename it them. Despite their, in this
case, for the spider, maybe I want something a little
bit smaller now, So tika, So I will just change
this part, do this, and then go back to my big spider actually,
I will drop it. And then remember,
sometime you can, especially if you
have the pencil of second-generation,
by tapping here, you might switch
to the, the liter. So in this case is
just remember when you wanted to paint is
always this one. You can do it legs as you
like, position as like. And so in this case, both the cat and despite that
are looking at the moon. And I will add the last
layer that we call the beds. And you can do like more
detail thing like this. Or you can just do
something like this. Or you can just
duplicate this one. Will flip it horizontal.
Turn it a little bit. Then maybe again, slide here, duplicate selected.
Put it like this. It's very Halloween. Yes, again, I will
flip it a little bit. Okay. Then I will group them. Or even better, you can just flatten them
by select like this. And as you can see, basically we did it. You just need to take
away the schedule. That is year fixer, the part that maybe are not. So as you like like e.g. the core time, I think
I don't like this part, so I will go in the level, select the color, and
just fix it a little bit. Doesn't have to
be perfect again, especially as following time. So nothing should be perfect. In yeah, I mean, it's a simple thing, but
you can personalize, make it more complicated. We could do also animation
and stuff like this. Just remember to sign it. So I will select
again this color. And you can cite it. E.g. I've put month-to-month
or you can write also, this one is a mistake. I should not put it there. I should put it in an order
level and put it like sign. So let me put my
demo is too big, so maybe I will just
put it smaller. And maybe here,
since you can use this image to send it
to your friend, e.g. maybe you can write
Happy Halloween. You can just do
another level with your message and say, Halloween is coming. Or any message that you like.
10. Bonus: inspired by Yayoi Kusama: Bonus time with the iPad, we are going to create these Yayoi Kusama
pumpkin on our drawing. If you don't know
you I equals Zama. You should definitely
go and check for her most probably use so many of our amazing creation in
different museum location. Absolutely stunning exhibition. Just go and look for her. She's a really amazing
and she's also very famous for her pumpkin. Another book I would
like to suggest to you is this one about the infinity mirror exhibition,
stunning real estate. Mat. Let's go back to business. We will use also
this bonus to have a faster view of many things. So let's take aside our canvas a little
bit and I'll show you, I'm going to do is activate this group of layer
where I put the pumpkin. Let's go just on
top of everything. Let's select the color. Will go for orange. As a brush. In my freebies, you will find a site that
we check the number, the 03, the jama
Panera low fluid and then we would just have started to do
like an oval here. We can drop the color. You can just check
everything is fine, but with these
brushes predefined. Then we'll add a
new layer where we are going to change the
opacity on multiply. By doing so, you will see that without
changing the color, we can just do directly the pumpkin curb to give
dimension to our pumpkin. As you can see
here, I went out a little bit and it's
not what I want. So if everything goes away, you just push this icon
and it will go back. So I could cancel it, of course. But one trick is to use them by clicking the clipping mask. As you can see now
is already fixed. Let's just redo it faster. So I will cancel, created a new layer. Maybe I will even make the
brush slightly smaller. And I will change
here and multiply. I will decide what let's turn
directly and clipping mask. We'll do the clipping mask on the orange level
of the pumpkin. And then I would
just work directly on the pumpkin shape
that could be like this. This one is actually a
little bit too much so I can just cancel it.
And do like this. Then I'll add another layer. I will do the upper parts
of the pumpkin like this. I would do something similar. Again, I will add the layer. We'll make it as
a clipping mask. In this case, we are going
to work on this layer. Put it on multiply to
show how easy is to give some shadow
effect to if we want. And now the final touch is going to be here by
opening another layer. Select black, e.g. any dark color. And as you can see, it's already automatically
a clipping mask because was between the main layer of
reference and a clipping mask. Now I can just go ahead. Andrew. The dots of Yayoi Kusama. First step. I will do the big one in the center of each
side of the pumpkin. They are not just so funny
to do relaxing my host. So they give really
the movement and the volume to the pumpkin. Here we can add the other one. Of course, you can
decorate as you like. But really each time I do the
polka dots of Yayoi Kusama, I feel so happy. I really loved her so much. She's so inspiring. She had such an incredible life. She's, she's now
in Japan, retired. She's about 90 something. You can also
decrease the size of the brush and pinch to zoom. Well, it's okay. I mean, I'm not very happy
with this one. It's a little bit. It's okay. Now, do you
remember how we grew up the layer because it's an ox exactly in the right
position, I guess. So. You cannot just fly
in front of the curtain. So I will just do this, select the old interested layer. I group it, I can rename it. But what is more
important is that I can just put it
where I like it to be. So e.g. under the
curtain or e.g. also under the
spider in the case. And then by selecting this one, I can move it into position. I I prefer. That's all. I hope you like it.
11. Final Thoughts: Thank you for watching
my first-class. If you made it till
here, following along, you might have already
some Halloween takeaway in your hands or in your hybrid, and I cannot wait to see them. Please post it in
the project section or tag me a jump
solution on Instagram. But what is more important
is that you have tools and capability now to
come out with more variation, color palettes,
personalization, and ideas. So please go ahead and surprise everyone,
especially yourself. See you in the next class. Bye.
 Madda Mom, Procreate & Productivity