Transcripts
1. Class introduction: Welcome to the spring edition of gouache Procreate postcards. As the title suggests, we want to create
beautiful wash painting with a spring theme
in Procreate. Now in the winter edition, we just picked up the standard gouache brush that comes with Procreate and started painting
in the spring edition. I want to change gears a little bit and make it a bit
more challenging. If you haven't
followed the previous class and don't worry, it is not a requirement for this class though it
gives you a good base. You don't need to do it
because I'm going to take you step-by-step through the whole process of creating a spring painting in procreate
with the gouache brush. I said, we're going to
change gears a little bit. We're not only gonna
do some painting, we're going to try to
get closer to go wash painting as close as we
possibly can in procreate. Using some blending two, I'm going to show you how
to blend effectively to get more of a painterly
effect in your. And that's not only it,
we're also going to add some animals
to our painting. And we're actually
going to use a for an autumn referenced and turn that into a
spring painting. So plenty of challenges
in this class. So I'd invite you to come along staff the next video
where I'm going to explain what you need and how are we
going to approach this whole subjects that we're going to
have lots of fun together.
2. Setting up: In this first part,
we're going to look together at what you can
need for this class. Let me just take you through all the things
that are needed to successfully paint this
beautiful spring painting. The first obvious
thing is, of course, your iPad, and I'm
using the Apple pencil. The next thing you're
going to need is either one of these files, the postcard, the spring
goulash postcard, You European size, so
the size or the US size, this is a letter
size postcard size. I've created them larger than
the postcard needs to be. Just because in case
you change your mind, you want to print this on
a larger piece of paper. You can do so, but this
should nicely scaled down to a posh cartoon. I'm going to use
this one. Since I'm in the European Union. And this is all there
is on this painting. Now, just one layer
with rough sketch, we're going to use as a guide. The sketch you will find
attached to the class. Another thing you find attached
to class is the palate, the swatch, the color palette. It is called Spring wash and you can download it and probably
if you bring it in, it might look like this or
you might have this screen. But by pressing on pallets and catch you get these and
you get the name to hear it because I'm going
to just say the names of which color I'm picking. So there's some sky color, some mountain color in it, some greens in it for the ground and the
trees, of course, the pink for the blossom and
some parts for this one. The next thing you're
going to need is then of course, a reference photo. And actually you're going to
need to reference photos. This is the first
reference photo. Now the one thing you
notice right away, this is not a spring photo, this is rather a four photo. We're going to use some
imagination to turn this photo into a spring photo. Now, we're not gonna
do the benches and the people were going
to forget about them. We're going to do the sky, the mountain, the water, this tree and this tree here. And we're going to add some
swan sweat and effort. You need to second photo, and that's this one photo. That is all you need
for this class. Now, even if you don't
know how to draw though, painted though, that
really doesn't matter. I'm just going to take
you through everything step-by-step in
the next lessons. So once you've downloaded
all these materials, then you're ready to go paint.
3. Painting the Sky and Mountains: Welcome to the next part of
gouache Procreate postcards, the spring edition, we're
going to start painting. We don't need to sketch because I've already
provided the sketch. Now if you want to
create your own sketch from the reference, Yes, please do so. Of course, if you want
to add some elements like the people and the
benches, or go for it. But I'm just going to omit
them from this painting. But if you want them,
please go ahead and do so. Then you of course
need to figure out the colors a little bit too. But I'm sure after we've
done some painting, you will figure it out too. Well. We're going to paint together. We're going to start with
the background, the sky, create a nice guy
to the mountain. And then we're going to move on to other paths in
the next lesson. For this lesson, we're
going to concentrate on the background and on the
mountain. Well, let's go. First of all, pick
the size you like, whether you want a US postcard, let the size or you
want the A4 size. And I'm going to pick the asset
before the European size. Now the first thing
we're gonna do, we're going to lock this layer. So we're going to tap on layers. We're going to slide to the left and we're going to say, look, we don't want to accidentally
paint on this layer. And trust me, it happens
more often than you would wish to that you
paint on the wrong layer. The next thing is
we're going to add, tap this plus and
add a new layer. But we want to make sure
that our sketch for now just stays on top so that we have to guide where
we need to be. And later on we can hide it. In this first layer. I'm going to just rename this. Tapping on it. I'm
going to say Rename, I'm going to call this the sky. Actually it's going
to be the sky and the water in the
background really. But for now, let's call it sky. Now that we have our layer, we're going to pick up brush. Now the brush you can find in the section painting that
comes with procreate. So the standard brush. And you see this painting
with the large brush, rather large brush for artistic painting though for
background that would work, but for sunlight details, use a large brush like that. You're going to pick
the gouache brush. Now mine is already picked. So it's scrolling
down a little bit and you can see there
you go, wash brush. The next thing is we're going to do a background color and we're going to use the sky
blue as a background color. So we're going to select that. Now. This brush that comes with procreate gouache brush
has a slight problem. Well, it is a very nice brush. It doesn't react like
a gouache brush. It has some gouache texture. It is night, but a quash
brush reacts differently. We got to compensate for
that in our painting. Now in the first section of this postcard painting series, I've just ignore it because it just worked fine
for the painting. But for this painting, I want
to come closer to gouache. And therefore we need to do some different
things in Procreate. And while we go through,
I'm going to show them. We could do that in two ways. And I'm going to show
you just one way. And if all goes well in the
next section of the series, I want to explore a
different way of doing this, getting closer to cohosh. But for now, I'm going to
show you one way of improving on this brush that will help us to come closer to go as well. That's nicely said, Benjamin, What are you talking about? Let me demonstrate that
I've got that brush. I'm going to set
the opacity 100%. I'm going to take the size
18 works fine for me. For this. We use a paint here. Now these are very nice strokes. These have some gouache
properties in it. Now, normally with gouache, if I would go over this again, I would actually get
another layer as it's, s is happening here. But this would also start
blending in a little bit. And that is not happening
with this brush at all. If I pick a different
color, that grayish blue, now, this should blend
in with each other, but they're not doing that. They're only layering. And with gouache, once I
start adding some water, I can actually nicely blend
in colors with each other. For that we have to compensate. And what we're going to
use that for is the hand. We're going to do a
little bit of blending. We could edit the brush
so that it does that, but we're not gonna do
that in this class. We're going to do that
in a different class. Edit the brush a little
bit so that it comes closer to goulash actually. But for now we're going
to make use of blending. Now what I'm gonna
do, first of all, I'm going to remove this. I'm going to tap on my layers, tap on the layer and say clear,
that removes everything. We're gonna go to
the sky blue color. And what I'm gonna do
is I'm going to put the brush on its largest. And I'm just going to add this color like this everywhere. And if there are
some white grayish coming through, that is fine. That is my first
layer basically, but it doesn't look
like a sky, does it. So what we're gonna
do is of course we're going to add a little
bit of sky colors. We're going to take that
sky grayish blue color. And I'm going to just
dab a little bit. And I'm not painting
as you can see. I'm dabbing in this
color a little bit and we're going to
go for some sky gray. Let me go to a little smaller, about 50 per cent. Little bit DID may
perhaps some clouds here and there they go. What's the other color? Oh, sky warm color. Let's add that too. And there we go For
now, this is good. I want a little bit
more of the blue black, blue black blue back. So I'm just going to dab
some blue here and there. And for a sky, I think
I'm fine with this. What I want to make sure
is that on the water here, there is the blue nicely. So if you have painted on the mountain some
different colors, that's okay, but makes
sure we're going to move. This stays nice and blue because we're going to use
that same color for the water. I think my sky is
totally fine like that. The next thing is we're
going to do the mountain. We're gonna take the
reference with it. And for that we're
going to tap the ranch. We're gonna go to Canvas. We're going to say
reference photo. Then we get our reference, our Canvas we're working on, we don't want that,
I want the image. So we're going to
tap on Import Image. We're going to
select that image. And by sliding this, we can move this, we
can enlarge this. And we can actually make this smaller and let's
make that smaller. Moving a brush, don't want that. If your finger, you can resize this just as with Procreate. All right, that's okay. Now I've got a reference
with it for the mountain. Let me move it right there. And I can see a little
bit of the mountain, a little bit of the
colors I want to use. Now for the mountain, I
need a new layer above the sky and I'm going to call
this mountain of course. So I'm going to say
remained rename mountain. And there we go are mountains. For the mountains,
we've got a few colors. We're going to start
with the lightest color, the mountain warm gray color. What do we have for
size for the brush? That is fine. We're
going to stick to that about 50 per cent size. We're just going to paint
roughly this mountain. Let's see. I'm gonna go like that here. Another skirt on the
bottom a little bit. And that's the first
color of our mountain. And right away, you can see this looks like a scene
already a little bit. Now you can see also the clouds better because we've got
this mountain color. The next thing,
what we're gonna do is I'm going to skip
the mountain gray, I'm going to the
dark mountain color. And on this bottom here, I can see it is
quite a lot darker. So I'm going to change
the size to about 17 and paint in roughly some of this dark color on
the bottom here too. I wanted on here
to say old others, very sloppy, but
that is okay for now because we're going
to use the blending. And even a little
bit, there you go. Now, the next thing is,
this looks terrible. I agree. You tap the hand. You select the hand, you tap it again and what
you're gonna do, you're going to select
the same brush. So you're gonna go
to painting and select Duke wash brush, exactly the same brush
we're going to use for blending so that we keep those
same strokes a little bit. Let's put it on
about ten per cent. And what we're gonna do
is we're going to blend this in a little bit nicely. And as you can see on
this mountain here, there is a direction
and we're going to use that direction with our mountain to
blending these colors. A little bit nicer. Day, go get more of
this paint strokes. They're looking a lot more
like paint strokes now too. There you go. That looks a lot better
as a mountain, does it? No. It doesn't have to
be dead accurate. Just licks. It
needs to look nice. Now in spring, at least
here in the Netherlands, the weather can
change drastically. Yesterday, it was 16
degrees, beautiful letter. Now it is about eight degrees. It's called rating and it
might actually snow tonight. They say, Well,
that's spring here. So we want to bring
in a little bit of the coal to while we're gonna do those nice
sprinklers on the mountain, we're going to just
put some snow, the residue of the snow
from the winter on that. Let's do that. For that snow, we're going to use that warm the mountain
grade at lighter gray. And we're going to
add a little bit where the snow would be. Let's take a smaller brush around nine per
cent, I would say. Let's start with the peak here. And do this peak a bit nicer to. And later in a minute we
might just blend it in again. This is not the snow, obviously. This is just some nice light
color for the actual snow. What we're going to use is
we're going to scroll down and we're going to use
this white gray for snow. This will be a wide, we're not going to use white, white for anything, but a
little bit of white gray. And we're going to add dab in a little bit of this color here. C, and now you get the
snowy mountain tops. Day you go, but there's not only a snowy mountain tops here. We're going to make
sure we're adding some snow on some of the
lower regions as well. Just a little bit. And I think I might add a little
bit snow there to. There we go. And now the next thing is, we're gonna go back to
our blending brush. I don't think we're going
to change anything. Ten is good and at the
end we're going to blend in the snow a little bit nicer. And as you can see, I'm
not blending in like this. I'm still dabbing in a
little bit so that I get some nice brushstrokes using some short-term
brushstrokes. I think I might
actually like this. Looking good. This is a bit too high, so I'm going to lower it by blending that in
a little bit better. And I think I want
some snow around here. So going back to the
brush, adding some snow, and then I'm going to
blend this in right there. Now. That's good. Okay. Now on the sky, I might want to have
some lighter clouds to, so let's return to the sky. That with that same color, get a bit of a larger brush. Now I don't want that down here. I want to make sure
the snow stays. So what I'm going
to hide the sketch, I want to make sure that the mountain clearly
stays in there. There is some contrast between
the Sky ends the mountain. But what I'm gonna do here, let me see I'm on the sky. You want to add some? I'm still on the blender brush. To add some. That is way too small. Clouds go large. I probably made that this
really large. Yes, I did. So let's see,
around 40 per cent. And just again, same thing, dab in some whites. And now that looks a bit nicer. Let's go to the blender brush. I like that size 50%. But let's put it
on really low so that it doesn't
blend that strong. So I've got it on nine per cent. And let's blend in a
little bit of these edges, especially day you
go not too strong. So we keep a little bit
of dose, nice colors. And I think I'm fine with this. Yeah, we've got a
nice contrast between the mountain might do something really dark colors at the
bottom of the mountain. So let's go back
to the mountain. We've got that mountain, middle gray we haven't used. Let's add some of this color. I'm about 13%. We do debts. Or it might have actually
used this color before. And the next thing
is I'm going to add some of this dark
color at the bottom. At the horizon line. Get the sketch back
so that we know where our horizon
line actually is. Going to lower it
to five per cent. And really, I'm going to add
a nice strong line here. As my horizon line. There you go. And our profusely, I will need some blending. Not that large. Go back to 100%, 12, 13% work. And where I've just added some, I'm going to blend it
in a little bit better. Alright, let's take
a look at this. I like that. I'm
going to stop here. Now obviously, we're not
going to stop painting here. We're going to stop
the lesson here. We've got our sky,
we've got a background. In the next lesson, we're
going to add our foreground. We're going to add that water. Well at least work a
little bit on the water. And then later on we're going to do the tree and
the Schwann cell, of course, Well, catch up with me if you
haven't follow me along. And then once you have this and I'll see you in
the next lesson.
4. The Foreground: We've got our mountains, we've got our sky. That's only half of the painting suffered
of the painting. We're gonna do the foreground, we're gonna do the water. And then already this starts looking like a really
nice painting. Well, even if we
only add to ground, we already have the distinction between sky, Water, Mountain, and foreground, because we
already painted in watercolor, at least a basic watercolor or that is in our
painting already. Well, let's continue
with the foreground. Now. First of all,
I'm going to hide my reference because
the reference has four colors and I'm
not having a full image. I want to create a spring
image from this full image. So I'm going to tap the wrench, tap on that reference slide
at button and their colonies, my reference so I can
focus on creating my own interpretation of the photo and turning it into a completely different season. We're going to slide
a little bit down to this section here where we
have the ground yellow, the ground green, the whites,
and all these colors. We're gonna do,
We're gonna start adding that grounds green, yellow on a new layer
on top of the mountain. We're going to call
this the grounds. That's good. Grounds. In spring. The colors are of
course, new and fresh. And once the season
that founders, the colors get darker and
darker and the chlorophyll it, I think it's called an English, is breaking down in the leaves, in the foliage and
you get darker colors and color slowly disappear. But then the green,
everything that, sorry, in the spring, everything that grows new
is beautifully fresh, nice bright colors
and we're going to start with that
right away here. This is slightly
too bright perhaps. But we're going to add a different color
to it in a minute. This will be our bottom are
ground color, the base color. The next thing is, we're going
to add that other color, that ground green to it. And just mix it a little
bit in their day you go. And now we've got a
nice scene already. See we're getting there. Then the ground middle green. I don't want to rename it. Pickets. Just going to add a little bit of the
bottom, little bit here. We're going to create
a little bit of that. Lights affect, want to have
some of that color here too. So that some cases a little
bit of the edge here, but more down, it is
a little bit darker. And the next thing
is I'm going to just take that hand again. And we're going to blend
this in a little bit nicer. You get a little
bit of this paint strokes that we go
and that looks good. I like that. Good. Now on here what I'm gonna
do right away, I'm going to create
shadow of the tree. So I'm going to imagine my light comes a little bit
from this side. And we're going to
get that darker green. That should be there. And we're going to go
for my brush smaller 54 per cent. That's nice. And we're going to add that
down here at the bottom, at the end of the layer, little bit at the bottom, sorry, bottom of this layer off
this little bit of a hill. And the tree will be casting
a little bit of a shadow. There you go. And then we've got some leaves going here to
some of that tree here. We're going to pretend a
little bit of a shadow there. At this, a little bit darker. And now we get, sorry, larger and get that hand. And blend that in. Here too. A little bit like this. There you go. That
looks nice here to blended in a little
bit like that. Right? Now we're getting a little
bit of a shadow effect, some dark colors, some
lighter colors here. A nice thing. The next thing, what we're gonna do,
we're going to add a layer on top of that. We're going to add some flowers. Rename this for flowers. And what is just
pretend there are some snowballs growing here. So this spring, we're
going to stick to that dark green
color because we're going to add those leaves first. And what we're gonna
do, we're not going to paint actually had in, we're going to just
give the impression. And for that, we're going
to lower the brush. I need to brush. Let's try 4%. That's way too big. 2%. Let's try that. Yeah, I like that nice. And we're going to
just add some clumps. And we're going to add
the weight bite in a minute here too and even
hear that still would work. I'm just dabbing this in. At a few here to right there, wherever you like them. My goal sum here. The next thing is we're
going to go to that, not that wide, wide,
but the white gray. And with the same size. I'm going to add some
flowers simply like that. Since we're working
on a postcard or not. Yeah, definitely. It
is a large landscapes. So we don't need to have
all these details in it. We can really get away with just creating
some simple things. And as you can see, just simply when you look
at it like this, you're going to, your
brain is going to say, hey, those are flowers. Even though there
is no flower there, your brain basically tricks you. And we are making use
of depth perception by creating some
flowers like this. Now the water, the water
is nice like this, but it needs some tones too. So we're gonna do that too. But we're going to do that under the ground because the ground is on top of
the water, of course. So we adding a new layer
on top of the mountains, we're going to call this water, or you could call it a lake. And we're going to
play a little bit with colors in the water too. Let's see, where are other
watercolors dedicated? The watery gray.
We're going to start with the watery gray. Select it. Let's see the brush. How large do I want it to? Around 15%. I was probably
that is not a dewater grade. Definitely not. That is still that light gray. I want dewater gray. There you go. That's better. Let's
remove this two fingers. And let's try again, right? That's better. Again, same with the Skype
on a seamless the mountain. We're going to put that
in roughly the sky we didn't do roughly. That's the first color. Then what we're gonna do is, let's go for a water midtone. Basic little bit
around the edge there. And down here, I want that
mid tone a little bit. And I want some dark
tones in the water too. Bit of shadow under here. And where the tree would
cast a little bit of shadow. And let's add some shadow
there too and the rest. Pretty much okay with. And the next thing is
what we want to blend. We're going to use
a large brush, 43. Will that work? Yeah, that would work nicely. And I'm blending it in right
away in one go like this. And I like that a
nice Stillwater. I want to leave it
like this for now. I'm okay with this,
some nice tones. And as you can see,
if I hide the sketch, now, we're getting a painting. We're getting some
mysterious part here, which we got a fix, of course, in the next lesson. But for now, we're
done with this lesson. That was easy, wasn't it? We've now got a foreground. We've got our water, we've got
our mountains and our sky. The next part will be the trees. I'll see you in the next part.
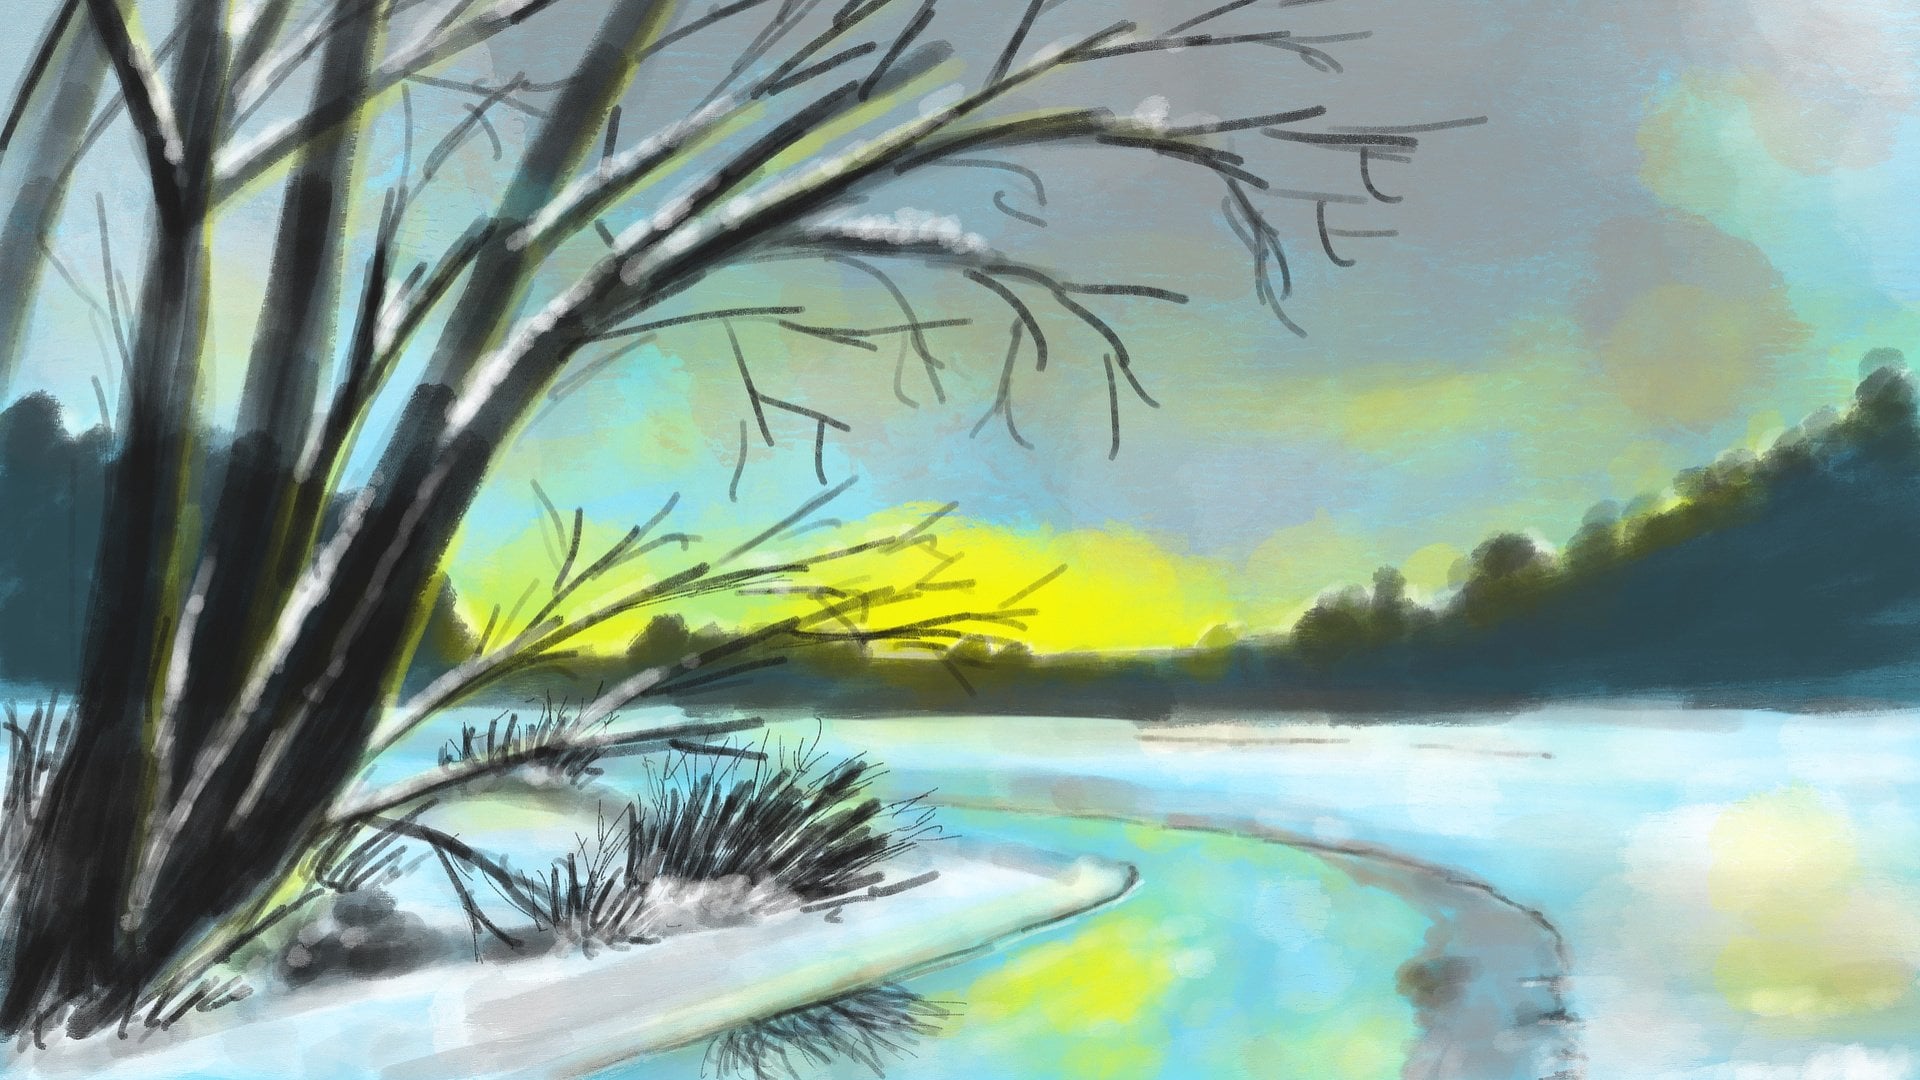
5. The Trees: Our painting is
already starting to look like a nice
landscape painting, but we're missing
some focal points. We want to bring in some
points we can focus on. The first focus will be a tree, a tree on the side, and a
tree on the other side. Won three really on the side, side on the right and the left
one slightly off the edge. And then of course
we need ghosts. Wants to compliment
this painting that a little bit more
of a spring feeling, even more than when
we do the trees. But let's start with the trees. For that, I need to
bring back my sketch. I need to have a clue where
these trees are going. There's a tree, desert tree. These trees are on
top of everything. So I'm going to, on top
of the flower layer, I'm gonna say trace for a
new layer. And there you go. I'm gonna just add
them on one layer. Now, for this one
we're gonna do next is I'm going to need that
same brush of course, but I need it smaller and it
needs some different colors. We're going to start with
the tree light color. Now I've kinda
selected, Let's see, I've cut my brush
on four per cent. Now that is too
small for my tree, that would be good for
the branches up there, but we want to slightly larger. Let's try a 7%. I like that. 7% is a nice for at
least the main trunk. One. It's slightly
wider. There we go. It's not it's not a, if we take the reference with
it back again, it's not a fig tree. So I don't want to have
a y fixed strong tree, it's just a thin tree. And I think that is fine. What I have now might
even be too thick or any. And I hate to reference again, you could work from
the reference. Of course if you wanted to. I'm going to now go
to the four per cent and add some of
these main branches. Not all the way. And this one, this
one a little bit. Here's a branch going there. I think I'm okay with
this. Let's see. Might wanna go up with that
for yeah, that's good. Now some of these branches. I once for two. There we go. And that's good. And let's lower this to 2%. And I'm just
following the sketch. But if you want to
deviate from the sketch, you no problem, you can do that. You want your branches
to look any different. Of course, your paintings, so you can change
whatever you like. I don't think I'm gonna go less than I think I may want
to add a level there. No, Why not? An unbranched going down. And though we have
all the branches, now we don't have
all the branches, but we're getting there. That one a bit
thicker. There we go. Let's do decide to need to get some better
connection with the others. There you go. That looks better. Needs to be slightly convincing when I'm doing a very realistic one. But we still wanted
to be convincing enough so that it looks
like a nice landscape. There you go on nasa
branch going there. I think I've got them pretty
much all on this side. Let's do them on this side. There you go. And that is definitely
our first layer. A little bit more tree-like,
bit more convincing. Let's hide the sketch. And there's our tree. And there's the tree
on the other side. The next thing, what
we're gonna do, we're gonna add
some darker colors. So we've now used
the lightest color. We're gonna go for the
brown light color. Starting at the end. I'm going to give some better definition
to this tree so that it is clear
which branch goes where. We're going to mix this in. Slightly better. Let's see. We're going to start
with this one here. This one where there is no sun. We're going to add
some darker parts and just create this into
slightly more convincing tree. This is a thick branch two. Alright, good. Perhaps dead one a little bit. Now we're going to slide it
down to 1%. Then I want it. These brands just a darker side to this one goes in
front of everything. That's starting to
look a little bit like a tree or a little blended later on too, so that it fits in with the
rest a little bit better. But for now we're just gonna
keep on going with this. And also make sure some branches got in front of other branches. Some branches go behind
other branches again so that you get a little bit. And DAD, the sense of
a little bit of depth. Alright. Let's put that
one in front of it. Then we're going to have
this one behind it. See this one. And now we need to go
to the other side. That one cost in front of it
and this one goes behind it. Now I went through it. I don't want to with that. Let's put this one in
front of that one here. This one goes in front of these. Alright, and she can
probably noticed already, this takes a little bit longer. I don't want that on this side, the light is coming
from this side. I want it on the back. This takes longer than painting in the mountains
and all that stuff. Just goes behind it again. Alright. That is no good. Little bit more on here. Okay. And we're gonna go
to the next color, that dark brown color. That is painting that
in a little bit to you go basically to get some
column nuances here and there. Well, some notes wherever I forgot some parts. I think I want it a
little bit more on here. There you go. And right there. I want something too. I think I'm okay with
this little bit here. This needs to be
turned into a branch. A little bit better.
This too. There we go. We need here. And the last color will be that tree dark color and
the three dark color. I'm only gonna do
right at the edges. Okay. Just one when in front of it, this one goes and
from that again. And this one is behind it. I think I'm okay with that. Let's do that here
to ride the edge a little bit down there. Just a little mostly
on the edge here. And that's nice. Let's stick with
this site first. Disk goes in front. This one goes definitely
in front of that one. This one stays behind. And now we're having some
nice tones on this tree. And only in a minute
all going to blend in. Because it kind of looks nice, but somehow a slightly
out of place. I want to say, there we go, Good. Right here. Some more. Here we need some I want some there. Good. I want a little bit of that brown color right there. And a little bit more there. So that gets a little bit
more color or otherwise, the blending doesn't
go that nice. I think. I'm okay. So like this, the next thing, what I'm gonna do is we're going to take that. And again to blend
it, gonna go small. I don't want it that strong. Let's go for, let's see, 22%. So I've got it on
four per cent of the size and 22% for blending. And I think that is pretty nice. Good go slightly
stronger with this. Well, I think this will
work now on these branches. In a sec, I need to go smaller. I'm going to go a
little bit stronger. Let's go 45 and a size of
two per cent. That's nice. And I want to blend
in these colors so that these obvious strokes, these lines a little bit
more into strokes like this. Because then it fits in a way
better with the rest of it. Instead of having small lines, we want to have some larger
strokes. There you go. Now if you want to have a very
detailed picture painting, what you could do is
do the same process and then go over it with a fine brush to bring
in some details. I go definitely didn't do this one. Go to 40 small, no, 1% doesn't work. 2% is fine. And how about debt? Right? See more? I'm okay with this
one, not this one. That needs to blend in
a little bit nicer. I need to blend that
in a little bit. And there's a really
dark, obvious line there. I don't think I've blended
this in. There. You go. Up here a little
bit. Definitely. Alright, forgot this one. Good. C and now it looks
fits the rest a lot more. Let's do the same here too. Leo. While for that bottom part, we could use a
slightly larger size, but well, let's
go with this one. Keep on going with it. All right, good. I think
I'm okay with this. And there's our trees. Let's check this. I don't like going
to blend that in. Slightly. Nicer. Give it some shape at the bottom
too. There you go. Now, these are only the
trunk and the branches. This doesn't look
like spring yet, so we need to add some
leaves and of course some blossom to really make
this look like spring. For that we need a new layer and we're going to call this, let's call this blossom. Why not blossom? And there we go,
blossom for that. What are we going to do first? We're going to find
that blossom pink. I've got two things, a
dark and a light pink. We're going to start
with the dark pink, and we're going to
add some blossom. Now it is on 1%, I would say that it's too small. Let's go for two per cent. Let's see if we're going
to add some blossom here. And just stipple
that n, like that. Yes, and that's
just what I want. Good. And this is going to take just a few minutes
to add Blossom. And we're going
to want these are the mostly at the
end of the branches. That's where they go. Slightly inside the branches. Now, this looks like
a spring tree a lot more than without this map. You can how many
you want to do if this is totally up to you. You want it to be a bit sparse or you want it
to be full and blossom? Well, whatever you like. I would say. Go for that. Just don't use strokes
like that because then you're gonna get
strange blossoms. Really. Only use. Now I'm going
to leave it like this. Good. Only use the stippling
and do this tree to. And even if it's not
completely connected to, to treat that is totally okay. Just reminds you, imagine a lot and AD,
imagine these AARP. Really small branches
your eyes can't see. Let's give this one
a little bit more. Ip. There's warm to do that, right? That's nice. Let's see, I have a gap here. So let's go with some
blossom dare to. The next thing is we're going to pick that different color, that light blossom pink slip, and then prepare that a little
bit more to it as well. Pip. Oh, just using a technique
simply called stippling. As you can imagine why
that is called stippling. You can see this is
just all of his random. To make this even
more convincing, what we're gonna do, we're gonna add some of these blossoms. On the floor as if
they have fallen down. And since this tree here, we can add them around here too. I'm going to pick that dark
color to Lawson pink dark, some in-between C and now it looks convincing that some of these have fallen down. Let's go back to
that light pink too. Just a couple more at
the base. There you go. And we get that spring feeling. Now the last thing,
what we're gonna do, we're gonna add some
leaves to this. For that, I'm going to add a layer under the trees itself. I'm going to call this,
of course, leaves then. So that I have a
clue what I'm doing. And I'm going to
add the mid green, is mid green to it. I'm going to go up
a little bit in size around 3%, I would say. Just behind the
blossom a little bit. Also on some other
spots on the tree. We're going to add some leaves, not too many, because
it is still spring. So this tree is not
yet fully lift. Now, you can't say that I think doesn't have the
food leaves yet. It's just starting
to grow, of course. And again, ship, perhaps
a little bit at random. I think that is enough. We're gonna do that
for this one too. And I'm doing this on purpose behind the tree to get a little bit sense
of depth, fun it. Alright, good. Old
we're going to do or that, a
little bit of that. Other green now, that
really yellow green, just a couple Here in there. Just to get a little
bit of a nuance in its, looks nice. Alright, I think we have enough to just a couple
more on that side. Alright, good. Well,
I'll leave it like this. Now our painting
looks interesting, but we need some focus here. That's what we're going
to use swans four, we're going to put them here and then we're going to work
on the water a little bit, get a little bit
more lifelike water since it's now one blend. We're gonna work on that
in the next lesson. A painting is starting to
look good already said, we need a little bit more of a focal attention, 0.1 extra. We've got one on the
side, on both sides. We need those swamps
to really complete this image and give it that
nice spring feeling too. And then of course, that water, that water is to, to play. We gotta do something about it. That's for the next lesson.
6. Adding the Swans: Before we go on to add our final touches
to this painting, we want to paint those swans. Now, we're going to make
it ourselves really easy, even if you can't paint at all. Should have seen already so far, you don't really need
to know how to paint. Just follow the steps. You get a beautiful painting.
Same with the swans. I want to show you just
a simple little trick to create some pretty
convincing swans, even if you can't
paint the door. Now, if you want to have a
real challenge, of course, get that reference, start
painting them from there. But I'm going to show
you a pretty easy way to do it. For that. We're going to need our
swans into this painting. So what we're gonna do is
we're going to tap the wrench. We're going to say
Add, and I'm going to add the swan photo. So Insert a Photo, pick this one photo, and then it comes
into my painting. This is way too large. What I'm gonna do
first, I'm going to take one of these dots, these handles, and give
it the right size. Now that would
still be too large, I would say around that size. So I've got it now on for 76 pictures pixels and 863
pixels around that size. I think that would work nicely. Tapping that ends now it's day. The place I think
I'm okay with that. Where it is now
might move it out. I don't want to have
it in the middle, slightly off the middle. I think this would work fine. The next thing,
what I'm gonna do, I'm gonna just move this
image on top of everything. I'm going to press on it and I'm going to
slide the Opacity. 40 per cent works for me. And we're going to
add a new layer. And we're going to
recall this name to swans because they're
going to be more than one. Not all might put them on
their own layer, I think. So Let's rename it and say S1. One, S1 only. Okay? Next thing is on this layer
of swan, this one layer. I'm going to zoom
in and want to pick that Schwann gray color. And I'm going to just paint over the painting and everything
where it is white. I'm going to paint over, and
now this is way too large. This brush, I think 2% might
be the right size here. I'm just going to
paint over this one. Don't wanna go
that much outside. I don't want to have it
super extra accurate either. As not nice as it wanted
to be slightly convincing. I'm starting with the
dark color and in a minute we're going to
add the light color to it. I want to do this
all on one layer. Now we're going to only
paint the swan itself, not the reflection in the water. We're gonna do that differently. Now we've definitely got a
nice small brush, go to 1%. Even the lowest,
the smallest it can go and add the rest to it. Now, there's all kinds of
different colors in it. We're just gonna do a simple
impression of this one. And that basically means we're going to give
it just a few colors, not all kinds of
colon new answers. There we go. There's our S1. Now we've painted over everything and have no
clue or other things go, but I think we can
pretty much see it. Let's go for that black color. The S1 has no black, so we're going to use the water dark color or the tree down. Let's go for the water
dark color. Let's see. That would be pretty okay. I'm going to undo it. I'm going to go for the
water dark, tree dark. I think that would
be more convincing. Yeah, that is a better
black. Still have the 1%. Want to paint in all the black now on the tip of his nose, sorry, not nose,
beak, of course. What am I saying? Down here? We've noticed there's the leg. Good. And for the next color, we're gonna do its
beak now. Swan beak. Paint that in one
simple color again. Yeah. Good, and if I hide
the photo now, this is what we get. It's not done yet, but
we're getting there. Might have this line
slightly less thick. The ego blend it in
slightly better goods. And now I can go
back to the swan gray and see some
water coming through. I may want to add
some of this color on it a little bit better. I'm going to go to larger
brush that makes it easier. Right? Now that's one
part of the Swan. Now we're going to
bring in the white. Alright, see, and now
it's looking like S1, S0. And that gives a nice attention
point of attention there. Some focal points. Good. Now we're going
to find the white, the light gray we have. The white gray. Don't
want to rename it. I'll only want to select it. Now on the swan, what we're gonna
do is on the edge. I'm on, add this color to it on the head a little bit
for that she could bring back the reference picture. So let's get the reference
picture above the swamp. See if that works. Then we need to lower the
opacity so that I can see where I want to add some
light colors definitely, of course, at the back. Oh, am I under swan? Yes. I'm on the room
in which I don't want to paint on that one. I need to make sure I'm
on the swan layer itself. Good. That looks nice. We're going to blend
this in a minute to make it look really good
enough for the next thing. Let's see, we have
the swan gray. We're going to take
the water mid tone. And right, where there's
some shadowy parts. We're going to add some of that color only to
bring some depth in it. Once I'm there two, Good. Now we're going to
hide that image. You can see it now. It already draws our attention by the colors, but we're
going to blend them in. Of course. Let's
see, around 50%. Size is on, I don't
know, 1%, 2%. I'm going to blend that in
carefully with the black. I'm blend this in. Really nice to the ego and no one is looking a lot better. Some color nuances in it, some tones here and careful around this bit to
that is the lack of the swan. We don't want one debt to
blend in completely ego. Let's see, let's bring
this up a little bit. Let's take a look
at it, seeing that looks a lot better,
only hear 1%. Want to blend this
into bit nicer. Connects the head a little bit. Hey, go on that. So S1, the back here. A little bit. That looks good. Now we're looking
at the painting. See, that adds something
really beautiful. Now I don't only want one S1, I want to swan, I want a couple of swarms in the spring that is
much better than one lonely swung want this
to be more spring-like. And so, and often, often, most of the time, swans
are in couples, of course. Of course we need some
reflection in the water. We're gonna do that now
to get a second swan. That is of course, very
easily what we're gonna do is we're going to slide
this over to the left. We're going to say duplicate, and now we should
have two swans. Let's see. The
bottom one is to one now in the back and the top
one is the one on the front. And we're going to move the
top layer. The bottom layer. In this case, we're going to tap on the arrow and
we're going to move it. I would say around
here, that is nice. And we're going to tap it C, and that looks very nice. Just a pair of swans, a couple. The next thing is,
we're going to need the reflection of the swans. Let's see, do I want to
keep them here or do I want to move them
up a little bit? Now? I think I want to
just sign with them here. Now we have two swan
swimming in the water, but of course reflects
in the water. So what we're gonna
do is we're going to select the layers. We're going to select
the top swan and then slide this
over to the right. And then we're
going to say group. We're going to group
these swans into a group. And we're gonna slide
now over to the left and we're going to
duplicate this group. The bottom group will
be our reflection. So what we're gonna
do with this, we're going to add
select that arrow again. And what we're gonna do, we're
gonna flip it vertically. And today we have
our reflection, but it's on the wrong spot, so we're going to move it. First of all, under D S1 that is on the
front. That is good. Now we're gonna go into that
group tapping on the arrow. And I need that bottom one. And I'm going to move this one till it goes to the other one. There you go. Now our reflection is now of course, the heads are. What's happening with the
swan status. Weird, isn't it? As if this is reflecting too? So what we're gonna do is
we're going to take a eraser. For an eraser I simply use
from the standard airbrushing. I'm going to use medium hard. For airbrush that is fine. The size doesn't really
matter that much. I've got it on 17% and we're actually going
to remove this too. What does ever is
behind this one, the ego and that's good. And for the next one, this one, remove his head. So that is not in she might
do it a little bit further. In the water in the ground. We move this just a little too, and that is bad and not
wish way too strong. So what we're going
to go do with these, we're going to of course set
the opacity change that, press on the N in the layer, change the opacity to, I would say 60%
looks good to me. And the other one
we're gonna do the same 60% and then look, Edit and say, Now that
looks a lot better. See, now we've got a nice one. Might go a little bit. Even back to 49, 45%. That's not right. Let's try 45. Tops 12. A wet cotton
off 45 already. The bottom then. Yeah,
that one, it's 45. Let's see. That looks better. Yes, now it's got
a nice reflection. Alright, so we've
got our swans ready. We now have all the major
elements in our painting. The next thing, what
we're gonna do in the next lesson is do
the final touches. A little bit on the water,
add a little bit of more shadow at some
places just to finish this painting
and create it and make it really
beautiful and complete. I'll see you in the next lesson.
7. The Final Touches: Time for the final
touches on our painting, we're going to take
a look at it and see what we can improve on it. That's always a good
thing once you're done and you think you are done. Let's take a look at
painting and say, alright, I'm really
happy with it, or leave it like this. Or I might add a little
touches here and there. Touch it up a little bit so that it looks the best it can look. Alright, let's start with that. The first thing I
want to change isn't right there in my painting, I see something that
doesn't look nice. So I'm going to the mountain. I want to take that hand. Slightly larger. Seven per cent. That blend that in
slightly better. That's good. And there
was some kind of a blob. Alright, good. What we're gonna do is we're
going to add a water line. First of all, we're going
to the final touches. And where's the water? On the water or above the water? Let's do a new layer
above the water and call this or
to improvements, improvement, fine
water improvement. For that first thing
I'm going to need is the light color again,
that white, gray. And my brush, I'm thinking
I'm going to slide to 1%. Now, first I'm going
to start at the swans. And we're going to
add a little bit of water here right
at the bottom and get some movement going. There you go, see, and that already simple trick improves it a lot and
we'll do that on this one to add some movement to it. As simple as that. Now the swans are moving. They're not static anymore,
but they're moving. I like that. We're
gonna do the same here. And we're going to just
add a shadow line, sorry, not the shadow
light and shoreline. And you may want to just add some lines
under a two like that. So did you get the
idea of water? That is, water is of
course at the world, at the bank of the river
or the bank of the lake, whatever disease is not static. But there is some movements. So we're adding some
movement to it. Now if you want
to, you can move. You can add some movement in some different places,
but you don't have to. You could leave it like it is, just, you could add a little bit of
movement to like this, see, and that just
looks a lot better. And keep in mind,
this is not going to be huge painting like this. It's going to be a small
painting like this size. It's like the smaller
even I think. So. You won't see
all these details. It's all about the
impression we're giving. The next thing, what I wanna do, I want to add a layer
on top of everything. I'm going to remove
that swan image first four on that
group with the swans. And we'll add some
general shadows. My typing, not shadows. I'm going to set
this to multiply. So I'm tapping on the end
and moving up to multiply. I'm going to probably do
this around 50 per cent, I think would be fine. I'm going to pick the
dark black color, the tree dark on the
mountain, the mountain dark. I'm going to do the mountain
dark, not totally black. Alright? I'm gonna go to 2%. I think I'm going to
start with the swans. And we're going to let
them cost a little bit of a shadow onto the
water like this. See, that makes it
more convincing, life-like, I might not too much blend this
in a little bit. 4%, 30%, 4%, 30% of sizes, four per cent and the opacity around 40 per cent blend
this in just a little bit. Here to get back to the brush. I'm gonna do the same here
at the edge of the water. I don't think I need
to blend that in. They just don't press too
hard with your pencil. Get some shadow into the water. Also under these lines
I've painted in. By doing that, see
you get the idea. The illusion of some small
waves going on. Very simple. That you go and you get the idea that there's a little bit of
movement in the water. What I wanna do here, I'm going to go to four
per cent at this bank. I simply want to add
some dark color here. Want to blend it
in on the edges. Just a little bit
better than this. There you go. And I
might want to do that on this side a little bit to add
some shadow on the water. Now blended them going
to 100 per cent. I think for this blending,
that's better, right? Do that on the other side to blend this in a
little bit better, see, and now we've got some, not only blue, white, sorry, the blue smooth water, but some shadow here. And dab, going back to
this brush, smaller 2%. And I want to add some
shadow to the flowers to just a nice finishing touch. There you go. That looks a bit
more convincing. Okay, that's more smooth. You go Good. Might want to add some general shadow, might do go larger, sea around six per cent. And I'm carefully adding
some general shadow. And I want some more
shadow right there. Smoothness a little
bit. There you go. Good. I think I like that. One may wanna do a
little bit on the tree to that is too
large to per cent. No, that is not good. 3%. Bottom of the tree and
at the back of the tree, a little bit like this. Just giving the tree a
little bit of shape. By adding a little
bit of shadow. Like that. They go, Oh, I like that better. Hit to just at some of the bottom of these. Good. I think I'm
okay with this. Alright, let's see, at the
bottom of the mountain, 6%. I'm gonna do that too. And we're going to of course, blend that in a little bit, following the direction
of the mountain. And around here,
I'm doing the same. They're all not on
the tree, please. I want to stronger. There they go. And now I'm blending it in. But again, following the
direction of the mountain. Now I might have
someone on the tree, so I'm going to use the eraser and erase that on this site, the ego, and apparently I
removed it there a little bit. Too much. My blended in
a little bit. I think. I'm pretty happy with this. Well, and that concludes
our spring edition of the goulash
Procreate postcards. We've got two beautiful
postcards now already a one-to-one and
lovely spring one. Next up is the project. So I'll see you there.
8. The Project: Welcome to the project. Now you may have
noticed that there are two more photographs
attached to this class, some folks with some sin it did I forget
to paint them in? No, I actually did not
forget to paint them in. But that will be your project. For the project, I challenge you to add these geese
to the painting. You can do both photos. You can do only one of them and place them where you
think they look the best. A day flight towards the swans, whether they fly away, whether they fly
higher in the sky. I'll leave that up to you. Find a place where you think they look best and paint them in just in the same simple
way that we've done this one. So don't make them
complicated and detailed. Just quick painting. You can use the colors
I've provided or pick your own colors
from the keys. I'll leave that up to you. Once you have done painting,
I would of course, love to see the complete
finished painting. So please do post it in the project section for
all of us to enjoy. And if you want to help me even a little bit more
than I would say, leave a review so that I can
get some feedback class. And so that others will find this class more easy to see what other students think
of it and just encourages them to follow
the class as well. Thank you for being
with me in this class. I hope you really enjoyed it
just as much as I enjoyed creating this painting and then creating a lesson about it. If you haven't done
the winter edition, I would say do that too. Or if you just want to do
something completely different, I've got a lot more
Procreate classes here for you to
enjoy on Skillshare. Well, again, thank you
for being with me in this class and I hope to
see you in another class.
 Benjamin A, Art Teacher, illustrator Art by Benjamin