Transcripts
1. Introduction: We're going to do some oil painting in procreate. My name is Benjamin alchemy and I'm an artist and illustrator and teacher from the Netherlands. I would love to teach you how to oil paint in procreates. For that, we're going to paint a beautiful autumn scene together. Now I've prepared the sketch already so that we can save some time and really focus on the painting. If you don't have oil brushes, don't worry. This class supplies them. And not only the brushes, but also the autumn colors in a nice palette is all in this class. I'm going to show you how to build up your scene to get a really nice oil painting, starting with the underground. Backgrounds. Slowly moving towards the foreground, adding some details, throwing him some light and some shadows, and topping it off with a nice canvas. This class is divided in various lessons, and each lesson builds on the previous one, but adding something new and exciting to it. Now normally, oil painting would take quite while and delays dry weight of the, the next step, procreate if instant drying. So we can keep on going and keep on having fun and create two. It's something really beautiful. All right, I'm done talking. I would say go to the next lesson where I'll show you how to get all the supplies into procreate and then start painting. Alright, see you in the next lesson.
2. The Sketch, Brushes and Palette: Before we can start with this oil painting, we need some things now, obviously you see me holding it. Prefer using a Apple pencil. You could do it with your fingers, but it's really preferable since this will control the pressure really well. You're going to need, of course, an iPad, which works with the pencil. And we're going to need some other materials. And those materials, what have you you need is on the Skillshare page of this class. So let's just go through it and I'll show you how to download and how to get this into Procreate. You gotta go to the Skillshare class. And then here you see about refused discussion. We need this one project and resources. Now as soon as you select that one, you see three things. Him, Autumn oil painting, procreate, ABB, oil brushes, autumn oil painting swatches. Now this is the color palettes. This is the brush set, obviously, and this is the sketch we're going to work with. So let me choose that sketch. We are going to start with that and all you have to do is, I'm working in Safari now. And this is finished. Yes, to click on it. And it asks you, do you want to download this? Yes, I do want to download it. Now we see here that it's downloading. And now this thing just told me, Hey, it's ready. This arrow just as if there's no bar on it, just click on it. And it tells you what the downloads are. And let's start with this one. Press on it. It's going to import this automatically into procreate and dairy this. All right, now the first bit was easy. Now we have the sketch ready, we have the canvas. We could start painting. We need those brushes and that pellet. Let me show you that too. All right. Let me go out of Procreate. Go back to Safari. I'm back at the Skillshare page. The next thing I'm going to download is the brush set. And that's me download the brush set. It asks me to download it. Yes, I want to download it. Now discourse really fast, tells me it's ready. I click on the arrow and the circle. There is the brush set if I click on it. So it brings you to download tried away and now you see, you have to find the brush. Now, the easiest is click on reasons. Now I see it's standing there, but if you can't find it, click on reasons. It's gonna give you the last things you've downloaded. As you can see, I've downloaded that Procreate brush and I'm going to just find the brush set. That's the last thing I downloaded. I click on it. It's going to import an hour of all as well. On top you have a set called ABB oil, and there it is. The last thing we need is the color palette. So we're going to download that now till shouldn't be too hard. Follow the same procedure. Let's go. Okay, going back to the Skillshare class, a garden hose, that little player. And the last thing I want to download the swatches, It's going to ask me again, do you want to download? Sure. I want to download and it's ready already. And I say, okay, the swatches, I click on it again, takes me to the Downloads. Now I'm not seeing them right away. So what I do is I click on reasons and there they are, the swatches. If I click on it, it imports it in, Procreate. And if all goes well, you should have at the bottom a new palette that is called Autumn, autumn oil painting. And those are the materials yet now I think we have everything. We have swatches. We have the brushes right there, and we have the sketch. Okay, that's it. Now we have everything we need in Procreate. We're ready to start painting. So let's go to the next lesson. Have some funding painting. See you in the next lesson.
3. The Underpainting: Welcome to this first lesson. We're going to dive right into it. We're going to do some oil painting in procreate. If all is well, you've downloaded the file, so you didn't have to sketch. And the canvas we need later on, you've got some brushes here. I gotta man subpoenas, not a brush. Brushes in Procreate. And if it is while you have a palette too, so well. And of course, you have your pencil and your iPad and things like that. So we have everything we need. So let's go and paint a beautiful autumn scene. Procreate. Okay, yeah, if you can see I've got the file two, so let's open it. And when you open it, most likely the file looks like this. That's the schedule it and there's the background on it was not a background, it's an overlay of a canvas. The first thing we need is to make sure that Canvas is gone. And we have a layer start here. That's where we're going to paint. We have the Canvas and we have the sketch now the canvas we don't need at this moment, we only want to sketch. The best thing to do now probably is to slide this to the left and lock this layer so that it won't be in the way. Before we lock it. Hang on. Let's unlock it. Let's see how much it is we can do. Little bit less strong. So I'm changing the opacity so that it's not that obvious the sketch bit less, alright, and now I lock it. And our Kant for accident, draw on that. You could do the same with the Canvas Lockett's, so you won't get any accidents. All right, That's the canvas. Now, here's my drawing. The toadstools, the branches and everything, and the leaves on the ground. And we have some brushes, of course. Now you've downloaded ABB are Dr. Benjamin oil and you see a number of brushes in here. That's a pencil it in case you want to sketch yourself something, add to it some smudge brush and a number of oil brushes. And we need a pellet. And the pellet is, if you downloaded it, most likely at the bottom of all your palettes, if you download it now, mine, it won't be there magnets on top. But if you downloaded it, it's probably on the bottom. You need to select that autumn oil paint. You set that as default. And then you go to the disk and we have the colors. Now the first thing you do an oil painting is create an underground. That's what you do in traditional oil painting. And we're going to do exactly the same in Procreate. Now we're not going to do exactly every step you will do with traditional oil painting, but a lot will come back. So let's start with that under painting. Now, we're going to create an underpainting and we're gonna do this on the Start here. And what I'm gonna do is with that, I'm going to just rename that and let me call that background. Because what we're gonna do, we're gonna use the underpainting as background right away to and there you go. Now, I want to have an underpainting under this. And for that, I want the brush I want to have a flat brush, that is the oil paint flat brush. I'm gonna select that one. The color I want is this green. And I'm going to put this right there about, let's say 60 around 60 percent or one we're going to do is just paint the background. Now if all these brushes, if you press a little, you get a little, if you press hard, you're going to get something like that. And if you go over it again, like oil smears out like that and we're gonna make use of that. I think it's big enough. I wanted to get rid of this. So two fingers gets rid of everything or you could use these buttons down. Alright, so I'm going to just paint lightly, so I'm not pressing hard but paint lightly. A little bit of background right there. So this will be my underpainting. And right away I already more or less need to decide where I want my light to come from. And what I want is my lights, I want it to come from, decides that's the nicest and this would get nice bright, this nice bright. So I'm going to at this a little bit darker and I'm pressing a bit harder bottom, then I'm pressing light again to smear it in. So I'm pressing hard and then I'm pressing lights to smear it all in. And I'm getting a nice, interesting background and a nice good on the painting too, so that most of my white is gone. I mean, moved at a little bit and a little bit here. Now, you could do this a long time. But I'm going to say, I'm pretty much happy with my underground. Like it this way. It looks good. So a little bit darker here might go this corner slightly darker. And behind there, just a little bit darker. Smear it out. A go. I my pencil squeaks a little bit. And there we are. I'm going to leave it like that. That's the first step. Alright. That was an easy step, wasn't it? We've now got our underpainting. And from here we can start building on top of that, creating older layers that will go above debt. All right, that's it for this step, quick and easy. I'll see you in the next lesson.
4. Painting the Ground: We've done the first step, so now it's time to do the second step on this under painting. We have we're now going to do our grant. We're going to start with that. And what we're gonna do is start a bit in the back and then slowly move forward to what is important. So the deck will be a bit rough. And the more we get to the foreground, the more detailed we will go. Alright, so let's start with that back. Well, we did the background, but let's start with the ground now. Alright, I still got this. Now the ground is around here, according to my sketch, this all is the ground. And what I want on the ground is of course, a lot of autumn colors. For brush. I might stick to this flat brush for now, since it's nice and large and what I'm gonna do, I'm gonna pick a different color. And we've got some more autumn colors and we're going to start with this autumn. You add up, what is it a bit pinkish, reddish color. And we'll paint in, first of all, a layer with dark colors. So what I need above my background, I'm going to need a new layer and I'm going to call that. This is my ground. This will be the dark colors. And then later on in the next step we're gonna do a layer above that. We have light club, white clouds, no light colors. All right, Now I want my brush to be a bit smaller. Otherwise, I have don't have much controllers go to about 40 percent. And I'm just going to paint in this lightly. I'm going to start lightly again, my contour and it's going around there. And I'm just adding this more autumn colors to my background. All right, it's quite light now, but now I've got my where I want it. And now I'm going to press a bit harder and I'm gonna go really nice and dark with this. And again, this will be quite rough. So that's and that's okay for this. So I'm not going to do everything neatly and nicely there, just a rough background. So I've got that. Now I want to add some more dark colors to it. Let's see. It's got this pellet here. Might just pick some browns in it. Press a bit harder, mix them in. And we'll just mixing in more or less our background, our ground, what the background. We've done that. And let's see. What would we want to split a bit of this color. And I'm gonna go a little bit lighter and add some of the dark coloring. Smear it in. Just a few dashes here and there. Alright, bit here. Good. And those would be my dark colors on the back. I'm going back to that first color. And ulna go a bit bigger again to about 40 again, and blend that in a little bit. Now I'm going to go lighter. Sorry, is smaller. And I'm just pressing some random splits here and there color, and that would be my background. Let's add some more dark splashes 2, we're going for this color here. And that gives the idea that there is on the floor later on food, at least not the leaves are right there already. We're going to paint them in later. But on the floor we want just that hint of lease, even a few really dark red ones here, but small, bit larger. Let's go about 50 percent, but let's lower the opacity to about 70 percent. There we go. And I want to smear that color in a little bit. And there we go. Now that looks good for our background, at least for the dark colors. All right, that's my dark colors. Now. That is pretty intense dark. But what we're gonna do, we're gonna add some light colors to give some hint of light falling here and there. And for that, we're just going to add a new layer on top of it. And we're going to work with a bit of a light color. Let's do that. So first of all, let's add a new layer and we're calling it this is the ground. But this will be my light colors, lights, grounds, lights. That's good. All right. Then let's select a light column. Our light color would be this one. Nice light color. I'm sticking to that brush now, let's go for a different brush. Let's go for this oil paint and depth. You have two choices. We're gonna go for the oil paint depth. Now it is on 22 percent. Let's see if that is large enough and otherwise, we're going to enlarge it. We want to just add a hint of light colors. Now if the light comes from here, that means that behind there this would be a little bit dark. But around here there would be some more light and perhaps a little bit streaks of light and on top of here too. So what we're gonna do is I'm just going to add some random bit of light colors here and there. That's nice, good. And let's do, So. Let's say there would be some light coming through here too. And I want just little lights there too. And I'm just pressing, I'm sure you can hear pressing lightly on the screen. I want to mix this in a little bit. So then I'm painting again very lightly and decor now, that would be good. I want a little bit of light in-between there, I would say, and that's good. Perhaps even just a little bit of light behind there. Good. And maybe in the corner here and that's good. All right. Okay. There will be our ground as simple as that because this is just all in the background. And we're going to move forward a little bit. We're going to work on the leaves and the branches now. Have some fun with it, but we do that in the next lesson. So once you've done with this, then I'll see you in the next lesson.
5. Leaves and Branches: We are going to work on the branches and the leaves in this lesson. And how we're going to add some color variations. And we'll come see this painting already a little bit to life. More than just some blurs and smears of color. Want to add slightly some details. All right, Let's do that. Okay, we've done this so far. So we need a new layer. So we're going to add a new layer and we're going to call this layer branches and leaves. There you go, branches and leaves. Now, that's a new layer. What I'm going to do next is I want to hide these layers under it. So get my sketch comes back and I can see clearly where I want to paint. The brush I'm going to use for this is this one the Old Paint Round, since that will give me a lot of control over some more details. Now, we've charged will start either with these leaves are going to start with the branches. Let's see why not start with the branches. For the branches, I'm going to use this color here. And I'm going to paint that as an under color for the branch is slowly going to add more color, but this will be my first color. And now I got to see if how large these brushes, that's way too small. So I'm going to go to about 17 percent, pretty much like that. Some lightly colored this in again. And we're going to just roughly paint these branches in. Now same as really with the underground. I'm just adding really much an underground. That will be my guide from where I'm going to work on. And now I need to go a little bit lower. I'm getting about 8%. Do these smaller ones. That's too large, probably 8% do this one. Some of the branch behind here, adding some color to this one. So you know, going back to about 19%. Now, not forget this guy. And there we go. And I'm going to go really small. What do I have about 45 percent to paint in these small branches. Now if you go slightly thicker than what this is, it's not really a problem. My code bit smaller here. Alright, and I need some color there. Let's see if I'm, I'm happy with this. And what I'm gonna do is for that, I'm going to turn off my sketch and we're going to look at my branch and say, are these look pretty nice? I'm going to add a little bit there and just check that one should go down, this one should continue there. That one goes over it. Make sure I painted over it. And there we go. Now made a slight mistake. Well, need an eraser. I'm using always the airbrushing for my eraser. For whom? For what I did is I made a mistake right there. This branch is cut off. So I need to erase that. And then I need to raise this to not as strong as that right? Now, Let's hide now it's good again. Now I need to make that a little bit of around again. There you go. All right. That would be the underpainting of my brushes. And I'm going to work on top of this mixin, a different color. Sketch, the sketch back. All right, now I've got my light color on the branches. I want to add in some dark colors, mix the light and dark a little bit gift right away. The perception of light going on, some shadows going on, light and dark will do that. So I've got this now, I've got the light colors. Now I want some dark colors. So I'm kinda pick that color for my branch, that brown. I'm going to set my round brush till about 67 percent. And I know that my light comes from here, this side. So that means that, for example, the top of this branch that will be dark. So I'm going to paint in. The bottom of this branch. And a bit more data. And careful that I don't go too strong for now. And I'm gonna do the same with this branch. Now I'm going to say around here, it's getting some light and the rest will be pretty dark. And now I'm mixing in this column. And there you go. Now, this one wouldn't have much light on, both will come to that. Let's see. This one isn't easy, one to shadows there. And on top, most of it will be dark. And let's do that. On this 12 on the bottom would be dark, but on the top that would be quite some light. So I'm painting that into now this one will be pretty dark because it's behind this one. So I'm going to give that a nice dark color. And then moving away from this other branch, I'm going to make it slightly darker, lighter again, so dark. Two lights. All right, now let's do this one. Nice and dark there. And let's see around here, dark around there. And now it can go just on the dare because I'm going to paint that leaf on top of it anyway. And do the same for this one. And then we go, all right, low my brush a little bit. I'm now at 4%. I'm painting a little bit of brown in there. Now, this one, and this one down, down a little bit. And I'm just doing this little bit roughly. Now I want to give this one a bit of color right there. And this one on the bottom. Just want to add slightly more color and I haven't done that. Now this one pretty much dark. And there we go. Here. I need some shadow behind that where it's dark. And now I need this part. Let's see little bits of brown in there. A little bit on their schooling bit last year again to about 67. Want to add just a little bit more here? Get that branch. Look. Now I'm going enlarge to about what do we do 1516 percent. And I'm painting in this one pretty dark and I am going for this one. And same again. Just pretty dock. There we go. Now let's hide the sketch, look at it. And there's our bronchus, right? We want to add some thinner line there. I've got my sketch back. Flow rate again to that five. Let's go for four. Adding in slightly. I lie in there. And I want to have a little bit stronger line on that. And I'm going to add some strokes very softly here to a hotly pressing to bring a little bit of brown into that gray. That one to row moved outside. And they go right there too. Now a few more here. Extending a little bit. There we go. Let's check that bit there. The sketch that we go now those are some nice bronchus going on, looking nicer rights. Let's see if we can add just a bit of a stronger lying there on the bottom too. Get a hint of bark going on. Hey, go mix that in a little bit. All right. And we're going to do that the same on this bottom. Hence the Beck. Make everything a little bit more neat, bit more tight. Little bit. There you go. All right. Good. Let's leave it for like this. For now. Little bit there. Good. Next step would be the leafs. So I need my sketch back. Now, where are these all up here? There's some leaves here. Let's start with these. I'm going to pick my green column. This one. I'm just going to paint them in. First. Again, I'm going to start reasonably light. And there's a nice leaf going on there. That would be my light color. And now the Sun comes from here. So this part here, it would be darker, this half will be darker and definitely under here. It would be darker. Blend that bit in. And I'm going to leave that as a leaf, leaf that as elif. Alright, let's hide the sketch for a moment. See, and now it's looking like way more like leaves and oily leafs. Good, Get the sketch back. Alright, well that's the first step for this. We did the branches a little bit. Now we're moving to the ground. We're doing pretty much the same, picking those leaves, giving them colors, but not only green, we're going to bring in the autumn colors to these leaves. All right, let's do that. Let's zoom in a little bit and we've got a cluster of leaves now there's a branch here. Let's do that first of all. And we're gonna do that with that light color again, same brush. Let's see, I've got it on 5%, that's pretty good. So I'm going to draw that branch in. And step branch goes right there, branches off. And thus what branches do that we go get some of that darker color in a two on the bottom. Um, but we're gonna go to about 23 percent. And we'll do this rather lightly because I want this branch later on to really be obvious. Stick out. It's not a stick, but a branch that sticks out. Alright. And down here a little bit more. So I want that light color to really come through steel. That's the branch. Okay, now we're gonna go to the leaves. Now, what? We're gonna do some mix of colors only leaves, not only yellow of, not only, sorry, not only green but some yellow in it, some red autumn leaves should be enough for this branch. Want to start though with the green again? There's that autumn green going to go to about 50 percent again. And I'm going to start with this leaf here. Paint that in and bit darker there. Now there's a leaf right there. I'm going to mix this one and let's add that leaf right there with the darker green right there. And at the bottom a little bit, here's a leaf painted in. Likely a go now decide that life comes from them. So that means the bottom is part would be a bit darker and I'm going to give these leaves green now let's not do that. Let's pick a leaf over at this side here is a nice leaf. I'm going to paint this one in lightly. Now, let's go a bit darker. We do 67 percent. Otherwise, we'll be painting for ages. But what I want to do, I don't want this to be in the foreground. So I'm going to cut this a bit off. I would say, let's go. Yeah, cut that off right there. And let that leaf go behind the stock of the torch to, alright, so dark the day he got some more greens. Let's go for this. This is a leaf too. So in stocking out there, branching out, they're not stuck in our data. Bit dark there. Alright, now I'm going back to that light color and I want to throw in this branch. So I'm going to about 2% And there is my branch. All right, that is the green leaves. Now rest. We're gonna do a bit random, yellow, green, red, all kinds of colors. But what we wanna do first, we're going to bring back our ground. There we go. Now we're going to take a look at how this looks. And if we've got plenty enough contrast now see we've got colors down here, so I'm going back to my green and making sure I'm on the right layer. Bigger one, about 5%. And add some more green to this so that, that leaves really stands out. Diego, I don't want the background to come through it. There we go. Not address back. Alright, let's check here too. Same here. I want this leaf to have all the green color. And these are pretty much fine. All right, good. Now we're going to work on the rest. Let's just give it some random cause, all kinds of leaves. So we're going to just, first of all, start with the light color and just pick a few lease and do them with that light color. At a little bit there, this leaf here. And that's enough for that. We're gonna go to this orange color. I'm going to bring in some orange now we gotta do that pretty careful. So let's add some, let's move this to 10 percent, my brushes and 10 percent. And I'm just going to mix in some orange color there. Or let's do some orange color down here. And how about hair a little bit. And as you can see, I'm not worried about doing this neat and nice. Just add some color. Let's do a little bit of orange up there. And now you see this already starts looking quite different. All right, Good. Let's add some really dark green to it. Starting with these leaves. So I'm putting my brush again on about 34 percent, getting in some of the really dark color. But Mitch, the edges, I'm mixing in a little bit. All right? And I do, does on this one too, at the bottom, mixing this end. And now at the edges, I'm smearing it a little bit. Let's do that here too. At the bottom. And there you go. Now you're getting this autumn field already here. We would call us, let's see, let's pick some pink. Put this on about 9, 10%. Just somebody leaves. Very likely. So don't press like that. Then you're going to get this really pimping. Now I'm pressing really lightly so that it gives me that hint of pink behind here too. Just a bit of that pink, the red fading into the pink sea. And that adds some nice touch to it here. All right, Now this you can do for pretty much hours and hours. Just want to have few really dark colors in it. So I'm going for that dark red. And this one. Yes, I'm pressing a bit more. Here's a leaf. Down here. I want some. And back here I want a little bit. And on this one here, now, let's see, looking pretty autumn already. Let's hide that layer. And now you're getting this look at that. You're getting the oil painting feel. Okay. So this is starting to look really like an autumn scene, but there's something missing those toadstools. The next lesson we're going to work on that. I'm going to leave the background now as is. And we're going to work on the stems and the rest of the toadstools. All right, I'll see you in the next lesson.
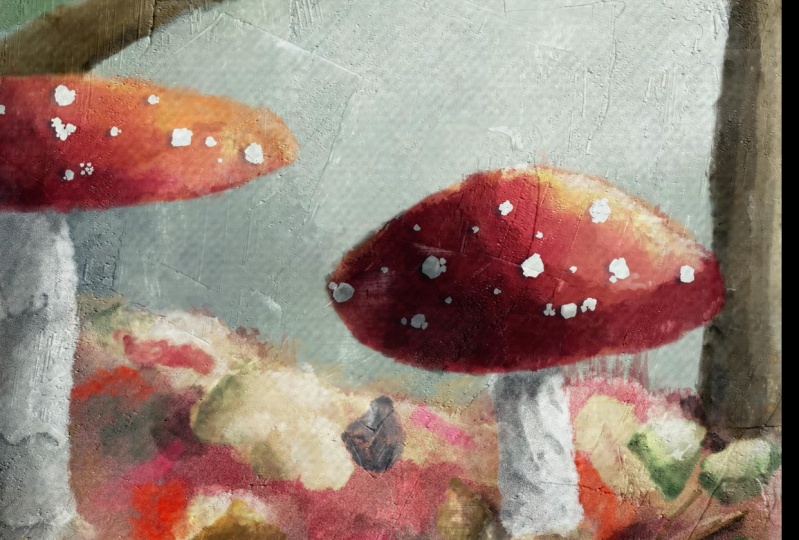
6. The Toadstool Stems: Okay, so our autumn scene is really getting somewhere, but the stars of the autumn scene, the toadstools are still missing. So let's add them. We're going to start with the stocks, the stems of these toadstools, and then we'll work our way up to the hoods. But let's start with these stocks. Now. First of all, I'm going to add surprisingly a new layer, and I'm going to call this tos two stocks. What should I call it? Stems. Stocks that call stamps. Told Stowe, look, I pet knows it. And the stamps. Yeah. And there's the next layer. The next layer will be told to stamps. So if I want to paint those tofu and we're going to need that sketch. What I'm gonna do is I'm going to turn off all these layers below it so that I can see it what I want to zoom in. And I'm just going to start here at a color I want to use is that light whitish color. This color here, almost white, but it isn't white. So I might just bring back that bottom layer. They go to see if it works well, to suffer. Go paint without it. I can hardly see it. See, I can see it a little bit. But if I put that layer above, under it and how I can see it really good. Or I know I don't want to have multitasking while I'm still having that round brush size 10 percent. And I'm just painting the stock and I'm only painting again the bottom layer, really with a lighter color. And then I'm going to bring in some shadows in a minute. And with this one I'm going to do shadows right away. Let's go to the second one. And that's outs. Don't want to go outside too much with this. Stick a little bit within the lines. And once in a while, I have to lift up my brush so that I can make a new stroke because my stroke is running out a little bit of paints and there we go. Now. For now, the bottoms, if I show you that, are looking a little bit weird, but we're going to work on that. Don't worry. We'll do that later on. Create some nice stocks you have bottom the part down there. All right, and let's do the third one too. That's here. All right, the layers. And I want to get this pretty darn, pretty strong wide. Day you go. Now look at that. That's quite something. Next thing I'm gonna do. I'm gonna work with a darker color that will be this plus Co for this gray. Now going to be little bit careful with that gray. I'm going to put that round brush on five and we're going to look at, start with this one, the easy one there. This one, I want to say, okay, now, if the light comes from here, that means that under here there would be some shadow. And I'm lightly drawing in some shadow on the parts where the shadow would be more than. And down here. I would need some shadow. And down there too, Let's add some shadow here and on this edge there, the ego, now for this one, same, that would be shadow here. And this part would be in shade a little bit. Now, on the here, you've cut that out, crowing in stages, in layers. There would be shadow there. Let's mix this in very lightly. And under here, that would be some shadow. And I want to have some shadow down there. And at the bottom, there's some shadow there. Let me go back to the light for a minute and really add nicely there. Now go back to that grayish color. And under here, how really want that gray color? Pitch stronger? Mix it in. And this mixing just a little bit better, do some loose strokes here. There are 2. And carefully add a little bit under there. And let's go to this one. Now that has some interesting shapes. First of all, we're gonna do the shared our shadow right there and here on the back. And blended in a little bit, code a little bit stronger at the bottom. Now I'm going to add that line here carefully. There's a line here. I'm going to add some shadow dish plane. I'm going to add a bit of shadow and right here two. And I'm going to add some loose strokes on a blended in a little bit. Now that one is a little bit darker. And if I hide my sketch now we're going to get this look at that. Say, now I want us to straw profusely. Let's go for this one. We want to add it right there a little bit, a little bit more here. And on top there to blend that just slightly more. And go here. Now those are interesting stats. Now this stock too much, too much dark in it. So what I'm gonna do, I'm just going to bring some light color back again. We're gonna go to about 2%. And with loose strokes, I'm mixing in some of the light here to there to a little bit. And very few strokes to get a bit of that. Oil painting. Few. Now, 4%. And I'm very carefully hotly pressing now, blending this in a little bit more. Getting rid of bit of really dark one. And now I think I like it a lot better. I'm okay with some dark spots there. Are bringing back my sketch, bring back that dark color. Go about free percent and actually adds a little bit of a line. There are no carefully blended in a little bit, doing the same here. And the same there. There's a line there. There's a line there, S even a line there. And obviously they're doing the same here. Get a bit more in here, and a bit more data. And we want this line to be there to get stronger. All right, Some slowly, carefully, some lines that, Let's hide our sketch to cut it. There we go. Now that looks nice. All right, just a little bit more there. And the more you give it a dark color, the more of an idea you get, hey, there is some depth data or some edges there. And that is what we want. All right. How about that? At just an edge? And I'm calling these stocks done. All right. That's the stocks. Good. Let's see. Yeah, like him here very carefully at just a bit darker color. The rest I'm fine with. Okay. Let's start. Right. Well, that's it. That's not it. That's this part. Now, moving to the next part, the next part will be the roots of the toad stool. Now we're going to work with a nice red color and bring some contrast. All right, let's do that in the next lesson.
7. The Toadstool Hoods: Welcome to the next lesson. We're gonna do the exciting part. This was exciting already, but now we're really exciting part comes. We're going to work with that nice bright red. Not only bright, of course, we'll bring in some dark tones too, but it red. And red will really make this painting pop. What we do. First, we're going to look at the painting so far what we've done, Let's do that. All right, I've cut this now from the previous lesson, but pretty much everything is gone. So let me bring that back. See how it looks and how far we are now. Now look at that. This is really starting to look like a nice autumn scene. But there's something missing here. Alright, let's go for that. For that, we're going to need a new layer. And surprisingly we're going to call that tos two and top hoods. Let's call it Hoatzin out. Or I'll rename. Those two, knows it and we'll call it the hoots hoodie or IT wants to call me hoodie. I'm calling that holds water rights. I'm not even sure if the cold toes on the hood, but I think it is, but hey, I'm not an expert and toads to I just paint, Right? We're going to create that. We're going to need a sketch for that, of course, right? There's a sketch and we're going to need some red for that day you go. We're not going to start with that red, actually not that red. We're going to start with this orange color there. We're going to start with the orange color. We use the orange color as a base, and that will brighten up this red we're going to use right away, but gives it a nice tone and blends. All right, We're still working with the round brush for this. And I think we're fine with fire 1516 percent, Let's see. Right. And there we go. So there's our first hoods mixing in a little bit, blending it. And even without doing anything, that already looks a lot better than before, isn't it? Isn't it doesn't it? And let's do this one too. All right. And that looks good. Corner, so I want to lower it a little bit. I would say, what do I have 6% now, we'll look at it in a minute without the sketch, and I'm bringing it to about 15, 16%. Again, I think I'm needing a bit higher, can't see it. My hand is in front of it, 15. And that goes over it a bit too much, I think. Leave it like that. That's okay. Alright, mix that in a little bit. There are two blended. Alright, I'm gonna get my eraser and erase. Some of that is gone outside these lines. There you go. All right. And that looks a lot nicer already, or wrong color obviously. So we're going to go to the red. Let's go for the red. We're going to change brushes. Want to pick another one? Let's take, we're going to go for a dash one, do some dashes of color on this one. Direct. There we go. Now we could use a clipping mask here. But I don't think I'm gonna do it. I'm going to avoid using clipping mask on this one because I just want to have some more color because it's not totally blend in yets. Well, let's go for this one. We want some red and what I wanna do is I want to leave this where the light hits a bit orange and the rest I won't read. Make sure it is on top. You're about 40% is, I guess, right? Let's try that. Yes, that's nice. And outlook. That brush gives you a whole different look right away. I'm not pressing really hard. Again. I'm still pressing lightly now impressing a bit hard. And I'm smearing this color in, and I'm using this dash brush. Because now I get texture in Etsy. That looks really nice. All right, let's continue bit darker there. And let's mix in that color a little bit. I want a little bit there too, and a bit more there. And on this side here, we're going to do some really dark color. Later on. And there we go. Now that looks good, that that looks nice. Doesn't it? Leave it like this? Yeah, why not? Now here the same the light would be around there. This part here. Pretty red. And let's mix that in that red color. And he go around there, I need some more red. And in the middle, really some nice red. But again, I'm mixing that in with the orange to create a little bit of a tongue. And you don't get a red, red all around, but you get some nice tones. And here we're going to do the same, the red coats there. And we're going to mix it in. And that's nice bit more around the edge there. We're going to lower this brush a bit, gonna go to 15 percent. And I'm going to add some more stronger read on these edges here. In the middle a little bit. And around here. Just a little. And let's take a look at it. All right, Now we're gonna do that here too. Strongly read them. All right, around here too. Okay. And now we've got this. Now this is to round at some, at the bottom. Okay. That's that. Well, that's not that because now I want a deep dark red stone. Tools are a bit darker red. So let's go. That is this red, the deep dark burgundy red. And let's see. Do you ever use the same brush? Yes, let's go for the same brush. What I wanna do is I want to get some dark around there and mix that in and around here too, but at the edges, I want to leave that a little bit more red. Yep. And I do the same here. Let's see this one I do want at the edge. And I'm going to mix that in a still got the brush on 15%. I added some and I pressed pretty hard for that. And now I'm just Hartley pressing and mixing and my colleagues. And I want some more round the edge here. And this dash brush really gets me interesting variations. I want some on the bottom here and blend that in right there. Color. There. You go. Look at that. Carefully. Blend these colors a little bit. All right, and this guy here, what I wanna do there and think I want to leave this a bit, light up the rest pretty dark. So I'm going to press really nice and now I'm gonna blend it in with the other colors. Rights. Following a bit of the contour here. Let's do some dark here to darken that slightly. And there we go. Nice. All right. On that red bit to go here. And I want this to be London in slightly more. Some dark down here. Let's take a look at it. All right, Let's remove this, the sketch for now. Let's see how that looks. Oh, look at that. Now, I see right away that that is too light here. The rest looks pretty nice. So what I'm gonna do, I'm gonna go back to that original red. And I'm going to add some of the edges at the edges here. I'm going to lower my opacity, or might just lower my brush to 9, 10% to halfway through opacity. And I'm just going to add that color here. And there we go and get rid of this. And what we could do to I could erase on the hair a little bit. But I want these edges to be a bit nicer. All right, here to add some color here. To just get rid of that opacity. That's all we're doing the rest now here to get an eraser, I'm going to lower it. A higher rate, 13, 40%. Remove a little bit there. Go back to my paintbrush, that one is fine, except for here. Background is coming through just a little bit too much. And let's see. Okay, now this is not nice, that needs to be blended in. Definitely a bit better. It's okay to have that rim around here and an edge, but I want to blend that in just slightly more. And there we go. All right. How about dance? Yeah, that's it's getting somewhere. Let's get a bit bigger brush. Add some color here, so get rid of the opacity. All right, I'm not sure if I'm happy with this one now. I want to blend this in. A little bit more nicer. There we go. Now, there's that, alright. And that would be that part. We're getting there slowly but surely. All right, Our autumn scene is getting along nicely. Next thing we're gonna do is we're going to add these white spots that belong to a tote two because without these white spots. But I don't know what it is. Yeah, Well, it is a total two, but it needs those spots to really become adults too. Let's do that in the next lesson.
8. Adding Toadstool spots: Welcome to the next lesson. We're going to do the white spots. They really belong to the toads to now it's just a toast to just a mushroom, red with white. But we're going to do those white spots. Really add some detail now, let's do that. Now looking at it, I don't like my scene around here. So I'm going to correct that. I'm going to go for that darker color. I still got that dash brush and fall as well. Yeah. The dash brush. I got it on 60 percent and on 21 percent. And I want to see if I can I'm lowering its till 12 percent. If I can get rid of this edge. Now, I cannot. Obviously, something is not, well. That edge is too strong for this color. So what I'm gonna do is I'm gonna go to this layer that underrate, that should be the branch is Diego, I'm gonna take an eraser and erase Probably everything. I'm going to lower my opacity and see where we get around 40%. And only erase an edge. There we go. And now it's gone. All right, that's better. Now I can go back to my totes to get that red again. And yeah, I'm caught. A fin mix that in a little bit. And mix this in a little bit nicer. Let's add some color here. All right, now I can get rid of that edge, lower it for 56 percent, and mix this in completely till all that re-read is mixed in with the rest. Okay. That's too strong, isn't it? All right. We're going to get that eraser still on there. And I might just as well erase this part. The ego kept my sketch back. So now correcting it a little bit. And now I will get my brush back and add a new edge around there and mix it in with the rest. Bigger so that it mixes in. There we go. Alright, let's hide the sketch again. That is better. Now I don't have all kinds of crazy tones going on. I'm just extending it a little bit to go over that part that I've erased, all right. And get in some color. Now that's better than the previous. Okay. Right. Mix this and I'm going to my original orange and add that orange a little bit there. And now blend that in. And now we're getting somewhere, right? I'm going to leave it like that. We're going to go for the spots now. Spots. There we go. I'm going to rename that, rename that toads two. And then spots, spokes. Now spots, we want, alright, there we go. Now touts two spots. Now they're not in the sketch. So we're just going to add a random toads two spots. And for that, we're going to use the round brush. I would say, let's try. Now let's pick this one here. They all paint two. We're going to go for oil paint to. That is really huge. We don't want that. See that our nice spots, we need some white of course, and that is that white color. And what we're gonna do, we're gonna experimental little bit. So I'm going to just press and I'm going to say right away, ouch, That's probably not what I want. And no, that is not what I want. So I'm going to clear this. So on a pedestal my layer, and here there is a clear, too large scope for free percent. That's what I like. I like that a lot better. And now I'm just going to add some random. Some of them get larger and some smaller. So press really light, press really hard. I want some around the edge here. So what I'm doing, I'm bringing back that sketch for now and around the edge. And that brings back that edge really nicely on the edge. Okay. All right. Is that good enough for this one? I would say I want one on top of it here too. All right. Let's go for this one. We're going to do bit the same here around the edge. And we're going to add a few. We're not adding them on the bottom. Just around the edge. And some there. And we're just doing this really random. The sketch can go away and look at that. Now that's starting to look like tos, to listen that I need some bigger ones on here. And I'm leaving it like that just to couple the air. There you go. And now this one, we may give this a lot of really cute little small. So if you have a problem with pressure, you could of course, really lower that same here. I wanna go around that edge a little bit. One on top, few out there. And there we go. Now, that looks great, doesn't it? Well, I want some more on this one. Probably just a few really light and a few bigger ones. Rights. I want some larger ones on that one too. All right. Now, I don't like that. That's better. All right. And there it is. That is our autumn scene. How we don't know what getting there, but we're gonna do a few more things. Alright, we're getting to the end of this. But what I wanna do if this is I want to add some very light coming in and some dark parts of shadows on the ground. So that's for the next lesson, adding shadows light. And of course, as I said, we're going to work on the base of the toadstools to, but that's not for now. We're going to leave this lesson as is at your spots. And then I'll see you in the next lesson.
9. Bringing in Light & Shadow: Welcome to this next lesson. Now you may notice it's getting a little bit darker because it's really autumn out here. I'm looking outside, it's getting really dark. It's gonna rain. Is it already raining? Now, people don't walk with umbrellas yet. So it's not raining, but it is getting dark. Really nice. Autumn, whether to continue with my autumn scene. Where are we? Oh yes. We're going to add some shadows and highlights. We're going to start with the shadows, give some dark parts. And then we're going to add some nice highlights. Will kinda ground a little bit, add some shadows there, and then finish off the drawing with the last little details we need to do. But let's go for those highlights and shadows first. And we're still painting. You can still see the painting really well, although the background is getting a little bit darker, we're going to add a new layer on top of everything. And we're going to call this one shadows. Shadows. Not really the right name for it, but every work shadows, we want to change this one. No, these are all normal, so to just work like normal paint lanes, but I want something special. I want to this to be a multiply layer. And I'm pressing the end here, moving this up to multiply. And what multiply does, it just strengthens the colors under it and it darkens stem and that's what we want. Great foreshadows. The brush. Which brush do I want? I want this brush here. And that is the DEP, dep, dep one DEAP doesn't mean up picking just the depth. The color is going to be. Let's see, this brown, this dark color there. We're going to go for this or the scholar, let's see in dark green, die would be tricky. Let's go for this one. Just that bluish, grayish color. And we're having a right shutdown. Yes, We've got that. Now. Let's see. The brush probably going to be too large. What we're gonna do, we're gonna add some shadow. Now the light comes from here. So that means that everything is opposite from the light. Like around here, around there, around there. As I've done a little bit already with these totes to stamps, which I'm not going to touch. Actually. I'm going to just give the rest some dark colors. Don't think I'm going to touch this stamp, but the hoods, Let's go for this. Let's see if the Russia that works painting in that lightly around here. Just some shadow. Right. There you go. That would be enough. On the hair a little bit. See, you know, you get right away some depth. Let me show you that. Switch it off. There it is. Switch it down. You get the idea that light is already coming from. They're going a bit lower. Let's go for 10 percent. Add a bit more stronger shadow around here. Now, if you would be really oil painting, you actually would do this in an underlayer beforehand so that it comes through. But since we're working in digital, we might as well do this afterwards. I want that sum here. And there we go. Now I'm bringing in really some shape. Let's turn this a little bit so that I can even this out just a little bit more. And there you go. Now, look at that, see, kinda do the same right here. Cannot start with a light layer. And I'm going to undo that. We want to have their bigger brush back about 15%. There you go. First lightly, that's added a bit stronger now. And go a bit with the shape of this total, two bit more there. Now I'm going to lower it till 10 percent again. And I want some there. Now you noticed and I noticed that two women, they're a little bit I've gone outside here. But that's what we have erases for. Now. If we would be oil painting, this won't happen, would it? No eraser. I'm gonna go for it bit lower on this bottom. The lower, what am I saying? Smaller, size, smaller, and I have now around 4%. It's nice and small to blend this in a little bit better. And now we're getting shape. Same scope for the last one. We're going back to that about 15 percent. Throwing up some paint and mixing it out. There you go. Nice to dark. Very lightly. Smooth this out a little bit more. If I press lightly, blend in with the rest. Now we're going to go back to that 10 percent, around 10 percent or am I There you go. Don't do as much here. Little bit more on the hair. A little bit. Now, we're bringing in that shape. I'm going to do it right there too. I'm bringing in that edge that should be that bit more than. Alright, there we go. Now think on this one there in the middle. It's a bit too much or still having that Eurasia doing nice and big for about, let's see, got it about 28 percent, 25, 28. Carefully. Erase some of it right there on the edge to right. Tone that down a little bit. There you go. Now look at that. Alright, that looks good, doesn't it? We're not done yet. We're going to do that on the branch to little bit on the branches to get some depth of the branches are bit flattish now but flat now. So we're going to correct that. Let's do that. We're going to do those branches too little bit for that. We're going to need our brush back. We're going to lower it to say about 45 percent. And we're starting with this one here. And I'm adding it to the edge. And they go, Well, I'm making sure I'm not going over that. Tos two. And here we go. And it's just dark edge a little bit and look at that. The difference. Show you the difference. They go flat and suddenly rounded with some shadow going on. Now in this toast to hear, I want some shadow, definitely. So I'm going a bit down the line. Hi, larger, not high and larger. And around here, I'm going to add just some shadow. Mix that in a little bit more. Around there too. Mainly around there now I like that a lot better the rest now. I'm fine, just maybe a little bit on that edge. And while we're on that to slightly on this edge too, now you're getting that shadow feeling, rights. I like that. Nice. All right, we've done this one. Let's go back to the lower 4%, 45 percent. And let's add some on the bottom here, mix it in a little bit. And I want some shadow right there to that branch. Casting a bit of shadow. All right, I like that a lot better here too. Just a line of shadow. All right. I can do around here a little bit. At that shadow back there too, is if that branch is costing a bit of shadow, Let's see. Some on this edge here. All right, and let's add some around here to the little bit that. All right, now I need to sum around to make sure I get two branches instead of one. All right, now might do some on this bottom here. On this bottom. Thank data are a little bit more. All right, Now I'm going to go lower it so that I can do d stocks. At some cast shadows onto this day you go. These are quite faint. We could do something about these, but let's go for now. If this line at some in here a year ago, now it's becoming a branch again. Some there, some in hair. Drawing back. Some of the lines that are lost. Right? Just strong aligned there. Some more. Now, I'm painting with shadows. Around here. Leaf. We'll do a little bit around the edge. Good. All right, that's debt for this part. Okay. Let's see. Let me check those branches with a bit more than, alright, bit, bit, bit more than that. And a few lines here and there. Here too. Okay, I think we're okay with this, alright, this branch, we need to do a little bit. At the bottom too. We're going to give it a ground shadow, but the branch itself needs just a little bit of shadow to the leaf too. All right. Still going a bit loosely or rough. Alright, like that by that, just blending in this little bit. All right, good. And there we go for our shadows except for here. We want some here because this is pretty much doc about 10 percent. Now we've got to be careful. I want it around then I'm going to use an eraser in a minutes probably to erase some pots now I like that better. It mode. Good eraser, smaller to a 100 percent here, about 8% there. And don't want the shadow to be 0. I am not going well, is it? I'm erasing my original shed. I don't wanna do that. Only this top shadow, right? Okay. And that's it. Now this, I don't like going to get too dark paint to a 2%. And I'm just going to create an edge that, and I want to etch on there too. Bit more. Seven, blended in, blended in, you go, and that would be debts. All right. So that's the shadows. The next step will be doing the highlights, or we can do that in this lesson 2. Let's do the highlights here too. Okay? All right, let's go. We need another layer then we call it, of course, highlights. Highlights should know that. And there we go. Now for highlights, what we're gonna do is we're not going to use Multiply, but we're going to use overlay and an overlay, as it says, put a layer above it, but lightens everything. So whatever is under it, it strengthens. And depending on the color you're going to use, we're going to use that. Light, the whites, right? It's not quite what green. Green is not a green but a queen tins. And let's go for that one. Same brush. I'm putting it about 80 percent. Let's see. We're going to start with this totes to here. I'm going to give it I like right around there. And I already see that this brush is too large, so let's remove it 10 percent, paint in and smear it out a little bit. And the ego, that is a nice highlight already want this brush to be smaller. I'm going to 5% pressing really hard. Adding in, blending this in a little bit, giving it really obvious highlights. I like that. Alright, doing the same here. I want my highlights. I'm fine with the edge. And then I'm going to blend it in more when I move down. Lower, cut that bigger brush again 10 percent. Because the bigger the brush, then it gives me a larger area to blended into one. Let's take a look at that. Nice. I want that to be a bit less like that. Yes, I like that. Now this guy here, Let's give it some nice highlight right there. And then landed on in a little bit more there. And I'm again, hardly touching it. There we go Now look at that. That looks nice, doesn't it? Right? I like that. I want some on this tree here at the edge. Just lighten this color a little bit. Blended in up there too. To get the idea of lights going on there. Now, that is a right away, a nice improvement. Going to lower it to 7%. Edits around this edge, blended in a little bit. There you go. Added right there, two blended in a little bit. And around here. And we can do some really strong highlights. Landed in a go. Now we're going to lower it 4% again. And I'm going to paint in some light right on this branch and then smear it out a little bit. There you go. Let's see some hair so that the line catch on there. Just, just a little bit. Bright. Light in there too. The leaves just a little bit. And what we're going to create a little bit of an edge there, too. Nice. Alright, That would be the main ones on the branches we could do, but then I would go really low, 1%. There you go. There we go. We're seeing that just a little bit. Not much. Really. Cut this branch off right? Now I have done there. I gotta go back to the shadow layer, get my eraser really small. Don't want it there. That's the cut-off branch. All right. Good. I think we're done playing with this light on this branch here. Let's go to the right layer highlights. Get the brush back, and paint in just a little here. All right. There you go. Okay, well, let's see it. All right, good. That's it for this lesson. Next lesson we're gonna do the finishing touches. Add a little bit to the stems, create some ground shadows, get that kind of fuzz on it, and then finish this class. Alright, see you in the next lesson.
10. The Finishing touches: Welcome to the finishing touches. We're going to finish this painting. We're going to do the last finishing, touching some ground shadows, work a bit on the stems. Then just look at it and see if we're happy with it. And then add that Canvas. All right, Let's go k What we're gonna do first. Let's add some ground shadows for that. I'm just going to need a new layer, but I'm not going to put that layer on top. I want to put that layer somewhere else. We're going to put this shadow above the leafs. Alright, so a new layer adding above the leafs calling this the ground shadows. Ground shadows. All right, I'm happy with that. Kinda go for multiply to some sliding up to I have multiply because it's going to add to my scene, darken it, making sure I got the right color. That is that dark color. I'm having that same depth brush still. Got a pretty low. About 4% is good. I want to zoom in. So I'm going to add shadow around here. So what I'm going to do, we're going to add some ground shadow. Let's see if this is good. Yeah, that would work nicely. So I'm painting in a shadow of the branch where it's laying down. And I'm smearing that a little bit out. Lending that a little bit. There you go. Now that's not all of course. We're going to need some shadow on the hair too. And if you want to give the impression that what I'm doing here, that this branch is bended, laying on the floor. See the same effect we're getting here too. You just, just move it away from wherever that is. Alright. Now, the same with the toads to some shadows right there. Some shadow would be there. Then that leaf is in the way. But we're going to extend that. And we're going to hire my brush to 8%. And I'm going to add shadow of the toads two here, two. And now I'm going to smear it out. He go same with this one. I want that shadow around here a bit more. Right here by slowly on the painting, just a little under the edges. And then the last one is going to be the tricky one because there's this leaf in the way I want the shadow there. And we might just as well throw it over the leaf and blur it a little bit like that. And then the next part, we're gonna do some shadow around here from that tree. Blur that a little bit too. All right, and now we need some shadow here, obviously from this tree. They go and that shadow would continue right there. And now we've got some nice shadows going on under the ground, under the grounds know, Underground. Okay. Now I'm going to look at my ground and when say what I want here is perhaps here and there a little bit of shadow too on the ground. And just add some shadows. Just a little bit. Not too much. A little bit. There are rights on the hair. Gives the impression of a little bit depth going on. Alright, good. Next thing we're gonna do is we're going to work a little bit on the stamps because now the floating and I got to blend them in a little bit in the background. So what we're gonna do is we're going to add a new layer for this. And we're gonna do that on top of the stems. And we're going to call that torch to base. All right, there we are told still base should still lower this one. Right? And let's continue tos to base. Alright. Since we're still having gotten, the sun is shining again now, pretty much still some clouds but Sandy speaking through again. So the light is picking up again, so I have to make some adjustment to the cameras to compensate. Hopefully this all works out well, but don't worry about it. We're going to paint in. Some of these basis, all right, the base, what I want is the base to blend in a bit nicer than anodes a little bit. Looking like mitosis tools are more or less floating. And I, I, I don't want that. So what I'm gonna do is that original color back. I'm going to go to the round brush. And what do I have it on a bit too large? Let's go for 8%, 100 percent there. And let's see if I can somehow kept this a little bit connected with the ground. Look at that, say or adding back the shadows in a minute if that's needed. All right, I like that better see now it's connecting with the ground. It's not that weird shape anymore. This one I kind of liked to which a pair, Let's see, do I leave it like that? That looks good. That one is not really floating. How about this one? This one, what we're gonna do is gonna do the same their rights. Day he got smear this a bit in chlorides. Now it's not floating anymore and let me do just a little hair to bid round here. Look at that. Now. They're not floating around whatever. Gonna get that original yellowish color. This one. And I'm just going to blend that in here a little bit to make this slightly more interesting. Rights do that here too. Letting it blend in a little bit. Here you go. And for this one, Let's see what might do it on this bottom two. Alright, now I need some of the dark color, black color. This one carefully. And that specially in the back there. All right, That's better here too. All right. And here a little bit to right on the hair. Of course, down there. Very softly, except for that bit more, but the rest really softly blending again. And there we go. Now, this one is a bit too, I think. So let's blend that in just a little. The Hague. Now, I like that a lot better than what it was before. Now the rabbit connected to the ground. Nice. All right. I would say we're getting near to the end. What do we want to do? Let me look at the ground for a minute. Go back to that. Branches and leaves. Hey, go on a might want to take that depth. If it works. There you go. Really dark green. Not that large. Let's go about 16 percent. Let's see if that's going to work. Just adds some hint of color here and that I like that back. There are two. That's better. I love better. Look at that. And then some of them bright red, some spots go under there a bit. And I like that a lot better. All right. Good. Now there's one more thing I like to do on the floor. I like to create little bit of shadow, dark shadows and some light. So go back to that highlight and shadow layers. Let's see if we can get dealt going to, all right. This I want darker than I want lighter. So I'm going to go back to that highlights. But I'm, I just create, I probably can do a new layer. Instead, something goes wrong. And I'm going to say overlay, gonna go to that lightest color. Let's see, I've cut that depth, depth one, depth one that should work. Let's see if I can create a little bit of light around here. Right around here to around there too, a little bit. I'm going to go smaller, about 7% now. Create some niches of light here on the, on the tops here a little bit. The idea, and there isn't a light hitting right there. All right, like that, a bit better. Okay. That makes it interesting. And now I'm going to add just under that. So on that new layer I'm going to add a new layer with multiply, kinda get out that dark color again. There it is. Going a bit larger again, 16, 17%. And I'm going to just add some dark tones to the forest floor. But smearing it out a little bit to create some interesting dark and shadow going on. And there you go. Now we've got obvious lighter there. Add some shadow here again. A little bit. They're not too crazy. Some light going on there, some shadows going on there. A bit darker shadow around here. And I think I'm calling this done. No, I'm not done. One more step I need to do, and that is added canvas that I've been hiding. Now I've prepared that canvas and the canvas is really simple. Let me show you how it works a little bit. All right, so this is the painting, but it's not on a canvas, so I'm going to add the Canvas. Canvas is there already, we locked it. And that's added. And now look at this. You get that whole painting feeling si con Canvas. There it is. And now my painting is pretty much what did I do if the canvas now it's really, let me open it up. You see an inserted image and the image is, if I would hide everything. Is a real Kansas photographed? There you see it? But with some darker edges. Paint is a little bit lighter, darker some edges, but it is a real canvas with a photo and you can see the canvas still there. And then I did two layers on top of each other. The first one is a multiply layer and let me get everything back before we go on with this. So the first one is a multiply layer, and the second one is a color burn, where I'm burning the color in a bit. Strong learner, you could do it only with the, if you like that better, but then you can see it's really faint and move to color burn. It just gets that nice little finishing touch. All right, I'm done. I think I look, this looks really like an auto painting. And we saw with the oil brushes with the Canvas, playing with light shadows in it. And I'm done. So I'm putting my pen down. All right, that's it. Well, We're done. We've painted a beautiful autumn scene. I've taken you through the whole process from start to beginning, except for one thing, the sketch, I prepared a sketch so that we can move on a bit quicker. But if you can sketch, you could, of course, catchy wrong thing and then start painting totally different autumn scene, but that's up to you. We're done with this lesson. Maritime scene is ready. So I'll see you in the last bit. And that's the project.
11. The Project: So we've now painted a beautiful autumn seeing together. I've showed you how to use those brushes. We're dealing with that Canvas at some nice color swatches with it shows you how to work with light and shadow, how to build up your layers from really rough to going forward to more detailed. We've discovered a lot together. And what I would challenge you to do for the project is to create your own autumn scene. Now perhaps the job place, it is Autumn. And then I would say, take your iPad, going to start painting there, or just take some photographs of leaves, trees, some autumn mushrooms. You can find really autumn scenes and create something with that. If it isn't autumn and where you live because yeah. Or living at different places in the world, perhaps there is no order or you might not even have automate 0. Then I would say go online. There's many websites like Unsplash, pixabay where you can get free images just take type in autumn or fall and you get plenty of images. Pick something you like and just create something. Won't change cameras and show you what I did for my projects. All right, so here's my procreate gallery, and you already see some versions of this oil painting with it. But there's also another autumn oil painting. This is what I did for my project. I just created a leaf. I took a photograph of a leaf. And if I bring up the reference, you will see there is my leaf. And there's my painting of it and looks great, doesn't it? And what I did is just basically exactly the same as we did. I created my background. I created the painting itself. That some dark tones, some lighter tones on it with the overlays and then multiplies, program some highlights. And of course, first of all, I created the sketch. Let me hi, it's my signature for now. Everything else. So here's my sketch, it really rough of this leaf. And what I did from that, I started painting a background. Then I painted leaves them some darker colors here. Some of the veins to bring that dark with an overlay, bring in some light, the light parts of the veins, then multiply, add some shadows here, some darker points, then another overlay for my highlights. And finally I did a multiply layer for my shadows. And now I can remove this again, and that's it. And then on top of that, I had this canvas quoted on there again. And I added my signature to it. And that's it. And I just use the same brushes, we use the same technique. And I got this for my projects. All right, So that is my project. So now I challenge you to do your project. Create your own autumn scene using the brushes, the same palette, and put the canvas on top of it. But this you have to sketch, of course yourself, find something you like and just practice a little bit of oil. Russia's, well, have fun doing that. I'm really curious to what you will create posted in the project section, and I'm really looking forward to that. If you enjoyed this, I've got a few other Procreate classes here on Skillshare. Or if you wanna go daring, pick up a pencil, some paint and things like that. I've got plenty of classes for that too. Okay, Well, enjoy the project. And I'll see you hopefully in another class.
 Benjamin A, Art Teacher, illustrator Art by Benjamin