Transcripts
1. Welcome to the Series: Wouldn't it be wonderful to have your very own
sketchbook completely filled with beautiful paintings and each one painted by you? Well, that's exactly what we're going to do together
in this series. So I welcome you all to this
gouache sketchbook series, a creative journey
where we'll fill an entire sketchbook page by
page with gouache paintings. Each class in the
series will take you one step further
in mastering Goh. So by the end of the course, you'll not only have a
completed sketchbook, but also gain a deeper
understanding of techniques, color choices, and also brush
control. So, hi, everyone. I'm Anaca Shivdas, a self taught artist and a portrait artist
based in India. I have been painting since 2022, and Gach has been one of my favorite mediums ever
since I discovered it. Everything I have learned
has come through practice, consistency, and a genuine
love for painting. And that's exactly what I want to share with you
all in this series. Whether you're a complete
beginner or just looking to get more
comfortable with Gach, this class will be a perfect
starting point to build that habit of painting regularly and filling
your own sketchbook. This first part of the series, we'll be kick starting
our journey by exploring a few simple and beautiful
gauche techniques by painting a floral spread. You don't need to know any
complicated techniques because I'll be guiding you through everything step by step. So if you're completely
new to gauche, I recommend watching my
short 15 minutes class, which is an
introduction to Gauche, where I explain the basics in
the simplest way possible. And if you'd love
to practice more, you can check out my
other Gauche classes that go deeper into color
mixing and brush work. So grab your paints, open your sketchwok
and let's get started.
2. Materials Required: Let's quickly take a look at the materials we'll
need for this painting. First, you'll need a sketchbook, which is quite thick enough. So here I'm using a
245 GSM sketchbook. Next, you'll need
a set of brushes, both around and flat ones, which will be useful
for our painting. For paints, I'll be using
the Hi Mia jelly gauche set, but you can use any brand of gauche that you have at home. Now you'll also need
a mixing plate, a jar of water, and optionally, some washi tape if you'd like to secure the borders of your
page before painting, and that's pretty much
it for the materials. So now let's move on
to the next part.
3. Painting Background: Now to start the painting, I'll be using the following
colors for the background, black, olive green, olive gray, Latin green, and earth yellow. Basically, these are the shades of green from my Hmia palette. Now, after masking the page, I'll start with the dark colors that is black and olive green. Now, using a flag brush, I'll first mix the paint. I'm taking some black along with a good amount
of olive green. You can start by diluting the
paint first and then make the consistency right before you move on to the sketchbook. So I don't really need
a pure black shade. Instead, I want a greenish tone. So that's the reason
why I'm actually adding a lot of green
to this mixture. So even though it may look
black at first glance, it will actually have
a green undertone. Now, once the mixture is ready, I'll begin blocking
the entire page with this color and make sure your paint consistency
is just right. That is, it's not too watery, so that your brush strokes blend smoothly without leaving
any marks on the paper. Also, make sure you have good
amount of paint beforehand. This will actually help you avoid remixing it
multiple times. But if you're confident about recreating the same
color, that's fine, too. But otherwise, I
would suggest mixing a little extra to
just stay consistent. Well, in my case, the paint
ran out a little bit, so I'm mixing a fresh patch. Not just once. I'll be
doing it further again. Since it's the background, it doesn't matter if the color
doesn't match perfectly. So just make sure to
cover every corner of your sketchbook evenly with
the color that you're mixing. And you can take your
own time and cover the entire page with
this dark color. Also, make sure to fill all
the corners completely. Sometimes because of
the masking tape, it's easy to miss those areas. So before you wrap up this step, double check and fill
the corners properly. And with that, the
background is now ready. Now give some time so that the paint would dry
off completely, and then let's move
on to the next step.
4. Practice : While the paint dries,
let's learn how to sketch leaves and understand
their shapes and flow. So I'll be using a thin
round brush for this lesson, so you can clearly see
how each stroke forms. I'll be also using
the same set of colors from the palette that
we had prepared before. So using a thin round
zero size brush, you can start by practicing
these simple strokes. You don't need to
put a lot of effort. Just keep your touch
light and relaxed. You can create
different variations of these strokes just by controlling how you move your brush and how much
pressure you apply. See how I can make
a range of strokes here just by slightly
changing the motion. You can actually
practice these on a rough sheet before moving
on to the main piece. So try to get comfortable
with these strokes because they'll be really
helpful in the later stage. And not just for this painting, but in the following
classes of this series. So just like how
I'm demonstrating, you can also practice a few
strokes so that you get a hang of it before you get
into the main painting. But, trust me, once you
practice these few strokes, it would be really helpful in the coming stages of
this series, as well. So as you can see, I now have a bit of control
because of practice, but if you're a beginner,
you can go slow. So focus on guiding your brush and controlling
the direction of your strokes because
these two are quite important for
painting grasses. So at the end of each stroke, you're supposed
to gently release your brush because that's how
you get that natural tip. You can also try it in
the opposite direction, but make sure you
keep the motion in an arc and then switch
to the other side. There are actually some
other different variations of strokes that we can create. So for that, imagine there is a single point here,
and from that point, you're pulling strokes
in different directions, basically spreading them
out from the center. Now, let's try that together. So you can practice this
exercise a little more so that you get an understanding of how the grasses are formed. So basically, from a point, you're exploring different
directions of these strokes. And again, if your brush is very thin or the
paint is watery, you might need to
reload your brush often to keep the
strokes consistent. So make sure you
have good amount of paint on your brush before
you start with this. Now, to paint leaves, we use a stroke like this. You can press gently and
drag and then release. You can repeat this in different directions to
form the leaves naturally. So if you're using a
round brush like this, just press it slightly
and then release, and there you'll
get a leaf shape. What I'm doing is simply
pressing the brush onto the paper and releasing it
at the end without dragging. Now, if I release it while
dragging, the shape changes. It stretches and also
looks a little different. So make sure you
release the brush right at the end to
get that clean shape. Instead of using a
thin round brush, you can go for a
bigger round brush. So the same way, you
can create leaves. So all you need to do is press
and then release quickly. You don't have to drag,
just press and release. So based on the requirement
or the size of the leaves, you can use the
brushes accordingly. So you can also vary the
direction of your stem. Some can be straight, slightly angled or then
completely curved. For each one, just follow the direction and bend
your leaf accordingly. So here, in order
to get the leaf, you can simply follow the
direction of the stem and mark the leaves in the same
way like we did earlier. So we practicing, if
something doesn't feel right, don't worry because it's very common if
you're a beginner. It's all a part of the process, so you can always
adjust or practice a little more to improve what
you're doing right now. You can also try
experimenting with different variations and also different types
of leaves as well. So it's really up to you
and your creativity. So just relax and
have fun with it. Practice a bit,
explore the strokes, and see what fits
best for you please. In the end, you can go with whatever feels comfortable
and natural to you.
5. Painting Leaves: Now, using a round brush, I'll start off
with the grass and leaves before moving
on to the flowers. So I'll make this
one point clear that the area below will
actually appear darker, so we'll use different
shades of green to paint these layers of
leaves and grasses. So let's start with
our darkest stone. So for that, I'm taking
olive green mixed with a little bit of a previous color that's already in our palette. Now using this mixture, you can consider this
point over here as a center and start marking
long curved strokes around it. You can vary their lengths and directions like how we practiced earlier to give that natural so since this
color is quite dark, that is just a shade lighter
than her background. It might not be very
visible at first, but once the paint dries, it'll become much lighter. So once you have
painted these strokes, you can slowly start adding the leaves just like
we practiced earlier. So you can use any of those
two styles which we had explored and place it
wherever you feel necessary. And remember, because the
color lightens as it dries, you don't have to
overdo it at any point. Just place them wherever you feel is needed, and that's it. Now while painting leaves, make sure you place them
in different directions based on the strokes that
you have already made. So don't just stick
to one direction. You can try placing these
leaves all around the page. Since our dark background and dark set of
leaves are ready, we'll now repeat
the same process, but now with a lighter tone. So again, start by making the strokes and then
add leaves accordingly. So with each new layer, you keep lightening
the green slightly. So this will slowly
build the depth and also make your painting
look more dimensional. In the beginning,
don't worry about filling every space completely. You can take your time,
observe your composition, and then gradually
add more leaves. Now, to bring a
fresher green tone, I'm adding a little bit of
regular green into this mix, and using that,
I'm going to paint a few additional strokes
and leaves here and there. Now, moving on to the
lighter version of green, I'll start adding the strokes and later on, add the leave. Now, to add small variations in the shapes and directions, repeating the same kind of leaf everywhere might
look a little flat, so you can give it a
try in your own way. And finally, I'll mix a little bit of earth
yellow with white in our previous mixture so that you get that warm
lighter shade of color. So using that, I'll add a
few final touches here and there in the form of
grasses and also leaves. And with that, let's move
on to the next part.
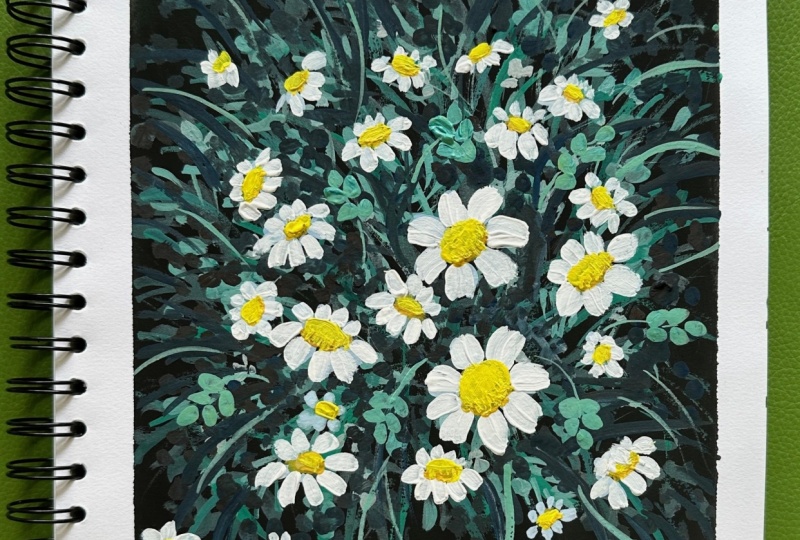
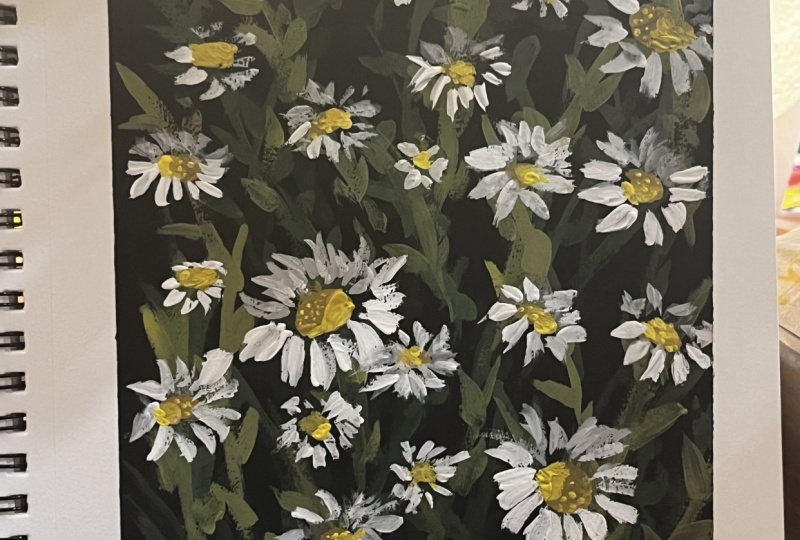
6. Painting Flowers: Now let's quickly practice
on how to paint a flower. So I'll be using this color
for a quick demonstration. So let's start with
a simple flower facing straight towards us. So this round area
will be the center, and the petals will
spread evenly around it. Now, let's change
the direction a bit. Now imagine the center to be tilted slightly to
the sides like this. So in that case, the petals on one side will appear longer, while the petals on the other
side will look shorter. So based on the angle, the petals facing
us will be larger, and the ones turning away will appear smaller
and closer together. Now, using the same idea, you can try sketching flowers facing in different directions. For example, if the
flower is facing upward, you'll mostly see
only the bottom part, just like how I have painted. So go ahead and practice
a few of these in different angles and directions before you move onto
your main painting. Now, here's a simple concept to keep in mind before
you start painting. The flowers on the top
will appear brighter, while the ones will look slightly darker because
of the shadows. Now, for the center of flowers, I'm mixing mustard yellow
with a little bit of white. And to make it slightly darker, I'm adding a touch of green
using the same old mixture. So using this mixture, I'll start by painting the
center of the main flower, which is going to be one of the largest flowers
that sits on the top. Since you already
have this paint, you can now continue by
marking all the centers first. Then once this part is complete, you can move on to
add the petals. And here, too, for the center, make sure you're not just
following one single path. You can keep it
wherever you want. So once you have
marked the centers, I'm adding a little
bit of lemon yellow to the same mix to create
some lighter details. So every flower or any three D object naturally
has highlights and shadows. So to show that effect, I'm adding this lighter tone to one side of each
of the flower center. And once you're done
with this task, let's move on to
painting the petals. For that, I'm taking
in some white. As mentioned earlier, you can add a little bit of
black to your mix to create the darker petals that is especially those flowers
that are lying below. Just like we practiced earlier, paint the petals according to the direction each
flower is facing. And if you notice
extra spaces anywhere, you can always add more petals first and then paint
the center afterward. So anything would do. So since I already have
white paint on my brush, I'll continue painting
the petals first, so watch the
demonstration as I paint different flowers and notice
how I vary the petal size. The flowers that are farther
away will be smaller while the ones in the foreground will be slightly bigger
and more detailed. Now, let's move on to
the bigger flowers. So make sure you always have good amount of paint on
your brush while working on these so that the strokes
looks more smooth and clean. Now, take your time and add the petals for the
remaining flowers as well. Whenever you notice
too much empty space, you can very well
add a few flowers. But remember, don't overdo it. Now place them here and there to balance the
composition right. You can also use my
painting as a reference to study and understand how to
position them naturally. Since the ones I'm painting now are smaller
and further away, I'm using a slightly
darker grayish color to suggest step and distance. Now, once that's done, you can again go back to the empty places where you need to fill the
center of the flower. You can use the same old mixture that we had created earlier. And if there is
anything pending, make sure you take your time, analyze your painting, and then proceed to
make the changes. Now, once that's done, you can refine the details, for example, add highlights to the
center, deepen the shadows, or slightly darken one side
to bring more dimension. And with that, we have come
to an end of this painting.
7. Thank you for joining: All right. So that brings us
to the end of this class. Now for your project,
just follow the steps we covered and create your own
version of the painting. You can do it in your sketchbook or even on a separate
sheet of paper. So anything that's comfortable to you, you can go
ahead with that. Now, once you're done, make
sure you click a photo of your painting and upload it
in the project gallery below. And I really hope to
see your paintings. And if you enjoy this class, please take a moment to
also leave a review. It really means a
lot and keeps me motivated to create
more classes for you. So happy painting, and
I'll see you in the next
 Anagha Sivadas, Artist, India