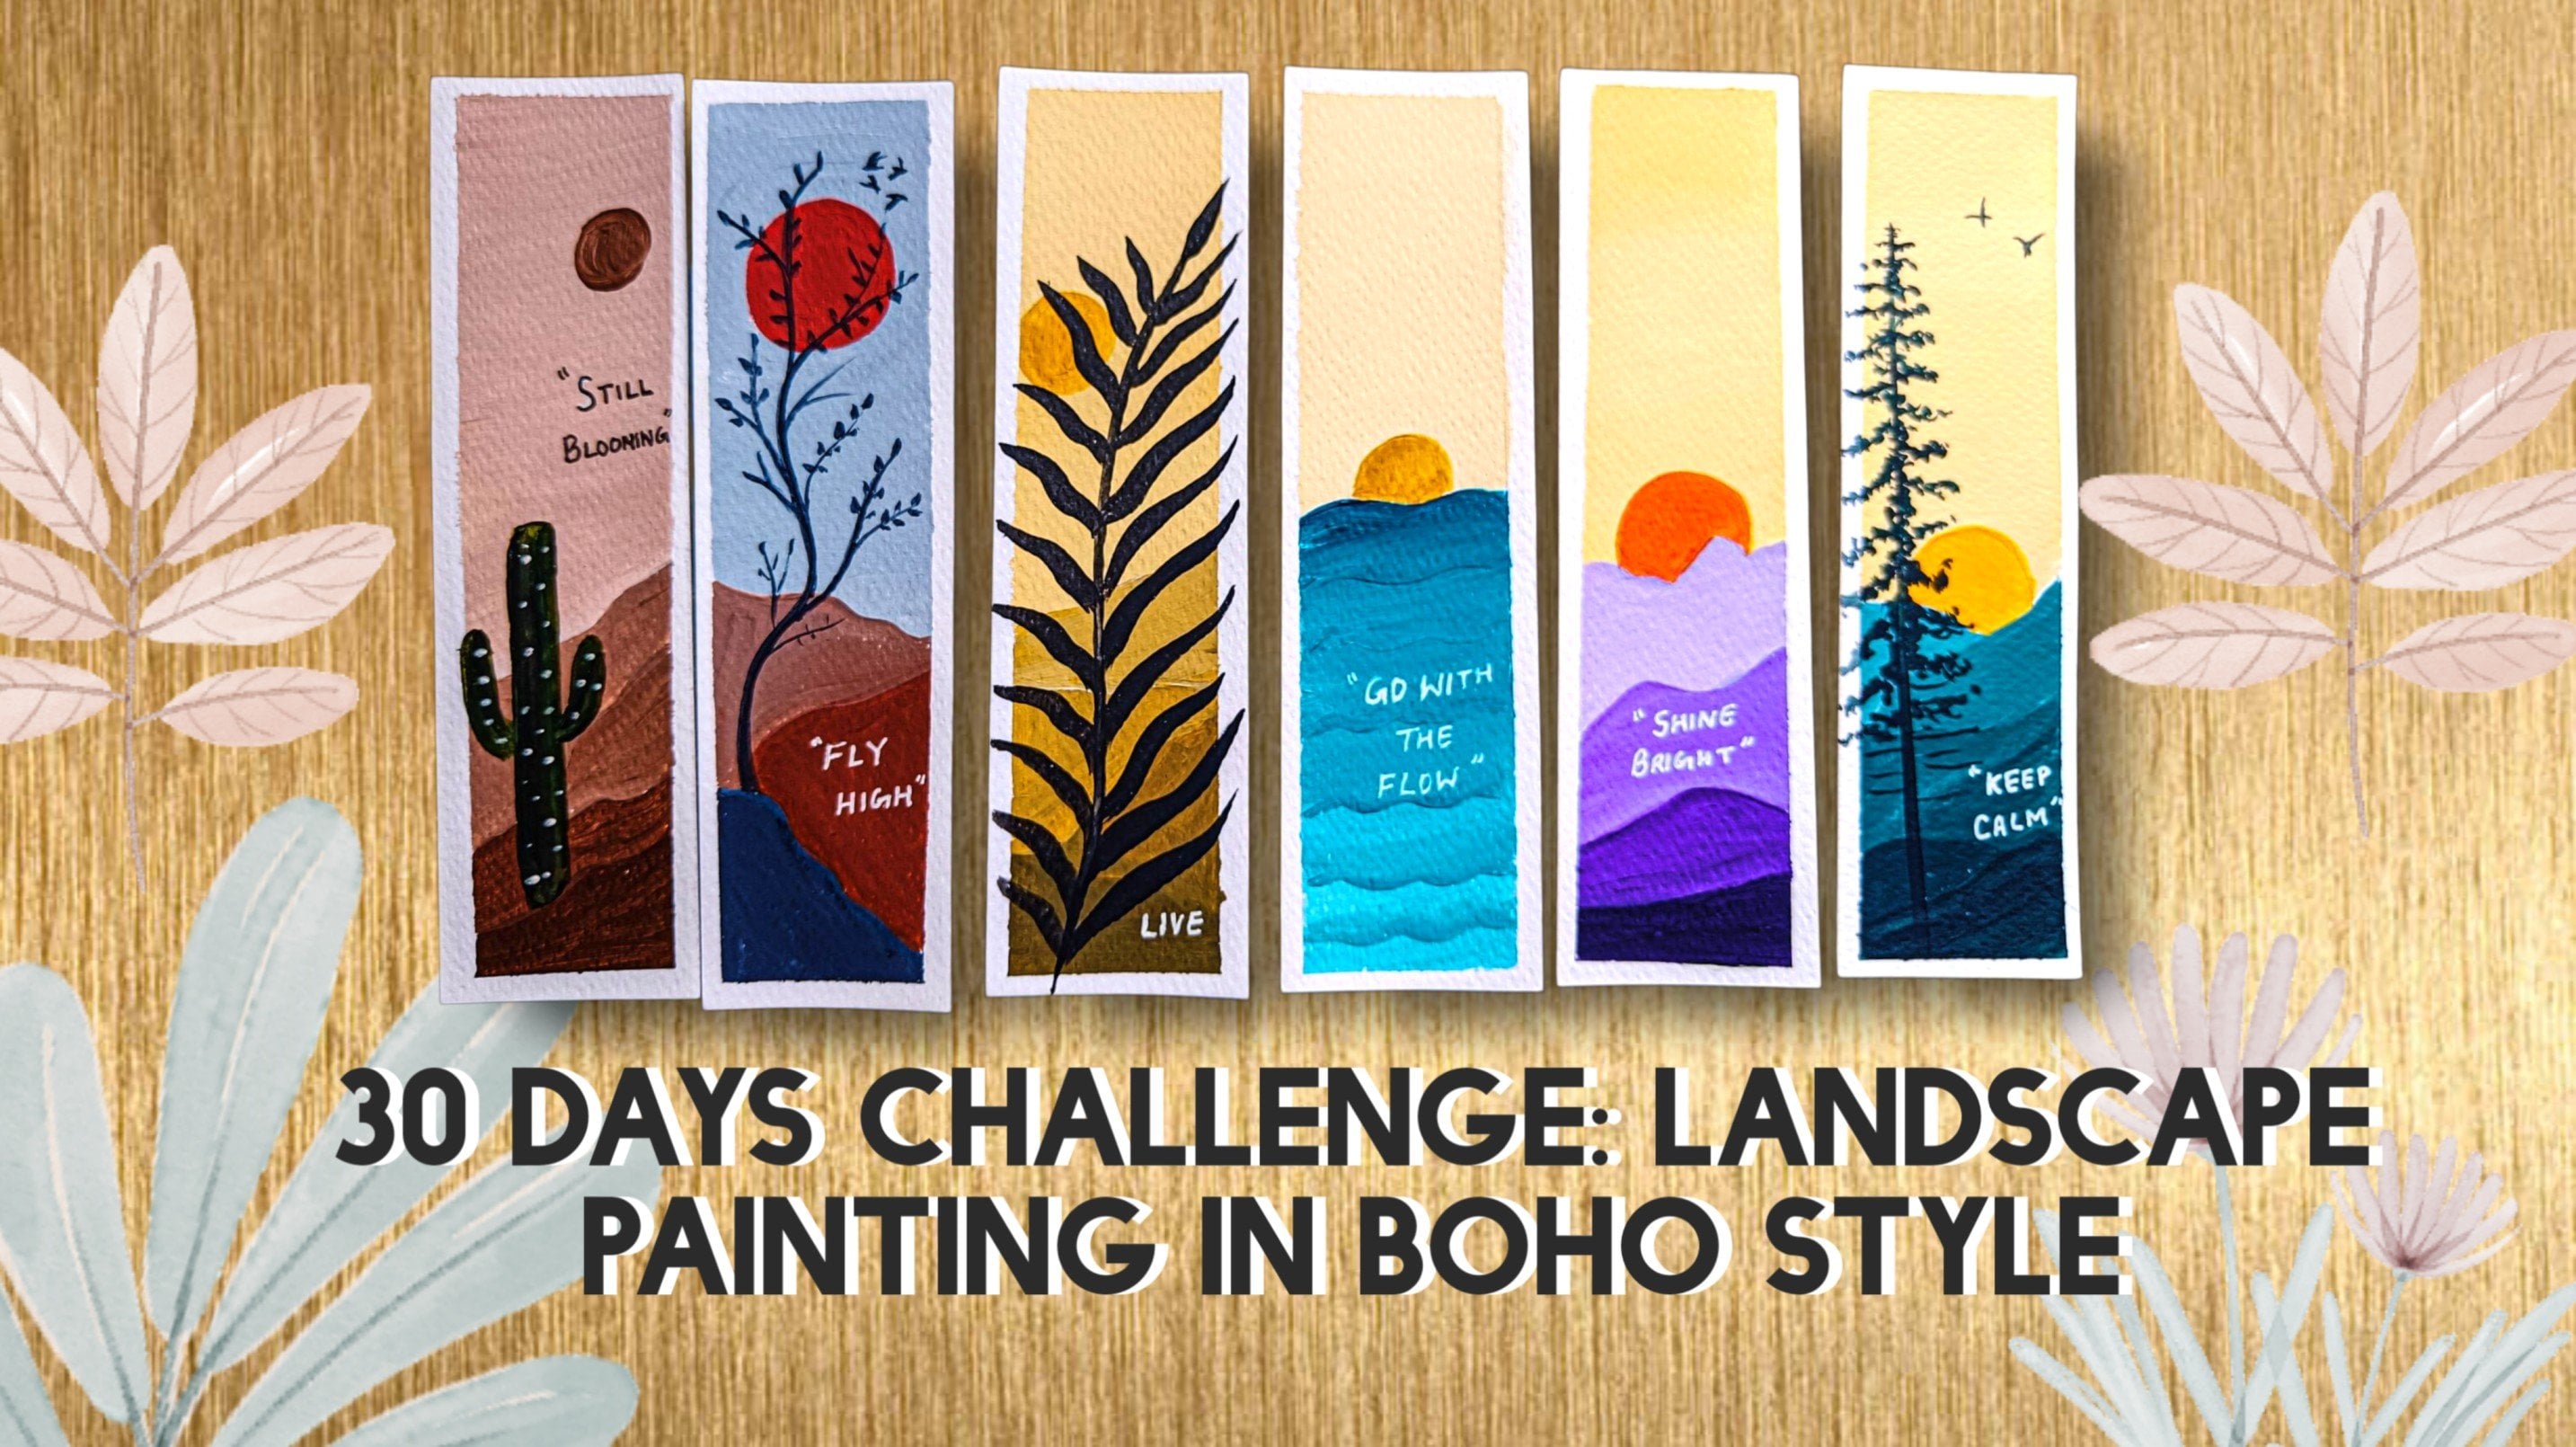
Transcripts
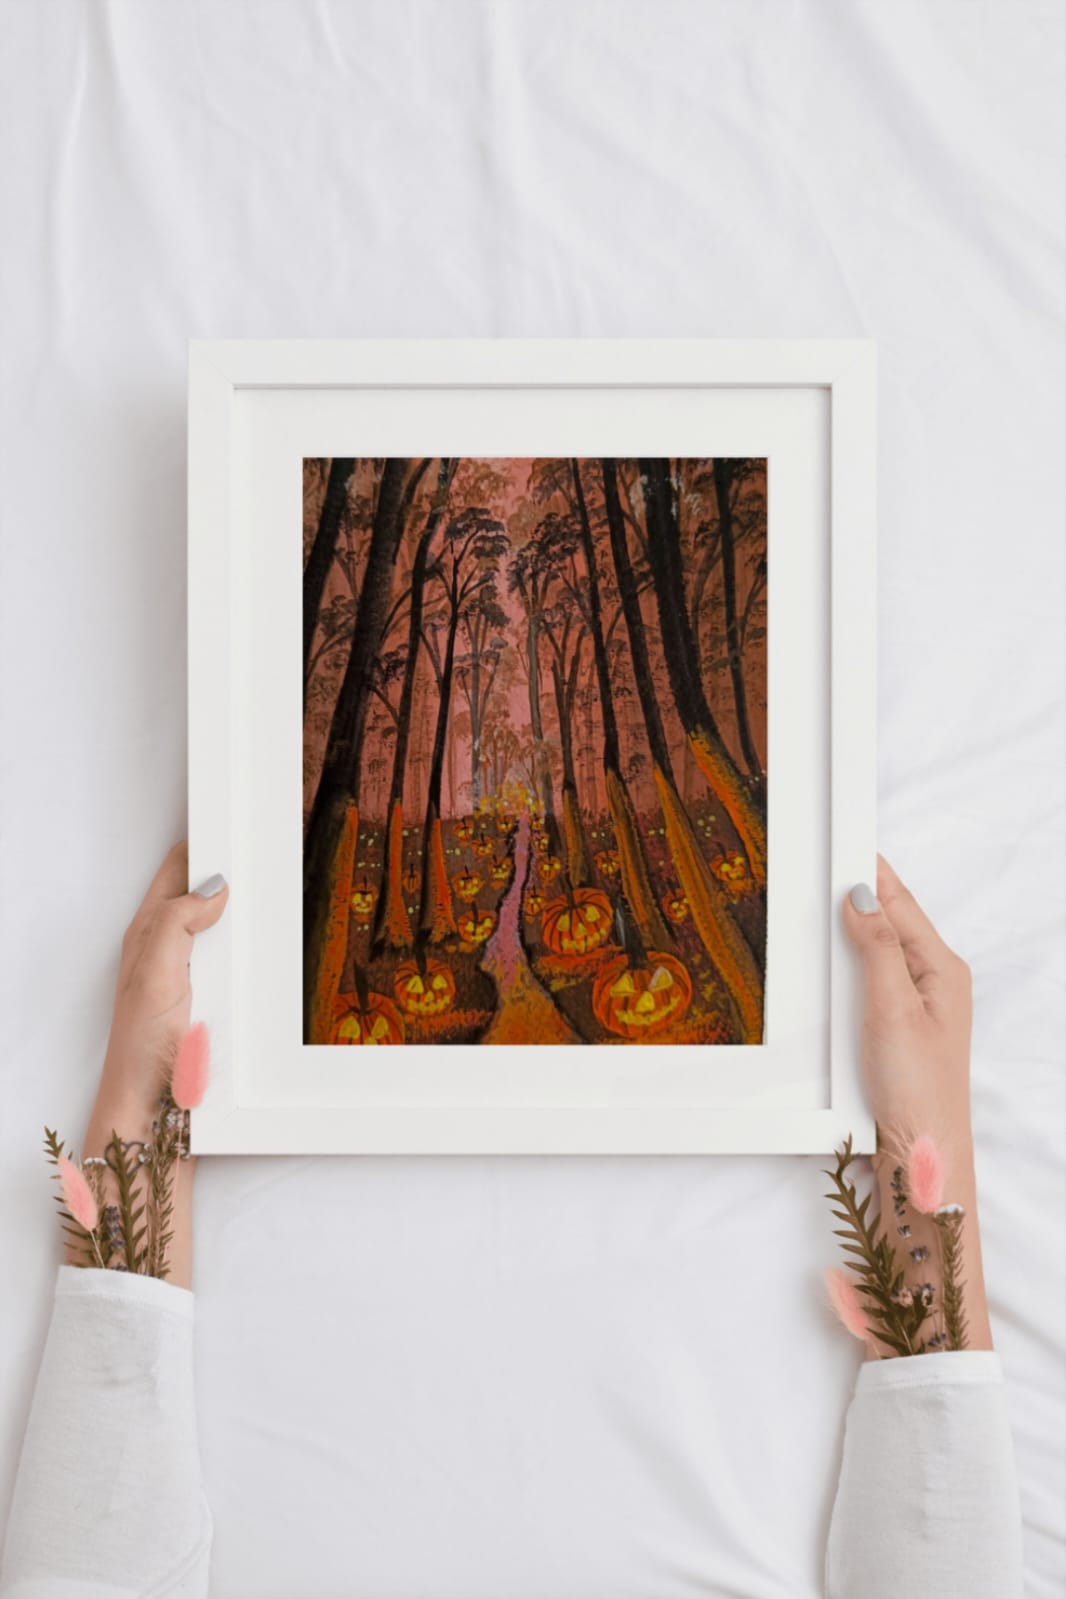
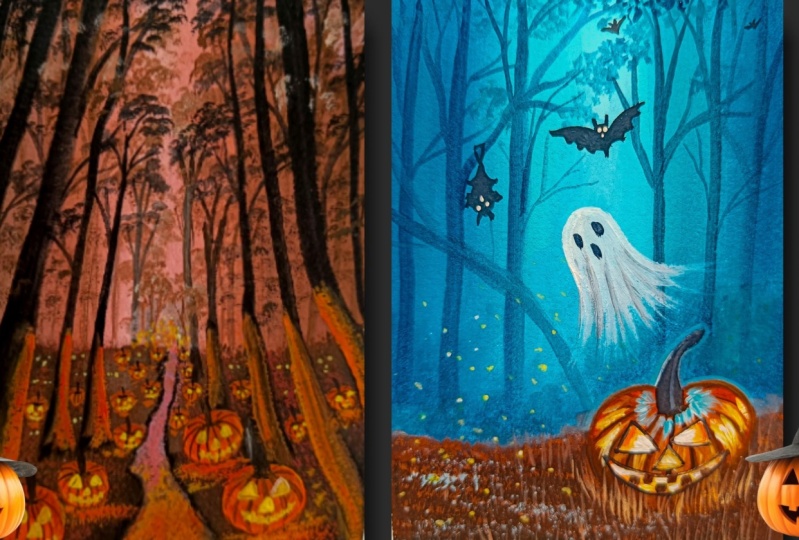
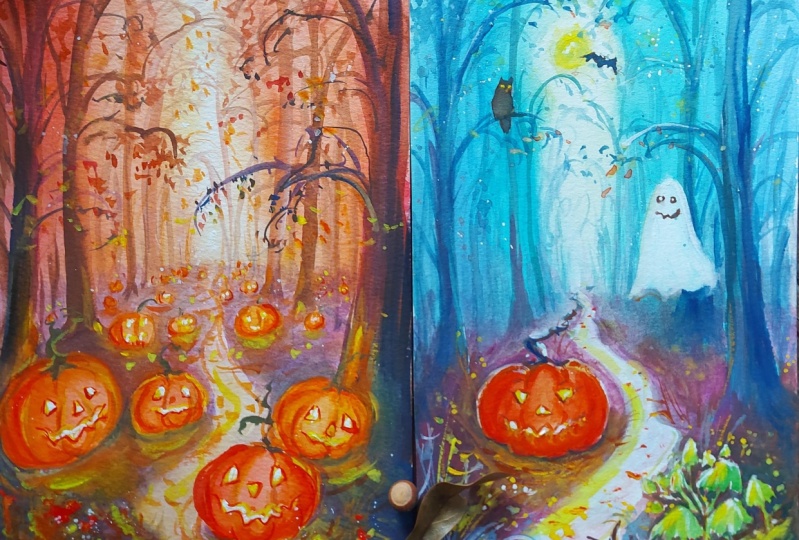
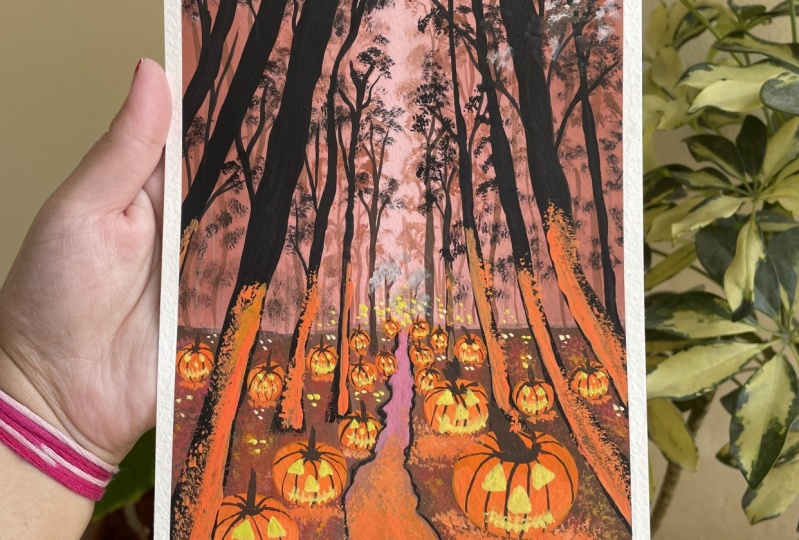
1. About The Class: The forest lay silent
beneath a heavy blanket of mist scattered among the roots and the stones
were the pumpkins. Their glow pierced
the fog like tiny, watchful eyes guiding or warning wanderers along
a narrow, winding path. F in the heart of
the misty woods, on this one night of the year, the forest did not feel empty. My name is Mohini Sinha, and I'm from India,
and most of you know me as Mohini Art Gallery
from my Instagram account. I mostly do nature
related painting, mostly related to nature. So this whole class
will be related to nature painting with Kosh. So in this class, we will be learning
so we will first start with the blocking
of the background, then the foreground, then
the back tree detailing. Then comes the front tree
detailing and blocking, giving three textures
to the front trees. Then comes the
foreground detailing, which we will be doing
with our fan brush. And then comes the
pumpkin shaping, blocking all the pumpkins
which are there, and then giving details to the pumpkin and some more
final details to the pumpkin, giving eyes and nose. And then comes the
entire painting and giving a little
reflection of the light. So this is it. Let's start
with our complete painting, and I'm sure you will
enjoy this session.
2. Materials Required: Welcome back. Let's discuss about the materials which
we will be needing. First, let's discuss
about the colors which we will require for
this entire painting. First, let's discuss about
the background which we will be needing the background where there are
different colors. The first color is
the mix of these, um, rose and a little bit of the
white and the burn sienna. This is the color which is there and it's quite light color because white is added more
in this for the darker color, again, little bit
of burned umber is added to create this dark color. These colors we will be
using for the background, and the other colors are
this is the rose color which has mix of the burnt sienna and a little
bit of burn umber also. In this color, it's a
mix of burnt sienna plus burnt umber and a little bit of rose also and white
is also added to this. These are colors we will be needing for the
background part. I'm just writing down the name so that it
will be easy for you to remember in both the colors, white is added, not much
white in the second one. Now comes the burned sienna also is needed over here for some
areas just burn sienna. Then for the foreground, we will be needing a darker
color which is a mix of the raw umber. Let's talk about the pumpkins, which all colors we will be
needing for the pumpkins. For the pumpkins, we will
be needing this orange, then black and one
more color is there, that is hot pink and
a mix of this yellow. Hot pink when we
mix it with yellow, it becomes a very
bright orange color so that we will be
using for the pumpkin. You must have seen
this bright color. It's because of this hot
pink and yellow mix. These all colors we will be needing for the entire painting. Let's write it down. All these colors we will be needing for the pumpkin orange, then this black color. Also with a mix of burnt umber, we will be using light yellow or lemon
yellow you can use, and this is a hot
pink and yellow mix. These are the colors
which we will be needing for the entire painting. All the below area, which is the orange area we will be doing
with this color. Now let's discuss about the brushes which
we will be needing. So four to five brushes
we will be kneading here, one more brush we will
be kneading here, that is the flat brush. So I forgot to keep it. So just the flat brush for blocking the
background, as you can see. Then comes the lining
part which is there. We will be using the round
brush, all these lines, a thick round brush
of size four or six, then the fan brush for
creating these textures. Then comes the filbert
brush for creating these tree textures and also
these smaller size brushes, that is a liner and a small
round brush for more details. In this. These are the brushes
which we will be using. That is the Filbert
round two round brushes, then liner brush, fan
brush, and flat brush. Let's discuss about the colors. The colors are these
brand colors which we will be using the paper is the 300 GSM cold press
paper from hithrput. This paper I will
be using over here. Then apart from this, we will
be needing cloth, pencil, masking tape, and the
two jars of water. This jar I will be using. So without wasting our time, let's start with this
beautiful painting.
3. Background Blocking: Welcome back. So let's
start with our painting. So first, we'll do
a little sketch, and then we'll start
with the painting the horizon line we will
be drawing, and that's it. And rest of the things we
will be doing while painting. So just taking my pencil
and just trying to draw a line from the little
below from the center, not exactly in the center. It's a little below. So just it is not
a straight line. It is a little bit of curvy
lines, as you can see. So this is above sky where
we'll be creating the trees and below will be the grasses
and pumpkins all over. So this is how we are going
to deal with this painting. So let's discuss about the
colors which we will be using. So the first color is white, then rose deep, burn sienna, burn amber, and black. So all these colors we will
be needing for our painting, let's start from the top
first for the blocking, we will be using a flat brush. You can use the different size of flat brushes depending
upon the size of your paper. So I'm using here size ten. So just taking this rose color
and mixing it with white. Now, if you don't
have rose color, you can use Alazarin crimson or red and mix a little bit of burnt sienna in it to
create this type of color. So just adding white burn
sienna and applying it first in the center because the center part is
the lightest one, so we'll start from
the center first. So as we are going to
create misty forest, so from the center, we'll start, and as we'll
go towards the end, it will be more
darker and darker. So you can see I have made it. It looks like pinkish, but it is not pinkish. So adding more white in
between and just trying to blend with this nice rose color. And again, taking this colour, mixing a little bit more of burnt sienna and
putting this aside. Make sure that your
color is milky, otherwise, you'll not be
able to blend the color. So you can see my
brush is getting dry, so I'll just wet my brush
and again, take the colors. And again, I will just try
to put it on the other side. And then slowly with
the lighter color, I will try to blend this color. The lighter color
is the pink color. So with this pink color, I will try to blend this So every time whenever
you're doing any blending, try to blend with lighter color and go towards the darker color. So again, I'm adding a little bit more white
because I want this to be very light in color and just pushing that color
towards the darker one, similarly to the
other side also. So this is how we are
going to blend the colors. If you have not seen if you don't know how to
paint gauche painting, you can watch my recent classes, which was the 7
Colors of Nature. And there are two to
three more classes of gauche that dad also you can watch just to know the basic knowledge
of how to paint it. So now you can see
I'm just adding this burnt umber and then pushing it towards
the lighter color. So the sides area is darker and the center
area is lighter. So this is how we have
to make the background. So you can see I'm trying to
blend the colors as well. I, I'm just taking the
lighter color and I'm trying to push this color
towards the darker color. Now we'll do same thing
on the other side, mixing all the three
colors and a little bit of white and applying it on the
side, which is the side. Make sure that your
tape is put nicely, otherwise, that border
will not come up. So just adding this
nice dark color. And when we are blending it, we'll blend it with
lighter color. So you can see how vibrant
this is looking when we are doing this blending
part from light to dark. Now, background color,
you can use any color, whichever color you like. You can use green color. You can use steel color, use steel color and
blue color mix. That will also create a
very nice background. Any color you can
use as a background. So it doesn't matter which color you are using.
The technique is same. Misty Forest can be of any color, whichever
color you want. So now we have done
the background. Now we will do the
foreground now. Just adding a little
bit more white in between and blending it
towards the other side. So you can see the
brightness of the painting. Whenever you go towards
the darker side, wash off your brush and
then go to the other side. Otherwise, the dark color
will come onto your brush. Oh, let's do the lower part. So for the lower part, there's a middle area, which is the river part, but we can draw it with
the colors also. So let's first block in it. Now for blocking, I'm
using this Bern sienna and burned umber and little bit of black mix because
I want a very dark color. So you can see I am pushing the color in vertical direction, so I'm painting it in
vertical direction. It's fine if there are brush marks because we don't want very smooth finish
of the foreground. Middle part is a
little bit lighter. That's why I used
that lighter color. Rest all are darker shade. So just try to fill
in the colors, moving the brush in
vertical direction, and just try to fill it up. Even if the brush
marks will come, it will add more beauty to the ground because ground
can never be very smooth. So it's okay if little bit
of brush marks are coming. So just trying to fill it up with more and
more darker color. Don't add too much black to it. Otherwise, everything will
turn out to be black. It is more of a dark brownish
color, maintain that color. So we almost done with
the background and with the blocking of the
background and foreground. Now we will start creating
the details of the forest. So just we are almost done.
4. Back Trees Details: Welcome back. So let's do
the background trees detail. So first, we will be creating
the background trees. Now my background
has almost dried. So now I will be taking
the lighter color, which is a little darker
than the background color. But first, I will take
the lighter color. And for the tree texture, I will be using my Filbert brush of size one or two, you can use. And we will be using damp brush and making the color a little darker than the
background color. Just mixing all
these three colors and making it a little lighter, sorry, little darker
than the background. So starting from the center, little towards the right, leaving that white part, we'll start creating
the tree textures. So slowly, slowly, I will
be giving these textures. Use damp brush. Don't use wet brush when
you are trying this and use very little little color and use the tip of your brush to
create these textures. And with a very light pressure, you have to create
these textures. And you can see I'm not going
inside the center part. I'm just adding to the sides. So on both the sides, I will be adding these
type of textures. If you are not aware of how to create these type
of tree textures, you can watch my latest class, which is there are
7 Colors of Nature. You can see how to create the tree textures
and tree lines. You can learn from there also. So there are almost
ten gauche paintings, which you can try them out, and then after that,
you can try this out. It will become
little easy for you. So just first see the process and then try to create
these textures. This will be easy for you. So you can see I'm just adding the textures in leaving
the center part. And now I will create some tree lines with
my rigor brush. So make your color a little thin when you are
creating any lines and then start creating the tree branches
and the tree lines. Very slowly try to give a
shape of these background. Now, these background
trees are light in color because they are
at a very far distance. That's why they are
very light and very, like in a misty way,
we have to create it. So that's why we
are creating it in a very light and light color. And as the trees will
become in the front, it will become more
darker and darker. So this is how we are going
to create the misty forest. Similar way in any misty
forest, if you want to create, you can create it like
this with any kind of background, any
color background. It's a similar process. So first, I'm just
adding the lines of the trees lighter in color. And as I will go to the sides, I will make the color
a little bit more darker so that it is
visible, the lines. So you can see I'm just adding the tree lines and
the tree branches. Now I will use my
round brush for creating the lines so that little thicker
lines are created. So let's use the round brush. You can use size four or size six round brush and try
to create the lines. So on both the sides, I will be creating
the tree lines. Now these are a little darker because we are
going in the darker side. To make it visible, we have to make
the color a little darker than the
background color. So similar way,
we will be adding the trees on the tree
lines on the other side. So very simple and easy way
to create the misty forest. If you will follow each
and every step of mine, you can easily create this type of beautiful
background textures. Slowly, slowly, we are building
the background effect.
5. Back Trees Final Details: Welcome back. So
let's start further. Final details of the
background tree first. So again, we have to add the tree textures on
the background trees. We have already added
to the center part. Now it's the turn to
add on the sides. So just making it a little darker than the one
which we have created. So just using this burnt
umber and a mix of burnt sienna and
just trying to add a little darker
textures of trees. So it should be like a
half circular shape. You can see I'm just
trying to create a half circular shape and creating some textures
here and there. Just to fill the background. Don't make the color very dark. Otherwise, when you will be creating the trees
which are front, it will not be visible. So try to make it a
little lighter in color mixing burnt
sienna and burnt umber. Not a little bit of
white, also you can add. Don't try to make
the color very dark. So just adding a little
bit of darker trees on the textures on the little bit here and there
where I've created the branches and just
trying to fill it up. So you can see I'm just creating some white textures
also in between so that it looks like that the background white trees are also there
lighter color trees. So there are variations
of three colors. One is light, then
another is mid dark and then another
is the darkest one. So like this, we have to
create the tree pattern. So just adding the tree
textures here and there. It's not like what I am adding, you have to add the same. You can add your own textures. The process is same. Now, I'm just taking
this rose and white and adding a little bit of white spot here and there, just to make this area a little bit more bright and a little bit
white part is visible. So a little bit of sky is visible that I'm trying
to create by adding these textures just
above part only. This will add a little bit of white background textures
on the dark part also. So now let's continue with the texture part on
the other sides also. So first, I'll just take the branches where we will be creating
the black branches, the black color branches. I'm just taking black
color, making it fluid, and then first creating the
branches from the side. As you can see, they are
mostly a little bit slanted. If you can see the picture. So first is a little thick, and as it is going
towards the center, it is becoming
thinner and thinner. So like that, I'm trying
to create the branches. You can see it's like a V
shape which is forming. So likewise, we have to do the branches which
are near the sides. And as it is going
towards the center, it is becoming
thinner and thinner. So if you're not able to create directly
with black color, you can draw first with
the white color so that you can easily remove white colour with a
very thin white color, and then you can draw
it with black colour. So just creating
some nice tree lines and the thick tree trunks. Now, this is a center part
where some stream is flowing. Just go slowly and
take your time and try to do it as
slowly as possible. Don't be it in a hurry because there are lots
of textures in it. And if you will
do it in a hurry, there are chances
of getting ruined. So take your time
and do it slowly. And whenever you are
creating tree textures, use your damp brush. Now for the lines, I'm just using black
color because these are the front trees
which are visible. So you can see first I'm creating the lines,
I'm giving the shapes, and then I will make it little So go one by
one slowly, slowly. First, you can create just
the thin lines and then you can create the
thicker lines. It's totally your choice, how you want to continue
with your painting. You just have to
make sure the lines which are starting from the
corner should be thick, and as it is going
towards the center, it should be thin. So go slowly one by one, take your time and draw these tree lines
because these are the main focus of the painting from the upper side and
below is the pumpkin. So these two has to be the main focus of
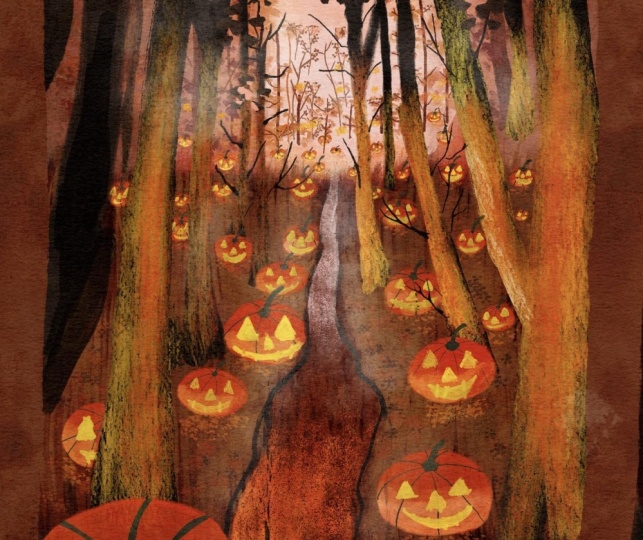
the entire painting. The above is the trees
and below is the pumpkin, which are glowing pumpkin. So just creating all
these tree lines slowly, making it thick one by one. Some of the small trees
also we will add. But first, I'm trying to
create the thicker ones. Just follow the process and fill this all with nice black colour. So once we are done with
these bigger trees, now we will go for
the smaller trees because as these trees
go towards the center, it becomes more
thinner and thinner. So, likewise, we have
to create the trees. First, we will create
the tree lines and then we'll make this
a little thick. So you can see all these trees
have a little thick base. So as it is going
towards the center, the trees are becoming
smaller and smaller. All these trees, you can
just make it little thick just by creating some more
branches here and there. So it's a very beautiful
painting itself. If you don't create any pumpkins and you'd keep it like this, it is already looking
very beautiful. But yes, this is the
Halloween painting. So yes, we have to create
pumpkins over here. So slowly slowly
making the lines a little thick and also
creating sub branches. So try to make the ones
which are the smaller ones, mix of this brown also, make it a little
lighter in color. Now slowly, slowly the shape
is coming, as you can see. Once we are done with all
the branches and everything, then we'll start creating
the tree textures.
6. Front Trees Final Details: Welcome back. So
let's start with the front trees final detailing. So the three textures
are left now. So let's start creating
the tree textures now. So using my again,
here, Filbert brush, I will be creating
the tree textures, starting from the smaller trees, and we'll go to the bigger ones. So similar way like we did the smaller and the
lighter color trees, similar way, we have to do, but with black color this time. So these are the front trees, so it should be a little darker than
the background trees. Then only that depth will come because if you will see
any landscape or anything, the things which are
very far looks a little blurry and the things which are a little close towards
it look very dark. So this is the same thing we are doing in
this painting also. The things the trees
which are very close to us to the foreground
is little darker, and the trees which
are very far are little blurry and
light in color. So you can see slowly, slowly, I'm just trying to
add the entire trees and making this forest
a little dense one. So whenever you are adding
these type of texture, make sure your brush is damp. It should not be wet and don't take too much
color on your brush. Otherwise, it will
create a patchy effect. Same way we will be doing
on the other side also. Now, one side I have done. Now we'll start with the
other side also with similar textures like
we did on one side. Same way we will be doing
on the other side also. Take your time and
do it very slowly, and don't be in a hurry when you are doing these type
of textures and take very less color when you are giving these
textures to the trees. So you can see slowly, slowly that effect of the misty
forest is coming up. So you can create any type of misty
forest with any color. You can use Pains gray
or Prussian blue mix to create these
beautiful backgrounds. Especially in winters, we
see this type of effect, the misty effect that
we see in the winters. This type of effect you can create using the same technique. So just enjoy the process and do the textures
slowly and carefully. And now, once we have done
the whole texture part, now we will be doing
the foreground part. But before that, let's add
a little bit of white spot on the top to create a effect. Also the trees which are below, just making a little bit more lighter with my filbert brush. Creating some light effect on the top just by
using this white and a little bit of pink so that some white rays are
coming from somewhere, creating some spots
here and there. So now just making these tree
lines a little more light. So now let's create the
foreground textures. Using my fan brush, I will be creating
all the textures, leaving the portion
which is in the center, the rest of the
area, I will just cover with these textures. Again, damp brush
you have to use. Don't use wet brush. Make the mix of this
red and burn sienna and this burned umber mix and
then create these textures. Just by using the
tip of your brush, you can add little bit of white in it to make it more visible, the textures which you are
putting so similar way, we have to put it in
the entire sections. Even if some textures
are coming on the tree lines or the tree
trunk, it's perfectly fine. We will overdo it
with the black color, so don't worry about that. Just adding to the horizon line where there is the textures and some textures
on both the sides. Now, once you have
added the textures, now we will add the center area, which is with white
and rose color, very light color
using my round brush. And as I will come closer, it will become more
darker and darker. This is the whole
foreground part now. After that, we will be creating
the pumpkin shapes and then we'll create the
shapes of the pumpkin. So just adding the
outline with black color.
7. Pumpkins Blocking: Welcome back. So now let's start with the pumpkin blocking. So for this blocking, we will be using two colors
as I have taken. You can see. So a little bit first,
let me cover the areas where that textures have gone. So I'm just covering it with the same color that
is black color. Just blocking it with
the same black color where the textures
have appeared. I have taken two
colors, as you can see, the orange and lemon
yellow over here. And first, I'm just
mixing these two colors. That is the burn sienna and red and a little
bit of orange. This is cadmium orange
which I have taken, and then I'll create the
shape of the pumpkin. The pumpkins are over from the side and a little
bit of curvy on the top, and a little bit curve
on the lower part. So first, I will
create the shape and then I'll start
filling the colors. So similar color you can use
for creating the shapes, and then you can just
do the blocking. So as it will go far and far, the shapes of the pumpkin will become more
smaller and smaller. So this is how we have to
create the pumpkin size. So pumpkin can be
created anywhere. It's not like where
I have created. You have to create the same way, but try to create it smaller as you go towards
the horizon line. Bigger at the foreground,
which is near, and as it goes farther
and farther away, it should be smaller
and smaller in size. So you can see first I'm
just creating the shapes, and then I will do the
blocking of these shapes. Some are hidden behind the
tree, half is visible. So like that, you can
create the pumpkins. Oh So once we have done the shape part, now we will be doing the
blocking of the shapes. So filling the colors
with the white mix, and there burn sienna orange. So it's a little bit
of this rose color. So this is the color
which I'm using here for filling this nice, beautiful pumpkin,
which is like, not a tomato colour. You can say it's a orange, yellowish, and
brownish color mix. So that's color we have
to create in this. And when you are filling it, try to use thick colour. Don't use thin colour. Otherwise, the background
color will start reflecting. So use thick colour, milky color, and don't
overdo it again and again. Otherwise, the background
color will reactivate. So try to use your round brush of smaller size like four or two and do these blocking of
small, small pumpkins also. They are full of This
forest is full of pumpkins. That's what we are
creating over here. So as many pumpkins you can
create try to create it. And try to fill it nicely
and in proper shape. So you can see, as it is going
towards the horizon line, it is becoming like a dot. So when this color will dry, it will become a little faded, so it's perfectly fine. We'll do one more coat on this. Just making this area a little
bit more gloey by using this orange color and just adding some orange and just blending it with
the above color.
8. Pumpkin Details: Welcome back. So let's start
with the pumpkin details. So we have already
given the shapes. Now, just to make it
a little more bright, I have taken one more color
that is the hot pink color, which I've taken over
here, as you can see, and little smaller size
brush this time I'm using. So just taking this yellow and mixing it with
this hot pink. This is lemon yellow,
which I'm using here, and you will see how bright
this orange will look. Just to make the orange, a little bit more bright, you can use this hot pink. If you don't have this hot pink, you can directly use orange,
and then you can create. So you can see the difference of this orange and the one orange we have created in
the background. So it's a very bright and
vibrant orange it is. When pink is mixed with
this lemon yellow. So I'll just do the blocking
of this entire thing, making the upper part
a little bit more darker and the lower part
a little bit more bright. This is how I'm just going
to make this whole shape. So one by one, again, I will just try to do the
filling of these pumpkins. So you can see I'm just making the upper part a little bit more darker and lower part a
little bit more lighter. So similar way, I
will be blocking the entire shapes which I have created over here with this bright, beautiful orange color. You can do one thing, first, fill the entire thing
with first orange, and then you can do the
darker part up after that, and then you can just
blend it because in gauche we can easily blend the colors because they
reactivate with water. You can see how bright this orange is looking just
by adding this hot pink. It's hot pink or
fluorescent pink, whatever you want to
say, you can say it. Filling the shapes one by one. So a little bit of small small shapes I
will also be creating on the area which is the
part of the shadow part. So now I'm using the
darker color and I'm just trying to blend with
this brighter color. Oh Now, let's make the upper
part of the pumpkin. So here I'm just using a
little bit of white so that this dark color is visible. So just black and
little bit of burnt umber you can add
to make this shape. So similarly, I will be adding
on the entire pumpkins. So do it very slowly. Take a smaller size brush, or you can use your liner brush also if you're not
comfortable with your round brush and try to create one by one these shapes, the stems which are
there on the top. All these small, small details actually add more beauty
to your painting. You can see slowly, slowly, I'm just trying to
add these shapes to the entire section of the
pumpkin where I've created. Specially to the smaller sizes, you have to be very careful. O. Now we will be adding the lines of the
pumpkins which are there, mixing this color with a little darker color and
just creating the lines. I don't want these lines
to be totally black, so I'm just mixing
this burnt sienna and burnt umber together and
using my smaller size brush, which is of size one and
creating these lines. This is my round brush
only of size one. You can use your liner brush or rigger brush for
creating these lines. These are all curvy lines
which the pumpkin is having. So, similarly, we
will be creating for the entire pumpkins which
are there one by one. All these very minute, minute details will
make your painting look more and more beautiful
and more realistic. So that's why I'm just trying to add these smaller,
smaller details. Do it very carefully, especially
for the smaller ones. Once we are done with
the lining part, then we'll create the eyes and the nose and the
smiling face and also the textures
of the ground that some lights are also falling on the ground because
of these pumpkins. And some lights are
reflecting on the trees, as you can see in the image. So slowly, slowly, this
painting is building up, and it's already
looking very beautiful. I am really enjoying this, and you can leave it like
this also if you want. But I will love to create
these eyes and nose. So to create the
Halloween effect. So this painting especially
for those who really want to celebrate Halloween with
your painting style. So try it out, and I'm sure you will
love this painting. So I can see I have created the lines on the entire
small small areas. Also taking this white
color and a little bit of this pink color and just making this area a little
bit more lighter, just by taking white, making it a little bit
more of the misty effect. And then I will create some
more lights over there also. First, I'm just making it
a little bit more light. Now, just taking a little bit of the orange color and adding some small small dots here
and there just to look like that there are some small pumpkins
which are very far. So also a little bit more lights I will add to this stream part, which is there just by adding more bright color that is white and a little bit of pink and a little
bit of orange also.
9. Final Details: Welcome back to
the final details. So for the final details, first, we will add the eyes and the
nose for all these pumpkins. So for this, I will be using my round brush of size one
and mixing this lemon yellow with the white and slowly, slowly, I'm just adding these
shapes, as you can see. So these are mostly
triangle in shapes. So the nose and the
eyes mostly triangle. And the lips first I will create a half circle and then
some nice vertical lines. This is a very easy
form of creating these, beautiful eyes and nose, just like a smiling face,
like they're laughing. And to the smaller ones
also similar ways, try to make it more
accurate and more perfect. You can just create a dot also when you are
creating some dots which are visible at
a very far distance that only dots are only visible. So just creating some dots here and there and
just making it a little more light just by removing extra
color from my finger. Adding some more dots of these, especially the ones
which are very small, you can just add the dots and
you can leave it like that. And the ones which are near, you just have to create
the triangle shapes. Try to use more amount
of white and less amount of yellow so that it
becomes more vibrant. So slowly, slowly, I'm
just trying to add the Is in all these pumpkins. So try to make it very simple, use thick color so that the background color do not
mix with your front color. And in one go, you can
create the face textures. So try to use thick colour. Don't use thin colour. So for the smaller ones, you can just create the
eyes if you are not able to create the smiling face. Some dots you can
create in the area which is the misty area, just some yellowish dots. These are very minute, minute details which will make your painting look more
like halloween effect, like Halloween feel because these areas like misty forest is filled with these pumpkins. That's what we are trying
to create over here. Also, some eyes, you can see, I've created just
to look that there are some pumpkins which
are at a very far distance and only eyes is just
visible similarly, I'm just creating some eyes
and nose here and there. Oh Now, let's add some tree textures, also the tree highlights
which are there, the trees which are
near to these pumpkins, which are very glowing
pumpkin because of these, these it's getting radiated
towards the tree area also, and the tree is also
shining like orange. So that's what I'm trying
to create over here. Use thick colour and try to blend this color
with this black. If you're not a you can
leave it like this also just by using thick colour and a little bit of a
little dry texture. Effect, also, you can leave. It's totally your choice, how you want to create
the tree textures. We are almost in the
end of the painting. So if you're trying it out, do share your project work
in the project section. And do tag me on my Instagram. That is Mohini Art Gallery. I will love to see
your project work. I'm sure you will love
painting this Halloween. And so just adding some nice bright orange
textures to the tree trunk. Some textures I will also be
adding to the ground part. Using my fan brush, mixing it with the same color, just adding some more textures just below the pumpkin
where they are, just to create some
glowing effect that the ground is also glowing
because of these pumpkin. So just keep on adding
these bright textures onto these tree lines to some of
the pumpkins below part, which is the ground part, just to give a little
more bright effect. For the areas where the
fan brush is little big, where we can use
these round brushes to create those effects. So I really enjoyed
doing this painting and especially the
bright cloing pumpkins. I've never tried
this, so I thought of trying this and
sharing with you guys. So I hope you enjoyed this painting and we
almost done with it. Just a few more details
and we are done. Just taking this color. This is the area, which is the tree area. I'm just trying to create a little bit more visible
trees which are there. Now, whenever you
end any painting, there is never any ending because every time you will
feel that this is missing, this is missing,
this is missing. So this is what I feel when I
complete my painting. Okay? This is also missing. So there is never any ending process. You have to end where you feel that your painting is perfect. Just adding a few more dots and then we'll just take out the tape and we'll
see how it looks. Just little more
textures to this part, which is the stream
part with my fan brush, mixing this white and rose color and just adding a few more
textures on the top part. Also making this line, which is the black
line a little bit more visible because of these
textures, it has gone. So I'm just making it a
little bit more bold. Finally, we are almost
done with the painting. We will just do a little bit of the final touch up
and we are done with it. You can also outline this
with white color if you want, and you can leave
it like this if it's totally your choice, but
I will leave it like this. I will not outline
it. But you can outline just to make it a
little bit more brighter. Now, let's take out the
tape and see how it looks. Just one more thing.
I will try to blend this area which is here
near just making a little bit more bright
and just blending it with the making this whole tree line a little bit more
bright and more visible. So you can see there is never
ending to any painting, so you have to decide when you
have to end your painting. So I'm just giving the final
touch up to the painting, just making the lines, which is the tree lines
a little bit more brighter just by
using orange color. So I hope you enjoyed this
whole painting of Halloween, and I would love to
see your project work, some beautiful project works. So just So just blending the colors
with the orange color with this black
color. So this is it. Thank you for watching.
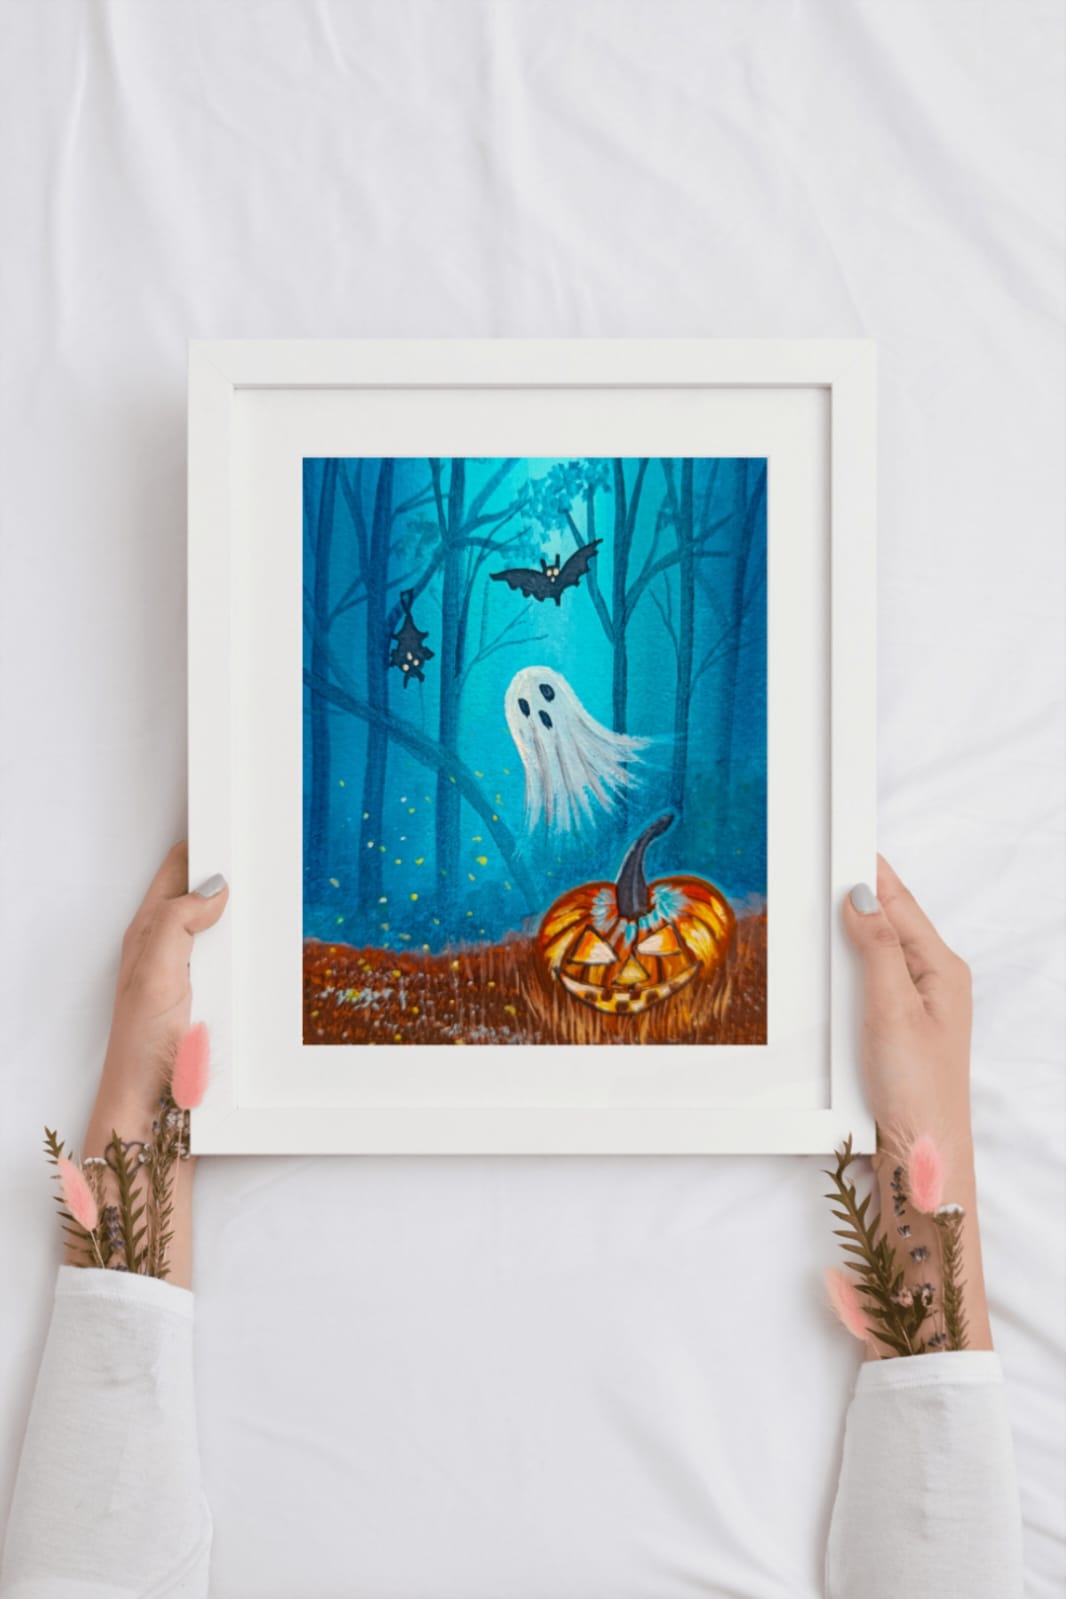
10. Bonus Lesson Background Blocking: Welcome back to
the bonus lesson. So let's first do
a little bit of drawing and then we'll
start with the painting. So first, very simple drawing, just one pumpkin
we will draw and the horizon line
where it will start. So just that and rest
of the thing we will do directly by using the colors. So simple first, the
pumpkin drawing. I'm trying to draw it with
a very light pencil so that there is no pencil mark
after we do the coloring. It's like an apple shape only
more flat at the bottom. And the horizon line, which is not straight, it's
a little bit of curve. Now, let's discuss
about the colors which we will be
using over here. The first color is
the black color, then the teal color, Prussian blue, white,
and Bernsiena. These all colors we
will be using first. Using my flat brush, taking first white color
and teal color mix, and it will be a very
light color in the center. So try to make it as
light as possible. I feel that it is more dark, so I'll just adding
more white to it. You can see I'm adding
more white in the center. We have to start the
painting from the center like we did in a previous
misty forest painting. It is similar to
the misty forest, but the color is different. So just taking more teal on the sides as you can see
the picture here over. Adding more darker color to the sides and little lighter
color to the center. For blending, use
just white and try to blend these two colors
in both directions. Don't use too much water, take thick color, milky color, and try to blend the colors
first and then move forward in the other directions
like the side directions. Now I'm just washing
off my brush and just take this
blue and teal mix. It is a mix of blue and teal and I just applying it in the sides. Taking more blue and teal color together and just
applying to the side. After that with light color, I will try to blend this. You can see I have
left a little bit of the lower portion as well. Just to give a little
misty look we will be doing with the
circular round rush. Now, similarly, I'm doing it on the other side also and just trying to fill the color and then we will
blend the colors. Do it carefully. Don't try to put it inside that
pumpkin shape. Even if a little bit of color go inside, it doesn't matter. We can always overdo it with
the thick gauche color. Now the background
part is almost done. We will do a little bit
of lower part as well. Because lower part, you
can see I have left it out because this is
more bluish in color. That's why I left it just making blue and teal mix
and just moving the brush in circles and
filling the lower part. Because I want the misty look
to be at the lower sides. That's why I'm doing
with my round brush. Just making it a taking the colors and just
making it with circles, just filling the colors, and just blending it with
the upper color also. Just go one by one, take the light color and
blend the colors as you know that these colors get
reactivated with water. It is a little easy to blend these colors when we
are using gauche. Similarly, on the
other side, also, I'm adding this blue color and little teal mix and
just filling it up with the round brush. Also I'll try to blend this
with the upper color as well. You just have to make sure that there is no sharp
lines in between. You just have to blend
it very smoothly. You can see after blending, the lower portion
has more blue and the middle part is a little white and the sides are bluish. For this type of background, we have to create when we
are doing this painting. After doing the background, we will add some
trees also to this. Now the trees also should
be very light in color. Use a little more water to make the colors a little
more transparent. I don't want it to be a very thick color and to
be a very sharp color. So make the colors a little thin and then make these
lines over here, just adding a little bit of black and blue mix and just
trying to create the lines. You can always blend the lines
with the background color because the background is still wet and I'm using
and wet background. It is not a dry background. That's why the colors are
not coming in very sharply. So when you are using
on a wet background, automatically the color
value lowers down, it becomes a little lighter. That's why I am just using it on the background which
is already wet. Adding some branches. I will also do it on
the other side as well. Adding the trees and tree
branches here and there. Similarly, I will be doing it
on the other side as well. If you'll follow each and
every process like I am doing, you will be able to
paint this easily. So very beautiful
and very vibrant background it is as you can see when we are
using teal color. If you don't have teal color, you can use the light blue
color for this background. Adding some of the trees
and the tree branches. A little bit of the broken
trees also I will add. This is the complete background and we'll start with
the lower part.
11. Bonus Lesson Foreground Blocking: Welcome back. So
let's start further. So now let's start with
the foreground blocking. So for this, again, I'm using my flat perch with a mix of
burn sienna and black color. And with just in
vertical direction, I will be blocking this
entire foreground first. Making the lower portion more darker than the above portion. It's okay if there are brush marks in this
because these are grasses, so there will be a little
bit of brush marks. So don't worry about the brush
marks if they are visible. So just blocking this
entire foreground leaving the pumpkin. Now, you can use the sides
of coloring by using your round brush or you can use your flat brush also if
you're okay with it. Now let's do the
blocking of the pumpkin. I'll just take first
the misty forest look, blending this color
with this blue color so that it looks like
a misty effect. Taking a little
lighter color that is blue colour and white
and just trying to mix this color with the
brown color which is below, just to make sure that it
looks both the colors are very foggy and not sharply visible. So my upper portion
has also dried, so we can draw here the
ghost, which is there. But first, let's
lock in the pumpkin. I'll just take the orange
color here that is cadmium orange and I'll mix this Bnciena little
bit to this orange, and then I'll start
filling the pumpkin. Using my round brush, I will be filling the
entire pumpkin first. The upper portion is more
orangy and the lower portion is more towards the darker side that is more brownish,
blackish type. So similar, we will be
painting this also. You can see I've just
block in the above part. Now, the lower part
is a little darker. First, I will apply
the colors and then I will try to blend both
the colors together. So this pumpkin is actually
residing by the grass. So there are many grasses, big, big grasses are there which will be having the
orange highlight. First let's do the pumpkin and then we will do the grasses. The above pumpkin is the stem. This fill, we will just be
adding the black color, just blocking it with
black color. That's it. Almost blocking of the
foreground is done. Now the detailing is left. Now taking some more of this blue and white
mix and a little bit of teal also and just
blending this part first, the part which joins the
foreground and the background. Just trying to blend
the colors more and making it more look
like misty effect. Taking a little bit of black
because this color has little it was wet so
little spread out. I just making a proper
shape of this stem. Now, let's add the
lines which are there inside the pumpkin. So taking yellow and orange mix, and first, I will draw the
lines with lighter color. So again, with round brush, I'll just draw thicker lines to give more effect
to these pumpkins. Now once I've drawn these lines, now I will draw the
little darker lines with mix of this brown
and black color. You can see already
this painting looking so vibrant
and so beautiful. You can just leave the background like
this and it will look like a very beautiful
landscape painting. I don't want to use
perfectly black color, so that's why I mixed
a little bit of this burn sienna in this
and just drawing the lines. Now, once this base will dry, then only we'll add the eyes
and the nose and the lips. So a little bit of highlight
with yellow color. Adding a little bit
of highlight to this with a little bit more
lines which are visible. Just adding a little
bit more foggy textures in the background just with my round brush just to make
some sharp lines more blurry. Now, let's add the coast
which is there on the top. We'll add here the grasses. But before that, let's add the
coast which is on the top. So just using my white color and giving the shape of like a
U and like umbrella shape. So just directly take thick
colour and try to draw this. Don't use thin colour, try to take thick colour then
only this will be perfect. Otherwise, this full
color will blend with the background color,
take thick color. A little bit of grayish
lines in between we can add. Also some leafy textures
on the top with a very light color
which we have used for the trees as well
using my round brush. All these small, small textures actually add the beauty
to the painting. So try to add these
with very light color. Once the base of this
white has dried, just add one more coat to
this so that this becomes more white and more vibrant and more the grayish lines here. Just taking this
white and teal mix and adding more highlight to this stem part just to make it more
vibrant and visible.
12. Bonus Lesson Detailing: Welcome back. So
let's start further. So let's start first detailing of the grasses
with my fan brush. For this, I will
be mixing white, orange and a little bit
of this burnt sienna together and just
adding the textures. Try to use damp brush. Don't use the wet brush. Otherwise, these effects
will not come up. So just adding some of these grassy textures
to these foreground. Make sure that the
color is lighter than the base color
which you have used. That's why I have mixed
here this white color. So just trying to add
the grasses all over. Very easy and very beautiful the texture comes
up with this fan brush. Now, this is the
Bristol fan brush. Don't use the synthetic one. Use the Bristol fan brush
and just taking, again, my round brush and
mixing a little bit of white to this brown
color and adding more longer grasses towards the area which is
joining the pumpkin. So there I'm just trying to
create some longer grasses, just making the color a little more bright by
using white color. White orange and
the burn sienna, all the colors together make
this color a little vibrant. So try to add all
these colors and then create the longer
grasses, just like this. You can use your rigor brush also for creating your grasses. It depends upon which
brush you are okay with. You can use the
rigor brush or you can use the round
brush of size too. Now, let's take again, the fanbush and add
a little bit of this background textures to the grasses that some
lights are falling on these just turning the grasses into blue just here and there. I'm just trying to
add the grasses. Now, let's add a little
bit more brightness to the stem area which is there just
outlining it with a light bluish color and
outlining the pumpkin as well. The outside outline it is. Now taking this black
color and making the small eyes and
mouth of the coast. I will also be adding
some of the bat which is flying and which is
also hanging on the tree. Let's also add those as well. Just making these cloth
longer a little bit. Let me just try to zoom in this area so that
you can see clearly how I'm trying to draw these
small bats and bigger bats. Some smaller bats,
just like a section. First, you make the oval
section and then on the top, there are two horns
which are there, and then the wings seem
similar like the wings of the butterfly or the
wings of the birds. It's similar, but these are, again, little pointed wings. So like that, you have to
draw the wings of the bat. If you're not comfortable
directly coloring it, you can draw it with pencil and then you can just color it. Making these eyes little picker. Now, one more pat I will
be adding over here, which is hanging on the tree. Just first I will make the
legs and then I will make the complete body which
is hanging upside down. Just try to add a V section
and little curvy lines and then the oval shape on the top with the two horns which
are coming outward. This is how we have to
draw the hanging bat. Now, let's add little eyes
and the lips of the pumpkin. Make sure that your
background has dried and use thick colour of white for drawing this
triangular shape yes. Try to use thick
colour, don't blend it. Otherwise, the background
color will mix. Always take thick
colour when you are layering any color on
top of the uh color. Now, let's add little
small eyes of these bats, very small eyes and nose, which I will be adding here. So this is it for the
bad and a little bit of the highlights of blue
on top of this pumpkin.
13. Bonus Lesson Final Detailing: Welcome back. So let's start
with the final details. So we have done the
backgrounds and everything. Now let's start with
further the eyes details. Now, first, I'm adding this
orange color to the sides. Use thick color when you are
drawing all these things, then the yellow color. And after that, I
will just try to blend these two colors together, the orange and the
yellow just by my brush. That is the damp brush. And similarly, I will
be doing the lips also, the mouth, which is wide open. Adding a little bit
of orange color and some yellow colour also. This paste will dry then only I will add the teeths
which are there. Just adding some
more highlights to the sides using white
and yellow color. These are the final details which I'm adding because these are necessary to complete the paintings when
you are doing, especially this
pumpkin one because a little bit of each
and everything is left. Adding some more teeth inside
this with my brown color. Now, let's add some fireflies which are in the background with using this yellow color and
try to use these colors, just a dot and just remove extra colors with
your fingers just by tapping it so that
it doesn't look like very bright and very bold dots. Similar fireflies, I'm just
adding some of them on the background and some I will add on the
foreground as well. You can use your
round brush of size two or one for doing this thing. You can also sprinkle
with your flat brush if you want for drawing
these fireflies. A little bit more lighter
values of grasses. I'm just trying to add near
the pumpkin which is there. Similarly, I'm making more
bright this goes by adding a little more white color
to the area which is the outside area of the shape, especially
the border part. A little bit more
darker colors onto these teeth part and also
we will outline this. Simply outlining with your
round brush or rigger brush, you can use any brush
for outlining it. Outlining is important and only the whole eyes and
the mouth will be visible. We are almost done
with the painting, just a few more details
and we are good to go. I hope you enjoyed this
whole series of Halloween. I just thought to bring share these painting tutorials with you because of
Halloween special. It's actually Halloween special
painting and I hope you enjoy you will enjoy doing
this whole painting. And if you have tried any of
these to tag me or you can share your project
works or tag me on Instagram that is
Mohini Art Gallery. So just giving
final touch to it. Now, let's take out the
tape and see how it looks. So one thing I will
add a little bit. I forgot to add the nose also, so I will be adding that
and also a little bit of grasses and the shapes of this making it a
little more dark, the shape, the outer outline of this pumpkin so that it
is more clear and neat. Also adding the
highlight on the top. Taking black color and mix of
blue color and just making the color a little lighter and adding a little
bit more branches on the top part and a little
bit more tea tree textures. Also, one most
important part that is the nose part which
I'm missing over here. So just adding these just adding a little bit
lighter color in the mouth and adding the nose again
with white color and then highlighting
it with orange color. So this is the
complete painting. I hope you will enjoy doing this and thank you so much for your constant support
throughout and for watching this entire Halloween
series. Thank you so much.
 Mohini Sinha, Acrylic and Gouache Artist- Nature Lover