Transcripts
1. Intro: Unlike quick text
messages or emails, greeting card requires thoughtful selection and
handwritten messages, creating a tangible connection between the sender
and the recipient. They also maintain traditions and strengthen community bonds, particularly during holidays
and special seasons. Thinking this in mind, I thought of creating these beautiful shimmery
cards Hello, friends. My name is Mohini Sinha,
and I'm from India. And most of you know me as Mohini Art Gallery from
my Instagram account. I mostly do nature
related painting, mostly related to nature. So this whole class
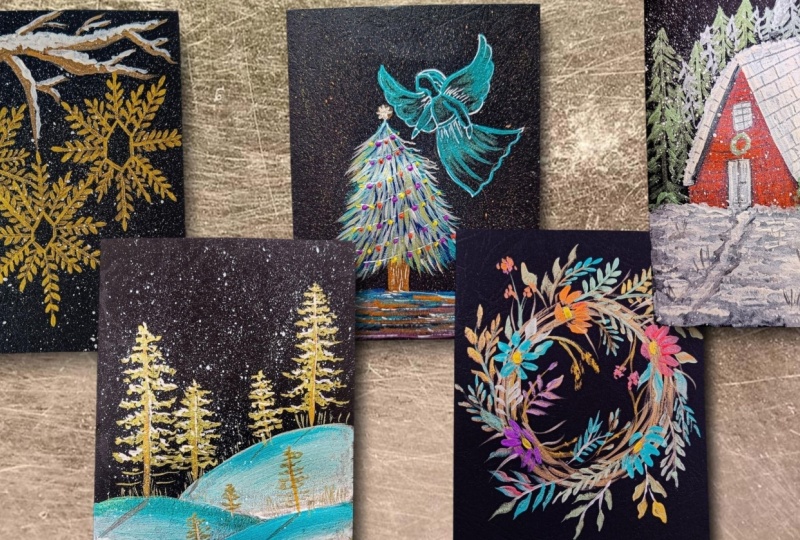
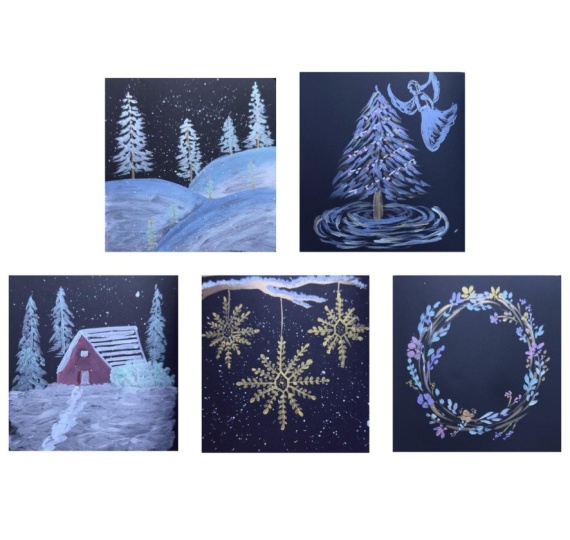
will be related to nature painting with Kosh. So in this class, we will be learning
five beautiful cards, starting with the snowflakes, beautiful golden
shimmery snowflakes with the Branches loaded with snow each and every
details we will be learning from the Christmas
tree to angel making, how to paint the angel, how to paint the beautiful
realistic pine trees. Then comes the red
floral painting, learning each and every flowers, how to make it, and finally, the beautiful tree house. So let's start with
our first cart. I'm sure you're gonna love it.
2. Materials Required: Back. So let's talk
about the materials. The first thing is the paper. This is the textured
paper of 180 GSM, which is of A four size, and I have just folded
it from between. So any paper, you can
use whichever you like. And this is the palette, which I will be using the glass palette for
keeping my colors. Then comes the masking
tape if needed. If needed, we will be
using the masking tape. Then comes the colors, which
is the metallic colors, which I will be using
from Brustro you can use from any brand
metallic colors. Then comes the brushes. The first brush which I will
be using is the flat brush. So flat brush, then comes the round brushes of
two different sizes, like two and six. Then comes the again, the flat brushes of small size. Then comes the rigor brush. Then comes the gelpen
which is white gelpin, then the pencil, then comes the cloth for cleaning the brushes and the
water container. All these things we will be
needing for the paintings. So without wasting our time, let's start with this
beautiful shimmery cards, which are five cards which we will be painting in this class, as you can see, different
different topics are there. All these holiday cards. Let's start with it.
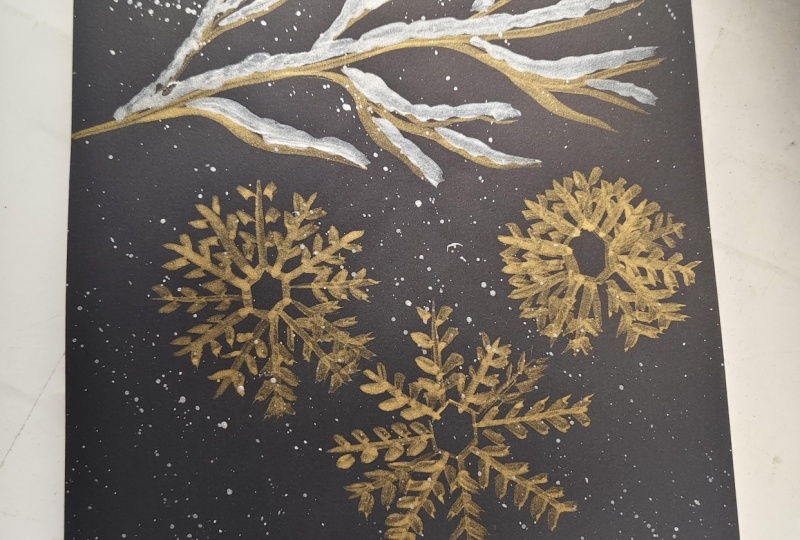
3. SnowFlakes: Hello, and welcome back. So let's start with
our first painting that is the snowflakes. So let's first draw
a tree branch. So I'm using a black
paper, as you can see. You can use any color paper, but on black paper, that metallic colors
comes up very nicely. So that's why I'm
using black paper. You can use any black
paper of 180 plus GSM. All the black papers will work. And I'm just trying to draw
the branches as you can see. So very simple sketch is
not very complicated. Anyone can write
off bigners also. I'm trying to make
it as simple as possible and beautiful cards, which you can just make it in 20 to 30 minutes and you can
gift it to your loved ones. I have drawn the branches. Now I will draw three
snowflakes of different sizes, one little below and
two little above. So there will be
three snowflakes. One I'm adding a
little downward. So as you can see, it's
a little down and two, I will add on the sides. This will be in the shape of
the you can say a V shape. So first, I'm just trying
to draw the hexagonal, and then the lines from the points where it is
intersecting the lines. So there I'm just
taking out the lines and some smaller lines in
between these bigger lines. This is how we have to create the structure of the snowflake. Similarly, I will be drawing two more So two more I will be drawing, one which will be hung on this and the other
one on the other side. Follow the process and draw these lines, these structures, and you can use any size paper, A five, a six, any size paper you can use. One more to go and we are
done with the drawing then. Three structures we have drawn. Now we will do the
coloring part. Let's discuss about the colors
which we will be using. This is the complete drawing. Now let's discuss
about the colors. We will be using three colors
that is the bronze color, pearl white and gold. All metallic colors we
will be using here. First color which we will
use here is the gold and using my round brush of size two or four
anyone you can use it, and we'll start first
with the snow flakes. Painting. I'm just making
the color little semi fluid. And with my round brush, I will first draw the
outline thick outline of this hexagonal
structure which is there and also the outline of the lines which
we have drawn, as you can see, a very simple
and easy painting, it is. Try to draw thick lines
covering all the pencil marks. Also, we'll draw the lines which is going in the
outward direction. Try to draw thick
lines, not thin lines. Here we need actually
thick lines. And try to use milky
color, not thin color. Otherwise, these metallic
colors are very transparent. If you will make the
color very fluid, it will start becoming very thin and it will not be so vibrant. So try to use milky color, a little thicker color, and just drawing
the lines first. H So you can see this is the image which
we are going to paint and just painting the leaves as we paint the leaves
of the flowers, press it and release. Make sure that the point of your brush is in
the outward direction, not in the inward direction. So again, taking
enough of colors, that is the gold color, and again, drawing the leaves. So it is the leaves which simple like we draw the floral leaves. Similar way, I'm drawing
the leaves of this also. So adding slowly. So try to make it as
slow as possible and as neat as possible because
this painting is very simple. And if you draw it in, like, the more neatly
you will draw, the more beautiful it will look, and the more vibrant it
will look as these are all like gold colours,
all metallic colors. So just adding these
leafy structure slowly. So just press and release,
press and release. We have to move it
in a diagonal form. You can change the direction of your page and then you can draw these leafy structures so that it'll be comfortable
for you to draw. Sometimes it is difficult for us to draw in a downward direction, so it's better to rotate your page and then
draw the leaves. So one snowflake is almost done. We will also do the other
two in a similar manner. So, the first one is done now. Let's start with the other also.
4. SnowFlakes Final Details: Welcome back. Let's
start further. So one snowflake we
have already completed. Now let's paint the
other two as well. Similar technique we
will be using here also, similarly with the same
brush with round brush, try to make thick lines, not thin lines here. As the color should be milky, not very thin color. Otherwise, that brightness
of the color will be gone. So try to use thick color. And I'm just outlining
all the areas first. So try to do it as slowly
and patiently and neatly. Don't be in a hurry since it
is a very simple painting. So try to do it very
slowly, very neatly, because in these
types of painting, mostly the neatness matters. So you can use it on
any colored paper, any background paper like black, white, or the brown color, any color paper you can use, but try to use different color rather than the golden color. If you're using white
and any other paper, you can use blue
or teal color for creating these stars,
these snowflakes. So just make your
color fluid, milky, not thin and try to
create these leaves in the upward direction
and make sure that your brush is pointed always
in outward direction. Then only that nice
pointed leaves will come. So I'm just trying
to create same here, trying to add more and more
leaves to all the areas. So just enjoy the process
of creating these leaves. So the idea behind making
these simple card is that you should make your
own handmade card and gift your own handmade card with your own touch to it to your loved ones
so that the feeling, the thoughts which you
have put in while doing the painting also transfers to the one whom
you are giving to. So that's why I have made a very simple and easy card so that everyone can try it out and everyone can gift it
to their friends, families, and loved ones. So very simple and easy. Use your round brush of any
size like two or four and try to create these nice,
beautiful snowflakes. Now the last one is left. So just adding the lines first and then we'll
create the leaves. And So you can see the size of this
star is a little small, the snowflake, which
is in star form. It is a bit smaller in size. So depending upon the area
and the size of your paper, you can adjust these sizes. So just adding the leaves. So, finally, we have done
all the three snowflakes. Now we will be doing
the upper part, which is the tree branch, which is snow is
covered with snow. So just first taking
bronze color, and first, I will fill this entire thing up with this bronze color only. Again, use thick
color, not thin color. Otherwise, you can see these metallic colors are
very thin and transparent. So try to use thick
color and fill in these whole branches with
the same bronze color. O So just creating these sub branches and stems. So you can see I've made these branches little
long so that it is so that it is
touching that snowflake. That's why I have made
it a little longer. So once I've made
these branches, now I will add the snow with
this pearl white color, adding thick colours, thick
colours with textures. Then only it will look like that the snow is on the
top of the branches. And don't smudge
the colors because otherwise the back color
will get reactivated. So try to use thick colors when you are doing any layering. Once we are done
with the snow part, then we'll add
some snow which is falling down with the same color that is the pearl white color, I'm adding some snow on
top of these branches. And So we're almost done with
the branches and the stems. Now let's add sprinkle some snow which is falling down
with my flat brush, making the color a little thin, and then I'll just sprinkle
everywhere on this card. Try to make the color fluid. Then only that sprinkle
will appear on these pages. So make it thin and try to
sprinkle it up everywhere. And this is it. The
card is complete. So very simple and
very easy to make. Anyone can try it out. Even you can try one
single snowflake. I'll show you how it looks that when you draw a single one, you can draw a single one also. So this is the complete one. You can see how shiny and
shimmery it is looking. So very simple and easy to make. You can also try
with one snowflake, which will look like this. So this is also you can try. Thank you so much. We'll
meet in the next class.
5. Christmas Magic: Hello. Welcome back. Let's start with
our new painting that is Christmas magic. Let's first draw
the rough sketch of the tree and the fairy, and then we'll start
with tea painting. Just a triangle shape.
I'm just drawing it. A nice small tree and leaving
a little space above so that I can add the fairy above
the angel which is there. Adding first the shape oval
shape in the bottom part. And above, we will
add the angel, which is touching this
magical Christmas tree. So very simple drawing it
is just follow the steps how I'm moving my pencil marks. And I'm sure you will also be able to draw
this simple sketch. So first I'm drawing the face. I'm not preparing any
details on the face. It's just like a shape and
then the body structure, then the dress which the
angel is wearing the hands. One hand is at the
side and one hand is touching the tree. So like that, I'm
making the angel. So if you will follow each and every steps like how
I have drawn it, you will be able to draw
this very beautiful angel, which is touching
the Christmas tree. So one hand, which is
touching the Christmas tree. You can see I'm drawing
very simple hands, also, not very complicated,
shape hand. And the now comes the back part, which is the hair and the wings which is coming and the dress which is flowing in
the air, very simple. A little bit, I think I
have made a little curve, so I'll just fix it up
just by rubbing it. So let me take my
eraser and rub it. Again, I will draw this
lower part which is there. So just a little curve is there. It's not totally curved. It's just one curve
and then the lines, the wavy lines, and then comes the wings
and the back part. So very simple and easy. You can also draw it if you follow each and
every step of mine. We have almost drawn
each and everything. Now, let's take out the colors and start
with the painting. So the first one which we
will do is painting the tree. So for the tree, first, the background I'm doing
with Prussian blue, and then I will use bronze
for the below tree trunk. So first, I'm taking
Prussian blue and I'm just filling the tree and giving some nice lines also
when I'm just filling the colors because I don't want the colors
to be just black. Little bit bluish
color should be there. That's why I have first
added this gauche paint, which is the Prussian blue. Rest all, we will be using
the metallic colors. Only this color is not metallic, it is simple Prussian blue. Yeah, you can see I have
used my round brush just for filling the
colors and making the lines slanting lines. And this is how I'm just filling
the entire tree section. After that, we will
paint the tree trunk and we'll give the details
with the metallic colors. So taking the washing of
my brush and now I'll take the bronze color and I'll color the lower part of the tree
that is the tree trunk. So just covered it, and now I will use
the teal color, and then I'll start giving a nice feathery
details to this tree. I've taken metallic teal color, and with this steel color, I will start painting the lines, the details of the tree, taking milky color and
using my round brush, and I'll create nice lines
and details of these trees, especially the sides of the trees I will make
with this color. Try to use fluid colors
and not thin colors. Otherwise, this type of
brightness will not come up. You can see I've
done all the sides. Now I will use the
mint green color and I will create some more lines, the slanting lines inside
this tree structure. Making the colors fluid
and adding the lines. Try not to cover each and every blue
areas with this color, leave some spaces so that the color which is
behind is also visible.
6. Christmas Magic Final Details: Welcome back. So
let's start further. So again, taking my same color, which is the mint color. And I'm just adding some
details on the sides as well. I will be adding one
more color inside this that is the olive
green metallic color. Now, see if you don't have any metallic color,
any of these, just use silver color and mix in that silver color
these opaque colors and your colors will
turn into metallic. Or if you want a very
light metallic color, just add white silver
and the colors, you will get the same color. You don't need each and every
metallic color to be there. You can prepare your
own metallic colors. So you can see I have
currently used two colors. Now the third color is
the olive metallic color. If you don't have this color, you can make it with
your green yellow, and then the silver color added to it with little
bit of white also. You can easily make
any metallic color, and it's not required that
you have to use same color. Whichever metallic colors
you have, you can use that. So simple lines I'm adding and I'm just filling
it with this texture. After that, we will be
creating some nice bulbs, which are series bulbs which
are hung on this tree, and there's a star on the top. So all these things we
will be creating over here and also the lights, which is reflecting
on the ground. Now let's again take this
metallic bronze color and I'm just adding a round
circular shape like this. Stars I will be adding with nice pearl white color
and just nice star. So this is the whole thing
which I have done the trees. Now I will be outlining the
angel which is there with my white gelpin so that the image which I
have drawn is clear. That's why I'm using here, the gelpin If you
don't have gelpin, you can use any white color, either gauche color
or acrylic colors, whichever color
you feel like you can use for just outlining it. I'm just first
outlining the shape. With elpin it is a little bit
more easy to draw than to draw with your liner
brush or anything. And if you are a
beginner with gelpen, drawing is very easy. So if you have white gelpin
try to use white gelpen only. So you can see I've
just drawn the shapes. Now my backdrop has dried. I'm just adding lines
where I will add some round circular bulbs
which are hung on this tree. These are all slanting
lines which I am making. Just to decorate this
Christmas tree and adding little bit textures
to the tree trunk as well. So now I'm again taking another color that
is metallic orange. Then another color
which I will take is the metallic yellow
and metallic purple. All these three colors I
will be using for creating the bulbs which are
there on the top. So using my again
round brush, first, I will take this nice
metallic purple color, and I'll start creating
some small, small circles. Take thick color here. Don't take thick
and thin colour, leaving some gaps also
so that I can add the other colors also because
I have to add three colors. That's why I'm not
filling entire space with the same color. Now, once I've done adding
these purple colours, now I will use the yellow and the orange color to
create more lights. So you can use any color,
whichever color you want. It is not a compulsion
that you have to use the same color which I'm using. You can use any
color of your choice and you can just decorate
your Christmas tree. It's just a idea
that what I'm doing, but it is your own creativity, you can use any color,
whichever color you want. Now adding this yellow color
which is metallic yellow. Very bright color it is. You can also use metallic gold. So just adding thick colour. You can see how
bright it is looking very all with metallic colors. After that, we will be doing the angel and the below part. For coloring the angel, I will be using
this steel color, which is a very beautiful
color, very vibrant color, making the color a little fluid and just
outlining it first, and then I will fill in some spaces and give some
textures with the same color. Outlining the below
area and also washing off my brush and
just smudging this color, which is the blue
colour downward, just to make it
blend a little bit, taking some thin steel
colour and just putting it and moving the
brush downward, just to give some textures. Now, just outlining
the above part. Try to use thick milky color. Don't make it very thin. Otherwise, that glow and
brightness will be gone. Every time I make
the holiday cards, I try something different so that people can get
to know how you can create your own handmade card and gift it to your
loved ones because handmade card has those touch and those feelings which that ready made
card does not have. I believe that giving
a handmade card is a very good thing to express your feelings
to your loved ones. Just adding some textures
on the wings also. Same I will do with the
other wings as well. So you can see how glowing
this angel is looking. So already she is looking very beautiful
and very magical. So that's what I wanted in this painting to give a little blessing to
the Christmas tree, to give some magic to
the Christmas tree. And also, I'll give
some reflections below with the same colors which I have used for the trees, same color, similar color. First, I will just add this Christian blue and give
a line of this oval shape. And then with all the colors, I will add some
textures, pillow. Similar colors I will use, which I have used
in the tree part. Some random oval shape textures,
which I'm giving here. Also adding some lines in this
pillow part of the angel, just some lines,
giving some textures with my white gelpin. This, you can leave it. It is completely optional, how you want to decorate
your car, it's your choice. It's totally up to you if you want to add these
textures or not. Below also, I will
add some lines with this white,
some oval lines. So this painting is almost
done. One part is left. That is to sprinkle
some colors on the top. I will use my flat brush, and as we did in the previous
painting, similarly, we will be doing here,
just spraying it everywhere to give a nice
sprinkly touch to it. Let's add some sprinkles
to this painting. Just make your colors
a little fluid and then just spray
it everywhere. All the colors you can use. It's not compulsory that you
have to use just one color. You can use all the colors. This is the complete painting. I hope you guys enjoyed this. If you enjoyed this, do
share your project works and do share your cards
to your loved ones. We will be now meeting
in our next class. Just spraying each and every
colors whichever I have. So you can see how sparkly
it is looking very vibrant. So this is the
complete painting. I hope you enjoyed
doing this like I did. Just adding some more
metallic textures below, and this is it. H
7. Pine Trees: Hello, all. Welcome back. So let's start with
another card painting. So let's first draw
a rough sketch of the foreground and then we'll
start with the painting. So some half circle shapes, which is overlapping landscapes, you can say, and a little bit of lines where I will
be creating the trees. That's it. For the drawing, we don't have to draw too much. Just some lines where I
will be creating the trees. So we have done
with the drawing, very simple drawing it is. Now, the colors which
we will be using here, these are the four colors
which you can see over here. One more color I will
be adding that is the aqua metallic color, teal color, and all these
pearl lime green, pearl gold. All these colors
we will be using. So the first color,
as you can see is the aqua color which is there. So first, I'll start
with the aqua color, then the so just I'm filling it up with my small size flat
brush, as you can see. So make your colors milky. Don't use very thin color. Otherwise, this type of
brightness will not come up. So try to use
thick, milky color. Just trying to cover
this whole up. So on the upper part, I will be using
more darker color and then the light
and then more lights. First, I'm just adding the aqua color and then
with this pearl white, I'm just filling
up the below part. Also trying to blend
these two colors together so that there are no
separate lines in between, Just filling it up with
this pearl white color. So just fill it up
with pearl white. Now I will take the teal color, which I will use it on the top just to make
it more brighter. And again, I will be adding the aqua color and
then the pearl white, one more layer of it so that it becomes quite thick
and opaque color. It should not look like very
thin and translucent color. Just pushing this color
downwards and covering the area and also blending
all the three colors. Blending is important over here. Similarly, I will be doing two shapes which are there
other two landscapes. Again, I'm using the teal color, then the aqua color and
then the pearl white color. This way, we will color the whole foreground
which is there. So try to use thick color. Don't use thin color because
metallic colors are already very translucent or
transparent colors. So try to use a
little opaque color, then only you will get
this type of brightness. Just covering it slowly and
also covering the edges. I am not bothered about
that it should be a very smooth finish or there
should not be any marks. I'm just covering it and I'm
trying to blend the colors. Little bit textures is fine
because this I'm actually trying to create something
like snow or effect. Again, I'm using the
same color combinations. If you don't have
these type of colors, you can take any color,
whichever color you want. Just take the similar
colors which are there like the similar cool colors
and then try to fill it up. It's not necessary that you
have to use the same colors. So just taking a little bit
more of teal, and again, I'm just filling the
last one which is there. Very easy to paint. Anyone can paint this out just by using different
metallic colors. You can just fill it up and very beautiful card will
come up in 15 to 20 minutes, you can create these cards. So now the pearl white just filling it up nicely so that the edges are
also done properly. We're almost done
with the foreground, and now we will add the
trees on the upper part.
8. Pine Tree Final Details: Welcome back. So
let's start further. So we have done the foreground. Now we will add the trees. So for the trees, we will
be needing one more color. That is the bronze
color which we will add over here
for the tree trunk. So before using any other color, I'm just picking some
bronze over here, and with my round brush, I'll just make a thick line starting from thin
and ending too thick. Use the tip to create the
lines starting from the tip, and as you go down, start
pressing your brush, it will become automatically
thicker lines. Like this, you can create
the lines in just one go. Use milky color so that
it is easy to flow. The colors can easily
flow from up to down. Now we will add some
leaves in this using the lime green color and another color which we
have is the mint color. Both the colors we will
be using for painting. Adding starting from the top, I'm taking my rigor
brush and I just mi little bit of water in it because we need a
little fluid color, not very thick color to
create the textures. Starting from the
top, I'm just adding the leafy textures
as you can see, so let me zoom in a little
so that you can see it properly how I'm
creating the lines, using the dots and random
textures and trying to create the shapes as
you can see it over here. Very easy and this looks very real and very
realistic painting. So like this, we have to create
the pine trees all over. So at least two to four
pine trees we will be adding on the top with
a similar manner. So if you're not comfortable directly drawing on your card, try to first do it
on a separate page, try it out, and
then you can do it on your painting
or on your card, whichever you are making. Very simple and very easy with dot and textures,
you have to make it. Starting thick and ending towards it should
be a pointed shape. This thing you have to keep in mind when you are
creating the trees. We will also create
some trees in the downward direction
which is there. So just making the
lines where I will be creating the small trees. Small trees doesn't
mean the size is small. It means it's a
little bit far away or that's why they
are small in size. So just adding a few
more lines and just creating again with
the same technique I will be using for
other trees as well. You can use any metallic green, whichever green you
have, you can use it. I felt like this green
looks more vibrant. That's why I'm using this green. But if you have any
other metallic green, you can use it and
you can paint it. Similarly, I will be doing
for the other trees also. If you want really complete
exercise on these trees, you can check out my class, which is the bignaevl class on acrylic painting where I have taught how to create these trees and everything that
you can check it out. These trees actually look
very beautiful and very real irrespective of the
other trees which we create. I want to keep the realism
of the trees here. That's why I'm creating
this type of tree. Try to use the rigor brush
and little thin colour, not milky color, also
a little thin colour so that you can
move the textures. Otherwise, these textures will not be formed if you
will use thick colors. Very simple and easy
painting which you can do in ten to 20 minutes, which I have done in
16 to 17 minutes. You can take half an
hour to create this. It's totally up to
your choice and how much you are practicing
it. That also depends. You can see I've created
all the trees on the top, small and big size of different sizes I have
tried to create it. Now we will be creating the
lower trees which are there. For this, I will also
use the same color, but let's see if it is visible this color is visible
or not over here. If it is not visible, we will add a little bit of metallic black so that
it is more visible, so it's not visible here. I will add a little bit of
metallic black in this. Let's take out the color
which is the metallic black. This color, I will
just mix it in this green to make it a little darker color so
that it is a little visible when you are
creating in this shiny part. Same technique I'm using
for the trees here also, the willow ones, same technique. Try to do it slowly and neatly because these are
very simple paintings, but yes, in these paintings
paintings, neatness matters. Try to do it as slowly and
patiently as possible. Don't be in a hurry. Now with my flat brrush
I'm just creating some reflections of these
trees with this black color. So this is it the
whole painting. Now we will also add
a little bit of snow on these trees with my pearl
white color on top of it. Just little little snowy
textures on top of this tree. So little little, I will be
adding on all the trees. This is already looking very
beautiful and very vibrant. And if you will give
this to someone, I am sure that
person will love it. So try it out at your own pace and gift
it to your loved ones. And if you are trying
out this project, do tag me on my Instagram
that is Moheni Art Gallery. I would love to see
your project works. So all the branches
and all over, I have added this
pearl white color. Also to the smaller trees, I'm adding these textures. So just creating some
grassy textures on the top. A little bit below. This is completely optional. If you want, you can add
it or you can leave it. Also, I will sprinkle
some snow on top of it, which will add the
snowy effect to this entire painting with this pearl white and a mix
of the steel color. Using my flat brush, making the color fluid, thin and just spraying
all over this area. Try to use flat brush
for spraying it or you can use your fan brush
also for spraying this. You can leave this
painting as it is, or you can spray like this
to create the snow effect. It's totally up to you how you want to
create your painting. But I love creating
these snowy effects. That's why I'm
creating it here also. We're almost done
with the painting, and now we will meet
in our new painting. All these paintings
are very special. I'm sure you will love them all, see you in the next painting.
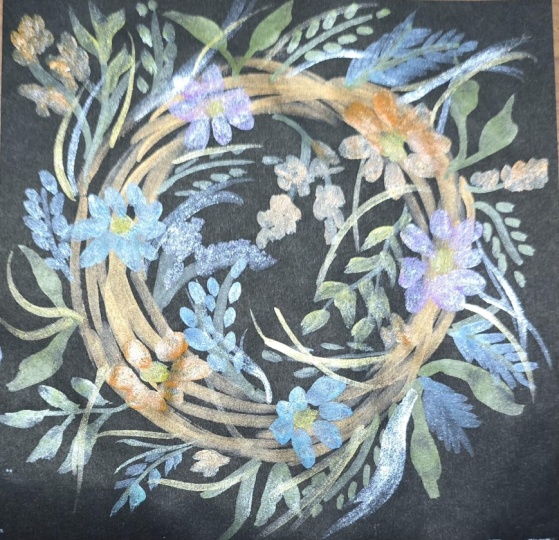
9. Wreath: Welcome back. Let's start with our new painting
that is floral with. Let's first draw a
circle in the center. I'm using this masking tape and drawing a circle
in the center. This much drawing is
needed for this painting. Rest all are the colors which we will be
directly drawing. So let's talk about the colors
which we will be needing. There are lots of colors
which we will be using here. So the first color
which we will be using here is the pearl white color, as you can see on the
top, then orange, then coral red, bronze, steel, gold, purple, green. All these colors
we will be using for this complete painting. Also, let's first
draw the floral, how we have to draw the flowers. Let's see on a rough page, taking this coral red, using my round brush
and you can see, just spress the
brush and you will automatically will be able to
create this type of flower. Similarly, you can
use two colors also like red and orange together
to create these flowers. Any color you can use, I'm just showing you the example that how
you have to create it. Always keep the point of the brush in the
outward direction. Then you'll get a nice
pointed floral shape. This is how we have to
create the flowers, which we will be
creating in this wreath. That's why I'm showing you
separately so that when we will be drawing
directly on that card, it will be easy for you to draw. These are the leaves which
are the filler leaves which we will be adding onto
the sides of the wreath. So different colors we
will be using over there. I'm just giving you an example over here with the same color. Then with the flat brush, you can easily create some
nice leafy textures like S, you have to create, and it will create a nice leaf
shaped structure. You can see over here.
Very nice leaves comes up when you
create S shape. Also, you can create some
nice pointed leaves with this same brush that you can see how nicely that
pointed leaves are coming. Like this also we will be
using in this painting. Also some more leaves in the branches you can
add like this for. All these are fillers
which we will be using in our painting. Practice it separately and
then go for the painting. First, I will be drawing these circles with
my bronze color. So using my round brush, I'll just create some nice
broken lines all over. Just like how the nest is, like the broken lines, I will be adding these metallic
bronze color all over. RIT has a special
meaning that it signifies both life and death. It is also associated with changing seasons
and fertility, it has a very deep
meaning to it. That's why mostly
these holy season, the red is put on the door. So as you can see, I've added rough lines
all over the circle. Now we will start
creating the flowers. First I'm using this nice
gold color and putting it in the center starting
from the first leaf. This is another pearl gold
which I have kept over here, which also I will be using because it's a
very bright color. This is the pearl gold, and this is simply gold. There are two different
golds actually. Adding in the center and wherever I have to
create the flowers, I will be using this
pearl gold color to create the center part of it, the center area, and then I
will be adding the flowers. Taking both the colors, that is the orange and
this red color mix, and I'll start
creating the flowers. So simple, just press
and release it. It's a very beautiful
and vibrant painting when you use these
metallic colors. I really enjoyed doing this because when
I was doing this, I was just thinking how to put
the flowers and the leaves here and there without my full focus was on
how to decorate this, how to make it more beautiful
and just full of greenery. So it's not like
how I am arranging, you have to arrange
it like that. You can use your own
arrangements and you can use these
techniques to create your own wth You can see I've added two types of flowers with
different colors. You can also use one color
flower for creating. I have used multiple
colors over here because I wanted this with full
multiple color flowers. But yes, you can use only one color if you
want or two colors, that is totally up to you. If you don't have
metallic colors, take one silver color and take
one normal colors and mix the silver color in
all these colors and you'll get these nice
metallic colors. So adding some of the flowers
in different directions. Just rotate your page
at your own convenience and try to draw the flowers
in different directions. You can draw one
upward, one side, one below, in any
directions you can add. So I've added all the flowers. Now I will start adding the leaves and the
fillers here and there. Ing my same brush and creating these leaves here
with the steel color. Using this lime green, again, I will create some other
lines here and there. You can mix two
different colours and create some nice
leafy textures. Anything you can do, you can just your own
creativity it is. H.
10. Wreath Final Details: Welcome back. So
let's start further. So we have already
created the flowers. Now we are doing the filler
part where we will add leaves and some birds
in these areas. So just taking some
different different colors, and I'm just trying to add this with this pearl coat, the line. Somewhere I'm using
the pearl cold, somewhere I'm using
the blue color, somewhere I'm using
the green color. So contrasting colors
I'm using here just to create the
leaves and the fillers. So here I will
create those leaves which are there with S shape. So different different colors, use the contrasting colors. Like here, I have
used the coral color. That's why I'm using
here, the gold color. Again, I will mix
both the colors together to create
some different color. So like this, just play with the colors and create some
fillers here and there. You can create the way
I am doing or you can create it on your own
with different designs. It's totally your choice. I'm just giving you an
idea that how you can decorate the side fillers
with different colors. Like here, it is
orange and I'm adding some teal color to it so that
becomes a little different. Cool and the warm colors together makes it
more beautiful. That's why I have mixed
those colors together. So again, I'm using
the green color and creating some
leaves on the sides. Mixing a little bit
of blue also to this just to make
it more bright. Anything you can create
in different directions, some s shaped leaves,
some pointed leaves, some fillers, some cherries, anything you can add So just slowly, slowly giving it a
little more shaves. So some small dots or
cherries you can add with these colors somewhere
on the top also just to make it more floral
and more beautiful, adding some cherries
here and there. So go one by one like this
one part I have done, then move to the
other part and create some more fillers on the
sides on the inside part. This is how we are
to arrange and make this red the beautiful one. Again, using my round brush and creating some more
lines with the pearl white. So try to use the mix of different different colors
and create the fillers. So just enjoy the process of creating all these
fillers on the sides. You can see it some
of the fillers and lines are insides also,
are outside also. So try to make it in different
different directions. The more you will play with your colors and mix
and match the colors, the more beautiful it will look. You just have to enjoy the process and the making
of leaves with one stroke. In this painting, we have
actually not drawn anything. We have just drawn one
circle and rest of the things you're all
doing with our brushes. Like I am enjoying this one. I'm sure you will
also enjoy it too because I really liked
the outcome of this. So try to use different
different colors. Like here it is purple, so
I'm using blue color over here to create the grasses
with a mix of red to it. You can see how nicely
that color has come up. You can mix the colors, mix two colors and make it. Again, I'm adding
to the inside part. Some lines leaves with some pointed leaves
which are there. So add different
different shapes of leaves here and there,
add some fillers, some lines, some flowers, some cherries,
anything you can add. See, this is a different leaf. So any color you can use
for creating the leaves, the flowers, any color, whichever color you feel like, Or if you want any
particular two color, that also you can do. I have done with
multiple colors, but you can use two to three
colors to make this width. So anything you can
do and just make this beautiful combination of
floral leaves and flowers. So slowly, slowly,
we are coming to the shapes like you can
see on both the sides, I have filled with leaves, but to the sides,
it is still left, so I will be adding some
more leafy textures. Here again, I'm adding some more leaves to the
writh which is there, which is joining the flowers. You can see I've not
added too much leaves. So here also, I
will add some more Just rotate your page in different different
directions and try to add these fillers. You can see already
it is looking so beautiful and vibrant. And if you will give
this to your loved ones, I'm sure they will love it. That's why handmade cards are
very important and also it connects the thought process and the feeling of the
person who has created it. So if you're trying
out this painting, do tag me on my Instagram. That is Mohini Art Gallery. I will love to see this work. So again, adding some more
fillers to the sides. So we are almost done
with this painting. Just a few more fillers, I will add and we
are almost done. Adding some more lines
here and there and then our painting is complete. So do try it out and
share your project. I would love to see them and see you in the
next class. Oh
11. Tree House: Welcome back. Let's start
with our treehouse painting. So first, we'll draw
a rough sketch, and then we'll start
with the painting. It's very simple sketch, just the foreground and the
house which is in the center. I will draw that, and that's it. Trees we will draw by
using the colors only. And why I have kept
this as a treehouse because this house is
filled with trees behind. It's not on the tree, but, yes, the trees are filled behind. That's why I have named this
painting as tree house. So just creating a nice
sketch with a triangle. And this is it. And the small hut,
which is there. And also, I will be adding
some windows and doors also. And this is the
complete drawing, not much to do in this. Rest, we will do by
just using the colors. So let's discuss about
the colors which we will be needing
for these paintings. So the first color
which we will need is the pearl white
color for the snow. Then the second color is the, red color, which we will be
painting the house walls. Then the rest of the
colors we will take out. Let's first do the house part, and then we will start doing
the rest of the things. So just simple metallic colors are these because in each
and every main painting, I have used metallic colors. If you don't have these colors, just take silver color
and mix in white and red. You'll get these type of colors. So don't worry if you
don't have these colors. You can just use any color
whichever color you want. If you don't have chimri colors, you can use simple
gauche colors also. So just painting first the
front part with red colour. Use thick color when
you are painting this. Because mostly the
metallic colors are a little translucent
and transparent. So if you will use a
little thick color, the color won't be
very transparent. So try to use thick colors
when you are painting this. It's okay if there
are brush marks. Actually, we are not focusing about very perfect painting. We are just focusing about
to make a handmade card, which looks beautiful
and vibrant. So it's okay if these little
brush marks are there. You can do one more coat on this once the first coat dries. So you can see leaving the
windows and the doors, I'm filling this entire triangle part with this red
colour, thick red color. Then the upper part with this white color that is
white metallic color. I'll just cover this whole thing with white metallic colour. I'm also using your round brush, which is you can use any brush,
whichever brush you want, but I felt that
round brush will be much more easier
than the flat brush. But yes, you can use flat brush also of smaller size
for painting this. Try to use thick colors
and cover the entire area. So filling and blocking
this entire upper part, which is there with this nice
white metallic white color. Mm. Also, I will be covering these doors and the windows also
with the same color. So just covering both of them, We have almost done the
blocking of the house. Now we will add some bushes, which is near to the house, which you can see
using my green colour. This is the lime green
colour which I'm using here. You can use any green
whichever green you feel like. Just adding some
nice green shapes of the bushes over here. Same with my same brush, that is the round brush. A, I will be using
some pearl gold color, which is quite a
lime greenish color. So it's very vibrant color, which I will be
adding in between the greens just
to add that there are some light greenish
and golden texture to it. And this is how I'm going
to fill these bushes. Also, a little bit
of snow textures I'm adding over here with
this pearl white color. Also for making the
outline of the dose, I will be using black color. So taking my metallic black
and with my same rigor brush, I will be creating the lines, making a color a little thin, and I'll just make the details of the
door and the windows. Also adding some black over
the area which I left and a little bit of lines also I will be adding on
the upper part, which is the roof part,
simple horizontal lines. Also some vertical
lines like alternate. So lines also I will be
adding to the sides. Mm
12. Tree House Final Details: Welcome back. So
let's start further. So we have added one more color
that is the silver color, which we will be using
in our painting. So let's first create the snow which is on
the top of this roof, creating a little
bit of textures on the roof with this
pearl white color. Try to use thick color. Don't use thin color. Otherwise, this effect
will not come up because these metallic colors are
very translucent in nature. So once we have done
this snow part, now we will add the trees also and the
foreground, as well. So with my flat brush, I will just paint this whole foreground using
this pearl white color. First, just making the line. It's okay if there are
lots of brush marks in this part because we're actually creating
the snow effect. And if there are
some brush marks, then that is okay. So just filling this whole
foreground area with this pearl white color mixing a little bit of this
silver as well. Adding some more thick color
with horizontal textures. You can see I'm just trying to add the textures
like intentionally. I'm not trying to make
it very nice blending colors when these so that it gives a feel
of the snow part. That's why I'm adding
these textures. After adding the textures, we will start creating the
trees in the background. Using two colors, we
will be doing one with this green color and
one with silver as well. So we will be mixing
two different colors. So simple trees with nice moving in the
downward directions. I'm just trying to fill it up. I'm using the milky color. Don't use thin colour. Otherwise, this brightness
will not come up. Again, I'm saying try
to use thick colours. And don't bother about the perfect blend of
colors or anything. We actually want
these paintings to be loose and a little
bit more easy. So try to do it as you wish. Now I'm taking this
silver color and again, making one more tree. So I will just alternatively use different colors
like silver and the green color so
that it looks like a mixture of two different
colors of trees. So you can see how I'm just adding these trees
at the back side. So we have to actually fill the entire part with
this whole trees. Take your own time and start filling these
trees at the back. Now, again, I'm using
this green colour to make the bigger tree and some
smaller trees as well. Just first making the lines and then there are the
lines where I have made, I will be adding those trees. So just enjoy the process. And it's a very
beautiful painting. The whole outcome
which has come up, it's very beautiful
and very vibrant. I'm sure you are also
going to like it, too. So we have done so many cards, and this is another
different card which has a hut in the center, and the whole pine
trees are at the back. So this is actually like
a dream house where the whole pine trees area is covered with pine trees and
you are living inside it. So full of greenery So I'm just trying to
fill the entire area of this part with
the tree textures. Also, I will be using these silver colours to
create the trees in between. So this is how alternatively
you can add these trees. You can add different
colors trees as well. It's not required
that what I am doing, you have to also
do the same thing. You can create your
own trees format. You can create blue
trees also at the back. That will also look
very beautiful. So a little bit of
textures of green below. Now, let's take this
black color and create the outline of this
door and the window. Also creating some horizontal
lines in front as well. In between a small reth I'm adding with
this green colour, use thick color to add this little bit of green and this golden
color which is there. That is the pearl gold color. Little bit of red also
I'm adding in between. M. Just to make it more bright, I'm just adding white. Now let's do a little bit of details in this foreground also. So we'll create a pathway
with the darker color first, the color which I
will be using here, let's first add a little
bit more textures to the snowy part. So just using my flat brush, the tip of the brush and
adding these textures. Use a damp brush. Don't use a very wet brush, the damp brush to
give these textures. So randomly try to fill these entire area
with these textures. So you can feel the snow effect which is coming when I'm
adding these textures. I'm sure you are also going
to enjoy this painting, too, and it's very beautiful
and very unique painting. I haven't bothered about
doing it very perfectly. I'm just doing it with
my own free mind. So anyone can try this
painting, even the bigners. So all the textures I have placed over
here, as you can see, now I will add
some pathways from the door to the end area
with my round brush. H just some thick colors and a little bit more
white inside this pathway. So a little bit of the textures and the grasses also I'm adding to the bushes
which are there. So more grasses here and
there with this black color. Just to add some more snowy
part to the edge of this hut, so this is almost done. We just have to
sprinkle some white to give the snowy effect, and we will be done
with this painting. So I'm sure you are
going to love each and every painting and do try it out and share
your project work. And you can also tag me on Instagram that is
Mohini Art Gallery. I will love to see them. Another the smoke
which is coming out, just a smoky flake which
is coming out from here. Now, it's not compulsory. You can leave this
also. The last part is the snow which is falling. Again, the same technique I'm
using here because I love to spray the sprinkles of white. I'm sure you are also
going to enjoy this too while doing all
these beautiful cards. So taking a little
more of this pearl white and adding more of this snowflakes This is the most satisfying
part which I'm doing here, sprinkling some white metallic
colors all over my card. So this is it. And
thank you so much, and I'm sure you
are going to love this paintings and
happy holidays. So this is it. I have
sprinkled it everywhere, and this is the last part, little bit of below also, little bit on the trees. Everywhere, you have
to sprinkle this. And this is the entire painting. Thank you so much, each one of you for watching my
class and supporting me. Thank you so much. So see
you in my next class.
 Mohini Sinha, Acrylic and Gouache Artist- Nature Lover