Transcripts
1. Intro: There's something effortless, heart melting about
Bunny's cuteness. Bunny's doesn't try
to be adorable. It simply is in the most
natural and pure way. Bernie acrylic painting
isn't just about technique. It is about capturing
innocence, warmth, and a quiet sense of wonder that instantly connects
with anyone who sees it. Hello, friends. My name is Mohini Sinha, and
I'm from India. And most of you know me as Mohini Art Gallery from
my Instagram account. I mostly do nature
related painting, mostly related to nature. So in this class, we will be learning
complete bunny painting, starting from how to mix and make the perfect
match of colors, how to mix the perfect
color which we have used in our painting like that of
the background colors. Then how to use the details
of using the brushes. Then comes how to do
the blocking part, how to paint with flat
brush, the blocking, then the fan brush details to create some nice
furry textures. Then comes the blocking
of the bunny with the darker and the lighter
colors using round brush, then giving some
nice line textures, some nice furry textures
to the entire painting. And finally, the final steps of creating some shadow
effect to the bunny. So this is how we
will be completing the entire painting
from scratch to finish. So let's start with this
cute little bunny painting, and I'm so excited to share the entire process
with you guys. So let's start with it. And
2. Materials Required: Welcome back. So let's discuss
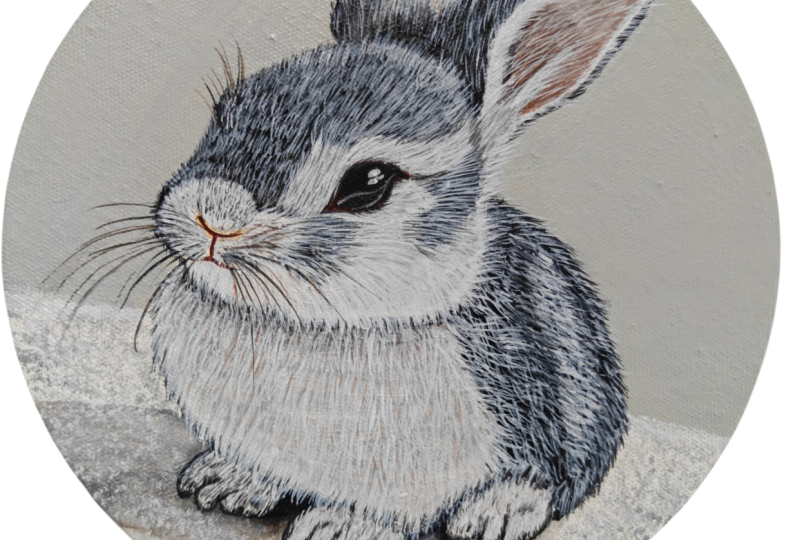
about the materials first. So let's talk about the colors which we will be using here. So this is the painting
which we will doing. Let's talk about the
background colors, how to mix and make
that background color. So the colors first
what I have taken here, you can see five to six colors
which I have taken here. So the first color
is yellow ochre. So this is yellow ochre. And then the second color, which is the burnt umber. So this is the then comes the
third one, which is black. That is charcoal black or then the fourth
one is pains gray. Then white color and
Alazarin crimson. So my Alazarin crimson,
I'll just take it out. This has already dried
because summer has started, so colors dry very fast. So you can keep some
spray water spray to keep your colors wet. So this is Alazarin crimson, and the last color is white. So all these colors we will
be needing for our painting. So let's first talk about
the background color. So for the background color, I'm mixing the yellow ochre, paints gray and white
mix to get a yellowish, grayish texture, as
you can see over here. So this is the
color which we will be using for our background. If you don't have Pains gray, you can use black
and little bit of Christian blue you can add
to it to make that color. So this is somewhat
this type of color, which we will be using
for our background. So you can see this
type of color. So this is the color
which we will be using for our background. Now, let's talk
about the colors, which is the lighter color. So a little bit more lighter than the one which
we have drawn. So a little bit up
and down is fine, but the similar
color which we will be using for the
background portion. Now comes the darker one
and the lighter one. The eyes is simply black, and then comes the area which is the dark
and the light one. So let's talk about that first. So I'm just taking white first. Let me take out a
little bit more of white because here lots
of white will be used. So make sure that you
have lots of white color. So again, taking white
and a little bit of paints gray and a little bit of black mix to make a color, a little lighter version. So the lighter version will
be somewhat like this color. Then comes the darker version, which is a dark grayish
color, as you can see. This is the dark grayish
color for the darker portion. All these colors we will
be using for our painting, and then comes the mix of this brown and Alazarin
and little bit of black. This is the color for the ears. All these colors we will be using for our complete painting. So let's talk about the brushes which we will
be using for our painting. So the brushes are these
which we will be using. Most of them are the rigor and the liner brush of
size two by zero, three by zero, zero. So all these are
different different sizes of the thin brush, liner brush, as you can say, where we will create some thin
lines on entire portions. So this has to be practiced. If you're not very good at it, practice it first and then
go for this painting. Then comes the round brush of different sizes
like six and eight we will be using for blocking. Then the flat brush
also for blocking, there are two different
sizes, small and big. Then comes the Bristol
fan brush for giving that details of the foreground, which you have seen,
like a fur details. So this is the
brush we will use. So simple dry brush and some nice textures like this we will add to the lower portion. And you can see here. So this is how we will add. So now comes the base. You can use any base, but here I'm using
canvas, which is primed. I have primed it
two, three times, and you can see this is around stretched canvas
which I'm using here. You can use any canvas
whichever you want. Now, these are the color
brands which I'm using here, CambllPstro, then
Windsor and Newton. So different different
brands are these. You can use any brand
whichever you have. Then comes the cloth,
then the palette. This is a glass palette. Then comes the water jar, also. So this is a nice glass palette which I will be using here. Then the water jar,
at least two cups. So here you can see
it has three edges, then the palette knife also
for mixing the colors. So all these things we will
be needing for this painting, apart from this, the
pencil and eraser. So let's start with this
beautiful painting of Bunny.
3. Background Blocking: Welcome back. So
let's start with the background blocking first. Let's discuss about how first
we will draw this thing. You can draw using grid method, and also you can draw using the circular and some oval shape so these things I will be attaching in my
recording sections. Here is my palette. And first, we'll start from top then
down then this part. So like that, we will
start with the painting. So let's start from the top. So first, let's take out the colors which we
will be using here. So first color is yellow Ochre. The second one is white. And the third one is Pains gray. So these three colors we will be using for our
background painting. So Pains gray if you
don't have Pains gray, you can use black also or
you can mix a little bit of Prussian blue and black to make a little bit a grayish
blue type of color. So these are the colors
which we will be using. So let's mix and make
a perfect color like a greenish grayish color. So it's not greenish, exactly. It's a kind of gray color only, but more warm
colors added to it. So just I'm mixing
these two colors first and then a
little bit of white. And I don't want the
color to be very dark, so I'm making it a little
more lighter version of gray. So just mixing the colors. And if you don't want to
mix all these three colors, you can just use the gray color and mix a little bit more
of white in that gray, and you can use that
as a background. I mostly try to mix and
make the colors so that we learn color mixing
also and we get an accurate color and
more opaque color. When we mix the colors, the color become more opaque
than the previous colors. So this is a kind of
color which I've got. Let's check if we have got
the correct color or not. So this is the color which
I have mixed and make it. So maybe we can add a little
bit of more of yellow to it. So let's take our flat brush and let's apply it
and see how it looks. So I think it's looking perfect. So we can use that color. It has a little bit of
yellowish touch to it. So that's what I wanted in
this background painting. So in first code,
you will not get the exact background finish. You need to apply at
least two to three coats when you are using canvas. The canvas which here I'm
using is eight inch canvas, which I have already primed two, three times to make it a smooth. Finish. And then I'm doing
this whole painting. You can use canvas, you can use paper, you can use MDF board, anything. So something like this
type of painting, as you can see in the corner
side, we will be painting. So first I'm just
doing the background, and then we'll do the foreground where the bunny is sitting, and then we'll start with
the details of the bunny. So first, my focus is to do the background and then
the center bunny part. So just a little
bit of coloring. You can use any brush, whichever brush you want. You can use flat brush. You can use round brush, whichever brush you feel like you can use
in this painting. So just covering the entire
part, leaving the sketch. So if you are having issue
drawing this sketch, you can always trace it. I will share each
and every sketch which I have shared here, the grid method,
the shapes method, and the raw sketch, also, I will be attaching in the reference
section so that you can see it and you can do it. So I'm just covering this entire portion
with a similar color and leaving that sketch so a little bit of color
will go inside the sketch. Don't worry about that. We will fix when we
will do the painting. So this is the first coat. You can see. It is a
very rough coating which has been done. There are lots of
brush marks in there. So once that first coat will dry then only we'll do the second coat. Let's
do the lower part. For the lower part, I will be using my fan brush
which is here. So I'll wait for the
upper part to dry. Then only I'll do the
upper part again. First, we'll do the lower
part with our fan brush. Again, a dry fan brush or a damp fan brush
you have to use for this whole thing,
which is at the down. It is like a cloth
thing which has furs. So I'm just making a color
a little bit darker. And just applying the
textures onto the top area, small, small textures,
filling it will look like that these are all
furs which are coming out. So just applying it everywhere
in the below section. Just use the tip of your brush and your
brush should be dry, should not be wet. So already my base is white, so it's just I will do with this gray color
because after that, we will add one
more coat of white. But first, I'm just doing
it with the grayish color. So all these paintings
require a lot of time and a lot of patience. So don't worry about if in first coat it has not
come up properly. In second coat, it has
not come up properly. You can always redo it when
you are using acrylic. Because in acrylic,
you can always modify your mistakes and
correct your mistakes. So this is how I have
done the below part. Now, I'll just take a
little bit lighter color that is white mix with
a little gray on it. Already, my brush has that gray, so I have just taken white
and applying on top of it just to give a little bit more textures
to the base area. So this is how we will
be doing the background. And once more, we will
do the background. First, I'm just waiting
for the background to dry, and then again, we will
add one more coat to it. If we feel that in
second coat also, it is not working fine, then again, we'll
add third coat. So I'm just applying some nice
light colors on top of it, just layering these
textures. That's it. So this is how you have to
also layer the textures. You can do with any color. I felt like gray
is more beautiful. So you can use any color and
create textures like this. So once we are done
with the background, now we will wait for it to dry and then we'll
do the second coat.
4. Second Background Blocking: Welcome back. So let's start
with the second layer. Now, my first layer
has dried up. So let's start adding
the second layer to it. Make sure that it
is properly dried, then only add the second layer. It should not be sticky. So once that first
layer has dried, now, same color we will be using, and we'll apply with our smaller
size flatbush this time. So if your color has finished, you can mix that color again, but make sure that
a little bit of color difference will be there when you mix
it second time. Whenever you mix the colors
and make the colors, every time you cannot get
the same color exact, a little bit of
difference will be there. So don't worry
about that blocking the behind part as
smoothly as possible. So just taking the
colors already, my brush is wet and just applying the color
directly on my canvas. If you feel that your colors are getting stick to
your brush, again, wash off your brush
and use that color. So I'm just mixing a
little bit more amount of color because I
think it's very little. So just mixing it in one go so that whenever I'm
applying this color, it is similar everywhere. So just mixing a lot of color, and then I will just
apply it again. So I've just mixed the color, and let's apply
again, the color. You can see a little bit of
color differences there. It is now a little bit lighter
than the previous color. So it's perfectly fine if a little bit of color
differences there. So just applying it in
very smooth manner. This is the second coat which I'm applying
on the background. My brush is wet, and I'm just applying
a thick coat of color. I haven't applied any
water on my colors. It's a completely dry color. I haven't applied
any water to it, and just water is there
on my brush. That's it. That much amount of
water is required, and rest is all the colors. When you use thick colors, it increases the drying time, and the colors will
not dry very fast, and you can easily blend
the colors properly. So if you feel in the
second coat also, the background has
not come up properly, you can always go
for the third coat. But again, whenever you're
applying third coat also, you have to make sure that your second coat which
you have applied, it has dried completely. I'm just making alge with
this white thick color so that we see the
difference between the background and
the foreground. Just apply slowly and
carefully and try not to push the brush, give pressure to the brush. Do it with a very soft hand. Just do it with very
soft and gentle hand so that there are less brush
marks on your painting. So just applying the colors. Same color. I'm
applying it everywhere and making a nice
smooth texture. You can see how nicely
now in the second coat, it is coming up, but still I'm not happy with
the second coat. I will definitely
apply the third coat. So whenever you
are using canvas, make sure that at least two to three coats you
have to apply to the background to give a perfect finish of
your background. So just applying
this second coat. Always remember
whenever you apply any layer on the second
layer or third layer, you have to wait for the
first layer to dry up. So to wait very slowly, very carefully, you can
use your round brush. You can use your flat brush. You can use your filbert brush, any brush you can use, it is all your choice
which brush you want to use and which brush
you are comfortable with. So just enjoy the
process of blocking. Now, once my upper
blocking is done, I will also do some layering
in the below part also. Just adding some lines just to give or give a difference between the foreground
and the background. Now, again, I will add some more textures
to the foreground. Just a little bit of textures, and then we are done with
the foreground, at least. Then we'll apply the colors on the bunny and then
the rest of the area. So just taking white
color and applying some white textures of white
in the vertical direction, just to give a look of this
as a furry cloth is there, which is there in
the bottom part. So first I did horizontally, now I'm doing it vertically. So a little bit of
textures above also. So that's about the textures. Rest we'll do in the next part.
5. Bunny Blocking Part One: Welcome back. So let's start with the background
blocking of the bunny. My background is drying. These are the colors
which I have taken out, and let's start with the
blocking of the bunny first. My background is drying, so I thought of just blocking
this bunny and then again, I will redo the third
coating on the background. Let's first mix the colors and
make the background color. Let's start first
mixing the colors. So here I will be
using my round brush for painting all these and blocking all the
background part. So let's start first
with the black color. Then comes the pains gray
little bit and a little bit of white just to tone
down a color a little bit. And I want this color
to be dark only. So if you don't
have a pains gray, you can use a little bit
of blue added to it. Not too much blue. It should
not turn out to be bluish. It should be more
grayish texture. So just grayish blue, you can make it. So just mixing the colors and you can see the
color which has come up. It looks like black only, but it is like a
dark grayish color. So just applying this color
completely on the background. So just slowly, I'm just blocking the color wherever
there is a darker part. So this color will be applied. So do it carefully, especially towards
the boundaries. So boundaries we will
be drawing the fur. We will be adding furs. So try to color all
this darker part first. Slowly with your round brush, you can use any size round
brush of size two, four, six depending upon the size of your bunny which
you are painting. So size totally matters on the size of the canvas or the
paper which you are using. So as you can see in the image, wherever there is
a darker portion, there I will be applying
this darker color. So the first step in any painting is the
background color. First, start painting the
background with dark. And as you layer the furs, it should become more
lighter and lighter. So this is how the process goes when we are doing
any fur painting. So if you have seen my
for painting of cat, you must have seen I
have added there also first the darker layer and
then the lighter layers. So if you want to
watch that, too, you can check out the link, which I have given
in the description. So just adding
these darker colors very carefully without
disturbing the shape. So all these adding of colors
is the most important part. Also, I'm outlining
the edge of the face, which is also a little bit of darker when we will add
the furs, you will see. So all this area is
darker in color. So whenever we paint any
animals or anything, it requires a lot of time because fur painting
requires a lot of time. So give time to this painting and do it very
slowly, very carefully. Take breaks. Don't
do it in a hurry. Take your time and
do this painting. So if you will follow
each and every step of mine during this painting, I'm sure you will be able to do this entire
painting very well. So just enjoy the process of painting and how the
structure is going. If you don't feel like
drawing the entire thing, you can trace it and you
can just paint the colors. If you're not
comfortable drawing it. That also you can do. So you can see how
I am just blocking the entire thing with
this darker color. And water is there on my brush, so I don't need extra
water for the colors. So try to block in the
entire darker area. So just enjoy the
process of blocking. As you can see in the image, the ears are also darker, so I will just block
in that part too. Currently, don't bother
about the textures, the hairs, and anything. You just have to fill in the colors with
the darker color. So just outlining the
edge of the body, and then I will just
fill in the colors. So here I will just make a line, and this is the area where there is a darker
color which is there. So I will just block in the entire thing with
this dark color. So this is a technique
that you can use in any of your pet or any animal
painting or bird painting. So these are the
techniques which you can use in any paintings. But, yes, you have to give all these painting quite a lot of time because it requires time and patience
because there is lots and lots of
detailings there. So just enjoy the
blocking of colors. Do it slowly,
carefully one by one. So once we are done with
the blocking of colors, then we'll start with
the fur painting. Now, our lower part and
the face has been done. Now we will be doing the ears and a little
bit of the area, which is the leg area, the outlining with
the darker color. So here also there are
darker areas which are here. So I'm just outlining the
area which is over here, just outlining so that to give a little more clear picture of how the shape is going to be Also, I will outline everything
which is in the lower part because outlining will give me a clear picture of where I
have to create the grasses, sorry, fur and the details
of the legs and everywhere. So just adding the outlines. Also I will start
doing the upper part, which is the darker
area of the ears. So I'm doing so
much of landscape, so every time grasses comes up. So I'm sorry about that. So let's add the colors,
the darker colors. So slowly, slowly, you can
see the shape is coming up. And once we do the
entire blocking, you will see how beautiful it is looking just
by blocking it. And then further we will
move towards the details. It will look more
and more beautiful. So here I'm just adding a
little white area just to give a little more difference
between the head and the ears. So when we add the hairs, at least we'll know
where to start. Otherwise, everything
with black, it will not be visible. So that's why I've added
there a little bit of line. With a lighter
color. So the edge here it is darker in color. So that's what I'm
painting over here. And now comes the area, which is the ears area. This area is completely dark and the whole circular
round thing is dark. So I will be painting. So you can see most of the
darker part we have covered. Now, the lighter parts are left, which we will be doing with very light color because
this is mostly white color. So here I'm just applying
a nice grayish color. And as I will go above, it will be more light
and light color. So this is how we have
to paint the ears. So this is how I'm just trying to paint and block
in the ear part.
6. Bunny Blocking Part Two: Welcome back. So let's
start the blocking further. So we have done the darker part. Now we'll start with the lighter ones which are a little lighter
grayish in color. So whenever we do white fur, we always use a little
darker version of it. So first, I will
add the gray color, which is on the eye part, on the body part,
and the neck part. So all of there, it is a little light
grayish color. So let's mix a nice
grayish color first, and then I'll start applying it. I'm using my rigor brush here because it is
a very small area. That's why I'm using
a smaller size brush. You can use any brush, round brush of
size zero of four, any brush you can use
to fill these details. When you use the
smaller size brush, it is easy for us to handle it. That's why I try to use
a smaller size brush, and Brush size totally
depends upon your choice, how you are comfortable. Like here, I'm comfortable
using the rigor brush. That's why I'm using
here the rigor brush. But if you're comfortable
with round brush, you can definitely
use round brush also. So this is the eye part, which is already here
the white color. That's why I'm applying
here gray color, the light gray color, and then I'll start
doing the fur part. But first, we are doing
with the blocking and then we'll start
with the fur details. So slowly, slowly,
we will be covering each and every part of the area. Blocking is necessary before
starting any detailing. And whenever we do any blocking, we should always use the darker
color than the fur color. So since my here,
the fur is white, that's why I'm using here, the light grayish color. Now let's do the ear
parts which are there. This is also a whitish in color. That's why here I'm applying, again, the gray color. Very thin layer of
discolor is there. A little bit towards
inside also. So slowly, slowly, we have to give a little shape to it so that we should know where
to apply which fur color. So I'm just adding first
the lighter color. And then there is
a darker layer of around the ears also
that also we will apply. So taking the same dark
color that we used earlier, just applying around the ears. Now, this is a time you
have to create the shape. So if you feel that there is some changes you have to make
in the shape of the ears, this is the correct time
to change the shape. So you can see slowly, slowly we are doing the
blocking of the ears. Now the ear part is left
in the center part, which is normally the
burnt umber and little bit of Azarin mix. So that we will do later. First, we will apply
the colors which are on this pause and on
this stomach area. So first, I'm just
outlining it so that we'll get an idea that
how the pause shapes are. Again, the other paws as well. So here only three
paws are visible. The other fourth one
is on the other side, so that is not visible. It's a very cute little
bunny which is having a fur of black and grayish and
white and brownish shade. Do it very slowly and carefully when you're
drawing these shapes. Now let's do the ear part. For the ear part,
I'm just mixing this Azarin and a little bit of this brown that is burnt amber and
doing the nose outline. Just the outline I am doing so that when I
will do the blocking, at least that part is visible. Now, again, let's mix the lighter color and do the rest of the
parts which are left. So you can apply
here at any strokes. Don't worry about if
there are brush marks or anything because when
you will apply the fur, all things will be gone. So you can do it
in any direction, in any random direction. So you can see here I'm doing
in any random direction. The upper part is
a little darker, so I've made a
little darker gray, and that I will blend
with the lighter color. So this is how we have
to do whole blocking. So only one layer is more than enough because when we
will do the fur part, there will be so
much of layerings, so it will be all gon, all the brush marks, all the lines, everything. So once we have done
with the blocking, then we'll start with
the for detailing. But first, we'll do
one more quoting of the background because
I can see there are some brush marks
which are there. So after this blocking, we'll do again the background
part and then we'll start with the for detailing. So you can see we have done the blocking of
this entire thing. The below part, just
the face part is left. So once we are done
with D blocking and then we'll start
with D detailing. So just enjoy the
process of blocking. So a little bit of
dark area is there. So we're almost done
with it, few parts. So just the mouth part
is left for blocking. Oh So now let's cover the ears, taking burnt umber
and a little bit of white and just covering
this whole part. So we're almost done
with the blocking. Only the final part of the background
painting is required, and then we are good to
go for the detailing. Uh
7. Final Background Blocking: Welcome back. So
let's start with the final background blocking. So two layers which we
have already applied. Now my colors have
already dried properly. Now I will use the same
color which we used earlier to do the third and final
layer of background blocking. So I'm just mixing a little bit of this paints gray in this white and then a little more of yellow we
will add into it. So a little more of
yellow we will add, and we'll see how the
color comes up because I want a little more warm
color, warm grayish color. So just mix it
with your palette, and this is the color which we will be using again
for our background. So let's check the color
which is on the paper. So it's similar color, but a little lighter version. So let's apply a third
got on the background. Why it is necessary to apply, we cannot apply in the last
go because when we will apply furs will also go
inside the background. That's why we have to do first
the background properly. Then only we can do the
rest of the things. So you can see this color is
a little lighter version of the background which I have used earlier and
little yellowish also. So you can change your
color accordingly. And every time you
will mix the color, you will get a different
version of gray. So don't worry about that. It's like a buff color, you can say more of a
buff grayish color. So just mixing and just applying
the same color all over. So you can see the
finish which is coming up when I'm
applying the third layer. So it is important to apply
layers of colors here to give a fine finish
look to your background. So once we are done
with the background, then we'll start
with the details. So slowly, slowly,
one side I have done, the other side and
the top part is left, and then we are
good to go further. I So do it very carefully without
disturbing the bunny shape. So you can see how I'm
doing it very carefully. First I'm just outlining
a thick layer, and then I'm just
blocking the other side. Once we are done
with this blocking, once the background dries, then we can add the four
texture all around. So each and every painting, if you're doing it
a little realistic, it requires layers of colors, especially on canvas
and MDF board. If you are applying, you have
to apply layers of colors. So finally, we are almost done with the
background blocking. And now we will start with the four detailings which is the main part of
this bunny painting. So you can now see how the
finished look has come up. It's more clear, more neat, and without any brush marks.
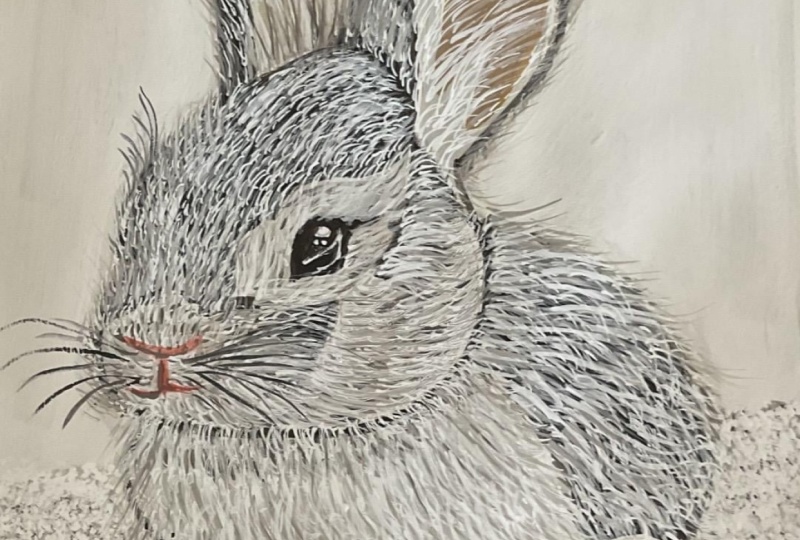
8. Fur Details Part One: Welcome back. So let's
start with the fur details. So let's first apply one
more layer on the ear part, and then we will similar
color I've used here, as you can see here,
fresh palette. So just first applying one layer on the ear part because I
think that color is very thin. So I will apply one more
layer on the inside ear part, and then we'll start further
with the fur detailing. So using my round
brush of smaller size, just taking burnt umber, with a mix of little
bit of paints gray, applying a little darker
color first below. So this seems to be
a lot of dark color. So a little bit of darker
color is at the edge, and as it goes above, it becomes lighter and lighter. So it's like that, the shade of the inside part of the ear. So as we are going out, I'll just take more
white into this and just make the color a little bit more
lighter, not grayish. So I'll just add a
little bit more of burn umber and just apply a layer of this color on top
of it and try to blend this color with
the darker color. So just applying this
layer and trying to blend with the darker
layer as well. So just trying to blend the colors taking again this raw umber and
pushing this color towards the top to make the
color a little more lighter. So again, taking
this burnt umber, making it a little more blendable and not
very light in color, because the edge is a little bit more brownish
than the upper part. So if your color is wet, you can easily blend the colors. If your color is not wet, it is a little
difficult to blend. That's why I use thick
color for blending. Now, let's do the
part which is here in the body part where we will
apply the fur details. For the fur details, I will be using my
small size zero brush, first empties taking white and making the color
a little fluid. And then I'll start adding
the lines from the top. So very small, small
lines first on the top. So this is how we
have to go first from the top then
towards the darker area. So I'm making small small lines in different directions
towards the upper area, and slowly we'll move downward. So very small, small
lines of the first, try to make it as
thin as possible. Make your color thin and
then apply the lines. You can use size
zero round brush, or you can use a
rigger brush, also. In this process, you can
use any brush, but again, you have to use a liner brush or a rigor brush of size
zero or two by zero. Try not to use
bigger size brush. And we have to apply these
small lines all over, as you can see, and it is a very long process of
applying the lines. So try to do it very
slowly, very carefully. Try not to do it in a hurry. And if any mistakes happen, you can recover it by using
the background cover. So any mistakes can be
solved here when you are using the color. Suppose if I have
applied a lot of white here and I don't want
it to be very dark, so I will reapply the
background color, and then again, I can
reshape that thing. So this is how we can
always redo the things. These are nothing
but just small lines which are in sections. So this is how we have to
move on till the down part. So now here I'm applying with my liner brush of size zero. This is a rigor brush
which I'm using here because it holds
quite a lot of color. So you can easily use this brush and you
can do it in one go. So, yes, you can use any brush, whichever brush you feel like. Now, this is another liner brush which is of size two by
zero, which I'm using here. And you can see the
hair of this brush. It is quite long. So it will
hold quite a lot of color. So every time you don't have to pick the colors and
do the same thing. So in one go, you can do quite
a lot of furs in one go. So a little bit of white hair, I'm pushing it towards
the black area as well. So you can use any brush but the liner or the rigger brush. So you can see how I'm changing the angles when I'm
going the outer side. So it is more towards
the outer side. When I'm moving inward, it is more towards
the inward side. So this is how we move the hairs in parts in
small, small parts. So again, one more layer. So first, second, now this is the third row which
I am doing here. So you have to change the rows, and then accordingly,
you have to add the hairs like this. So we have to cover
this whole area with this type of texture. This is just one layer. We have to apply at
least two, three layers. Then only that for
reality will come up. Currently, it is
looking like a line, but when we apply two, three layers on it, it will
look more realistic fur. So you can see I haven't
made it like speed up the process because I want
you to do it along with me. And so that each and every
process of mine is visible. That's why I haven't speed up the process because I want
you to do it along with me. So try to do it slowly, carefully one by one and small small lines And slowly, slowly, you will see
the shape is coming up. Whenever we do any painting, the initial process
is, like, very boring. We get stuck into it. We feel like it is
taking a very long time. We should stop it here. But the end result when you see how much effort you have done to paint this whole thing, and the end results, when you see the end results, you feel like satisfying. It was worth doing it. So that's what I feel when I
do these types of paintings because it is very,
like, mind relaxing. You are focused on one thing. You don't have to
do any other thing. You don't think of
any other thing. So this is the main thing when you do such
type of painting. You are into it and
you are just doing like just focusing on one thing and rest of the
things are just blank. So that's what here
this painting is about, patience discipline
and how slowly and very patiently you
are doing such task. And if you follow each
and every step of mine, I'm sure you will be able to do this painting
as I am doing. Anyone can try this painting
out, even the bigners. It's not like very tricky. Anyone can try it out. It's just that you have to make the lines a little bit thinner. That's practice you have to do when you are doing
such type of painting. So you can see we have almost
covered the below part. You can see already
it is looking very beautiful just by applying
one single layer. Now when we apply more layers, it will look more
and more stunning. So just taking a darker
color and just making a darker fur all
around the body part. Now, this will give a little
edge to the curved area.
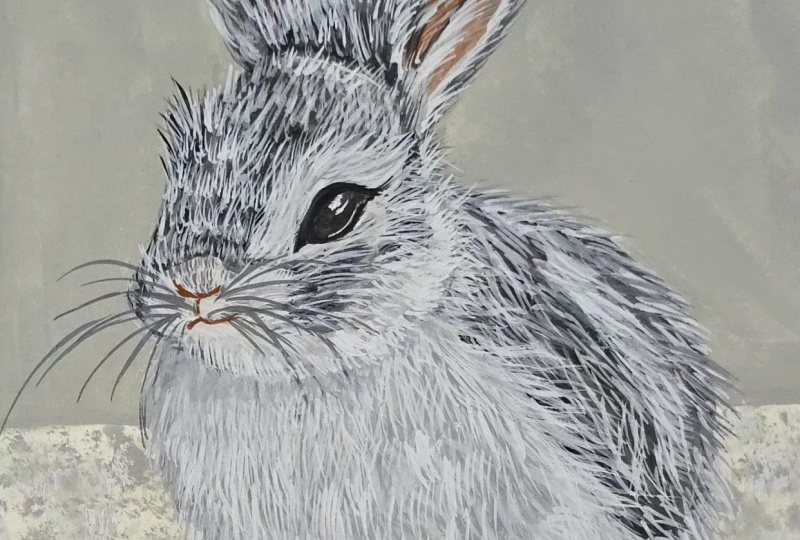
9. Eyes Details Part Two: Welcome back. So let's
start with the eyes detail. So for the eyes detail, we'll mostly be
using black color. So let's start with it. And I'm using my again, round brush of size zero. Try to use a smaller size brush because these are very minute
things which we have to do. So try to use a
smaller size brush. Just taking some
nice thick color and applying it
all over the eyes. So a nice black
color. Thick black. So first, I'm just outlining
it how the shape will come, and then I'll start
blocking the colors. So outlining first, take a little liquidy color because we are doing
outlining here. Try not to use very thick color, and then we have to just
fill it with black, leaving the area, which is
the white spot over there. So just doing it very
carefully, very slowly. So let me zoom in a little
so that you can see it more clearly because these eye details are the main thing, which we have to do
it very carefully and very carefully because this is the main thing in
the painting when the painting looks more
beautiful and more attractive, it's because of
the eyes, I feel. So leaving the white spot, I'm just covering the entire
area with black color. So this is like jet black color. You don't have to mix any color
in here, the black color. So just taking a little bit
of brown and black mix, and I will just outline the
area which is on the outside. Outside, it is a bit
more brownish color, especially the lining. So I'm just taking out a
little bit of Azarin also. I will mix Azarin and this
burn tumble together. And just make a nice
light brownish color and we'll apply it
all over the outline. Do it very carefully, make your color a little
thin and then apply the lining because we need a
little thin color over here, not very thick color. Otherwise, you will not be
able to make thin lines. So once that lining is done, then we'll just cover
this entire area with, again, the black color. So whole area, I'll just cover it with black and
a little bit of grayish. I will add it over here. Just a light grayish
color, not very light. It is just more darker only. So this is how it looks
when we apply the color. Now we will add the eye
details which is there. So there are a very
soft light grayish line which is there inside the eye, so that I'm just trying to add. My color is wet. So when I apply this line, it will not be very dark, so it will be very dull line. So that's what I wanted. I don't want a very dark line. Also, there are three
dots in the eyes, which I will be applying
it on top of it. So very light lines. Just like the shape of the eyes, some reflection which
is coming on the eyes. So now let's add the
dots over there. So there are three
dots which are there, one big and two in
the below side. So just the three dots. So this is how we make the eyes. It's very simple, especially
in the bunny part. But when we do the cat
painting and all that, the eyes part is
much more difficult. So this is a very
simple eye painting. So now let's add more
brownish touch to the eyes. As to the outside part, the outside of the eyes is
more towards the brownish, reddish side. Does the outline. So try to do it very
carefully and slowly. Now, once we are
done with the eyes, now we will start doing the
hairs which are around them. So first, I'm taking this
liner brush which is of size two by zero and trying
to outline the eyes. So if you feel that your
size zero brush is thick, you can always switch to
a different size brush. So here, mostly we have to
use a very thin size brushes, like very thin brushes. So we cannot use thick
brushes over here. So now you can see
the eyes is done. Now the hairs are left, which are all around the eyes. So let's start adding
small, small hairs. Just adding one more
layer to this area, which is the highlight inside
the eyes, as you can see. So again, taking some
grayish color and trying to fill and add
some hairs all around. Try to add very tiny, tiny hairs all around the eyes. Don't use very long lines, very small, small tiny, tiny hairs you have to add in a slanting shape just
across the eyes. So let's zoom in a
little again and see how this hair details are going. So again, taking white color, make Ola color thin. Take very little little
color on your brush. Don't take too much color
and start adding small, small hairs across the eyes. First, I have done
on the lower part, now I'm doing on the upper part. These hairs will also add the hairs of the eyebrow
and the eyelashes. So all these hairs are very small tiny hairs which
are across this eyes. Also now we will
add the hairs all over the light part of
the area which is here. So big hairs also, as it is going above. So some big, big hairs across the cheek area and
the lower part. So wherever I've added
the lighter color there, I'm just adding these hairs. So very small tiny, tiny hairs which are coming out to the darker portion also. Again, on the upper side, it is a little bit of slanting
lines which I'm adding. These are not straight hairs, some slanting hairs which are moving upward in the
upward direction. So hair should also go
according to the shape of your body if your body shape
is going above upward, the hair shape will
also the lines shape will also go upward direction. This is how we use the
directions of the hairs. So you can see, I'm
just adding some small, small tiny lines, very
thin lines are these. Try to make it as
thin as possible. Also, we will add
some hairs across the nose part where there is
a white patch over there. Now, here it is a straight line because the face
is a little flat. So that's why there are
some straight lines which are over here, some straight, tiny lines. So this is how this whole
eyes area is covered. We'll do more
layering over here.
10. Fur Details Part Three: Welcome back. So let's start
with the more for details. So we have done the lower part. Now, let's start with
the face part now. So face part also we
have done the eyes part. The extra side parts
are still left. So let's start with that first. So again, taking my same brush the liner brush or rigor
brush of size two by zero. And just making the color
a little bit of thin and applying to the face area. Now, how the direction
is in same direction, we have to move the brush. Now, you can see
the direction is a little bit towards the sides. So our firm also will
be towards the side. So like this, we have
to fill this area, which is there on the side part. Now, this part is more
in the upward direction, so it will be more towards
the upward direction. Starting from small hairs, it will end towards
the bigger hairs. So we have to make sure all the rigid lines
which are there, it should be a little blurry
with these feather lines. So what I'm doing here, you can see there's a half curve line, and I'm making small hairs
around it just to make it look like those are all hairs
which are around that shape. So very small, small first, we'll start adding the textures, and then as we will go above, it will be a little
bigger in size. So this is how we have to move
the textures, very small, fine details and make sure your color is not thick.
It should be fluid. Then only you will be able
to create thin lines. Otherwise, there
will be thick lines. So again, here,
the moustache part where I'm making the lines a little bit towards the sides, little bigger lines
because there are spaces which
have a bigger area. There is lines which are the moustache is coming,
the hairs are coming. So that's why the area
is bigger in size. Now, let's take
another darker color that is a grayish color, and let's add some more
grayish lines in between just to mix and make the colors. So this is how we mix and
blend the colors using darker, lighter mix of colors. So again, I'm adding a little
more darker version of gray and starting to add
more hairs around it. Try to make the color thin and then add all these details. Try not to use thick colour. Try using thin colour. Thin colour doesn't mean that the color should be like watery. It should be a liquid color. So try to use that and
give a very fine lines. So if you have done
my cat painting, this will be a little bit more easier than the cat painting. But if you have not
done the cat painting, you can try for this and
go for the cat painting. So small small hairs, I'm adding around
this whole head face. So very small small hairs, just to give a little bit
more depth to the face area. So slowly, slowly,
we have to build up a shape just by using hairs. So this is how we build
up the shape, actually. So again, taking more of
this pains gray and a mix of black so that it
is not totally black in color and adding some
more hairs around it. So if you don't have pains gray, you can directly use black. Don't worry about that.
You can use black. I feel that a little
tone down the black. I have used that pains gray. But yes, if you don't
have pains gray, you can directly use
just black color. So this is the neck region, which I'm giving a little
depth to that area. These are very
small, small lines. Try not to make very big lines, especially around the nose. A. These are very small and
minute hairs which are there, very small and minute
lines should be there. Just add some darker
lines and then we'll start adding the
lighter ones too. Similarly, adding some lines to the side parts with
a grayish color. So dots, just to
add some more lines to give the moustache
section which is there. So this is how we have to give a little shape one by
one to the nose area, to the mouth area, a little bit hairs which
are coming outside the whole area which
is there because the hairs are also coming
outside the background. It's not like stiff. So you have to make
the hairs also outside the area,
which is the shape. So a little bit hairs, I'm
just adding to the sides, just to look more furry. Now, you can see here I have done a little bit of mistakes, which I will fix it by using
the same background color. You don't have to do anything. You just take your
same background color and just apply a thick
coat over there, and your mistakes will be fixed. So this is how you can fix your mistakes also if
you have done any.
11. Fur Details Part Four: Welcome back. So
let's start further. So we have done the nose part. Now we will move ahead
with the head part, which is there, the
darker portion, as you can see over there. So let's start adding more fur details
using the same brush. Same liner brush I'm using
that is size two by zero, making a little more
lighter grayish color, and I'm starting to add very tiny hairs
around the nose part. And as I will go above, it will become
bigger and bigger. So mostly the direction
of the lines are in a straight form because
it is going upward. And as it will go upward
a little bit hairs, I will start adding to the
nose area which is here. Try to add very small lines
because this area has very small fur details,
not big hairs. So try to add very
small, small lines. So as we are moving above
little bit bigger lines, we will start adding. All these steps take
a very long time, so have patience and
do it very slowly. Don't do it in a
hurry because this is a time consuming process
and a very repetitive task. So sometimes we feel
bored that, Okay, we are doing these
same steps again and again and we feel like to complete it in a hurry,
but don't do that. That will ruin your painting. So take breaks, do it very
slowly. Take your time. Don't do it in one day. Take breaks, take a
week if you want, and do it very
slowly one by one. The parts. Try not
to do in one go. So just adding all the hairs. So this is just a small
advice that I also do. I also don't complete my
painting in just one go. I also take breaks. I also do the
paintings in chunks. This is a small painting, so I have done in two days. But if I do a bigger
size painting, I always give time
to that painting so that it doesn't look like
that you have just completed. It should not look like
that you have done in a hurry just to
complete that painting. Because when we
see that painting, we know like, yes, we have done it in a hurry. This could have
been much better. So try to give time to your painting and do
it slowly carefully. If by mistake, some of
the colors go darker, you can always redo it by using the same
background color. So here you can see I'm making the hairs like a little slanting because this is the area where the hairs are little slanting. So that's why I'm adding
the hair a little bit more slanting this side
and a little bit more bigger. So this is how we have
to go one by one in the different directions of the hairs because all the
directions are not same. So it depends upon how the curve and the shapes of the body is. That's how we decide
the shape of the hairs. And whenever you are doing
such type of painting, try to use if you're
using any picture, try to use a good quality
picture which has good pixels so that you can see the exact hair and the
directions where it is going. So just doing some
small hairs on the top. So this actually area is more
white than the area which is towards the other side where there is a darker portion. So above also, I'm
adding the hairs with white color just to give
the depth of the shape of the head because all
these area which is on the above
it is more it has more lighter hairs than the
one which is on the sides. So slowly, slowly, I'm
just overdoing the hairs where I feel that there
should be more white color. So a little bit of black color. I'm just taking black
and paints gray mix and just adding some more
hairs to these sides. You can see the
side is very stiff. It should not be very stiff. It should have hairs
which are coming out, especially the structure area. So I'm adding small small hairs
on the outside part also, just to show that there
are small small hairs which are coming out also. That's why I'm doing it
with a darker color first. If you will directly do with lighter color, it
will not be visible. So try doing it first with
a little darker color and then you can overdo it on
top with the lighter color. So all over this area,
I'm just adding small, small hairs which are also
showing up in the background. And very small haze. Again, I'm adding with
the lighter color. So the more and more
you will do layering, the more beautiful it will look. So it's all about
layering how much layering you are giving
to your painting. So a little bit more lighter
colors I'm just adding. So slowly, slowly, you can see the shape is coming
up and the hairs are coming up and it is looking
more like a real bunny. So that's what I think of doing while doing
this painting. I want it to be look more real because I like doing a
little realistic painting. So just adding, again, this grayish lighter
color to the area which is near the
nose and the mouth. So white hairs across the whole chin area and the whole bottom
area of the head. Again, taking this
light grayish color and adding some more
hairs to the sides, making it towards more towards the darker area which is there. Even if my background is dark, I'm using a light grayish color so that the hairs are visible. So most of them are
light grayish color. Again, I'm taking
this darker color and adding some more lines
which are going outward. It should not look like a patch. It should look like
that this darker color is also mixing with
lighter color. It's a sort of blending which
we do with these textures. So slowly, slowly just
adding some more hairs. Just adding a line which joins the eyes actually through hairs. So you can see this line
is joining the eyes also. Again, adding some more
lines towards the area which is joining the dark
and the light portion.
12. Fur Details Part Five: Welcome back. So
let's start further. Now we have done the head,
we have done the body part. Now let's start further
with more hair details. We have just done the
one layer of the fur. Now let's first make the nose which is there a
little bit more visible. As you can see, it's
a very light color, so it's not visible completely. I'm just making it
a little bit more dark just by adding
one more layer to it. So a little bit more
colors I might need, especially the Azarin because
it has already dried. So I'm just taking a little bit of yellow ochre also and giving a little highlight around just to make that area
look more yellowish, highlighting that area because my yellow ochre is already
very transparent color. So it is easily
highlighted over there. And then I will add the lines. I'm waiting for that first
this yellow ochre to dry. Then only I will add the lines. So now let's first do the more fur detailings
in the below, and then we'll start with more details on the
mouth and the nose part. So just adding some
more thicker lines and some more white lines across this area across the
nose and the mouth area. So just adding some
more white lines. So that's what we
have to do here. The more layers you will add, the more real and more furry
your furry friend will look. So just adding some more hair, bigger hairs around the eyes, around the cheek everywhere. Especially when we are doing
this type of painting, blending is done
with textures only. Here, with textures only, we are blending the dark and the light color blending in the sense that we are
mixing the two colors. I should not look like that
this dark color is a patch. It should blend with
that lighter color. So that's what we
have to do here also. So just adding some
more darker lines. So more and more lines, you will add more realistic it will look. It's
just like that. And try not to use very thick color of
white, use milky color. Then only you'll be
able to draw the lines. If you will use thick color, you will not be able
to draw the lines. If you have liquid white color, you can use that
also so that you don't have to mix every
time water in this. So just adding some more hairs around the area which
is the head area. Because this hair area has
maximum number of hairs. So this is how we're adding very small small
hairs are these. So now you can see
the shape is coming when I'm adding more
white hairs around it. I will also add some small
hairs around the nose part. Especially around the nose and the mouth part,
the hairs are small. In the rest of the areas the hairs are much more
bigger than the areas, which is the nose part. So just adding more
and more hairs because this area
is quite white. M. So even if you have white
bunny or something, it should not be completely white painting in
the background. You should always
first do with gray and then use white as for detailing. Now, I'm just taking my, again, this brown color and just
adding more darker color to it. Already, my raw umber has sorry, yellow ochre has dried, which I applied earlier. Now I'm just highlighting
all this area, which is the mouth
and the nose area. Giving a little more
proper shape to it so that it is more visible. My Azarin crimson
has already dried, as you know, acrylic
dries very fast. So I'll just take a little
bit more of Azarin and I will mix to this
brown Azarin crimson. And then, again, I will add a little bit more outline to it. So this is how you have to do a very simple nose
and mouth details. So this is the whole
mouth and nose details. Now again, let's start with
more of the fur details now, taking the darker
color and again, applying towards the
area which is just below the head part,
that is the chin part. As to the sides to give a little more depth
to that structure. Adding also to the hairs
around the leg part. And whatever we are doing
here is just giving a depth. Here, I'm just
painting it with black where the two legs join, painting that area with
black because that is a shadow which is
totally black in color. So that's what I'm
doing here and adding more and
more hairs around. So this is how you
can see I've added all to the sides, the hairs. So this will give a little
depth to the below part. Now I will add some
shadow also to the side, which is falling with
my different brush. That is the round brush. So making a light
grayish color first, mixing brown and a little bit of black and grayish
texture it is actually. It's not brownish color. So just mixing it with the same color and adding a little bit more of
black and pains gray, whatever you feel like you
can add and make it a grayish color and just add
the shadow below. Just adding some shadow. Giving a little shape to the shadow and then just
blocking it simply. I feel that this
color is little dark, so I'm just adding a little
bit more of white to this, and I'm just adding some
shadow part over here. Some darker shadow around
the pause which is there. And again, redoing it. Also a little bit shadow to the behind pause,
which is there. So this is it for
the shadow part, not much we have to do.
13. Fur Details Part Six: Welcome back. So now let's start with more of the fur details. So now we have done the
shadow, the whole details. Now, let's start with the
paw details which are there. So first, we will add some
darker highlights over the pause just to give a
little bit more depth to it. So let's start first with the
first paw which is there. So taking again, my same brush, and here the hairs will be
very small, very small size. It should not be very big. So try to make very
small, small hairs. I'm just making a dark grayish
color and starting to add some small tiny hairs around around the paws,
around the lines. So just filling first outlining it with dark color and just
adding some hairs around. Similarly, I will do the
other finger section also first outline the line
and then just add small, small tiny lines around it. This will look like
that there are hairs which are around the paws and
in the center part as well. So you can see I've filled it with entire small,
small tiny hairs. Similarly, I will be doing
the other paw as well. Also, I'm adding
some lighter colours that is the light
grayish color around this paw just to blend
it with a darker color. Try to add very
small size lines. Don't try to add very big size. Just adding some more
hairs around the area, which is the body portion. And try to make the depth
of that area more darker so that it is visible
clearly the poor shapes. So this is the area which
has the darkest shadow. That's why I'm making
it very dark inside. So now let's do another
paw which is there, adding some more
brownish shade as well and blending
it with the color. That is the darker color. Okay. Now, let's add more of the lighter color to the
first paw which is there, a little bit more
brownish hairs around it. So there are more brownish
hair which is around the neck portion in the
middle side of the body. A very light brownish
colours are there. So just adding that in the
center part especially. So mostly the bunny is not
totally white or gray. A little bit brownish
color is also there in some of the areas. So just adding all
these hairs here. Now, again, taking
this white color and adding some more small
small hairs around this paw Similarly, we will be
doing other two paws also, but this paw is more of a darker color as compared
to the other paws. Adding some more lighter
lines across the paw section. Similarly, we'll be doing
the second one also. Same color, same
technique we will use here also for the second one, making a color little
dark grayish color. And then first, I will
add the darker hairs. I'm also outlining it and also adding small
hairs around it. Just to look that there
are small hairs which are around the fingerline. And then we can add the hairs in the center part of the paw. Very small, small tiny hairs here and there
with darker color, and then with lighter color, you can add with
similar technique, which we have done
for the first one. So everywhere we have to use the same technique and
the last pi is also left. Same way we will be
doing the last one also. So we're almost done
with both the paws, adding the lighter and the
darker version of hairs. Very small small
hairs are these.
14. Fur Details Part Seven: Hello all. Welcome back. So let's start further
the fur detailings. So the third paw is left. So let's start with that. So again, same brush, the liner brush of
size two by zero, and just making some
dark textures around the area which joins the
paw and the upper area. Just small small hairs
around the lines. So slowly, slowly,
I'm just adding very small tiny hairs around
the lines which I have made. And making it more dark
so that it is visible more taking again the same color and adding some more textures of the darker fur and just
outlining the edges also. Same technique I'm using
here like we did in the previous two paws, same technique, adding
some nice hairs and then some lighter ones also. So grayish texture also
inside the paw area, then some light textures. So slowly, slowly, you can
see the shape is coming up. So this is how we
have to create small, small textures, and one by one, we have to add the fur textures. So we have just done one
layer of the fur details. Somewhere we will be requiring some more layering of the fur. So currently, I'm
just focusing on the first layer of
the fur details. I'm making this area more white just by adding more
white fine lines. The more and more
lines you will add, the more and more it will
look like a real for thing. It's all about layering and
overlapping of the details. So again, taking some
white thin color and just adding some more
layers around the area, which is the curve area, adding some more lighter lines. Adding some more white lines
across the pause area. So slowly, slowly, I'm just adding more and more layers to it so that it looks more
like fluffy and more dense. So just adding some more
lighter colors to the sides. So in each and every painting, the more and more layers
you add to your fur, the more realistic it looks. This is the idea behind it. So again, I'm adding
the lighter layer that is the white
color around the nose. Above is a straight line, and as it goes to the sides, so it becomes the side lines. So like this, you have
to move your brush. Um, the more and more
you will add the layers, the more it will look real. So again, I'm taking
this flat brush. Here it is more white area. That means more grayish and
whitish patch is there. So I'm just taking my
flat brush and adding more thicker details around over here just to
make it more visible. So you can use any brush. Here I am using my flat
brush which I used earlier. But you can use any brush, whichever brush you feel like, giving a nice textures of
white around this area. So this area is actually
having a white patch. That's why I've added extra
white layers around it. Now let's take again the
darker color and start adding more for details around
the neck region. So slowly, slowly, we'll
move towards the ears also because ears we haven't
touched yet the details. So ears also we'll start doing. So just adding small small
hairs around the sides. And then as we go above, we will add more smaller
hairs around the ears, which is also showing
up in the background. Try to make it as
small as possible. This can only happen
if your color is thin. Try not to use thick color whenever you are doing
such layering thing, such layers and fine details, try to use a thin color, then only those lines
will become thin. So first I just layering
the outside part, giving small hairs outside. And then we'll start
the inside part also. So you can see, just taking
the darker color and adding some nice fur
details outside. So similarly, I will be
doing the other ears also. So this area is quite dark. That's why I'm adding more
and more black details to it. Then comes the other
side of the ear. Now, this time is the time when you can fix the
ear shapes or anything. So try to fix it and
then do the detailings. Some more hairs which
are coming outside. Also some hairs around
this grayish area.
15. Fur Details Part Eight: Welcome back. Let's start further with the ears detailing, which we are doing. We have already done
the darker details. Now let's start with
the lighter ones. So taking my white
color and adding very small small textures
first around the ears. Now, this is a shape of, like, a eyebrow type. So I'm just making it
more thick and more repeating the same color that is the white color and giving
a little shape also to it. Just adding more
white to this area because this area is
quite white in color. So and bright also. So just adding more
white layers to it. This time, you can use a
little bit of fluid color, not very thin color
when you are doing the second layer on top of it because we have
already done one layer. I'm just repeating again, the same process with the same color and a
little bit of fluid color. So whenever you are
doing such type of process, do it one by one. First, take a little thin color, then take a little fluid color. If you feel that this
area is more bright, then add a little
thick layer to it. That also you can do. Now we'll start with the ears. Now, around the ears is a
very white furry texture. So that's what I'm applying here going towards slanting
towards the upward direction. So taking very
little little white and applying it over the area, which is the leaf shape
area which is there, try to use a fluid color
and a thick color. And I'm just first outlining it just to give a shape to it. And then, again, I will
start adding the lines. So very close lines and just adding lines all around
this curved area. It. So just adding very closely
these lines one by one. So you can see how much color I take very little little
color at a time. Don't take too much
color on your brush. Otherwise, there are chances that lots of color will
come up on your painting. So every time whenever
you're applying, take little little color
and then do the detailing. Now here also the hairs are a little bit of grayish color. So that's what I'm adding over here in the darker portion. All around this is
a grayish hair. So that's what I'm
applying here. I'm not covering it too
much because I want this area to be dark, not light. So again, adding
a white layer of the lines around this
area, the curved area. Similarly to the area
which joins the ears, there also there
is a line which is going in a upward direction. There are some white hairs
inside the ear portion also. So that's what I'm just
adding it over there. So slowly, slowly, you can
see the shape is building up, the fur level is building up. So this is how we have
to do one by one, the area which is there. And whenever you do all
these type of process, it requires a lot of time
and a lot of patience. So if you're starting
to do this painting, make sure that don't
complete it in just one day. Try to take breaks and then do the painting because
all these paintings require time and patience. Some of the bigger
white hairs I'm just adding to this brownish
area which is inside part. Not too much hair, but
little bigger size hair. So also, I will do the
other side of the ears. So I've just outlined
it, and then again, I will create the hairs
in the upward direction. Oh. So slowly, slowly the
hair is also building up, as you can see, some of the hairs which are in
the downward direction, some in upward direction. So, likewise, we have to change the direction of the hairs. Now, this hair I'm just adding
in the downward direction. And then I will add
the hairs around the area which is the longer
hairs which is going inside. O. So this is how we have to
change the direction accordingly where the hairs are. So some more white
hairs in the center, and then a little
bit more hairs in the center part because this
area has a quite white hair. Again, adding some more hairs to the sides, some white color. So this is how we
have to do the ears. So one ear is almost done. We have to do the second one. Especially the area
which is inside, it has quite a lot
of white hair. Then comes the area which
is around the eyes. This area is also quite white. So I'm adding more and
more white hairs to it. And it also has a
shape of S shape, as you can see, so that
should be maintained. O.
16. Fur Details Part Nine: Welcome back. So now
one years we have done. Now, let's focus
on the other one, which we have to do. More lighter colors are
there on the sides. So just taking white color
and the same rigor brush and adding some white textures
first onto the sides. Because this area is more white, as you can see the picture, more lighter color as
compared to the other one. So this area hole is
very light in color. So that's why I'm adding the textures more
close, as you can see, the hairs which are really
very close to each other so that maximum area looks
more white in color. So this is how I
have just filled this area with
small small lines. Also, some of the highlights I will add to the sides also. Not too much because
this area should be a little darker as compared
to the side portion. So a little bit of these white shades around
these darker parts. And now let's add more
layers to this part which has more whiter
look on the upper edge. And So just repeating the same process and adding
the textures and don't worry about the dryness of the colors because whenever you add
such type of details, these type of colors dry very fast when you're
using acrylic, especially the lines
and everything. You're adding some
more brownish texture around this area, taking that brown
color and white mix. Similarly, some on the
sides of the other ears. Okay, now let's do more
detailings of the fur. We have done one coat on each
and every part of the area. Now it's the time to do
the second fur coat. It's not like you have to do just one coat and it is done. You have to do at
least one more coat on this so that it looks
more dense and more furry. So again, taking
this white color and adding some more
lines to the side, moustache area, which is here. So wherever I will
feel that there is less hairs and we need
more for details, there we'll start
adding the hairs because we have only
done one layer of it. So just adding to the area, which is the chin area
and the nose area everywhere because this
is the main portion, which should be done
with much care. So slowly, slowly,
I'm just adding more and more white
to the areas, which is the lighter section, which is a lighter part
of the whole hair part. So you can see now
this white area is also visible when I'm
adding more and more hairs. Similarly, all
around, I will start adding So in this
type of technique, the more and more
layers you will add, the more it will look beautiful, more furry, more realistic. Adding the hairs
in the direction, which is like a half
circle direction, as you can see in the
downward direction, because the face is going
in the downward direction. That's why the hairs
are also going in the downward direction. So similarly, adding
more and more whites across the area, the edges. So during this time,
you have to fix all the areas where you feel that there are
less for details. So slowly, slowly,
I'm just adding more and more second
layers to it, just to make it more
furry and more dense. So let's do Let's first give a little texture
to the area which is below. That is the shadow area. I'll just take the fan brush and white color and I will add
same textures which I have applied to the area which is around just to match that area. It doesn't matter
if it is a shadow, still that fur should be there. So that's why I'm adding
all these small details of white around
all these section. So now it is looking
like that this is that this reflection
is inside that part. So this is it for
the foreground also. Let's do further.
17. Second layer Fur Details: Welcome back. Now we have to do the second layer of for details. So we have done
one layer already. Now I've taken a fresh colors, as you can see over here,
all are same colors, burn umber, black,
paints gray and white. So let's start with
first the eyes. So just one more layer, we'll start using
similar colors, same colors, just another
layer of fur and the details. Because whenever we
do any fur details, it's required that at
least we should do a few layers of for
details over there. So just taking this brown and this Azarin mix and just adding a layer of around
the eyes section, which is there, just adding a nice outline around this eyes just to give a
little more depth to it. Now, this is the time when
we have to fix each and everything which we feel that it is not good or
it is not proper. It is not accurate. So just I'm just outlining
it with this color. Now, once we have done
the outlining part, I'll just take a mix of white and paints gray. And again, we'll start adding further the second
layer details. So just mixing the colors and
with the same brush, again, this is the liner brush
of size three by zero, and just adding some
more highlights of the hair around the
eyes because here the hairs are very tiny, as you can see, just making
it a little darker color. So let me zoom in
a little and you will see how the
details I'm adding. So just around the eyes, I'm just adding small, small slanting hairs,
as you can see, giving a little edge to this area and adding
small, small tiny, tiny hairs around the eyes, just to give a little
more shape to this. Very small, small hairs
are these just to make it look more
real, as you can say. So similarly, I will be doing
for the upper part also. Try to take thin color and add very small small tiny
lines across the eyes. So we'll start adding
now the lighter color. So same thing we have to do for the hairs and small
small hairs around the eyes. So just adding some more
lines to this area, which joins the lighter
and darker color. Since this is a second tone, so this is a time
when you have to fix the issues where you feel
that there is a darker layer, you have to add the darker layer where you feel that there
should be lighter color, add more white to it. So here I'm adding
more grayish texture around the nose, as you can see. And also, I will add
some to the sides, just like some hairs
which are coming outside. So do these very carefully, make your color thin, and then try to add these small, small hairs because this
all small small details will make your painting look more realistic
and more beautiful. So just adding some white hairs around the eyes like we
did for the darker ones. So we always have to do the layering with dark
and then with light. This should be ongoing
until and unless you feel that it is perfectly fine. Especially when you
do around the eyes, it should be very careful because this is the main
part of the entire painting. Your eyes should look more
beautiful than anything else. Around the eyes, there
are more lighter colors. So I'm just adding
more white hairs across the area across the eyes. So take a milky color and take small small amount of color
and start adding the layers. You can see when I'm
adding the second layer, the colors are becoming more
vibrant and more bright. So that's why layering
is important when you do these four details. Some hairs which
I'm adding across these darker shade
which I have applied. And also, I will add some
darker shade as well. And h some more lighter tones across the cheek area
across the neck area. Try to add these areas, hairs which are very close
to each other, actually, the area which is
around the neck part. Again, taking the black and the pains gray mix color and adding one more
layer of black to it. Adding one more layer
so that it becomes more nice and there
are three dots. That's why I'm just
adding one line in between to divide
and look like that there are three dots wherever you think that
something is missing, you can always redo
it, re add it. Anything you can fix it just by applying the
same base layer. So you can see just adding a little bit more grayish
and blackish line across the eyes. So slowly, slowly, we are moving towards the
finishing of our painting. So we already have
done one layer. We are just applying the
second layer onto it. All these I have
made in real time. I haven't done any fast
forward so that you guys can also look and see how
I'm doing one by one, and you can also do
it along with me. Small, small hairs
around the nose. If you will follow each and every step what I
have done over here, I'm sure you will be able to
do this beautiful painting. And if you have never
tried any fur painting, this is the right time
to try it now and check how it looks when
you do all these details. So I have made it very simple
and easy to understand so that people can also follow
each and every step of mine. So you can see how many
layers I have added across the neck part because that is the main portion which divides
your head and the body. That should be very
crisp and very clear. Just adding some more
around the cheek. Some more around the chin. So more hairs around
the nose area. Then taking more brownish color and adding some more
brown details across the chin area should be a
very light brownish color. Try not to use very dark color, very light brownish color. So this will add more
depth to your painting. So slowly, slowly more white
lines across the chin. Especially to the area
where the small mouth is here the hair is
quite small in size. Depending upon the area, you have to make the
size of the lines, especially across the mouth and the eyes area
and the nose area, the hairs are very small and rest of the hairs
are normal size. So very small, small
hairs are these. Adding more white layers
across the nose part. Oh,
18. Second layer Fur Details Part Two: Welcome back. So let's start with the second
layer for details. So we have already done a
little bit of the second layer. So same brush. That is three by
zero rigor brush. Make your color thin and start adding small small
details on top of it. We have already done one layer. This is the second fur layer
which we are applying. So this nose area is quite wide, so that's why I'm applying
more layers around it. So slowly, slowly, we are moving towards the
more detailing. And wherever we have to
fix the colors or we have to add more furs we will be
doing under this process. So just adding more
white hairs around this white patch which is
there around the eyes. So try using thin
colour, milky color, not very thick color when you are doing all these details. Now, I'm making this area, which is the S shape area more white just by adding
more white lines to it. Similarly, some more white
textures around this part, which is the darker
part, as you can see. So layering on top of it. That's what we are doing here. Same technique, same process, and I'm just adding the small small lines So whenever we do such
type of layering, like one or two or three layers, the fur becomes more dense
and it looks more real. That's why we have to apply at least two to three layers
on top of the layering. So first, we have started
with the dark blocking, then the grayish color, then the white color,
then more white. So like that, we have
to layer the fur. So you can see I'm doing
the second at and it has started becoming more
dense the lines. So gradually we will be
doing the entire thing. Currently, I'm just focusing on the upper part, that
is the head part. So one by one, we will
do the entire portion. Adding more white lines
towards the area, which is the outline
area of the head. So bigger white lines just to show that there are
lots of hairs around it. So keep on adding
until unless you feel that it satisfied
that, okay, it's done. So here you can see
I've added more white, so I'm just fixing it
with a darker color. Now, again, taking the
lighter color and adding more details on the upper part. Whenever we add these details, the upper part is actually
more whitish in color. That's why I'm making that
area a little bit more dense. Even if the background is white, when we apply the layers, it actually blends the mixture. The dark and the light
mixture combines itself, and it is like a
blend, we can say. So blending is not only
done with just colors, blending can be done
with textures also. Also some more white
lines around the ears, where the white portion is. So this is the time
when you have to fix all the mistakes
which you have done. If you have added less around something, you
have to add more. So this is what I
am doing over here. Just adding more and more
white textures around this ear so that it looks
more white and more vibrant. Now taking the brownish color, very light brownish color, and also adding to the ears. Small, small hairs in the diagonal form and also towards the other form
which is going downward. Likewise, we have
to fill this area. So this is how we do
the second layer. We have done the
head part. Now we are doing the ear part. We will also do some
layering on the body part. So yes, the layering
will keep on going until unless I am satisfied
or when you are doing, you are satisfied with it. But yes, try to do at
least two layers of the details so that it becomes more and
more dense and furry. Adding some more white
hairs across the area, it should don't look
like a sharp line. Some more lighter colors
across the darker portion. So also going outward because already we have done
with the black color, we haven't done
with white color. So I'm just adding more and
more white hairs across the area which is also coming outside to
the background part. So these all small
small things makes your painting look more
real and more beautiful. So you can see I'm adding
some of the long hairs also, which are going
outside the ears. So try to do it very
slowly, very carefully. Use the liquid color. Don't use thick colour while you're doing all these details. So now you can see how
the ears have come up. Adding some more white areas
across the darker portion.
19. Second layer Fur Details Part Three: Welcome back. Let's
start further. We have already done
the ears, the forehead. Now we will start further with the lower part and some more details
around the lower part. One more ear is left,
we have done one. The other one is left. I'm again adding some
more white because the upper portion is quite
a lot of white in color. So it is more brighter than the side portion,
which is more darker. So that's why I'm adding more white lines
across this half area. Fewer white lines across
this darker portion also. So again, taking
the same color and making the color a little darker and applying it
more towards the area, which is the darkest area which joins the head and the ears. So this is how we do the light and dark
transition of the fur. Now, let's take more of the white color and add some more white lines
across the cheek part, which is the side
portion of the eyes. So you can see so many
layers we keep on adding and adding until and
unless it is properly fixed. So the more and more layers you will add in such
type of painting, the more real it will look. So that's why give this painting a lot of time and
do it very slowly, carefully one by one. So now let's add some more white to the nose area
around the nose part. Very small small hairs
are these which are around the nose and
the mouth part. So I'm just taking a
little bit of Azarin and this brown color and a little bit of black
color also just to make it a little bit
more dark and just applying one more layer of the color towards the nose and the mouth part because this
area has to be quite dark. Try to use thin color. Don't use very thick color. Otherwise, there will be chances that thick line
will be generated. So just adding one
more layer of it. Giving a proper shape
to the mouth as well. So one by one, we
have to proceed. Now, let's add some
lighter color that is we're adding some glazing
effect around the neck. Make the color very
thin and then add this light thin color around the neck portion just to make
this area look more dull, like more grayish in color, and then we'll start
adding more for details. So again, taking the same
liner brush that is size three by zero and adding
more white lines across the area where I have
highlighted it with grayish color and also highlighting the sides
portions of the area, which we have already
done with black, but we haven't done
with the lighter color. That's why I'm adding more
and more light color across. So adding more and more white
layers around the section, which joins the head
and the body portion. So this time, try to
take milky colour, milky white color and draw
this across the whole line, which divides the
head and the body. So one by one, I'm again adding the same layers
with white colour. It's the same
repetitive process, but this time it is more of a fluid color than a
very thin liquid color. So as you can see
the difference when I'm adding these white textures, this area is becoming
more brighter than the area which
is to the sides. So slowly, slowly, I'm just
building up the whole shape. The shape has already come up, it's just the hairs. Some hair it is less,
somewhere it is more, so I'm just adjusting and
making it more furry. So keep on doing
until unless you feel satisfied and you feel
that it is perfectly fine. Especially the area which
is the border area or the outline of the
shape of the bunny, that should be very
crisp and very clear. That's why I'm making that area quite dark with white color. Just adding more and more
white lays across the area, which is the neck area. Try to add more and
more repetitive lines so that the lines become very, like in a bunch or you
can say very crowded, and it looks like there are
lots and lots of hairs which are there across the whole body. So you can see I'm just
added in this half of it. The rest half of it,
I will also add. So just enjoy the process, do it slowly, carefully. Try not to do this portion, at least in a hurry
because this is the last portion
which we are doing. Actually, after this, the
painting will be done. So you have to do
it very carefully, the last step because this is the main step when
we feel that, okay, it is done, and we complete
that portion in a hurry. So give this thing at least time and do it very
patiently and slowly. Adding more and
more lines across You can see now it is
looking very full of furs across the whole body when I'm adding
the second layer. It's the same thing when
we do the shading part, we add one layer, then second
layer, then third layer. Similarly, we do
here also when we do painting, especially
detailed painting. So slowly, slowly,
the hairs will become more fluffy and more like furth. That's why we are adding
so many layers of lines. This painting is
all about lines and textures and how we
apply the colors. Whenever we do such
repetitive process, we actually learn how to be discipline and
how to be focused. So that's what I
have learned from so many years of doing
this type of painting. So slowly, slowly, we are coming to the end
of the painting. Only a few details are left, and then we will be done
with this entire beautiful, cute little bunny painting. So now we will add the hairs
around this darker portion, which is there once we have
done this lighter one. So taking thin colours, milky colours and adding
some hairs across the black portion as well and across the paw
line which is there.
20. Second layer Fur Details Part Four: Welcome back. So
now we have done the upper part, the white area. Now we have to do
the darker portion. We have to add more and more
details towards this area, which is the darker area. So adding more bigger hairs
around all the head portion, and also we'll add some
hairs across this area, which is the darker portion
in some diagonal direction. First, I did it in straight, then I'm doing it in a
little diagonal directions, as you can see. Also, I will add more and
more hairs towards the area, which is the darker white
area patch which is there. We'll add more and more
hairs so that it looks more whiter because there is a white patch which is there. So just adding more and
more layers of hairs across this whole dark area
across this paw line, then the side
portion of the body. So everywhere you have to add more and more layers so that it looks like dense lines which
are overlapping one another. So just making this
area look more like whitish just by adding
more white lines to it. All these lines are in
diagonal direction, as you can see, So
again, same thing. Try to do it very
slowly, very carefully, very patiently because
all these paintings take a lot of time. So try to do it very slowly. And once you are done,
I'm sure that you will feel very happy after doing
this entire painting. The end result will
be very beautiful. Just adding some more
hairs across the area, which is the outline,
the black outline. Just making some more
hairs which are coming outside the background part
also, the lighter hairs. Again, milky color you
have to use over here. Try not to use very thick color. Use milky color. Now I'm taking a
grayish color mixing white and this both
the dark colors, and just adding more
and more black lines across the area just to
blend the two colors, the light and the dark colors. So this is how we
actually do blending when we do with textures. So this is one form of
blending which we are doing here with
so many textures. Again, adding some lines
to the sides as well. So lines to the paw area. Giving a little more darker
shape to the paw lines. So you can see so many
times I'm repeating the same and same process until unless I feel satisfied that, okay, it is finally done. So try to add more and more
layers to make it more fluffy and more hairy. So again, adding some
more white lines across the first por Similarly on the
second one as well. So finally, we are done with most of the details
which we require. Now we will add some
moustache across the face, which is the thing which
is left over here. So whenever you are
adding any details, make your color thin. And this line itself
is not very sharp. So that's what I'm doing here. I'm making the line
a little sharp so that the paw is fully visible. So again, taking
white and adding more and more lines
of white color. So now the whole
texture part is done. Now we have to add some
brownish color which is there. So light brownish color, which I will apply across the nose area,
some of the lines. So whenever you draw it around the nose part or very
small small lines, now we will add some
more lines which are the Mustache lines. So try to make it
thin the colors, especially don't
use thick color. I'm mixing both
the darker colors. You can use just black also. That is also fine. But try to use thin color when
you are drawing the lines. You can change the direction of your face so that you can draw
the flawless curvy lines. So lots of hairs which
are coming outside. So I'm just trying to add those. If any mistakes
happen over here, you can always fix by using
your background color. Just paint it over with
your background color, and you can fix this issue. Because whenever we
create these lines, there are chances that
mistakes will happen. If it happens, then
you can just cover that line with the
same background color which you are using. You can rotate the
canvas according to your convenience and
then draw the lines, make your color fluid, and then draw very fine lines
using your liner brush, either of size two by
zero or three by zero. Try to add different
sizes of lines, some big, some small, like that. That's what I'm doing over here. So big, some small curvy lines which are going
in the downward direction. So taking some white
thin color and also adding some
white lines as well. So you can see after
adding these lines that bunny is looking so
cute and so pretty. So I'm really liking
this whole painting, and I'm sure you will also
like it when you will try it. So it's a very cute little bunny which has a very cute face. And if you're trying
out this painting, do tag me on my Instagram
Das Mohini Art Gallery. I will love to
reshare your work. So you can see I have
switched my brush to a more thinner brush because
I want more thin lines. Adding very tiny lines
across the area, which is the mouth area.
21. Final Details: Welcome back. So let's start
with our final details. So a little bit more
of the lines are left and then we are
done with this painting. So I'm just taking again the same color and
adding more lines, more curvy lines
across the nose area. You can change the position
accordingly and try to draw a nice curvy
line in just one go. Adding the lines, some small, some big, lots of hairs
which are coming out. So you can see I'm taking
a very thin color. Try to take very thin color. Don't use thick color. Now, there is a hair
which is coming outside the eyes,
that is the eyebrow. This eyebrow, we can see. We cannot see the eyes, but we can see the eyebrow hairs which are there across the eyes. So it is at the position
where there is a curve. So there we have to add
some more hairy lines, darker lines which
are coming out. So you can see some lines
which I have added above, some dots across the nose part. So see what all is missing
and you can fix it here. So you can see already this
painting is looking very beautiful and just taking some lighter color and adding some lighter lines across this nose area because there
are lots of dark lines. So a little bit, I'm making
this area more white. Taking some white color. Adding some more white
across the nose, across the hairs
which are coming out. So you can see how
this is looking, adding some more brownish
color on the ear part. So this is almost we have
completed this painting. And if you want to
protect this painting, you can always put one or two
layer of varnish across it. I will add the link of how to varnish this painting.
You can see from that. I think I have done in
one of my painting, how to do the varnish part. That link also I will add so that you can see how to
varnish your painting. Varnish is very
important because that protects your
painting from dust. So just a few more details
and we are done with it. Taking more black color and
drawing some more lines. So try to take as thin
color as possible. Try not to use thick color when you are drawing
all these lines. So you can see so many
lines I have added, which are also
overlapping one another. Just adding some area
and fixing this part. So just adding some white
textures across the line, which is the line which joins the foreground and
the background. So I hope you enjoyed doing this painting like I do and
do share your project works. I will love to see them. I know it's not a
very easy painting, but if you will follow each
and every process of mine, I am sure that you will
be going to do it as beautiful as the bunny is. So just some final details. You can try this
painting on any base, either on canvas or
paper or the MDF board. A base you can use
or a canvas sheet, any base you can use and
try out this painting. Not required that it
needs a circular base, you can take a square base also. So thank you so
much for watching.
 Mohini Sinha, Acrylic and Gouache Artist- Nature Lover