Transcripts
1. Introduction: Yes. Do you enjoy escaping the hustle and
bustle of the city, getting away from the noises and the fast ways and taking a long leisurely trips
through the forest, wide open landscapes or
maybe along wintering roads, especially when you
are on your way home where the peace of leaving the city behind
starts to settle in. There is something magical about those roadways that led us back to home.
What do you think? The stillness of nature, the open air, the feeling
of space, it's carming. That's what this class is about, capturing that feeling of
robes that take us away from the chaos of the city and bring us closer to
the nature's crown. Hello, everyone. I'm Anu Variga. I'm a mother, artist, and architect from India. I explore my passion for
art at my free time. You can also find me sharing
my creative journey on social media under my handle
at my sketchbook tales. I'm so excited to
have you here with me today as we dive into the beautiful world
of gouache painting. Now, patie is truly the key
to mastering any skill, and this is especially
true for painting. But why gouache? You might ask. Well, gouache is straightforward
and approachable medium. Yet with regular patties, it transforms into
a powerful tool for capturing scenes
with texture and depth. Its versatility and
express neediness makes it ideal for bringing
your unique ocean to life. One of God's greatest advantages
is its forgiving nature. If you make a mistake or
want to adjust an area, you can easily rework it. Something many other mediums
don't offer as sin messy. This quality encourages
experimentation, making gosh perfect for both beginners and
seasoned artists. In this class, I will guide
you step by step through creating three beautiful
roadway scenes using gouache, covering its unique
properties and techniques. So by the end, you will
have the skills to create any inspiring rod
scene you encounter. So whether you are
completely new togoch or you have some experience, don't worry, I will cover all the techniques in this
section to get you started. Together, we will bring to
life those peaceful roadways that lead us back to home away from the noise
and closer to nature. Alright, let's jump into the next section
and start painting.
2. Before we start: Hello, friends.
Welcome to the class. Before we dive into our project, let's take a few minutes to look at the materials
you'll need and do some simple practice
exercises to make the class project
more enjoyable and small. Let's start with the materials. First and foremost,
we need paints. For this class, we'll
be using wash paints, a medium that offers vibrant
colors and wet versatile. I'll be using imma
gauche paints, but feel free to use any brand
of couch that you prefer. Next, let's talk about brushes. For painting with gauche, we may need these three types of brushes, the round brush. This is my gauchu brush, and I'll be using it for the
most part, the flat brush. This is handy for specific
areas where broader even strokes the detailing brush. This is a must have for adding those small intricate
details to your painting. But in this class, I'm using my round brush for
most of the parts. You can use any
brush you prefer. Now let's move on to the paper. I'll be using 100
percentage cotton, watercolor paper, with a rush
texture and a to 400 GSM. This type of paper works
beautifully with gosh, as it holds the paint well
and prevents buckling. However, if you don't have this, any paper above 100
GSM will work fine. Just keep in mind that
thinner papers may bleed or bend when wet. Also, the texture
of the paper can enhance the details and
character of your paint. In addition to these essentials, you will also need a
palette for mixing colors, two jars of water, a cloth or tissue paper, two wipe your brushes as needed. And lastly, a pencil
for sketching, and that's it for the materials. Now, let's spend a few
minutes practicing. These exercises will help
us comfortable with paint and washes and set tone for
a smooth, enjoyable project. Now that we have gone
over the materials, let's dive into some
practice exercises, starting with the dry
on dry technique. For this, I'm using
my round brush. Take a small amount
of dry paint on your dry brush and start
making sprokes on the paper. You can tilt the
brush slightly as you work to create
varied strokes. Notice how the textures are forming and giving
it a unique effect. Next, let's compare this
with wet on dry technique. Here, we will load
the brush with wet paint and apply
it to the dry paper. As you work, observe the
difference in texture and smoothness between the dry on dry and wet on
dry techniques. Now, let's move on
to practicing trees. Start by drawing a straight
line for the tree trunk. Then add curved lines branching out from either
side of the trunk. Once the branches are in place, the time to add leaves. You small otrokes
on either side of the branches to create
cluster of leaves. Next, let's paint a full tree, begin with a straight rum, and then add branches
on both side, starting with small curved
lines near the toe. As you move downwards, gradually increase the size and thickness of the branches. Once that's done, you can
add leaves just like before, filling in the tree for
a full leshed look. We can use the same trees
class project one and two. Now let's move on to the
class project three. In our third class project, we will be using dry on dry
techniques extensively, especially when
painting the rocks. Now, let's move on to painting
clouds using a flat brush. For this, we are also
using dry on dry method. Make sure your brush is dry
before loading it with paint, and then apply the
paint to a dry surface, use small angled strokes
that are slightly connected, mimicking the appearance of clouds floating
together in a group. Finally, let's practice some grass. For this, you can
use detail brush, but I'm sticking
with my round brush, all the brush to create a
pointed tip before you start. Now make long or short, slightly curved sword shaped lines to represent
blades of grass. Vary the length and angle of the strokes for a natural
realistic effect. And that's it for our
practice section. With these techniques,
you will be able to easily follow yellow
with the upcoming steps. Let's move on to
the next section and get started with
our class projects.
3. Through the woods Part 1: Hello, everyone. Let's dive right into our first
class project. This is a very simple, easy painting with very few colors, and I am using only one brush
for this entire painting. That is my round brush. We are going to start by
creating the basic sketch, which will serve
as the foundation for our gauche painting. First, I will begin by lightly
sketching with a pencil. I like to start with
the straight line, the center of the page to represent the boundary between
the road and mountain. From there, I will add
curved lines to represent the road as it winds
into the distance, giving our seeing a sense
of depth and perspective. Now turning our attention
to the foreground, we'll sketch in a
small landscape on either side of the road. Next, we'll focus
on the background. Let's mark out the
distant mountains that will serve as a beautiful
backdrop to the road. These don't have to
be overly detailed, simple lines to suggest
the peaks and varies. Then mark the positions of trees on both sides of the road. These trees will add balance and structure to
overall composition. Remember, this is
just initial sketch, so keep your lines light
and easy to adjust. Once we have got our
basic layout in place, we will move on to
adding colors and bringing the scene to
life with gouache. It. Now, let's begin adding
colour to our sketch. We will start with the
mountains by creating a so natural gradient using
different shades of gray. First, mix a small
amount of black into white paint to
create a light gray sing. Use this light gray to cover the entire mountain area
with a smooth even layer. This will serve as our base capturing the so distant
look of the mountains. Once the light gray
layer has dried a bit, let's create a
slightly darker gray by adding a touch more black. Use this shade to add depth to the mountains
by shading the sides. Focus on areas where natural
shadows would appear, such as the edges or valleys, giving the mountains
a bit of dimension. You can use dry brush
strokes for texture. This creates dry swatches that mimic oky texture
in the landscape. Next, mix an even
darker gray shade using a dry brush technique. Apply this darkest shade
sparingly to add more contrast. This layering of
different shades help build depth and
intensity in mountain range, making it look more
realistic and I. Remember to concentrate
the darkest shade on the side opposite to the sun to represent
natural shadows. Okay. Take your time with
each layer and feel free to build up
the texture gradually. Once these base
colours are in place, our scene will really
start taking shape. Now let's move on to
painting the road. For the road, we will use black to create a
striking contrast. Filling the road area
with a solid black, but be sure to leave small section near the
friend and painted. This bit of white represent a dusting of snow on the road, adding an extra touch of
realism to the scene. Next, let's bring the
landscape on either side of the road to life with
some color and detail. We will begin by using a mix
of yellow ochre and sienna to paint the base layer for the land on both
side of the road. Apply this shape evenly
across the areas on each side to create a
warm earthy foundation. Once this base layer is dry, we will start
adding more details to make the landscape
feel rich and textured. Now, take some burnt umber on your parrot using this
slightly darker shape, add in patches of color to create dimension and
depth in landscape. Focus on creating
shadowed areas which help such as the natural
unnewnness of terrain. To add even more contrast, take a touch of black and
use this darker shade sparingly to enhance the shadows and make certain
areas stand out. Repeat this process on
both sides of the road, adding dark patches
here and there to bring out the textures
and condos of the land. Finally, let's add
some snow details. Once the painting
is completely dry, take a bit of white
paint on a dry brush. Using the dry on
dried technique, gently dab the brush on the road and along the sides to
create soft white patches. Also add some white paint
to the mountain area. This technique gives the effect of snow dusting
across the landscape, adding realism and a
sense of season chose. Okay. With these layers and textures, our landscape will feel full of life with plenty of
depth and character. So our background for
the painting is ready. Now let's move on
to the next chapter to complete the painting.
4. Through the woods Part 2: Awesome. Hello, everyone. Welcome back. Let's continue with
our first project, capturing the beauty
of a dry roadway. Okay. Our background is ready. So now we will focus on painting
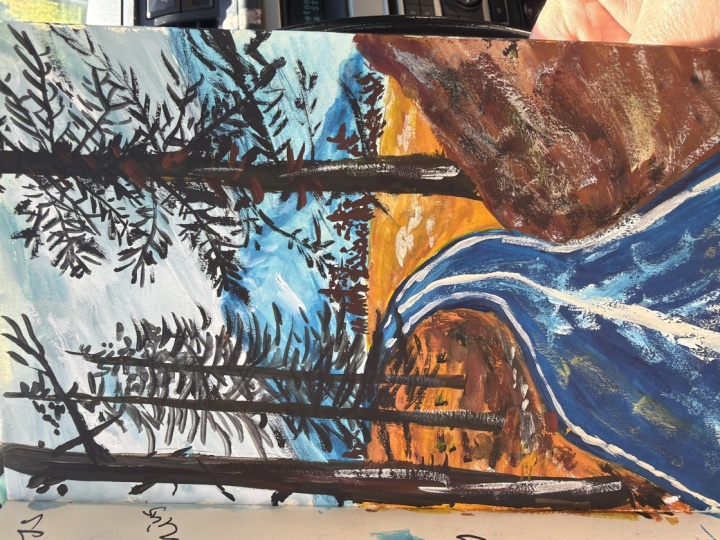
the foreground details, starting with the trees. For this, we will
use black paint. Begin by drawing
the tree trunks. Use thinner lines
for the trees in the background to
feel the distance, and thicker lines for those
close to the foreground. I'm using a round brush for
this end of painting as it provides great control for both fine lines and
fuller strokes. Now, let's add one
with the biggest one, which is more closer to us. Now, let's add
branches and leaves. For these details, we will continue using
the round brush, applying small strokes to
form clusters of leaves. Start with the smaller trees by adding branches and
leaves one by one. Moving from top of each
tree down to bottom. For the larger trees
in the foreground, carefully draw each branch, adding leaves along the way. I'm leaving one of the large
tree on the left side with just a few bare branches without leaves to capture
the look of winter. O. Take your time with this step. It's a detailed wording process. Painting the trees with
care and patience is what brings the scene
to life. So enjoy it. Although it's time consuming, this detailed work
is the heart of our painting and really
enhances the fin do. So work with your own pace. Now that our trees are complete, the painting already has
a beautiful, lively feel. I'm absolutely in love with
how it's coming together. But let's add a few
finishing touches to make it even more dynamic. Take some white pink and carefully add guiding
lines to the road. Paint thin white lines along
both sides of the road and a dashed white line down the center to create a sense
of direction and movement. For an added detail, you can also include
a thin yellow line in the middle of the rod. For one last finishing touch, let's add some background plans. Using a touch of burnt amber, I'll paint a few subtle plans and thin line detail
throughout the landscape, bringing a bit more texture
and depth to different areas. Feel free to add small details wherever
you feel they are needed. Okay. Once everything
is in place, it's time for the reveal. Carefully remove
the masking tape to frame our finished piece. And our winter
landscape is complete. It's so beautiful, and I'm absolutely in love
with how it turned out. Thank you so much for joining me in this painting section. Now let's move on to
the next chapter. Oh
5. To the Green Part 1: A Hello, friends. I hope you enjoyed painting the roadways in
our last section. Now let's move on to
our next painting. As usual, we will start with a light pencil sketch to outline
the main elements of our s. I'll begin by
sketching your road using two curved
lines to give it a sense of direction and bopet. Then I will throw the outline of the mountains near the top
portion of the canvas. This is just a rough ase, so don't worry if your
sketch looks little rough. It's only there to
guide us as we paint. Now let's move on to the sky. I'm using a light
blue for the sky. But if you don't have
a pre made light blue, you can easily create it by mixing a bit of dark
blue with the white. I made my light blue even
lighter by adding white to it. Et's paint the sky portion,
starting at the top, paint the sky
gradually lightening the color by adding more white as you move
towards sporttom. This blending will give
a smooth radiant effect, creating a natural and soft sky. I'm using my brown h here as there is only small
portion, therefore sky. You can use flat sh
if you prefer them. With our sky complete, let's turn our attention
to the mountains. For the mountain base, mix two shades of gray, a darker gray and
a lighter green. Using the darker gray, paint one side of the mountain, which will be in shadow. Then use the lighter
gray for the other side, giving the mountain
a realistic look with natural depth
and dimensions. Now, let's paint the light
gray on the remaining parts. Okay. Once the base layer has dried, we will add some detailing to
bring the mountain to life. Using black paint
and a dry brush, let's apply the dry on dry
technique to add texture. Gently grab the dry brush with a small amount of dry black
paint to create rough, rocky texture on
the mountain sides. Focus on areas where shadows
and natural condos would be watching the mountain scene come to life with each stroke. Finally, add a few touches of white paint along the light
side of the mountain. This will create a soft
high light effect, mimiing the light source and giving mountains a
beautiful, realistic look. With that, we have completed the first
part of the painting. Now let's move on
to the second part. Mm.
6. To the Green Part 2: Hello, friends. Welcome back. Let's continue with our
second project by adding some foreground elements to bring more depth
to the painting. We will start by painting trees at the base
of the mountains. For this, I have
prepared two shades of the one lighter
and one darker. Beginning at the bottom
edge of the mounds, let's add trees in
alternative colours. This variation will
give the forest a sense of dimension
and natural variation. Mm. Once the top layer of the tree is in place, we will move down to
the lower section of the forest area. To deepen the photograph, I have created a
darker shade of green by mixing a little black
with a green paint. Using this dark, fill in the
bottom part of the woods, building up the density and
creating a shadowed effect. Good. Now let's add more
layers of green over the darker portion to
build texture and light. Using a lighter green shade, add lines and small strokes
of the darker area to depict the leaves and
sunlit sections of the dense forest
along the roadside. Feel free to add random patches of light green across the
bottom part of the woods. This layering of
green gives a richer, more realistic look to our tree, adding depth and contrast that
draws eye into the scene. Now let's focus on
the left side of the road and add some
dense trees here as well. Starting along the
roads outline, paint trees throughout the
remaining area on this side. Use straight lines
for the tree trunks and then add branches and
leaves to fill out each tree. This gives our painting a balance with the dense trees on either side of the road. With the trees completed, we are ready to finish
the road itself. For the road, I'm using black
paint mixed with a hint of blue to give it
a cool subtle tone. Apply the paint in a
light consistency and add a touch of white to create a
softer, more natural shape. This light variation help the road blend harmoniously
with the rest of the seed. I missed recording
one small step, adding final detail to the road. I added two thin white lines along either side
of the road and a dashed yellow line down the center to create a
realistic Broadway look. With these final touches, our second class
project is complete. I hope you enjoyed this
painting as much as I did. Now let's move on to our
next class project. And
7. Rocky Road Part 1: Hello, dear friends. I'm so grateful that you have
made it this far, and I hope you are
enjoying the process. Let's do next project. We will start with a ue
Outline sketch to guide us. Begin by sketching the
basic shapes for the road, mountains, and rocks
along the sides. Remember, this doesn't
need to be detailed. It's just a reference
for our painting. We will bring it to
life as we colour. Now let's move to
painting the sky. I'm using a darker shade to create a dry, moody atmosphere. For this, I have mixed
black with sky blue. You can also create
similar shade by blending a little
black, blue and white. I am applying this
with my flat brush, covering the entire sky area
in this moody blue tone. To give it depth, I'm adding a bit
of white towards the bottom of the sky
and blending it upward. Once you're happy
with the sky's color, allow it to dry completely. With the sky in place, let's add clouds using
the dry on dry technique. Dip your brush lightly
into white paint, ensuring it's not too wet, using small dry strokes to
paint clusters of clouds, creating the appearance of a few small clouds
floating together. I'm using my flat brush here
as well and making sure such clouds is formed by a series of tiny strokes
close to each other. Neck, let's move on
to the mountains. For this, I am using a sienna or warm brown shade to paint
the mountain areas, creating a dry epi look
that complements our sky. Paint over the mountain
outline and cover the entire area
with a event layer. Now that we have
finished the mountains, let's let everything dry before moving on
to the next part. I can wait to continue this journey with you
in the next chapter.
8. Rocky Road Part 2: Hello, and welcome back to the final chapter of this class. Let's continue
with our painting, starting with the valley
regions of the mountain. Take yellow ochre and Sienna, mix the two colors
to create a warm, earthy tone, and paint along both sides of the
road with this mix. To add depth, use burnt
amber on alternate spots to create shadows in the grass and give
a sense of texture. For grass detail, add a touch of white to our brown yellow mix to
lighten it slightly. Then use a round
or pointed brush, paint thin vertical line to represent the blades
of grass along the road. Key areas. Prepare three
shades of burn duple, a light, medium,
and dark vision. I'm starting with the base coat, that is the lightest
version of burn damper. Start with the base coat of lightest burn damper shea
covering the rocky areas. Oh Once that layer is dry, add the second coat with a
medium shade by painting small connected circles
to create textured rocks. Finally, use the
darkest shade of burnt umber on one side of
each circle to add shadows, giving the rocks a more realistic
three dimensional look. You can also add some
dry brush strokes with a dark color around the rocks to suggest dry grasses or soils
for added details. Now it's time for the final
detail with dark shade. Take the darker shade of burned dumber and
start adding details. Let's add some details
on the mountain first. I'm adding some details on dry brush technique by taking
dry paint on a dry brush. Add strokes to the mountain. You can now see the
magic of mountain getting more realistic
in each stroke. Moving on to the rocks
on the roadside, add dark shade of Bonumber to the rocks in a
dry on driveway. Next, let's paint the
other side of the road. Start with the base coat using the same brown yellow
mix as before. Adding a small amount of
white to light in it. For the second layer, alternate between burn umber and sienna to create a
natural blended look, follow along with
my brush soap to achieve a soft blend
between two colors. It looks a little messy, but let's make it
more messy with some dark roks and
tried grasses. Now for the third layer, we will add some larger rocks to enhance the rug
feel of the valley, mix black with
burned umber and use this dark tone to paint
larger rock shapes. To smooth out the transition, blend in mix of sienna, yellow gray, and hint of burn umber alongside
with dark colors. Add grasses in
between the rocks and the space behind using small
strokes of burned dumber, filling in any gaps and
creating more depth. With the main landscape
complete, let's finish the road. Create a light gray by
mixing black and white and paint the entire
road area in this shape. Once the road complete. Add the finishing details like painting white lines
along each side of the road and a yellow line in the center to capture that
familiar highway look. We hat. Our painting
is complete. Carefully remove
the tape to reveal the clean edges of
our final artwork. Thank you so much for
joining this class. I hope you all
enjoyed the process, and I can't wait to see
your beautiful creations. See you again on
the next lesson. Oh
9. Thank you: As we reach the
end of this class, I hope you have enjoyed
exploring the magic of gauche and how it can bring
peaceful roadways to life. Each stroke we made together, every layer of color and the
textures we built were steps towards capturing the calm and beauty of nature
that we often see. Remember, art is a journey,
not a destination. With every painting, we
are going as an artist, learning to express
ourselves more freely and discovering
the joy of creating. Keep practicing, experimenting, and finding inspiration
in the world around you. Whether it's the winding
roads through the forest, the vast open landscapes or even the streets
outside your home. Thank you for allowing me to be a part of your
creative journey today. If you recreate
the scenes or try your hand at painting your
own favorite roadways, I would love to see your work. You can share them with
me on the project section or on Instagram at
my sketchbook tales. I would thrill to see them. Until next time, keep painting, keep exploring, and
most importantly, keep enjoying the process. Take care and happy painting.
 Anu Varikattu, Artist l Gouache & Acrylic Instructor