Transcripts
1. Introduction: Welcome, my dear friends to a magical and cozy
creative journey. In this class, we are
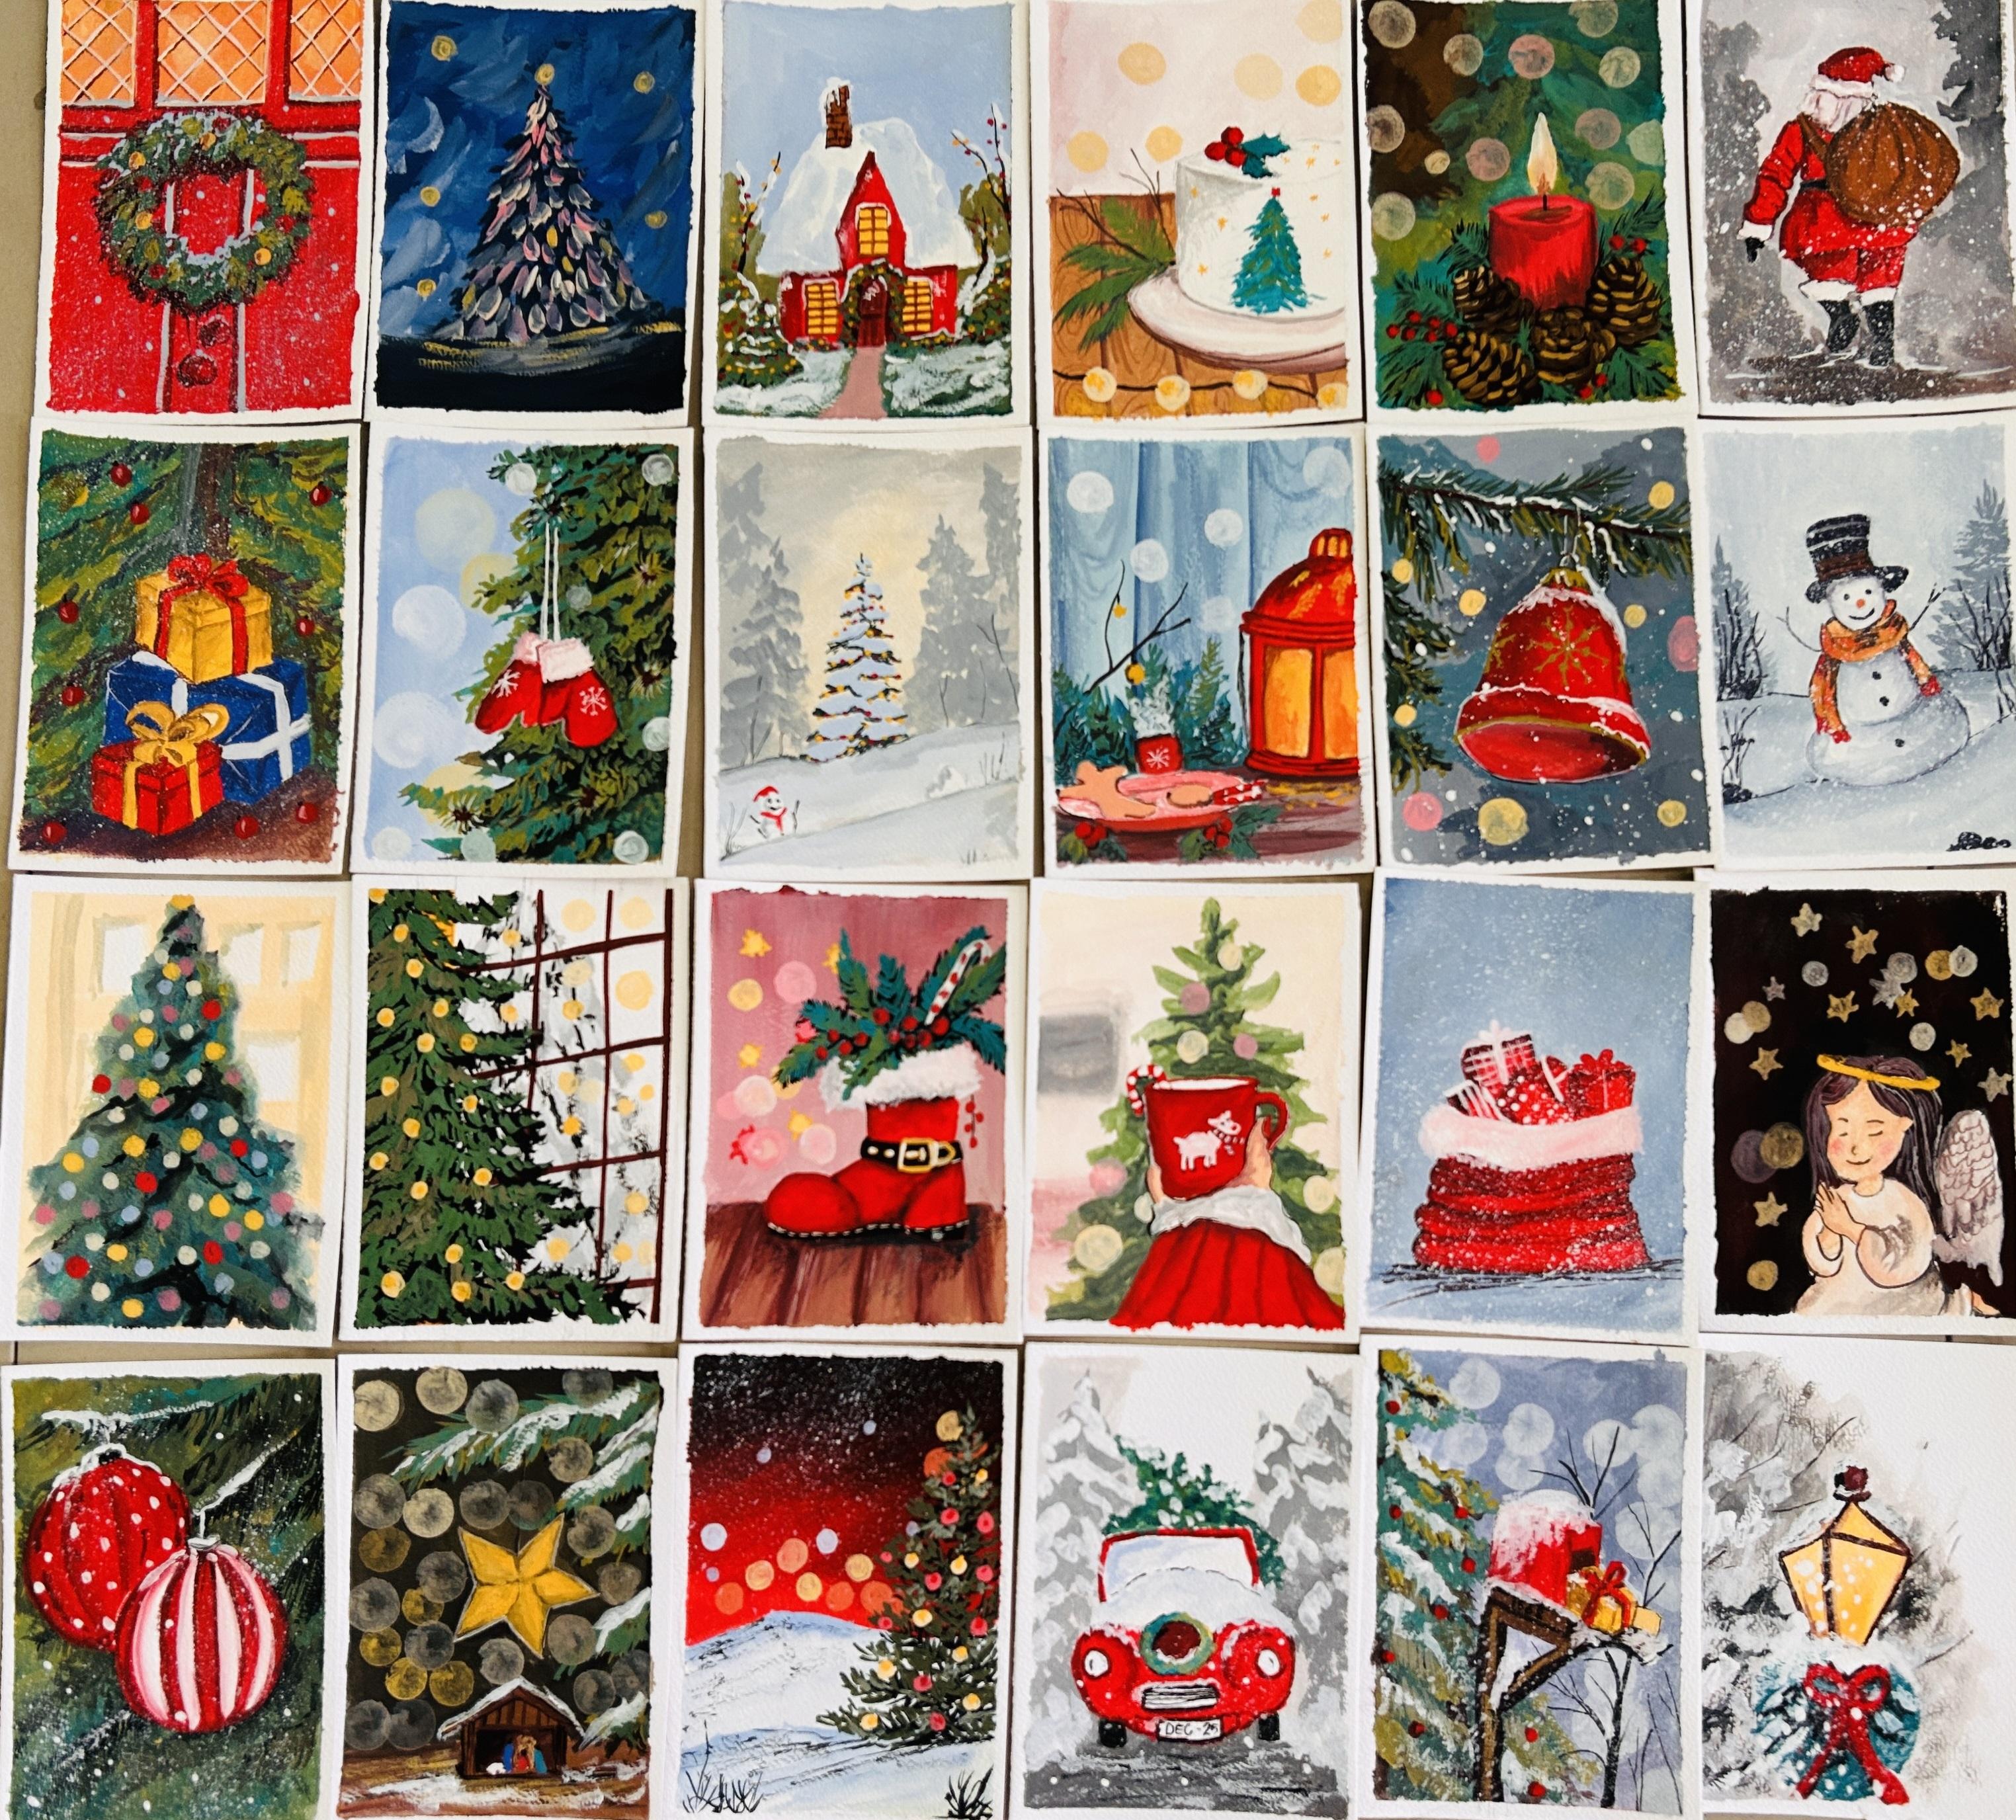
going to slow down, breathe deeply, and embrace the joy of a handmade Christmas. Together, we will paint 27
charming Christmas artworks, perfect for handmade
Christmas cards, gift tags, tiny wall frames, or simply for your own
mindful relaxation. This course is all about creativity, calmness,
and connection. Every brush stroke is
designed to help you unwind rela dress and
enjoy the peaceful, heartwarming spirit
of the holidays. Whether you are a
complete beginner or a creative soul
returning after a break, you will find this
class comforting, inspiring and beautifully
simple to follow. Hi, I'm Anu Eigot, an artist and someone
who absolutely loves bringing joy to
small handmade creations. I have spent years
exploring art, teaching, and sharing my love for painting in the most simple
and mindful way. My goal is to help
you experience the same happiness I
feel when painting, especially during this
warm and festive season. What you will learn
in this class. We will begin with the
absolute basic materials, brush type, color mixing, consistency, and fundamental
gauche techniques. I will guide you slowly
through every step from holding your brush to understanding shadows
and highlights. Then we will move into a short practice section where you will learn
essential strokes. After that, we will
loosen up with a cozy warm up painting
to build confidence. And finally, the high rate of the glass, 25 Christmas theme, gouache paintings,
each one simple, relaxing and full
of festive charm. Plus a sweet bonus painting
giving you a total of 27 beautiful Christmas artworks by the end of this journey. So grab your brushes, open your colors and prepare your heart for a mindful
magical creative experience. I can wait you to paint this
Christmas season with you. Hope to see you all
in the class section.
2. Materials Used: Before we begin our cosy
Christmas painting journey, let's take a moment to
look at all the materials we'll be using throughout
this class. Don't worry. Everything is
simple, affordable, and perfect for beginners. First, let's talk
about the paints. For this entire class, I'm using the hii mia
jelly gauche paints. They are creamy, vibrant, and so much fun to work with. And the best part,
we will be creating all 27 Christmas paintings
using only six basic colors, red, blue, green, yellow,
white, and black. Just these six colors
will help us explore endless festive
combinations from cozy warm tones to
cool wintry shades. This limited parrot
keeps things simple, beginner friendly, and
incredibly satisfying. Next, for the paper, I'm using 300 GSM textured
watercolor paper that I sourced from
a local store. You don't need the
exact same one. Any matte paper starting from 110 GSM will work beautifully. Higher GSM means less warping
and smoother blending, so choose whatever
you have access to. My paper is in A three size, so I'm going to cut
it into A six size, so we will get eight
papers from one sheet. Now, let's look at the brushes. We will keep things
minimal here, too. I'll be using three brushes, a flat brush number 12, a round brush number eight, and a detailed brush
for those fine details and tiny Christmas
details with number one. You will also see me
using an old toothbrush. It's perfect for creating snowy splatter effect that instantly add magic
to our winter scenes. For color mixing, I'm
using a regular palette, but you can use anything, even a ceramic
plate works great. I also keep two jars
of water beside me, one for washing of the paint, and the other one is
for rinsing the brush clean before dipping
it into fresh colours. This helps keep our colors
bright and prevents muddy mix. I also use a boat to tape down my paper and keep
it flat while painting. And speaking of taping, a simple masking tape is all you need to
secure your sheep. Finally, keep a cloth or tissue handy for
wiping your brush, controlling water levels,
or fixing small mistakes. Mm hmm. That's it. Just these
simple materials are enough to create a whole collection of cozy festive, heartwarming
Christmas paintings. So gather your supplies, get comfortable, and let's start making holiday
magic together.
3. Let's Practice: Hello, friends. Before we dive into our main
Christmas paintings, let's warm up with a quick but super helpful practice session. This little warm up will help
you understand your paints, your brushes, and
the consistency that you will need
throughout the class. So take a deep breath, relax, and let's begin. First, let's look at the colors we will be using
for this entire class. We are painting everything. A 25 Christmas illustration
using only six colors, green, red, white,
yellow, blue and black. Let's start with
this watch test. I'm using the exact same paper I'll be painting for this class. But understand how
each color behaves on this paper and also get familiar with its
texture and absorbency. Mm. Now, let's try a
simple wash with red. Take a little red onto your palette and mix
it with damp brush, not to water, enough to
make paint spread smoothly. Now, use a flat brush and horizontal strokes
one below the other, apply gentle pressure and
paint across the paper. When your brush start
running out of pigment, reload it and continue. See how beautifully
opaque the paint looks. This is what we call
optimum consistency where the paint is neither too
thick nor too watery. It spreads effortlessly
and stays opaque. A Gauche can be used in many consistencies from thick and dry to
extreme battery. Let's explore. Tick,
dry consistency. Try applying the paint
without adding water. You will notice dry streaks, white gaps, and
an uneven finish. Adding water gradually add tiny drops of water
each time and watch how the opacity decreases and the paint start
behaving like watercolor. Optimum consistency.
This is smooth, creamy, opaque,
and easy to blend. To get to optimum consistency, mix the paint with
brush very well in parrot and make it
even and smooth, then load into the
brush and apply. Now, let's learn
tonal variation, take some green paint and slowly add white to it.
Little by little. Each addition
creates a new tone. This way, we can create shadows, highlights, and depth
in our painting. One of the best things about Gus is its
ability to layer. Let's make your base
wash with flat brush. And once it's dry, let's try layering it
with a second er. Um Uh, Remember, only layer after
the base is completely dry. Let's paint some circles on the grid base code
with white colour. Don't apply too much
pressure if you press too hard or if your
brush is too wet, the base layer will reactivate and mix with your top colour. You can see the base
color reactivation and the white colour
changes to red shade. Watch how it behaves
and get a feel for it. We'll be using
just three brushes in this class, one flat bridge, number tall, one down bridge, number eight, and one
detailed bridge, number one. Let's practice with all three. The flat brush is perfect for larger areas and
smooth blending. The round brush is used
most in this class, played for thin
lines, thick strokes, leaves, branches, and details. The detailed brush will
help us with fine lines, small dots, highlights,
and delicate touches. Practice few strokes
with each brush, feel the pressure,
flow, and flexibility. Next, let's mix the browns. We will be using often. Start with the red plus black. I this gives a deep dark brown. It Now, let's make more shades from it. You can make a lighter
version by adding more red. Now, add a little yellow to the one part to
create a warm sienda. And add bye to it to get
a soft light Sienna. Adding more white to it, we will get a pale brown tin. For the greens, I have used
the green color as it is. Then I added yellow to make
it lighter and fresher. Add white to create
soft pastel greens. Mixing black and yellow
to get a ochre trim. Mix green, yellow
and black to get a deep, richer subline shade. Now, let's create
some pastel tones. Add white to colors like
red, yellow, and blue. These pastel colours
help us paint bocelts, soft glow areas, and
festive decorations. Let's practice shading
a simple circle, paint a full circle in red. Now take brown and apply it only on one side
of the circle. Wipe your brush, and
with a clean damp brush, blend the brown into the red. The opposite side stays bright, giving us a beautiful
three D effect. That doesn't We'll be painting many trees. So let's try some trees. First one without a spine. Imagine a triangular shape
and had slanting strokes on both sides. With the spine. Draw the center line first, then add strokes on both sides. Snow covered tree. Paint
some dark sheaves first, then add white
strokes over them. It instantly looked like
snow sitting on branches. Let's make boctes in two ways. Simple circles, pastel circles
overlapping each other. Rotating strokes,
load your brush and rotate it to form a circle. If it doesn't complete, finish it with single stroke. Don't rotate again, or you
may lift the bottom layer. H Lastly, let's practice
snow splattering. Dip an old toothbrush
into the white paint, cover the areas you
don't want to splatter. Now, tap the brush gently with your finger to release
tiny snowflakes. Practice this technique first before doing it on
your final painting. With that, our practice
session is complete. I hope you are feeling
confident and excited. Now, without wasting
any more time, let's jump into our beautiful
Christmas painting series. Happy painting friends.
4. Let's Warm up: Okay. Hello, friends, and welcome back to this fun filled Christmas
illustration class. Before we jump into a
25 day festive journey, let's start with a
relaxing warm up section. We have already talked
about our materials, explore the basics of gouache, and practice different
brush strokes. So now let's warm up our
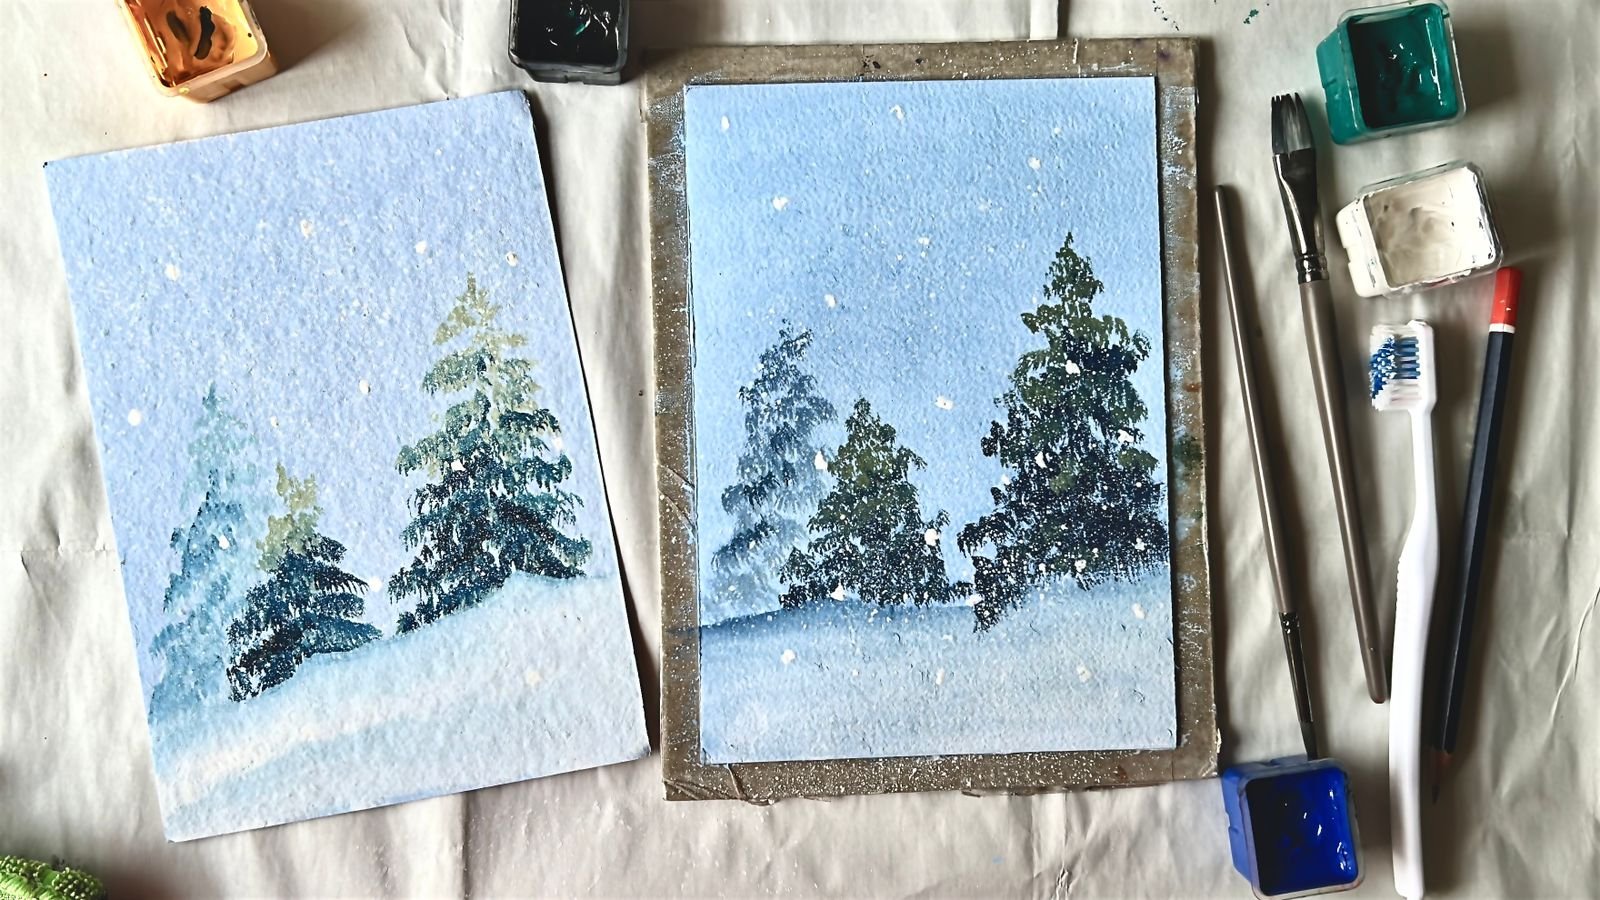
minds and our brushes. Today, we are going to paint a simple loose Christmas tree, not part of the
main 25 projects, but perfect to get us
into the festive globe. I have already marked
the tree trunk, just a simple vertical line roughly in the center
of the canvas. Don't worry too
much about details. This is all about letting go. Now let's mix some colors, take a bit of blue and black and blend them to create
a nice dark shade. Make two versions, one
darker and one lighter. With those ready, let's begin
filling up the background, use pure blue, the
mixes we made, and white to break up the tones. Grab your round brush, and without any stress
just add brush strokes. Soft strokes, random touches, switch colors, switch sides. Just enjoy the paint, making friends with your paper. If this is your first time
using gouache, welcome. Think of this as your
ice break exercise. Now, take a little white paint
onto your palette and just soften with a bit of water until you reach a
smooth, creamy consistency. Not too watery, not too thick. Just enough, so the
brush glides nicely. Alright, let's bring that
white into our macy sky. Go ahead and place the wine directly onto the background
using the same brush. Don't aim for perfection here. Just enjoy the moment. Add those stroks freely almost like you are
letting the sky breathe. You can see we already have different shades of
blue on our canvas, darker ones, lighter tones, all creating that
moody winter evening. Now, as we add these
white strokes, something magical is happening. Now, let's blend
everything together. Remember, this is not a
smooth gradient blend. We are not going for a
polished airbrushed effect. We want that
beautifully imperfect, slightly chaotic blend that gives gouache its
jamming personality. Use gentle random strokes, overlap some colors, let some areas stay lighter and
let others stay darker. Keep the brush moving, play with the texture, let the colors overlap
into each other. As you reach the bottom area, add a few dark
strokes using black. This will make the tree
feel grounded later. You might have noticed
how the background slowly turned into
this soft misty, snowy night atmosphere,
the kind of sky where you could almost feel the cold
and magic at the same time. And those messy textures, they added so much
character to the painting. They created mystery, depth and the cozy winter
feeling we all love. Take your time here, enjoy it. B B title, the B title, the B title, the B B title. Now, let's start
with the tree with a darker blue mixture made
by mixing black and blue, begin at the top and gently
make outward strokes. Like small diagonal flicks. Let the tree widen as
it comes downward. Don't worry about being neat. This warm up tree doesn't
need crisp or sharp edges. I just need your energy. When you allow yourself
to paint loosely, you unlock your natural flow, and that is what makes hand
painted work so special. O Let's now glow up the tree. Mix small quantity of pastel sheets using yellow
and red with white. You are creating tiny pockets
of light with your brush. Gently dab those onto the tree. These are in sharp ornaments. They are soft glows like
light seen through the blur. So we will add some
diagonal strokes with our round brush like
we painted the tree. Do not apply too much pressure. It may soil the colors as the gauche will reactivate
when in contact with water. Just feel grateful and
enjoy each strokes. Let's do the same strop
with red pasted color also. For the finishing touch, take a soft pastel yellow and add a glowing circle on top. Then add few circles
or bocce lights around the tree as the distant lights
from the surroundings. These are just simple
circles using pastel yellow. This will elevate the background and give our painting
a little context. I As a final step, I have added a few lines
on the ground with pastel yellow as the
reflection from the light. And with that, we are done with our warm up painting section. Now that our hands and
minds are warm up, let's jump into day one of our 25 Christmas illustrations. I can wait to paint with you. Let's make this holiday extra colorful and
meaningful together.
5. Santa: Hello, friends, and welcome to the first class project of this Christmas painting series. Today, we are bringing to life a Santa Claus carrying a bag
full of gifts, just for us. I have already prepared a simple sketch which you'll find in the
project resource section. It's easy to trace or frehan a basic outline to
guide your shape. Nothing too complex. We are starting with
the background. Let's mix a light brown
by blending red and black and then adding plenty
of white to lighten it up. Test the shade on your paper. It should feel warm and soft. Now, start filling the canvas. Make the area around the
Santa lighter shade. This will make him stand out. Then gently darken the
outer edges for depth. As you can see, I'm leaving some space around
the Santa unpainted. We will paint here next. Simply fill the remaining
area with the same colour. I'm using my round
bridge for this, but you can also use
a flat bridge if you want to cover larger
areas more quickly. Now, to lighten up the
area around the Santa, I added a little
more white paint on the area where I
had left unpainted. Now let's soften
everything nicely. Go ahead and blend the
fresh white paint with the gray underneath using
small circular strokes. These little circles
help reactivate the dried darker gray
so the colors melt into each other smoothly
without leaving harsh lines. As you blend, you will notice the area around Santa
head and the direction he's walking that is towards the left side of the canvas
naturally becoming lighter. This gentle glow helps to make the sense of direction
and movement. And at the backside of the
painting behind the Santa, make it slightly darker. That contrast between light
in the front and darkness behind helps us to create a sense of
direction and movement. It feels like Santa is
walking into a brighter, magical space, and the shadows are gently trailing behind it. At the bottom, use a
slightly darker brown. This will make the ground. Blend everything
nicely, and let's use white paint as a mediator
to blend between colors. Use gentle strokes and apply a little more pressure to
reactivate the dried layer. Add a little more
darker shade at the bottom to get a little
more focus to the ground. Now, let's add a little
background vegetation to make the scene feel richer
and more atmospheric. I'm taking a dark
brown for this. On both sides of the canvas, I'm adding a few
lose tree profiles. Don't worry about drawing an exact perfect tree shape
instead, sharp details. Think of these as soft silhouts
that help to frame our s. I'm using gentle
diagonal strokes almost like cube hints
of pine tree branches. No crisp edges, no
clean outlines. Just suggestive shaves. These loose strokes
naturally create that mysterious misty forest
mode we are going for. Alright. Now let's move on to the main focus for
painting the Santa. This is where everything starts to feel festive and joyful. We're going to begin
with Santa's outfit, starting with that
classic bright red. Go ahead and take some vibrant red paint
onto your palette. I'm switching to my detail
brush for this part because it gives me better
control around the edges. Start by painting the coat and then moves on the hat and pants. Basically, the entire outfit. Let that bold red fill the
space and bring Santa to life. A little tip I always swallow. I like to outline
the area first with my detailed bish and then
fill the inside area. It makes it so much easier
to keep those edges neat and clean without accidentally crossing over onto other areas. Now, continue the
same process for all the remaining
parts of Santa outfit. Let that beautiful red slowly bring Santa to
life with each stroke. There is no rush here. Take your time, breathe, relax and enjoy the
painting process. As you fill the red area, pay a little extra
attention to the edges. Try to follow gentle
natural curves where the fabric
would fold or bend. Even a slight curve
in your breast stroke can suggest movement or
weight of the fabric. These small details
really matter because if we establish
those folds lines now, it becomes so much easier
later when we add shadows. So keep going slowly. Enjoy the red spreading
across the canvas and let the Santa gradually
emerge from your brisroks. Once you have filled
everything in red, and that base layer has settled, we can add some dimensions. Next, let's create
our shadow color. We will mix black and red
to get a nice deep brown, perfect for shading and giving
the outfit some volume. With your detail brush again, gently add shadow lines along the outline of his coat
and hat around the belt and just below the sack
and in the folds of his shirt where natural
shadows would fall. The big, the big be the big
better, the big better. Once you have added those
brown shadow lines, let's gently blend
them into the red. Don't brush this part. Just soften the edges with a slightly damp brush and let the colors
melt into each other. And if at any moment you feel stuck or unsure,
don't worry at all. First, place your
brown shadow lines wherever you want them, then rinse your brush
above the water, gently wipe on the
cloth or tissue. And with that
lightly damp brush, gently soften the edges
of the shadow line. This helps the brown
blend smoothly into red, giving you soft natural shading
without any harsh lines. Take your time with this
step, enjoy the process. This is where Santa's
outfit really starts to feel
dimension and cozy. Let the paint guide you. See how a shabby little
rakish has slowly transformed into something
bright and beautiful. Let's keep going. The
painting is coming alive. Now that we have added
the red and the shades, let's move on to
the white areas. Santa's hair, the
fluffy sleeve edges, and the trim on his hand. I'm starting with queer white to block in
all the sections. Take your time and enjoy this step because the
bright white really pops against the red and instantly adds life
to the painting. Once the white
layer is in place, we will add some soft shadows
to give it more depth. I'm using very light
brown for this, just a gentle tin. Add it right along the areas
where the fluff naturally dip in or where the light
would be less strong. Then blend that
light brown into the white while the paint
is still slightly wet. This keeps everything soft and fluffy looking instead
of flat or harsh. This tiny bit of shading
makes such a big difference. It gives Santa hair and trim a warm rounded
dimension look just enough to make
him feel real and cozy without losing that
cute festival charm. Take it slow, enjoy
the blending and let the texture build naturally. The the now let's move on to the black areas, Santa as shoes, belt,
and the gloves. I'm not using pure
black straight from the tube instead of taking the leftover brown
mix that's already on my palette and adding a
little bit of black onto it. It is black in color, but it's softer than
pure black and blends much more naturally with the rest of the
colors we are using. It also helps the
overall painting feel more cohesive because
the tones are connected. Once shoes are done, let's move on to the glouse. Lastly, fill the belts
in the same way. Once the darker
areas are finished, let's move on to
the final part of our painting, Santa's gift sack. I'm choosing to paint the
sac in warm brown shade, something close to Sienna ton. But remember, this
is your painting. If you prefer a red sack
or even a deep black one, feel free to explore that. Art becomes more personal when you make little
choices like that. To create my sienna
shade, I'm mixing red, black, and and yellow
on the palette. Red and black will give
you a deep earthy tone, that tiny bit of yellow
lifts it and add warmth, making it look more
like natural fabric. Paint the back completely
with the color you've chosen and don't forget to paint
the straps on the shoulders. And now that the
painting is complete, let's deepen it even further by adding some soft
shading to the sac. This step really
brings everything together and makes the painting feel rich and dimensional. I'm switching to a dark brown
and add depth to the bag, and we are going to follow the exact same shading process we used earlier
for Santa's tress. Adding outlines and four
lines using dark brown inside the bag and then
gently blending it with the sienna color
using a damp brush. We are almost done
to finish up by add few darker lines to
the ground for depth. And just look all
over the painting. Then if you want to add some touches somewhere,
you can do that. I'm adding some final touches
with white on Santa's hair, and then adding
some white colour on the ground where
the snow is fallen. Now for the magic, dip an old toothbrush
into the white pane and gently flick it to create a snap effect over
your painting, as we practiced earlier. And just like that, we have completed our first Christmas
painting in this class. Let's remove the tape and take a moment to
admire our work. I will see you in the next
class session where we will continue our festive journey
until then happy painting. Okay.
6. Christmas Cabin: Hello, friends,
and welcome back. Today we are painting
something straight out of your Christmas storybook, a warm decorated Christmas
cabin tucked away in the snow. Let's get ready to bring this cozy winter
scene to a live. We already have the basic
sketch of the cabin ready. You can find it in the
resource section for easy tracing or
free hand drawing. It's simple and
beginner friendly, so don't worry too
much about perfection. Alright, let's swarm up those brushes and begin
painting step by step. Let's start with the windows. Take some bright yellow paint and fill in the window panes. Imagine the cozy glow of lights inside the cabin on
a cold winter night. Next, let's move
on to the chimney. Use a warm brown and
fill in it evenly. Once that dry, add tiny brick patterns using
a darker shade of brown. This will make the chimney
look textured and realistic. Now, with that same brown
shade on your detail brush, let's add the window grits. Use thin, steady strokes to paint neat vertical
and horizontal lines. These little details help frame that warm glow
we painted earlier, almost like the window is
softly lit from inside. Now, let's do the same for
the remaining two windows. Very gently, add thin lines around and inside the windows. It looks beautiful. See how
everything is slowly coming to the cozy little cabin is really starting
to take shape. Next, let's move
to the chimneys. As we discussed earlier, let's bring in some
texture and depth. Using the dark brown, start adding tiny brick like patterns, short, horizontal
and vertical lines. Nothing too perfect. This instantly adds character and makes the chimney
feel rusting and real. Now, let's begin filling
the cabin areas. Take bright red on the palette, and let's mix it to get optimum consistency and start painting the entire wall area. Don't worry about details yet. Just focus on getting
an even base layer. Just like we did in
the previous section, first, outline the
edges carefully. This keeps everything neat and gives you clean
boundaries to work inside. Since this is a large area, let's break it down
section by section. Paint one portion fully, and then move on to the next. This helps to prevent streaks and keeps the paint
looking smooth and rich. Keep going at a comfortable pace and enjoy watching
the color fill in. See how beautifully the
cabin begins to glow. I'm using my detail
bridge for filling the cabin walls for protecting the edges
and avoid accidents. Since it is the small brush, we can paint smaller
details perfectly. Once the walls are painted, we will add shades to the walls to make it
more realistic and live. Alright, the walls are
now painted completely. This looks so flat. So let's add some shading to look it more
deep and realistic. We will start shading with brown for that mix is soft brown. You can simply use the
same brown we used for window grills and chimney
and begin adding shadows. I have added brown lines under the roof along the
corners and edges. Anyway, you want a bit
more depth and warmth. Blend the brown softly
to the bright red, make the edges of
the brown border we added using clean
and damp brush. This will give a realistic and three d appearance to the olds. Let's move to the door now. Take a light brown and
paint the main door area. Then with a darker brown, add the outlines and
the wooden parle lines. This contrast make the
door stand out so nicely. Next, we will move on
to painting the sky. Mix a gentle blue,
very light one. Nothing too dark, just
a soft calm shade to set the mood for
our winter scene. Let's start painting
the sky area. We are keeping this
part flat and simple. I'm using my round
brush for this, and you can do the same. Start by carefully painting
along the cabin outline. You can use my trick
outline first to protect the edges and then fill in
the inside area smoothly. Once the edges are clean, simply paint the entire sky
in that light blue colour. No shading. Just enjoy covering the space with
this soft wash of blue. D Perfect. Let the sky settle
in beautifully above our bright red cabin. Now, let's add some
vegetation around the cabin. First, we will
prepare our greens. On our palette, take
a little bit of dark green and place
it near the black. Mix the two together
to deepen the shade. This gives us rich base. Now, add a good amount of
yellow to the mixture. As you blend
everything together, you will notice the
colour shifting to a beautiful sap green, perfect for the neutral looking bushes and
winter greenery. Now, take that sap green. We just mixed and start adding vegetation in the background
on both sides of the cabin. Use a simple tapping
motion with your brush. Just tap, lift, and then tap lift to create those
soft leafy textures. Alright, this looks messy now, but trust me, this will become a beautiful
painting at the end. Now let's add a
simple little pathway leading to our cabin. For this makes a
very light brown. You can do that by
taking a bit of your brown paint and adding
plenty of white to soft int. Now, use your round
brush to paint a narrow path from bottom of the page towards a cabin door. All right. Now let's move to the painting the friendiad of our
cozy little cabin. For this base layer, we want a nice deep green. Something that feels
rich and natural beneath the snow we
will be adding later. So on your parett make your regular green with
a just touch of black. This will immediately
deepen the shade and give you that perfect
dark foundation. Once your color is ready, let's start filling the
entire friendiad area. Now, once I finished
painting this layer, I personally felt it
looked a bit too greenish. So I decided to adjust
it just a little. I added a small
amount of yellow into pallet and painted
it over the greens. We got a nice sub green, little darker than the previous, a richer and deeper shade. So I'm moving with this one. So experiment with the colors, and it will help you know
deeper about color mixing. That is exactly why
I decided to do this project entirely
with only six colors. And now we are going to create two
different shades of green to bring even more depth and
richness to our scene. This step is super simple, but it makes such
a big difference in the final look
of the painting. On your palette,
take a little bit of green and mix it with
just a touch of black. This will give you
deep shadow green, perfect for areas that
needs a darker base or pass where you want
the vegetation to feel dense and tucked away. I'm using this color as the base layer for
all the vegetation, the bushes, the Christmas tree, and the little
decorative elements we will paint in
front of the cabin. Now the second shade mix a
little black with some yellow. You will notice this
gives you a warmer, slightly earthy green tone. This color is used to highlight all the elements
painted with dar grey. I hope you are following me on painting all these small
elements in front of the cabin. Use simple tapping technique to create all these
decorative elements, which gives that festive
vibe to the cabin. Use the light shade to
highlight all the elements, add small strokes with the tail brush on top of the
base layer to highlight it. Do not apply too much
pressure as it may reactivate the base layer
and colors may get mixed up. Now using black paint
and detailed brush, let's just add some branches on the background as emerging
from the vegetation. No leaves needed, just
tiny branches popping out. Do the same on the other
side of the cabin. Next, using the same
brush and thin stalks, I'm adding some depth to
the elements in the front. Some smooth touches on the Christmas tree and the
vegetation with black. Some fine lines and strokes below the lighter green
highlights to pop it out. And now it's time for
some magic lights. Using red and yellow are tiny dots along the
garlands and trees. These represent little
ornaments and to glint lights. They instantly brings
the whole scene to life. So now I'm adding tiny dots almost like a
delicate little chain of lights on the Christmas tree, the garlands in the front
and the nearby vegetation. You can also add them on the
small ticks around the cabin anywhere you imagine those cozy illumination
lights would have. Take your time and place these
dots carefully and evenly, keeping the spacing
almost equal. Make each dot small,
soft, and cute. That's what gives it that
magical Christmas ramp. These tiny touches add so
much warm to the whole scene. So enjoy this part. It's like decorating a mini
Christmas soil. Once you have done with yellow, let's switch into the red
and do the same process. D Now let's move on to that final part, that is the snow. We will start with
the roof which we intentionally left
unpainted earlier. Begin by adding a layer of pure white paint
across the roof. Just let that white settle
softly on the surface. Once that's in place, makes a very light blue shade. This tiny hint of
blue is what will give the snow its depth
and cool, frosty feel. Now gently brush that
light blue along the areas where you want
to show the thick snow. Usually, the lower edges, the folds or anywhere
shadows naturally fall. Don't cover everything, leave
some parts perfectly white, so it looks like
untouched fresh snow. Now, it's snowfall
time. My favorite part. Let's go ahead and add snow everywhere it would
naturally settle. Start by gently brushing
white paint onto the ground, on top of the vegetation
and over the decorations. Add little touches of snow on the window sills,
the chimney tops, the trees, and anywhere else you feel snow
would sit peacefully. Think of how snow
quietly lands and hugs every surface soft
light, and magical. Just take a brush and tap or stroke tiny amounts of
white here and there. You don't have to be perfect. Just imagine the snow
finding its place. Slowly, you will see your entire scene transforms into a cozy, wintry
Christmas moment. It brings everything
together so beautifully. This part is a bit
time consuming, but it's such a peaceful step. So take your time with it. Put on some calming music, or you can just listen to
the music in the video, relax your shoulders,
and gently add the white paint wherever
the snow would settle. Let this be your
moment to breathe, to slow down and connect
with your painting. Each little touch of white brings more magic
into this painting, so enjoy the process. This quiet mindful
step is what makes the whole artwork feel alive
and ful of Christmas charm. The And there it is our adorable Christmas
cabin glowing with warm surrounded by snow and
decorated for the holidays. Let's gently remove the tape
and reveal the painting. So two paintings are done and many more festive
adventures waiting for you. I'll see you in the next lesson. Let's keep the
Christmas spirit alive.
7. Christmas Wreath: Hello, friends. Welcome back. This is our third
painting of the glass, and today we are decorating a cozy door with a
beautiful Christmas wreath. You can find the reference image for this project in
the resource section, so get your brushes ready. Let's drive into the painting. We will start with some warm
glowing colors for the door. Mix a lovely orange shade
using red and yellow. Once you're happy with the mix, fill the three rectangular
boxes at the top of your door. Sketch with that color. These will look like
the glass panels glowing from the light inside. Now, mix the colors on
your palette really well so you get a smooth
event consistency. Once the paint is ready, load your round brush
with that shade and gently begin filling in
the glass panel area. Start by outlining
the shapes first. This will help you keep
the edges clean and sharp. Then slowly fill in the inside space using
steady even strokes. Don't rush this part.
Take your time to enjoy the process and let the paint glide smoothly
across the surface. Now that all three glass
panels are filled in, I'm just going back over
them for a quick retouch. This step is all about
refining the edges, evening out the colors, and correcting any small
areas that look uneven. Take your time here, gently
clean up the borders, smooth out any
visible brush marks, and make sure the shape of each panel looks crisp and neat. Now let's move on to the red. Go ahead and fill the rest of the door area using
your round brush. Take your time with
this step and paint it just like you did
the orange panels. Slow, steady, and even. This sad pill become the rich
festive base for outdoor, so make sure you
enjoy the process. Be extra mindful around the
borders of the glass panel. We have already cleaned
up the inside area, so now we just want to keep
those edges neat and sharp. A good trick is to outline the shape first using the tip of your round brush that gives you clean boundaries
to work with it. Once the outline is done, you can switch to flat brush to fill the bigger rectangular
area at the bottom, if that feels easier for you. I'm sticking with my round brush because I'm comfortable with it. But you can use whatever
feels steady in your hand. Make sure your paint is
at right consistency. If it feels too thick or draggy, just dip the tip of your brush lightly into water and mix
it well on your parrot. You want the paint to glide smoothly without leaving marks. Once the consistency feels
perfect, continue with it. Take your time and
enjoy this moment. It really does feel like
a colorful therapy. Let your brush move gently
follow the shapes you have sketched and allow rich paint to settle evenly on the surface. Now, I am moving on to the thin borders around
the glass panels. These areas need
a bit more care, so take your time
with the edges. I'm rotating my canvas to more comfortable angle before painting. You can do the same. Always position your
canvas in a way that feels easiest for your
hand to move steadily. Work slowly, breathe
and enjoy the process. H next on the left side
of the red borders, right next to each glass panel, let's add a thin line of yellow. This will act as
a warm highlight as if the light from inside, the house is softly glowing
onto the wooden door. Make sure to use just tip of your brush and apply
a light touch. Let's use detail brush for this. We don't want thick strips, just a subtle glow. This tiny detail instantly make the door look more dimensional,
warm, and welcoming. Take your time and enjoy these
small finishing touches. They bring everything
together beautifully. Now, let's add a soft glow
to the orange glass panel. Start by mixing a pastel yellow. Just add a little white into your yellow paint to get
that gentle warm shade. Using your detail bridge, apply this pastel yellow softly on the left side
of each orange rectangle. This little touch
instantly creates the effect of warm light
shining from inside the house. Use tiny circular motions
with your detail brush, so the yellow blends
naturally into orange. Then wash your brush, wipe off excess water, and use it slightly darm to gently soften
the edge of yellow. This will smooth
out the transition and give you that
beautiful glowing effect, just like warm candlelights, diffusing through
a glass window. Now, we will add a bit of structure and
shadow to our door. Mix a brown shade by combining red and black on your palette. Using your detail brush, start drawing thin lines
along the edges of each door panel and around any decorative shapes you
added in your sketch. These lines don't need to
be too thick or too thin, a comfortable medium strokes that feels natural in your hand. The I started with the
borders of the glass panel. Since we already added that warm glow on left
side of the border, we will now balance it by adding shadow
on the right side. Take the brown shade
we mixed earlier, load just a tiny amount onto your detail brush and gently trace along the right
edge of the border. Now for the rest of the door, follow the sketch
slowly and mindfully, outlining the wooden
panels one by one. This step adds depth
and definition, helping the door look more
dimensional and realistic. Take your time and
enjoy this part like gently carving out the wooden
grain with your brush. If you accidentally draw an extra line,
don't worry at all. It happens to all of us, even when we are
being super careful. I also made an extra line here, so let's fix it together. Just take a clean brush, wet it slightly and gently soften that area by blending the line back
into the base color. Once it looks
lighter, add a thin, fresh layer of red paint on top of that area
to even it out. Anyways, we will be placing a wreath right over
this board later. So as long as it looks neat and blend well with the
surrounding red, I don't have to worry at all. So take your time and
enjoy this process. Every little correction is
just part of painting journey. Now comes the fun part,
our Christmas wreath. Start by using the
same brown shade to lightly sketch a circle at
the center of the door. This circle doesn't
have to be perfect. It's just a guide for
where our wreath will sit. Next, switch to your
detail brush and bring filling the area using
short cute brush strokes. Think of these strokes as tiny flakes of your brush moving outwards from the circle. Keep your wrists loose
and your moments light, almost like tapping or
flicking little leaves. Work your way around the circle, adding these small strokes
in all directions. Some strokes can be
longer, some shorter. That natural
variations will help the wreath look fuller
and more organic. Don't worry at all if it
looks messy at this stage. This is only our base layer, and the magic comes when we add greens and
highlights on top. Just enjoy this process, the uk repeating strokes, the circular rhythm, the way the wreaths
slowly take shape. It's such a satisfying
step watching those tiny marks come together to form something
rich and textured. So take your time here, let the messy base grow
into a beautiful wreath. Now, let's paint the grills on the glass panel using your detailed bridge and
the same brown shade, start by drawing diagonal lines inside each of the
orange glass rectangles. Begin with one panel at a time so you can
stay consistent. Gently pull your bridge from one corneer to
the opposite corner, creating clean slanting lines. Repeat this process
for other two also. Once the first direction of
diagonal lines are done, go back and add the lines
in the opposite direction. This will create those
classic little diamond shapes you often see on Vintage
Christmas doors. Work patiently. Steady
diagonal lines make such a big difference in giving the door a charming,
handcrafted look. Take your time, enjoy
the tiny brush moments, and soon the grills on the all three glass
panels will look neat, delicate, and
beautifully detailed. Let's brighten up
those edges once again because as
the print dries, some of the glow can look
little dull or faded. If your edges still
look crisp and vibrant, you can skip this step. But if they appear bit muted, let's gently lift
them back to life. I'm now making a
little lighter version of the pastel yellow by
adding more white paint. Using my detail brush, I am lightly running this shade along the
edges of the glass panel, and anyway, the warm light
would naturally spill over. Now it's time for
a touch of snow, one of my favorite
part because if it instantly brings that
cozy festi feeling, I'm using white paint at
the beginning and then shifted to white paint mixed with just a
tiny hint of blue. This addition gives the snow a soft cold ton
instead of stark, pure white, making it
look more natural. We will start by gently
adding this snowy touch along the tops of old grill
lines we just painted. Think of it as snow that has softly settled there after
a calm winter night. Don't worry about
being too perfect. Snow is naturally uneven, so a few irregular strokes
will make it feel authentic. Next, focus on the corners of the door and any rised
edge on the wood. Imagine where snow would
naturally catch and roast. A light hand and small
stalks work perfectly here. You can even add a few
brush touches directly onto the wooden
panels themselves to resemble tiny
delicate snowflakes. Take your time and enjoy
this meditative step. Painting snow isn't just
about adding white. It's about feeling the coolness, the calm, and the quiet
magic of snowy evening. Step back every now
and then see how these small touches start to bring the entire
door to life. To So I'm adding few dry strokes with my flat brush on the
surface of door. I keep it so light,
not expressive. Use a dry brush and
dry paint for this. If the paint or brush is wet, that will affect
the bottom layer and the colors make it soil. Now comes one of
the most fun and satisfying parts our
Christmas wreath. Painting wreath is
such a joyful step because it's full of rhythm,
movement, and color. And honestly, this is exactly why art is called
a form of therapy. Each breast stroke is a
small act of self care, a moment to slow down, focus, and just
enjoy the process. We will start by mixing a
dark sap green using green, yellow, and a tiny
touch of black. This will be the
base of our foliage, rich, deep and natural looking. Using a detailed bridge, begin layering
small short strokes all around the circular
shape of the ab. Think of each stroke
as a little leaf. They don't need to be
perfect or identical. The slight irregularity is what make it feel alive,
organic, and vibrant. Do Once your base layer is done, take a lighter green by adding
more yellow to your mix. Now go over the wreath again with another
layer of short strokes. These lighter touches
will catch the light, gives the leaves depth and make the wreath feel
three dimensional. As you paint, take a moment
to notice how the colors come together and the wreath starts to grow on your paper. Each tiny stroke is like
a mini celebration, and just like that,
your painting become more than just an image. It becomes a moment of
mindfulness a way to reconnect with yourself and a reminder that
creating is pure joy. The process is as
important as the result. Take a deep breath, enjoy
the rhythm of your brush and let yourself smile as your
festivity comes to life. So for the third layer, things are more simple. Instead of covering
entire areas, let's make leaf
profiles across the ab. Now it's time to
decorate our wreath. The most joyful part, let's start by adding the
tiny ornaments. Begin with yellow using
your detail brush, add small circular dots
all around the wreath. Keep them scattered in
a natural random way, not too perfect, not
too evenly spaced. These little yellow
ornaments instantly bring light and warmth
into the greenery. Once you finish
the yellow layer, clean your brush and
move on to the red. Add more small circles in
between the yellow ones. The mix of warm red
and bright yellow gives that classic Christmas
charm we all love. Don't overcrowd any area. A little breathing space makes
everything look elegant. Now, to make these ornaments
look three dimension, take the same brown
shade we used earlier. On each ornaments, add a tiny
shadow on the left side. Just a gentle touch. This shading gives
the illusion of depth like the little bowls are
sitting on top of the rib. I am mixing that same
blue tinted white again on my palette, a touch of blue mix it into white to get that
soft cold snow color. With this shade,
gently add snow over the wreath the little ornaments and along the edges of the door. Think of it like placing tiny snowflakes wherever
they might naturally set in. You say light hand, soft
tabs and don't overw on it. Gosch reactivates, so
gentle touches are the key. Now for the final little detail, take your brown paint again
with the detail brush and add a small shadow
right below the wreath. This helps the wreath look
lifted from the door, giving it a nice depth
and finishing touch. These small additions create that beautiful
snowy texture like soft flakes settling on
your cosy festive door. Each strokes had just a
bit of more charm and suddenly your whole
painting feels alive and glowing
with holiday warmth. I'm going to add two
hanging ornaments at the bottom of my wreath. So paint two larger circles. I'm painting both
circles in red. You can choose one red or one yellow or any
combination you like. Add a shadow on the left side, just as we did earlier. Then using your detail
brush and black paint, draw thin delicate lines about each ornament to look like twine or string
that holding them. Keep the lines simple and fine. That tiny detail
adds a lot of charm. Let's now carefully place
a bit of snow that is the blue tinted color on
top of the red balls. Now dip an old toothbrush
into your white paint. Make sure it's slightly thin, but not too watery. Then using your finger, gently flick the bristles
towards the painting. You will see tiny delicate white dots scatter
across the surface, creating the look of snowflakes drifting down in front
of your festive do. Keep the movement
light and controlled. A few gentle flakes are enough. If you want heavier snow food, just repeat the
process once more. Thise little steps
add so much charm and instantly brings your
Christmas scene to life. Let it snow. As a final touch, I'm adding few dots with my brush to depict the
largest snowflakes. And there it is a beautiful decorated
Christmas tree door. Carefully fill up the tape
to reveal the painting. So we have done an
amazing job together. Now, three paintings down and plenty more
Christmas joy to come. See you in the next session
where we will continue this festive painting
journey together. I.
8. Snowman: And Hello, my dear friends. Welcome back to the fourth
painting of our class. Today, we are going
to bring to life a cheerful little snowman
surrounded by snow, trees, and that cozy
winter magic we all love. I have already mixed two beautiful shades of bluish gray on my
parrot as we talk, a lighter shade with more white, and a slightly darker one
with more blue and black. These two tones will help us create a depth in
the background. Et's start painting
around the Snowman. Begin with pure white right
next to Snowman's outline. Gently fill the area around him. This soft glow will make our snowman appear
brighter later. Almost as if he's reflecting
the pale winter light. Now gradually shift
your light bluish gray, start blending outwards from the white using calm sweeping
strokes. Don't rest. Enjoy how the colors
meet each other. Generally fill the rest of the background
with lighter gray, working your way around
the snowman Salud. Once the area around
the snowman is painted, start blending the
gray by lifting your brush upward in
soft vertical stroke. This symbol motion helps pull the paint upward and create
beautifully subtle texture, almost like a soft winter
mist behind the snowman. Keep your pressure light. Let the brush glide. This gives the background a smooth atmospheric look while keeping the
focus on your snowman. For the lifting technique, I'm using my flat brush. It helps cover larger areas smoothly and keeps
all the colors moving together in harmony. After painting the lighter
gray around the snowman, gently begin lifting the paint upward in a vertical motion. This soft blending not only
merges the shade beautifully, but also adds a lovely textured
effect to the background. Work your way around the entire background using
the same technique, keeping your strokes light and gentle for the
most natural look. If you feel the area around the snowman, is
it bright enough? Go ahead and a touch more white to softly
highlight that space. This will help the
snowman stand out and give the whole
painting a balanced blow. Now, let's add a few pine
trees in the distance. I have freshly mixed gray
shade for the trees. This help them look
soft and far away. Using your round brush, begin creating pine shapes
without drawing a spine first, just like we practiced
in the practice section. Make short quick output
strokes left and right, gradually widening
as you move down. Keep your hand loose. These strokes naturally form the salute of
distant snowy pines. Don't worry about perfection. Trees in the distance always appear a bit
hazy and blurred, and that softness adds
to the atmosphere. Paint a few trees on both
sides of the snowman, so he feels surrounded
by a quit winter forest. Use very light
pressure at the top, so the needles look fine
and slightly firmer strokes lower down where the
branches are fuller. Vary the length and angle
of the stark slightly. Perfect symmetry looks staged, while irregularities make
the trees feel natural. I'm adding only two trees
one on either side. If you're adding more trees, space your trees unevenly. So closer, some further. This creates a believable depth. Now that our background is done, let's move to the snowy ground. The snow is not just white. It has shadows, curves
and soft mounds. Take the darker
tone and apply it lightly on the upper
edges of snow mounds, where the shadow would sit. Then with a flat
brush loaded with white, gently blend downwards. This will create a smooth, soft slope like untouched snow that glows under winter sky. Blend the gray with white
to get a soft even finish. You can use a flat brush if you want quicker,
cleaner blending. It covers more area and
create smoother transitions. I'm using my round bridge, so it's taking a
little more time, and that's perfectly okay. Every brush moves differently. And part of the joy of painting is learning how
each one behaves. Use a clean dam
brush for blending, not dripping wet,
just gently moist. Start pulling the colors together with light
soft strokes. If you feel the paint is trying or the color
looks patchy, load a bit more gray or
white and continue blending. Remember, blending is
slow and relaxing. There is no rush.
Just let your brush glide across the surface as the colors melt
into each other. This is the best part when the painting asks you to pause, breathe and simply
enjoy the motion. Finally, I am switching to a flat brush for those last few
blending touches. A flat brush really helps
pull everything together. The brazil spread the paint
softly and naturally, giving you that
smooth event finish we want for the ground. Now the fun part, let's
paint our snowman. Take a deep breath,
relax your shoulders. This is the moment where your winter scene truly come alive. Start by outlining the
snowman's body with the lighter blue shade
you mixed earlier, follow the sketch line slowly. Letting your hands
stay soft and steady. There is no sh, enjoy the
moment of your brush. Once the outline looks good, fill the inside
with white paint. You don't worry if
the first layer isn't perfectly opaque. We will be building
it up as we go. Now comes the soft blending. The part that makes
him look round, fluffy, and full of life. Using just a tip of your brush, gently merge the blue
outline into white center. Move slowly in little
circular or sweeping motions as the colors melt together, you will start to see those smooth curved
snowball shapes forming. If you feel the paint is drying or the
colors look patchy, load a bit more gray or
white and continue blending. To our depth, pick up a tiny
bit of light purple made by mixing red to our gray and place it along
the shaded side of his body. Purple looks magical on snow. It creates that cold soft shadow that instantly adds realism. Blend it gently, so it
stays subtle and dreamy. Now repeat the same
steps for his head, a soft blue outline, white incender, a touch
of purple on shadow side, and a bright highlight
on the opposite side. Blind everything softly, keeping the middle
areas brightest. Watch how each strokes makes the snowman look
more three dimensional. Now, let's have some retouches and some dark lines
on our snowman. Et's give our snowman
some personality. This is the moment he truly
comes alive on canvas. Mix a deep purple black shade by adding a tiny bit of
black into your purple. This keeps the color rich and soft rather than harsh
like purple black. Using your detail brush, start adding the features. Outline hat first, then fill in with the same
purple black shade. Take your time. Hats don't
need to be perfectly shaped. A few uneven edges actually
give a hand painted charm. Using the same mixture, let's add tiny branches in the background,
soft thin strokes. Since there are no leaves, these lines should
feel thick and light, almost like scribbles of nature crossing in front
of the pine trees. These little branches help bring depth to
your winter scene, almost like the viewer is
peaking through a forest. Add three buttons along Snowman's belly,
space them loosely. Irregular spacing makes him feel cuter and more whimsical. Add two small dots for the eyes, then add a curve smile. Now let's add a few
more details to the ground to make everything
feel grounded and real. Using the same dark
tone we mixed earlier, paint a few small stones
on the snowy ground. Don't worry about, make them
perfectly round innature. Stones are always irregular
uneven and full of character. Keep your strokes
short and light. Use the dry on dry
technique here, load only a tiny bit of paint onto completely
dry brush and let the texture of the paper help create those natural
rough stone edges. This will automatically give
you your stones a soft, realistic look
without much effort. You can add a couple of
slightly darker touches underneath the stones to
suggest gentle shadows. These little details will
give you a snowy landscape, depth, grounding and a
sense of quiet stillness. Let's prepare the scarf. Gently outline the edges of his scarf with the same purple black
color. Don't fill in. This is just a guide so
that when you add colour, the scarf popes beautifully
against the white snow. These tiny details
can feel slow, but you are wilting
character mood and warmth into painting
with every stroke. Let's now add some warmth. Mix the bright orange by
combining red and yellow. We will paint the scarf using alternating stripes
of red and orange. This contrast against the snow makes your snowman look
cheerful and festive. Paint slowly, keeping
the strokes smooth. Now, let's add those tick hands using the same dark
purple black mix, load just the tip of
your detail brush. Start from the sides of
Snowman's middle body, place your brush gently and pull outward in a single
smooth motion. Before we finish, let's complete the hat using bit of brown, add soft highlights and
textured strokes on the hat. Now, the best part
snow splattering. Take your tooth brush,
dip it in white paint, and gently flick it
towards your piper. Watch the tiny snowflakes
fall across your endorsing. Every flick a magic. It's almost like a therapy
like watching real snowfall. I hope you loved painting this winter character
as much as I did. Snowmans are simple, yet
they hold so much joy. Thank you for painting
with me today. Take a moment to
enjoy your artwork. You created something beautiful. I'll see you in the
next magical section.
9. Red Ball Ornament: Hello, friends. Welcome back. It's time for another
festive painting. Today, we are going to decorate our Christmas tree with a
beautiful red bowl ornament. This one is simple, fun, and full of that
cozy holiday spirit. So grab your brushes, get your paints ready, and let's start creating some
Christmas magic together. We will begin with
the background, the lush green base of
our Christmas tree. On my palette, I already have a few shades of
green ready to go. First, I'm starting with
a lovely sub green. I created this shade by
mixing green, yellow, and just a touch of black
to deepen it slightly. Using my round brush, I am filling the entire
background with this color. Don't stress about making
it perfectly smooth. In fact, we don't want that. Christmas trees are full
of natural variations, and the more uneven the tones, the more organic and realistic the final painting will look. I also have another shade
of green on my palette. This one is a mix of
black, yellow and white. I'm applying both greens
randomly across the background, letting them met
and blend softly. These subgradations create an interesting
textured backdrop that will make your
tree look more alive. Once that first lays down, it's time to deepen everything. Mix a darker green by adding a little extra black
into the green. With this shade, start
painting the shadow areas, especially the sports
where you plan to place the thicker
branches later. These darker patches create visual depth and guide
the viewers eyes. I'm planning three such darker
patches across my paper, one in the central diagonal area and others on either side. These will act as foundation for our main Christmas
tree branches. Don't worry about making
them identical nature. Nothing grows in
perfect symmetry. That's exactly what
makes it beautiful. You can add more
patches, if you want. Some patches can be wider, some narrower, some more
shadowed, some more highlighted. Just let your brush
move with ease. The So I have placed three of my branches. Next, let's bring
in some highlight. Make a lighter green by adding more yellow to
your original mix. Use this shade to brighten areas where light would naturally hit. These lighter strokes will help tree feel more
dimensional and lively. With these different tones, dark, medium or light, your background transforms
into textured glowing base that already feels like a real Christmas tree
rising from the canvas. Use yellow directly to make some parts even lighter
and highlighted. And now I'm adding the darker branches and
leaves directly above the shadowy patches
we created earlier. Placing the branches over those darker areas
instantly reads as depth, so foliage feels
layered and full. Take a fine detail brush and
a little bit of black paint. Keep your hand relaxed
and your wrist loose. Start each branch
from darker patch and let the line slant gently
from right to left. Following the direction
you sketched. Short confident strokes work best For the pine needles
or little leaves, you scoop short
strokes coming out from the central branch
line on both side. Keep them varied in
length and spacing. The detail irregularity is
what makes them look natural. You don't have to
fill every gap, leave some spaces, so the
background greens peak through. That contrast of dark branch and green underlayer is what creates the shadow
full branch effect. Use a lightly loaded brush. Too much pain makes blobs. A medium load gives
crips textured strokes. Way pressure, lighter pressure, fine needles, firmer pressure, slightly thicker branch marks. Work in small sections. Finish one branch
cluster before moving to next so the composition
feels balanced. If a line is too dark or heavy, immediately soften it with a clean damp brush
and lift slightly. Gauche is very forgiving. Take your time and enjoy these
rhythmic repetitive marks. Painting branches
can be so calming. Step back occasionally to
check the overall balance. Are the dark patches now
red as full branches. If one area feels empty, add one or more two extra
short strokes to anchor it. I hope you are enjoying
the small steps. Let the bush glide freely
and trust the process. This is exactly what makes
painting feel like therapy. Every stroke is a
moment of calm, a break just for you. Let this be your little
pocket of joy today. Oh See how those dark branches are giving the background
structure and dimension. Keep going at your pace. The scene is starting to feel wonderfully lush
and atmospheric. Once you're happy
with the background, let's move on to the next. Here comes the exciting
part, the red ornaments. These little Christmas
bowls instantly bring life, warmth, and sparkle
to your tree. Let's begin with
the first ornament. Using your round brush, fill the entire circle with
a bright, rich red paint. Take your time
here, let the brush glide and enjoy the
smooth flow of color. Keep your canvas in a
comfortable position and paint the circle completely. Once this red layer is complete, we will start building
the details that make it look beautifully
three dimensional. Make sure you paint the bowl
completely smooth and even. Let's now go back and
retouch the circle to make it even more
smooth and even. Once it's complete, let's move
on to some shadowing part. To create the shadow color, mix a bit of black
into a red to get a deep, brownish red tone. This shade is perfect for adding gentle curved lines from top
to bottom of the ornament, just like the natural grooves
of real Christmas bowl. So I have added three such
curved lines on my red circle. So once the guiding
line is created, now I'm taking bit more color and making the lines
bit more thicker. Now take a clean,
slightly wet brush and softly blend those curved
brown lines into the red. This blending creates that
perfect rounded shape, making the ornaments
look shiny and full. Once you're happy
with the blending, add a few crisp thin lines with the same color
on your ornament. This adds more depth
and definition. Now, pin a small hook on at the top of the
bowl using black. Add a black line to
depict the string that connect the ornament to
the nearest branch on top. Now take a little amount of
white on the detail brush and add very thin line to highlight the hook and the string that
holds the ornament. To finish it off with
the festive sparkle, add a few tiny white
dots on the ornament. These scattered glitter is adding that magical
Christmas charm. Now take a deep breath
and enjoy this moment. Every stroke is bringing
our artwork to life. Now let's move on to
the second red bowl, and this one is going to be extra fun because we
are adding stripes. First, using the same red shade, start painting vertical
stripes across the bowl. You can absolutely choose
horizontal or diagonal stripes. Anything that feels festive. When painting stripes
on a round ornament, the curve matters
more than the stripe because that's what creates a beautiful spherical illusion. So as you paint the
vertical stripes on your second red ball, let them follow the
curve of the ornament. On the left side, gently blend the lines slightly
towards the left, and on the right side, let the lines curve
towards the right. The central stripe can
be stay almost straight, just the tiniest gentle curve. Now let's add some
white paint on the blank areas and slightly
blend them with the red. Do the same for all
the white areas there. Once your stripes are in place, it's time to add them. Mix a slightly darker red by adding just a touch of
black to your red paint. Using this darker shade, gently shade one
side of each stripe. This tiny step create a
beautiful rounded effect. Suddenly, your flat stripes look like they are wrapping
around a real ornament. Take your time. This part
feels incredibly satisfying. Next, let's paint
the hook and twine. Mix a little black and white together to get a soft silvery gray and use this paint the
hook and the hanging string. This gives them ornament
a metallic feel like it shimmering
gently on the tree. Now for my favorite
part, adding the snow. Take your detail brush, dip it into white paint, and gently add snow accents to the bold branches and leaves. A few tiny touches
here and there instantly make it feel
wintry and magical. The better, the better, the better Next, grab your toothbrush, dip it in diluted white paint and lightly flick
it across the page. You'll see tiny white spurks appears like snow softly
falling on your painting. For a finished touch, I have also added a
few larger snowflakes using my detail brush, small round dots scattering
across the painting. Oh And with that, our festive scene is complete, carefully remove the tape
and reveal the painting. I hope you enjoyed painting
this one as much I did. Now, get ready for
our next project. We will be exploring another cozy Christmas scene
in the upcoming session. See you soon and happy painting. The big the the
10. Car with a tree: Hello, friends. Welcome
back. In this section, we are going to paint something
truly festive and joyful, a bright red car carrying
a Christmas tree. It's such a
heartwming scene that instantly brings that cozy
holiday feel, isn't it? I already have the sketch ready, and you can find
the same outline in the resource section to trace
or sketch along easily. So let's begin our painting
journey step by step. Take your generous
amount of white and add just tiniest
touch of black. You should get a soft misty
gray like winter fog. Let's start painting background. Using a flat brush
or round brush, fill the left and right side
of the background with grey. Leave the center right behind
the car slightly lighter. So I'm not adding
any paint there. Let your brush rocks show a bit of texture gives
life to the scene. Simply fill both sides and leave some uneven
projections to the central area
as if the leaves or branch profiles
projecting out. This unevenness actually mimics the winter mist or
soft frozen his. Outline the areas where you need to fill the color and
then fill inside. This will protect the car from being painted accidentally. And even if you do, don't
worry, gouache is opaque, and you can easily layer
another color over one color. Once the background
is completed, let's mow to the ground area. Add a tiny bit more
black to gray mix. You don't need much. Just a
touch is enough to create slightly darker shade that will separate the ground from
lighter background. Now, let's paint. Paint beneath the car with your round brush, begin filling the area
directly below the car. Think of this as a
snow erode soft, slightly sleshy and peaceful. Keep your brush
movement horizontal. This simple little trick instantly give
that rounded look. Don't need to try to make
it super smooth or fancy. Let the natural texture show. Now that our winter
background is ready, let's bring in some lovely
trees to complete the scene. We are keeping these trees
very simple and misty, nothing detailed, gentle shapes to make the background
feel alive. Start by mixing medium gase, just a little darker than the background you
already painted. We don't want it too
dark because these trees should look far away and slightly hidden in
the winter fog. Now using your round brush, let's begin painting the trees. We are not drawing a spine
or trunk line for these, just organic tree shapes made with upward and
outward brush strokes. Load your brush lightly
with the medium gray, start from the top of the tree and work your way downward. Make gentle strokes that move upward and outward
on both sides. Let's make the branches full and fluffy as the snow
makes them heavy. Let the shapes look
little fuzzy and uneven. That imperfect look gives them
their misty winter charm. This gentle layering creates
a sense of depth as if the red car is making its way through a quiet
snowy forest path. These soft faded trees instantly add mood and storytelling
to your painting, and they help our bright car stand out even more beautifully. Alright. Now for the main focus of our little winter
painting, the red. Take a moment to breathe
and enjoy this part. Bright reds are so satisfying to paint and really bring energy
to the whole painting. First, mix a clean, vibrant red on your palette. Make sure the paint is at
a nice creamy consistency, not too watery, not too thick. If it's too runny, the color will spread into
places you won't want. If it is too stiff,
it will look patchy. A quick dip of brush,
dip into water, and good steer on
the palette will get you that sweet spot. Now with your round
or detailed brush, I'm going with the round brush, carefully trace the
outlines of the car, but leave tiny elements
like headlines, friend glass, and small
trims unpainted for now. Outlining first does two things. It protects your crisp edges and gives you a clean
container to fill, which makes the big color blocks and look neat and intention. Once the outline looks good, switch to a slightly
fuller load of paint and fill the rest of the
car with that bright red. Use controlled strokes and
work section by section. If you accidentally
go over an edge, don't panic, wipe your brush, soften the area with
a damp clean brush, and carefully paint back the border with the
background color or wait until it dries
and repaint the edge. Small imperfections often
disappear once we add shadows, highlights, and details later. I once the bright red base layer
is completely in place, it's time to make
your little car look three dimensional
and full of life. Right now, it's flat like
a coloring book page. But with just a bit of
shading and blending, we are going to turn it into a shiny rounded
Christmas card. Let's start by mixing
beautiful brown shade. To do this, take some of your red paint and add
just a touch of black. You will instantly get a warm soft brown perfect for shadows. Now load your detail brush with this brown and begin adding shadows anywhere the light
would naturally be softer. Along the bottom edges of
the car, under the curves, near the wheel areas
around the deeper corners and lightly around the
edges of the bend or fold. Once the brown lines are
placed, don't leave them hush. Dip your brush in clean water, wipe off excess water, and with a slightly damp brush, gently plent those brown
strokes into the red. You soft tiny circular motions or gentle back and
forth strokes, you should see the brown melting beautifully into the red, creating that smooth
transition that makes the car look
rounded and glossy. Now let's bring in
darker details, the parts that make
your car instantly look more defined,
polished and real. Using black paint
and detail brush, start working slowly
around the key elements. Paint the entire wheel
structure in black, go gently around the curves. If your hand feels shaky, rest your wrist on the
table for support. This dark base will make the
bright car pop up even more. So now I'm going back to the ground area to paint some areas I left
unpainted accidentally. Use the black shade to outline
and fill the number plate, the thin metal borders, and any small shadow sections like the space under the car, the inner part of the tires, tiny dark corners where
light doesn't reach. Keep your brush steady
and move slowly. These little areas add so
much character to the car. Alright. Now comes one of the
most charming part of this painting the Christmas tree tied lowly to the roof of little car. This tap always makes me smile
because it instantly bring that nostalgic holiday feeling
like a family bringing home their tree on a
chilly December evening. Let's paint it together
slowly and joyfully. Before we begin, let's mix
two beautiful green shades. First one is dark green, mix your regular green
with just touch of black. This will be your shadow color. Light green, te green,
and a bit of yellow. This will brighten the branches and help them pope
where the light hits. Having both tons ready, will make your tree look
full layered and natural. Now begin at the
top of the tree, start with tiny strokes. This is the narrow
tip of the pine. Short, quick taps with your brush will perfectly mimic the needle like structure. As you come down, your strokes
can get a little longer and wider naturally forming the triangular shape
of Christmas tree. Use both greens alternatively, so the darker green will give the shadowed finish and the light green for
the highlighted parts. Keep alternating
between two shades. Don't try to make the
strokes do perfect. The beauty of pine trees
lies in their irregularity. Alright, it's time to sprinkle that beautiful winter magic
all over our painting. This step is truly
transform the painting. Suddenly, everything feels cold, festive, and so Christmasy. Let's do it gently and slowly enjoying every brush strops. First, let's mix
a soft icy shade, take a tiny bit of glue and blend it into
plenty of white. You will get a pale
winter blue almost like the color of
early morning frost. Now, load a little of that
tinted blue onto your brush, start applying it on on
top of the car bonnet, on the roof of the car, and a little on
the road beneath. Next, take the icy shade and lightly tap it onto the
trees in the background. Just a few strokes on
top of the trees along the top edges of the branches on random spots where snow
might rest naturally. These trees are far away, so the snow should look faint
and fuzzy, not too bold. Now let's move on to the
tree on the car roof. Use the same pale blue
mixture and gender stroke, the tip of the branches,
some middle areas, and especially the
top part of the tree. Small touches are enough. Little hint of snow makes the whole scene feel
cooler and real. Finally, take a little
bit of black page in your detail brush and let's add some rough
strokes on the ground to add those depth and
texture to the rod. Now outline the upper edges
of some snow patches, just a thin line, barely touching the
brush to the paper. This adds a cool
illusion of shadow beneath the snow and help the white shape
stand out cleanly. Now let's add some
final details. Let's add the wreath in
front of the car now. One of my favorite detail, use the same dark and
light green shades as before to paint small wreath right at the center
of the car front. And then add a few touches of red or yellow ornaments
to make it pop. Now, let's add some
final round of snowe on the wreath and the number
plate and on the metal parts. H. Let's now add a faint blue
tint on cars friend glass. This creates the
reflection of winter sky. Now for the grand finale,
the snow splashes. Dip your toothbrush into diluted white paint and gently flick it
across the painting. You will see tiny
snowflakes start fall all over the painting like
a pure Christmas magic. To finish, add a few
larger snow dots with your brush just here and there to balance
the composition. And that's it. Our red car with Christmas tree is complete. Now carefully peel off the masking tape and
reveal the painting. I hope you enjoyed painting
along with me today. Each painting we
finished brings us one step closer to completing
our Christmas collection. So stay excited. We have more cheerful
projects coming next. See you on the next section
until then happy painting.
11. Angel: Oh Hello, friends. Welcome back.
Today, we are going to paint a sweet little
Christmas angel, calm, glowing and full of hope. Most of our previous
paintings had bright red or green backgrounds, the classic Christmas colors. But this time, let's do
something different. We will give our angel a dark glowing background that
makes her truly stand out. Of course, if you like
to keep it festive, you can always go for
red or green instead. Let's start by
painting the face of her sweet little angel. This part always feels
extra special to me. It's like the moment
your character gently begin to come
alive on paper. First, grab your detail brush so you have good control
over those tiny curves. We will create a soft skin
tone by mixing bit of red, touch of yellow, and
plenty of white. I have mixed two
variations on my palette, a lighter skin
tone for the base, a slightly darker tone for
the soft shadows letter. Having both ready makes blending super smooth
and effortless. Start by filling entire face
with lighter skin tone, move your brushes slowly and
gently around the edges, especially near the
cheeks and string. Using the same light, paint
the hands and tiny feet. These are small,
so take your time and keep your strokes
short and soft. At this stage, she
will look flat, and that's perfectly okay. We will be adding depth
and dimension soon, and that's when she
begins look magical. Now let's bring some life and
gentle depth to her skin. This is the part where your
angel starts looking real, soft, warm, and
full of character. I'm switching to the
slightly darker skin tone we mixed earlier with
your detail brush, begin adding shadows
in the areas where natural depth appears. Along both sides of the face, under the eyes lightly on the nose bridge
around her hands, fingers, and tiny feet. Keep your hands soft and don't
worry about being perfect. Shadows in paintings
are meant to look subtle and blended, not crisp. Once you place the shadows, take a clean,
slightly damp brush. Not too wet, and gently blend
the edges into base layer. Work in small circular
notions or gentle tabs. This soft blending is what gives her skin that smooth glowing
finish we are looking for. And now the sweetest
part, the blush. I have dubbed a
tiny bit of red on her cheeks just enough to
warm up her expression. It instantly makes her look more incent and full of charm. You can soften this with a gentle tab if it
feels too bright. Take your time and
enjoy this moment, watching the angel slowly
come to life on your canvas. Now that her skin looks
soft and glowing, let's gently bring out
her facial features so she truly comes
alive on the page. Using a tiny detail
brush and bit of black paint carefully make
the most important features, the eyes, the nose,
and the mouth. Use very light pressure here. Think of it as touch and lift. The softer your hand, the sweeter and more delicate
her expressions will look. You don't need to
bold or heavy lines, even the thinnest strokes are enough to suggest
her features. In fact, a hint is better
than a strong outline because it keeps your angel look soft, gentle, and peaceful. Mix a dark brown shade by
combining black and red. Until you reach a rich warm tone you like using
your detail brush, gently start filling
in the hair. Following the direction of the stands you sketched earlier. Don't brush this step. Let your brush flow naturally
moving soft curved strokes. We will add some
extra texture later. For the time being, just outline the hair
with a darker tone. Now let's move on to one of the most beautiful part
of our angel her dress. Instead of using pure white, I want to give her a
sof more gentle glow, so I'm mixing a creamy
off white shade by adding just a tiny bit of skin
tone into my white paint. This creates a warm, delicate colour that feels
perfect for an angelic outfit. Using your round brush
or detail brush, start filling the dress slowly. Take your time here, follow
the shape of the fabric, and let your brush glide
smoothly across the paper. Once the first layer is down, it's time to give the
truss some dimensions. Mix a slightly
darker creamy shape, add a touch more of skin tone. Now place these
darker strokes in the shadowed areas
under the folds, near the edges, and anywhere
the truss curved inward. With a clean damp brush, gently blend those shadows
into the base color. Don't rush this tape. Soft blending is what makes the dress look flowy
and realistic. To make the folds
stand out even more, switch your brown paint, use it sparingly
to add tiny lines and soft shading along
the deepest greases. These little touches create the illusion of motion
and fabric weight. Also, let's give an outline
with the same color. Keep your hand relaxed, enjoy the process and remember every gentle butter strop brings her to life
a little more. Now for those deeper
shadowed areas, let's switch a dry
on dry technique. This is perfect for adding extra depth without
muddying the colors. Take a tiny bit of dry brown
paint on your dry brush. Make sure there is
almost no water on it. Gently tap or drag the brush over the darkest
portions of the truss. You will notice how beautifully this technique creates
soft texture shadows, almost like natural folds and feather layers
appearing on their own. Work slowly lightly, letting the brush barely
kiss the surface. This touch adds richness and dimensions and makes the shadow feel more realistic
and delicate. Now it's time to
paint the background, and this is where the magic
really starts to happen. Remember how we decided
to go with a dark, glowing backdrop, make
our little angel shine. Let's build that
mood beautifully. You can choose any
color you want. If you want a bright red
or green background, you can go for it. So let's build that dark mode. Start by mixing deep shade
using black and brown. This combination gives
you a rich warm darkness, not a flat black, but
something soft and atmosphery. I'm using my round brush
first to place the color, begin around the
edges of the angel and lay down low strokes. Slowly fill the
entire background, leaving some patches unpainted. Here we are going
to add brown color. Now place both colors
alternatively. By placing both
colors alternatively, the dark brown and black brown, you will naturally get
beautiful variations, creating darker pockets and lighter pockets throughout
the background. As you paint, some areas
will look deeper and richer where you have applied
more of black brown shade, and other areas will
appear softer and warmer where you
have brown shade. These alternating patches create a mix of dark pockets
and lighter pockets, giving your background
a textured glowing feel without any extra effort. Don't worry about being
perfect, in fact, even strokes makes
the background feel more natural and alive. Move your brush in
different directions, so it doesn't look too uniform. Once you have
placed your colors, switch to your flat
brush with a clean, slightly damp flat brush, start blending those
shades in gentle sweeps. Work slowly moving outward
and around the figure, softening any harsh lines.
Take your time here. Background blending is
relaxing, almost meditative. Let the colours melt
into each other until you get a smooth velvety finish. Now that our background
is beautifully moody, let's return to the hair and add a few magical
finishing touches. Using a lighter shade, a soft gray or of white log
tip off your detail brush. Very gently, add a few thin, delicate strokes on
the strands of hair. These tiny highlights
will make it look like the angel's hair is catching
the soft glow from behind. Now let's bring our
angel's wings to life. This one of the most magical
parts of the painting, start by filling the entire
wing area with a soft white. Don't worry about making
it perfectly even. Little texture actually
helps the wings feel airy. Once the first
layer is in place, mix a touch of brown
into your white to create a light,
warm shadow color. With this shade, gently add shadows along the inner
parts of the wing. This gives the wings dimension and helps them look
softly curved. Now comes the
delicate detailing. Take your detail brush and
using slightly darker shape, begin painting that curved
feather like lines. Start from the top
of the wing and let your strokes follow the
natural shape outward. Keep the lines soft, short,
and slightly curved. Blend wherever needed as you go along the white and brown
tones melt together. With every stroke,
your angel's wings will begin to look softer, fuller and more graceful. Now comes the magical part, adding boca lighting
to the background. First, make a diluted
mix of white. You can also prepare
a soft pastel yellow or any other color by mixing white with just a tiny touch of
the colors you need. This gives the glow
a warm, gentle tone. Both colors should be watery and transparent, almost
like watercolor. Now load just the tip of the brush with this
diluted paint and begin adding small
glowing circles or stars across the background. Think of them as soft bocelts, little floating
halos of brightness. Gauche reactivates very easily. So as you paint on top
of dark background, make sure your brush
is super light. Don't scrab or press too hard. Simply float your brush
over the surface. Imagine you are
placing the paint on the paper, not
into the paper. Add circles of different size or draw stars of different size, some tiny dots, some
slightly bigger. This variety creates
natural dreamy effect. These are my favorite. They instantly makes the
whole painting feel magical. I'll gently tap the bridge
to make small circles, not perfectly round, soft
little blows of light. Don't press too hard, let the brush float. See how some circles look
brighter and some look faint. That variation makes
the background look deeper and more atmospheric. So don't aim for perfection. Let them be irregular. I'm also adding touch of pastry
yellow into few circles. This gives a warm glow like light shining softly
behind the incher. If you feel a circle looks
too sharp or too bright, simply clean your brush, remove excess water, and lightly tap the
edges to blur it. Think of it as
fogging the light. Again, remember, Gach
reactivates easily. So touch the brush very gently. The lighter you had, the softer your stars will look. Do the same process, make more lights on the
background and make variations. Some of them overlap, and some of them bright
and some of them dull. Two to Finally, let's paint that soft golden
aurora around our angel, the gentle glow that makes her feel heavenly and peaceful. Take a little yellow on your
palette and mix it well for smooth consistency and
apply it on Angel's head. To do And there we have it, our beautiful Christmas
Angel is ready. Let's slowly remove the
tape and reveal her. Such a satisfying moment. I would love to see your
version of this painting. Please share your angel
in the project gallery. I can wait to admire
your creations. See you in the next painting. Temple, the mid tempo, the mit tempo, the
12. Gift Boxes: Hello, friends, welcome back. I hope you have been enjoying our Christmas painting
journey so far. Today we are painting
something that instantly reminds us
of joy and surprise. Beautiful Christmas gift boxes placed under a glowing
Christmas tree. You'll find the sketch for this painting in the so section. You can either trace it
or draw it free hand, which feels comfortable for you. Before we start, I'm
going to lightly wash my paper with a thin layer
of diluted yellow paint. This step is optional. It removes the star
white of the paper, helps unify the final painting, and even hides a little
mistakes later on. Once that layer is dry, let's begin painting
the Christmas tree. We are going to work with two beautiful shades of green today. The first one is a
deep rich green. I made this by mixing green, yellow, and just a
tiny touch of black. The second is brighter,
lighter green, simply add bit of yellow
to your green mix. I'm placing the main stem right at the center, and from here, I'm letting the branches spread out naturally
to both sides, almost like the tree
is opening its arm. Keep your hands relaxed, and this part is all about flow. With your round brush, start painting those lovely
pine textures, small cuke strokes, beginning at the center
and moving outward. Think of these strokes
as little clusters of pine needles layered
one top of the other. And don't paint every
branch the same. Alternate between your dark
green and light green. This variation is what
brings the tree alive. The darker strokes fall
into the shadows while the lighter strokes catch light and add that
beautiful dimension. Remember to keep the areas where the gift boxes will sit
completely unpainted. We will fill those areas later. And this clean space will make sure our colours stay
bright and crisp. Just keep building
the layers gently, enjoying the rhythm of
the strokes bit by bit. Now, continue building
the foliage by making the same outward
strokes from central stem. Don't worry about keeping
it perfectly symmetrical. Real pine trees are
beautifully uneven, and that's exactly what makes them look natural
and full of character. If at any point you feel the leaves are looking
too light or too flat, just mix a bit more darker green on your palette and
deepen some areas. And if you want
brighter highlights, pick up a little more yellow and refresh
your lighter green. Keep switching between two tons. That gentle back and
forth layering is what creates that
list festive volume. Remember, we are painting a rich Christmas pine tree with decorated gifts
placed beneath it. So the background leaves
should feel dense and full. Now I'm adding a little
more yellow into that green mix to create a lighter, fresher
highlight shape. This lighter tone really
helps the tree come alive. With this new color on my brish, I'm going to repeat the
same short outward strokes and gently tapping them
across the branches. I'm placing these highlights
randomly all over the tree, not in any strict pattern. Think of how light naturally
hit a Christmas spine. Some areas catch more glow, some stay tucked in the shadows
and don't overthink it. Just scatter these
lightest rokes wherever you feel the tree
needs a little sparkle. As you build these layers, you'll notice the foliage starting to look
richer and fuller. The background leaves will
feel thick and leish. Now let's paint the
ground area beneath tree. I'm using a mix of
black and brown for the shadowed base and adding a bit more brown right below where the gift boxes will sit to
ground the composition. Now it's time to add
trunk and branches that holds all those lovely
pine needles together. For this, makes a
deep brown shade by combining little
red and black. Before adding the brown, I'm first using the
leftover black paint on my palette to lightly outline the trunk and a few
gidling branches. This outline doesn't
need to be perfect. It's just to help us splice
everything with confidence. Once that done, switch
to your dark brown and paint along the outline
to thicken the main stem. Make the central trunk slightly
wider at the bottom and narrower as it goes
up like a real tree. Now start adding branches. Let them spread out
naturally from the central, long ones, short ones,
upward, outward. Don't worry about
symmetrical at all. Christmas trees look the most damming when they are imperfect
and full of character. Let these branches peak through the green foliage
you painted earlier, a little branch showing
here and another there instantly adds that depth and structure to your tree, making it feel more
layered and live. As we are adding these branches, let's also take a
moment to define the edge of gift boxes
a little more clearly. Make the areas right behind the gift boxes slightly darker. This contrast will help the
boxes stand out beautifully once we paint them with those bright wrapping
paper colours. Just deepen the
greens or browns in the shadowed zones and let the darker tones sit right
next to the left box outline. The more step adds so
much depth and makes the whole tree area feel
fuller and more layered. Take your time. Once you like how the tree
and the gift box, it just look, we will
move on to the next part. Now, let's bring even
more life and texture to our Christmas tree by adding those beautiful highlights and subtle variations in color. I'm starting by mixing a warm yellow ocher tone that's just yellow with
a tiny touch of black. This creates a soft
muted yellow that works wonderfully as a highlight
shade for pine foliage. With this color,
I'm gently placing lighter strokes here and
there across the tree. Don't worry about the pattern. These highlights don't need
to be exact or symmetrical. Just sprinkle them
in wherever you want the light to be catch,
the tip of the branches. This instantly makes the tree look fuller and more festive. Next I'm going to take
that same yellow aqua mix and blend a little green to it. This gives us a slightly deeper, more earthy highlighted shade. With this shade, I will add few more strokes in
the shadowed areas, place where the tree dips inwards or where the
branches overlap. These subtle sheats between
lighter and darker tones help the foliage feel rich,
layered, and natural. Continue painting the
areas where you feel the tree needs a bit
more depth or shadow. You can use shorter strokes
or slightly longer ones, whatever feels right for the
texture you are creating. Just keep stepping back,
adding a bit here and there, and trusting your eyes. Once you feel happy
with the overall look, the balance of highlights, shadows and those lesh layers, we will stop right there. Now, let's add some delicate
touches on the main stem. Mix a very light
brown and lightly push it along the stem to
create subtle highlights. These gentle strokes
catch the light and make the stem feel more
dimensional and alive. Next, we will deepen the
ground area below the gifts. Use a darker brown and carefully
painted around the base, adding shadows
where the branches and gift meets the ground. This contrast help
anchor everything making the scene feel more
grounded and realistic. Now it's time for one of the most fun and colorful parts of the painting the gift boxes. We have already built that lish Christmas pine tree behind. So these boxes are really going to stand out
beautifully in front of it. I'm keeping the color
theme simply today. Nothing too complicated,
two boxes in red, yellow combination
and the middle one in a lovely blue shape. But remember, you absolutely don't need to follow my colors. Feel free to choose your
favorite pastels or bright neon, muted tones, anything that
matches your holiday bow. Let's start with the
first box at the top. I'm painting this one
in a bright yellow. Use your round brush and
carefully fill the entire sheep, making sure to leave the
ribbon area unpainted, if you plan to plant a
contrasting ribbon like me. Take your time with this edge. Neat lines really make gift
boxes look crisp and clean. And don't worry too much
about the ribbon edges. You can easily layer it with second color on top
of the first layer. Now, move on to the second
box, the one at the bottom. Take the same soft
yellow we used earlier and carefully paint
only the ribbon area. Leave the rest of the
box free for now. Let's add a contrasting
color later. Now, once the yellow
layer is completely done, we will add the shadows. Mix a little brown. You can make this by
combining red and black. And with your detailed brush, gently place shadow
lines along the edges of the folds and anywhere
to surface meat. Then with a clean damp brush, softly blend those brown
strokes into the yellow. This blending gives a smooth, soft fabric like finish and makes the box look perfectly
three dimensional. The While blending, pay attention to the amount
of water on your brush. We want just a slight
dampness, not a wet brush. Too much water can dilute
the color and make it run. Blend the colours gently using soft light stalks
and remember to wipe your brush or
rinse it in water between blends to remove
any darker paint. This prevents the light
yellow from getting soiled and keep your
ribbon bright and clean. Once the top box is highlighted with brown, take a moment to see how it instantly pops into a
three dimensional object. It's amazing how little
sharing changes all look. Now let's move on to the
ribbon of the bottom box. We will follow the
same steps as before. Start by outlining the ribbon on the sides where the light is minimal and where shadows
naturally fold along the folds, underneath the pens
and the edges. Once the shading is done, take a slightly damp brush and gently blend the
brown into yellow. Keep your stock
soft and careful, letting the colors
merge smoothly. This will give the
ribbon depth and make it look realistic and
festive as top book. Finally, I took some brown with my detail brush and slightly outlined some edges
of the ribbon. Now let's move on to
the next part that is painting the bottom red box and the ribbon of the first box. First, I'm painting the red
ribbon on the yellow box, the one placed right on the top. Carefully fill in
the ribbon areas, the vertical strip,
the horizontal band, and the little bow loops. Use slow clean strokes so the
red stays bright and even. Once that rises,
add a bit of brown along the lower edges of
the ribbon under the folds, and anywhere the
ribbon overlaps, these tiny shadows help the ribbon look
raised and realistic. Then I use a
slightly damp bridge to gently blend the brown into the softening the shades without losing the brightness. The big B the big beat Now we will move on
to the bottom gift box, paint the entire box with
the same festive red, keeping your brush
pressure light and steady so the color stay smooth. Let that layer sit for a moment and then repeat
the same shading technique. Add brown along the corners, edges and areas where
the lid meets the box. After that, blend softly using a damp brush to create
natural shadows. Okay. Now, let's start
outlining the box with brown. Plot a small detailing brush
with just a touch of brown and gently trace along the edges and corners
of the red box. At the outline where the lid meets the base along the sides, edges and around
the bottom corners. These clean brown
lines instantly defines the shape and give
the box more structure. Once done, blend them together. And the Now let's move on to
the middle gift box. And for this one, I'm
choosing a lovely soft blue. Carefully fill in
the entire box shape with your blue shape, making sure to leave the ribbon
areas untouched for now. The to the Once that layer is fully done, we can add shadows. For this box, I'm using a purple shadow tone to
create that purple shadow, mix a little red into a blue, not too much, just enough
to warm it slightly. Apply this purple shade
along the side edges, the bottom borders, and any areas that would naturally
fall away from the light. These are the sections where
shadow naturally set in, giving the box
structure and form. Now using the round brush, slightly damp and not wet and softly blend
the purple into blue. Work in small gentle strokes to get that smooth transition. And just like that, the
box start looked like solid dimension and slightly glossy as if it's catching
light from the friend. Now for the ribbon
on this blue box, I'm choosing white, but plain white on its own can
look little flat. So first paint the entire
ribbon area in clean white, both vertical and
horizontal bands. Once that layer settles, we will add just a touch of light blue to
bring it to life. Use this tiniest moment and place it only on
the shaded parts of the ribbon under the folds along the lower edges and anywhere the ribbon curves
away from the light. This hind of blue gives the ribbon that
frosty winter glow, almost like a satin bow catching
cool light in December. Use your detail brush
and follow each curve gently so the shading looks
soft and rounded, not hash. The ribbon should feel smooth, icy, and delicately highlighted. Before we finish, let's quickly enhance the shadows
below the boxes. And also now we are
in the final stage, and this is the perfect
time to step back and take a look at your
painting as a whole. If you notice any
areas that feels a little light or uneven or
in need of a second touch, go ahead and gently refine them. Maybe a shadow needs softening, a highlight needs brightening or a shape need just a
bit more definition. Take your time here. These tiny adjustments can make everything look
polished and intention. Now, dip toothbrush into
slightly diluted white paint, hold it above your paper and gently flick the brazil
with your thumb. You will see tiny
ditty snowflakes scattered across the
entire painting. It's such a dreamy
Christmas effect. Now, let's add some
tiny red ornaments that instantly make the tree
feel festival and alive. Let's take a little red paint on a detail brush and start placing small circles
across the branches. Don't think too hard
about the placement, scattered them naturally the way ornaments would hang on
a real Christmas tree. Some can be tucked deeper inside the foliage and some can
sit right near the edges. This variation gives a lovely
three dimensional look. As soon as you finish
placing the red balls, we will make them sparkle. Clean the detailed brush, dip it in a bit of
red pastel shade made by mixing red
and white paint, and add the tiniest highlights on one side of each ornament. Just a tiny touch, almost
like taping the brush. This little highlight gives the illusion of
light reflecting off the shiny surface and makes the ornament look
wonderfully glosy and round. Next, let's add strings and hooks that hold these
ornaments in place. Use black paint with your
detail brush and draw fine curved lines connecting the ornaments to the
branch about it. You can make that strings slightly curved or
slightly tilted. It doesn't have to be perfect. These small delicate hooks add so much realism to
the painting and make each ornament look as if it is gently hanging
from the tree. And that's it. Our Christmas
gift painting is complete. Let's carefully remove the
tape and reveal the painting. Thank you for painting
with me today. I would love to see your version of this festive painting. Please upload your work
in the project gallery. See you in the next class. We have more Christmas
magic waiting.
13. Gloves: Hello, friends. Welcome back. Today we are painting another adorable Christmas
tree decoration, a pair of cue tread gloves hanging on a snowy tree branch. Let's begin by creating
a soft tremy backdwn. I'm mixing a very light
blue shade by adding just a tiny touch of blue
into white with a flat brush, start gently applying this color onto the left side
of your paper. Then blend them softly
using the same flat brush. Yeah. I'm adding a bit
more white to soften the bottom part and to
make a little gradation. And don't worry about
making it perfectly even. A few visible brush marks
and soft gradations actually make the sky feel
more natural, more lab. And also, we will be adding
some bouquet circles next so we can easily
hide any mistake. Just keep the pressure light and let the paint
settle by itself. Once the sky is ready, we can add a magical bouquet
effect in the background. Honestly, one of
my favorite steps, load your flat brush with
a bit of white paint, and instead of sweeping, it gently rotate the
brush on the paper. This soft twisting
motion creates those hazy circular shapes almost like blurred
lights in the distance. Keep them light,
imperfect, and dreamy. Now let's add a touch of warmth, mix a little pastral
yellow and repeat the same motion to place a few soft golden circles
around the background. You can add a couple of slightly
darker yellow ones too. This gives the whole scene more depth and makes it
feel rich and glowing. Just like that, the background
already feels festive, cozy, and full of life. Now, we will move on
to painting the tree. First, mix a warm
yellow ochre shade with just tiny touch of black. You are not creating
an earthy brown here. Instead, you want a uter
shadowed yellow tone that acts as the base
for the pine needles. It shouldn't look perfectly
bright or perfectly dark. Just a gentle tone down ochre. Use this mix to paint
the entire tree area, filling in the remaining
portion of the canvas. Unlike the sky, this layer doesn't need to
be a smooth wash. A slightly rough textured
fill works better because it acts as the
underlying for the pine leaves. Once that base is in place, use the tip of your brush to lightly indicate few branch
lines near the bottom. I'm using my flat brush for the leaf structure
and the background. Keep them soft and imperfect. They are only guides for where our fuller pine branches will
sit later, not final lines. And be careful on
the gloves area. Leave that portion unpainted. Now I have switched
to my round brush, and we are ready to start building real depth
in our pine tree. I'm picking up a
rich darker green, this will act as a first
through foliage layer. I have also added a
tint of yellow with it and mixed really well too
lightly soften the toad. Start at the top right
corner and begin forming the branches using
short slanting strokes. Keep your wrists
loose and relax, almost like you are gently breathing the strokes
onto the surface. Let the brush flick outward. That tiny angle at the
end of each stroke is what gives us that
natural pine needle texture. Notice how the branches lean slightly downward as they grow, just a soft diagonal
movement, nothing too stiff. Pine trees don't grow
perfectly straight, so allow those strokes
to wander just a bit. That variation is what
makes the tree feel alive. Be sure to leave pockets
of open spaces between some of the branches where the underlayer can
be seen through. It gives more naturality and
bonds everything to them. Let's repeat the same process, still using those short
confident strokes to build more branches. As you add these pine
needle clusters, notice how the tree immediately start to feel
fuller and more alive. Each tiny flick of brush adds
its own whisper of detail. And together, they create that gorgeous layered
forest texture. More slowly and intentionally
letting the branches overlap just a little
but not too much. This basing is what
gives the tree air and depth instead of turning everything into a new
flat mess of green. And remember, leave
the glove area completely untouched for now, we are going to brighten that space later
with vibrant reds, so give it room to shine. Take your time
here. This is where the tree begins to
truly feel like a tree. Once that lush green
base is complete, it's time to bring
in definition, the id structure beneath
all the foliage. Switch to detailing
brush and load it with a deep black or you can
use very dark green black. Now begin adding
thin slanted lines right along the branches. These strokes are
not bold outlines. Think of them as more
like whispered shadows. Place them just beneath many of the green strokes you
have already made almost as if the leaf clusters are sitting on top of
these dark branches. Use the same motion we
practiced for the pine needles, short angled flicks,
but this time, keep them fewer and
more restrained. The goal isn't to cover the
green but to support it. The tiny lines act like the hidden twigs that
hold everything together, giving you tree echo
its realism and depth. As you add them, notice how instantly the greenery
gains dimension. It's like the tree now has bonds beneath
its soft needles. The silaut sharpen,
the layers separate, and every branch start to
feel alive and believable. Move gently and don't
overthink the placement. Just let the strokes fall naturally beneath
the green ones, almost like shadows
cast by leaves above. This hint of dark
detail is what turns a painted pine into a real pine, textured layered and
perfectly wintry. The Now, let's bring in a bit of warmth with some
soft brown ascents. Switch to retail brush again and load just a
touch of warm brown. We are going to place
this brown only on select branch tips, the spots where
pine needles turn slightly dry and golden
brown at the ends. Start with a tiny dot at
the tip of the branch, and from that dot flick out short lines in
different directions. Almost like a tiny burst of
needles reaching outward. Keep these brown touches
light and occasional. You don't want to cover every
branch just enough to break up all the greens and add a
hint of natural variations. As soon as you add them, notice how tree begins to feel more textured
and realistic. Not just greens,
but truly layered, withered and full of character. These tiny brown
strokes are small, but they add so much charm. They tell me the story
of a real pine tree, touched by cold weather, kissed by sunlight and
gently aged at very tips. Next, mix a lighter
shade of green by adding a little yellow
to your green pde. This will become our
highlight color. Now we can add the final
layer of greens to the tree, start around the brown
branches you just painted, and gently brush in those
lighter green strokes. Think of them as soft
highlight catching light. Lay the lighter shade
over the dark ones, letting them overlap
and blend just a bit. This creates depth glow and that beautiful variation that makes the tree look full and i. So now take a step back and
look at what we are building. We actually have four
beautiful layers sitting on this tree, the muted orchard rays, the deep dark green,
the black shadows, the soft light green highlights, and finally, those
brown needle tips. Just look at how full, rich and dimensional it appears all from simple
repeated strokes. No complicated
techniques, no thinking, just flicks of bridge
layered with intention. It is amazing, isn't it? With one type of stroke used patiently in
different shades. We have created a tree
that looks dense, wintry, and wonderfully alive. Every layer has its purpose, depth, shadow,
light, and warmth, and together they form this strong radiant pine
that feels almost touchable. This is the magic of layering, slow gentle steps that bloom into something truly beautiful. Now, while we admit the depth, let's go ahead and add our
light green highlights. Just repeat the
same exact stroke, small cube flicks
smooth and thin. No changes, no new techniques, just trust a process. Dip your abrecitd light
green migs and gently lay those strokes right on
top of the darker ones. Think of this as sunlight softly landing on
the pine needles. Not everywhere, where the
light would naturally rest. As you go, you will see the
dream brighten instantly. Those muted greens
underneath start to lift, the branches separate, and the whole pine begins to
sparkle with dimension. Now comes the most fun
part, the red glouse. I'm picking a
bright vibrant red, the kind that makes
your heart skip a bit. Carefully fill in the shape of each glove with
smooth even strokes. Slow steady here. Keep your brush
pressure consistent so that the colour lays
down clean and bold. Take a moment to breathe and
simply paint the gloves. Don't worry about the evenness. The shading and planting
can correct if there are any mistakes made while
laying the first layer. Once the base layer is done, load a touch of brown
onto your detail bridge, place the brown shading where the foam naturally occurs along the edges between the fingers and the tiny gaps
under each fold. Think about where the
light would not reach. That's exactly where
the shadow lives. This simple shading instantly gives the gloves
weight and shape. They begin to feel soft
and three dimensional. Now, rinse your
brush and wipe it, so it's only slightly
damp, not bid. With gentle curved
blending strokes, soften the brown into red, work in the direction of folds, so the shadows melt naturally
into the base color. Keep your moments soft and circular where the
fabric would gather. As you blend, notice the red forming natural
folds and subtle depths. That clou starts
look warm, cozy, and convincingly
tactile. A small tip. If a shadow feels too strong, little paint off with a
clean damp brush to soften. And if a highlight needed, a tiny dot of pure red
mixed with a touch of white or faint
white highlight on the ridge will make the
fabric read even more real. When you step back, you will see two bright hot warming glouse
hanging against a tree, bold, cozy and full
of holiday cheer. For the white cuff
of the glouse, first cover the area in white, then mix white with just
tiniest hint of brown. You'll get a creamy warm in, something that feels soft and cozy rather than
pure stark white. Gently apply this shade along the cufs covering
the edges evenly. Then with a slightly damp brush, softly blend it with the white, and also outward to create
a fluffy, natural texture. Keep your straps
light and feathery so the cufs feel soft to touch, almost like a real winter
hole catching bit of light. Now using clean white pine let's draw the little string that
connects the two gloves. Make it thin, soft, and slightly curved as if the gloves are gently
hanging in the winter. D Next, add a few delicate
white highlights on the gloves themselves. Place them along the edges
on the curved areas, and anywhere the light
would naturally heat. These lines make the glouse
pop giving them that bright, cheerful look almost like they are catching
soft holiday glow. Keep the highlights
light and minimal, just enough to make
this glouspackle without poving the red. Let's also add a few
gentle highlights around the brown branches
we painted earlier. Using a small detailing bush, pick up just a touch of light green or creamy
yellow green and glide it softly along the
upper edges of those branches. These tiny highlights help
the branches pop forward, catching the light
and separating them from the deeper
greens behind. Keep your stalks
light and subtle. We don't want harsh lines, just a soft cloth that sits
naturally on the needles. This small step adds a beautiful lift making
the tree feel fuller, laid, and more dimensional. Now, let's add some magic to the trees using your
detailed brush, dip into diluted white paint. Make sure it's not one tree. With the lightest touch, gently rotate the tip
of your brush over the branches to create
white bouquet circles. Place them softly
almost like they are light speaking
through the pine needles, not sitting on the top, but glowing from
within the tree. These are not meant
to be bold circles, just whispery hints of tingle. Keep them small or big, scattered and airy, so they feel soft and creamy rather
than heavy or graphic. A little glow here, a circle there, just enough to suggest Christmas lights
blurred in the distance. Remember, use very
gentle pressure. We are not trying to
disturb or reactivate the pain midath, touch it lift. A slow rotation of the brash creates that perfect
blowing blood. With a few delicate touches, the entire scene shifts. Suddenly, the tree feels alive, sparkling and wrapped
in it holiday warmth. Finally, let's add a snoflake design on the gloves using
crisp white paint. With your detail brush, draw just a few thin lines
meeting in the centre, a tiny, delicate snuflake. Keep it simple and light
doesn't need too much. This little winter detail
adds charm and ties the entire painting together beautifully like a final
whisper of holiday ch. And that's it. We have completed our Christmas tree
gloss painting. I hope you truly enjoyed
this painting along with me layer by layer,
detail by detail. Thank you for creating this little holiday moment with me. Now let's move on to
her next project. I can be to paint
with you again. It's
14. Christmas Cake: A Hello, dear friends and welcome to day ten of our Christmas
painting journey. Christmas just put
in pi Christmas without a delicious
cake on the table. So today, we are painting a cozy Christmas cake that looks almost
good enough to eat. Soft roasting, warm textures, a festive little touch of toe. This piece brings
together everything we love about holiday,
charm and celebration. So settle in, relax, and let's begin creating this sweet Christmas
moment together. Et's begin by setting up
a soft frosy background. First time mixing
a tinted brown, just a touch of brown
into white and applying it gently across the left
side of the background. I'm simply applying this background wash
using my round push. No need for special stocks, just more gintle moments. Let the tinted brown settle
softly on the left star. On the right side, I'm using pure white
paint W two sheds meat, soften the transition with
calm light blending stops. Keep the pressure light so the gradient stay soft and cozy, like a cod glow falling
over our Christmas deserts This gradient creates
the feeling of warm cold day light glowing
over our festive desert, making the sea feel calm, inviting, and
gently illuminated. The table surface
beneath our DC. We will start by mixing
a warm sienna shade, just blend yellow
with a bit of brown until you get a soft,
cozy wooden tone. Now, fill in the
entire table area with this colour using broad
even strokes. Don't trash. Let the paint relax
into the paper. I'm still using the
same round bridge here, nothing fancy, filling in the tabletop we
sketched earlier. If you check the
resource section, you will find the
sketch included. It's a very simple outline, so you can easily hand sketch it or trace it down directly
before painting. Right now, I'm just laying down the base color
with smooth strokes, keeping the application even. We will add shadows and
wooden textures later. But for now, this
flat layer gives us a nice clean
foundation to work on. The lines completely dry, we can start giving the
table its structure. With your detailed brush, gently draw a few evenly spaced vertical lines
across the surface. You can use horizontal
lines if you wish. These lines separate
the wooden planks. Keep them soft and straight, just enough to suggest supreion without taking too much
attention from the cake. Outline the cake base to
give it depth and grounding. Using the same brown
shade we mixed earlier, take your detail
brush and gently draw a line along the bottom
edge of the cake base. Not too thin, not too bold, just enough to create a soft shadow that lifts a
cake slightly off the table. This tiny strap adds
weight, dimension, and that subtle hint
of realism making the cake feel truly
set in its spls. The most interesting
part, the wood grains. This time, instead
of long wavy lines, we are creating those
beautiful circular rings you see inside natural woodcut. With a slightly darker brown, begin adding soft concentric
circles on each plank. Let them curve gently outward, expanding like ripples on water, light, uneven and organic. Some rings can be tighter
and close together, others white and more relaxed. At a few breaks,
fades or overlap, real wood never forms
perfect circles, and that subtle irregularity
is what makes it believable. Think of the story wood
carries within it, roting seasons, age time, each layer whispering
a little history. My darkling wall shapes, we are suggesting texture, letting it sit lightly on the surface rather
than dominated. Once these circular
greens settle in, the table instantly
feels warmer, richer, and wonderfully natural, a perfect doubting base for
our cozy Christmas ita. Once the coins are complete, it's time to soften them. Take a clean brush, dam, not wet, and gently glide
it over the surface. You are not scrubbing it, just lifting and softening. Lightly sweep across the
circular grains so that they will blend into the bay son keeping the texture
visible but sept in. Next, run the same damp brush along the edges of
each plank line, letting them blood just a touch. This soft blenting
removes any harshness, melting the rings and plank
edges into wood naturally. No pressure. Just a gentle wipe, water doing the work for you. The wood now looks smooth, warmp and beautifully worn, like a cozy holiday table
ready to hold a cake. Now let's move on
to the cake base. Start by filling the
entire breeze shape with clean white paint, keeping your brush
strokes smooth, so it looks neat and crisp. Next, we will add
a soft shadows. Lighten a bit of
your dark brown by mixing in a touch of white. This creates warm
gentle shadow tone instead of something too strong. Apply this lighter
brown on the side of the base and also just
beneath the stem portion, following its curve,
then smoothly blend the edges so the shadow melts
naturally into the colors. This subtle shading
helps the base sit realistically in the scene
rather than floating above it. Now, the most exciting
part our Christmas cake, clean, simple, and
quietly festive. This cake will sit at the
heart of our holiday scene, finished in soft pure white with tiny Christmas tree
adoring the sides. As you paint, slow
down, just a touch. Let every stop feel delicate,
smooth, and intention. This isn't just a dessert. It's a centerpiece, the glow that ties the whole
celebration together. Keep it tele again,
keep it calm, and let the detail
unfold gently. By the time the final
highlights go in, this little cake will
feel like a moment of Christmas all its own cozy, inviting and perfectly magic. Next begin painting the cake by peeling in on the
remaining white portions, use a soft even quarter of white color so the surface
looks smooth and clean. Next, let's define
the base of the cake. Mix a light t shade and
with a fine detail brush, add a thin line, right where the cake meets
the cake stand. Keep this line subtle, just enough to separate the layers and give
a clean crisp edge. Big people. The big people. Now, let's move on to
the cake design details. Start by painting the
tree with a deep dark. Let's start shaping that
beautiful little Christmas tree, begin right at the
tip, make short, light, slanted brush
strokes, palat outwards. As you move downward, allow
each layer to widen just a bit like the natural
spread of pine tree. Keep your strokes
airy and taped so the tree feels soft and
full rather than steep. Once that fast green settle, mix just int of yellow
to brighten your tone. Now with that very same
motion and gentle highlights focus mainly on the outer
edges on tips of each branch. You don't need to
cover the entire tree, kiss the surface with light. This second layer instantly
brings demth darker green, stuck inside, lighter green, catching the light
on the outside, simple strokes, soft touches
and trust that's all it takes to make your tree
glow with festive charm. Next, let's add the
classic Christmas dropper, a tiny red star right at
the peak of the tree, use a detailed brush
and pure red paint, keeping the shapes crisp delicate so it doesn't
overpower the tree. Now, let's spring in
some festive charm, add small red cherries
across the top of the cake, simple round dots placed evenly, but not too symmetrically. Leave tiny highlight spots on each terry using dot of white, so they look glossy and fresh. Now it's sailing time to make each little cherry look perfectly round
deliciously glossy. Take just a hint
of dark brown and place it along the
lower curve of cherry. Right where the natural
shadow would form. Rinse your brush, keep it
only slightly damp and gently soften that brown
upward to the red. No hash lines, no rushing, just a soft melt of color
that creates shine, depth, and that
plump, juicy look. You'll see it happen
almost instantly. A flat circle transform into a tiny glowing
Christmas herry. Now, let's bring in the leaves. Start with the deep green ase, keeping your strokes light
and tap it towards the end. Once that layer settles, add a secondary soup
of lighter green, focusing especially
on the center vein, the tip of each leaf, and just a touch
along the edges. This layering creates
a beautiful contrast, dark grounding the leaf and
light bringing to the life. No need to overthink
the stops here, a flick, a lift, a touch of brightness.
That's enough. In just a few brush moments, the cherries feel fresh, dimensional, and full
of coit holiday charm. Now, let's add depth to the
cake with very soft shading. Load a bit of light
gray onto the brush. Remember, this is dry on dry, almost dry paint onto
a full dry base. Move generally along the
top left side of the cake and let the color travel
just to touch downward. Keep your hands right here. We want the foam to
feel soft, not heavy. Because there is less water, the strokes remain textured and subtle rather than
blending away completely. This tiny hint of gray is all we need to make the cake
feel dimensional, lifted, and beautifully real. Now let's bring in
the Christmas glow, mix a soft pastel
yellow and begin adding circular bucy
lights in the background. Soft blurred circles like distant fatty lights
stingling out of focus. Keep your hand light
here and rotate the breeches as if they
barely touching the surface. Next, create gender
variations by mixing one shat slightly lighter and
another just touch deeper. Scatter them delicately,
letting some glow brighter and sits
off in the distance. This subtle shift of tones makes the scene feel magical, dreamy, and beautifully
illuminated as if the holiday lights are quickly sparkling behind our cozy setup. To make the painting
feel even more pristine, we will add a few decorative
leaves around the cake. Begin by placing your base shape using a deep green
as the base layer. I made that deep green by mixing my bright green
slightly to the left or brown. Once that layer settles, makes a touch of yellow
to your green to create a lighter toe and gently brush it over the tops and
tips of the leave. This subtle highlights instantly brings life and dimensions, making the foliage feel
fresh and luminous. That little tonal shift keeps the greenery,
natural, varied, and beautifully
organic, just like real festive foliage gathered
around a winter desert. Now paint the string
lights on the tip. Start by using a light
pastel yellow to paint small glowing
circles for each b. Once they are in place, add a just touch of darker yellow in the center of each one to
create that warm cozy shine. It the lights gently reflecting on the tabletop, lightly bruschet diluted base of yellow right beneath the bubs. Keep it soft and septile. Finally, connect
all the buds with a thin line using either
black or a deep brown, letting it curve slightly
for a natural draped look. And just like that,
your Christmas lights are tingling beautifully
across the table. Next, let's add a picture of natural texture using a
fine detailing brush, paint a few slender twigs peaking out from
behind the leaves, nothing too bold, thin, delicate lines that
curl and taper. These tiny ascends
instantly enrich the scene, giving its structure, depth, and that thoughtfully
layered holiday charm. Finally, let's sprinkle in those
last magical touches with a soft pastel yellow, add a few tiny star shapes, just gentle sparkles on the
cake top and along the sides. Keep them miniature and airy, so they shimmer subtly rather
than steal the spotlight. With just these little tingle
and fine organic strokes, the entire set feels complete, festive, elegant, and quietly glowing
with Christmas warm. And we are done. Now gently remove the tape and
reveal the painting. Doesn't it look delicious. I can almost smell the frosting. Thank you for joining me on the day ten of our
painting journey. Don't forget to
share your version of Christmas cake in
the project gallery. I would love to see
your creative touches. See you in the next lesson
where most festive fans await.
15. Christmas Tree at Night: Hello, my dear
friends. Welcome back. It's already D 11, and every day so far, we have painted cheerful, bright scenes filled
with color and warm. But tonight we are going to
paint something magical, a Christmas tree shining
against a dreamy night sky. So grab your brushes,
take a deep breath, and let's create a painting that glows with festive light
and peaceful night charm. Taking with our background, the beautiful glowing night sky that sets the tone
for our endure scene. Place a little black and bright red paint
on your palette, keeping them separate for now. Start at the very
top of your paper, laying down a smooth, confident layer of pure black. Let it feel deep, calm, and velvety, like a winter
night just before Christmas. Next, let's shift our focus
to the lower portion of the sky and brush in that
stunning bright red. Keep your stalks
long and gentle, allowing that warm
glow to build softly. This contrast of cool night and festive warm will soon
create pure magic. Now for the blending, the moment when the sky truly comes alive, mix a bit of black and red together to form a
rich brown tone, apply this right where
two colors meet. With light pressure
and patient strokes, softly blend all
the three shades. De black to warm brown, then to radiant red. Let the transition feel
seamless like night slowly melting into holiday
lights. Don't rust. This gradient is our foundation. Once it settles beautifully, everything you paint on top will glow with depth
and atmosphere. Continue blending the
colors softly and gently. Lift each color with a clean, slightly damp brush and
sweep it into the next area, so the transition melt together. If a section need more paint, load your brush
with a little more of the same color
and blend again. Small additions, soft motions. Make sure your paint has smooth consistency
before you blend. Very thick paint won't glide
and will leave rough edges. If the paint has started to dry, lightly touch the
tip of your brush into water and blend again
with that damp brush. Ghost reactivates easily, so you can always soften
area as you go. You know that uron
paste, take your time, breathe, and let
each gentle stop connect you to the process. This is where the
painting calms down and becomes little moment
of stillness. Enjoy it. And Once the background is fully dry, it's time to add the magic. Those dreamy bouquet lights that makes the whole
scene sparkle. We are not just painting dots, we are painting atmosphere, warm, and that cozy
Christmas slush. On your palette, mix
few soft pastel shades, light blue, light yellow, red, and glowing pastel orange. Keep them muted and
creamy rather than bold. That softness is what makes bouquet feel real
and enchanting. Using your round bridge begin placing circular
shapes across the sky. Let some be big and airy, others tiny and delicate, paint few brighter ones close up and keep others faint
and whisper soft, almost disappearing
into the darkness. Don't worry about
perfection here. Bokets are meant to
blur to overlap, to glow gently into each other. Let some circles touch, let others float on their own. This scattering is what gives your night sky its
dreamy festive jingle. Step back for a moment
and look at how the colors bloom softly
against the dark radiant. Paste bouquet sauce settle beautifully into the background. Let's add few more. Use the same pastel shades, but play with consistency, leave some creamy and
bold and thin others just slightly so they
sit softer and lighter. Keep your touch slow and gingle. Don't press the
brush down too much. Just a light tap
and smooth lift. This helps the paint
sit on the surface without disturbing
the layers beneath. If a circle overlaps, let it, that overlap is what
gives bouquet depth, some lights pushing forward,
others quietly receding. And remember, we are not chasing perfect rounds or
excite pacement. These lights are meant to flothe to glow to
feel like warm, festive whispers scattered
across the night. Notice how your
background shifts from flat colour to atmosphere, a world of tingling
lights, some close, some distance or softly
celebrating the moment. Now for final sprinkle
of magic, the stars. Take an old toothbrush and dip just the tip of the bristles
into your white paint. Before splattering,
make sure to dilute the paint slightly so
it flicks smoothly, but not so much that it runs. Hold the brush
facing your sky and using your thumb gently
pull the bristle forward. Tiny white specks will scatter
across the upper part of the background
like distant stars stingling through the
cold Christmas night. Keep your motion
light and control. We want delicate
snowfall not bizarre. Let more stars gather near
the top where the sky is darkest and fewer as they move down towards the
glowing red horizon. Now, let's shift our focus to the base of the painting
with a snowy ground. Mix a touch of light blue
into a white paint just enough to give it
a cold prosty tint rather than strong color. With calm horizontal stalks, begin painting from the
horizon line downwards. Let your brush glide gently. This is in harsh edge or
a bold block of color, but a soft layer of winter light spreading
across the snow. As you move lower lightly blend the blue white mix
to pure white, letting the tones
melt into each other. This subtle gradient creates
the illusion that ground is blowing softly under
the Christmas lights and steering sky above. Keep your pressure feather light almost as if you are
brushing over a real snow. You will see how the sky and
ground start feel connected, one glowing, the other
quietly reflecting. In just a few stops, the scene become calmer, colder and wonderfully wintry. A peaceful blanket
of snow waiting for all the festive
magic we will add mist. Now it's time to introduce the main focus of the painting
the Christmas tree so. Pick up your detail brush and
load it with black paint. Start by placing the main stem slightly to the right
side of the paper, a clean, confident vertical
line from top to bottom. Next, begin forming the
branches, use short, shaky, uneven strokes, almost like tiny
flick of the wrist. Let the branches stretch
out gently on both sides, narrow delicate near the top, then wider and fuller
as you move down. Don't worry about
perfect symmetry. The charm lies in the
little variations. Some branches can
be dipped slightly, others lift upward,
some shorter, some longer, just like a real pine tree standing
quietly under a winter sky. Keep the pressure light
and your stalks ok. Those imperfect broken lines are exactly what creates
the night lame, dark, crisp, and rich against
the glowing booki sky. With just the simple stalks, the tree begins to emerge, bold, dramatic, and beautifully framed by the tingling
lights behind it. As you continue building
those branches, try not to overthink each mark. Quick light stokes work best. Just touch, lift,
flick, and move on. The more you hesitate, the heavier the
lines become and s strive on looseness
and spontaneity. Think of it as sketching with paint rather than feeling
a perfect outline, let your hand move freely. If a stalk lands a bit longer, darker or sharper than
you intended, embrace it. Branches in nature
are never uniform, never identical, never planned. You can add tiny clusters
of lines in a few areas to make certain branches look fuller or keep others
fare and open. Let some Tims taper
off to nothing, a whisper of stroke, and let others trail
thicker and ducker. If you'd like, add few
little broken strokes near the edges as if thin needles are catching the last blow
of light behind them. These tiny needles turn a simple sell out into
something poetic and alive. And remember, your
tree doesn't need to look exactly like mine
or anyone else's. This is your forest. You
are quite winter night. You are a bit in pain. Trust your hand,
trust your stops. Now it's time to bring this loud to live with a hint
of Christmas magic. On your palette, mix green, yellow, and just
a tint of black. This will give you
that deep velvety sabreen perfect
for a night tree. Load your unbch lightly, and just as you did before, apply tiny slanted stroke
along each branch. We are not covering the black. We are layering color
on top of the shadow, letting both tons breathe. As the green settles
out the black, you will notice something
beautiful happening. The branches start to
look dimly light as if they are catching
just a touch of moonlight and Christmas glow. Let some areas stay darker, let some tips be brighter. This unevenss creates
the feeling of death, mystery, and quiet winter magic. We are no longer
painting just a tree. We are painting
that still dreamy pine standing under the
lesh of holiday night. With every little
flick of green, the tree feels more alive, shimmering subtly
against the deep sky holding a warmth of
Christmas lights behind it. While we continue adding those
little touches of green, just take a moment to
enjoy how the tree is slowly coming together.
There is no rush here. Enjoy each strops. You cup tiny flakes and remember your strokes don't
have to look the same. Some can be a bit longer, some berelat that variation
brings life into the silo. If at any point you feel
your hand getting stiff, just loosen your grip a bit and let your wrist grad
you instead fl up. Cube confident strokes always look more natural than
overthinking each line. As you keep building
these layers, look for small gaps
on the branches. Generally drop in
a few stalks there so that tree feels
full and organic. As you move towards the
bottom portion of the tree, let your stalks become a
little wider and thicker. This adds weight and
balance to the salud, giving the tree a
strong grounded look, just like a real pine spreading
out proudly at its base. The et's add a little
detail to the snowy ground, tiny plants and subtle shadows that bring the painting to life. Now with your detail brush, pick up a bit of the
same dark color and add a few tiny plants and
glasses at the very bottom. Use thin upward
strokes, some straight, some slightly curve
just cue delicate lines that look like frozen stem
standing cutely in the cold. Taller, some shorter,
some clustered together, and a few standing alone. These little stalks anchor
the tree beautifully, giving the snow sense
of life and softness. Et's load a dry brush with
just a touch of dark. Keep almost dry. We don't want full coverage, just
gentle impressions. Til the brush slightly and tap lightly at an angle along the
lower portions of the snow. This creates soft natural
textures hinting at tiny plants peaking through the snow and the gentle shadows they cast. Very your pressure and spacing, so the effect feel
organic and random. Natural never perfectly uniform, and neither should
your snow floor. These tiny touches instantly
add depth and realism, making the winter
scene feel cozy, quiet, and wonderfully alive. Now let's make
your tree sparkle. On your palette mix pastel
red and pastel yellow, soft glowing tones that feel
like warm holiday lights. Using the tip of
your detail bush, paint tiny circular ornaments tucked gently with
you in the branches. Scatter them in different spots. A few near the top, some
hidden deeper in the tree, and a couple resting
towards the bottom. Keep them small and subtle, just to hint tingling
Christmas magic. Well, once they are fully dry, mix a darker version of
the same shades, deep red, deep yellow, and place tiny
dots on each ornament. These little highlights
instantly make them look glossy, round and soft
glowing in the niche. Don't rush this step. Watch how those miniature lights we can tingle and warm
the whole painting, turning the koi tree into
a cozy Christmas moment. Now it's time to add
a little sparkle and dimension to our tree. Take the green we
mixed before and add a touch of white to create
a softer lightle green. This will be our
highlight color, perfect for catching the glow of ornaments and fairy lights. With your detail
brush, gently apply these lighter tone random areas on the branches and leaves. Think of where the light
would naturally kiss the tip, not everywhere,
just cut touches. A few flicks there
and soft up there. The effect is
subtle but magical. These highlights
will make the tree feel alive and luminous as if each branch is softly reflecting the warm glow
of Christmas lights. Hang on it. Just a few strokes, and suddenly your tree begin to shimmer
with festiive jar. If you'd like an extra
sprinkle of magic, dip your toothbrush
again in white paint and gently splatter a few more
stars across the sky. Keep it soft and delicate, just a little extra shimmer
to make the night feel alive. Finally, it's time for
that satisfying review. Carefully peel off
the masking tape to reveal the painting. Take a deep breath
and enjoy the moment. You are glowing Christmas tree, tingling ornaments and
sparkling night are complete, capturing all the cosy
festive charm of the season. I hope you felt the
calm and joy of painting this peaceful
Christmas night painting. See you in the next section. We have more holiday
magic waiting for you.
16. Santa's Shoes: Hello friends. Welcome back to another fun fill
Christmas illustration. I hope you have been enjoying all the cozy festive paintings
we have done so far. Today we are going to paint something super
classic and nostalgic. Santa's shows with cheerful
Christmas decorations. It's one of those little images that instantly brings the
Christmas mood alive. So let's get started. We will begin by building
the background around our main element that is Santa's festive show
on your palette, which black and red to create
a rich deep dark brown. This will be the
perfect on to define the wooden table where our little Christmas shoe will rest. Using a detail brush, start by sketching the
outline of the table. Then add few vertical lines or horizontal lines to
suggest wooden plagues, giving the table some
structure and character. Keep your stocks
light and confident. You don't need perfection here, just a solid foundation. This subtle framework
will help everything else in the painting feel
grounded and cozy. Now it's time to bring
some warm into our table. Start by taking the dark
brown we mixed earlier and soften it by adding a touch
of white and a little yellow. This will give you a
gentle light brown shade, perfect for that
cozy wooden look. Use this lighter colour to
fill the entire table area, keep the strokes smooth, but don't worry about
making it perfectly flat. A bit of texture actually makes it feel more
like real wood. Once the base layer is thin, go back to your darker
brown and lightly, blend it along the edges and
between the plank lines. This soft transition
adds depth and gives the table a nice
three dimensional feel. D. As you blend these
traits together, take your time and let the
brush do most of the work. You don't need
perfect lines here. Gentle uneven strokes actually help mimic the
natural variations. You would see in real wood. If you notice any harsh, just just soften them with a slightly damp brush or by lightly glazing over
with a lighter brown. Keep building those
subtle shifts in color until the
table feels warm, smooth, and grounded
in the scene. This step is all about patients
and small adjustments, so enjoy the process as the
texture slowly comes to life. Now, let's bring in
those finishing touches, load a fine brush with the original dark brown and add septal shadows
along the plank, edges and corners, emphasizing the natural dips and
grooves in the wood. Finally, take a
detailed brush with a light brown and draw a few delicate lines
across the planks. These tiny stalks mimic the
natural grain of the wood, giving our table a
rich realistic texture that's ready to halt
and as festive shows. And to finish off the table, let's add a few thin
highlight lines. Mix a tiny bit of white
into your brown to create a very light soft shade and gently drag it
across the plants. These little strokes act
as subtle highlights, giving the table a gentle shy. Almost like it's catching that festive glow from
the holiday lights. Keep the lines
thin and delicate, just enough to enhance the texture without
overpowering it. Now let's shift our attention to the background just
behind Sanda's shoe. This part sets a mood
for all the painting. So we want it feel
soft, warm, and gentle, something that supports
the main element without pulling the
eye away from it. Think of it as the
cod glow that makes Sanda's little details
stand out even more. Start by mixing
very light brown, your regular brown with
plenty of white added. Until you get a smooth, creamy warm tone,
using a flat brush, begin covering the
top portion of the painting with this shell. Let the stalk stay light and
even almost like you are brushing a warm mist across
the page. Down rush. This lion really helps create that cozy atmosphere
around the show. Once the lighter
shade is in place, take a small amount
of dark brown and gently brush it along the
top edge of the background. Then slowly blend it downwards
into the lighter toe. You are aiming for a
very soft gradient, slightly deeper at the top, fading gracefully
as it comes down. This tactile shift
creates depth, makes the space feel
more three dimensional and helps Santas hop
beautifully in the foreground. Using a flat brush here really makes a difference because it naturally keeps your
stock smooth and helps the gradient look
clean and diffused. By the end of this tape,
you will have a warm, softy glowing background that frames our festive
centerpiece perfectly. And don't stress too much about getting that background
perfectly smooth. A lot of people
think the gradient has to be flawless,
but honestly, I think those tiny streaks, soft lines and natural
brush structures actually add so much charm
to a gouache painting. They give the background
handmaid cozy feel almost like the gentle grain of old paper or the warmth
of vintage illustrations. So if you see a few uneven
patches or visible strokes, that's totally okay.
Let them link there. As long as your colors
blend softly and the tones blow from warm to slightly deeper, you
are doing it right. The little texture will help the whole painting
feel more alive, more inviting, and
even more festive. So just enjoy the process, keep your strokes relaxed
and let the background build its own coit character
behind Santa's shoe. Now it's time to bring
the background alive with the tinkling lights
and starts, grab red, yellow paint, and using
your detail brush, scatter tiny star shapes across the upper portion
of the background. They don't need to be perfect, little burst of color that
feels natural and festive. D. Once the stars are in place, take pastel yellow
and pastel red to add soft flowing
highlights around each one. Focus especially near
the center of each star, letting the pastel tones
gently radiate outward. These subtle touches
give the star a warm luminous quality as if the soft clove Christmas light is hanging on the background. D. As we add these
pastel highlights, take your time and let the color softly melt
into the background. You don't have to worry about
making each glow identical. A little variations actually
makes the light feel more natural like they are gently
flickering in the distance. Keep your brush light and sien almost like you are tapping
into little pockets of warm. You'll notice how pistil shades instantly
soften the stars, giving them that
creamy glowing effect that ties the whole
painting together. This step may seem small, but it adds so much
arm and atmosphere. Just keep building
those gentle hallows and in the background
feels cozy and alive, like a warm holiday night filled with tiny
sparkling lights. Let's take the background a step further and make
it extradremy with soft Bcalts using the same
pastel red and paste a Let's start painting small
circular shapes of different sizes across
the background. Focus mostly on the left side to create gentle
glowing focal area. Don't be afraid to let some
circles overlap each other. This overlapping is exactly what makes bouquet look realistic. It creates depth and sense of magical light
floating in the air. Vary the opacity and
size of your circles, a few bright ones in the frame, and some faint barely
there ones in the back. This layering instantly
transforms the background, making it feel warm, festive, and enchanting, as if the air itself sparkling
with holiday cheer. Now it's time for the star of today's painting
Santa's festive show. Take a bright, cheerful
red and filling the entire shape of the show
with smooth event strops. This bold base coat
will make the shoe pop beautifully against our
soft flowing background. Once the red is down, it's time to add
shadows and dimensions. Mix a bit of dark brown and carefully paint shadow
lines along the edges under the fords and where
our natural shadows would naturally
fall on the shoes. While the paint is
still slightly damp, grab it clean,
slightly damp brush, and gently blend the
brown into the red, softening the transition so
the shadows look natural. Remember, if you're
blending is too strong or one color fades
too much, don't worry. Gouache is very forgiving. Simply reapply a little
colour and blend again. With each careful stop, your Sanda shoe will begin
look three dimensional, cozy, and perfectly festive. As you continue beating
these brows into the red, don't brush this tip. This is where the shoe starts to gain
personality and depth. Take your time moving your
brush in small chile stops, letting the colors wet
softly without harsh lights. If you notice the red lifting
or feeling too strong, just pause and wash
gives you time. It dries slow enough for
you to adjust soften, nudge the colors exactly
where you want them. You can always tap a little
more red to brighten an area or deepen the brown in places
where you at a richer shot. As the shades slowly blend, you will start to see how the shoe feels
rounder and warper. Keep observing how the
curves catch the light and imagine how the fabric would
behave in a real life. Let your brush follow that idea, darkening the tips, and
softening the s eiuss. This stage is all about
patients at etts. Let your strokes stay light and portlet allowing the colours
to settle into each other. With every blend and
every shadow you place, the show transforms from
that flat shape into a cozy dimensional
festive element that truly arcades the painting. Next, let's add
those darker details that really make Santa's
shoe come alive. Pick up a bit of black
paint and gently fill it the hey area and the decorative
beds around the shoe. These darker scents instantly give the shoe more structure, helping it stand out beautifully against that bright red wasece. Take your time here. The shapes don't have
to be perfectly sharp, but keeping your
edges clean will make the shoe look
polished and beltified. As you paint, notice
how the black naturally balance the rest of
the colors in our painting. It anchors the shoe, gives it a sense of
weight and hints at the sturdy festive design Sata would wear a cozy with the tat. If you feel any area
needs soft drink, just pick up Eta, push
gently smooth the edge. And if the black looks a
little too strong in one spot, you can always tap
a bit of red or brown nearby to help the
thrash feel more natural. This step may look small, but it adds so much
personality to the shoe. With every stop, you are
not just airing color. You are giving the shoe, shade, deep, and that charmi. Now it's time to give Sanda's shoe that soft
fluffy trim on the top, the part that instantly brings in all the
posy winter charm. Switch to your white paint
and use the lightest, gentlest stroke you can, as we painting soft winter fur, airy, delicate, a full
of little ripples. You don't need to make the
edges perfectly smooth, fat, a slightly uneven
outlined makes it look even more
natural and fluffy. Just keep your hand relaxed as you build up that white layer. Once you have filled the
entire fluffy section, take a moment to
let the pat settle, then makes a tiny touch of gray, very light and start adding subtin shading of
the folds and edges. Apply this softly, almost like you are whispering
the colors on the surface. This tiny bit of gray gives the fur depth and makes it look like it has gentle shadows
tu between the strip. As you blend the
gray into white, you will notice how the
fluffy trims start to feel warm and realistic,
almost touchable. This shoe suddenly has its festive coarseness like something straight out
of Christmas story. With this step, the top of the show really stand
out in the painting, glowing gently against
a warm background, and tying the whole
look together. Now let's bring in some of that festive greenery
spilling out of Santa's shoe. Pick it by using plaque pay to sketch out the
basic leaf profile, keep your stalks
loose and natural. Just simple elegant lines rising from inside the shoe and
gently planging outward. These dark lines help anchor the greenery and give you a strong structure
to build down. If you add smaller stalks
allow each branch, think of them as little leaflets for being the shape
of the foliage. They don't have to be
perfect or identical. A bit of variation actually make the greenery feel more
lightly and char. This step is just
the foundation like laying down the shadows
before the light comes in. Take your down here
and enjoy the flow of the brush as these
shapes start to fd. With every small
flakes of black, you are giving the
painting more movement, more festive energy, and
a sense that something fresh and evergreen is
right inside the shoe. This base layer will make all the upcoming greens sit
beautifully and look rich, balanced and full
of holiday charm. To do Now let's start bringing these leaves to
life with colour. Prepare two simple
shades of what, eddy dark green straight from
your part, and a softer, lighter green bide by mixing a little yellow into
the green base. These two tons
will help us build the depth and natural variations that greenery always has. Using your detail brush, begin layering the greens right over those
black leaf lines, work slowly and alternate between the dark
and light greens. Letting the darker greens
sit closer to the base of each branch while
the lighter greens bright in the tips
and outer edges. This subtle shift
in values makes the aves feel dimensional
and full of wit. Keep your stalks short and delicate following the gentle curves you
sketched earlier. You are not trying to fill
the black completely, just letting small touches of green grow along the lights. Almost like the leaves
are appearing one by one. As the colors start
to overlap and blend, you will notice the greenery gaining texture at first slug. With every tiny stop, the leaves begin to
feel more alive, rich, fresh, and full of
that festive speckle. You find it holiday practices. This tape adds so much
energy to the painting, making it feel lush and vibrant, like the greenery is happily spilling out of Santa's
shoe and bringing the whole painting closer to that warm cozy
Christmas marching. D to Now let's return to
Santa's shows for those final little touches
that truly make it shy. Start by painting the buckle with a bright, cheerful yellow. Place it gently on
the front strap, keeping your edges
clean and steady. Even though it's a small detail, the buckle instantly
drops high and adds that perfect festive
speckle to the shoe. Like a little golden charm that completes Santa's cozy holiday. Once the buckle is done, switch to white paint and
begin adding thin dash lines. You see fine brise to gently
rise along the bottom, edges of shoe on the canvas, like a small stitching detail. Also, I'm adding small
white highlights to the buckle as it
shines against the light. As you at them, you will see the shoe come to life
with a subtle glow, almost like it's catching the gentle shiver of
Christmas lights nearby. These highlights give
the show dimension and shide making it feel
polished, warm, and full of character with just a few well priced stops
Santa's shoe looked vibrant, charming, and absolutely ready for his magical journey
across the winter night. Now it's time to bring the
little decorations to life. These tiny elements add so much character
to our painting. Let's start with the candy cake. Begin by painting the
entire stick in pure white. Your slow, steady stops. So the surface looks
queen and smooth, almost like polished sugar. Don't worry if it
looks simple at first. This white base is what will make the red
details really shy. Once the white layer dries epi, switch to your detail brush and begin adding the red stripes. You can go with classic
diagonal stripes or cute little red spot. Anything playful
that adds charm. As soon as those
red marks go in, you will notice the
candy cane instantly picking up that familiar,
joyful quality look. Now let's bring in the cherries for an extra pestive touch. Paint small bright red circles wherever you want
the cherries to sit. Then mix a little brown
into the red and gently add shady allow one
edge of each cherry. Keep it soft just enough
to make them look round, glossy and full like tiny
ornats made of kdge. Each pi. You can even add a few cherries dangling down from the top of the shoe as if they are chy peeking out
from the cleanery. These small touches bring moment and personality
to your painting. With each detail you add, the show start to feel
more magican at LA, like a miniature Christmas
tress sure that it a warm glowing winter moment. As you blending that
so own shading, take your time and let each
cherry slowly cap to live. Notice how just a touch of darker color
instantly gives them depth almost like they are
starting to glow from inside. Keep your breast strops
gentle and curve, following the round
shape of each cherry, so the shading grabs
naturally around them. Now using my black pile, I'm adding a little
shadow with the greenery, especially right
behind cherries. This tiny touch of contrast
makes such a big difference. See how the cherries
suddenly pop forward. That darker base
pulls the background back and lets red look brighter, juicier and more
three dimensional. Keep your brush light here. We want soap shadows,
no harsh lines, just a gentile
sweep of plaque in the deeper areas and everything starts to
feel layered at alive. And that's it. Our adorable little Santa shoe decorations is all complete. I hope you enjoyed painting. This festive painting with me. Let's meet again in the next session for
more Christmas magic.
17. Crib: Hello, friends. Welcome back. I hope you are enjoying this Christmas illo stration series just as much as I am enjoying
creating it for you. Today, we are painting something
very close to my hurt, a small Christmas strip. When we hear crib, we often imagine the scene of baby Jesus. But today, we are
painting posit. The tiny handmade rep we plan. Many of us grew up
creating with checks, dried gas, and kittle
paper figures. For me, this brings a wave of beautiful
childhood nostalgia. Afternoon spent,
collecting blanches, arranging straw, and
decorating it with love. So let's recreate
that memory or paper. Let's begin with the
star at the top. Instead of using plain yellow, I'm mixing my own
yellow ocher shade by planting yellow with just
a tiny touch of black. Create two versions of this
colour before you start a slightly darker okay for
the outline and shadows, and a lighter version for
pinch and highlights. The Now start painting the star. Use the darker shade to gently
outline the entire shape. This help to define the points and gives the star
a lovely war base. Then switch to a
lighter shade and begin filling the inner
areas of each point. Blend the two tons
softly where they meet so the transition
feels smooth and. If you feel the center
looks a bit dull, just add another layer of the litic ochre to
a brighter tub. To finish, tap a little of the dark sheet into a
few corners or edges. You had a hand deep at start a beautifully
dimensional clothed look. Now that your base
star is steady, let's make it shine
even brighter. Take a moment to
observe the shape. Each point of the star ally curves inward where
the sides weak. These little inward curves are ideal place to a
touch of more shadow, helping the star feel
fuller and more dimsional. So I'm picking a bit more of the dagger oke and softly shading into
those subtle bends. Keep your strokes
light and tenicre. We are not aiming for
strong outline skin here, just a gentle hint of depth that makes the whole star
low more naturally. Once you do this, the
star instantly look fuller warmer and more sculpted, almost like it's
glowing from inside. And if anything
feels too strong, you can always blend it
back with a lighter shape. It's all about building
up depth slowly at keeping the star
feeling soft at tops. D Let's get down darker
background ready. Instead of reaching
for pure black, I'm mixing black with whatever left on my page in my aca shape. This gives a deeper tone that
still carries a bit of wap. Perfect for creating that cozy evening glow
around the star. Once your color is ready, load up your brush and begin
filling in the background. I'm first painting around the
star with a smaller brush, then I will shift
to my flag brush for covering the
larger areas at. Work in long even strop strokes, moving around the star and carefully leaving the
crip area untouched. Don't rush this part, enjoy the smoothness of the brush as it glides across the paper. This gentle warm
darkness sets the mood for the whole sat and makes
the star shine even brighter. As I'm laying down
this background, notice how that warm
dark cloud instantly gives a soft, peaceful
evening feel. It's not too harsh,
not too flat, just a beautiful cozy backdrop that makes everything else pop. To get more texture at depth, let's add a bit of
yellow at some places and make it lighter
sounds at some apex. And remember, keep
the stocks relaxed. The more comfortable
your hat is, the smoother the
background will look. Look how nicely the
star starts out now, like it's glowing
in the night sky. This simple wash really brings the whole
patting together. Alright. Let's mix
the perfect browns for our grips and grow. Start by creating a rich
brown using a black and red. This gives you warm earthy tone that feels perfect for
a rustic wooden crib. Next, take half of that brown
and add a little on to it. You will notice it instantly shifted to a beautiful
light sia tach. Soft warm and perfect for highlights and
lighter wooden gas. So now we have got two
essential colors ready, dark brown for structure, shadows at the and
light sienna brown, for highlights, glow and
natural wooded warp. With these two shades
on your palette, we are all set to start
painting the grip at the graph with a
lovely wooded texture and gentle contrast. But light sienna shade. Begin by filling in the entire grip structure
and the ground. Keep your stocks
even and relaxed. This soft warm color creates a beautiful base
that instantly gives the painting a gentle
inviting feel. Once that base ares down, it's time to build depth, switch to your dark brown
and start deepening the shadows wherever the
grip needs more definition. Along the inner edges,
under the beams, and in any areas where the
light would naturally reach. These touches of dark
brown help carve out the structure and make the
grip look study at real. Now, let's add the
wooden plank lines using the same dark brown, follow Allow me as we paint each line exactly as
shown in the video. Keep your strokes confident, but light these lines are what gives the wood its
texture and character. Next, move on to the ground, add a soft shadow on the
left side using dark brown. Then take a clean, slightly
damp brush a chimney, let the shadow outward. Let it melt into the sienna
beneath it for a smooth, natural fade that gives the ground a sense of
depth and softness. Now let's add a
bit more character to the ground using
the same dark brown, like you say a few gentle
horizontal strokes across the lower area. These lines don't
have to be perfect. They are just subtle bars that suggest uneven earth
and natural textures. Once those strokes are in place, trade your brush and pick
up a tiny touch of white. Lightly blend the white
into the brown lines, softening them just enough to
create a gentle highlight. This mix of light shadow gives the ground more
realistic texture feel. Next, I'm switching
to a tinted brown to outline the tiny human
figures inside the crypt. At this stage, think of them as gender so rather than
detailed characters. Just let your brush create
simple expressive shapes, a hint of a head, a slide curve for the shoulders, and soft lines for
their postures. We are not aiming for perfection or intricate
features here. These figures are meant to
feel humble and peaceful, blending beautifully with
the warp glow of the creek. Once the outlines are done, go ahead and fill the
remaining area in sent the grip with
a rich dark brow. This darkened tone
instantly adds depth making the tiny figures stand out softly against the backdrop. Don't worry about making
it perfectly flat. A little variations in your pressure will
naturally create those gentle shadows that gives the inside of the crip
a sheltered feel. Now it's time to bring these little furs to life
with bright, festive colors, pick up tiny touches
of red, blue, and green and gently drop
those shades into the figures. You don't need to add lolow
just enough to colour to make each ward stand out softly against the dark crib interior. Think of these strokes a tiny hints of clothing
and personality, almost like gentle glimmers of celebration with the
warm glow of painting. Keep your brush movements
light and delicate, letting each color settle naturally without
overpowering the shapes. With just these small touches, the figures begin
to feel lively, warm, and beautifully present. Now, let's deepen the
atmosphere inside the crip using dark brown paint, add a darker section
on the left interior. Keep your stock soft
and controlled, so the shadow blends naturally into the proud we already have. This contrast instantly adds a sense of deep
making the crip feel more tucked into the
shadows and giving the whole painting a
quasi intimate glow. Let's carry that same
idea down to the grown. With the darker shade
still on your breast, gently paint a shadow
on the depth side of the crown right near
the base of the curb. This grounds, the structure, makes it look firmly
placed and adds a beautiful gradation that enhances the web light
coming from the center. Blend the edges
softly with a clean, slightly tough brush, so the
shadow fades out smoothly. Like the soft evening light
settling into the painting. Let's move on to
the branches that hang gently over the cream. Start by taking black
paint and drawing the main branch from the
right side of the painting, letting it slant softly
towards the left. Keep the line loose and organic. Branches never grow in
a stray, perfect light. So a little wiggle or pen
makes it feel more natural. Now, begin adding the paint les using your roundish paint, sharp, cube strokes
all around the branch. Fanning them out in
different directions. These stats don't
need to be uniform. Variety actually
makes the greenery look more realistic and lively. D Before we layer the means, let's mix two shades,
light green, green, mixed with a more eowtart, deep and mix by adding
extra get back in. Now add your second layer
of wears using light weed, letting bits of black
underneath pe through. That little cordax help the layers feel fresh
and full of live. As you add this second
layer of needles, keep your strokes, can live
almost like flick of fresh. There is no need to press down. Just let the tip glide
and lift naturally. Allowing bits of the black underneath to show
through creates that beautiful contrast that makes the leaves
feel fresh and air. Try not to cover
everything completely. Those tiny gaps
between the strokes help inary breathe
and catch light. Move your hand freely, follow the natural
direction of the branch, and enjoy the rhythm
of the small bombing. With each light touch, the pine needles start feel lively and full
of that festive glow. Finally, go in with your darker heat to deepen the greenery
and add richness. Using the same short,
delicate strokes, begin placing this color
closer to the inner part of the branches and in the areas that naturally
fall into shadow. Keep your pressure light. We are pitting deep, not
covering what solidary there. Let the darker green sit gently
on top of the ner layers, allowing the black vase and a lighter green to remain
partially visible. This layering is what
gives the needles their realistic texture
and sense of polio. Each rocks aquight
and dimension, making the greenery feel
fuller and more natural. Work slowly and observe how the branches start
to gain structure. Then either greens catch the ni while the darker tones
pull the leaves inward, creating a beautiful balance. With this vine on, the greenery takes on
that she pesterichness, textured, vibrant, and perfectly grounded
in the painting. Now, let's return to the star and make it shine even brighter. First, take a thin detail brush, black paint and add
a simple string connecting the star
to the tree branch. Keep the line
delicate and steady, just enough to suggest that
this star is gently hanging, swing softly in the nightmare. Next, pick up your
fine detail brush again this time with white page. Slowly outline the star
with a soft blowing edge. You don't have to outline
every corner perfectly. Even a slightly uneven blow
feels natural and magical. This gentle white
highlights makes the star stand out beautifully
against the dark background, almost as if it's
radiating warm, peaceful light
over the painting. Take your time, enjoy the
calm details and watch how this tiny touchtonsfok the whole mode of your painting. In the same way, let's add a soft flow to the
roof of the crip. Take your fine retained sh and not it with
little white paint, not too thick, not watery. Now gently trace
a thin line along the top edge of the crip roof. Also let's add dilute
it white and yellow on the ground as the light
falls on the ground. That to bring that
magical Christmas move, let's add some soft bouquet
lights to the background. For this, dilute a bit of yellow and white to create
like glowing colour, almost like tiny halos
of cresty light. Load a generous amount of this diluted paint or dir brush, and then choose the spot where you want your
bouquet to appear. Now, place the brush
down gently and rotate it softly
in a single tax. Let the brush slide in a
small circular motion. Without pressing too hard, we are aiming for a soft globe, not a harsher circle. Remember, if you apply
too much pressure, the base layer can
reactivate since it's gauge. So think of this
dead light placing a little spars of light
onto the painting. As these glowing gobs appear, you will instantly feel
how they bring warm depth and that unmistakable Christmas sparkle to the entire painting. A gentle touch that ties everything together
with festive job. As you keep adding those
soft coke circles, don't worry about making them all the same size or intensity. A little variations actually makes the background feel
more natural and lec, just like real Christmas lights softly glowing in the distance. If some circles appear brighter and some
lighter, that's perfect. Those tiny differences
creative and gives the painting a
dreamy magical atmosphere. You can even overlap a few
of them slightly or let the fade more into
the background to enhance that warm
glowing effect. Take your time and
enjoy this step. It's one of those moments where the painting starts to
feel truly festive. Each soft circles, add a
little speckle of joy, little warm and
snow wreath ransom the hon painting into a course Christmas night filled
with changing lives. Let the brush dance lightly and watch the magic belt
with every touch. Finally, a gentle
touch of snow to bring the whole breathing
into a peaceful winter night. Using slightly dry wipe, we will begin with
the tree branches. Lightly tap the paint along the upper edges of the
needles and branches, letting the snow rest naturally where it would settle first. Keep your pressure minimum, soft air it touches as if the stove was
totely at it there. Next, go down to the ground, scattered the snow in
small uneven patches, allowing some area
to stay darker. This irregular placement keeps it looking fresh and natural, like a cam snow hole that hasn't fully
covered the earth yet. Using dry paint
here helps to mint that crisp powdery texture without disturbing
the nays underneath. Finally, let's finish by
adding snow to the crepe pump. Gently place a few delicate
strokes along the top edges, imagining snow softly
collecting on the surface. Don't overdo it just enough to suggest at winter pump
and crossing tie. With these final snowy details, the entire painting
settle into a calm, magic at Christmas
night, serene, posy, and filled with warm even
under a blanket of peters. And with that, our nostalgic
crib illustration is come. Now gently peel off the masking tape to
reveal the painting. Thank you so much
for joining me in this nostalgic Christmas
painting session. I can wait to see
you in the next. There are so many more adorable Christmas illustrations
waiting for me. Okay.
18. Christmas Candle: Hello, my dear friends. Welcome back to another cozy Christmas illustration section. Today we are painting a
beautiful Christmas candle glowing warmly among festive
greens and pine cones. I already have this
gauge ready for you. It will be available in the resource section if
you would like to trace or refer to it. So let's begin. We will start with
the background. First, create a brown shade
by mixing red and black. Then add a little yellow to transform it into a
light sienna shape. I'm adding yellow to the mix, and you will see it immediately shift into a lighter,
softer brown. Using this sienna,
begin painting the top left side of the paper just as you
see in the video. Let your brush move gently enjoying the warmth
of the color. This doesn't need to be
perfect smooth wash at all, just like you see me doing here, se small gentle brush
strokes to cover the area. Next, let's take the darker
brown shade and place it right along the edges of
the sienna. We just add it. Gently blend the two colours
together where they meet. Nothing too smooth,
nothing too fuzzy, we are keeping this
loose natural. This creates that lovely warm glow as if
the candlelight is slowly spreading outwards
into the darker background. Now let's move on
to the right side of the background using greens. Make two shades of green, a dark green and a light green. For the dark green, I'm using
the green I have as it is. And for light green, I'm mixing green with yellow. Now that we have two
beautiful shades of green on our palette. Let's start building
the background on the right side of our canvas. Using your round brush, apply these greens
alternatively, like some place darker
and some place lighter. This creates a lousy sense
of movement and soft depth. As you paint, don't worry about making the strokes
perfect or uniform. Let them be loose, natural, and little
unpredictable. That's exactly what bring life
to these background trees. Now, to make the foliage
feel rich and dimension, take a touch of black and dab it in between the green areas. These darker spots act like little shadows hiding
between leaves and branches, adding mystery and depth. Continue filling the
rest of the background with the mix of greens
and touch of black, letting the colors blend
loosely with each other. Make sure to leave the
candle area unpainted. We want that space
fresh and clean so the candle can glow with
its full brightness. Take your time,
enjoy the layering, and let the brush build the
atmosphere stroke by stroke. Let's keep some areas
intentionally light by adding more yellow to
create a pale soft green. Continue the same process on the bottom part of the candle as well because we'll be adding
leafy decorations there too. Use a mix of greens and touch of yellow to bring
in some lightness. Apply the colours
in small strokes alternating between them. There is absolutely no need
for a smooth blend here. Let each color keeps its own
individuality and space. When they sit next to each other with those brush strokes, the whole section become
more vibrant and realistic. So just keep adding those small strokes in
different directions, letting the colors
naturally blend in some areas and stand
apart in others. Now let's work on pine
cones in the foreground. Using black paint, start adding small oval shapes wherever
we sketch pine cones. At this stage, the canvas
may look a little messy, but thrust a process. Layer by layer, every element
will begin to come alive. Now, just play with it. These shapes might look like little black eggs at this stage, and that's completely okay. No need to worry
about the details. Simply add few owl
shapes in black. While the pine cones dry, let's move on to the cantle. Fill the entire candle shape with a bright red base layer. Let the color be bold and even. Here again, for the first
layer of the candle, we are simply filling the
sketched areas with red. Don't overthink it, just paint. The easiest way is
to first trace along the outline of the sketch
and then fill the inside. This helps to keep those
edges neat and safe. This stage is just
playtime, so enjoy it. We will add all the shading and depth once this
layer is done. Now let's add dimensions. Using brown shade, add shadows on the right
side of the candle, blend it gently with
a damp brush to create beautiful soft
gradient from bread to bro. This will make your candle
look rounded and glowy. Tying typing better,
tying better, typing better, typing better, typing better, typing better. D. Don't forget the top area where the candle wick begins. Add a touch of brown here as well to show the melted valves. Now onto the magical
part, the fire. Take your detail brush and start by painting
the flame shape in white just to give it
a bright glowing base. Next, add pastel yellow onto the lower
portion of the flame. Then slowly introduce a soft pastel orange
in the center portion. Keep your strokes very
light and gentle, almost like you are barely
touching the paper. Let the colors blend softly into each other
without forcing it. This will make the
flame look warm, delicate, and truly magical. They retouch the
edges of the flame. Use your detail brush
and softly go around the outline to make the
shape clearer and brighter. Now paint a candle thread using black with
your detail brush, just a thin line
rising into the flame. Finish the flame by adding
few deeper orange detail at the lower center to make it look bright, warm, and glowing. So now I'm taking my green
on my detail brush and just gently retouching around the flying to fill in
small left outt areas. Take a moment and check around all main
elements in your painting. If you see any tiny
gaps or uneven edges, go ahead and softly
retouch them. These little final touches make the whole illustration
look clean and complete. Next, at the decorative leaves
behind the pine gos using black paint thin lines spreading outward in
different directions. Then add the leaf strokes on both side of each central stem, the dark leaf shaves will act as a base layer for our
vibrant greens later. So let's do it together. First, I'm painting slightly
curved lines emerging from the bottom part of
the candle and also from the spaces between
the pine cones. So these lines are
the main stems. Once the stems are in place, I'm adding those delicate needle like leaves on both
sides of each stem. Keep your strokes
quick and light like tiny flicks going outwards. This entire layer is done using black because it works
as the base layer. Later, when we add the greens, this dark underpainting
will help create depth and make the final leaves look
fuller and more realistic. So let the leaves spread out in all directions so
the arrangements feel natural and festive. Now that the base
outlines are dry, let's paint the pine cones. Use two shades of brown, a dark brown and
a lighter brown. First, paint the
pine seed shapes within the pine
cone using black, following the curved patty. To bring the pine cones to life, start by defining the
individual pine seeds. Using black, carefully
outline each seed as a small, curved half moon shape. Arrange them row by row, letting the outer one
slightly project outwards. This irregularity adds
charm and realism. Once the outlines are complete, go over the same shapes
with a darker brown. Follow the same curved part, so the brown sits neatly
on top of the black base. This layering creates
depth and dimension, making the pine cone look
fuller and more natural. Finally, with the
light brown shade, paint delicate highlights along the edges of each seed shape. Add more of lighter shades wherever the light
would naturally hit. This three layer built create a realistic textured pinecone. Now that our first
pine cone is done, let's move on to the remaining
three layer by layer. For each pine cone, we will be following the EAT sin three step process to keep everything
consistent and realistic. Step one, the seed
shapes. In black layer. Begin by sketching the
curved seed shapes in black, just like tiny half mon forms, arrange them in rows
one under other, and let the outer one
slightly project outwards. This gives the pine cones its
natural rounded structure. Now, step two, deepening
with dark brown. Once the black layering is
in place for all three, go over the same shape
with dark brown. Follow the exact curves
you created earlier. This dark brown adds
depth and begins to give each one its
rich woody tone. Step three, highlighting
with light browns. Finally, add the light brown
layer to old pine cones. Applied gently on the upper
curves of each seed shape. This highlights brings
out dimension and gives that beautiful
realistic pine cone colos. By repeating these three layers, black, dark brown,
and light brown, each pinece will come to life with depth, texture, and warmth. Alright. Now let's add the third layer
or the highlight layer. It's all about showing
where the light hits. So I add the light brown in a slightly thicker stroke on the side where the
light is coming from, which in our painting
is towards the top of the pineces closest
to the candle flame. This gives the illusion that the pine clones are blowing
softly in the warm light. Then as I move away
from the light source, I switch to thinner
delicate stalks for the rest of the cone. This contrast, thick where
the light hits and thin on the shadowside adds depth
dimension and sense of ism. Take your time here and
feel free to play a little. Notice how the pine cones
start to pop off the page, looking three
dimensional and alive. The thick and thin strokes following the
direction of light, guide the eye naturally and make the endare arrangement
feel dynamic and vibrant. Remember, the key
here is to follow the direction of candle light and let the paint to the work. Don't worry if it
is not perfect. The roughness adds charm and
keep it feeling natural. Keep observing the
light and enjoy how your pine cones now have
as a soft luminous glow. As the pine cones are completed, let's bring our leaves to life. I'm using a slightly
lighter green made by mixing green to a
light green colour already there on my palette. And we are going to paint over the black leaf shapes
we created earlier. Start gently applying the
green over each leaf shape, following the curves and
directions we painted before. Don't worry about being perfect. A little variation in
strokes and thickness actually makes the leaves
look more natural and lively. Let's use a detailed
brush for this. As you work across the foliage, let the green flow
in all directions. This single shade is enough to add depth and sense of life, giving the leaves a
soft vibrant look. Each brush strokes add
texture and character, making the area around our
candle feel rich and full. Take a moment to step back, look at how greenery frames the candle and enjoy watching
your painting come alive. Now it's time to add the
bright red cherries, paint small circles between
leaves and pine cones. Once the red layer is done, add tiny shadows
with dark brown to give the cherries
shape and wearisom. The the play small circles wherever you feel they are
needed around the foliage. These little red berries
instantly break up the cool greens
at the bottom and add a cheerful eye
catching contrast. Once the red spots are in place, we will add bits of shading
to give them dimension. Mix a tiny bit of
brown for shading. Since the area is small, be careful not to let the
color spread too far. Controlling water
is the key here. Dab off extra moisture from your brush before adding
the brown to the red spots. Gently add shades on one side of each berry to make them
look round and natural. See how just a few small touches can make your leaves and
cherries feel alive and festive. Take your time and enjoy this
little decorating moment. We are almost done. Let's add some beautiful glowing
boktes to the background. Using diluted pastel
yellow and pastel red, pains circles on the
left and portions. Allow some circles to overlap. This gives a dreamy,
realistic Christmas glow. Just like we practiced earlier, use a light circular
rotation motion on the canvas to create those
soft glowing circles. Be gentle with your pressure. We don't want to reactivate the gouache underneath
and muddy the colors. Place these bulky circles
around the candle near the leaves and wherever you feed the light would
naturally glow. Don't worry about
making them perfect. Their regularity is what gives the effect a magical
natural feel. And that's it. Our glowing festive Christmas candle illustration is complete. Now gently peel off the masking tape and
reveal the painting. Thank you so much for
painting with me today. I hope this candle brings
warmth and joy to you and home. See you in the next
session. Happy painting.
19. Red Bell: Hello, friends, and
welcome back to another magical Christmas
painting session. Today, we are diving into one of my absolute favorites
from this entire class, a beautiful Christmas bell ornament hanging
delicately on a tree. This little red bell captures everything we love about
the seasit charms, sparkle, nostalgia, and warmth. So let's begin this festive
painting journey together. We will begin by creating a soft soothing background
for our painting. Start by mixing white with just a tiny touch of black
to get a very light gray. Now, introduce a bit
of blow to this gray, and you will see it transform into a beautiful warm blue tone. It's calm, wintry and sets
the perfect Christmas mood. Using this shade, fill the entire background
of your canvas. Dot AM for perfection here. Gentle brush robes,
subtle textures, and uneven patches all
add charm and character. Let your brush move freely
and enjoy the process. Once the background
is fully covered, it's time to add some depth
mix a little more black into the same blue to create a slightly darker
version of the colour. Now, apply this deeper shade mainly on the right
side of the canvas, softly blending it
into the lighter area. This gentle contracts
instantly add dimension, giving the background that quiet winter evening feel calm, light, and ready to holds
of the Christmas painting. I Let's create a darker version of the same color by
adding more black and blue and mixing them variable. Now, as I deepen the
color on the right side, I'm not trying to paint
anything sharp or peta. Think of this as
a soft suggestion rather than clear shape. Using the darker
version of the blue, I lift the brush
move loosely forming uneven branch like strokes that gently fade
into the background. These imperfect broken
shapes create the feeling of distant trees or
vegetation softly blurred, almost hidden in the mist. Nothing needs to
be defined here. The magic comes from keeping
it subtle and atmospheric. As I blend this darker shade
into the lighter background, the contrast adds depth
without overpowering the s. It starts to feel
like it inter Ivy, where trees disappear into the fog and the air
feels calm and still. Now let's add a
green to the lou mix and begin sketching the first
layer of tree branches. Take a deep breath, and let your brush move freely. There is no brush here. Start from the left side, adding loose branch profiles. Remember, these don't
need to be perfect. A little messiness
actually gives your pine tree a
natural lively texture. I have added two
groups of branches for afinsO just above the
center of the paper, and another group is just Bilid. Keep it struck wall and short
with your round Bridge. Think of this as layering
down for the foundation. These are just the base shape. Don't worry about details yet. We are just letting the tree
persti begin to emerge. If a branch goes little
off where you plan, that's completely fine,
natural isn't symmetrical, and neither should
your branches be. Feel the moment and
enjoy the process of building up your
tree layer by layer. So it will start to feel
alive right on your canvas. Now it's time to bring some
structure to our tree. Mix a little red with black
to create a deep brown. This will be the
backbone of your pie. Using a round brush, start painting the
proper branches, begin with main stem, and then let smaller branches
grow out naturally from it. Don't worry about
being too precise. Let your branches be
expressive, loose, and organic. Think of how a real
pine tree grows. So branches twist, some lean straightly,
and some overlap. That little bit of
unpredictability is what gives you tree
character and lights. As you paint, keep your hand relaxed and
your stalks gentle. This is your tree
story unfolding and every line you add is
part of its personality. If a branch curves or tapes differently than you
expected, embrace it. It's all part of making
your tree alive at here. D Perhaps, I have done with
my big and fast branch. Now let's mix a rich
dark green by blending green with touch of yellow
and just heat of black. This will be perfect shape
for our pine needles. Using this color,
start painting leaves. Remember, pine leaves
are long and needle. Let them pop out from
both side of each branch. Following the natural
direction of the branch. Don't worry about being exact. If you are lapping needles,
some slightly longer, some shorter will make your
tree feel alive and textured. Add as many needles as you like. The more you layer, the leisure and fuller
the pine tree will look. Take your time, enjoy the
rhythm of your brush, and let the tray grow
naturally under your strokes. Each little needle adds
life, depth and character. Your tree is slowly
coming alive. As you price each stone, keep your hand relaxed
and your pressure light. These needles don't need
to be perfect clients. Confident flicks of the
brush work beautifully here. Like some strokes overlap, lets others fade softly
into the background. Follow the direction
of the branch and allow the leaves to
grow outward naturally. Just like a real
pine tree would. Some needles can stretch
a little longer. So can stay short and subtle. This variation is what
brings trees to life. Take your time and enjoy the rhythm of these
repeating stalks. This is a slow satisfying layer where the tree begins
to feel full and leg. With every needle you are, you are building texture, depth, and that
cozy winter curve. Lets the tree grow
at its own pace. There is no rush here. So we have finished
our first branch and look at how full unless
it already feels. Now, let's continue
building the tree by adding a few smaller
branches on the same side, just a little lower down. You can absolutely follow
the same process as before, sketching the branch first
and then adding needles. But in this section, I'm going
straight with the leaves, short needle like strokes naturally such as the
branch underneath. Keep your stalks
light in the ut, letting the leaves flow outward in the direction
the branch would grow. This helps the tree feel dense and layered
without becoming heavy. Take your time, enjoy
the repetition, and let each small branch blend
softly into one above it. Now, to give our tree
some real dimensions, let's add a touch of shadow. Take a bit of black paint and lightly layer it on your
green pine needles. Your short scattered strokes, these don't need
to cover anything. Peek through the here and there. Think of it as adding little
pockets of shadow where the kings overlap or where
the branches receive. These subtle black create depth and make your foliage look
three dimensional at lag. Remember, it's all about suggestion rather
than perfection. The goal is to hint
the shadow or texture, letting the tree
leaves pop while giving your tree a
rich natural texture. Take your time and
enjoy watching your pine tree gain its
depth and character. Now let's brighten
things up a bit. Take your dark
green mix and add a little more yellow to create
a lighter fresher green. Using this new shade, lightly touch it
over the branches and leaves you have
already painted. You don't need to
cover everything, just a few well placed strokes
there and here enough. This allows all three layers. Your dark green was
the black shadows and now this light green to
show through clearly. The little highlights give your tree that extra
pop and freshness, making it feel full
of life and depth. Think of it as catching the sunlight on the
tips of the needle. Just subtle touches that make your pine tree look
vibrant and realistic. Take your time, enjoy laying
the colors and watch how these simple additions
bring your tree to life. With the background
beautifully set, let's shift our focus to the main element of the
painting, the bell or. Start by mixing a
bright she ful red, use it to fill the
entire bell sketch. This will be our
solid base layer, giving the bell its bold
vibrant foundation. Don't worry about details yet. We are laying down
the color that will make the ornament bob
against the backdowd. Take your time and enjoy the process of
filling the shape. Smooth even strops will give you a nice clean
base to build on. And this is where
our bell really start to come to
life on the canvas. What? As you fell in the bell, let your brush more slowly
allow the curves of the shape, follow the rounded edges and allow the paint
to settle evenly. There is no need
to rest this step. If it stops, our
lamp or red looks slightly uneven in places,
that's completely fine. This is just the base layer, and a little variations
actually helps the bell feel more
natural and hand painted. Focus on enjoying
the richness of the red as it spreads
across the surface. With every stroke, the bell becomes stronger
and more vibrant. Next, let's add some
depth to our bell. Start by mixing a light
brown using white and clo. This will be perfect
for gentle shading. Apply this light brown, allow the bottom
edge of the bell just enough to start
giving it some four. Now grab a darker brown and focus on the lower ground
opening of the bell. Place the darkest tons
on the right side. This will give your bell a natural sense of
light and shadow. Using a clean dam brush, gently blend the darker brown into the red from the left side, creating a smooth,
seamless foundation. Once you're happy with
the inside shading, add a few soft
brown strokes along the outer edges of the bell
and blend them gently. Don't worry about making
it perfectly uniform. Subtle variations make
it look more realistic. I have also left a few
thin lighter lines peeking through the highlights. These light touches are what
gives your bell that shiny, glossy finish, catching the eye and making it truly
sparkle on your canvas. As you add the shading
along the curves, let your brush follow the
natural roundness of the bell. Your soft controlled stroke
and keep your pressure light. We are slowly shaping the foam, not drawing the heard lines. On the left side, gently
pull the brown into the red, allowing the colour to
melt into each other. This smooth blending is what gives the bell its
soft glow round. Take a moment to pause, step back and notice how the light begins to wrap
around the surface. If some lighter lines
remain visible, leave them just as the. Those little gaps as highlights, giving the bell that
glossy polished look almost like it's catching
a warm festive light. There is no need to
overwork on this area. A few thoughtful
stops are enough. Test your eye, enjoy
the slow blending and watch how these chandel shadows bring your bell
beautifully to life. Now it's time to bring some
festi speckle to our bell. Let's create a soft golden sha. Take the light
green mixture from earlier and add a
little more yellow. This warm golden
green will leave a gentle shine that really pops. Using your detail brush, start adding the little
festive touches. Paint the hook of the bell, so it looks ready to have. Draw a delicate snowflake
pattern on the bell. Don't worry about perfection. The charm is in
the handmade look. Add thin decorative lines along the bottom curve to give it
a polished elegant finish. These small thoughtful details instantly make the bell
look festive and alive. They are the magic touches that bring joy and calm
to your painting, giving it that extra
holiday sparkle. Take your time,
enjoy each stroke, and watch your bell
transform into a cheerful little bell. Next, let's sprinkle
extra little magic around our bell by adding
portions of snowflakes. Take your detail brush and using the same lovely golden shape, add just a few delicate
strokes around the bell. You don't need to
cover the entire area. Just a few well placed
touches are enough. These tiny golden acins
add balance and charm making your bell feel surrounded by gentle
festive sparkle. Take your time and enjoy seeing these final touches bring the painting together
beautifully. Now let's give our bell a little extra
definition and make it feel like it's truly
part of the tree. Take some black paint on
your detail brush and add thin outlines around the
hook to make it stand out, tiny details on the
bell to give it take a finished look and the string that holds
the bell on the tree. These subtle lines
anger the bell visually making it look like it's really hanging
from the branches. Don't worry about perfection. Just a few confidence
stops are all you need. These final touches add
structure and realism, bringing your festive ornament to life right on the canvas. Now comes the magical part, adding soft glowing bocets. Mix a gentle pastel red
and pastel yellow to create a warm luminous
shade using your brush, paint circles of different sizes and scattered across
the background. Don't worry about perfection. Some can be larger,
some can be smaller, and let a few overlap to
create a natural soft glow. Think of this as little burst of festive light floating
around your tree and well. The overlapping areas will make the light look
soft and realistic, adding deep and dreamy magical atmosphere
to your painting. Take your time, enjoy the
playful placement of each glow, and watch your scene come
alive with warmth and charm. Okay. As you paint the bokeights, keep your pressure very light, simply place the pressure
down and form a soft circle. Pressing too hard can reactivate
the layer underneath. And we want these clothes
to stay gingle and cling. Let you touch, stay
playful and relaxed. Some lights can appear
soft and subtle, almost fading into
the background, while others can feel
a little brighter. There is no pattern
to follow here. Imagine these tiny
lights floating freely in the winter air. Allow a few circle
to overlap and melt into each other,
where they meet, the glow feels warmer
and more natural, just like festive lights
seen slightly out of focus. This layering adds depth and creates that dreamy glowing
atmosphere in the background. Take your time with this
step, pause between strokes, step back and enjoy
how the warmth of these lights balances the cool
weather towards behind it. With every gentle glow you add, the scene becomes more
magical, cozy, and anni. Now let's give our bell that final sparkling
touch, the highlights. Take some white paint and your detail brush and carefully draw thin lines along the hook, the string, and the
edge of the bell. These delicate strokes
catch the light and instantly give your ornament
a polished glossy shine. Don't worry about being
perfectly precise. Just a few well priced
highlights are enough to make the bell see three
dimensional and lively. These little touches are what really bring your
ornament to life, making it sparkle as if it's
glowing right on the tring. Now for the last touch of
Christmas magic, the snow, take your white paint
and start adding small areas where snow
would naturally color. On the branches, on
the pine leaves, on the top of bell and along the little
decorative projections, these subtle touches
already start giving your painting that
cozy wintry feel. Next, let's create soft
scattered snowflakes, load a bit more white print onto your brush and
gently tap it on your other hand to spangle tiny snow dots
across the painting. This gives you snowflakes
of different sizes and makes the painting
feel lively and magical. Take a moment to
practice once on a scrap before you apply it
to your painting. This way, you will get
the effect just right. Finally, add a very thin
highlight line along the bottom of the bell to anchor everything
and make it proper. And there you have it. Our festive bell
ornament is complete. Now carefully peel off the masking tape and reveal the painting
you have created. Take a moment to step
back at Mu Gork and enjoy the holiday magic you have brought to life on your canvas. I hope you love painting this beautiful
Christmas bell with me. We have many more exciting holiday illustrations coming up. So stay with me and continue
this joyful journey. Until next section, happy
painting, my frets.
20. Santas Bag: Let it. Hello, dear
friends and welcome back. Today, we are going to paint
something truly festive, Sanda's big red bag filled
with colorful kits. It's a coke and easy
project, but trust me, the result will look so magical and full of
Christmas cheer. So grab your brushes and
let's get started right away. Our sketch is already ready, so we can jump straight
into painting. Let's begin with the background. For this background,
we'll be working with just three main colors
blue, black and white. First, mix a little black with white to create a
dark clichhade. Using a flat brush, make broad loose strokes
across your canvas. Don't worry about
making it perfect. The beauty is in the texture. These uneven textured strokes
add depth and atmosphere, giving your painting a rich, moody background that sets the
stage for everything else. Remember, this is all about
feeling the movement of your brush and letting the background come
to life naturally. The more relaxed and
playful your strokes, the more dynamic and interesting
your canvas will look. Next, let's bring in a touch of cool color to give a background
that cozy winter wine. Mix blue with white
and add just a hint of black to get a muted
dark not too bright, just enough to keep the scene
feeling calm and wintry. Using this mix, add gentle brush strokes
around the gray areas, allowing the colors
to blend slightly. Don't worry about being perfect, soft overlaps and
subtle variations make the background feel
natural and atmospheric. Now take a little pure white, paint and lightly brush it over some portions
of the canvas, especially near the cinder. This adds a sf clawing effect, almost like woodlight or a distant glow in the
snowy sky. With it. Finally, gently blend
all three sheds together using light
horizontal strokes. Step back and look. You will see a lovely misty background emerge like a serene snowy
Christmas night sky. Take a moment to enjoy how these simple layers have
created depth and atmosphere. Now, let's move on
to the ground area. Start by adding a layer of blue along the top
edge of the ground, and then a layer of
white at the bottom. Using a soft brush, gently blend the two
colors where they beach. This creates the illusion
of snowy ground, catching the cold blue
light from the background, giving your painting a sense
of death and atmosphere. Take your time
with the blending. Smooth, soft transitions
make all the difference. Step back and look
at it for a moment. You will see how this
simple layer sets the stage beautifully
for your back. Perfect. The scene is steady, cozy, and sparkling
with winter magic. Now it's time to bring the
main element of the painting, Santa's big jolly red bag. Load your arm brush with bright red paint and carefully fill in
the entire bag area. Take your time, let your brush follow the natural
curves of the bag, helping to bring out its plump,
three dimensional shape. Don't worry about getting
everything perfectly smooth. Gentle confident
strokes will make the bag feel lively
and full of character. As you paint, imagine the bag is stuffed with
festive surprises, toys, streets and holiday magic. This playful energy will come
through in your stalks and make the bag feel joyful and
vibrant on your characters. Once your red base is in place, it's time to cream Santa's
back some life with shaving. Mix a little brown and
carefully applied along the edges of the sack
and near any folds. These subtle shadows start
to suggest depth and volume. Then take a clean damp brush and gently blend the
brown into the red. Soft smooth transition sir key. This will make the bag look
rounded, plum and damaged. As you blend, watch
the bag start to puff up right on your canvas. Almost as if it's stuffed
with holiday surprises. These little touches of
shading really makes your painting feel
lively and festive. Great. As you add the brown shading, let your brush follow the
natural curves of the bag. Keep your pressure light
and build the color slowly. It's easier to deepen
the shadows little by little than to add
too much at once. Focus on the areas
where the fabric would naturally fold or tuck in. Gently, pull the
brown into the red, allowing two colors
to blend smoothly. This soft blending is what gives the bag its rounded pluffy form. There is no need to
overwork this step. A few thoughtful
stocks are enough to bring them back
to life, relax, trust the process and enjoy
watching your painting, gain depth and character. Now, using your detail brush, start adding a few fine
lines where the bag would naturally fold along the
sides and near the bottom. Keep these lines
soft and delicate. We are only suggesting folds, not drawing strong outlines. Think about how heavy fabric behave when it's
filled with gifts. The materials gather bends and slightly creases
under the wege. Let your lines follow
the natural flow, curving gently with
the shape of the bag. Use very light pressure and add just a few
lines at a time. Even minimal details can
make a big difference here. These subtle touches instantly
make the bag feel heavier, fuller and packed
with holiday goodies. Let's also add a few
darker touches along the ground to help
anchor the bag in place, using a slightly deeper toe, gently brush in some shadow just beneath and around
the base of the bag. Keep these stalks
soft and subtle, we are simply grounding the bag, not drawing hard knights. This small addition helps it
feel settled into the scene, making it look like it's resting naturally on the snowy
ground rather than floating. Now that our bag
looks nice and full, it's time to move on to the gift boxes
spilling out of it. Easily the most fun part. We will paint them one by one, taking our time with each. I'm using a red and white
colour combination, but feel free to choose any
festive colours you love. Greens, golds, or even soft pastel shades
work beautifully here. Start by painting each bs with a clean flat
layer of color. Keep the edges neat, but don't worry
about perfection. We will define the
shapes as we go. Once the base is done, use the same shading technique
we have already practice, a a touch of down along the edges where the shadows
would naturally fold. And then gently blend it
with a clean dam brush. As you blend, you will see each box start to pop
up and gain volume. These symbol shadows give the gifts a solid three
dimensional feel, making them look stock
layers and ready to unwrap. Take your time, enjoy
this playful step, and let the gift slowly bring extra joy and colour
to your painting. As you add brown shading, focus on the edges and
corners of each bobs. Use very light pressure and
peel the shadows slowly. Just a touch is enough
to suggest step. Let the darkerton
sit where the boxes overlap or where one side
actually falls into shadow. Then with a clean
dam wrist softly, pull that color inwards so it blends seamlessly
into the base color. This smooth transition
is what makes the boxes feel solid
and three dimensions. The Now it's time to decorate the gifts and
really bring them to life. Let's start adding ribbons, pink paper, detail
and playful pt. I have painted daughter
design on one box, simple stripes on another, and left a few plain to
keep everything balanced. Mixing patterns like
this add interest without making the
painting feel too busy. Using a thin brush, gently draw delicate ribbons and bows. Keep your strokes
light and confident. These don't have to be
perfectly symmetrical. Even simple lines can instantly make the
gifts feel festive, thoughtful, and full of chow. Take your time with this step
and enjoy the creativity. These little decorative details add so much personalty and warm, turning the gift boxes into cheerful highlights of
your Christmas painting. I'm using white for
my patterns and ribbons because my
theme is red and white, but feel free to use
any color you like. Choose shades that mature on festive palette and make the painting feel
personal to you. Let the ribbons
flow naturally over the boxes and allow the
bows to lose and slightly. That softness adds
charm and keeps everything looking hand
painted rather than stiff. Take your time with the step and enjoy the creative freedom. These wall decorative touches bring warm and
personality to the gifts, turning them into joyful
little highlights that really complete
the painting. Finally, let's finish off Santa's bag by
painting the top edge, that soft fluffy band
using white pap. Apply it gently, keeping
your stops light so it feels soft and
flush rather than flat. Once the white
layer is in place, add just a tiny hint
of print into it. This subtle tin wants
the white and gives a cozy velvety feel as if it's softly catching
the festive lights. Dot overblnd here, a
little variation in tone adds texture and makes the fabric feel
fluffy and realistic. With this final touch, the bag feels complete, warm, and perfectly
ready for holidays. Now that we have completed the main elements
of our painting, let's move on to
the final details, adding some magical snow fold. Take it out brush and
load it with white paint. Gently, run your finger across the bristles to splatter
the paint onto the canvas. Keep the platter
soft and scattered. We want it feel like
light falling snow. You can control the
effect by adjusting the amount of paint and
the pressure you use. It's always a good
idea to pack his one on his scrap paper before
applying it onto the painting. And there we have it
Santa's big joyful bag filled with presents resting under a magical
clove of Christmas. Take a step back
and look at your painting the beds cold blue, and the soft white together create the perfect
holiday harmony. Thank you so much
for joining me. Let's meet again in the next section with another
festive painting idea. Until then, keep creating
and keep smiling.
21. Wine Glass: Hello, my lovely
freights. Welcome back. And tell me what is Christmas without a festive Cheer, right? So, today, let's slice
out brushes like a toast and paint a beautifully glowing
Christmas wine glass. Cheers, and let's begin. Basically, for this painting, we will be using two main colors for the background,
brown and green. We will add a few
other colors later, but these two are
our code B colors. So let's start by
mixing them first. To make a dark brown, mix red and black together
until you get a rich deep dot. From this dark brown, create a lighter brown by
adding just a little yellow. This softens the color and
adds a warp earthy fade. Further dark green,
mix green and yellow, and then add a tiny
touch of black to deepen the shade without making
it look flat or dull. All right. Now, let's continue
with the color mixing. Add a small quantity
of yellow to the green on your palette
and mix it thoroughly. You will notice the green immediately become
warmer and more natural. Now, using your brush, take a tiny bit of black from chil cup and mix it
into the green mixture. Go slowly here. A little
black goes low way. Mix it well, and you will get a deep rich shape perfect
for our background. D. Next, let's make a lighter brown. Take the dark brown we already mixed and add a small
amount of yellow to it. Blend it well until the color soften into
a warm earthy brown. And that's it, simple
control mixing. These shades will blend
beautifully on the paper and help us to create a cozy
layered background with depth and richness. On the right side of the canvas, apply both the dark brown
and the light brown. Let the colours sit next to
each other and gently mingle. This creates a warm, rich base for this painting. As you work on the right
side of the canvas, start applying the dark brown and light
brown alternatively. Place them next to
each other rather than mixing them
fully on the palette. This way, the colors naturally blend and interact
right on the paper. Use relaxed, gentle
strokes and softly blend where the two browns we
don't overwork on this area. We are now aiming for
a smooth flat finish. Let some variations
remain visible. The subtle shapes in tones
add warm and richness, making the background
feel layered and alive. Think of this area
as a soft glow sitting behind the main
elements of the painting. Take your time, enjoy
the blending and allow the browns to settle into
a natural cosy harmony. As you move towards
the lower portions, start adding a bit more
yellow into the brown. This creates an even lighter
warmer tone near the bottom. Blend this lighter shade
gently into the brown saco it, so the transition feels
soft and natural. This subtle shift in colors
helps guide the eyed upwards and adds a sense of light and depth
to the background. On the left side, bring
in the dark grey, start from the
lower area and use more gentle strokes to
begin filling the space. Keep your brash movement
relaxed and natural, letting the green slowly
build up as you move upward. As we move towards
the top portions, and while the paint
is still wet, start adding small
patches of red and yellow here or
there within the gray. Just add some circles with red
and yellow at some places. As the decorations
on the background, continue filling the
entire area with green, leaving those red and yellow
spots peeking through. Okay. Once the green is in place, gently blend the reds and
yellows into the green, Let them soften and blur
naturally without sharp edges. This creates a beautiful
out of focus effect, suggesting background
decorations and Christmas trees
sitting far behind while the main focus remains on the foreground objects at
the table in the street. These subtle color
hints add festive, cozy Christmas mood without
overpowering the sea. There is absolutely no need
for perfect blending here. We are aiming for a soft misty
backdrop where the colors gently flow into each other and create atmosphere
rather than detail. Kiper brush lose
trust the process and enjoy building this
warm, dreamy backdrop. It uintly supports the story of the painting while letting
the foreground shine. Next comes our little tree, a dark chocolate cake. Start by painting the cake
with a deep rich brown. Let's prepare the brown
first with red de black. Make it dark and rich, then start filling
the cake shape. Keep the shape simple and clean, focusing on solid
coverage first. Now let's move on to the
table setup for the table, makes a pastel brown by
adding white to brown. Once you have a soft mutatne, use it to paint the tabletop, apply the color evenly, keeping a strok
smooth and relax. This gentle neutral shade helps the main elements
stand out while still grounding the scene and giving everything a
service to restore. A Now, let's move back to
the chocolate cake. Once the baseline is in place, add a few simple
designs or markings on the cake to give it a
finished decorative look. Add some frostings, I have add some simple designs
with the white colour. There is no need to overdo it. Just a few subtle details are enough to make
it feel special. On top of the cake, paint some cute little
strawberries using a bright red, while the is still
in slightly fresh. Add a tiny touch of
brown for shearing. Blend it gently, so
the strawberries gain a bit of form
and dimensions. This small step makes
them look more realistic, rounded and juicy. D I'm continuing with
my cake design, just adding some
small designs on the sides as the ganache is
flowing down from the top. You can choose any designs. I have kept the cake design very simple choosing one of
the easiest styles to page since the main focus of this painting
is the wine glass. We don't want a cake to
overpower the composition. A clean, minimal design, keep everything balanced while still looking rich
and delicious. Once the cake
design is complete, finally take brown again and
start adding soft shadows, add gentle sharing
to the cake details, especially along the
running ganache, the sides of the cake, and the areas where the
cake meet the table. These subtle shadows
help to define the soap and add realism without
making the cake look heavy. Continue with the
same brown and add soap shadows underneath the cake and the wine glass on the table. Keep these shadows
light, diffused, slightly spread out.
Avoid harsh lines. We want the object feel
naturally placed on the table. This final shadowing stip grounds everything
in the painting, making sure the cake and
the wineglass feels stable connected to the table are fully part of the composition
rather than floating. Take it slow and enjoy this dip. These tiny details
add so much arm, warmth, and storytelling
to the painting. Now before moving
into the wine glass, I'm adding a touch of lightness to the lower part
of the background, just above the tabletop. I'm using a bit of
paste and yellow here, gently placing it into the background to break the
heaviness of the brown above. Keep this layer very subtle. Just a small amount of
paint a played with soft, smooth circular brush drops. Let it blend naturally into the surrounding colors
without sharp edges. This step is
completely optional. You can absolutely skip it if you prefer a deeper
moodier background. But this gentle glow helps add warm create a
soft transition the table area and gives the scene a cosy
illuminated fade. Let's begin with the base
and stem of the wine glass. First, paint the stem using a light brown as
your base color. Keep your stop smooth
and controlled, following the slender
shape of the stem, so it feels legate and delicate. Once the base is done, use a white paint to outline
and highlight the step. Add thin fine lines along the edges and a fuse soft
touches through the center. These subtle white highlights are what create that
beautiful glassy shine, instantly making the stem
look reflective and light. Now let's move into the
wine inside the glass. Start by filling the wine
area with a rich red, letting your brush follow the
natural curve of the glass, so the shape feels
smooth and fluid. I have chosen to keep
the glass half filled, so paint only the
bottom half with red and leave the top
portion unpainted. That empty space is important. It helps to create
the illusion of transparency and light later on. Once the red base is in place, let's move on to the shale. Take a small amount of brown
on your detail brush and add it gently to the top and
left side of the wine area. These darker patches create dip and give the wine a
rich full appearance. Slowly, blend the brown into
the red with soft strokes, keeping the transition
smooth and natural. Near the top surface
of the wine, leave a small portion unshaded. This represents the
area catching light and gives the wine that subtle
shine and reflective quality. Work slowly, blending
as you go and watch how the wine begins to look dimsional and realistic
inside the glass, deep, glossy, and glowing beautifully against
the festive background. Now gently merge
those empty portions with the background colors. Since glass is transparent, whatever sits behind it
will softly show through. Use a very light touch
here and blend gently, making sure there
are no harsh lines. The goal is to let the
background colors speak through naturally as if it's seeing
through a clear glass. I should also mention
something important here. You can actually paint
this area along with the background while you are doing the background
layer itself. And then simply add the
glass outlines later. That approach can feel a bit
easier and more intuitive. In this painting, I
chose to leave this area unbated earlier and can
come back to it now, just so you can
clearly understand how the transparency works and how the background
interact with the glass. This step is what truly
creates the illusion of glass, light, transparent
and realistic. So now let's add cute little sander cap resting
on the rim of the glass. This tiny detail instantly
brings in the festive char. Start by painting the cap
with a bright, cheerful red, filling the shape neatly and following the
curve of the class. This bold red will stand out beautifully against the
softened background torts. Next, add a touch of brown along the folds and shaded
areas of the cap, bend it gently into the red. So fabric looks soft
and slightly routed, giving it that cozy fabric like. To finish it off, paint a clean white strip along
the pace edge of the cab, keep your strokes
smooth and confident this fluffy band adds contrast and complete
the classic Santa. And just like that,
your wine glass start to feel playful, festive and full
of Christmas sp. You can also add a
touch of shading to the white details using brown
just to enhance the depth. For this, wipe your brush
completely clean first and then load it with only a very small amount
of brown paint. Using the tip of
your detail brush, add very thin light
lines along a few of the white portions we
painted for Christmas care. Keep this shading
extremely subtle. I barely noticeable. Next comes the most important
step of this painting, a simple step using
a single color, yet one that truly transforms the artwork and brings
everything together. The wineglass outlined in white. Take your detail brush and load it with white paint with a calm, steady hand, begin outline the entire wine glass
using thin light strobes. Keep your hand relaxed. These lines don't need
to be perfectly even. In fact, a slight softness
in the line makes the glass feel more natural
and delicate and lag. As you outline, carefully follow the natural
thurve of the glass, letting the shape guide brush. Next, add a few highlights line on both side of the glass. I have added two
lines on each side, one longer line, and
second shorter line. This variation in length
helps the highlight look more realistic and adds
depth to the wine glass. Think about how light reflects
of smooth shiny glass. These gentle strokes
suggest reflection, transparency, and that
beautiful glass shine. Using the brown paint, I'm also slightly
deepening the left side, again, with just a
few tiny touches. This adds a bit
more contrast and helps balance the light
and shadow in the glass. Keep this step very minimal. Use only a small amount of
paint and apply it lightly. And remember, this is
completely optional. If you feel your painting
already looks balanced duplet, you can absolutely
skip this part. Below the wine glass, let's add a lovely little leaf decoration
to truss up the table. Start by painting the
first base layer in black, keep the shape simple and loose. This dark vase will help the lighter colors
stand out beautifully. Once that layer is in place, take a light red and begin by drawing the
center stem first. From there, add small slanting
strobes on both sides, gently moving outward
to form the dips. Let your brush move
lightly almost like you are flicking the
paint into the surface. You don't need to
make ab as identical. Slight variations
in size and angle, make it feel more
natural and organic. They symbolize stops, add lovely texture and
contrast to the table, trying the whole
painting together and giving it that
extra festive charm. And now it's time for some
magical finishing touch. Let's start with the bottom
area using pastel red, yellow and orange, gently
add small bouquet circles. Keep your pressure
light and relax, softly place the circles
without pressing too hard. So the layers
underneath stay intact. These little gloves
should feel subtle and war like tiny festive lights
scattered near the ground. Do Do D Now, move to the top area and create larger blowing bocelts using
brush rotation technique. Generally, rotate your brush
as you paint each circle, allowing the edges to
stay soft and diffused. This gives that beautiful
out of focus glow effect. Let some of the circles overlap and blend
into each other. Where they meet, the light
feels richer and more natural, adding depth, add a gentle
sparkle to the sea. There is no pattern
to follow here. Imagine the lights floating
freely in the air. With just a few layered gloves, the entire painting
transforms warm, dreamy, and full of histe magic, like acod celebration,
caption in pike. And that's it. Our festive, warm Christmas wine glass
painting is complete. Thank you so much for
painting with me today. I'll see you in the next section until then cheers
and happy painting.
22. Sparklers: Hello, friends. Welcome back to another joyful
painting section. Today we are stepping right into a festive celebrity mode
because we are going to paint a beautiful hand holding a sparkling speckler surrounded by warm lights and
magical bouquets. It's cheerful, cozy, and
full of holiday engi. And I'm so excited to
paint this with you. Your sketch is already ready, and you will find it
in the so section. So check it before we begin. Alright friends, let's
jump straight in. F, let's prepare two George
shakes for our background. This will set the mood
for the entire pinging. Start with a dark brown created
by mixing red with black. Keep it rich and
deep, not to flat. This color brings warm
and cozy festive fe. Next, we will mix a warm blue, begin with blue and white
to soften the color and then add just a tiny touch of black to deepen it slightly. Be very careful here a
little black goes along way. The goal is a calm, muted blue that still
fails pintry and gini. Together, these two
colours balance warmth and coolness beautifully, creating the perfect festive atmosphere for our background. Now let's begin painting
the background and bring those colors
onto the canvas. Start on the right side
by applying warm blue, se relaxed, loose strokes, and let the brush move freely. This side sets that
calm wintry mood. Next, move to the left side
and paint the dark brown. This adds warmth and richness, balancing the cold
blue beautifully. Where these two colors meet, gently blend them together, but don't aim for a
perfect smooth gradient. Let the press drops stay
soft and slightly uneven. That subtle irregularity creates a misty atmospheric transition, almost like the glow of winter night softly
blurred in the backdrop. Take your time here.
This gentle blending sets the emotional tone of the painting and gives a beautiful backdrop for
everything that comes next. Here, I'm using my
round ridge to ala and blend the contrasting
blue or brown shades. Using small gentle
circular movements, start blending the colors where they Work slowly and patiently, keeping your pressure light. These circular motions
help soften the edges and allow the colors to melt
into each other naturally. As you blend, you will
see the background slowly transform into
a moody misty bag. Take your time with this step. There is no h. The
slower you blend, the more mysterious and atmospheric the
background will faint. Stop once this transition
looks soft and dreamy, and you are happy with that misty more
setting into the same. Next, let's prepare a few soft
pastel colors using white. Take your blue and mix it with white to create
a gentle pastel blue. Do the same with red,
yellow and orange, adding white until
each color looks light and slightly muted
rather than bright. These pastel tones should
feel airy and dreamy, not too strong or opaque. They will be perfect
for creating those glowing effects
later in painting. Set these mixes aside
on your palette. We will come back
to them soon to add that magical festive
glow to our patting. Now let's move to the
focal point of our painting the hand
holding the sparkler. Start by mixing a natural
skin ton using red, yellow, and plenty of white. Adjust the mix until it feels soft and warm,
not too bright. Using this shade, begin
painting the fingers first, keep your strokes
smooth and confident, following the natural
curve of each finger, so the hand feels
relaxed and natural. Once the base layer is in place, take a bit of a brown
mixture and gently add shadows between the fingers
and around the knuckles. These darker touches
define the form and instantly gives the
hand depth realism. Bend softly, so the shadows
melt into the skin tone, subtle transition
work west here. Now, let's paint the sleeves. Start by filling
in the sleeve with a rich red as your base color. Let your brush follow the
natural flow of fabric using smooth confident strops so the sleeve already feels
soft and wearable. Don't brush this step, and even lllaid se makes all the shading detail
much easier later. Keep the colour solid
and clean for now. We will add depth folds and
highlights in the next steps. But this red ase sets the
foundation for a warm, festive sleep that beautifully complement the
rest of the paint. Now mix in a little
brown and gently shade along the folds or
inner curves of the sleeve. Focus on the areas
where the fabric would naturally dip or overlap. Don't overdo it. Just a hint of shadow is enough to suggest
depth and softness. Using light pressure, blend the brown
softly into the red, letting the colors
melt into each other. This smooth blending
helps the fabric look natural and flowing rather
than stiff or flat. Take your time here, working slowly until the sleeves
feel dimensional, cosy, and comfortably worn. Once the base color and shading of the
sleeves are complete, let's move on to the detailing. Continue with your detail
brush and take some wining. Begin by adding tiny dash lines along the sleeve to
create a stitched defect. Keep the dashes small, gentle, and very event spaced. You say very light hand here. We are suggesting detail, not overpowering the fabric. These delicate
dashes instantly add safe steve touch
and make the sleeve feel more refined
and decorative. Once they are in place, continue with the same
white paint and add a fine, delicate highlight light
along the edge of the sleeve. Keep this line thin and so. It doesn't need to be
perfectly straight. This septal highlight helps
separate the sleeve from the background and gives the sleeves a clean,
polished finish. It's a simple sequence, but these small white
details add so much charm, elegance and beautifully
finished look to the painting. Now comes the fun
part. Let's add those streamy bucy lights. Using your pastel shades, start dabbing soft circular
shapes all around the paquum. I made the colors
very die out here, so the circles are
very subtle and fat, and they provide a very
light blood effect, perfect to highlight this
part is coming on the fret. Keep your hand relaxed
and you pressure light. We want these circles
to feel airy, gentle, and not heavy. Since we are creating
large goopy circles, let's use brush
rotating technique. Place the pressure
down, rotate it slightly in a circular
motion, and lift. This help create those
soft blowing orbs. Let some of the circles overlap naturally
where they meet. The light looks warmer
and more realistic. Switch between colors and do not apply pressure here as it may reactivate the gauche layer beneath and the colors
make it blended at sewing. So be gentle and very light. There is no strict pattern to
pope, scatter them freely, imagining strings of lights
glowing in the distance, pause now and then step back and enjoy how the background
slowly transforms. This gentle layering
of pastel gloves creates that magical
blurred light effect, like a camera capturing a quit, fuzzy festive night filled with warm, softness and sparkle. Wow. Look at the background
we have featured with chafic. It already feels so
festive and magical, filled with soft
glowing colours. The gentle lights
are warm and tip, making the entire painting
feel lively and cozy. Like a beautiful celebration happening quietly
in the background. This dreamy backdrop
sits a perfect mood and brings everything
together so effortlessly. Now it's time to bring
the celebrations to life. Start by painting the stick with black using your detail brush. Keep the lines
straight and clean, following the angle of the hat. Then add a thin
white highlight line along the edge to give it stick a subtle
reflective shine just enough to make it
look three dimensional. Next, let's focus on the
tip of the Sprackler. This is where the magic
really comes alive. Begin by painting a tiny star like shape in the
white at the center. Think of this as the
herd of the sparkler, the brightest point where
all the light pickets. From this cener, take
pastel yellow and start painting long radiating
strokes in every direction. Let these lines flow
outward freely, just like real sparks
flying in the air. To enhance the glow, gently layer white over
some of the strokes. This variation in
brightness adds depth and makes a sparkler feel
energetic and lumeus. As I pull these lines outward, I'm letting my brush move freely without our
thinking the direction. Each stroke can be slightly
different, some longer, some shorter, just like real
sparks busting at the air. I'm working slowly
one line at a time, allowing the yellow to
spread outward from the center and create that
sense of motion and energy. Let's softly layer a little
white over a few of strokes. Not on all of them, just where the light would naturally
be the strongest. This variation in
the brightness helps the sparkle glow and feel alive, almost as if it's
cracking and danced. If you prefer, you can
also use white gel pen or a white pencil for these highlight lines
instead of page. Choose whatever feels most comfortable and gives
you the better control. Keep your hand light and
relax through this step. There is no need for
perfection here. The beauty of apracler is in
its randomness and movement. Let the starks flow
naturally and enjoy watching the light come
to life on your canvas. Now for the final
touch, using white, at any Sprackling dots and delicate flick alum and
around the radiating lines. These little details creates the illusion of
crackling, light, and movement, giving
the Sprackler that lively fistif feel. Step back for a moment
and observe how this small but vibrant detail instantly transforms
the painting, filling it with joy,
warm, and celebration. Et's continue adding tiny
sparkling shakes randomly, add small star
shades or plus marks along the long radiating lines and right at the
tip of each bar. Keep these marks very
light and delicate, quick touches of flesh, almost like gently
tapping the surface. Scatter them naturally without worrying about
symmetry or spacing. Real sparks never
fall in partic. Some can stay close to the cinder while others
drift outward into the air, creating a beautiful sense
of movement and energy. Now, take some black in
your detail brush and add some lines around the
sparks to deepen them. Just a randomly where
you feel it is flat. After that, I'm
adding some more of the white clay to the center
to make it even brighter. And we are done. What a cheerful, glowing celebrative painting
we have created today. Thank you so much for
painting with me. Your energy and your presence makes every session special. See you in the next class
until then keep painting, keep shining and keep
celebrating the little moments.
23. Coffee Mug: Hello, friends,
and welcome back. Today, we are painting something super cute
and super cozy, a Christmas themed coffee mug, held against a softly
decorated Christmas tree. This painting is warm, festive, and perfect
for the holiday season. And I'm so excited to
paint it with you. Let's gem in. We will start by creating a soft inviting pastel
yellow background. First, prepare your pastel
yellow by mixing white into the yellow paint on the palette
until you get a smooth, light and gentle shade. Take your time blending it well. This softens the color and gives that warm cozy glow we
want for this painting. Once your pastel
yellow is ready, begin applying it to
the background area. Keep your brush strokes
loose and even, letting the color flow
naturally across the surface. I have intentionally left the
cup and hand areas painted, so they stay crisp and focused, while the rest of
the space is softly covered in this warm,
glowing pastel yellow. This first layer sets the mood for the
painting, calm, cheerful, and ready to card all
the festive details that comes next. I'm actually using
my masking tape from the previous session. So some of the old colors on the tape got slightly
reactivated. As a result, a few tiny spots of pastel brown appeared here
and there on the background. And honestly, I loved it. The colors blended
in so naturally and softly so I decided
to keep the effect. These little marks add
warm and character, and they don't distract at
all from the main elements. So feel free to embrace these happy little accidents
if they happen for you to. Sometimes unexpected
touches bring the most charm and
make your painting feel more organic and y. Next, let's bring in
some cozy room details, but keep them softly
out of focus. To begin, mix a gentle gray using white with just
a tiny touch of black. We don't want it too dark. A soft muted tone
works best here. Using this gray, paint a simple rectangle on the
wall to suggest a TVoid. Keep the shape
loose and minimal. This element is only meant to hint at the space
not drawn attention. While the paint is still
wet, take a clean, slightly damp brush and
gently soft the edges. Lightly pull the color outward so it melts
into the background. This blurred effect
keeps the focus on the foreground
while still adding a cozy lived inrobe feel. Think of it as background
ambience present, but quiet, helping the scene feel warm and complete without competing
with the main elements. Do the same with a brown
rectangle below it. This will be the base
furnisher of the TV unit. But just again, we want all these elements to stay soft and dreamy because
our main subject, the mug and hand will
be crisp and in focus. Now, let's bring in one of the most festive elements
of all our Christmas tree. Start by mixing a light green
using green and yellow. With this shade, begin painting the basic
sill out of the tree. Use loose upward strokes and
let your brush move freely. Don't worry about
defining every branch. In fact, a sharp
wedges altogether. We want the tree to
feel soft, distant, and slightly misty as if it's sitting gently in
the background glow. Now gently, complete the
base layer of the tree, focus on filling the entire
tree area down to the bottom, but leave the mug and
had area unpainted. We will come back
to those later. Keep your strokes
soft and relaxed. The edges of the tree shouldn't be sharp or overly defined. If any branches appear
to take a clean, dark brush and lightly
blend the edges into the background for a
smooth, natural transition. For an extra soft dreamy effect, you can even use a
touch of white paint to help blend the tree
into the background. This isn't mandatory, but it can create a septie
mistilo making the tree feel distant
and cozy without drawing attention away
from the main subjects. Once the light green
base is in place, mix your dark green by adding
a touch of black to green. Using this deeper shade, start adding color mainly
towards the center of the tree. Keep your strokes
subtle and layered, allowing the darker
tones to sit within the lighter greens rather
than covering it completely. This contrast naturally creates a darker core with
lighter glowing edges, which exactly what we want
for a background tree. It gives the illusion
of polum while still keeping everything
blurred and out of focus. Resist the urge to our work. The beauty lies in
suggestion, not detail. This soft glowing
Christmas tree quietly adds warmth and
festivity to the scene, while letting our main subjects remind the true stars
of the painting. Now comes the fun
part, the adorable k. Start by painting
the entire mark with a bright, cheerful red. Apply the color evenly
and confidently, following the shape of the mark, so it already feels
solid and well defined. Since this is the main focal
point of the painting, keep the edges clean
and the form clear. To Once the red base is in place, take a little brown and
begin adding soft shade. Focus on areas where natural
shadows would float. Lock the side near the base and slightly
around the handip. Blend the brown gently into the red so there are
no harsh lights. This subtle blending
gives the mug a smooth, rounded form and
lovely glossy finish. Take your time with this step. The mug should feel crisp, bold, and eye catchy, standing out clearly against the
soft dreamy background. This contrast between
sharp foreground and blood background is what really makes the
painting capive. Inside the mug, paint the candy cane with a
bright red se colour. Keep it simple for now, just a clean even layer of red that follows the natural
curve of the dike. Don't worry about the
stripes or details yet, we will add those later. Focus on getting a
smooth solid vase that will make the white stripes
pop when we add them. This step lays the
foundation for a cute festive dike that looks like it's playfully
leaning out of the mug. Mix a soft light skin ton
by combining red low, then gradually adding
plenty of white until you get a centile natural shade. Take your time
adjusting the mix. It's better to build it
slowly than rush the gager. Using this tone, begin painting the fingers with smooth
controlled strops. Follow the natural curve
of the fingers and keep the shape soft and
rounded rather than stip. At this stage, focus only on laying down an
even base layer. Don't worry about
shadows or details yet. We will come back later to
add depth and definish it. For now, this calm
simple step helps establish the form and keeps the hand looking
delicate and natural. Now, let's bring the
jacket sleeves to life. Start by filling the paint area of the sleeve with a rich red. This will be our base color. Let your brush follow the
natural flow of the fabric, so the sleeves already starts
to feel soft and wearable. As you lay down this red base, work with smooth
confident strokes and keep the paint layers even. Don't worry about perfection. This is just our foundation. Notice how the
shape of the sleeve naturally curve around the arm. Let your brush move in the same direction following
the flow of the foam. This will instantly make
the sleeve feel more natural and three dimensional even before we add any shading. Take your time with
this step and enjoy it. Once this wretch
base is in place, we will come back
and add shadows, highlights and all
those cozy details that really bring
the jacket to life. Next, take a little brown and gently add shading
along the folds, edges and between the
strips of the sleeve. Focus on the areas
where the fabric would naturally dip or overlap. Letting the shadow follow
the flow of the cloth. Use a light hand here. We are just suggesting depth, not overpowering the
d. With a clean, slightly damp brush, softly
blend the brown into the rid. Use gentle strokes, so the colors melt into
each other smoothly, creating a natural transition. This blending helps a flame
look rounded and soft, giving it that
realistic fabric feel. Take your time with this step. Subtle shading is what
brings the slave to life, showing its curves and folds while keeping
the overall look warm, cozy, and beautifully balanced. To give the sleeve that
cozy winter jacket wipe, add a thick white piping along
the edges of the sleeve. Let your brush move
slowly and confidently, following the curve
of the fabric. This scripts white
band instantly defines the edge and makes the sleeve stand out beautifully
against the background. Once the piping is in place, take a very soft light gray and gently shade w one
side of the piping. Keep this shading
extremely subtle. Just a whisper of
gray is enough. This small touch
will help the piping feel rounded and slightly puff, like a warm padded winter
catching the light. With this final detail, the sleeves start to look
realistic, soft and cozy, perfectly complementing
the festive hand holding the bag and tying the whole
winter painting together. Now, let's redefine the pan to make it truly
three dimensional. Take a slightly
darker skin tone and carefully add shadows
in the natural recesses between the fingers
around the knuckles and along the curves where the light
doesn't hit directly. Blend these shadows softly
into the base skin tone, so the transition feels
smooth and realistic. In between, I also took
a little time to retouch a few areas where I felt
an extra touch was needed, like the background tree or the soft blurring
with the TV on it. And that's completely okay. You can always do this, too. As more elements get
added to the painting, our initial perception
often changes. Something that felt perfect
earlier might suddenly feel a little strong or too sharp
or in need of a soft nk. That is very natural part
of the painting process. Feel free to go back, adjust, blur, deepen or
soft areas needed. Painting is not a rigid
step by step rule book. It's a fluid process. Trust your eyes, respond to
what the painting asks for, and allow yourself that
freedom to refine as you go. Those small, thoughtful
retouches often make a big difference in bringing everything together beautifully. As I speak, using a thin detail brush and
white paint, generally, I added diagonal stripes, over the red base
of the candy ce. Keep this line
light and flowing, following the curve of the cane, so the stripes feel natural
and wrapped around the form. Now using your detail
brush and white paint, draw a thin, delicate line along the outer
edge of the mug. Keep your strokes
light and smooth. This subtle highlight
instantly suggests the reflected light and makes the mug appear glossy
and three dimensional. Don't worry about being
perfectly precise. A soft slightly uneven line actually looks more
natural and gives that warm glowing effect as if the mug is catching the cozy
light of this painting. Okay. Well, let's
paint the reindeer. Using your detail
brush and white paint, start with a large oval
shape for the body, keep it soft and simple, add another one above
it for the head. From there, paint cute
basic shapes for the ears, legs, tail, et cetera. Don't worry about
perfect realism. The charm is into simplicity. Next, let's add tiny
details to give personality a little round nose, explosive eyes, and a cozy
scarf wrapped around its neck. You can use a hint of black to add subtle shadows or outlines, which will give your
reindeer a sense of deep. As I add these tiny patters, this is why the character
really starts to come alive. I'm keeping everything
simple and playful, a small round nose, gentle expressive eyes, and cozy little scarfed
throughout the neck. There is no need to overwork it, even the simplest shapes man
feel full of personality. I'm using just a hint
of black here very lightly to define a few
edges and add soft shadows. These tiny touches help
separate the features and give the interior a bit of depth without making it look
heavy or outlined. Take your time with this step, pause between stroks, step back and see how the
expression forms. It's amazing how a
few small details can completely change some mood and make the character feel friendly and
full of festive char. And finally, decorate the scarf
with stripes or patterns. This small, playful touch, make the mug feel festive
and extra adorable. Step back occasionally
and admire your cheerful little
character taking shape. Now, let's define and
refine a few final details. Take your detail brush
and black paint, and add a very thin line
where the hand weds the mug. This subtle outline
sharpens the edges, making the mug stand out
crisply against the background. For a finishing touch,
add a small dab of real colour on the
finger, holding the mug. This is tiny, which is enough to make the hand look
colish and realistic, ablating the cozy festive
scene beautifully. Time to make the
tree really glow. Take your pastel shades
and start adding soft circular bouquet
shapes all around the tree. Keep your touch gentle. Don't press it too hard
because with gouache, pressing firmly can
reactivate the layers underneath and disturb
the smooth background you have already painted. For larger tremy circle, try a subtle brush
rotating motion. Place the brush down lightly, rotate it in a small
circular and lift. This creates soft blood herbs
of light that feel magical. Let some of the circles overlap naturally
where they meet. The glow looks warmer
and more realistic. Vary the size of the
circles to create tap and scatter them
freely around the tree. There is no strict pattern here. The goal is to capture that whimsical softy
glowing festive light. Take your time,
pause, occasionally, and watch as these
delicate bouquet layers instantly bring
the tree to life, giving this painting a cozy, sparkling, magical
Christmas atmosphere. And that's it. We are done. Remove the masking tape, and there you have it. A warm, festive Christmasy illustration with a cozy
mug and a glowing tree. Thank you so much for
painting with me today. I hope you enjoyed this
section as much as I do. See you in the next class
until then happy painting.
24. Post Box: Hello friends. Welcome back. Today, we are stepping into a
little pocket of nostalgia. Do you remember those days when Christmas postcards would
arrive through the post? I used to wait all year just to receive those
beautiful cards, and I love sending out my o, usually, hand painted words. So today, let's go back
to that memory and paint a charming winter postbox gifts and cards speaking
out. Let's begin. For the background, we will use a beautiful warm blue
made by mixing blue, plenty of white, and
just a tiny touch of black to soften
and deepen the toad. Take a moment to mix it
well on your palette until the color feels calm,
balanced, and wintry. Once your shade is ready, start painting the entire
background with this color. Use broad relaxed strobes and let your brush move freely
across the surface. There is no need to aim for a perfect smooth or
even finish here. In fact, slight
variations in tone and visible brush texture will add so much character
to the painting. Allow some areas to stay a little lighter and
others slightly darker. This natural unevenness help create a misty
atmospheric effect, almost like quiet winter morning where the air feels
soft and hazy. If the blending is imperfect,
that's absolutely fine. We are building mood,
not sharp details. I left the postbox areas and the three areas on the
left painted here. We will add details
one by one. Later. Next, let's mix our browns
to create a dark brown, start by mixing red and black together until you get
a deep rich shade. Take your time
adjusting to balance. A little black goes a long way, so add it gradually. From this dark brown, we will make a light brown by adding just a small
touch of yellow. This instantly warms
the color and soft it, giving us a beautiful
lighter brown that still feels
natural and herpy. These two brown shades, one deep and one valve will be very important
in our next step. They will help us adapt,
contrast and structure, especially when painting the
postbox stand and the tree, making those elements feel grounded and three dimensional. Take your light row and start painting the stand
of the post box. You steady relaxed slopes and focus on feeling
the shape evenly first. This lighter tone work
perfectly as the base, giving the stand that
soft wooden feel. Once the paste
layer is in place, switch to the dark brown
and begin adding shadows. Concentrate these darker tones under the post box
along the edges, and any areas where the structure would
naturally catch less light. Blend the dark brown gently
into the light brown so the transition feel
smooth, not harsh. This layering instantly adds tap and makes the stand look
solid and grounded. As I start applying
the dark brown, I'm focusing on the natural shadow areas under the postbox, along the edges, and in the corners where light
wouldn't reach as much. Notice how the contrast between the light and dark
browns begin to keep the stack structure
and solidity. I am bending the dark
brown gently into the lighter base with
soft controlled strokes, making sure the transition
is smooth and natural. This gradual laying creates depth and a realistic
wooden texture, so it doesn't feel flat
or floating on the page. Take your time with this step even subtle shading makes a big difference in bringing
the start to light. Now, let's move on
to the left side of the canvas and start
building our tree. Begin with dark brown
shade for the first layer. This will act as the
underlying structure and shadow base of the pine. Using your round rich, make short continuous strokes, letting your hand move freely. Don't try to draw each
branch perfectly. These loose slightly uneven
strokes naturally suggest the form of spreading pine tree and give
it an organic feel. Keep your pressure light
and your strokes relaxed. Allow the tree to grow
outward as you paint, wider at the bottom, and gently tapering
as you move upward. This dark base layer helps to
define the tree's shape and creates a strong foundation for the lighter greens
we will add next. Next, let's start building
the green layers of the tree using the same short continuous
strokes technique, ad dark green or the brown base. Follow the natural
direction of the branches, letting the strokes extend
outward from the center. Don't try to cover
everything completely, allowing bits of brown
layer to peek through's depth and makes the tree feel
fuller and more natural. Once the green
layer is in place, it's time for final
highlight layer. Mix green with yellow to create a fresh light tree using
a very light hand, add this color mainly to the outer edges and
tips of the branches. These small touches
act as highlights, catching the light and giving the tree a bright,
snowy pine effect. Keeping this layer
spare and delicate, just a few strokes here
and there are enough. Together, these three
layers, brown, dark green, and light green create a rich dimensional pine
tree that feels pesty, lively, and beautifully
balanced within the winter sea. Now it's time to create
some magical glow, load your brush with
loose white paint, and using a very
gentle touch, place, brush on the paper and rotate it softly in a circular motion. Lift it slowly to form those beautiful blood buchts vary the sizes of the circle, some small, some larger, and let a few of them
overlap naturally. This variations adds depth and makes the background
feel la and cresty. Keep your pressure light
throughout this day. We want the lights to
feel airy and tremy, not heavy or flat. There is no pattern
to follow here. Imagine distant holiday lights softly glowing out of focus. Now, to enhance the tree, take your light green
leftover and mix it white to create a
soft light green toque. Using this shade, add a few gented highlights
to the tree, placing them randomly along the outer edges and
tips of the branch. These touches suggest light
catching on snowy needles and helps the tree glow subtly
against the background. With these final highlights
and bouquet pets, the dA scene comes
together, warm, festive and filled with
quiet Christmas magic. Now, take your detail brush and load it with cheerful red, carefully paint the
entire postbox, keeping the edges neat and
the color nice and even. This bold red is what makes
the postbox stand out, so take your time and
enjoy feeling the shape. As I paint the postbox, I'm working slowly
and carefully, letting the brush
follow the shape so they just stay clean and crisp. I want this red to feel bold and joyful because it's one of the main focal
points in the painting. I'm making sure
the color goes on evenly without streaks and
covering the surface fully, so it look rich and solid. If the paint feels
a little thick, I'll just add tiny bit of
water and smooth it out. This is a relaxing step. Once the red set plays, you can really see
the postbox come alive and start anchoring
the whole to sin. Once the red base
layers come red, it's time to add
depth and dimension. Pick up a little
of the brown shade and gently apply it
along the edges, corners, and
especially underneath the box flub where natural
shadows would fall. Blend the brown
softly into the red, so the shading feels smooth
and subtle, not harsh. These gentle shadows give the postbox a solid
slightly weathered look, helping it sit naturally within the winter painting while still remaining bright,
festive focal point. As I start adding the shading, I'm using just a small amount
of brown on my breast. I'm blazing it slowly along the edges and corners and
especially under the flap, imagining where the light
wouldn't reach as much. I'm blending the
brown gently into the red while paint
is still workable, softening the transition so
there are no heart lights. I don't want the shadows
to overpower the red, just enough to suggest
type and a bit of age. This step really
grounds the postbox, making it feel solid
and three dimensional, while still keeping
that cheerful, festive pop of color
in our winters sea. Now, let's add the
sweet little details inside the postbox. Using your detail brush, paint the tiny gift box and the card peeking out
from the opening. I have painted my gift
box in a bright yellow and added a red ribbon to keep it festive
and eye catching. But feel free to choose any
color combinations you love. Pastels, greens, or even classic reds work
beautifully here. Keep the shape simple and clean. Small, happy details are all ny. You don't have to
overwork this part, just enough color and contrast
to suggest what's inside. These cheerful little elements add a lovely storytelling touch, making the post box feel, thoughtful and full of
Christmas surprises. Alright. I'm adding a
little shading here now. I'm taking a very
small amount of brown and softly
shading the gift books, focusing on the areas where
shadows would naturally fall. I'm gently blending it out, so everything stays
smooth and light. Nothing too heavy, just enough
to give a sense of pom. I have painted the postcard
in a soft pastel yellow, so I'm adding very subtle
shading to it as well, just to give it a bit of depth while keeping it
bright and cheerful. Next, I'm picking up a small
amount of bright red on my detail brush and carefully painting the ribbons
and the book. I'm using gentle
controlled strokes here, following the shape
of the ribbon, so it looks naturally
around the gift. I'm keeping the lines clean
and the color nice and solid. These tiny details really pop against the softer
background and tones. Now let's add a little
depth to those ribbons, take a very small amount
of brown and thin it slightly with water so it
stays soft and subtle. With your detail brush, gently place this shade
along one side of the ribbon under the bollbs and where
the ribbon overlaps itself. These are the spots where
natural shadows would fold. Take your time with this step. Even simple ribbons
can instantly make the gift feel more festive and joyful when they
are painted neatly. A clean, confident
bread here adds that perfect Christmas
touch and helps the gift box stand out as a cheerful little focal
point of the painting. Now it's time to sprinkle
some winter magic. Take your white paint and
gently add snow where it would naturally gather on the
top of the post box, on the gift box on the wooden stand on the
branches of the tree, and lightly along the
edges of the car. Keep your brashtrop
soft and playful. You can, tab or gently strop to create
natural looking snow. These touches
instantly transform your painting into a cozy, snowy winter scene,
adding charm, depth and that
festive wintery feel. Now, grab your black paint
on the detail brush, choose any number you like, maybe a meaningful date, a lucky number, or just a fun little decoration and carefully paint it
onto the postbox star. Keep your strokes
light and steady, so the number sits neatly
on the proud surface. This tiny detail adds a personal touch and makes your festiive scene
feel extra special. Now, using the same black
paint and your detail brush, let's add a few final
strengthening touches. Take a very tiny
amount of black. This step is all about control. First, add a septile
highlights and ascends on the state due
to pen the structure. Focus on the areas underneath the postbox ella,
the inner edges, and a few select
lines where you want the start to feel stronger
and more grounded. These dark nodes
help bolden the form without overweighting
the lighter brown. Next, w to the tree and deepen shading in a few
places along the branches, especially just beneath
the green layers where the darker
pays already exit. This enhances the
illusion of depth, making the branches
feel layer and natural, as if some parts are
tucked into shards. Keep these touches small and tential little bags
here and there. Think of this as a fine tuning of the painting rather
than changing it. These id final details tie
everything together and give the painting a more
richer finished look. Behind the post bobs, take your detail brush again
and take some black paint, gently paint thin delicate
twigs and small bare branches, just tiny logs and
stem without leaves. Keep the stalks
light and settle, so they add depth and
texture to the background without pulling attention
away from the main elements. These simple touches
can your seen feel more laid and natural giving
that cosy wintry vibe. Now, let's add a
gentle touch of snow to those tick lines with
your detail brush and white paint lightly
trace along the tops of the tek and branches we just
added in the background. Keep these lines delicate
and broken, not continuous, so it feels natural as if the snow has
softly settled there. Finally, it's time to bring the painting to
life with falling snow. Dip your toothbrush in
some diluted white paint and gently splatter it
across the entire painting. Keep your hand
light and playful. This will create soft
delicate snowflakes that feel natural and lively. Next, let's add some festive details
to the Christmas tree. Take red paint and dab small
circles for ornaments. Once they are in place, use a tiny touch of brown to add subtle shading to each ornament, giving them depth and a slightly
three dimensional look. D D, And I also add a little extra snow on the postbox and
surrounding surfaces, soft highlights on the edges and top to tie the whole
painting together. These final touches make the painting feel
complete, cozy, and ready for the festive
season. And that's it. Our nostalgic Christmas
post box is complete. Thank you so much for
painting with me today. I hope this cozy little painting bring back warm
memories for you, too. See you in the next
class until then, happy holidays and
happy painting.
25. Table Decorations: Hello, low it friends.
Welcome back. Today. Let's create a warm
and cozy Christmas table full of festive treats
and glowing charm. We are decorating our
table for Christmas, so get your colors ready, and let's dive right in. We will start by setting the whole mood
with a background. Mix green, blue and white on your palette to create a
soft cool toned shade, something calm and wintry, not too dark or overpowering. Once you're happy
with the color, load a flat brush evenly. Begin painting the
entire backdrop area with smooth relaxed strokes. Let your brush glide
gently across the paper, keeping the layer
plain and even. Don't worry about achieving
a perfect blend here. This first wash is
simply meant to create a peaceful coid backdrop for the cozy Christmas elements
we will build on top later. Take your time with this step. It sets the atmosphere
for the whole painting. As you paint, keep your hand glaxed and let the
brush move naturally. Allow a little texture
to show through. Those soft uneven areas actually add character and warm
to the background. Remember, this layer doesn't need to be perfect or polished. Think of it as calm
cod paste that gently supports everything
we will add later. If you notice slight streaks of variations in tone,
that's completely fine. They create a subtle lived in feel almost like the
soft air of winter rope. Slow down, enjoy the process, and let this peaceful
backdwn set the mood for the cozy Christmas painting we are about to bring to life. Now let's move on to
the table surface. On your palette mix brown with a good amount of white to
create a soft light wood. Once the color looks
warm and natural, use your brush to fill
the tabletop area evenly. Keep your stock smooth and follow the
direction of the table, so it already starts to
feel grounded and sturdy. Be careful to leave the objects sitting on the table
unpainted for now. This little post help us keep clean sharp edges when we paint them later and avoid
muddy overlaps. Once the base layer is down, pick up some dark brown
and begin adding shadows. Focus these deeper tones
along the edges, corners, and areas where the object would naturally cast shadows
onto the table. Blend gently into
the lighter brown, so the shading feels
soft and realistic. This step gives the table
its depth and makes it feel solid beneath all
our festive elements. Next, let's deepen
the background a big. On your palette, mix
blue with just a touch of black to create
a rich, deep blue. Using a round or detail brush, lightly draw vertical lines
across the background. Don't worry about
making them perfect. These lines are only there to
build depth and variations. The now let's add some gentle vertical
lines to the background. Use a slightly darker
tone and draw them loosely without worrying about straightness or sharp edges. Let your hand move freely. These lines are just hints of texture, not defined details. Now take a clean, slightly damp brownish and
gently blend over those lines. Soften them just enough, so they blur into
the background, creating a misty out
of focus effect. This subtle blending
adds atmosphere without pulling attention away
from the main elements. To finish, let's introduce a hint of texture
into the background. Take your detail brush, and with a very light hand, draw soft subtle wood
grain style lines. Keep these marks
minimal and indelicate. They should feel almost
like a whisper on the surface, not bold strokes. Once the lines are in place, lightly blend over them again
with a clean darm brush. This softens the
texture and helps it melt naturally
into the background. So nothing feels
harsh or distracting. This final touch adds just enough visual interest while keeping the
background calm, gentle, and perfectly supportive of the cosy Christmas
scene we have created. Let's start adding the
Christmas leaves to build that festive backdrop
using a medium green, paint loose simple leaf shape
behind the cookie plate. Keep your strokes
relaxed and organic. These leaves don't
need to be perfect. Think of soft movement and natural flow rather
than sharp details. Here, I'm not using a puo
gain for the leaves just yet. Instead, I have mix
the blue with green to create a slightly darker
shade than our background. This layer act as a
base for the leaves, suggesting subtle shadows
falling across the wold. By starting with this
muted dark tone, we establish depth
and dimension. So when we add brighter
greens on top later, the leaves will pop naturally and feel more three dimensional. This way, the background
stays off while giving the illusion of the foliage subtly interacting
with the wool. And As I paint these medium green leaves, notice how the shapes
are loose and flowing, simple curves and soft edges. I'm keeping my brush relaxed, letting the strokes
move naturally, almost like they
are gently swaying. Don't worry about
precision here. The goal is to suggest foliage
behind a cookie plate, adding depth and natural
cozy feel to the painting. These subtle organic shapes start to bring the background to life without pulling focus from the main elements
in the foreground. Now, mix a darker green by adding a touch of
black to your green. With this shade, go back in and add some second
layer of the leaves, placing them slightly
overlapping the first layer. This contrast instantly
creates depth and make the foliage feel
fuller and more alive. And, add a few extra leaves creaking out below
the cookie plate, too, just to balance the composition and
frame the plate nicely. Keep everything soft. The leaves are meant to support the main elements,
not overpower them. Start by painting the
main central stem of the leaf with a
slightly darker green. Once the stem is in place, you cook fine strokes to create the needle like leaves
radiating out from it. Let these strokes scatter
naturally in all directions, wearing the length and angle a bit to give sense
of organic growth. Now for the cozy Christmas lamp, this is where the warmth
really comes alive. Begin with a glass
motion of the lamb. I'm painting the right side
in a soft warm yellow, and the left side in red. Where these two colors meet, gently blend them together
with light relaxed strokes. Don't rush this step and
don't overwork the paint. Let the colours naturally
melt into each other. This smooth transition is
what creates that glowing effect almost as if the lamp
is softly lit from within. Even if the blend isn't perfect,
that's absolutely fine. Slight variations
and softness only make the light feel more
natural, warm and cozy. As I blend these two
colors together, I'm using very light
gentle strokes and letting my brush
do most of the work. I'm not pressing too hard, just softly moving the paint where the yellow and red meat. You can slow down and
enjoy the process, watch the colours softly
merge into one another. Notice how the center area starts to glow as
the colors overlap. That's exactly what we want a warm diffuse light rather
than a sharp deviation. If you see uneven areas or
so of streaks, let them be. Those little variations
actually enhance the illusion of glowing glass and make the lamb feel warm,
cozy, and alive. Next, let's move on
to the lamb body. I'm starting by filling the entire shape with
a rich bold red. Take your time here and make sure the color goes on evenly. This red is what gives the lamb its classic cozy Christmas feel. Keep your strok smooth and
follow the curves of the lamb, so the form already
begins to feel rounded. Today's painting is a little different from our usual ones. Instead of focusing on
just one main subject, we are working with several
elements in the foreground. Because of that,
you might notice that we move back and forth, adding base color
to one element, then shading or
detailing another. This can feel a bit
confusing at first, and that's completely normal, but don't worry this
layering is intentional. As the painting builds, everything will slowly start to come together and make sense. Just trust the causes and
take it one step at a time. We will work through
each element calmly and thoughtfully, and by the end, all
these pieces will connect into a cohesive
cozy painting. Stay with me and let us
enjoy the process together. Once the red base is in place, pick up a very small amount
of brown on your brush. Gently add this along
the curves, edges, and underneath areas where
shadows would naturally fold. I'm keeping this shading
soft and controlled, blending it slowly into the red, so there are no harsh lines. This step is all about suggestion rather
than heavy contrast. The brown should quietly
sit into the red, helping the lamb feel solid, three dimensional and grounded, not flat on the surface. O as you blend, you will notice the lamp
instantly starts to take on depth and for making it feel more realistic and
cozy within the scene. I'm picking up just
a tiny amount of paint and placing it
only where shadows would naturally leave along the curves near the edges and slightly
underneath the foam. I'm not drawing
lines here instead. I am gently nudging the
colors into the red and blending it slowly so everything
stays soft and seamless. If it ever feels too strong, simply clean your brush, wipe off the excess water, and lightly blend again. This is a quid step
but powerful one. The brown doesn't
need to stand out. I just need to sit
subtly within the red. As you blend, you
will start to see the lamb round out
and feel more solid, almost as if it's
gently glowing and resting in the painting rather than floating
on the surface. Take your time here and enjoy watching the foam come to life. To enhance the glow, highlight the top of the
lamp with bright yellow, suggesting light
catching on the surface, add a touch of the
same yellow inside the glass area and lightly
on the table surface below. This act as the
reflection of warm light, tying the lamp beautifully
into its surroundings. For the cookies, start with a soft orange pastel shade and gently fill in
each cookie shape. Use smooth, relaxed strokes, so the surface feels
even and warp. Think of that freshly
baked cookie colour rather than anything
too bright or harsh. As I'm filling the
cookies, I'm using calm, smooth stalks and letting the brush move slowly
across the surface. I'm not worrying
about perfsion here, focusing on getting that
warm even paste down. Notice how I'm
keeping the colours soft and gentle, not too bright. This helps the cookies feel cozy and freshly baked rather
than flat or harsh. I'm simply enjoying this stage, letting the shapes come
together naturally. For the plate, a pastel
red on the main surface. We will paint the
bottom edge later. Once the paste
color is in place, pick up a small amount of brown
and begin adding shaving. I'm placing this lightly
around the edges and in a few random spots to suggest
that natural wage texture. Keep these shadows very subtle. We are not outlining
just hinting at depth and slight unevenness
that real cookies have. Blend the brown softly into the pastel orange so
there are no sharp lines. This gentle shading makes
the cookies look rounded, soft and slightly golden as if they have just
come out of oven. Take it slow and keep
the touch light. The beauty here is the
softness and warm. Now, let's paint the cozy
Christmas coffee mug. Start by filling the endear
mug with a rich red base, smooth even strokes, and take your time to keep
the color nice and solid. This red will really stand out against a softer background, so enjoy building
that bow shape. Once the base is in place, pick up a little brown on
your brush and gently add shading along the curves
and sides of the mug, especially near the
edges and bottom where natural shadows will fall. Keep this shading soft
and subtle and blend it slowly into the red so
there are no harsh lines. Now, let's complete
the cookie plate by adding a red colour to the
bottom part of the plate. Take some brown on
the detail brush and add some shadows
on the bottom part. We already had
some shadows here. Let's deepen it further
with the brown color. Now let's paint the candy
bars on the cookie plate. Let's add red stripes to
the candy bars. Alright. Now, let's return to
the leaf decorations. Let's add the second layer using Litan made by mixing
green with yellow. With this brighter shade, gently go over the
parts of the leaves, especially the outer
edges and tips. Slight relaxed probes and let the color sit softly on
top of the base layer. This lighter green acts
as a highlight catching the light and giving the
foliage a fresh lively feel. Don't try to cover everything, leaving bits of darker
layer visible underneath helps to create tape and keeps the leaves looking
natural and layered. Next, it's time to add
a pop of color with red paint tiny round cherries
nestled among the leaves. Place them naturally in small clusters or
scattered here and there, just like real berries
peaking through the foliage. Next, let's add those
final cozy details to the mug with
your detail brush and white paint gently draw a simple snowflake design
on the front of the mug. Keep the lines
thin and delicate. It doesn't need to be
perfectly symmetrical. A soft hand drawn
look adds charm and keeps the design warm and
festive rather than stiff. Next, let's show that the
drink is nice and hot. Take a diluted transparent
white and lightly paint so wispy strokes
rising from the mug. Use very gentle upward movement, almost like drawing
floating air. Now, to finish the cherries, take a very little
amount of gown and lightly shade one
side of each cherry. Blend gently to the
shadow melt into the red. This tiny touch gives
the cherries volume and make them look plum and lively, adding that final festive
charm to the greenery. Use your detail brush
with black paint and carefully draw a thin
handle for the table lamp. Keep the line light and control. I just need to
suggest the shape, not overpowering the lamp. These small details
helps to complete the structure and makes the lamp feel finished
and functional. Once that's done, continue
with the same brush and black paint to add thin delicate
twigs behind the leaves. Use light cube strokes to draw
simple branch like lines, letting them peek through naturally without drawing
too much attention. Finally, add small soft
shadows under the leaves, both where they sit behind the plate and slightly below it. Keep these shadows
subtle and diffused. They help anchor the
leaves in space, adding depth and realism, while keeping the overall
look gentle and cozy. Finally, let's brighten
the dL foliage by adding a few more light greens and soft branches in the backdrop. Mix green and yellow to
get a fresh light green and use it sparingly to place gentle highlights
here and there. These rocks should
feel airy and relaxed, little touches that catch the light and lift the
darker layers under. At this stage, we are working with many small,
thoughtful details. Nothing need to
be bald or heavy. Each tiny leaf branch or highlight quietly adds
its own bit of charm. When all these subtle
elements come together, they bring warmth, depth, and beautiful sense of
life to the painting. Take your time, enjoy the
process, and trust it. These delicate finishing
touches are what truly makes the painting
feel cumblech and cozy. Now for the magical touches, let's add a few soft
white boky circles in background using loose, slightly diluted white paint, gently dab or rotate your brush to create
soft circular shapes. Keep your hand
light and relaxed. These circles should
feel airy and glowing, not heavy or opaque. Now let's add a sweet little festive detail
to the background. On the twigs we painted
behind the leaves, place two soft glowing
yellow circles. Imagine them as tiny hanging
ornaments or fairy lights. Use a light hand and keep
the circles slightly soft at the edges so they feel
luminous rather than flat. You can gently tap
the brush or make a small circular motions
to build that glow. Once they are in place, take your detail brush
with black paint and draw very thin lines to
connect to the tok. And that's it. We
have a beautiful, warm Christmas decorated table ready to celebrate the season. Let's peel off the masking
tape and reveal the painting. Thank you so much
for joining me. See you in the next
section. Happy painting.
26. Tree in Snow: Hello, friends,
and welcome back. Today we are painting a quick and cozy snowy Christmas tree, something simple,
something peaceful, a lazy day winter sketch
to warm your heart. Let's begin by creating a
so of dreamy winter sky. Start right at the
center of your paper and gently brush in a
pastel yellow glow. Think of it as a quiet sun peeking
through the winter forks, subtle, warm, and
soothing. Not too bright. Use light circular strokes and let the color
softly spread outward. Next, move into a very
light gray by mixing white, the tiniest touch of black. Begin applying this around the yellow area slowly
surrounding it. As you paint, gently blend where the
yellow and gray meat, allowing the colours to melt
into each other naturally. There is no need of sharp
patches or perfect blending. We want this background to
feel misty and atmospheric, like an early winter morning filled with calm and stillness. Let the brush stay loose, embrace the softness and
enjoy watching the sky slowly come to life with
this peaceful, foggy snow. Now let's mix blue, white, and just a tiny dot of black to create a cold, surf warm gray. This color will help us suggest distant trees fading
into background. Using this gray
and your round se, lightly begin painting the
trees far behind the main sea. Keep your pressure very gentle. These trees should feel soft, misty and pushed into distance, not bald or detailed. With your round he, use short slanting strokes
to build the tree forms. Let the strokes angle slightly
downward and outward. Just like natural branches, start shaping the tree on
either side of the paper, allowing them to frame the sea. There is no need to
define every branch. Simple broken strokes
work beautifully here. As you paint, remember that
these are background trees. If anything feels too sharp, softly blur with the damp brush, so they just melt into the sky. This keeps a focus on the
foreground while admiring depth atmosphere and that
calm winter forest feeling. So let's gently move to
the left side of paper, take your round brush
and continue using the same short slanting strokes. Let them flow downward, and slightly outward just like quite winter branches
resting under snow. There is no brush here. Allow the strokes to
stay loose and broken. We are not painting
individual branches. We are simply suggesting the feeling of trees standing
together in distance. As you fill the left side, notice how the trays naturally
begin to frame the sea, guiding the eye
towards the center. If any edge feels a little
too strong or sharp, just clean your brush, dab it gently on the cloth, and softly blood the edge. Let it melt into the sky. For the main tree, let's
mix white with a touch of blue to create a fresh
snowy blue shade. This cold ton will give the
tree that frosty windry feel. Using your roundish, start painting long oil strokes
from side to side. Let each strop gently curve and overlap the one above
it as you go downward. Think of these as
so layers of snow resting on the branches rather
than sharp defined peeves. Keep the shapes
uneven and organic. Some wider, some narrow because natural is never
perfectly symmetrical. Don't press too
hard on the brush. A lighter touch, help the branches stay
focused and fluffy. As you stop these
strokes downward, the tree will naturally take
shade full at the bottom, and light it towards the top. If any edge feel too sharp, lightly soften it
with the damp brush. We want this tree to
feel calm, snowy, and peaceful, like it's quietly standing in
a winter waterland. Once the overall shape
of the tree is complete, it's time to add gentle
shadows to bring it to live. Take a very tiny amount of black and dilute it
well with water. This should be a soft gray, not a strong black. With your brush,
lightly place the shade just underneath each snowy
layer you painted earlier. These shadows suggest where one snow covered branch
sits above another. Keep your hand light and
your strokes minimal. We are not drawing lines here, just softly hinding a depth. After placing the shadow, gently blend it outward, so it melts into the snowy
blobe without any harsh edges. This small step adds beautiful dimension and
makes the tree feel fuller, layered and actually
three dimensional, like al snow, gently,
rusting, ot branches. As I work on this final stage, I'm being very gentle
and intentional. I have taken a tiny
amount of diluted black, and I'm lightly touching just under side of
each snowy layer. This helps to define
where one branch sits above the other without overpowering the
softness of the snow. I'm also taking a moment
to retouch a few areas, softening edges, strengthening
shadows here and there, only where it feels necessary. This is a good time to pause, step back and really
look at your tree. Trust your instinct. If something feels a bit flat, a whisper of shadow can fix it. If it feels too dark, gently blend it away. These final touches
bring the tree to life, giving it balance and that peaceful winter presence as if it's starting
silently in fresh snow. All right. Now let's bring
the snowy ground to life. Start by painting the
ground with clean white using gentle
horizontal strokes. Don't aim for a
perfectly flat fill. A little variations in
the brush movements actually help the snow
feel soft and natural. Once the white is down, take a very light gray. Just white with a tiny
touch of black and a few subtle rich lines
across the ground. Place them loosely following the natural rise and
fall of the snow slopes. Now gently blend these
lines with the soft brush, so they melt into the white. Creating the illusion of
it rolling snow drifts. Now, I'm using my detail brush for some very subtle
finishal elements. Using a slightly darker tone, I'm adding a few tiny plants, just hints of branches and thin grasses peaking
through the snow. These are very small, delicate strokes placed here and there, almost like this bus
in the landscape. I'm keeping them minimal
and scattered so they don't distract from the calm
open feeling of the scene. So I'll add a couple of bare winter twigs or plants
with thin dark strokes. I'm gently pulling the brush upward to create
simple slender lines, no leaves at all,
just quiet skeletal forms reaching up
through the snow. Try not to overthink these. A single confident stroke often looks more natural than
multiple corrections. Let's decorate the tree and
bring its festive sparkles. Using a detailed brah, start adding tiny circles of yellow and red across the tree. Keep them small and delicate. These are like little
ornaments or glowing lights peaking out from between
the snowy branches. Scatter them naturally rather
than placing them evenly. So the tree feels
lively and organic. As you praise the colors, imagine the lights softly shining through the
layers of snow. Some dots can be brighter, some are muted, depending on how much
whites surrounds them. There is no need to overdo it. Just a few cobs of
color are enough to instantly add warm and celebration to the
cold winter scene. Step back for a
moment and enjoy how these simple dots transform
the tree from quiet, snowy into festive and joyful. Such tiny touches, but they make the whole
painting feel alive. Now, let's add a
tiny playful detail on the ground our
little snowman friend. Start by painting two simple
circles one above the other. Make the lower circle slightly
bigger than the top one, so the pi feels
balanced and natural. I'm also adding one small circle on the other side as
a little snow bone. I'm keeping it very simple, just a soft round shape
painted in white. To give it a bit of fam, I will add the
slightest touch of light gray on one side
and let it gently. This tiny detail make
the ground feel more playful and natural as if someone has been
rolling snow nearby. Even such small
additions help balance the composition and add extra hint of
pintasha to the sea. Let's dress up the snowman, paint a bright red
cap on his head, and add a matching red scarf
wrapped around his neck. These cheerful pops of red instantly bring him to life and tie beautifully into the
festive color palette we have using throughout
the painting. With your detail
brush, add tiny eyes, add a sweet little smile
using thin dark strokes. Keep these marks light and simple just enough to
suggest expression. Then paint his checks
hands extending out from sides using
cute, delicate lines. Simple strokes work best here. Feel free to add
any extra details you love a tiny buttons, a small nose or a playful
tilt to the scarf. Pause for a moment
and enjoy this step. Such a small element,
it adds so much warm, charm and storytelling
to the scene. Making the winter landscape
feel truly alive and joyful. Now take a moment
to step back and look at your
painting as a whole. Add any final little
touches you feel it needs, maybe a bit more snow, a tiny highlight or a soft
shadow here and there. Trust your eye at this stage. These small
adjustments often make the artwork feel
complete and personal. And there you have a quick, relaxed lazy day snow
tree painting that brings instant winter charm and calm
to the page. We are done. Thank you so much for
painting along with me. I truly hope you enjoyed the
process as much as I do. I can't wait to see you again the next tutorial until
then keep painting, keep creating and stay cozy.
27. Little Cat: O. Hello, friends. Welcome back. Today, we are painting something super cute and
absolutely nor melty. A little cat staring up at
a glowing Christmas tree. The sketch is already ready
for you in the so section, so let's dive straight
into the magic. We begin with the Christmas tree that our cat is
quietly admiring. Start by mixing a deep sap, combine green with a
tiny touch of black for dip and bit of yellow to
keep it rich and lively. Using your round brush, gently add slanting strokes
across the background. Let these strokes
flow diagonally, suggesting that tree branches
naturally spread outward. Vary the direction and
length slightly so the tree feels organic
rather than step. Keep your pressure
light and relaxed, we are building
atmosphere not sharp t. Think of this step as softly hinting at a tree rather than
fully defining it. These loose laid strokes create a beautiful
backlop and set the stage for quiet moment between the cage and the
glowing Christmas tree. Next, loading brush
with black and paint the next set
of slanting strokes, letting them naturally alternate with the green you
have already laid out. These darker strokes acts like shallow step between
the branches, adding depth without making
the background too heavy. Keep your hand relaxed
and your strokes uneven. We are suggesting a tree
now defining every branch. Now switch back to green
and add another layer, allowing it to overlap both
earlier greens and black. All right. Let's continue
building the tree, using your round plush
and the same deep green, add slanting strokes to all
the remaining empty spaces, focus on filling the gaps, but be careful to avoid
covering the previous layers. We want all three layers
to remain visible. Keep your stalks loose and varied in length and direction, so the branches feel
natural and textured. As you paint, think of
the tree as having depth. The first layer is sitting
softly in the background. The second adds mid
level fullness, and this final layer gives
the tree AIB dynamic look. Take your time and let the
colors and layers break. The layered effect will create that rich festive tree
we are aiming for. After that, pick up yellow and lightly places a few
strokes here and there. The yellow works
like highlights, catching imaginary light and bringing warmth
into the foliage. By moving through
these four tones, green, black, green,
again, and finally yellow, we build a rich
abstract tree profile without ever painting
a little one, focusing on loose movement and texture rather than details. Let the colours dance
and blend on paper. This layered playful approach
gives the background, life, depth and a
beautifully festive feel. Now, let's calmly finish
off the tree profile. I'm switching between
colours as I go green, black and yellow to add final touches and bring
everything together. Step back and take a look at the tree's overall
shape and balance. Add layers wherever you feel it's needed a little more
depth fulness or contrast. I have gone back to
place touches of black, green and yellow at some spots until the tree felt
complete and harmonious. Remember, this
layering is flexible. You can stop whenever
you feel satisfied. The goal is a rich texture and pestive tree that feels full and lively without
overworking it. Take your time, enjoy the
process, and trust your eye. Let's now move on to the cat. We will start by preparing a
sienna color by mixing red, black, and a good
mode of yellow. Using this colour,
along with yellow, begin filling in cat's shape. On the left side of the cat, I'm applying yellow to indicate where the
light naturally falls. And on the other side, I'm using Sienna
to suggest shalow. I gently blend the two colors
together via them, creating a soft
transition that gives the left side a lighter
illuminated throat. Keep it stops smooth and flowing to capture the
softness of the fur while establishing
the base shape and volume of our little cat. Using your detail brush, carefully fill in the cat shape with soft control strokes. Follow the natural curve
of the body and head, so everything feels
smooth and rounded. Not stiff or flat. This careful laying helps
the cat feel dimensional, cozy, and naturally
part of festive s. As you paint, begin thinking
about the light source. I'm keeping one side
of the cat lighter, just a touch of more yellow, where the light
naturally falls or the opposite side slowly introduce brown to
deepen the shade. This contrast help define the form and gives the cat a
cozy three dimensional look. Blend the lighter and
darker areas so ply. So there are no harsh lights. We are not outlining
or working here, just gently sting volume. Take your time with this deck. These subtle shifts in tone are what make the cat feel warm, calm, and quietly watching
the glowing Christmas tree. Now using your detail
brush and pick up the brown with a steady hand, carefully outline the entire cat using a thin plain strop. Think of this asekoid definition rather than a bold border. The line should be delicate just enough to separate the
cat from the background while keeping the look natural
and elevate, not cartouge. This combination
of sort highlights and gentle outlining
brings clarity, depth and character to your cat, helping it stand out
beautifully while still feeling calm and
realistic within the sea. Let's give the tail a little
extra love and attention. Start by taking a dark
brown and softly placing it along the areas where the
tail naturally and tucks in. This shadow touches help the tail feel rounded and
grounded rather than flat. Keep the shading gentle and blend it slightly so it
melts into the base color. Now, you sing the
detail brush and begin adding those tiny hair strokes along the edges of the tail. You short repeated
delicate lines following the natural
direction of the fur. Don't rush this part. These
fine strokes are what create that soft fluffy texture and bring the tail to life. Even a few well placed strops
can make a big difference. Now, pick up your dark
brown once again and load just a tiny amount
of your feet and brush using a very light
hand gently outline the rest of the cat's body
with an ultra thin line. This is only a hint
of an outline, not a strong border. Let the line follow the natural
curve of the batiil and body or breaking the lines
in places if needed. I think it, I don't
think I don't think it, I don't to make your kitten
start out just a little more, pick up a very small
amount of pastel yellow on your detail brush using an
extremely thin delicate line, lightly trace parts of cat's
outer profile once again. Think of this as
a heat of light, not a full outline. Let the lines softly appear and disappear as you
move along the fur, especially along the
side facing the tree. This subtle touch creates
a gentle rim light epith as if the warm
Christmas lights are softly glowing around cat's fur. Keep your hand relaxed
and your pressure light. The glow should feel almost
accidental barely there. That softness is what
makes it magical. The cat feels warmly
wrapped in light, cozy, and quietly
admiring the tree. Now for the little face, this is where all the
personality comes in. Using a dark brown
on tail brush, begin by adding
the tiny nose dip, keep it small and soft enough to suggest the shape without
overpowering the face. Next, place the eyes gently. Don't worry about making
them perfectly symmetrical. A little imperfection
will art char. Since we are painting the
cage in a back facing force, the facial details should
stay very subtle state. We don't want clear
defined features here, just the softest hints. With your detailed brush, add a tiny amount
of dark brown and two very small marks on either
side, suggesting the eyes. Then place a tiny door or
short strop for the nose tip and lightly connect it with
the finest, shortest line. That's all we need.
No outlining, no sharp features, less
true is more here. Finally, paint facial hairs using very thin
delicate strokes, extending outward from the
cheeks and near the nose. Use minimum pressure and
let your hands relaxed so the lines feel soft and
airy, almost floating. Now, let's brighten up the tree our little
cat is gazing at. This is where the
magic tree is purple. Using soft basil tons, begin adding small bouquet style circles across
the tree area. Pick up white, yellow, red, and a touch of light now and place them
gently and randomly. Let some circles overlap, let others sit
quietly on their own. Vary the sizes if you want, a few larger glowing orbs
mixed with tiny hints of life. So the tree feeds alive at
tublet but in this painting, I am keeping my circles
almost in the same size. You can vary their
size if you are. Keep your touch
light and relaxed. These aren't meant to
be perfect circles or evenly spaced decorations. Think of them as blurred Christmas lights seen
through soft poker, dreamy, warm and glowing lights. As you build these layers, you will notice the trees
slowly transform into a cozy, magical backdrop, full
of warmth and wonder. Take your time here
and enjoy the process. Every little circle
adds to the charm and makes the painting
feel festive, glowing and full of
it Christmas cherry. As I add these booki circles, think of them as
soft glowing lights on Christmas tree
in the background, using gentle circular strokes, I'm placing them
loosely and later pi. As I add those boke lights, I'm keeping them mostly small
and fairly similar size, just like tiny twinkling
bulb on a Christmas tree. I'm placing them genly across the background with
low circular motions. They don't have to
be perfectly round. Slight variations in shapes are absolutely welcome
and add to the charm. You can choose to vary the
size and spacing if you like, or keep them more
uniform the way I am. Both approaches
work beautifully. The key is to keep your touch
light and the paints off, so the light feel
distant and glowing, not sharp or or power. These subtle little dots quaintly fill the
background with warmth and festive sparkle, pmulting the cozy Christmas
mood of the painting. Time to add a final touch
of charm to our scene. Take a bright red and paint a small bow around cards sleeve. Keep the shape
simple but playful, the bow sound feel
light and festive. Once the red is in place, gently add a touch of brown to shade the
folds and curves. Blend softly, so the
shading suggests volume and gives the bow a sense
of dimension and realism. Even though it's
just a tiny detalle, this little bow instantly
brings personality to our cat, making it feel psy, festive, and full of story, like it's ready to celebrate
Christmas along with us. Now, as I add
shading to the bow, I'm using just a very
small amount of flour. I'm placing it softly where
the fabric would naturally fall right at the center note and along the inner
curves of the loops. With gentle strokes, I blend
that brown into the red, so the transition stay
smooth and subject. I'm not aiming for
strong waters here. The goal is simply
to suggest depth, so the bow feels softly
folded rather than large. Even a hint of shadow make a big difference at this squid. Take it slow, step back if
needed, and adjust lightly. This delicate shading is what gives the bow that
finished cozy look, small, simple, and
full of festivo. And that's it. Our adorable cat admiring the shining Christmas
tree couplet. Thank you so much for
painting with me. I can't wait to see
you in the next class. And then happy painting.
28. Shining Tree: Hello, dear friends.
Today, we are painting another shining Christmas tree because what is Christmas
without a tree, right? This one is very simple to
create with just a few steps, but final result looks like
glowing shining festive tree. This artwork instantly brings that magical holiday vibe to your space. So let's back it. Start by setting the
mood with a night sky. Mix black and white to
create a soft gray. Not too dark, just enough to suggest a calm
evening atmosphere. With relaxed event stops, paint the entire background
area around the tree, carefully leaving the
tree shape and painted. Don't brush this step. Let your brush move smoothly so the sky feel quiet and still. It's perfectly okay if your
isn't completely flat. A little variations or textures only adds to that
nighttime fake. By keeping the tree area
clean and untouched, we are creating a strong
contrast that will help the tree stand out beautifully once we begin painting it later. Now let's work on tree. Mix green with a little
black to deepen it and add a touch of yellow to keep the tone warm and cisty. Using your brush, gently
fill the entire tree shape. I'm using my round brush here. Don't worry about making
it perfectly even. Slide variations in color. Actually, make the tree feel
richer and more natural. Now, mix the colors thoroughly to get a smooth,
consistent pale. Mix until you get that
buttery consistency, then we will start
filling the tree shape. As you can see, right now, I'm simply filling in the
tree shape and nothing more. I'm not thinking
about the depth or details at this stage
that will come later. This tap is just
about blocking in the form so we know where the tree lives
in the conversation. If the color goes on flat,
that's perfectly fine. And if you notice a few natural variations
showing up as you pay, that's also completely okay. Wash has mind of
its own sometimes. And those little changes in the tone won't hurt
the painting at all. Keep your brush relaxed, cover the shape evenly, and don't overwork the page. Think of this as a
calm grounding layer. Once this base is down, we will slowly build depth and glow on top of it
on the next steps. Once the tree is filled in, it's time to add
that magical glow. Switch to your detail bridh and take a soft pastel yellow. Very lightly, paint a thin line just outside the
edges of the tree. Keep this line delicate
and broken in places. It should feel like softly
spilling into the night, not a bold outline. This gentle hallow
instantly make the tree feel illuminated
as if it's glowing against the dark sky and it adds a beautiful sense of
warmth and depth to the sea. Now, let's add more
depth to the tree. Mix a slightly darker
green by adding just a tiny bit more
black to your green. We want it deeper
but not too heavy. Using short, small strokes, begin adding these
branch marks from the top of the tree and
slowly work your downwards. Keep the strokes light
and slightly angled, letting them overlap
and vary in size. These little marks
suggest plusters of branches and needles rather
than outlining them clearly. As I add these darker strokes, I'm keeping everything
contained within the triangular shape we
already mark for the tree. I'm not letting the branches spread outward or
break that outline. This is more a
packet refined rey, so all the depth stays
neatly inside its space. I'm using very short
gentle strokes here, just little touches,
not long lights. Think of these are
shadows between plusters of needles rather
than individual branches. I'm letting the marks
overlap and very slightly, but always working within the tree shape from
top to bottom. There is no rise with this deep. I'm simply building depth slowly adding darker areas where the tree would
naturally feel denser. If some spots look fuller
than others, that's perfect. It keeps the tree looking
rich without becoming messy. Keep your hand light here. Don't overfill every area, and remember we are not
redefining the tree, just quietly strengthening
what's already there. This apt laying is what
makes a tree feel deep, cozy, and beautifully grounded. Now it's time to
decorate our tree and bring in that
fisting speckle. Pick up your red and yellow and begin adding small decorations
all over the tree. Keep them simple, tiny
dots, small circles, let in star shapes, or irregular marks
are more than enough. These don't need to
be perfect ornaments, just hints of color that
suggest decoration. I'm starting with yellow first. Notice how I am not
pricing them randomly. I'm letting them flow like a
hanging chain of ornaments. I begin near the bottom of the tree and
gently move upward, placing the doors in a
soft curved angle line. As if the ornaments are naturally draped
across the branches, let the curve guide you. Some ornaments sit closer
together, some further apart. That variation makes the
tree feel laid and alive. As I move through the tree, I'm also being mindful
of the ornament sizes. Near the bottom of the tree, I'm adding slightly
bigger ornaments. This makes the lower area
feel fuller and closer to us. As I move upward, I'm intentionally reducing the
size of the ornaments. Smaller marks naturally
suggest distance, so the top of the tree feels
lighter and further away. This symbol change in
scale helps create perspective and makes
the tree feel taller, more balanced, and
more realistic, even though we are keeping
the shape very simple. Once the yellow chain
feels complete, I move on to the second color. You can choose any
color you love, but here I am choosing red. I repeat the same idea, another flowing curve chain, weaving it between
the yellow ones. Try not to place the red
directly on top of the yellow. Instead, let them alternate
and dance around each other. This keeps a tree feeling
full without looking crowded. As you add these chains, step back once in a while and look at the overall ballots. If one area feels
empty, gently fill it. If another area already feels
richer, leave it alone. There is no strict rule here. Trust your eyes. By layering these alternating chains
of yellow or red, the tree instantly
start to feel festive, decorated and joyful with ornaments wrapping around
it from bottom to top. Symbol marks can bring out
such a big transformation. Now I'm taking my detail brush with a tiny amount of black, and I'm adding very subtle
fins of shadow just below some of the picker
red and yellow ornaments. Once the ornaments are in place, it's time to add the
illumination light. This is where the tree
really starts to glow. Take your detail brush and load it with soft pastel yellow, using very gentle pressure, begin placing tiny glowing
lods across the tree. These lights should feel lighter and soft
than the ornament. Think of them as little points
of warmth peeking through the branches rather
than bold decorations and placing them in
between the ornaments, letting them sit naturally
within the layers of the tree. There is no need to cover the entire tree or make
them evenly placed. A few well placed
lights go a long way. Some can sit closer together while others can
scatter it apart, just like real Christmas lights twinkling in different depths. Now, let's finish the
tree with a glowing star. Using pastel yellow gently, draw a simple star at the
very top of the tree. Keep the shave soft
and not too sharp. This helps it blend
naturally with the warm festive glow
of the lights below. Once the star is in place, pick up a brighter
yellow and add a small highlight right at
the center of the star. Lightly blend it outward so it feels like the light is
radiating from within. Thise tiny highlights
makes a big difference. The star instantly
look luminous like it is softly shining and crowning the tree with
a warm, joyful glow. Using black pink and
your detail wish, begin drawing very thin, curved lines starting
just behind the star and gently spreading
outward across the preach. Wet your hand move freely. These lines don't need
to be symmetrical. You can use your pens
for this that will help you to get even
a straight lights. Think of them as soft
hanging light chains rather than carefully
measured graves, allow them to dip, rise, and wander slightly as they
move across the background. This natural movement
is what gives the painting its festive
rhythm and sense of flow. Keep your pressure very light so the lines stay delicate
unobstructive. They should support the
painting, not dominating. As you add each line, imagine strings of lights quietly suspended in winter air, framing the tree with
warmth and celebration. Take your time with this step and enjoy the calm repetition. It's slow, meditative and sets the stage beautifully for the glowing lights
we will add next. As you can see, I have divided the entire area into
smaller sections, and I'm filling the space
one portion at a time. Working this way
makes the process feel lighter and
less repetitive. Instead of overwhelming. By breaking it up to
manageable parts, you can stay relaxed
and focused, finishing each section before
moving on to the next. It also helps maintain consistency without
rushing the details. I have slightly
increased the speed of the video here to
keep things flowing, but feel free to take
your time while painting. There is no hurry, slow, steady work always brings
the most satisfying result. Once the light
chains are in place, we can slowly begin adding
the lights themselves. Close to the star
place tiny white dots. These are the
brightest points where the glow feels strongest
and most intense. Keep them very
small and delicate, almost like little
sparkles of light. As you move farther
away from the star, gradually shoots
to pastel yellow. These soft dots
creates warm and give the feeling that the light is gently fading as it
travels outward. Don't worry about
spacing them evenly. Let them appear naturally. So closer together,
some drifting apart, so the lights feel organic
rather than patent. This part of the painting is intentionally slow and repetit, and that's a good thing. There is no need to rush, allow your hand to
relax and you are beth to settle into
the rhythm of doting. If you like, put on
some gentle music and let the process
become almost meditating. Stay present with
each small math. Trust that every dot is
adding to the overall glow. As everything comes together, you will start to
feel the magic, a quiet festive atmosphere as if the night itself is
softly celebrating. So it's already day 34. And with this one, we have
reached 24 paintings, including the warm up
session we began with. So as we slowly are
celebrating chains, let's take a moment to
celebrate our small wins, too. Every painting you showed up for every brush
strokes you didn't skip every day you chose to sit with yourself even
when it was in DC. Just like these light, each small effort may feel
symbol on its own, dot, align, a quiet
moment, but together, they create something,
meaningful and complete. So let the chains flow gently, add the light slowly, and allow yourself
to feel proud. This tree isn't just
decorated with celebrations. It's a celebration. The So now let's slowly add the lights
hanging along these chains. Take your time with this part, put on some using you love, something calm,
something familiar, and let it play in the
background as you walk. Yes, this might feel like the most repetitive or
even slightly boring step of all painting,
but that's okay. This is where patience comes in. Each tiny door may seem
insignificant on its own, but together they
create the magic. Stay with the rhythm dot
by dot, breath by breath. Don't rush towards the result. Trust that it's warming
right in front of you. When you reach at the
end and step back, you will see it clearly. This low quid stage is what
brings everything to life. D to do you feel it? Something is still missing. The tree is complete, but it hasn't started
celebrating yet. So now let's add the final glow. With your detail brush, begin drawing so flowing
lights in starting from the bottom of the tree
and slowly moving upward. Let the lines curve
naturally as their eyes, gently wrapping around the tree. Think of them as strands of light softly
hugging the branches. They don't need to be
perfect or symmetrical. Slight turns and variations are what makes them
feel festive and alike. A once the chains are in place, pause for a moment, and
simply look at your tree. Let your eyes wander. If any areas feel a
little quiet or empty, this is your chance to
respond intuitively. Add a tiny light here, a soft sparkle there, just small, thoughtful touches. These final details bring
everything together. They balance the composition, enhance the glow, and give the tree that
celebratory presets. And just like that, the
tree begins to shine, calm, joyful, and full
of holiday magic. And that's it. Say back
and enjoy your work. Your shining festive Christmas
tree painting is complete. Thank you so much for
painting with me. I hope this browse
is spelt calm, joyful and creative, can't wait to see you
in the last section. Oh
29. Street Light: U Hello friends, today, we are painting
beautiful street light decorated for Christmas. This is also the last day of our 25 Christmas
painting series, and I'm so happy
and truly grateful for each one of you who
painted along with me. You will find the sketch in the Azo section,
and let's begin. Let's begin by
setting up a calm, woody background that will beautifully support
everything we add later. Start by mixing az gray using white with a touch of
black with the smooth, relaxed strokes,
paint a background evenly leaving a small area
unpainted on the right side. This little break in the
painting adds visual interest and gives us space to
play with contrasltle. So don't worry about
filling every inch. Once the first layer is down, mix a slightly darker gray. Make sure your brush is
fairly dry for this tip. Using a dry on dried technique, generally dab and
sweep this darker gray over the lighter
ways in random patches. Keep it loose and irregular. No patterns, no perfection. Think misty shadows, soft clouds or subtle
movement in the air. Some areas stay lighter and let others build
a bit more depth. This layer texture creates an atmospheric backdrop
that feels rich but quiet, setting the perfect stage for the elements that will
come forward lighter. Take your time
here. This step is all about mode, not precision. Using your own brush, keep both your paint and
brush fairly dry. This is a dry on dry technique, so we are working with
a very little moisture lightly touches the
surface and let the texture of the paper
do the work for you. Avoid pressing too hard ave and creates those beautiful broken
barbs and misty patches. If the brush feels too wet, simply dab it on a
tissue and continue. This dryness is what gives the background its quiet
atmospheric depth. Now, let's bring in that
quiet winter feeling by adding snow at a hint
of vegetation beneath it. Start by taking clean
white paint and gently applying soft place of snow
across the background area. Use light, relaxed strokes. Think of snow settling naturally rather than
being carefully placed. Let the white sit unevenly in some spots so it feels
organic and freshly for. Next, using your detailed wish, draw a few delicate is speaking
out from the background. These can be thin simple lights just enough to suggest
winter vegetation, resting under the cold. Don't add too many, if you will, plasticks are more effective
than filling the space. Now, take a tiny amount of black or very dark gray and add depth, especially towards
the lower part of the painting and around the
base of the vegetation. Keep this septle.
These shadows help crown the snow and prevent
it from looking flat. Finally, go back in with one
more light layer of white over parts
of the vegetation. Let the snow partially
cover the tips as if a fresh dustling
has just settled. This last touch makes
the St. Feel crisp, cold, and beautiful winter. Now, let's bring warmth into our winter painting by
painting the street light. Start with the glass panels of lamb using yellow carefully, fill it each panel. This is what creates that
beautiful warm glowing effect. While the paint is still fresh, soften it by blading in a light pastel yellow
around the edges. Let the colours melt
gently into each other so the glass feels soft
and radiant, not harsh. Think of a lam glowing quietly
on a cold winter evening. To as you work your way
around the street light, take your time filling each
glass panel with yellow. This yellow is the
hurt of the glow, so apply it gently and evenly. While the paint is still fresh, softly blend a touch of pastel
yellow along the edges, letting the colors
melt into each other. Use very pressure here. We don't want sharp
lines or harsh borders. The glow should feel
quiet and comforting, like a street lamp shining softly on a cold winter evening. Repeat the same process
for each panel, keeping the warm consistent, and you will see the lamp slowly come alive with
cozy winter light. D Now, pick up your brow and begin lightly outline the
structure of the lamp. Keep your strokes
thin and steady. This step is all about
guiding the shape, not overpowering the
glow we have recreated. Let the lines feel
soft and intentional, helping the lamp stay clean, elegant, and well defined. As you move around
the glass panel, add just a hint of brown
shading here and there. This isn't about
filling the glass. It's only a whisper of shadow. There are these tiny touches
such as transparency and depth showing how the light sits inside the lamp rather
than on the surface. Use very gentle pssure
and step back often. If it feels barely there,
you are doing it right. This subtle contrast allows the warm yellow glow
to remain the hero, while the structure
quietly supports it, just like a real street light blowing calmly in
the winter night. Now, using the same
down sheet gently paint in the base layer of the wreath
attached to the lamp. Think of this as
the Cid foundation. We are not adding details yet. Just giving the wreath a
solid form to build later on. Keep the stroke simple
event and relaxed, letting the shape come
together naturally. I'm using my detail
brush here as you work, take a small pose and notice
the painting as a whole. See how that warm golden glow from the lamp plays against
the cool snowy background. This contrast instantly brings a sense of cseness and
life into the painting. Like a welcoming light on
a cold winter evening, let yourself enjoy this
moment before moving on. Now it's time to dress wreath and bring in
that festive charm. Go ahead and add
a second layer of green over the base we
have already painted with small low strokes
and let your greens vary slightly as you a little dark
here, little dight here. We are not aiming
for perfection. We want the wreath to feel
full, soft and natural. Allow some of the darker
base layer to peek through while other
areas catch more light. Display of light and shadow
gives the greener in depth and make it
feel lush and alive. Walk slowly, enjoying the
rhythm of your brush, and watch how the
read start to take on its own character
with every stroke. Next, let's add a pop of joy
to your wreath with bow. Pick up a bright, cheerful red and
gently paint the bow, keeping the shape
soft and playful. There is no need for sharp
edges or perfect symmetry. A slightly loose shape actually make it feel more
natural and fisty. Once the red base is down, pause for a moment
and let it settle. Then take a tiny touch
of brown on your brush and softly shade the folds
at inner valves of the bow. Think about where the fabric would naturally bend or tuck in. Use a very light hand
and blend gently, allowing the shadows to melt into red rather than
sit on top of it. These subtle shadows instantly gives the bow volume
and movement, making it feel like real fabric catching the winter light. Even with just a few
careful touches, you'll see the bow
come alive and add that perfect festive
finish to the wreath. Now let's bring in that
fresh winter firing. Take a bit of white
on your brush and begin adding gentle
touches of snow. Place it where snow would
naturally settle along the top, edges of the rep,
lightly resting on the bow and catching on the
upper curves of the lab. Let the snow continue on to the surrounding
elements as well. Add so flays of the vegetation
behind the street light on the ground and anywhere the cold air would
quietly leave its mark. Keep your strokes
light and relax. We are not painting thick snow, just a fresh fluffy dusting. To gently complete this dig, let's move our focus to the top portion of
the streak lamp. Using your brown, paint it
as a soap rounded spear. Take your time
shaping it smoothly. Think of it as a
solid surry fam, quickly holding
the lamp together. Use slow controlled strokes, so the shape feels balanced
and grounded, not rushed. Once the brown ase is in place, pause for a moment and let
the foam settle visually. Now with the clean white paint, begin adding light layers of
snow over the lab structure. Place the snow where
it would naturally collect along the
top of the sphere, catching on the edges, resting gently on small ledges and lightly dusting
on the metal surface. With the snow highlights
soft and minimal, we are not covering the alarm, suggesting that it's
standing here for a while, quietly gathering snow
as winter passes by. Let some brown
steel peek through that godrag make the snow
feel more real and delicate. Now, time for those quit fun touches the kind that truly make the painting
feel complete. Take a moment to step back
and look at your painting. Don't rush, let your eyes
wander slowly across the NAC, notice where you
feel something could use a little more strength,
balance, or clarity. Using your brown,
which in adding tiny hints of dep
wherever it feels needed. This might be a small
shadow underneath. A slight deepening
allow the parts of the lamb structure
gentle retouched beneath snowy edges or a subrine sharpen a form without making it hush. Keep your pressure light
and your stocks minimal. These are not big changes, just small whispers
of contrast that help shapes stand out a little
more confidential. Now it's time for the snow. Take your tooth brush and dip it lightly into diluted
by white paint, gently tap it or
flick the bristles, so the fine, white speckles
scatter across the painting. These tiny douts create the effect of soft
snowfall in the air. They don't try not to
overload the brush, lighter splatter looks
more natural and keeps the painting
airy and calm. Once the platter is done, switch to your detail
brush with white paint, add a few larger soap circles
here and there to represent big snowfall drifting
down toss it to us. Keep them random,
some slightly round, some imperfect because real
snow never falls event day. This final layer
of snow instantly brings movement and
life into the painting, trying all the
elements together, and giving that quite magical
winter night feeling. And with that, we have completed all 25 Christmas painting. Thank you from the bottom of my heart for joining
me every day. I hope this series has made you more confident in wash
and blot you joy. You now have a whole collection of hand painted
Christmas art this year. Let's move on to
the bonus painting. I can wait to see you there.
30. Illuminated Tree: Hello, friends, and
welcome back to the bonus painting
of this class, our 27 artwork, and the final one in this beautiful
Christmas series. Today we are painting a soft dreamy Christmas tree placed against a large window, almost like how I see
it without my glasses. Just kidding, it's meant to be a lovely blood flowing tree full of warmth and
festive charm. We have created versions of this tree in many of our
previous backgrounds, but today we are exploring it fully as the star
of the painting. Start by loading
your flat brush with a soft pastel yellow gen ink, begin painting the background
around the window pia. Now, the interior sheet, think of this tape as
painting the walls and ceramic globe while
the window glass itself remain untouched for now. As you work carefully, leave the large window opening
unpainted in the center, this unpainted area will
become the glass later. So allow you to stay
clean and light. Don't worry about measuring or making the window
perfectly straight. An organic hand drawn shape actually adds warmth
and character. Now, instead of
creating sharp borders, a clean brush, slightly down, and soften the edges
of the window opening. Gently, pull the
yellow inwards and outwards along the edges so
the color feeds naturally. Let the paint blur and
melt into those borders. We are not painting
a solid wall here. We are creating the feeling of light surrounding a window. Keep the strokes
loose and relaxed. If some areas look uneven, or sofly clouded,
that's perfectly okay. This blurred background
is intentional. It gives us that dreamy
boxed look as if warm light is
filling the room and the window is glowing rather
than being framed sharply. Take your time with
this tape, at overload, step back and once
in a while and enjoy how calm and cosy
background feels already. This softness will make
everything we painted later. At the three lights
stand out beautifully. So I'm making the edges off
with gentle brush drops, train your flat brush
completely and wipe it off with a damp brush slightly touch
the edges to soften it. Now, let's gently
define the tree shape using black color
with a round bridge, begin at the very
top of the tree and slowly work
your way downward. Use short loose strokes, letting your wrist stay relaxed. These strokes are only here
to suggest trees move. We are not outlining a perfect triangle or
drawing a solid shape. Keep the marks broken,
light and uneven, allow more gaps
to remain between stops so the tree
feels airy and soft. No heavy or rigid. Imagine you are sketching a quid shadow rather than
painting a bold object. Just enough to guide the eye and hint at where the tree
lives in the space. As you move downwards, slightly, widen the strokes to follow the natural spread
of Christmas tree, but stay gentle and looms. This is just the
bailout that will support all the glowing
layers we will add later. If any lines start to look too dark or
harsh, don't worry. Simply take a clean, slightly damp brush and
soft it right away. Let the black melt back
into the background, so everything stays
up until a drink. This step is all
about suggestion, not precision, a calm, loose outline will
make the tree feel atmospheric and beautifully
blended into the painting. Now, let's build the tree
with soft plowing layers. Begin with your second
layer using green page. With your round
brush, gently brush this screen over the black
slow we just created. Let your stokes stay
loose and relaxed. We are not filling
in every inch. Allow little bits of the dark waste to peek
through here and there. Those dark hints are important. They act like shadows
stuck between branches and instantly give
the tree depth and dimension. As you work, fw the
natural triangular flow of the tree using short soft
strokes that slightly overlap. Don't worry if the green
look uneven or texture. There are variations is that makes the tree feel
alive and natural, not flat or artificial. Now move on to the third layer, which say lighter green by adding a touch of
yellow to your green. This color should
feel fresher and brighter or most like
it's catching light. With a very light hand, gently brush this shade
over parts of the tree, especially along
the outer edges and a few rised areas where light would naturally
touch the branches. Keep this layer
soft and selective. We are not covering the de tree, but just kissing it with light. This brighter greens bring warm into the painting
and start to create that beautiful festive
glow that makes the tree feel cozy and inviting. Once you're happy
with the layers, pick up a small amount
of white paint, lightly blend around
the edges of tree to soften its outline and help
it manage to the backdg. Then using a very
pale white chin, gently brush over random
areas within the tree. There is no need to
define the shapes here, think mist glow and softness. This final blending step creates that dreamy
out of focus look, making the tree feel
gentle mans and beautifully atmospheric
rather than sharp or detail. Mix loose, watery
gray and gently apply it along the bottom and left
edge of the window piles. Use a very light pressure and keep your brush
moving softly. Think of this as whispering in the shadows rather
than chowing Tp. There is no need for
strong lines here. Just let the gray lightly at the edges where deep
would naturally form. As you paint, allow the
greater Oakley feather out wood and glend into the
surrounding piston background. If the paint feels too strong, simply clean your brush, dab it off the extra water, and gently soft the areas. We want the shearing to
melt into the background, not sit on top of it. Notice how this subtle shadow instantly gives the window
frame more depth and structure while at
the same time making the glowing tree behind it feel brighter and more probant. It creates that quiet contrast between cool shadow
and warm light, the kind you'll see on
a calm winter evening. Now it's time for one
of the most maglo step, adding the glowing poke lights
to your Christmas tree. These little spots of color are what will make the tree
feel alive and festive, giving it that warm
tingling holiday glow. Start by mixing soft pastel
sheds of blue, yellow or red. Keep your hand relaxed and use very light pressure
on your brush. As you dab each circle, let the brush barely
touch the paper. Almost like you are brushing a whisper of color
onto the tree. The goal is soft dumous
circles, not heavy pad. Remember, pressing too hard can reactivate the base
layer of the tree, which might mix with your pasts and make the glow look muddy. If you notice your
brush picking up any of the base colour,
stop immediately, rinse it in water, wipe it tree, and use second jar of water before picking
up fish colour. This step is all about patience. Gentle deliberate touches
make all the difference. Once you have done with
the softer base lights, you can go for brighter
yellow and red tones for a few focal spots. These represent the
lights that are closest or brightest giving you a tree depth and dimension. Remember, a little
goes a long way. You don't need too many just enough to suggest
sparkle and walk. Take a moment as you
place these lights, let yourself enjoy the rhythm, the repetition, and
the gentle glow slowly appearing on your tree. With each soft dab, your painting is
starting to come live with festive charm
creating that dreamy, cosy Christmas
feeling we all love. Take your time with this deep. It's slow and meditative, and each circles add warmth, depth, and that
unmistakable festive magic. As you work, step back
officially and see how these of clos instantly
trans off the tree, making it feel alive,
joyful, and radiant. Now, we are adding the brighter, more vibrant lights to our tree. The ones that really pop and catch the eye using
your detailed brush, gently place more circles of bright red and yellow
across the tree. Focus on random placement. So near the branches, some peeking through the gaps
and vary the size slightly. I'm keeping the
size similar here. Let them overlap
a little here and there to make the glow
feel natural and layered. These brighter dots are the closest to most
sparkle lights, giving the tree depth and
that celebrate tree sparkle. Don't overdo it. Just
a few well placed dots will be enough to make the tree look alive, cozy and magical. And finally, let's add a gentle blood star at
the top of the tree. You re soft diffuse
strokes, not sharp, just here just a subtle glow star shape to
crown the tree, adding that finishing
touch of magic. It doesn't need to be refined. The soft blood will
make it feel dreamy. To create even more dimension, lightly add a touch of
black or very deep green in the central parts
of the tree hinting at shadowed areas
behind the lights. These subtle contrast will make the glown spots feel
like they are floating, giving the tree a rich
three dimensional sparking. Take your time, step back occasionally to observe
the overall blow. Each gentle dab adds
to that magical, festive moment when
the tree comes alive, Bth in shimmering light. And that's it. Our last and
final painting of the season. Thank you so much for
painting along with me through all the 27 paintings. This journey has been so
special and I truly hope it filled your holidays
with creative and joy. I'll see you in the
conclusion section, and once again, thank you
from the bottom of my heart.
31. Thank you: Thank you so much for joining me on this cozy,
creative Christmas journey. I'm truly grateful that you chose to spend your
time painting with me. I hope this class
brought you moments of calm joy and mindful relaxation, the kind of soft peace that makes the holiday season
feel extra special. Throughout this course,
you explored ghost basics, played with brush strokes, mixed beautiful festive colours, and completed 27 charming
Christmas paintings from warm up illustration
to detailed holiday pieces. I hope each painting felt like a small celebration
of your creativity. I'm so proud of you
for showing up, practicing, and letting
your artistic side shine. Remember, art is not
about perfection. It's about expression, play, and the joy of creating
something that feels like you. If you enjoyed this class, I would absolutely love
to see your paintings. Please share them in the
class project section or tag me on social media. And don't forget to click Follow on my Skillshare profile, so you will be the first to know when a new class go live. Also, if you're interested in creating handmade
Christmas ornaments, I have a full class dedicated
to that on Skillshare. You can easily find it on
my Skillshare profile, and it pairs beautifully
with this painting course. Thank you once again
for being here. I can't wait to paint
with you again. Until then, stay cozy, stay creative, and keep
filling your world with color. Happy holidays and lots of love. If
 Anu Varikattu, Artist l Gouache & Acrylic Instructor