Transcripts
1. Class Introduction: Hello, everyone. I am Chan
Tibi an artist from Vietnam. I started my journey with
watercolor, but lately, I have fallen in love with wash, especially for painting
vintage style floals. And welcome to my new class. Watch for beginners, ve up your skills with
magic rose gardens. Roses are a favorite
for many artists, but they can be challenging
to paint. Don't worry. I will guide you step by step from practice drills for stems, leaves and petals to creating a magical rose garden as
our final class for jack. This class is a little
bit more challenging than my daisies and
forget me nots glasses. So if you are
completely new to wash, you may want to check
those out first. Now, let's get started and bring some blooming roses
to your sketchbook.
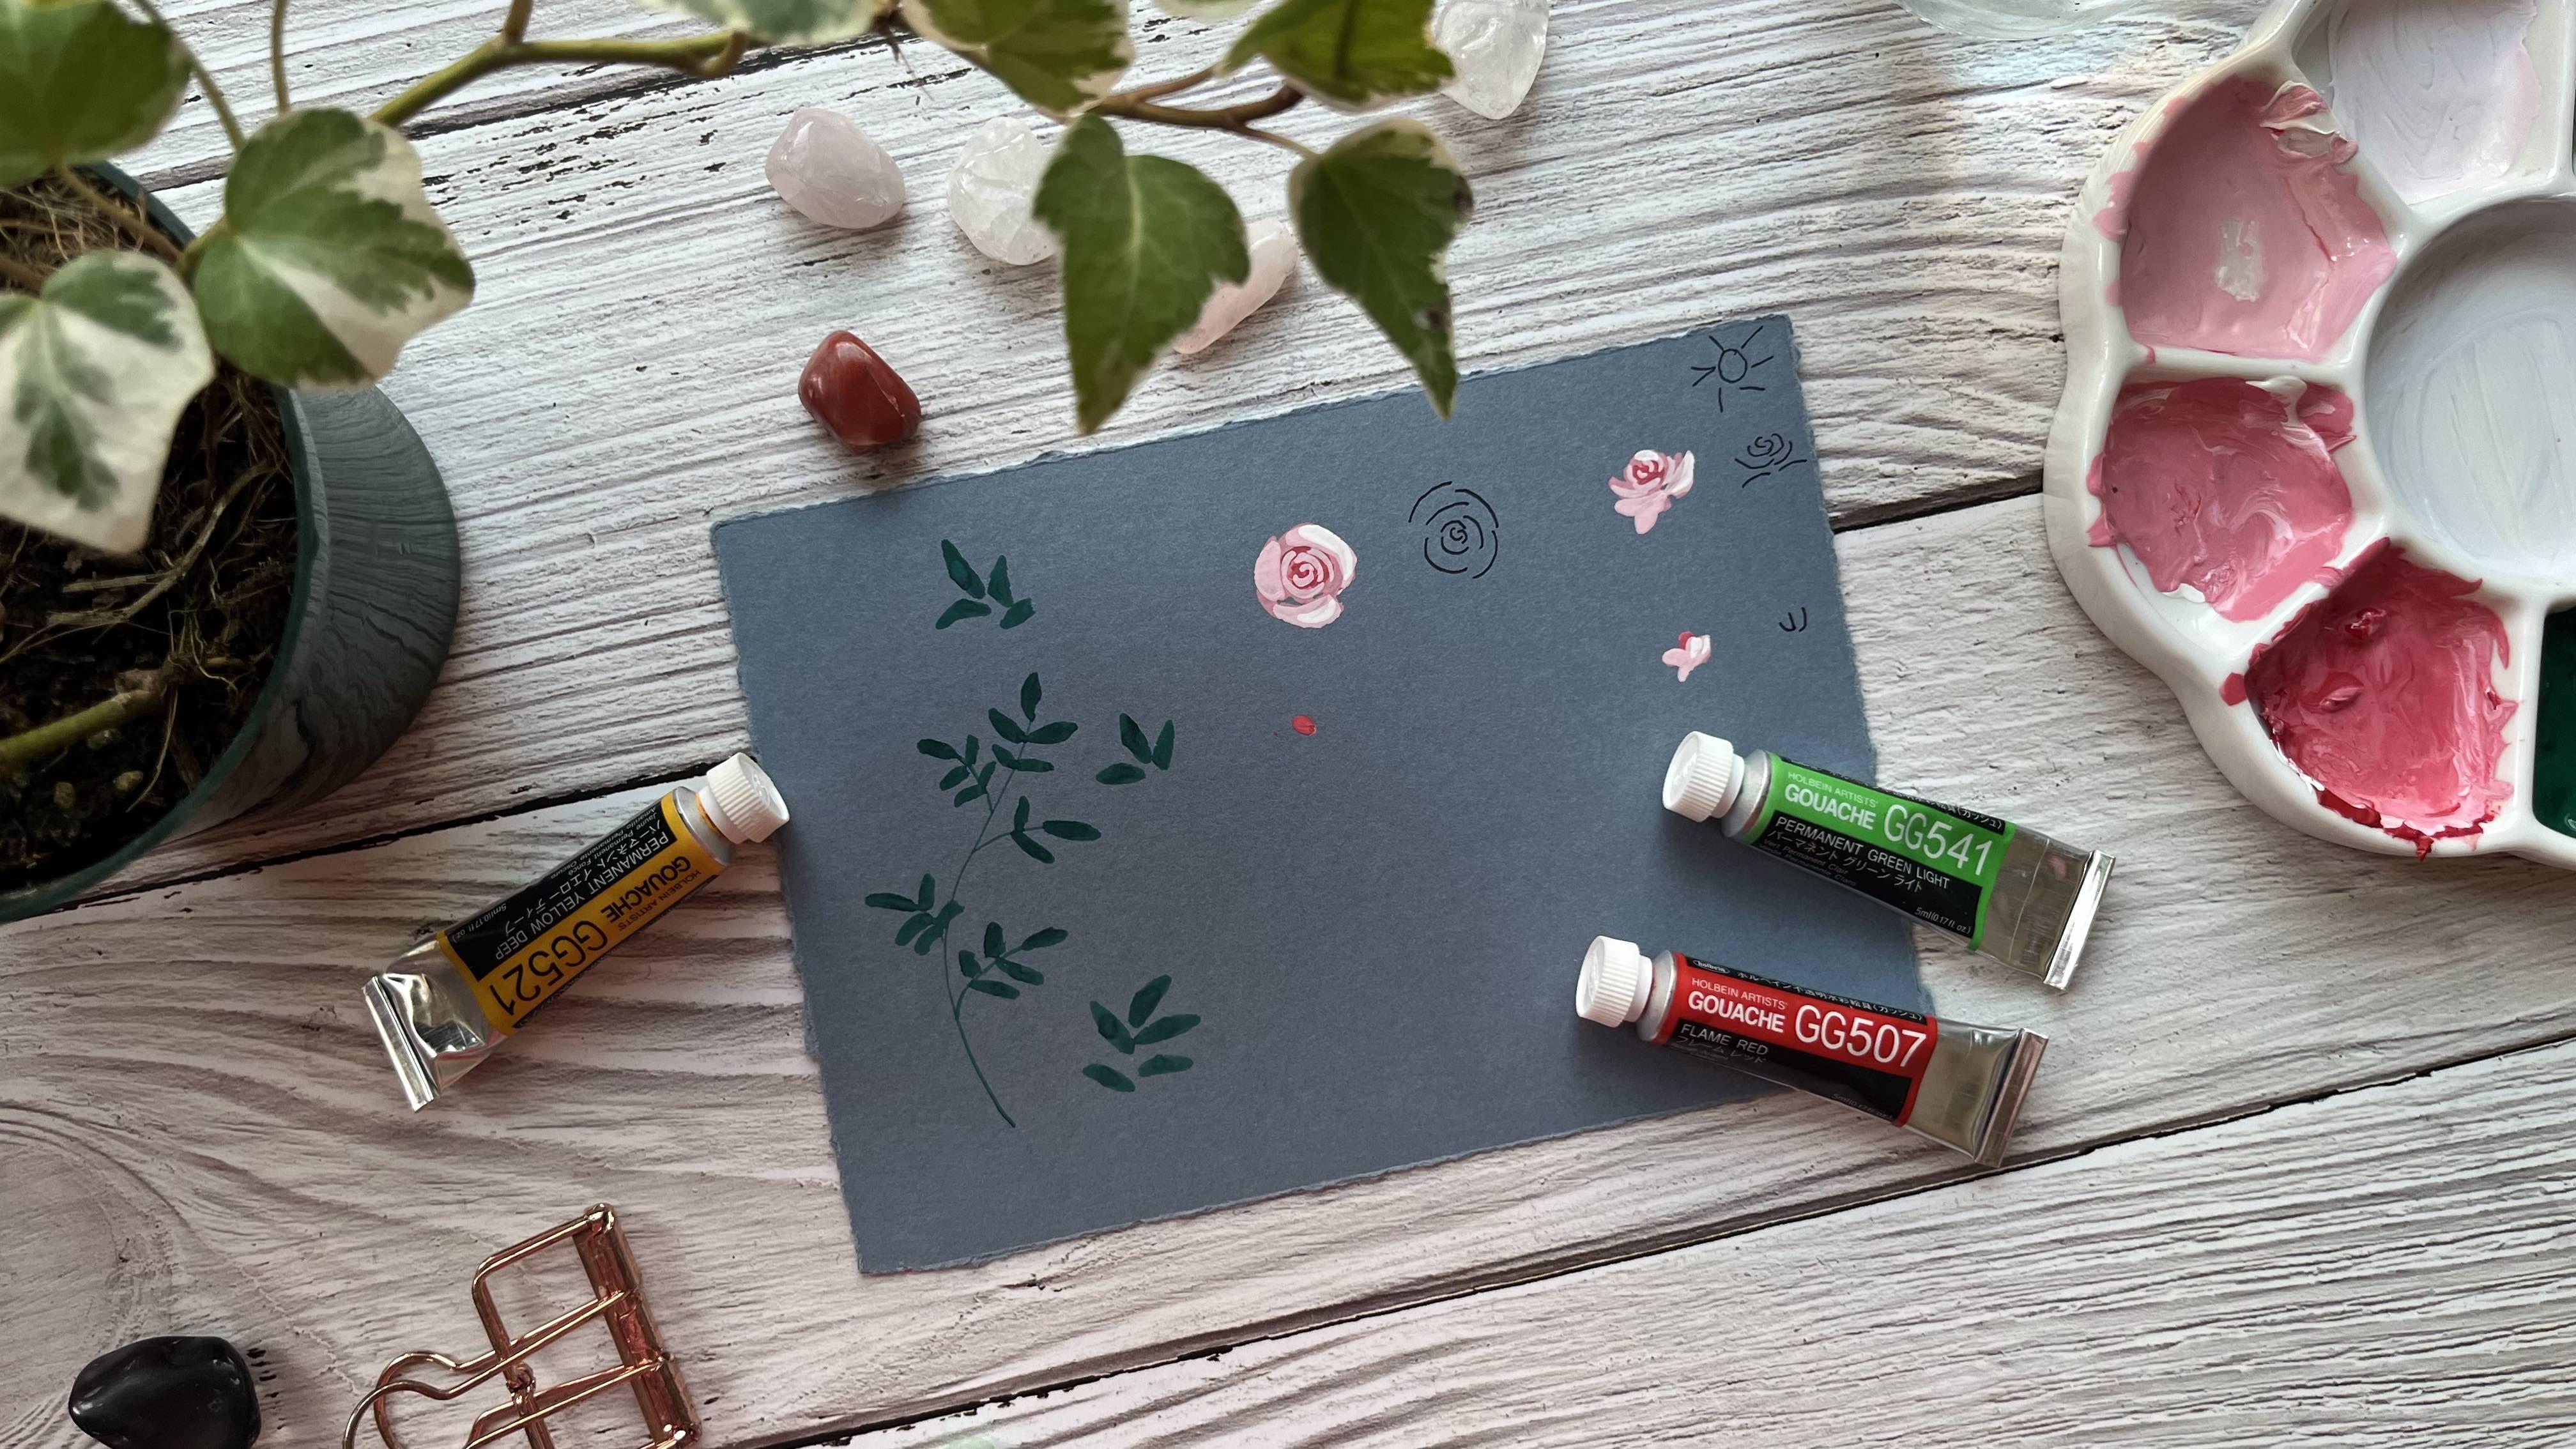
2. Materials and Color Pallete: In this first lesson, we go over the
materials and color palette I will use
for our today class. Just keep in mind, you
don't need to have the exactly similar
art supplies as I use. Feel free to use whatever is the most convenient
and available to you. In this very first lesson, let's talk about the tons and materials you may need
to use in this class. Keep in mind, these
are just suggestions, you don't have to use exactly similar art supplies as I do. In order to wash, we wash pin, we need some paper. We need some brushes,
a missing palette, and the container and
small piece of cloth. Let's go into
everything in detail. For for today class, I will use a small piece
of watercolor paper. This is a six size which is ten multiplied 15 centimeters, and this is about student grad, 100% cotton, water colour paper. But for this class,
you don't have to use 100% cotton water colour paper because we will only use
the layering technique. We don't use on wet
technique for this class. For practicing some techniques, I will use this gray paper. The reason I use this gray paper is because for final project, we will paint the flowers
on the duck pick ground, so I will use the gray
paper so that we don't have to to put the first layer of dark color to practice
some techniques. But it is okay if you
don't have a gray paper, use a normal white paper
and you paint some kind of color background first
before practicing the techniques to paint the
leaves and the flowers. Next for the washban
it is Himi 36 colors, Whpan I purchased this
very cheap in Vietnam. It's only around more than $10, it may be more
expensive if you are living in a country
which is far from China. But this is just
a student grade, washban and you can use any other brands
you have at home, it is the most convenient
for you to purchase for today's proche we don't need to use 36 colors, we only use. The first one for the sky, I will use a little bit of
light a little bit of violet. And a lot of white a
lot of white color. So, in order to paint with wash, we use a lot of white color. So make sure to
have a separate tip or pep or white wash pain. And for the make the flour, I use black paint. I will mix it with
this kind of green, it is green blackish green. But if you don't have
this brush green, just use any dark green
color in your bobs. I will also use this blackish blackish green to
paint the first layer of bleaf I mix it with lemon to paint another layer
of bleaf and for flower, In just red color. It is orient red, but you just need to use any vibrant red colors in your paint pops and
that's good enough. That's all the colors we may need to use
for today's class. For brush for today class, I use this.This is zero size rail brush
to paint the leaves, to paint the flowers. I mean, use this small
lila brush to paint, you see the the stem and some some leaves in the
center of the flowers. And I also use this
fiebre brush to paint the sky and
and the background. Honestly, I think I think I use another brushes,
another brush. I mean, use the flat
brush flat brush to paint the sky here, so we need probably three to four brushes because you can use the fiber
brush to paint the sky, but I think the flat brush is easier to paint the sky here. So we need water container, maybe we need to one to
clean the dirty brush, want to clean the clean brush. But for me personally, I only use one container
of water and I will change the water when
I find it to be dirty. And I will also use a
small piece of cloth. So after after cleaning your
brush with water container, we can tap it on this small piece of cloth
and it will be cleaner. And that's all the materials we may need to use
in today's class. And in the next lesson, we teach you some techniques to paint the flowers
and the leaves.
3. Practice Painting Rose Stems and Leaves: Next, we practice some leaf and petal drills to prepare
for our final project. If you find it difficult, keep practicing and
after several days, you will be confident enough to tackle the project with ease. In this lesson, let's
practice to paint some lease, rose flowers, and
as you can see, I am using a gray color paper because I don't want
to spend time on painting the background
before painting the flowers later because you
see the flowers here have some white color. So if we paint it
on white paper, it will be difficult to see. That's why I use
this gray paper. But if you don't
have gray paper, you can try with white
color and we need to put the wash first. And if you are not very familiar with the
layering techniques, you may want to check out
my very first glass here on skill share blooming with
materials, techniques, and Daisy del because
painting daisies is a little bit easier than
painting the rose flowers. If this glass is a little
bit difficult for you. Just try our Daisy, forget me not glass. First, in order to
paint the leafs, pain we will paint
the stem first. This la brush to paint the stem. I'll be easy to paint thin lines using lila
brush instead of brow brush because you
see the This section, I don't know how to con it, but it is thinner, so it is easier for us
to paint the thin line. We put some water here to have a creamy consistency
and we paint the stem. My hand is wet, but it's not a big problem. And so some stemus then I
will use this round brush. I will use this round
bus to paint the leaf. Ose leaves often often
have some kind of cluster 3-4 leaves together. So you don't try to
make the leaps perfect, one stop, one or two stop shop, and that's good enough. So if you look at
my paper right now, the leafs here look
a little bit weird. But when we paint a, a
lot of them together, we have a feeling a garden and the leaves here don't
have to be perfect. One thing to keep in mind
is for this painting, not on the leaves, we can see the stem, so you need also to practice the leave when we
don't see the stem. I just make someter
blase together. We imagine there's
some stem here, but we don't have to paint it. It's maybe three or it's
maybe five leaves cluster. This is on the techniques we need to use to paint the stems and leaves
of this rose garden, and that is probably
the end of this lesson. See you in the next lesson. I mean teach you the techniques to paint the rose flowers.
4. Practice Painting Rose Flowers: In this lesson,
let's practice to paint rose flowers and keep in my bending rose flowers is a little bit more difficult
than painting daisies, or forget me not because
you see it is more seedy for daisies forget
me not it's tout flowers. Again, if you find this glass is a little bit
difficult for you chi my other glass on painting daisies or
forget me not flower. I will teach you how to paint
the rose when we see it, how to say 90 degree and
also the rose when we see from I think
it's a 70 degree, something like that, some
bad and some small bat. Actually, for that kind
of bass only one dot. So in order to paint
this kind of rose, we need to paint in one, two, three, one, two,
three, four layers. You start with the first layer. For the first layer,
we will we will mix, we will mix white and red. So if you see this color, you mix the ratio to have
the color that you like, but it is the color we will see we've easy to
see on the flower. I put my right hand
onto the paper. So now, it is a
little bit dirty, but no problem because
as I mentioned before, imperfections make the
painting looks perfect. So first, let's paint the
flowers up front 90 degrees. So If you find it is a little bit tepy we
will paint this kind of show one, two, three, four. If you have participated some classes on painting rose flowers on
using watercolor, we will use this kind of stop. Next we will paint the rose with around 70 degree
three quarter degree. If you find it is a little bit too difficult to visualize, which is the shop. Then for Z title, but it is just one dot. And for this tile,
it is guided up. The shop here is like this. This is the first layer. Now we need to wait for the
paint to dry before painting the second layer on top of this so the first
layer is already dry, if it's not really dry, but for the second layer, we don't have to wait
for too long because the second layer is very simple. It's very simple. We just need to put a small.in
order to I add more red into only I will
add more red into this color to this color
to covid shade of red. I think this is better. The second layer, it just put a small.in the center
of the flower. You can use Sevastop to make it. For the bus, I will
just make it darker. You can make your stop so that it look like the
same shop, the rose, but it's not important
because you will put another layer on it anyway. You can use it to fill the gap. The second layer, basically, we we put the nappies value of the red color onto
the center of the flour. Now we need to wait
for the paint to dry again before painting
the third layer. We need four layers in
total to paint rolls. I have just used my hat dryer to accenuate the drying process. Now let's pin the third layer. For third layer, we a
lighter shade of red. In order to do that, I will pick up some wine here. Pick up the right from here. That is even lighter shade of I will start with this small layer brush first
B in the central flower, you can only use actually
to paint this painting, I only use I only use
this brush but too easy, we will use even
smaller brush to paint centre flower first and then use bigger brush
to paint out layer. We just repeat the
previous process, but we leave some gap. Let's try to bend this big br to I feel that there are
some missing here, so I add another leaf here. For this wolf, this boat, we don't have to use anything. I think it is
beautiful enough for the small but the rose flower. For this In boot
or maybe you can put another here another
petal here if you like. That is the third layer
of the rose flowers. Now, we need to wait
for everything to dry again before adding
the little highlight on top of everything. Now, let's bend the
final the rolls. So for the final layer, we identify the light sauce, so we imagine we have some here. And you can use poor white or
you put just a little bit, stretch a little bit
red here to go with even lighter shade a red. Imagine if we have a sun here, this part of the flour
will be lighter. I a highlight here. And that's on the techniques
to paint the rows, flowers. I look a little bit complicated, but it is really simple. But when we paint when we
paint the final painting, we may need to have
some adjustment about the shade and the highlight
depends on the composition. So we may need more
than four layers. For example, up to four layers, you feel that we need to add
some an extra petal here, we may add a some flowers, if you want to paint a
colorful rose garden, we may add a little bit, in yellow for some flowers. But first, you need to practice the essential
technique first and that's all the techniques we need before moving to the final
project of today's class. This is the end of this
session and I will see you in the next class where we practice to paint this
lovely rose garden. Oh
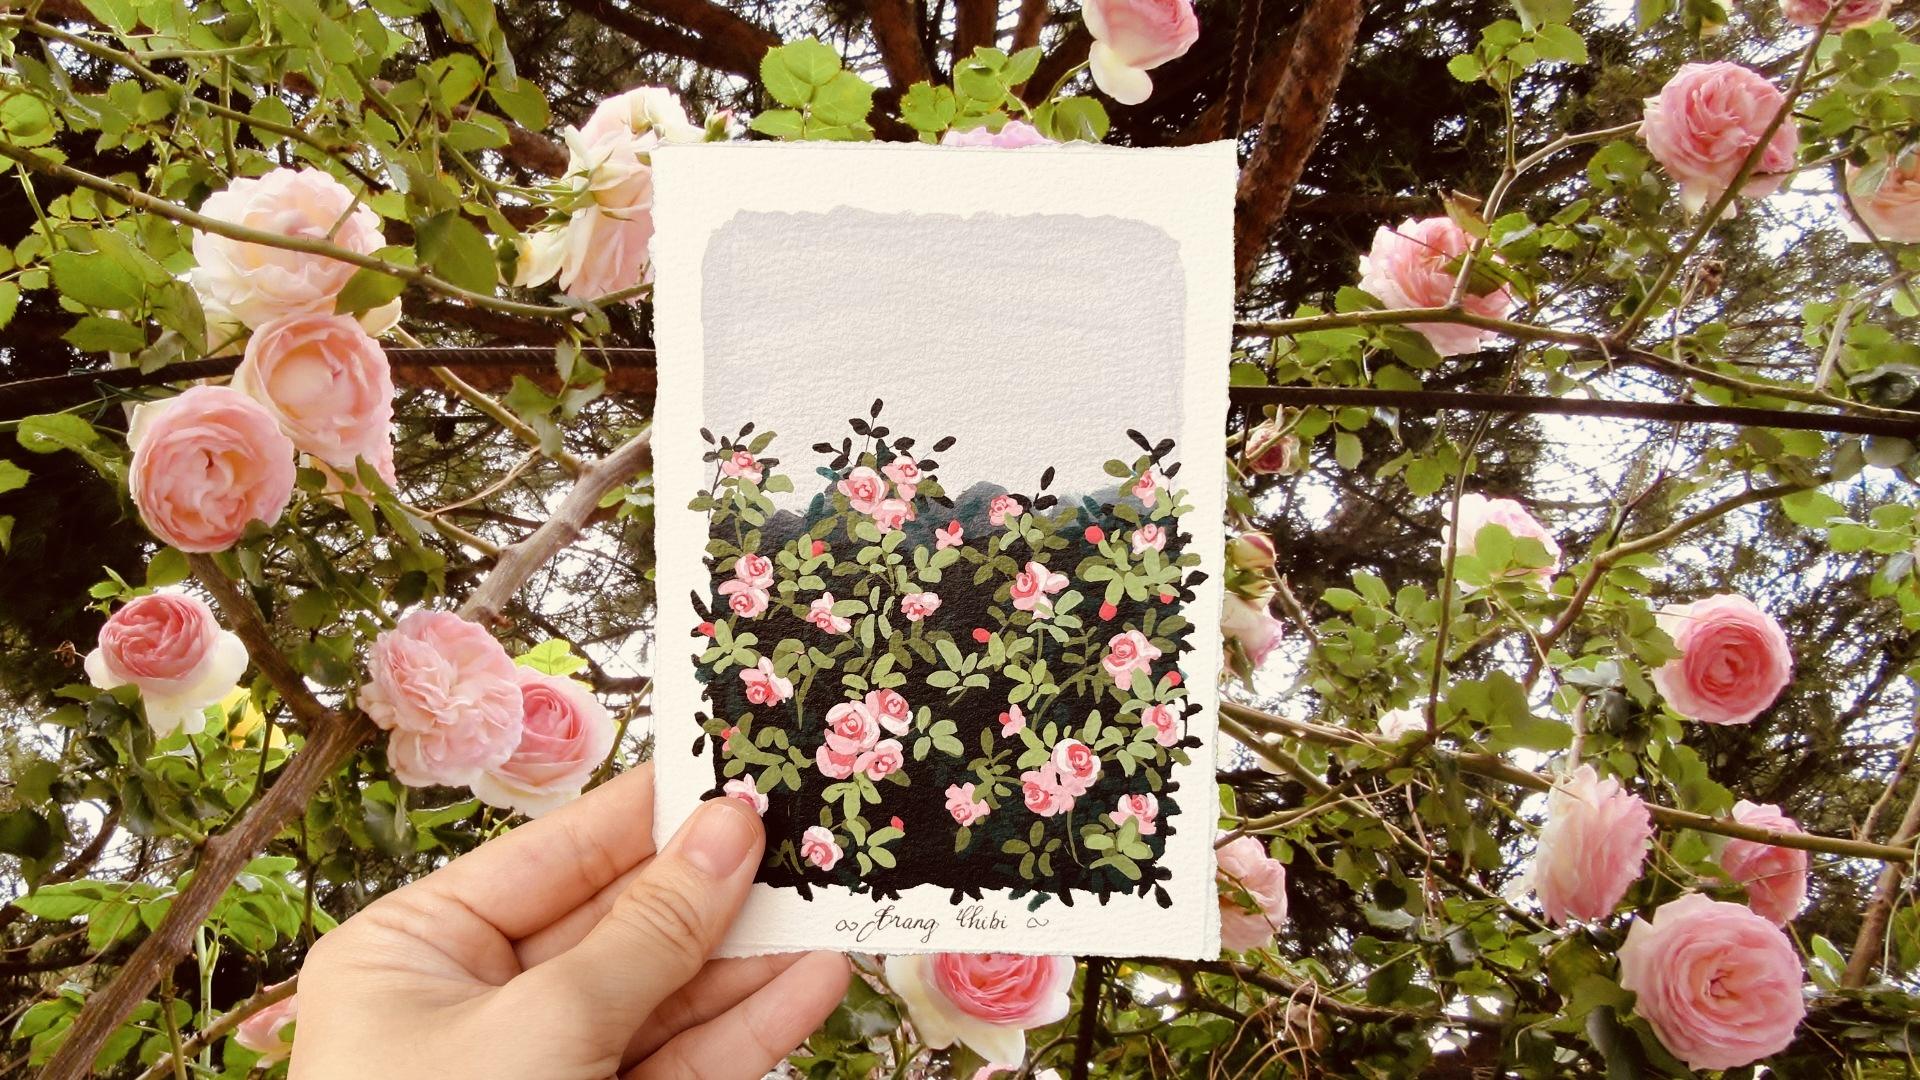
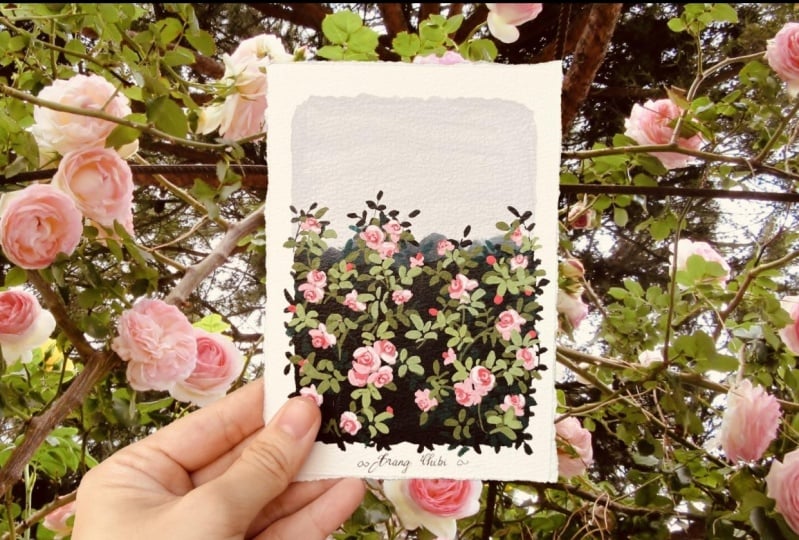
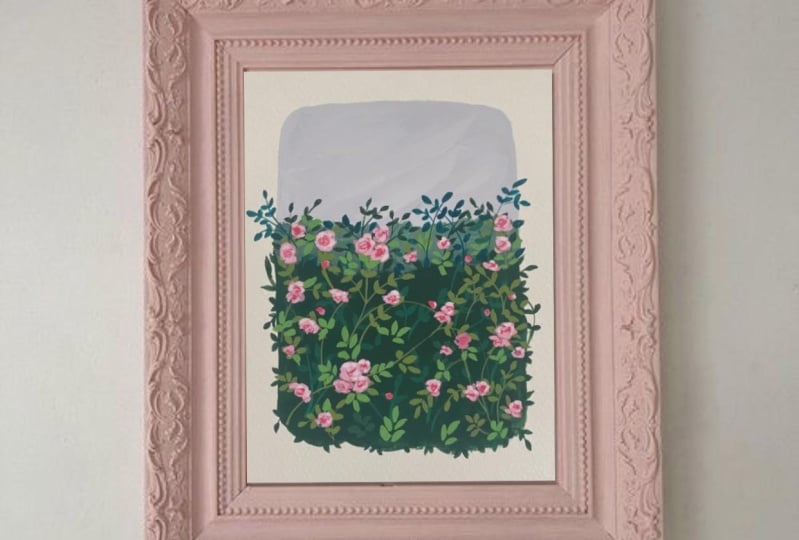
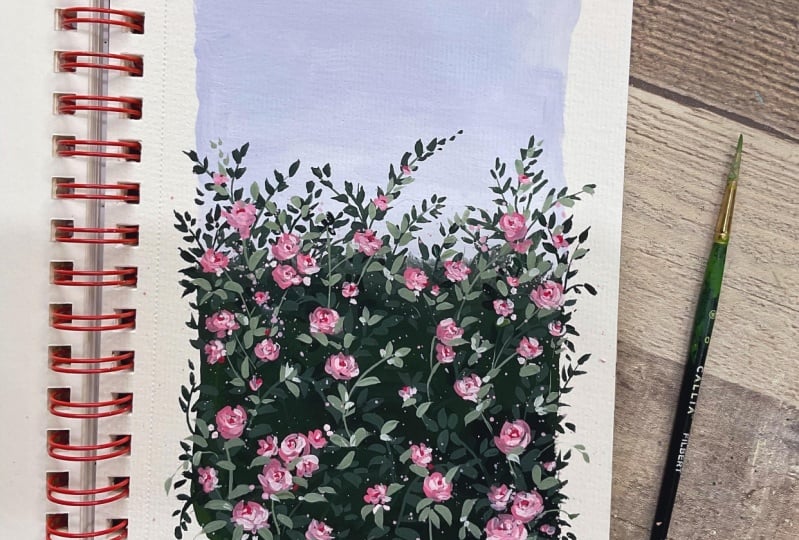
5. Final Project: Compotision and Sketch: Thanks for sticking
with me so far. Now, let's pin this
magical rose garden together and bring
your vision to life. Let's start to paint our
final glass project. My method is before
painting anything, I will create a light sketch on the paper we use
for the final project. Different artists have
different methods. Some people prefer
to create a sketch on another piece of
paper so that they can look at this on painting
the final painting. So the drawback of
creating the sketch on this final project paper is because wash is
not transparent. When we put the first
layer onto this, it will cover everything. But for the painting, I don't need to
follow the sketch. Exactly. I just want to have the the initial sketch to
visualize the B self is okay. If later I cannot see it, but you can alternate. You can change the method. If you find that it is easy joy on another piece of paper is more
convenient for you. I don't want to make the
bending too perfect. That's why I in COVID eight
kind of imperfect model. But it is okay. It is 100% okay and a lot of artists do that and the
painting still look gaseous. It's just you add
some masking tape onto the four edges
of the painting. I think we need to
put our signature on the bottom of the painting
so I will make it is the gap here is larger. I'm not really satisfied
with the position of this. So I want it is exactly you see, we have the wound
up so I want to have a thorn flower
in this area. I will mark this that you may want to try to
identify some flour here. Another, we use the
wounds a third. I want to put a cluster
flower here so three, three, three on this session. That's enough for visualize
the whole painting. Now As I mentioned again, if you find that it
will be difficult to remember the placement
of each flowers, you can draw it on
another sheet of paper. That's for this lesson, started from the next lesson, we will put some
colors onto the paper.
6. Final Project: Painting the Background: So let's paint. So in order to paint the sky, I mix, I mix a little bit. Actually, first, I
need to take a lot, a lot of white here into this and add a
little bit of black, a little bit of purple to create this purple gray We need more purple. It is very difficult to make the exact shade color
as I painted before. So just go with some kind of
purple shade, gray color. I've been painting the sky. I will try to cover the
pencil by this color. The pain here is a little
bit too liquid now, so the sky here is not smooth, but normally the sky
is not that smooth, so I trying to add more pain to this because I don't want the
pain to be too transparent. H. You see, we see
some stop here on the on the paper, but it is okay, as I mentioned, that is a just a hand painting and we don't need
to make it perfect. Next, we mix the blackish
green and the black hair to paint the background of
the flower and the leaf. M What I like from gash and I collect is because even
if the pain is dry, we can still mix. Need to put a little
bit of water there and we can use this pen again. So try to cover the pencil. It is okay if you don't cover the pencil bottle because
we can erase it later. Because we've been paint a lot of layer onto
this background, so don't try to make a thick
layer of paint over here. I am on purple mixing
the black paint into the sky because I to create the transition
between two area. So now let's create
some kind of edge. We have the illusion
of the leaves here. First actually, if
I put the pen here, it will bleed into the sky, so I will leave
that session later. One Okay. So we leave this session later. Just make sure to
keep the paint on the palette to make
the similar color. So here we paint the
leaf using black colour. So as I mentioned, I don't want to paint
into this session. Uh, because I don't want
to COVID on effect here. Now we need to wait for this leg grow to dry
completely before coming back to paint some leaves in black here and also
another layer of lives. Actually, this time, I want to wait for it to
dry completely, so the paper will not cold. So this is in the morning and I will go for lunch and when we come back, we will paint we continue to finish our final
glass budget. Hello, everyone. So I just
come back from lunch. Let's continue to
paint our porte. As I mentioned, we use
the wound up third here, so I paint some
stems and lips here. So the pain now is already dry, so I put some more water there. I don't want the
stem here is to bow that's why I try with
other area first. I will paint the black
leaf Black leaf over here. It looked a little
bit awkward for now, but don't worry because we
have different layer lips. And now and that's on for
the black leaves here. So we can start to paint
another layer here, but I want to wait a little bit for this part is dry
completely before painting another layer on it because you can try to paint around and come
back this area later, but it will be easier if we wait for this layer to dry
before continuing. And,
7. Final Project: Painting the Leaves: The guy turned out
to be a little bit dark in my bless
is going to win. So I just turn on some of my lights I am not really
fan of artificial lights, but in this sky, I don't know every
time I want to make some videos or some tutorials. My neighbors just become very noisy and the
sky is become locker. I think I need to depend on
the artificial lights so that I can make videos and tutorials in glasses
in on condition. Now I will use this green.This
is the blackish green I I already told you in the very first lesson
about the materials, but if you don't have this
green on this palette, for example, if you
are using Hb insect, you can try this green. Th is permanent green
deep. Just some tied up. Deep green on your color
palette on your paint bobs. Now I will put first, I want to create
some stem first, you then zip this line of brass. I will start here. Because this layer will become invisible
in the next layer, so we don't have to charge
to be perfect here. You can paint on the
leaves without the stem, but the stem will make
our work to be easier. That's enough for
the second layer. One thing you need
to keep in mind is we don't charge both
the leaves everywhere, leave some area in a completely row to create
depth for the painting. One mistake I often have
painting with wash is I create very thin and
transparent layer of paint. This is a habit I got from
painting with watercolor. So remember, if you got used
to painting with watercolor, when you paint with wash, you need a different mindset. In watercolor, everything
is transparent. Everything is gentle.
But for wash, we need to have a bow
and confidence shop. I think now I don't need
to create most them, but I mean put some
random leaves on the edge of the painting on
the bottle of the painting. There are some leaves, I
use a very thin layer gas, so now I revisit and
add more paint into it. I think that's enough
for the second layers. I don't want to overdo this
because on top of this, we still need two other
layers for leaves. Want to go with some
area which is just T because it will create more depth and dimensions
for our painting. Let's pin the next layer
and I will add more. I will take more black
green and put it here. The reason I don't
want to use it because if you remember from last night I accidentally
add a drop of black onto it. And for this layer, I don't want to use
any black on my pending I will mix the two color together
with yellow green, we will make this
color become brighter. Actually, if you look
at the painting here, the shaded color
will be different because for this painting, I mix it with not
with lemon yellow, but with earth yellow. I think the shade of colour here is still
a little bit dark. So I think I want to add
more lemon yellow onto it. So I still feel the shade
here is a little bit. I don't like the shade
here with a little bit, I think I will need to take a small palette to alter
the colors a little bit. I don't really like
this shade of colour for the next layer of the
leaf I will add I will take yellow cha and So black head green here. Sorry because I didn't mention
yellow ochre off yellow. For Him, it is
called off yellow, but for other brands such as Huber I think
it's yellow ochre. I prefer this shade for my
second layer of the pending. If you look at my hand, it is lty now after I take out a lot of paints
from the paint pops. I install the video here
to clean my hands and wait for it to try before
I continue our lesson. Luckily, the sky is bright now so I can use the
natural light again. For the second layer, I will use this this color
and it is olive green. I add a little bit of white, just a little bit of white, so the color will be a
little bit brighter. I want to make the distinction between this layer and
the previous layer. First, again, we need
to create a stem because my hand is
still a little bit wet so I don't use a perfect stop
for the stem because you see this is a garden and we
don't always see the stem. It's still a little bit dark, so I turn on the line again. Let me turn on the line for my room is because I thought
that the sky is already brighter but it is not so I think that's
enough for values. I mean just be it
without the stem. Again, we don't have to
make the perfect leaves here because there's no perfect
leaves in a row garden. Just one t, one stop
and it is when we have a leaf Make sure to
a relatively thick. And it's okay for the
leap to be overlap. And try to make the leaves
here is not uniform, so I try to create different
brussre on the breast. So some leaves are big
and some are small You can even charge with different brushes if
they don't get to COVID to create
different pressure, different stop just
using one we still have another layer of lips
after finish minding the flower so don't have to So now I just want to quiz and
leaves without the stem. We visual there's a stem here. I think I will add
another stem here. I think that's enough for the second layer
place now again, we need to wait for
it to try and then we come back and paint the
flowers on top of this.
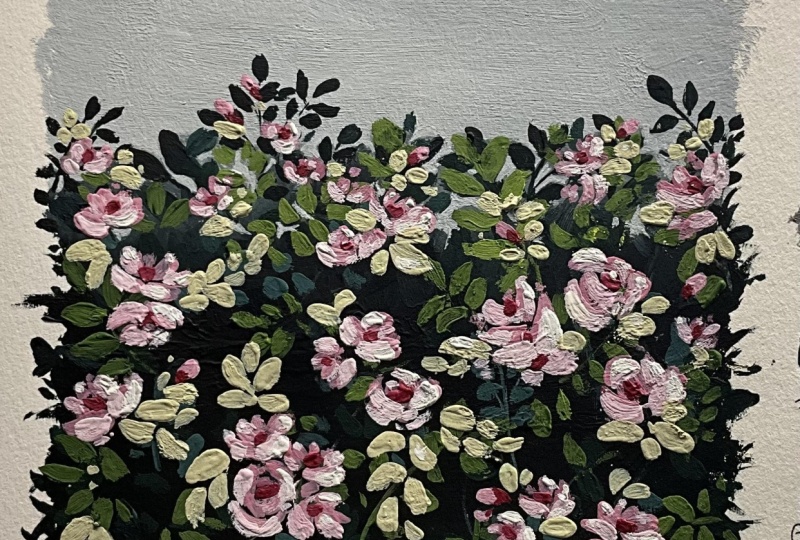
8. Final Project: Painting the Flowers: Uh Let's come back
with a project. Now we will paint flowers and after finishing
on the flowers, we come back to add
another layer of leaves. Similar to the practice lesson, even in this middle or red, we use darkis value,
lattice value, and the mist of value and the middle value to paint
the first layer, the flower. So this is this color. I will change the
composition a little bit compared to the
painting I did previously. I use the run first. I will paint a cluster
of flower here first. Because this cluster
of flour is essential, I will make the flower a
little bit biicker than other I will make four flower here in total. And another glter flower here. That one have four,
one only have three for other cluster, generally, we only have one
or two flower put together. Don't worry. The flower is in the middle of nowhere
without any storm on it because we will come back to paint
another layer of blue. And some small books
over here and there. So we need to practice a little bit to have a feeling
where to put the flower. So o is the I think row is most most
favorite flower to paint, but from my experience, it is also one of the most
difficult flower to paint. So don't worry if the first
bending is not as you exted. I think that's enough. Now I put some and I want it is
kind of the root of the rochi I don't want to put a lot of flowers at the bottom of the painting. It is okay if you paint
more flowers than needed because in the final
layer when you put the leaves on top of this, you can cover any flowers
if you don't like it. But I think that's enough for the first layer of the flowers. Let's wait for it to dry before coming back to paint
the second layer. Now, let's come back to
paint the second layer rose and luckily the
sky is bright now, it's sunny now, so I don't need to use the artificial
layer anymore. So similar to the pic session, we will use the dark t here to paint the
center of the flower. You can just add a dot
chart cool Illusion browse, but actually, it doesn't matter. A dot is okay because we
add another layer on this. But I do feel a little bit
more comfortable when I ask the I think I need to up my my glasses because normally
I don't need it, but now you're painting
very small details, so I want to see
it's very clear. Hi Penny, don't remember
what is the direction of this I want to make the paint a little bit thicker because I want to make sure that everything in the
background in the cover. Now, wait for this
layer to dry again, and then we come back with
another layer of the flowers. Now, let's bend the
third layer of the rose. For this, I mimic. It is too dry now, so I will add more wie in here. Pick up some pain here. Let me look at the patie. So for convenience
for my convenience, you see in the practice session, I use two brushes,
but this time, I will only this one brushes because I don't want to
change the brushes too often. So I will use the tip of
the brush to paint the central and if you
find this difficult, use a smaller brush
to paint the central. You see the pain here is a little bit too thin,
but don't worry. We can come back and out more
and make the pain thicker. We can paint around
first because I do think that we
need a thicker paint for for the heat of the flower. Because this row is
only in the shadow. So I mean I mean just darker
shade a brow to paint it. We will come back
and add glolaa. I think I forgot to
paint the center of that flower in the last row. I want to paint brush one brush, but now I see it is a
little bit difficult. I pick up my small brush here, my Buss because for the central floral I
don't want it to be So there's some blest where I do find that the
pain is too thin, I will go another row to
add more pain onto it. Now, not yet. Now we will wait for the
rose here to dry again before coming back to make the final adjustments
for the flowers. The painting is just
dry and let's come back and now we need to
do the final adjustment. The final adjustment, first
we being the highlight, we mean create an
even lighter shade a bright color almost white. I assume the light direction
is in this direction. For example, for this for the roll under we we don't
need to put the highlight. For this step, basically
we add highlight where we think the role
is more bright color. I will show you this brush to to look whether any rolls, it needs some more ck value. I think This flower on more dark color. And that's it. This one. That's it. Lets more. Less is more now we need
for the pan to dry. I think a little bit here. I want to feel some some gap in the flowers, so make sure. So now we wait for the
flowers to dry before pending the final layers of leaves. Oh
9. Final Project: Final Details: Welcome back, and now
we need to create the final layer
of the leaves and maybe the final layer
of this painting. In order to do this, I I will add more I mean
add more lemon yellow, and wine into this mixture. So try to not remix the green instead using
the green you have already painted before so that the color we have the subtle change in the value I want to try this sheet. Oh, sorry. My hair is wet. So I want to my I want to dry my hand as well. But let me see. I will echo this area first. You see the painting cover the part of the
flower buts not problem. It is on purpose. I think I forgot to paint to add more vibrant
color onto this. So I do feel that I need the color
to be brighter, so I will add more yellow
and more white here. B color I put here, I still feel that it
is a little bit dark. That is already the final
noblp I want to make sure it is brighter than than on the
color we use before. You can paint over the
lip, we paint before. Hip now, we think that we need to add more bright
colour onto it. I want to make the leaf
here very deeply small. So I try to only use the You can different
rust if you want that. Having paint over that leaf to so I don't want the
painting to be too coral. I think I will stop
adding for now and I just come back
because this is the final layer so I want to make this layer
really stand out, there are some place where I feel the pain is
too transparent. I will come back and pain
the second layer over it. I don't want some here
to be flowed in the air. I put some more leaves around
it. I believe that's it. We finished painting our
rose garden together. Let's se our piece. See you in the final class in the final lesson so
that I will tell you a little bit more
about how to upload your project and how to ask
questions if you have any.
10. Thank You and Goodbye: And we reached the
end of today's class. Roses as one of my
favorite flowers, and I believe mastering
them is a lifelong journey. I hope you enjoy the class. If you have any questions, feel free to start
a conversation in the discussion session. And please don't forget
to upload your pose. I promise to comment
on each one. Good luck, and I'm looking forward to seeing you
in another class.
 Trang Chibi ❤️, Watercolor and Gouache Artist