Transcripts
1. Class Introduction: You know that white is also
the color of the rainbow. Hello, everyone. I am Shang Shi Bi watercolor
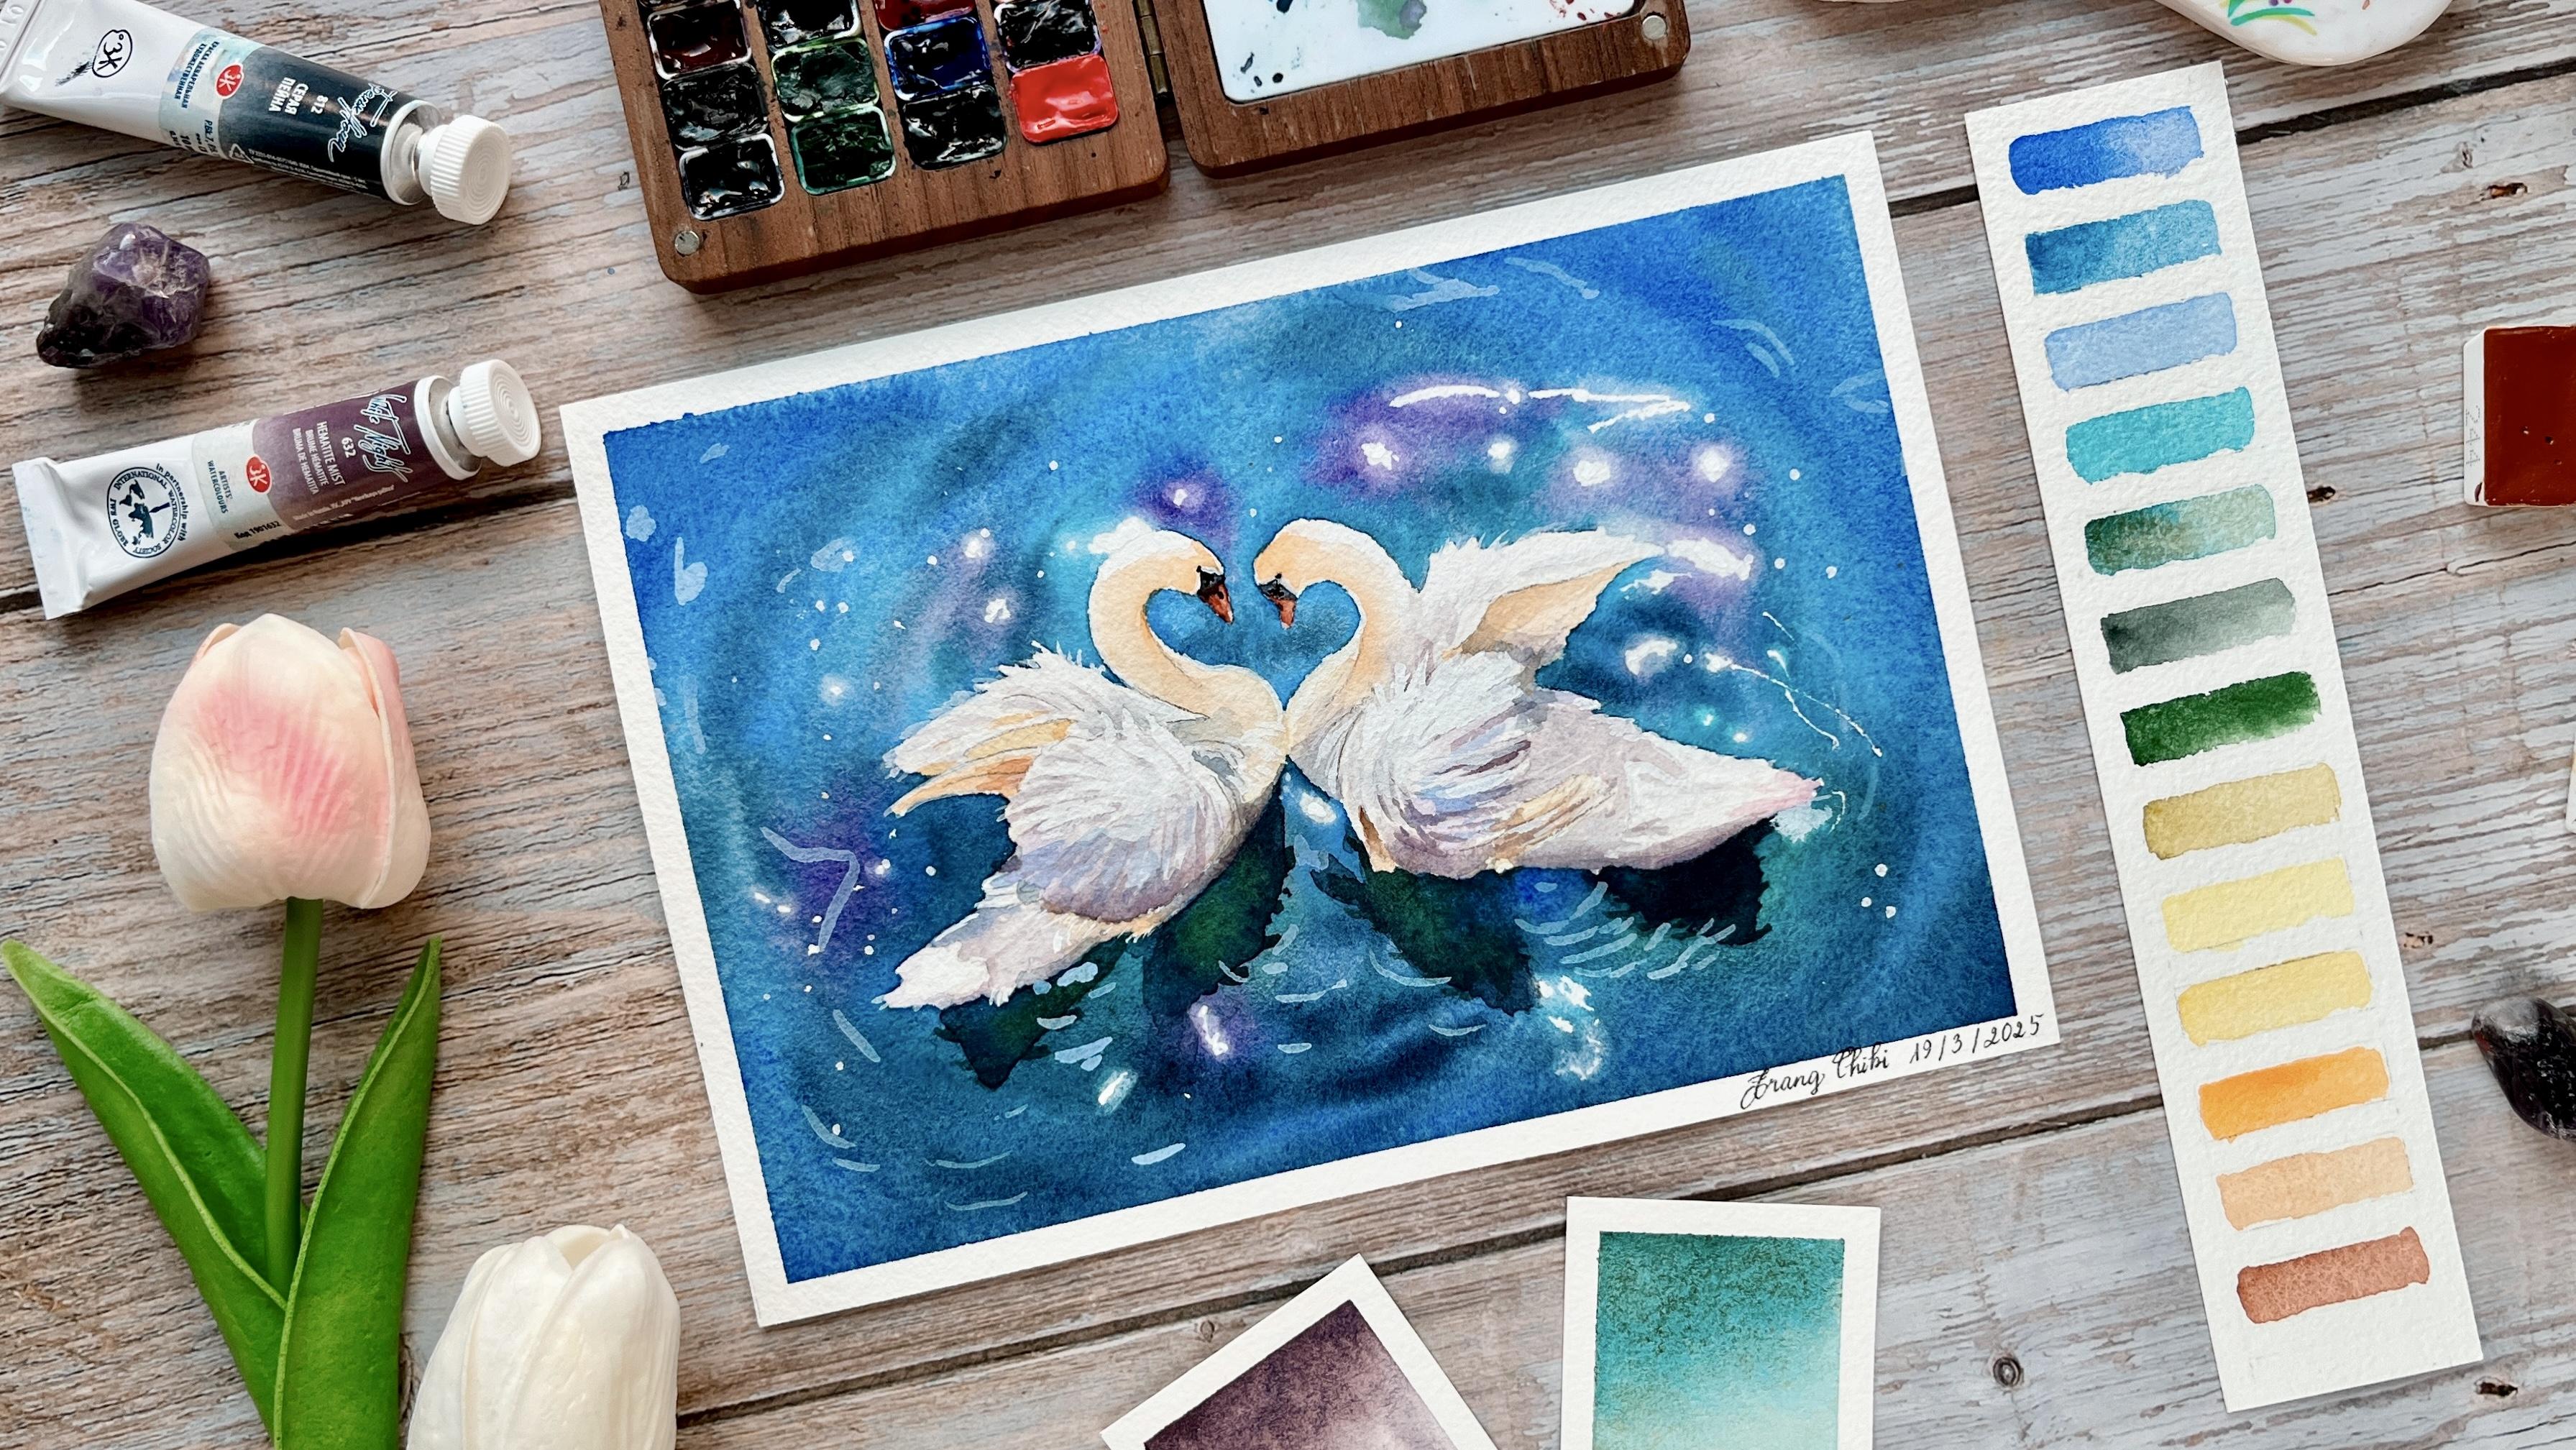
artist from Vietnam. And in our today class, I will show you how to capture the rident white of the
Lovelace one painting light, color, and glow
using watercolor. We will go step by step from
editing the reference photo, saving the white with
masking fluid to layering the subtle rainbow tones and adding the final
glowing highlights. I will also walk you
through the tones I use, explain why I choose
them and show you how to mix granulating color
from basic pigments. This glass is perfect for artists with some
watercolor experience. If you are a beginner, feel free to check
out my buffet. I have plenty of glasses for all levels from
beginner to advance. And don't forget to
hit the follow button to stay updated on
my future glasses. Now, let's dive in.
2. All about the Class Project: In this lesson, let's talk
about our final glass budget. We paint this lovely
one couple together. I've provided the
reference photo under creative common license, so you are free to create
and even sell your painting. Just remember to credit the photographer as mentioned
in the glass intro. You will also find the outline two
versions of my painting and extra reference
photos if you want to challenge
yourself after class. It might be hard to
follow me step by step, so I recommend watching it once for the overview and then
replay and paint along. After finishing, go to the
Busick and resource section. Click Submit Boshek, upload
your photo and submit, and check and give
feedback within 24 hours. You can also tap
me on Instagram, ink in my Bfi and be happy to like and
comment on your work. Now, let's move on
to the tones and materials we need
for today's class.
3. Tools and Materials: In this lesson, let's
talk about the tones and materials we may need to
use in today's class. So keep in mind, these are just suggestions. Feel free to use
whatever which is more available and
comfortable to you. So I film this video up to
finishing on the lesson, and this is the
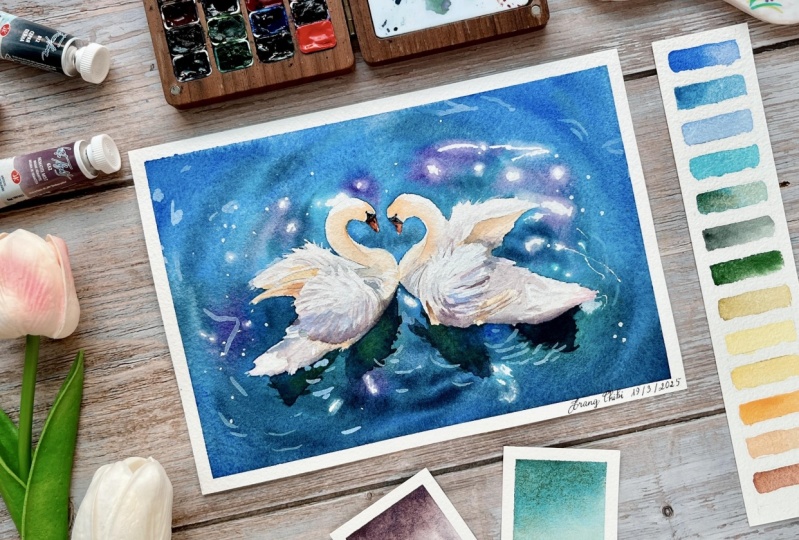
painting I made today, I film this piece for today's class porte this is the painting I
painted before. I am very happy because
our final painting today turned out to be more beautiful than my
previous painting. Now, let's talk
about the materials. For Watercolor paper for
today's porte I use this brand? Watercolor paper? Is the artist grade from China. Because I am in Asia, it is very convenient
and a reasonable price, but feel free to use arts front, but make sure the
quality is high enough. It needs to be 100% cotton and preferably art is
great because we will use masking fluid
and a lot of water. I painted on the AFI size, which is 15 and 20 centimeters, but feel free to paint it on
a bigger size if you want. I am thinking after this lesson, I painted another version using a three watercolor paper so that I can frame it and
hang it on my room. But because painting a la
piece takes more time, so I don't want you
to I don't want the class is too long.T is for watercolor paper for
the paint I will use this handmade the box, I purchase the empty box and I feel watercolor here myself. It is from Wine Winice brand. So the color is very common. You can purchase it. You can find it in
any set watercolor. There are two special colors. One is casket green. I mean, it casket green is not important for out
today class project, but it was heat hematimsF
winne it is a grating paint. And don't worry because
in the next lesson, I will teach you how
to how to mix the hematite miss from
normal normal paints. And I will provide
a full list of my colors on the project
and resources lesson. But I you don't need to have the exactly
similar colors as my hematite mis is special color and I I
will use it to paint. You see to paint the shadow on the feather of this one and I will teach you how to
mix it in the next lesson. We also use white wash. You use the final stage of the painting boys to
ask some highlights. But before that, we need to
use mask and flow to cover this one to cover this one
and this brand is from China. It is not very good brand, feel free to use whatever brands like pur pal or winds Newton. Anything is okay. Sure. I think the paper is more important. But make sure the masking fluid, don't tear the paper when
you try to remove it. I will use this eraser
to remove masking fluid, but it is not essential. You can remove just
by your fingers, but make sure your
fingers are clean. With that because
we don't want to put oil on the watercolor paper. I will use this ruling pen
to apply masking float. That is my favorite tone, but if you don't have it, you can use an brush
or silicone brush. I have a dedicate lesson about different tones
applying masking float. In one of my very early
court here on skill share. The name is 12 techniques, 12 watercour techniques
for beginners and beyond. It is my very first class
here on skill share. Quit the production
quantity is not very good, but I think the lesson about the tones apply masking float is quite
helpful in this class. You may check it if you
want to learn more so for brushes I use this mop brush to paint the back row
and abou brush. So this is number zero. It is a brand from Vietnam.
That is number two. Number four, number six is synthetic brush it is Ecdversat so just want to
know because I will the brush to remove some paint to create the highlight
on the water. So if you are using natural
hair brush, it is quite soft. So you want to have at least one synthetic
brush to remove some paint. We need to use mixing
palette and a water and I will use this
iPad to show you the reference photo during
today's class and I will also teach you how to adjust the reference photo
before painting. But you can use the
same with your phone. It is very simple. That's about the
tones and materials. In the next class, I will
teach you how to mix this hemi mix if you don't
have your hand.
4. How to mix Hematite Mist: Welcome back to the glass. In this lesson, I will
guide you how to make something which is
similar to hematite maze. Hemetit maize is granulating
color from wines brand. I think if you are
using Daniel Smith, the most similar color
is hematite, genuine. So I often use it to
paint the shadow, whether it is on the cloud or on some wide subject
like today's class. If it is available at a
store near your home, I recommend purchasing it. But if it is okay, I will guide you how to make
something which is similar, almost similar,
not 100% similar. It is very difficult to recreate
some granulating color, but we can create something 80% similar for
our today class project. We will need you two parts
of anchamarin We need two part of anchamarin
here and one part of red. I think I add a little
bit too much red, so I need to add more Shama. Now, it like a well, I mean, add more red here. And then just a little
bit of BonsianaFgot, this is the hemodims
fromOina here. I think we need to have some
adjustment, add more Shama. So here, maybe just a little bit Bonsaa we have
something you see, not 100%, but 80% because we only use it for very light subtle
shape of this one, so it is very difficult
to make 100%, but you can whatever version, its maybe sometime
if you mix it with its maybe more blue or more red. But it is even better
because we want to create the dynamis the
feather of the one. In this lesson, I will teach
you how to mix hemat mix. It is a graduating colors
from inusR as I mentioned, it is very difficult to make something 100% similar because
if you look at this color, it has the blue shade, the violet shade,
and the lock shade, everything combined
but we can use different ratio antamoin and red to go with something similar to the shadows on the on the feather of
this one for today glass Bjec can use I think if
you using Daniel Smith, you can use the moon glow hematite genuine
as a replacement, it is not 100%, but it is very beautiful. The key here is because I am
using the granulating colors for out today glass
Poet because I want to create the vibrant, a whole range of colors on the
white feather of this one. That's the reason why I'm
using granuating colors, but we can try to mix to replicate and use
other alternatives. That's for this lesson, we will start to paint
in our next lesson.
5. How to Adjust the Reference Photo: In this lesson, I will show you my hip to manipulate the
photo before painting. I just discovered the tips
recently and it really helped to elevate my what I call
paintings white subject. Ti is today's reference photo. You see the swans here
are very beautiful. But the problem why transfer this reference photo into our watercolor
paper is we cannot capture all the details
of this painting onto this photo into
our watercolor paper. So if you look at
the swans here, we can see only the white
and the gray and we just use white and different shades when painting in watercolor, the painting become very boring. So in order to make our white color in our watercolor
painting more vibrant. One of my them is we will adjust the colors
photo before paint. Here is my iPad, but you can use this feature on your phone
and any photo editing app. I will touch here. And I in fight the saturation and I increase saturation
into the max level. When we increase the
saturation into the max level, you can see the
shade on the next of this one golden orange, yellow, and the shade
on its body is violet. I may also increase
a little bit of vibrant I think that's enough. I depending on the rest photo, we may increase the contrast, but I don't think I will increase the
contrast a little bit. That's for this photo, I think it is beautiful enough
now and I will use this to reference photo for today
glass painting process. In the next lesson, let's talk about we will start to prepare for today's painting and we will use masking
to cover this one.
6. Masking Fluid - Prepare for the Painting: Let's start our
painting process by preparing the paper
for the painting. And as you may see, I have already taped down
the watercolor paper. There's no tips and chick. So I don't I don't I don't perform this action
to save time. But let's start with
using skin float. I use muscin float
from this brand. Superior it is a brand from
China. Not very good brand. You can use muscin float
from Windsor and Newton pur pe I put it on my palette
and use this woolen pen. So the skin float here is
a little bit too thick. I will add a little bit
of water water down it. So I don't cover. I don't I don't try
to cover on this one, but only you need to cover the you see the
bottles, the drawing. Because if we cover
on the ones first, we need to use a lot of
skin float and secondly, later when we remove skin float, we have to re traw
on the details here. But if you find that it is easier for you to
paint the back val, if you cover on this
one, feel free to do so. But for me, covering the body on the models of
the drawing is good enough. And it is very
difficult to cover the whole the whole body, this one using this rolling pen. If we want to cover
everything here, we need to use a brush to apply the skin fluid and may we may coat we may cover the brush using doing some kind
of deion or soap, but it is still
very difficult to both the brush up to
several musculin flows. So I don't want to do that. I don't think we need to
cover the I don't know how to say the mouth be ones
here because no, I think we need to cover it
because it is in red shade and the back well
is in blue shade. So even though it is quite dark, it is not easy to create the red shade on
top of the blue shed. After covering the bottles of those ones with Muskan fluid, we will use Muskan
fluid to cover some highlights on the water. So you see, I don't
try to put on the highlight on the
lines I provided in the Bose sections and
resource session because we can just look onto the
reference photo to draw them and we don't have to
create the highlight at the exact exactly similar shape or position as in
the original photo. I will adjust the woolen
pen a little bit to to draw some see there's
some light on the on the water I forgot to mention on the Boston but we also we also need some why for the final
highlights of the painting. Mm. And if we forgot to cover using
using masking fluid, we can always ask it later. But it's still better to cover using masking
fluid because we can paint the highlights
to make it glowing. And that's on for
the masking fluid, and now we need to wait
for the masking float to completely dry before
painting the background.
7. Painting the Background: The skin float is
completely dry now, so it's time to paint
the background. So first, we should
wet on the background. Actually, we can it
with clean water, but the background
in the blue anyway. So it's a light blue to
wet on the background. So it is easy for you to see. So I mix this is bright blue. And antramarin. Antramarin is warm blue and
bright blue is whole blue, so I want to add each
part equally to First, we will everything
with this slide set. I will go another round to
add more duck, don't worry. I just want to have a round
for us to work on it. You might find it easier to cover the host
when it was a masking fluid, but if we just cover the bottle, we need to be a
little bit careful, but for me, it is enough
for us to work on. So we don't need to
create a uniform color because we can alternate between hamarin and
bright blue too. Because the background we
have a lot of color anyway. So for this area, I changed to I pick
up the wrong colour, so I need to look again. So I mean, for this area, I'm in a smaller brass so now the whole
background is already red, so now it is time to
add more shade into it. First, you see the whole
background here in the middle is a bit bit
lighter and on the edge. So we will add more color on
the edge here below area, this is than the
top of the pending. I will add I will add
more chaman here. I think I get in smaller quest. I think I forget what this, but it is no problem,
no big problem. So add more colo at the
edge of the background. I think it's role in blue, so I will add to add
more light colour. Feel free to use different
shade blue on this. You don't have to follow
me exactly and don't need to copy this
bending rifle and photo. But we look at here.
You see here we have some violation shade. So I will make some violet. Yes. I think we will also
add some violet here. You see. I add more violet than in the original photo to
don't make the area around this one to be too bright
because you need to have the contrast between this one and the background. Add more. Now I will add indigo
with this indigo, I want to create this
kind of circle movement. So we want to go with the
movement in the painting. I want it to be even darker. No need to create any perfect
shape here, that to work. I will make the pain is
a little bit thick and because normally for
this kind redneck when the paper is dry, it will be lighter, so I want to add more dark colour even
smaller brat for some area. I think I forget to cover
the skin flue here. It is okay. So there is no
we see here is green here, so there is no
coil is blue here, but I want the to be
even more vibrant, so I will to call blue. If you don't have to coil blue, just want to if you
have any blue shade. Just add it to make
the B will Bly with color and water to
make it more dynamic. Now cascade green. I mentioned in the motor lesson that I won't use cat cat green, but now I use this. But if you don't
have cut cad green, feel free to use other green. So it is not as my bland because you see now I am
playing with the background, playing with the color. So it is not it is
not how I paint the original painting and it
is not how I blend before. So that's mean now we just need to try to play with the color. To add even darker
add more add more. I even add a little bit of
pain right here because indivven dark enough
for this area. So later we'll be painting
the reflexenRd orange w. So this one, I want to
make it more uniform. Even we are creating
the movement, I don't want it to be
too too too clear. I think en to add
some more violet. And add more violet, make the area lot here er because if
it's too light later, we don't see the contrast. I think it is enough.
We blight a lot and now the paper is to be warp now we wait
for everything to dry before continue to
paint this painting.
8. Painting the Shadow: Amps Dor Jumper Duper m welcome back to the class and now the paper is already dry. Actually, I painted
the background and the skin fluid here
in the morning and I just went to lunch
and now I come back and I use this eraser
to remove skin fluid, but it is not must have item. You can remove
using your fingers, but make sure your fingers clean because we
don't want to put oil onto the paper
because with oil, the watercolor people cannot
absorb colors after that. So now we will start to
paint this one here. First, I want to I need
to redraw some o here because now the pencil
is too light for me because we don't cover
everything using spin so just I think I mistake using bit to
rub over the drawing. So now it is a little
bit too light. It's not a big problem. Actually, we don't have to
try to mask the exactly Actually, I realized I forgot
to paint the shadow here. So if we start to paint it. Ideally, we should
paint it before removing skin flu but uh, it is my mistake, but
it's not a big problem. It is not a big mistake
because we can just fix it. I am mire, indigo
and paint gray, and we paint over. We already draw it
in the outline, but as you can see now, it is too light. The drawing is too light, but we can just looking at the reference
photo to paint this. It is not too it is better to paint it
before removing muskin fluid, as you can see, we
might paint over some area with highlight area. It is my mistake, but I
just want to let you know, ideally we should paint it
before removing muskin fluid, but if we forgot, it is not a big problem. I think I forgot to put the, there's a very sharp
highlight here and I forgot to put it on I
transfer the ally. But it's not a problem. We don't have to copy. So I will add a little bit of turquoi into the shadow because if you look at
the reference photo, the shadow has the hint
rim and so put some saben. So to create kind of movement, the dep of the grass to
create some of you see circle around the reflection,
the shadow. The shadow is more
is correct what? Because you see
it is reflection, it should be white, but here we only see the shadow We may try to paint
the swans now, but I think it will be better if we wait
for everything to dry because I may want to
put my hand on top of this, that is easy, we will
stop this lesson here and we will start to paint
the swan in the next lesson.
9. Capture the Colors of the Swans: Welcome back. Just let you guys know that when
you guys are not here, I just put another tip around the paper to
make sure it is flat. Now the shadows are already dry so we can paint those ones. So it is an optional step, but we may try to use an eradicator brush to
remove some paint here. And if you want to flood, it is not important in
this case because you see those one will have
a lot of fears. I shouldn't make two to polish. I just want to remove
some drop of pin here. Now, you can start to paint I will use
this is number four. I will start with number four. No, I will start with
number zero because I want to paint the I don't know how to say
it exactly in English, but the mouth of the swans first because it is the
easiest thing to paint. This is English red. So even small area, we have some highlight
and some shadow, so I will try to reap some
pain in the top area. It should be darker underneath
and lighter on the top. This time, I will try with a lighter shade
English bit first. It is easier to we
can do it both way, but you can add a dark layer and then try to
remove some pain, but you can also start with some le layer and you see this area is a
little bit darker, so I will put more pain. So we need to wait
for it to dry before painting the area here. So we start with the number two, and we start to paint the
head of the one first. So this is golden. So this orange color. Try to make it light
because this one is white. We need to make the color
as subtle as possible. So we will paint the
one's body in two layer. At least two layer. But
in the first layer, we only focus on the color. We shouldn't focus on
the shaded the shadow. Now, what I want you
to do is you see it is in yellow or orange, you will put orange EPC, it is in blue or purple, we will put blue and purple. You don't need to focus
too much on the value of this area it is try to eel the light or shed. This one is more
yellow than golden. I want to glean this
so I can put.Th is Indian gold It's similar to Quinac we
don't go by Daniel Smith. You see this area
is a little bit more yellow, not orange shade. I will put yellow over there. I think I paint over
it should be y area, but don't worry because we
still have another layer of y was to correct
some of our mistake. This area is also
I will put yellow first and I put oven on top of it. Not on top, but
it is more under. I want to add this
piece of cloth here. So in this area, we see it a violet, I use violet here. I think I need to use
another palette because I and We put violet on the bottom. This one. Here is also some in violet. A little bit of blue and Chama. I think I've been
chained to the pickle. There is a shadow here. Later, I want to use
hematic mist in this area, but we need to wait
for it to dry first. While waiting for it to dry, we will move to this one. Again, here is the orange here is we put our wings here. I think at the bottom, it should be violet. Ready to build violets
here. With area. When we come back
for another round, I want to put Bunsena
in this area. But for now, just a Just as the golden the orange color. It is the golden
colour by whice. So it is yellow and then
transition to golden. Bit area is violet and blue there's hamarinble. It is too dark, so in this area, it is violet. At the bottom of it, we see some rose
color, it was cami. We need to paint
this shadow area, but I want to wait for the
paint around that area to dry. I come back to this one. Now this is hematid mis. For shadow area, it is a little bit colder. So I will add. It is indigo or pain gray. It is. It is more pin grey here. You may find difficult
to follow me exactly because I try to
paint what I see. And even if I don't paint exactly similar to
the reference photo, it is not a problem
because we don't need to to to capture on the details on the So on the the swan. Hematimys In this area, it is cooler, so I
will out a little bit of indigo in this area, I think it's more hematomys
in this area than I think we just finished bending the first
layer of those one. So now we will
wait for it to dry completely while I plan to take a rest because I
want when I come back, my eye is clearer
so I can notice the difference between
the shades of those one. So let's wait for it to
dry and take a rest.
10. Capture the Shades of the Swans: Welcome back to the glass. Now we will paint another
round of these ones. First we will paint
this area here. I just use dictionary
to know it is going the knob of this one. So I will you pink gray Let me try to find my glasses. Because the problem is
I am short sighted. So here we need to focus
on the detail here. So there is a dot here. A small dot here. I will use my fountain pen to paint the eye of the swan now. I just want to use black, but there's no black
on my color palette, so you can just use
pun poi fountain pen or anything or just a small
brush to put some black here. Okay. So now we look up we've been trying to
in on the shadow area, this one, we need at
least two shades. So we just put the light
shade here so you can go over on this one
to at another round. Here you see. I think we need to come
back to the area later because I don't want to touch
the knob, it's just pin. We've been paint the other
area first. The tail here. I see there is a shadow here. I will add a little bit add a little bit of
hem I did miss here. I want to add little
bit Boniena this area, If you look careful
in this area, you see there is a little bit. It is yellow, but I want
to make it more glowy. I add the golden colour. I want to show you another tip. I want to make a copy. I want to create a copy
a duplicate of this right now we have
a two photo swans. So for this one, I, I want to it, transfer it into
black and white. Because for now we need to focus on the different shades
of the same color. So by looking at this, I will know which is
more darker area. So you see now is very clearly is a very dark shadow here. More dark shadow. So it is very dark on this area. And in this area, it is darker in size, so I add a little
bit of bones in. I think I would use Bon umbo because it is very
dark inside here. And this area it
is so I will use hematigms I do find that it should be even larger. I forget what is colour
of this is brow. I mean, it was burn red area. That is burn umber. There is a dark area here. So this is negative pending. Shadow around the feather. Here. This bad I think it needs to I use even smaller glass
to us, burn and burn. Now it's time to paint
the head of this one. So it is almost dry, but I want to make sure
it is dry so I will use this hair wire to dry it. Here, I mean, we need to add
more golden in this area. So the shadow here we
need to ask to be shadow. So it's negate painting
over the feather here. Make this area darker. I try to leave some cor
here because it should be very little even when cover
it using some white glass. So here you need to be even darker it may be difficult for you if you want to try to copy me every step. I just go around
the painting and identify the dark
area of this one. If you look at here, it has
almost a lie over here. It's almost a lie over here. Let me to be even in this area. For this one, see, I want to check
what is the colour. It is yellow here. Because the tail
here is in pink, so even we don't see pink here, but I want to
create the harmony, so I add a little bit here. Come back to this one. We need to add more
golden over here. It is. It is very
dark in this area. That's why I add
more color here. This area is negative
painting it is yellow, but it's now, it's a little bit. I
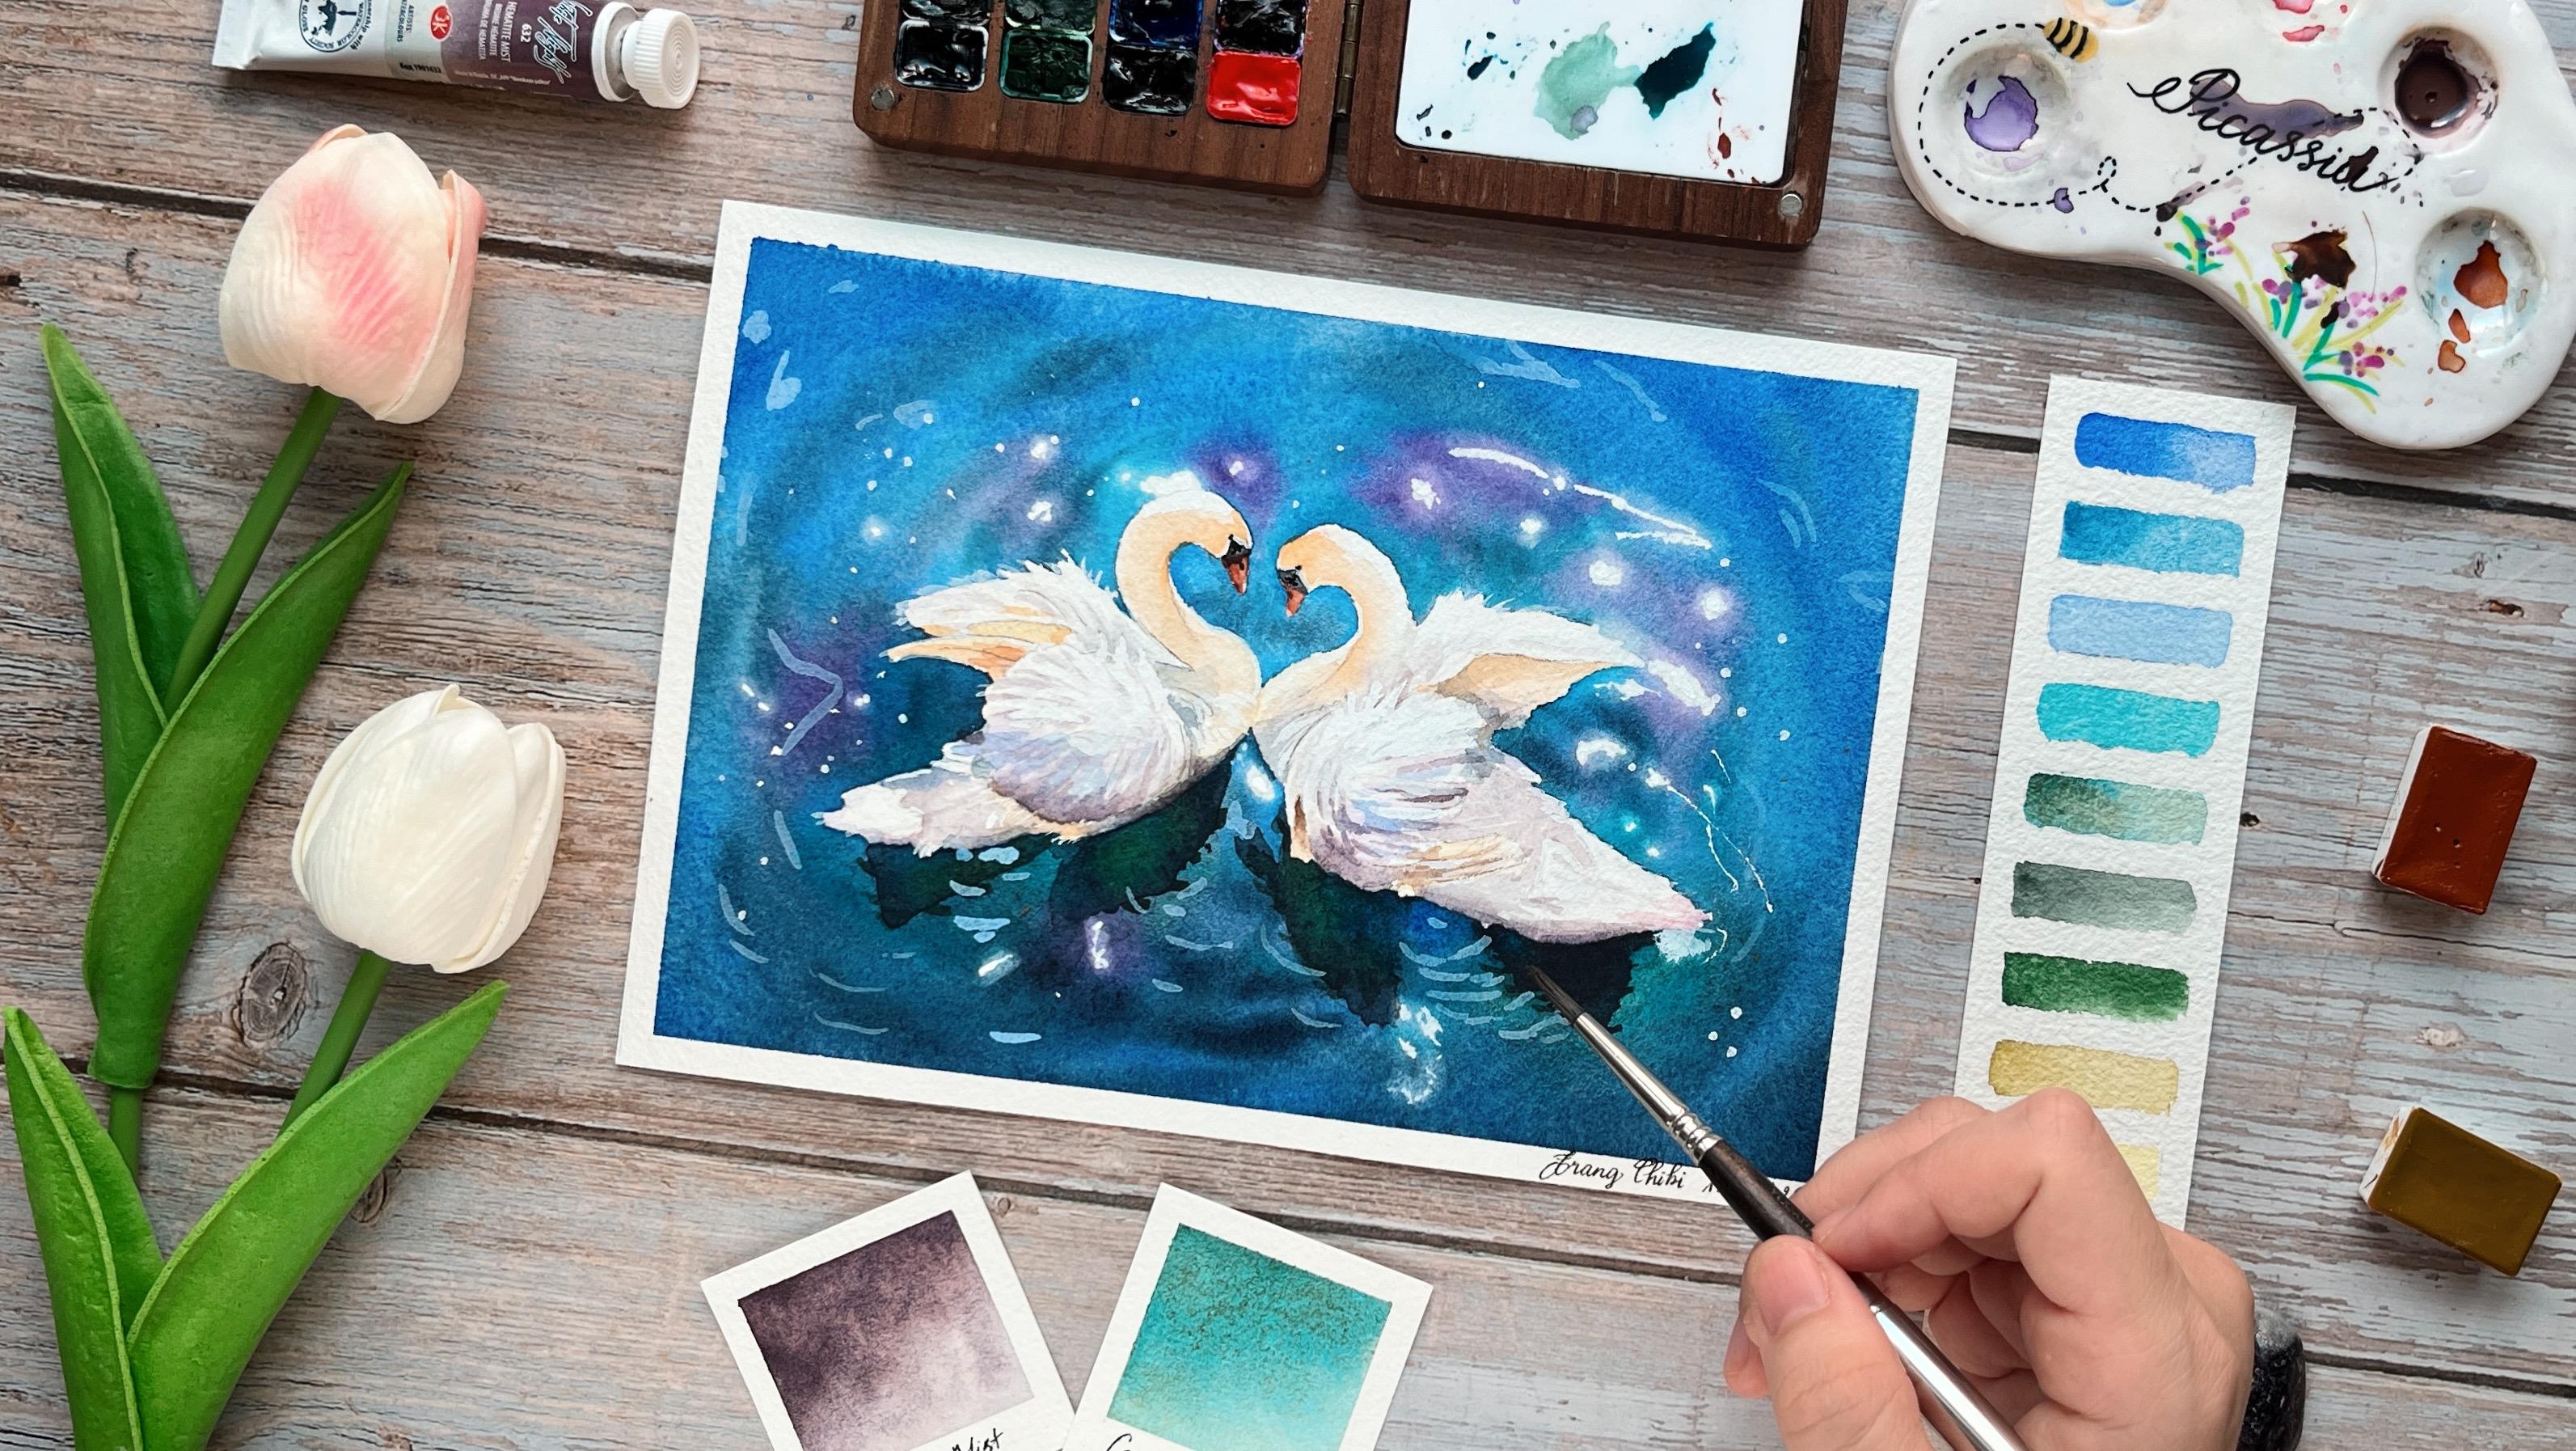
11. Final Details: Well, come back to the glass. Now it's time to pin
the highlights on W. So I think I can
just use actually, I have just purchased
this yesterday. When it is eradicatoE
eradicato Brush. So when I painted this, I didn't have it. So I just pined whether it is better
than my normal brush. So if you normal brush, it can just I mean, so like this, Let me try whether
this one is better. I think for this class, I mean, it just normal part
because it is routed. So we want to grace
some kind of glowing effect and we need to
have the circular motion. I will change to a smaller
one for the smaller dot. So we need to make this glow. I think we need to
stop this video rich because here you
see I want to change. I want to change the water here. It is okay, but I want to make I want to make the
glow is very bright, so that's why I'm going
to change the water now. Okay. I'm using coda tat brush, it is a synthetic
watercolor brush. I think if you are using
natural hair brush, you need to change to the synthetic one because we need the brush to be to be hard for this
kind of technique. Change the paper tissue. It is a bigger one because it is fatal for this big highlights. We want to make
the wing to glow. I mean it was this
technique for the wing to Small for small area. So now, we don't
need to wait for it to dry it is the white wash. It is very difficult
to open this one. It is time for as to
fix some mistakes and also to add some highlights to the painting and it
small small brusse one. First, I paint from right hand
side into left hand side. In each highlight area here, we will add it was
in the middle. Because this is wider than
the watercolor paper. Typing make it more watery to add the
highlight on the head of the you see there is very
thin highlight here. I think I let you
even smaller css. So in this area, it is very wide here. I way was because we don't
want to make it too. I think I need to make it here. I don't want to make
the I think it's better to make the movement from inside to the outside to create the feeling
of the feather. If I don't film the video, I may put it on the panel so that I can turn it over
so that it is easy for me to put my hand really highlight inside. Use it to add highlight, create the further picture. The area, it should be witter than we paint
it originally. I will use this to cover the pen lie because there
is almost no light here. I will use this my w to A very very small line here. I think I need to add halagin here because it is dry and it become
more transparent. I paint over the
eyes we combine. So in the center of the
highlight on the window. A high on the wick
of those ones. I just this to know that is a pic wick I forgot to so I need to stop and make the glowing
effect of here first. While it is wet wet the highlights so that the
transition is more smooth. See, this should be very white. I was to cover the pencul line, we put on the first blade. Y. It is easy for me to paint
the feather in this area. It should be very white here. It may be difficult for
you to copy me exactly. We just go around this one to add the
white was to the area. We find that it is white
is in the whole painting. There was highlight
in this area. We use this to cover
the Benso my here. G area. It should be white so I will stand up to
see the whole painting, and I think I am
quite satisfied. Just a little highlight here. So finally finally,
I take a brush. This one, this number four. So I will put my hand
to cover this one, but don't need to I think. No, I forgot. I forgot. We still
needs some detail here. So I will use
anchamarins anchamarin. I mean, I will mix anchamarin
with this white wash. So at the end of the painting is very
easy to miss some details. So that's why when I stand up and I look at
the weapon photo, I realize that I miss something, so we need to paint it needs to be even more opic. So we hold the
brus at the end of the handle so that
we cannot control. But I mean, the
movement is we try to replicate the
movement on the water. If you look at the
the reference photo, there's there's the tip of the bus to create you see the movement
on the water here. I forgot to use the
masculine fluid to CV I wet this area. You see, I will area
and we will use the wet on wet
effect for the wet be I will splat some we war to create the
harmony for the whole painting. I believe we are done. We finish this lesson here
and in the next lesson, let's review the painting and I will show you some final heaps and cheese for our
today class Boga
12. Masking Tape Peeling and Final Thoughts: So we are done. Now let's tell up the masking tape to
see our final reason. You see, I add to round
masking tape to make sure the paper is flattened. And we are done. So just
want to show you this is the painting I painted before before today's
class lesson. I think the one I
painted today is better. Maybe it is the second
time I painted this on final dips I want to tell you is even after we painting the
paper is not too flat. So in order to fix it, I will use this spry water
bottle to put it up the mi. Then I put some books
or some heavy item on top of this so that I will
make sure after several hours, it will be even more beautiful. That's on for today's class. I hope you enjoy it
and found it helpful. Don't forget to
upload your project in the projects and
resources section. I'd love to see your
beautiful ones. You can also tap
me on Instagram. The link is on my
Skillshare profile, and if you enjoy this class, make sure to follow me for
updates on my future classes. Thanks so much for joining me today and see you next time.
 Trang Chibi ❤️, Watercolor and Gouache Artist