Transcripts
1. Class Introduction: Hello, everyone. I'm Sensibi
an artist from Vietnam. I started my tourney
with watercolor, but recently, I have completely
fallen in love with wash. It is now my favorite
medium for painting vinted style flos and I'm excited to share
my passion with you. I also have a few other wash
classes here on Skillshare. However, I've noticed that some students find it cheeky to finish the final projects even in the beginner
friendly ones. That's why I created
this course. This class is short, sweet, and focus
on the essentials. I will guide you
through selecting the ray materials,
practicing key techniques, and together, we will paint this beautiful black
eye Susan step by step. This class is perfect for absolute beginners who have
never tried wash before. Students who find my other
glasses challenging and some experienced
artists who may want to explore my style and learn
something new about wash. By the end of this course, you will bring this
stunning flower to life in your sketchbook and gain
confidence in your wash skills. So wrap your brushes and let's bend something
amazing together.
2. Tools and Materials: In this lesson, I
will walk you through all the tones and materials
you will need for this class. I will also share with you
some of my personal tips and experience in choosing
the right materials. Please keep in mind
you don't have the exactly similar
art supplies as I do. Feel free to use
what is available at home or what is the most
convenient for you. In order to path we
need wash paint, we need some paper. We need some brushes, some other items such
as a mixing palette, put a container, a small piece, cloth, and some masking tape and this palette
line in order to pick up the paint
from the paint box in case you use the same
tight pain box as mine. Let's go into
everything in detail. First, let's talk about paint. I personally use this paint bob, 36 colors, the pimi wash
paint for my everyday pain. You don't really need 36 colors. You can start with
five primary colors. But I prefer somewhere
12-22 colors so that you don't have to spend a lot of time on mixing colors. I purchased this
paint box very cheap. It's just around more
than $10 in Vietnam. You can easily to purchase
from all around the world. But maybe a little bit
more expensive if you are living in a country
which is far from China. And it's just a
student grade wash and you can see whatever which
is more available to you. I be b in or I Newton. They have artist
great washpin which is much more better
than Him Whpain. The reason I use it for my everyday painting because
I practice a lot and it waste a lot of
pain and it is too easy to purchase and too cheap to purchase
this in Vietnam. So let's talk about paper. For today's lesson, I will just use a normal bit
of watercolor paper. This is 100% home student grade
Watercolor paper, copres. For this glass in particular, you don't need to
have 100% cotton or high quality
watercolor paper. But I do feel that
the co brass is easier for the
erntechniqu in wash. I prefer to use co
watercolor paper. And you can also try the ton paper and
the handmade paper. This is hard handmade
watercolor paper from India. It can help you to
create the vintage vibe. But because today lesson
is for absolute beginner, I just want to use what
is easy to purchase. I will just use a
normal piece of watercolor paper and I
will teach you how to create this kind of ton paper edge in one
of our next lessons. This is a 610 multiply
15 centimeters. And let's talk about brushes. I only use three brushes
in today's class. With brush brush, it is very small rough brush
and I will use it to paint the flower petals, the center of the
flower and the lips. I will use this lila brush to paint you see the
stems, the thin le here. The difference between
the lila brush and the rough brush is the lila brush has small
but longer bristle, it is easy to create a
thin vein or thin le. But if you don't have
the liner brush in home, you can just try a
small small round brush and I will use this flat brush
to paint the background. We also need some water
container, one or two. I often only use one
because I paint at home. So when I need to wait for the paint
on the painting to dry, I will just replace the water
and it is a mixing palette. I prefer to use this kind of
ceramic mixing palette with separate container
because I want to have different colors
on each section. However, you can try with any any type of palette or
even licks in your kitchen. And because I use
this paint box, I will use this palette
light to pick up the paint and I use this masking tape to tape down the paper and also
for our today's lesson, I will use it to
create the square, the rectangular background
of the painting. But I think it is very
easy to purchase, but it is not a must item because you can just
paint the square yourself and I use this small piece of cloth in order to
clean a palette light or brushes every time it got dirty because for watercolor, you can just use the water container
to clean the brushes, but for wash, it is a little bit more difficult
to clean the brushes. So I need to tap the brushes on this small piece of cloth every time I
need to make it clean. That's on for the materials. In the next lesson,
I will tell you more specifically about our color
palette for today's lessons.
3. Color Palette: In this lesson, I
will go over on the colors we use for
today's glass project. I also guide you how
to mix the colors from mary colors in case you don't have the similar
paint box as mine. We use a very simple color
palette for today's glass, first, we need some paint
to paint the background. So in order to paint
the background, I will use olive green,
this olive green. So if you don't have olive
green in your pin box, you can mix, you can use any dark green colors in your
pin box or you can mix it. It is a little bit of
green a little bit yellow, a little bit blue. Actually, it's about two
parts yellow one part, blue, and a little bit
a tiny bit of red, and we can mix olive green. But it is also very easy
to purchase, I believe, on the wash brands
have olive green in the color palette and it is
my favorite green color. You see, it is black here. Actually, what I'm
doing is I am mixing black with olive green in
order to paint the background. I use poor olive green to paint the leaves
Olive green here. For the thin vein on the leaf, I will use I just mix olive green with white
to make it brighter. Normally for other painting, I will mix the green
with some earth, yellow or just yellow in order
to create different green. But today it is
absolute bigness glass, so I want to make it
as simple as possible. So next we need yellow and orange to paint
the flower petal here. In this color, it is medium
yellow to paint the petal. This is medium yellow. I use orange to
paint the shadow on the petal. It is orange. If you don't have a
different shades of yellow and orange color
in your paint box, it is okay because basically you can mix different
shades of yellow and orange just by mixing yellow primary yellow,
and primary red. You see for the very
central of the flour, I will use this is
uh burnt amber. I will mix burn amber. With ocho. To be very center the
center of the flowers and I want to create something like dry stems and leaves
in the background. I've been mixing two of them. It is very I think almost
all beanbx have this color. If not, you can mixing
a primary, red, primary yellow, primary blue, and we will have this
kind of brown colors. That's on for the color
palette in the next lesson, let's practice some
important techniques before diving into the
final glass project.
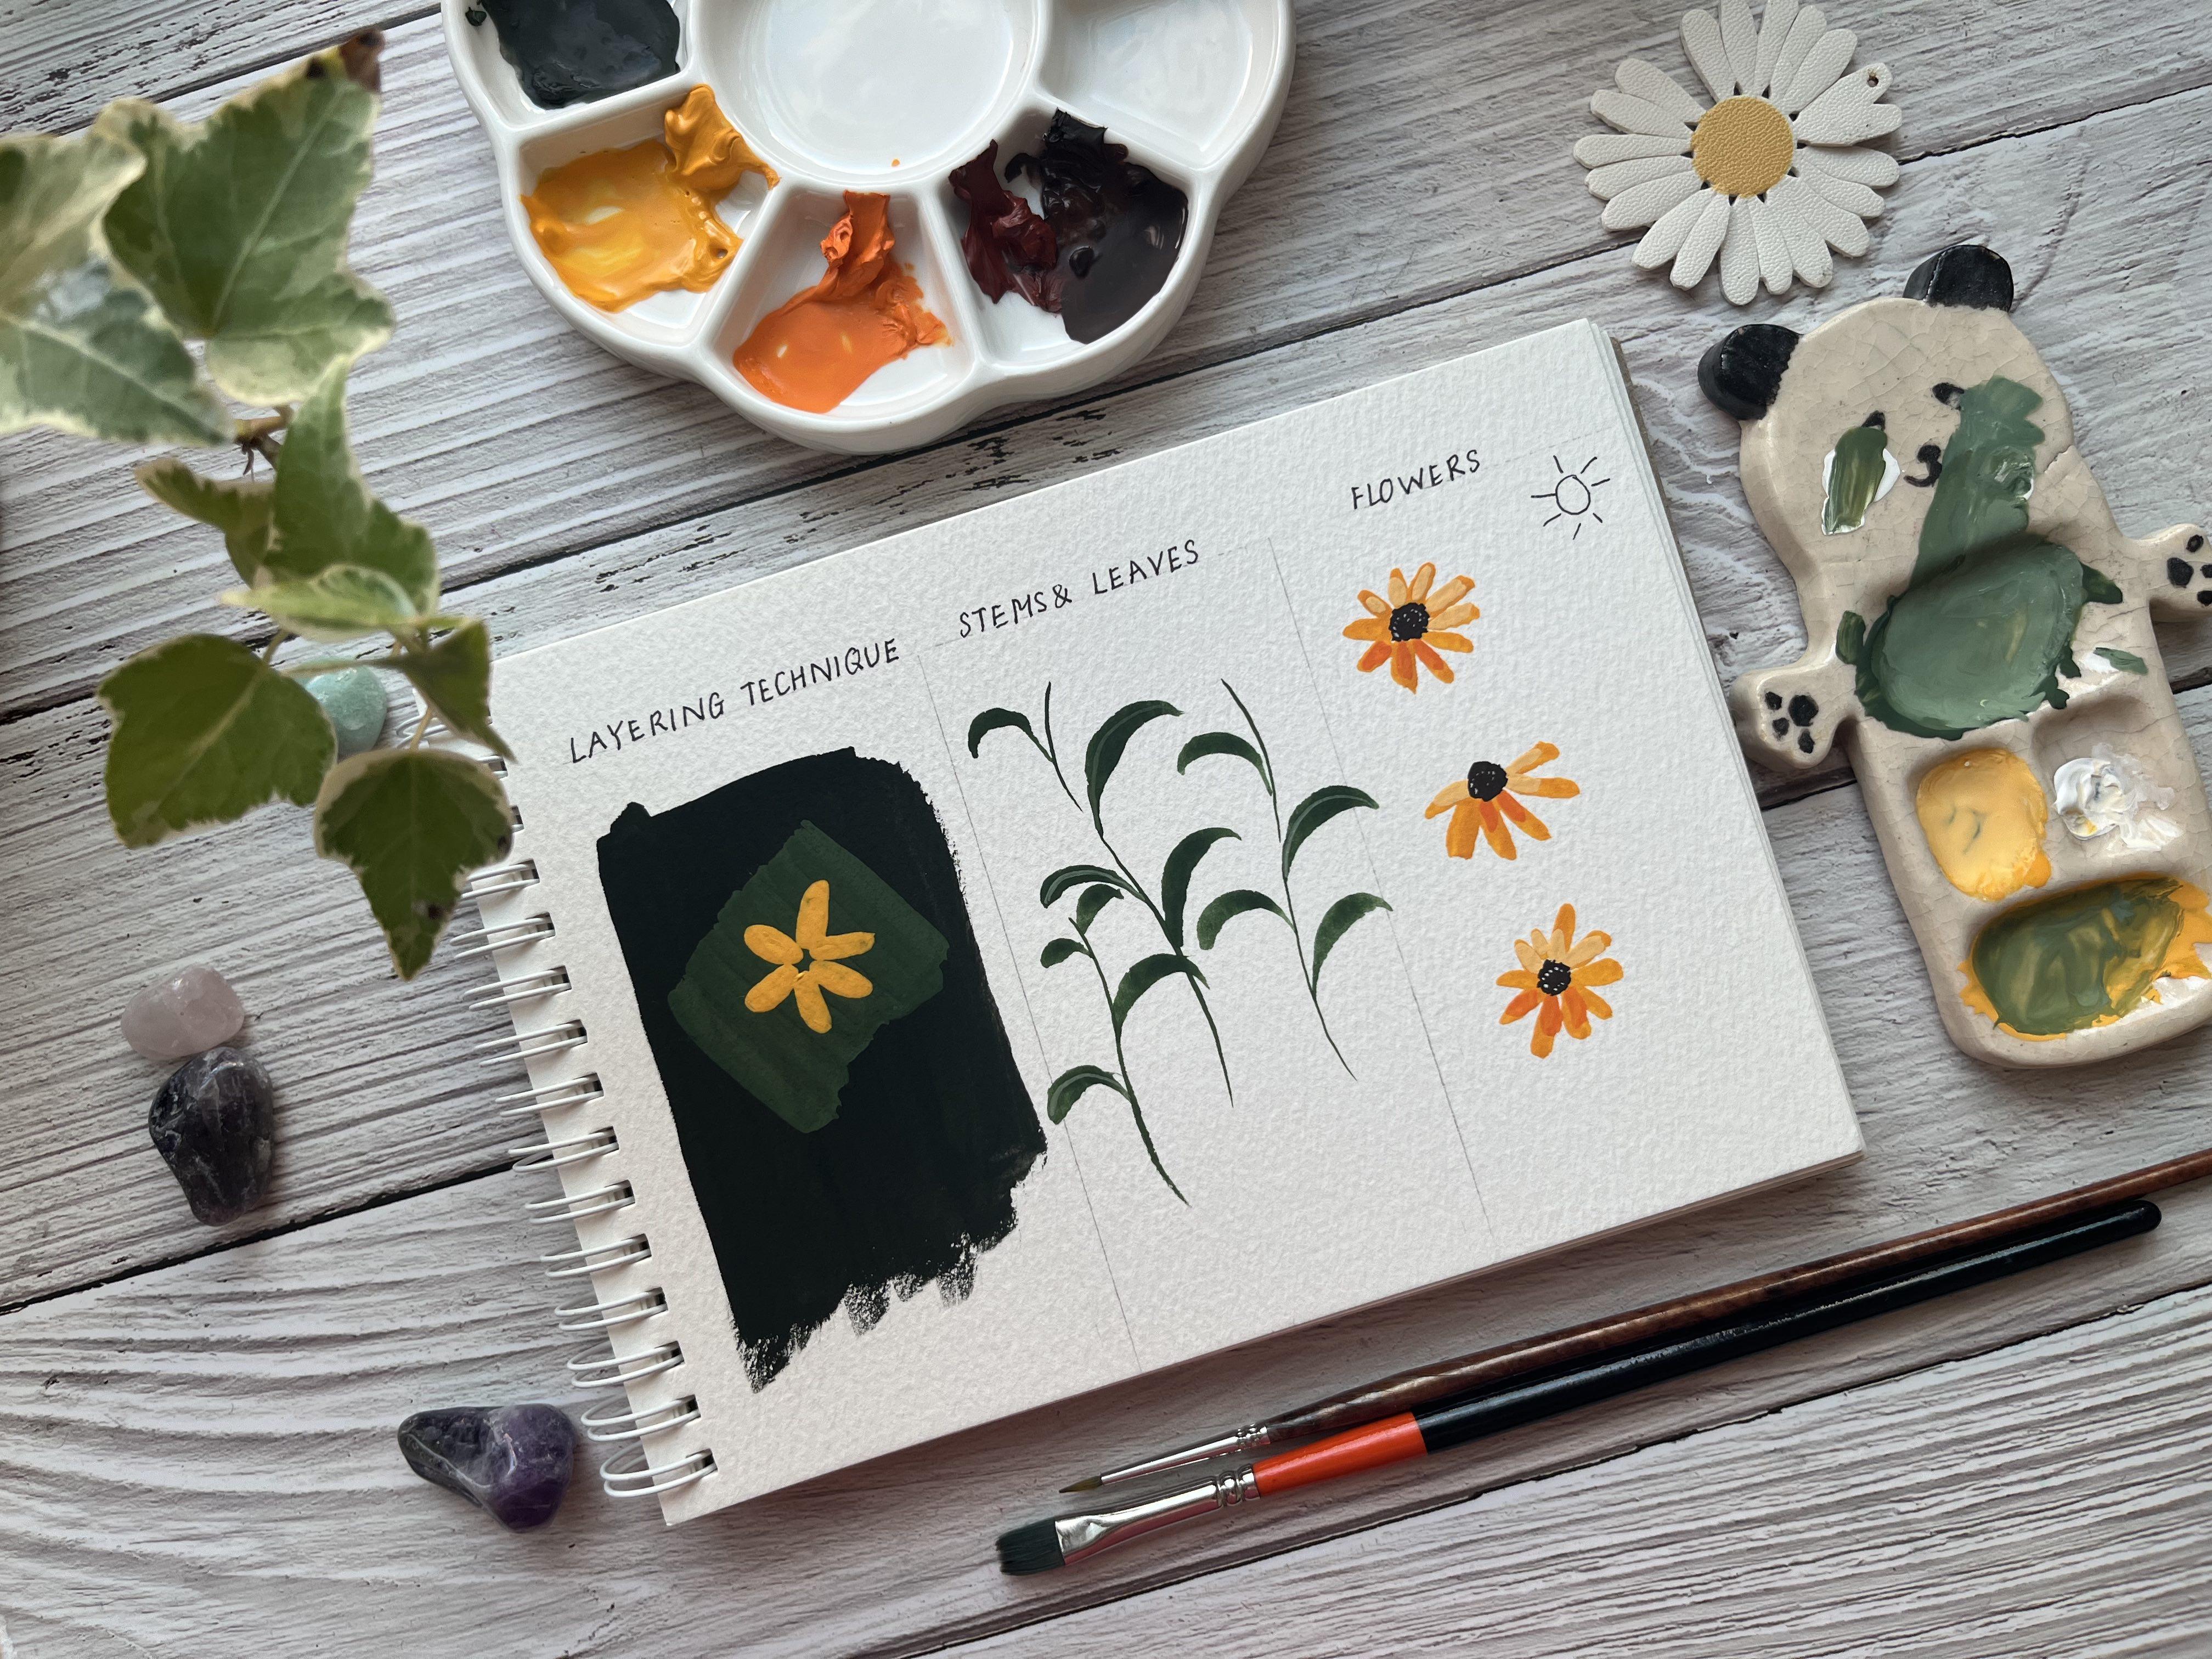
4. The Layering Technique: Before diving into
the final project, let's practice some essential
techniques we will need. We will start by practicing the layering technique to understand the
unique properties of wash. Then we will practice some drills to paint the
leaves and the flowers. I will also show
you how to create the torn edge paper if you want to create the vint
look for your paintings. In this lesson, let's practice
the layering technique. It is the most important
technique in painting with wash. When I first started
learning painting with wash, I thought it's very easy. It is very simple to understand. But now I can say it
is not that easy. Actually, it is quite difficult to master the
layering technique. And the problem with
layering technique, a lot of my students have is the layer is
not optic enough, especially if you have experience with painting
with watercolor. Normally you try to use the layering technique
in watercolor in wash and it doesn't work. In order to paint the
layering technique, we need to have the
ratio between water and pain and I will display it
in each layer with pain. For the first layer, I will use a mixture of
the black and olive green. I mix it with this. Because it is the
very initial layer and you will put a
lot of layer on it, I don't want this
layer to be too thick. So that's why I am
watering it down. So this consistency, it is
still creamy consistency, but it is a little
bit watery compare with other layers have
been put on top of it. So I will use this flat rush
to paint the first layer, the back row layer of p pan so this is just
the practice session. So you can paint
whatever shape you. You see, if the
paint is too dry, it will create this
kind of drying effect. This is the first layer. And one thing from
my experience, it is easy to easier to perform the layering technique
on cold breast paper. It I painted this on this hot breast paper and I can still
finish the painting, but I do feel that it is more difficult to apply each layer. This is the first
layer so I can use a lot of shops in order to
blend it to make it smooth. But for other layers
on top of that, we try to minimum the
number of shops as small as possible because every time we put the
brush on the paper, it will reactivate the
layer painting under it. For example, if you
paint the white on top of that and we
put a lot of shops, you put a lot of pressure. I will reactivate
the black layer and then the white pain
will become muddy. This is the first layer. We need to wait for it to
dry before moving forward. You can use the hair dryer, but I prefer to wait for
it to dry naturally. The paint is already dry and now it's time to put
another layer on it. I will put olive green on
the top of these colors. In the final
painting, I will just use the olive green
straight from the box. But for the technique lesson, I will mix a little bit
of olive green here. And I will add it with
a little bit of white. The reason it a little
bit why because normally the pain you take it
straight from the box, it is not opic enough even
for some pastel color. So if we add a little bit
of if you add too much why the color will become
lighter pastel color. But if we add just a little bit, a tiny bit of why it will increase the opicity
of the pain. So the key to have the opic layer is
we need to have the ratio between
water and pain. If it too wet, it would be something like water color and it
is not opi enough. If it is too dry, it is also very difficult to
put the pain on the paper. It needs to have the
consistencies and after a while, experience bending with us, have the feeling, what
is the right ratio. So you can use this kind
of brush or it will be easier if we use flat
brush or some ti of. We don't use it for our today's
class but of fiber brush. For this flat brush to
apply this neck layer pain. You see it is different
from watercolor. We need to put a thick layer and try to use a few
sharp as possible because if we paint again and again, reactivate
the underlayer. Wait a little bit
and when it is dry, we will put another
layer on top of this it is now dry and let's put another
layer on top of this. As you can see, it is
very difficult to create a layer without the
visibility of the shop, it is actually, it is
helpful in painting. So for example, when
you bend the leaves, bend the flower petals, try to keep the
brush with the shop with the shop direction
you want it for example, the texture on it, and the gush band is srying
faster than the color. So if we wait for it
to dry naturally, it may be around
three to 5 minutes. And actually, for this, I use a head wryer to
accelerate the process. Let's put another layer on this. This time, I will put this yellow because I will use this color for
our final process session. So I don't want to mix
the paint on this. I use this smaller palette so that the paint here
is not go dry. So let's bend some flour on it. Make sure we a very
thick layer of wash. You see my brush, it needs to be
something like this in order to achieve the
opaqity of the pain. So try don't be too saving when you paint with
wash because for example, here is little too little
paint on my palette. But for final project, make sure to mix enough a pen so that you can write
your brush with this. Now we wait for this to dry. I want to make sure it is to dry before moving to
the next lesson so that you understand you
understand the property of wash. I just wait for it to dry so that you see the reason of this. It is not really
dry because I put a very thick layer
of paint here so it may take longer
for it to dry. But you see with gas, when it's dry, the color will
be a little bit lighter. So keep that in mind when
you paint with gash. But if you use, for example, some protective layer
on this varnish, the color will be darker, understand the property of gas will help you to paint better. I will stop this lesson here
and in the next lesson, we will practice to paint
with stems and leaves.
5. Practice Painting Leaves: Now let's practice to paint
some stems and leaves. I put a several reference
photos on the project session. So you can look at the
black eye Susan and I base my painting on the
real black eye season. But we just paint a symbolized version of the
flowers and the leaves. So in order to paint the leaf, first, we will paint the stems. So for this, I will this poor olive green from the paint boobs. I
thinkin it down. It is easy to paint the very thin stem
with a thinner pin. You need to make it
a little bit thinner than when we practice
the layering technique. It is okay for the stem to not visible on the pen
because we want to make the feeling disappear
in the background. I will use this layer
brass to paint the stem. It is it's just practice, but it's just practice, so I don't need to try on
another sheet of paper. But for the final project,
you might want to, try the lie on another
sheet of paper so that you know how the brush
will behave on the paper. As you see, you don't
have to make the le too consistent here and try to make it is not a
mask but try to make the bottom is a little
bit thicker than the top because it is the stem how the stems will
appear in the nature. Next, we've been
paying the lips, we've been paying something like Try to bring some smaller
leaves on the top of the stem. You see the leaves here
don't have to be perfect. There's no perfect leaf in
the future in the nature. If you look at each stem
and each leaf individually, you can find the imperfection, when you look at many of them, you just feel this is a garden. Now we need to wait
for the layer to dry before painting something
vein in the central as leaf. So now the pain is
already to dry. I will need to put just some central veins on
some leaves, not all of them. In order to do
this, I will create a lighter shade of green
lighter shade of green, I will add some why here. I want this green is a
little bit more yellow, so I will add this leftover
middle yellow here. And use this liner brass to paint the central vein on on some leafs. You don't have to
paint on all of them. I do feel that this colour
is a little bit too d, so I will add more white on it. When the paint dry,
it will be lighter. Keep that in mind when
you are mixing the paint. And that's on the technique to paint the stems and leaves
in the next lesson, let's practice some technique
to paint the flowers.
6. Practice Painting Flowers: Now, let's paint the flowers. I use this yellow. For this exercise, I use the medium yellow
straight from the box. But in the final painting, I will add a tiny bit of white color on this because now we are painting
on the background. When we paint in the
dark background in order for the paint
to look more opaque, I will add more white on it. I will teach you how to paint flowers in several
different directions. And when I started painting
this type of flowers, I often paint the center
of the flower first. But then I realize
it will be easier and more realistic if we
paint the pet off first. So first, we will paint
the flower upfront. A different petal like this. I look clearly imperfect, but it is okay because it is
laser and it is not perfect. Next we will paint the flower from this
type of direction. Flower like this. So now, it looked really,
really Imperfect. But don't worry when we paint
it on the final painting, when we have a lot
of flowers together, it will create the
feeling flower garden with a lot of flowers and now we need to wait for this layer to dry before
continue to paint the flowers. Now, the first layer
is already dry. Let's put some highlight
and shadow on top of it, I assume it is the
line direction. First, we will mix a very
light no this middle, yellow. I don't want to make
this white colour dirty, so I will use the y from here. Mix the middle yellow
with white to create a light shade of the color and
if we put it on the petal, we think that got the sunlight. There's no hard
and fast wound and you don't need to
be too pricy here. For the shadow, this orange
color shade from the mops. Again, we don't need to
put it on the petal. In this flower, we will
have three type petals, the light one, the darker
one and the neutral one. That's on for the light
and shadow of the flowers. Now again, we should wait
for it to dry before putting the center of the
flowers on top of these petals. Now, let's be the center of the flower and I will
mix the two color here. The sense of the flour
is a little bit dark, so I will add more burn umber. I use some dot for the
edge of the centre of the flower to with
the filling it's not a perfect round circle. So again, wait for this
to dry before painting the adding some tiny tiny
dot white on top of this. It is already dry now, so I've been put a little
bit of white dot on top of it to give the feeling of something is there in
the center of the flour. And that's on the techniques for our today plus project and
started from the next lesson, they will start to paint
the final project together.
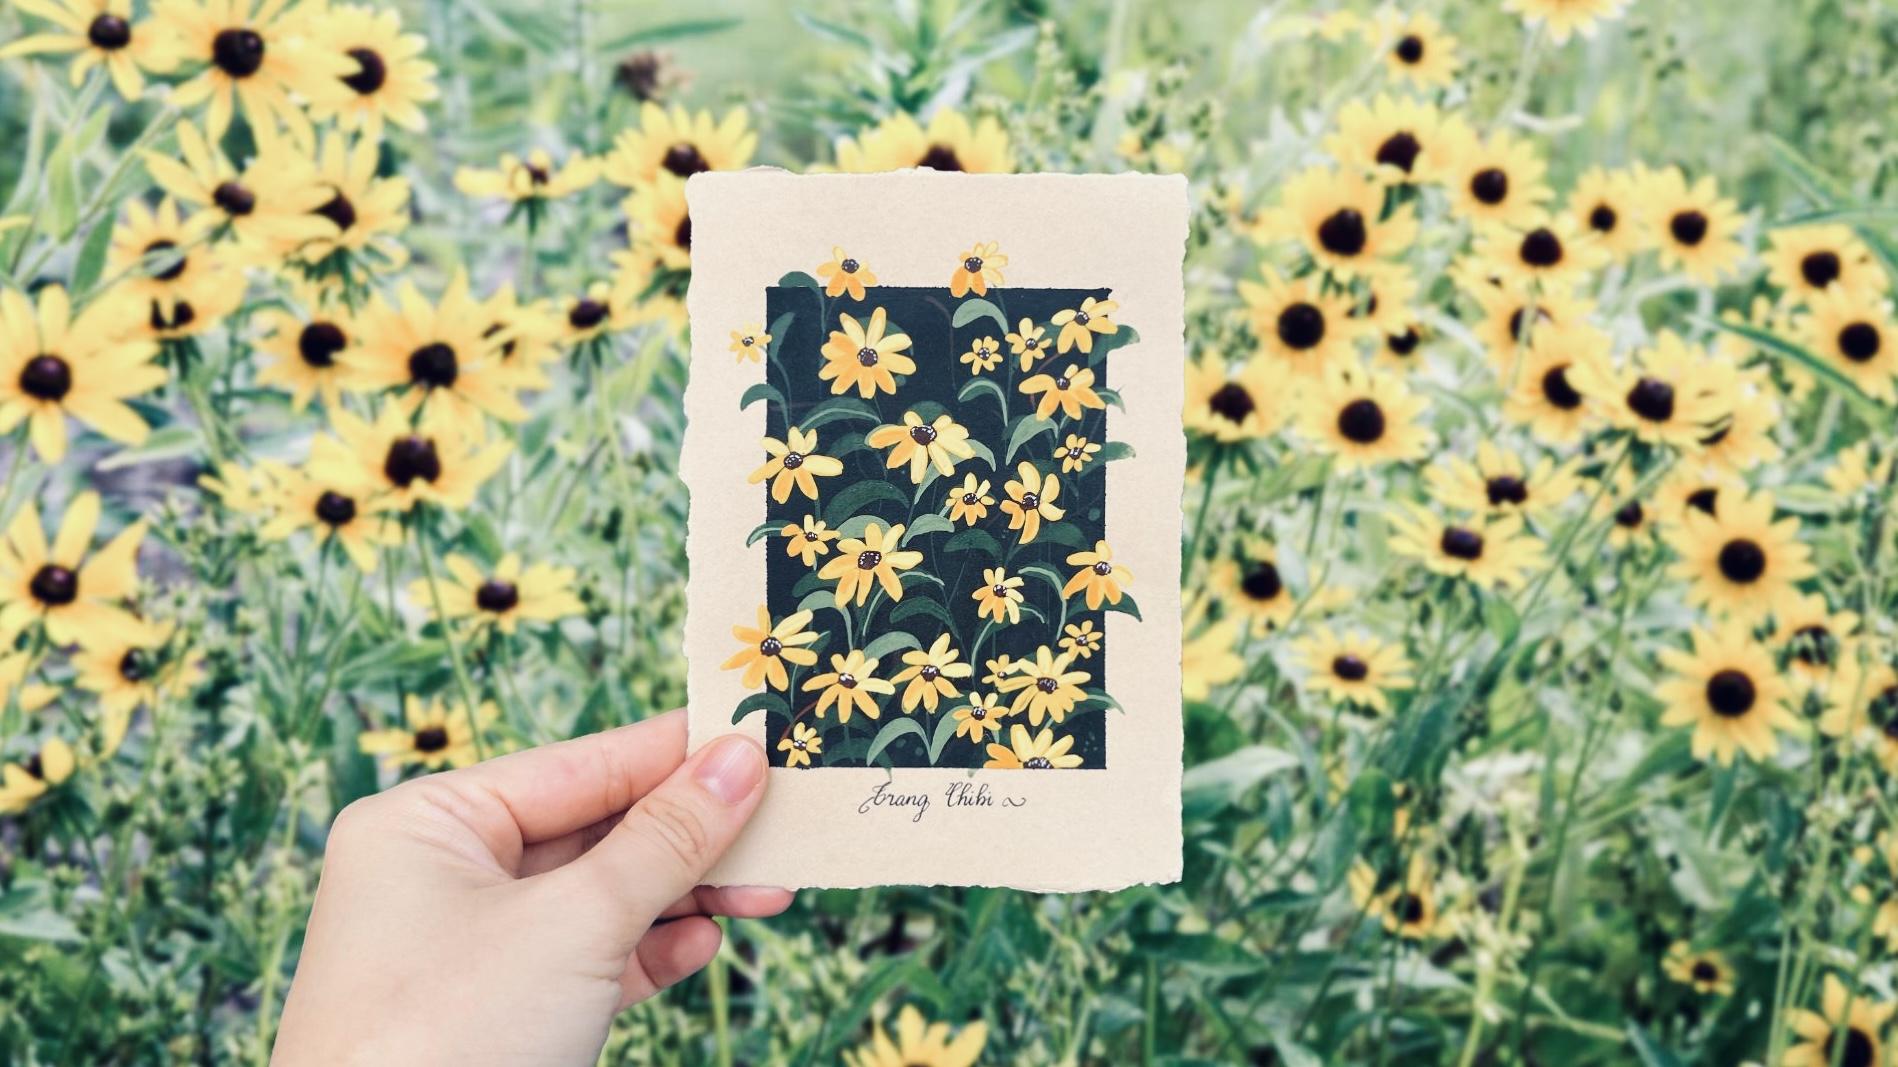
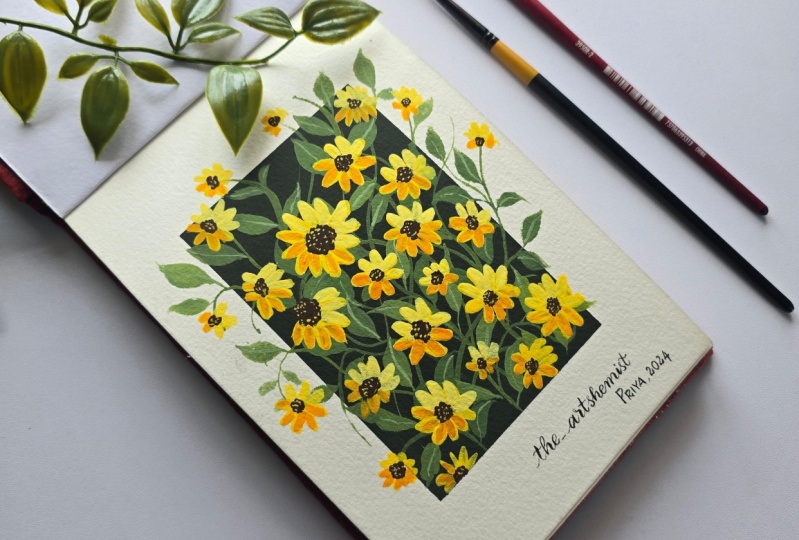
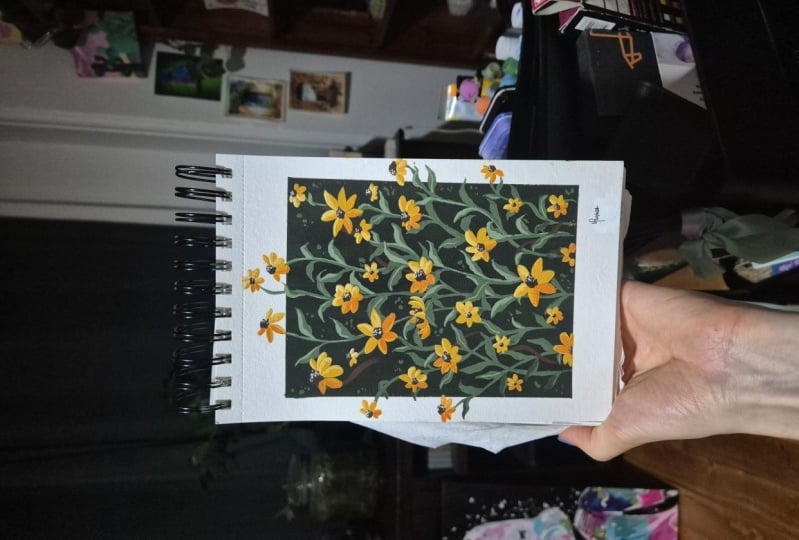
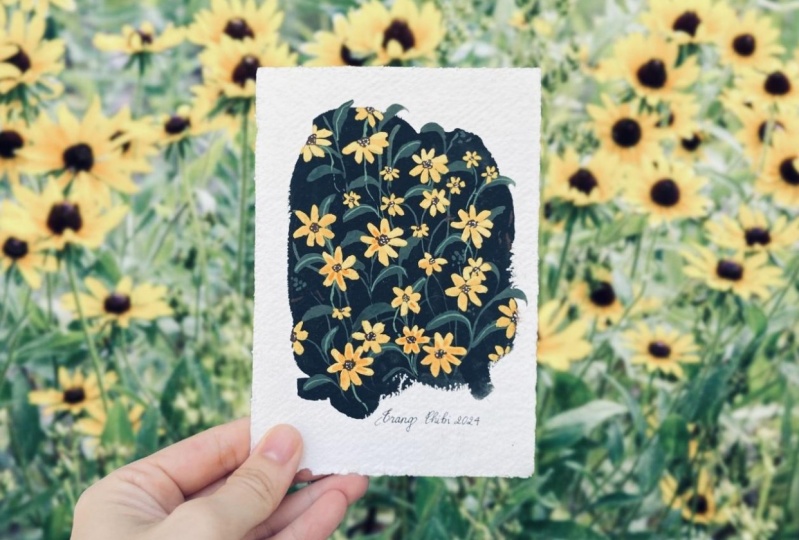
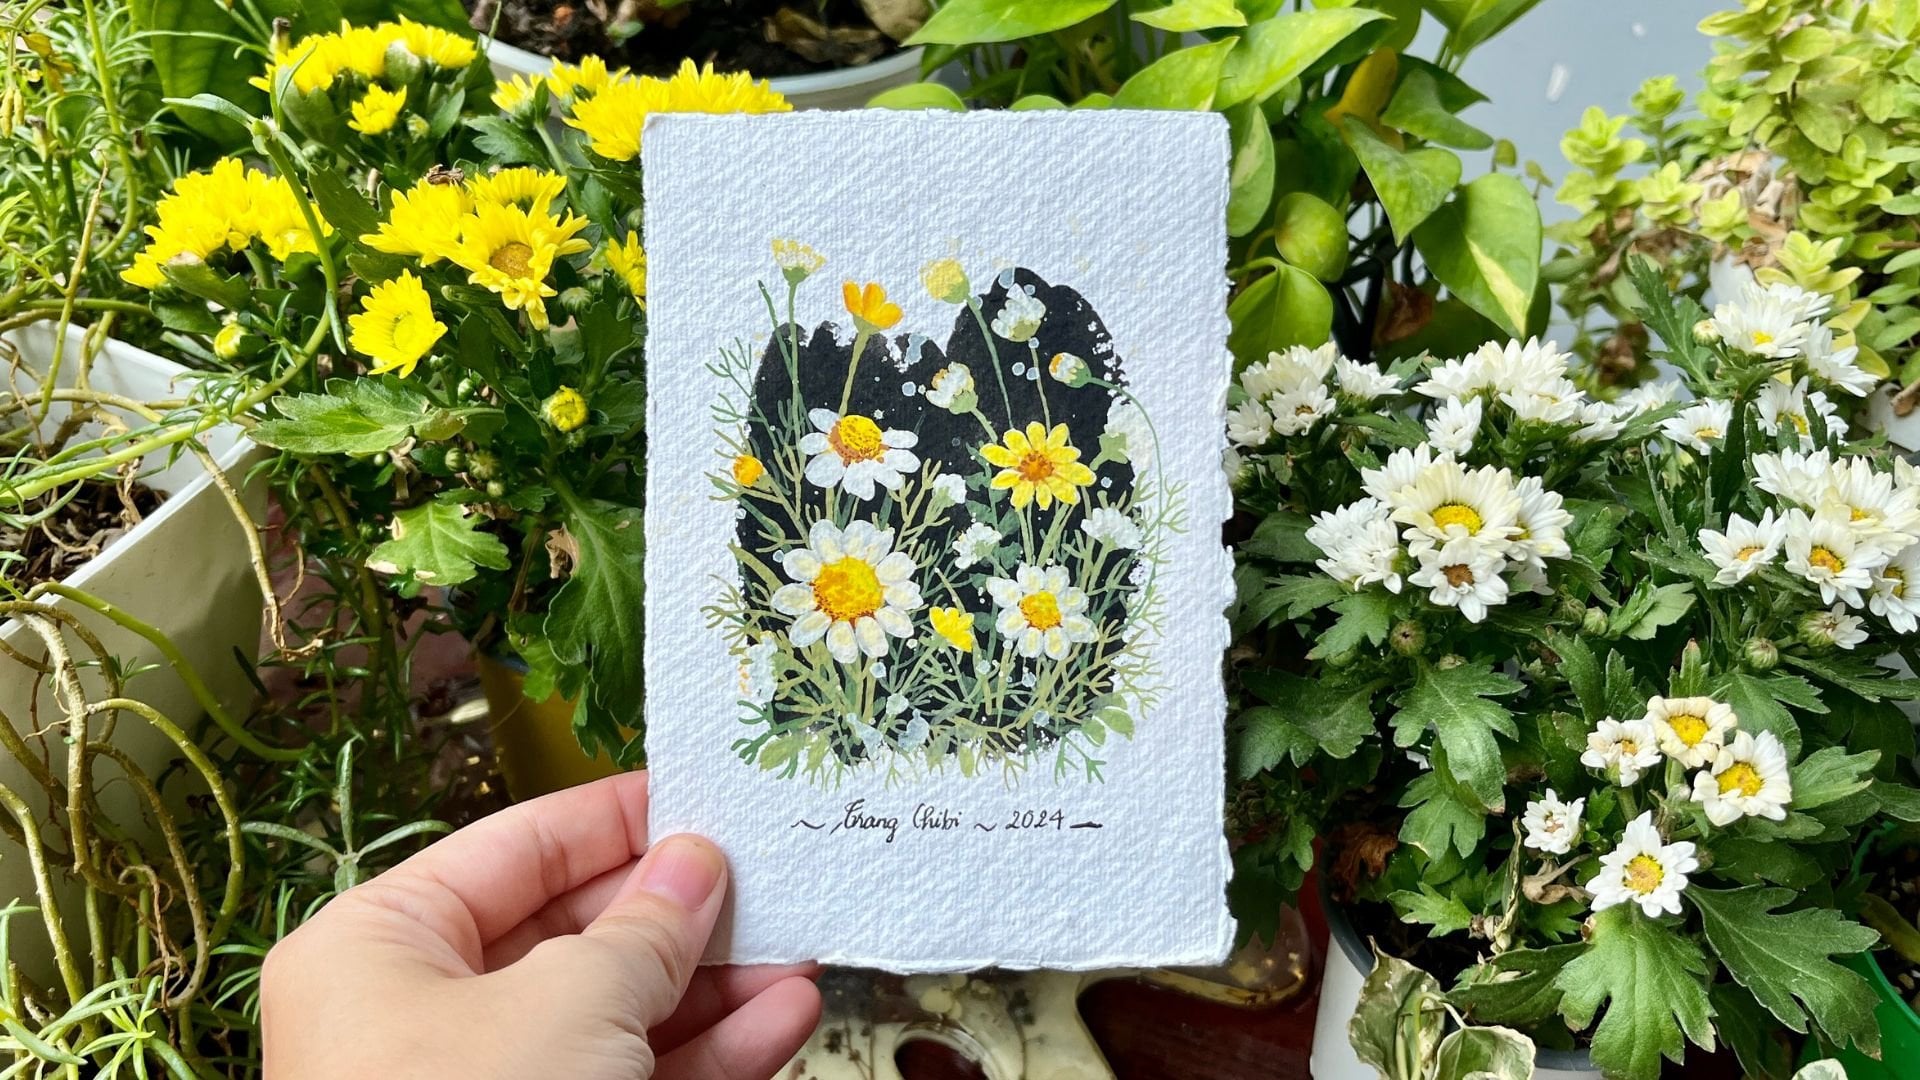
7. Final Project: Torn the Paper: Okay. Thanks for
sticking with me so far. Now, let's bring everything together and pain out
today's final project. This beautiful,
lovely vintage sky, Black eye Susan piece. And in this lesson, I will
teach you how to create this type of ton edge paper. So you don't have to do this, you can paint on a square
paper or on your sketchbook. It is perfect fine. But that type of edge
is my current favorite because it create very
loose and vintage look. I didn't try it Watercolor, but I think I will
try it soon to paint some Watercolor painting
on this ton edge paper. First, this is a ACC a six
square paper and I put it on a final project paper and make sure it is
larger than a 65, but not too large because
if it's too large, we will waste a lot of paper. We cannot use the
edge for any purpose. Maybe try to test out
some color brushes. Then I will put the wound here. Somebody in just
tear it with hand, but I think it is easy, it is easier to cove a
how to say shape line, but not to shape
with this wounla. I need to put a
lot of pressure on the wooly I don't
know how to say, but we need to put a
lot of pressure on the woodlo to fix the
position of the paper. I cannot do a lot of this
because after a while, my hand ring got hurt. And some paper, it
is very difficult to tell from this direction. That's all we have roughly piece of paper and
started from the next lesson, we put our pin onto it.
8. Final Project: Painting the Background: We already have
torn edge papers, and now in order to easy
to paint I tap paper down. Actually for this
small piece of paper, we don't have to do this because actually the paper normally
doesn't work for that much, but because I am filming, so I want it to be
in a fixed position. And I often do is to make
it is to si masking tape. There is a premade to si
masking tape on the market, but it will be I think it's
in too how do you say? I prefer I make to si
masking tape myself because the the premade to sig it will be too difficult
to pin that off later. I am trying to put it on
the central of my camera. For our today's glass project, I will prepare this
square back row. You can certainly have
this type of round. It is a loose row, not in a particular shape, but this is an absolute
beginner glass, so I want to make it super easy easier than
my other glasses. Let's create a square row. First, I will also use
this math instead to tap down to create
the square bottle. If you don't have to do this, alternative way
to do this is you use the ruler to
draw rectangle here. But I think it will be easier
with the masking tape. The masking tape is
not expensive anyway. I will make the top is slightly smaller than the bottom because normally we will sign a
signature at the bottom. Now let's paint the background. In order to paint
the background, I mix I will mix. We only have this mixture. I will mix the black
and the olive green. We already have this mixture
from our practice session. So we don't have to
make a very thick layer here because there is a
wild and you paint a lot of layers onto it and you don't need to make
the color is too even too. Maybe there's some
place which is greener, some red which is blacker because it is the nature
and it never perfect. That's it. Now we wait for the Brow to dry before
moving into the next step.
9. Final Project: Painting the Leaves: It is almost dry. I think it dry faster
than I expected. Then we will peel this off. Try to be careful because Okay. Because it is not perfect but no problem and it is
very easy to clean was. I mean just usemod piece of cloth to remove this Now, you will start to
paint the stem. So to paint those stem, I will use I will use the
poor li green from the box. I mean, use a small piece
of paper here in case I need to take the
pass and the colour, but I think it is good enough. You don't need to
follow me exactly. We just need to create
a very random stem. And don't try to
make it to shade. I think it is easy to paint it. CoV instead of shade line. I will paint I think I will
also paint some kind of, you see some kind of dry
leaves in the background using this color but more more ochre than
Burn Amber this time. Just go with some random. As on for the s. It can
be easier if you wait for all of these to dry before painting the leaves because
you can put your hand on. But I will paint the leaves now because
as I mentioned before, we don't need to paint
the perfect lifts. It is okay to make
the lips over. What I like from wash is
because even if the paint dry, we just need to put
a little bit of water and we can
paint with it again. We cannot do this with a clic. And now we will wait
for this layer to dry before bending the central
veins onto some leaves. It is already dry, so now I will create a
lighter shade of green. I will pick up. Actually,
it is it too dry now. So I will put a little
bit water into it. It'll be better if you
have a palette which have a need so
that you can cover it when you don't why we wait for while you are waiting for the
painting to dry. I don't I don't think In this I think it's too light, so I will mix it in here. And I will put a little
bit yellow into it because if you look at
the leaves in the nature, you will feel that
the vein is not only light but have
more yellow shade. Now you will use this mixture
to paint the central vein. I feel that it is
still too chew duck. This Mitchell. And we will draw some vein, but not on all of the least because if you look at the reference photo of
the black eye Susan, sometime we can see the
the vein, sometime not. So that's why we only paint
it kind of very randomly. I think we need
something here because the whole blood here
is too plain for me. I think that's enough. Now, we wait for this to dry, which is quite fast before painting the flowers
and in the meantime, I will go to clean on my
brush on my bathroom.
10. Final Project: Painting the Flowers: It's time to bring the
flowers and you see, I can just use this
color but actually, because I put it when I took the technique lesson
in the morning, so it is a little
bit too dry now. I use the fresh
pin from this bag because to make it easy to mix. And I will add a tiny bit
pie for the first nyer. When you paint with wash, keep in mind that the
brushes get ruined faster than when you
paint with the color. I will use this thick
paint to paint the flour. I will start from left to right. For this painting,
I don't think I need to create a drawing first, but you can make the
plan if you want. Just create some some new
sketch on a scrap paper. But you see, just keep
in mind, for example, we have on up third, I will put some flour
over this area. So you see when we paint
on the background, sometime even I use quite
a thick layer of paint, you cannot cover the underlayer. So don't worry. Later, I will wait for it to dry and we will add another
layer on top of it. Try to vary the step of the
flour because in reality, we never have the for
some flour on top, I want to make it small, just at the tip of your breast. I forgot to at this
kind of shape, but it is not that difficult. Try to create some kind of uneven improvision on the
distribution of the flowers. Try not to create
it too uniform, something we look
at the pattern. So Okay. So let's go again to add some. We still have the
layer halide and lado, so don't worry too much. But for the petal, it is too aparen and
it is already dry. I will try to add another
layer been onto it. I think that's
good enough and we finish the first
layer of the flowers. Now we need to wait for
it to dry completely. This time in be a
little bit long because we have a painted
a very thick layer before put another
highlight and shadow, another layer on top of it. Now the flower petals
are already dry, so let's put some highlight
and shadow onto it. For hi, I just put I will just put this yellow onto
this white color. I try to save the pain by not. I think this shape
is beautiful enough. Let's try assuming
this is the sun. Mm. Just a little bit
high and there. We don't need to cover on the petal because if you look
at the flower garden, some petal, we have the
highlight on just a part of it. We try to put more highlight on the flowers on the top of
the painting because we assume that it is near the sun a Then in the shadow for the shadow, I mean, it is this orange
and it is already too diner, so I add some drop
of water onto it. Again, we don't need to cover on the petal and not on flour, needs to have both
shadow and highlight. So I will ignore that flour. Now, because there are some
petals in medium yellow, but we don't find that
it is opic enough, so I will put this color again on some petal to make it really
opaque and standard. I think that's beautiful
enough for the flowers and now we will wait for it to dry before painting the centre
of the flowers. It is dry now, so now it's time to paint
the centre of the flower. I we this mitchell before Oh, my God. It is not dry. So I need to fix it. No big deal. So try to not touch your
hand on your paper. If you are not sure the painting is the previous n is 100% dry. It is a little bit
difficult for me because I prefer to paint on with my
hand touch on the paper. It is like when you
write something. H. Now, wait for it to
dry again before we putting the final
details onto our pending. This layer is already dry, so now it's time to add tiny, tiny detail into the
center of the flour. I will add I will get some wine from the bear and I
will use the lined to to just ate some small dog onto the it we don't want to have a lot
of pain on the ale. And I think I need to
ask a little bit of darken some darken dot on the background to have a feeling of some very small
bus over there. And I can bust it. We all done and's
my signature here. Actually, when I write, I need to turn my my paper
on the left hand side. That's it. We finish our project and let's see each other
in our final lesson. In that, I will
guide you how to ask questions or upload the Bjets for comment and for other people to
appreciate your artwork.
11. Final Thoughts: Okay. Thank you so much
for joining this class. I hope you have learned
something new and created this beautiful
painting you can give to your friends or family
or decorate your home. If you have any questions, feel free to post them in
the discussion section. Don't forget to upload your
Bjet to the Project Gallery. I would love to see your work. If you enjoy this class, check out my Skillshare Bfi for more wash and
watercolor tutorials. You can also follow me on Instagram TV Lacks purple for updates on what
I am working on. Thank you again and
happy painting.
 Trang Chibi ❤️, Watercolor and Gouache Artist