Transcripts
1. Class Introduction: Hello, everyone. I'm Cheti Be an artist from Vietnam and
welcome to my new Was glass. In this glass, you will
learn how to capture the delicate beauty
of white briar rose. I will guide you
step by step from choosing the right
tons and materials, analyzing the reference
photo to simplify complex rose garden into a beautiful painting
in your sketchbook. This class is
perfect for artists with a little experience
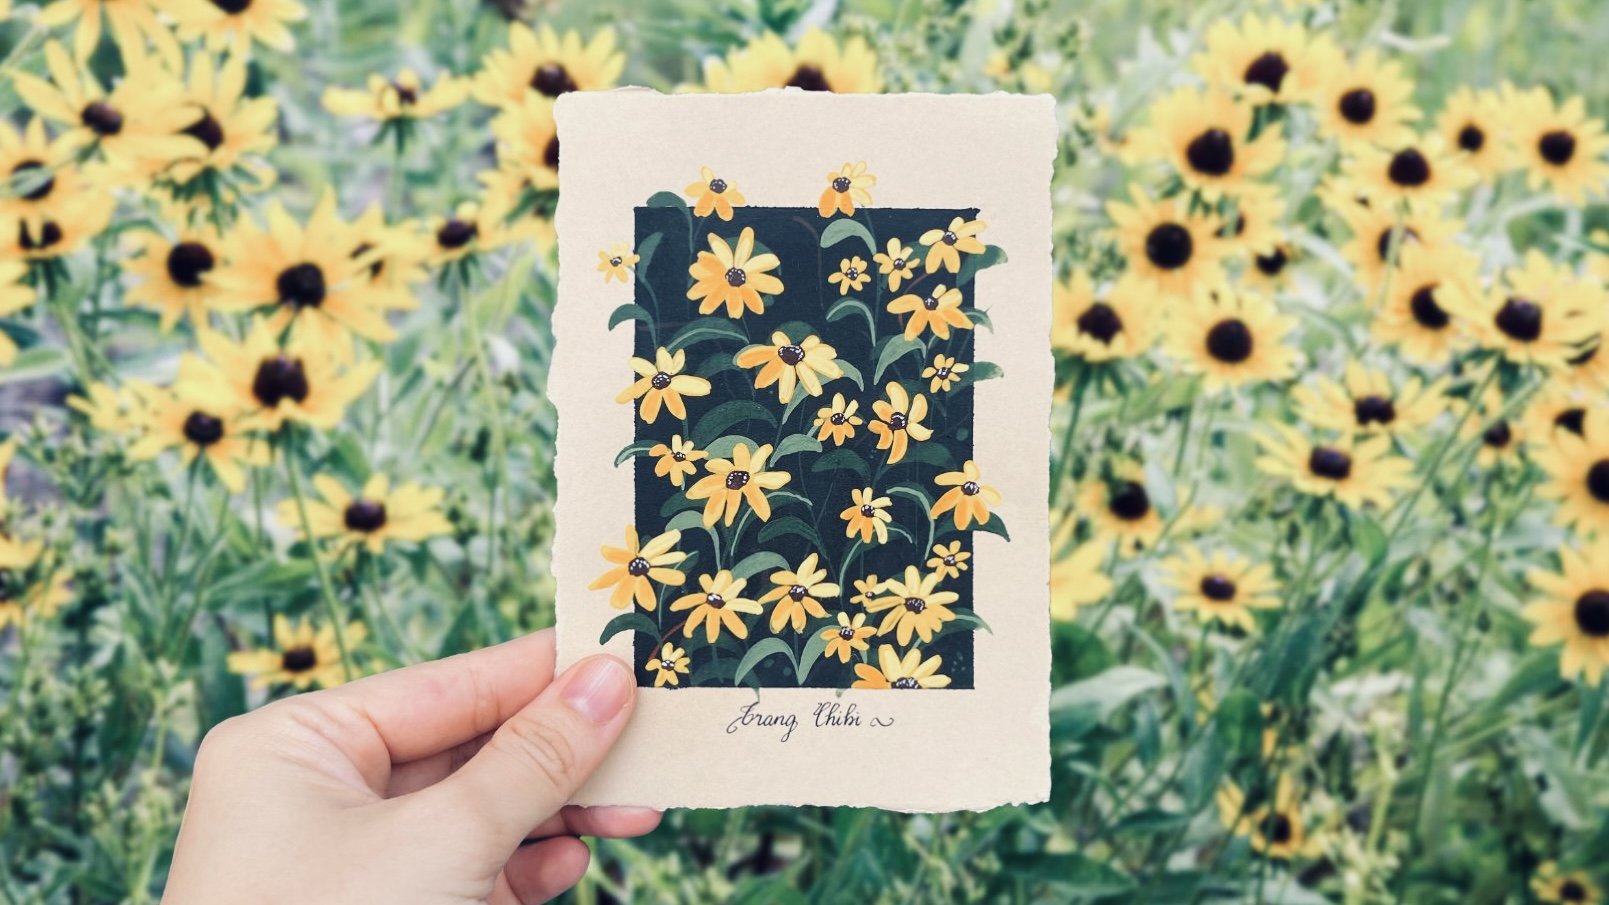
in was painting. If you are completely new, check out my class. Was for absolute beginnss Black Eyed Susan
in vintage style. Now, let's get started.
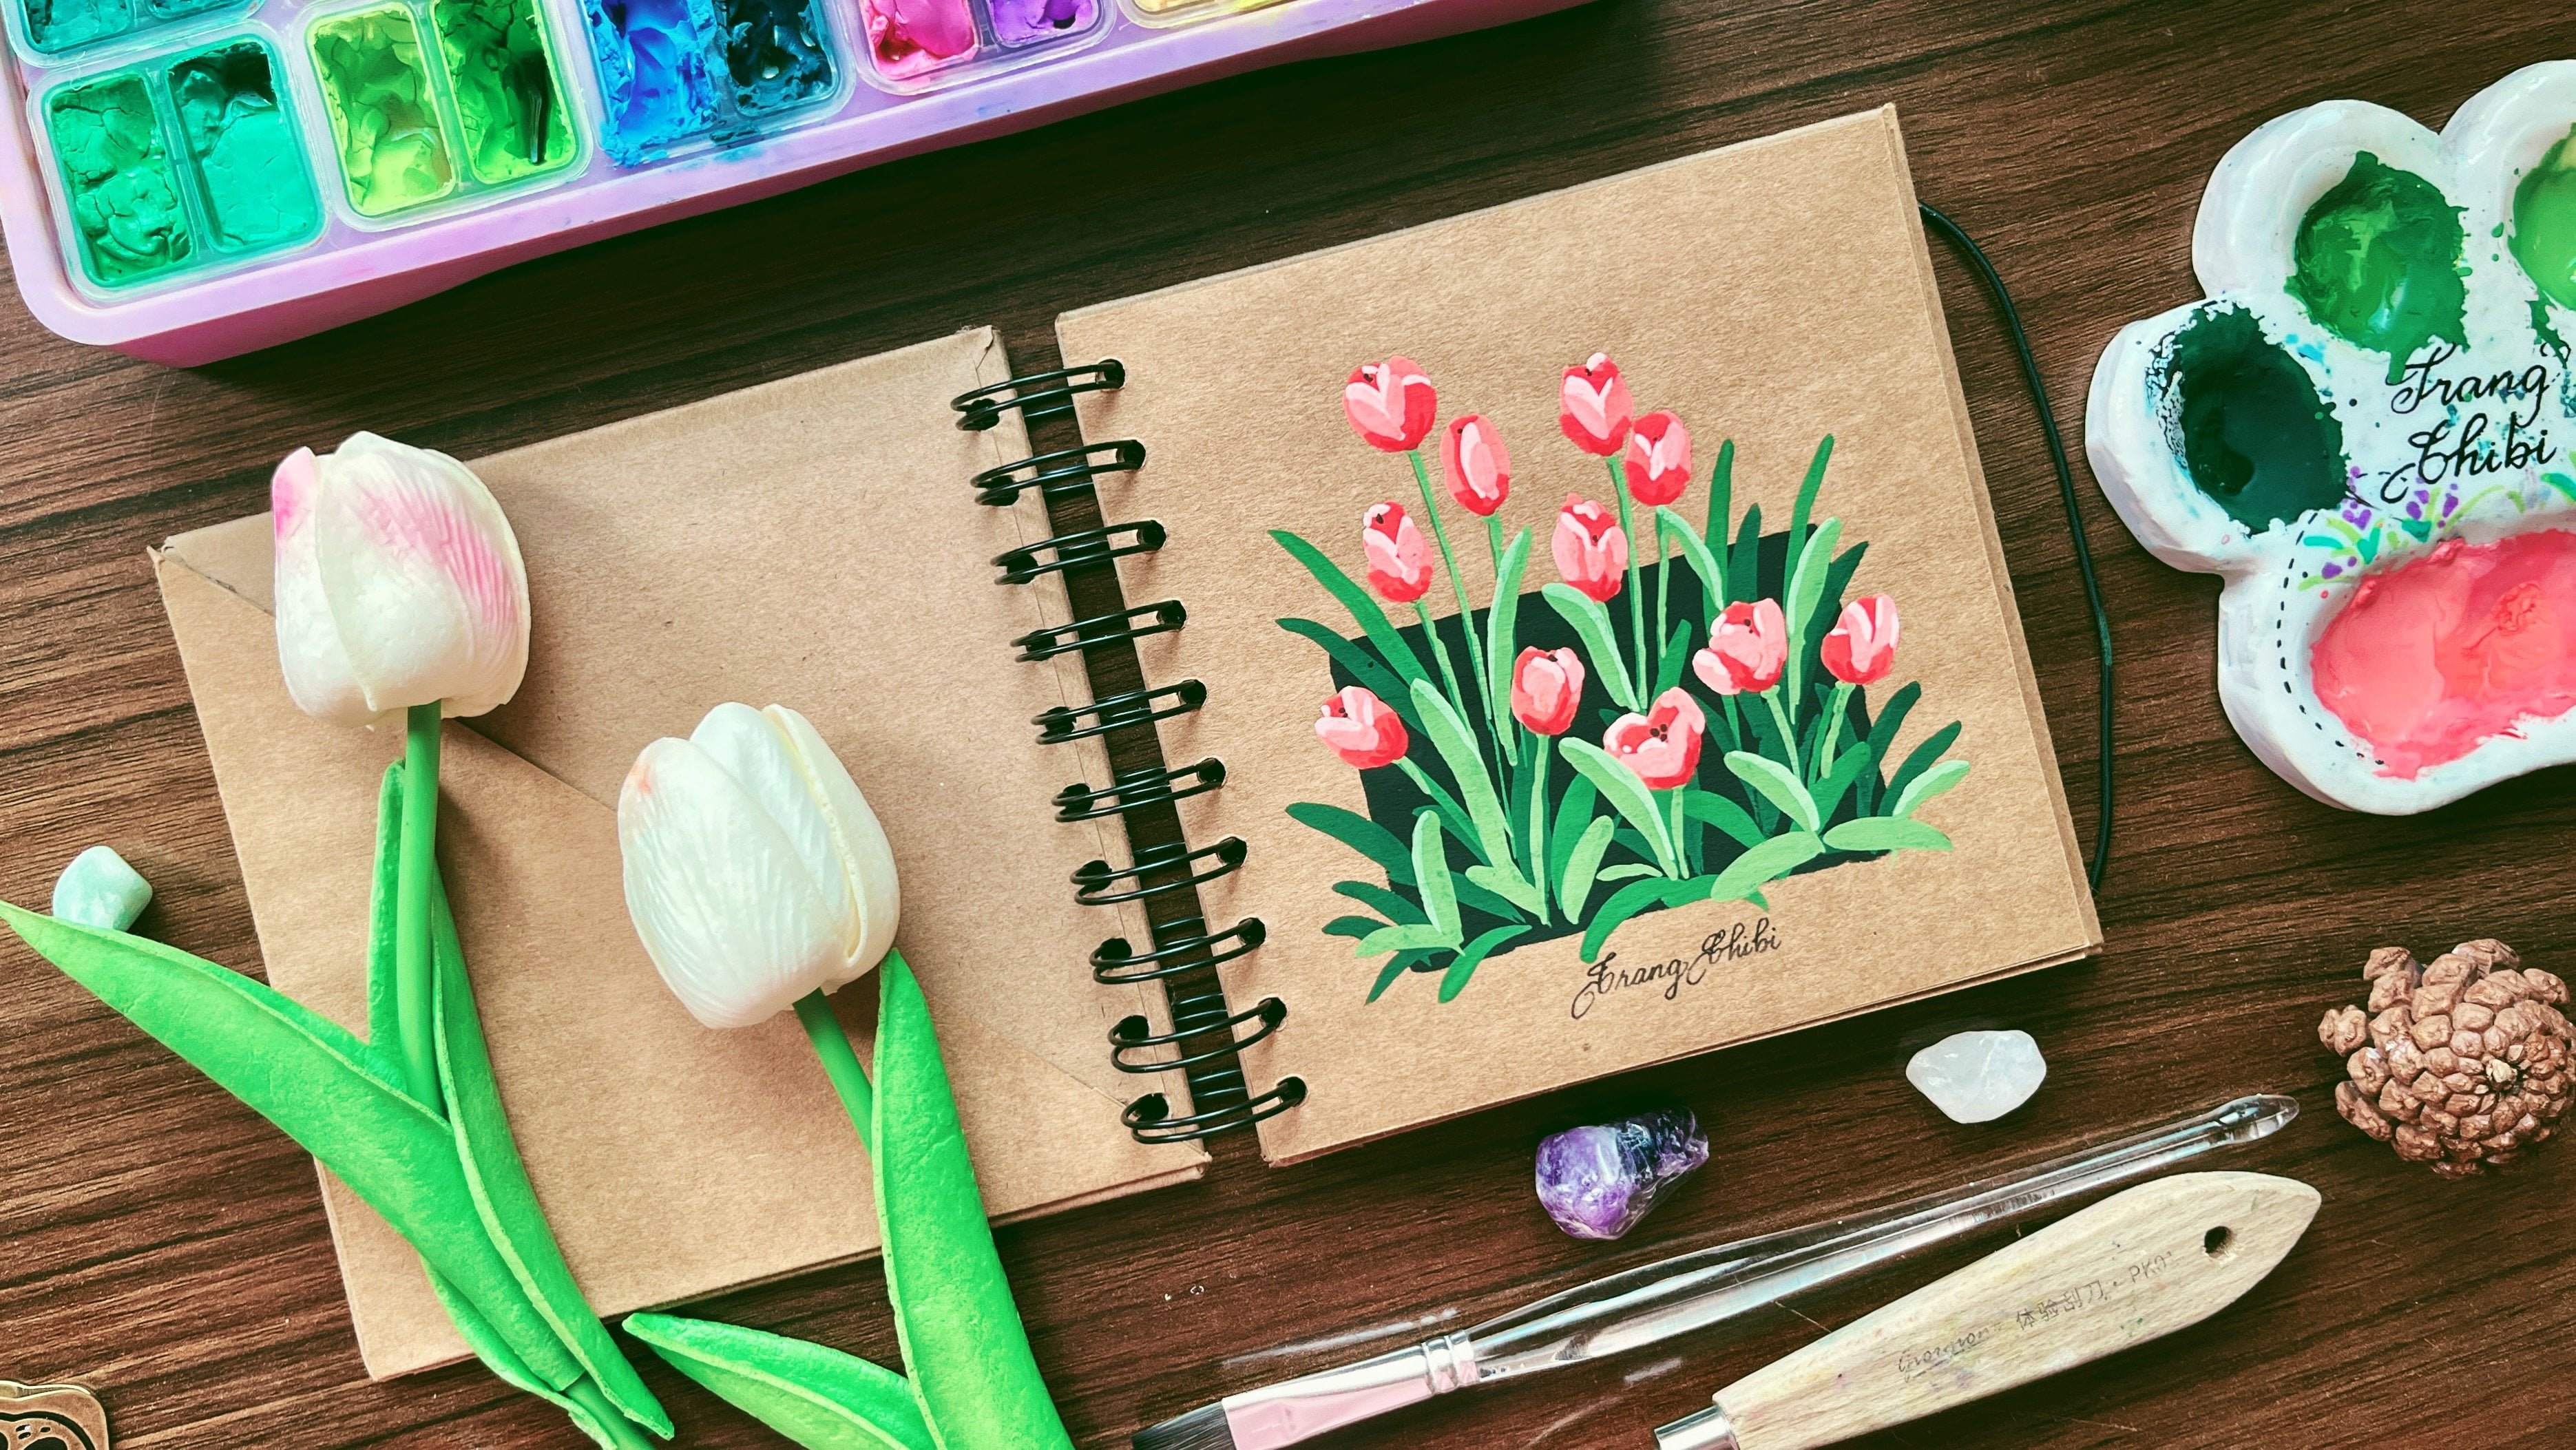
2. Tools and Materials: In this lesson, let's
talk about the tones and materials we may need
to use in this class. Keep in mind these suggestions, feel free to use whatever tones and supplies which is more available to you. In order to participate in
this class, we need Wahpan, we need some paper, and we need some rushes
and some other items. Let's talk about all
of them in details. For Waspan for today's
class demonstration, I will use my 36 color Himi box. This is very cheap brand I
can purchase in Vietnam. The quality is not too high, is not very special, feel free to use
whatever brand which is more available in your
local art supply store. There are 36 colors
in these paint box, but we don't need to use them. We need to use some
very basic colors, which I dedicate the next lesson to talk about it. For paper. For today class demonstration, I will paint it on my newly purchased sketchbook
watercolor sketchbook. It is around 4.5 and 4.5 " of around 12 and
12 centimeters, but feel free to use any
sheet of watercolor paper. You can use cold
breast or hot breast, whatever you have on hand. I personally prefer cold
breast because I want to some picture on our painting. But for outlay glass project, it is okay to use hot
breath or cold breast. I will use this small piece, a ton watercolor paper. For us to put some
basic techniques, some basic chops before moving
into our final glass port, I chose this ten paper
because for today's glass, we will paint white rose
some white rose on the row. So I don't need to spend
time to paint the bike row first and then demonstrate how to paint the white flowers, but feel free if you don't
have a ton watercolor paper, just normal watercolor paper and spend a little bit of time to to paint the Browsing was or watercolor paint
and you'll be fine. For out today glass, I will you self brushes I will use this flat brush to
paint the bike row. I will use this is you see
it is an awful shape of board brush to it is very convenient to
paint the flower petal. So if you don't
have this on hand, I recommend you to purchase it because it is
very convenient to paint with wash and I will use several rou brushes in
different sizes because I want to paint the leave in diferente different size and also a liner brush to
paint to paint the stem. It is more convenient
to paint the stems using this liner brush
than the normal row brush because the brisles is
a little bit thinner and longer in this liner brush. And I will use this ceramic
palette for our today glass. Feel free to use any
palette you have on hand or just a normal dish
on your kitchen. We will need some wood
jar to clean brushes, and I will also use this
small piece of cloth. To make sure our
brushes are very clean before moving to
another different colors. I will also use it was d to the model of today's
glass painting. That's on tons and materials we need to
use in this glass. Let's stop this lesson here. In the next lesson
I will talk about all the colors we need for
our today's glass bohet
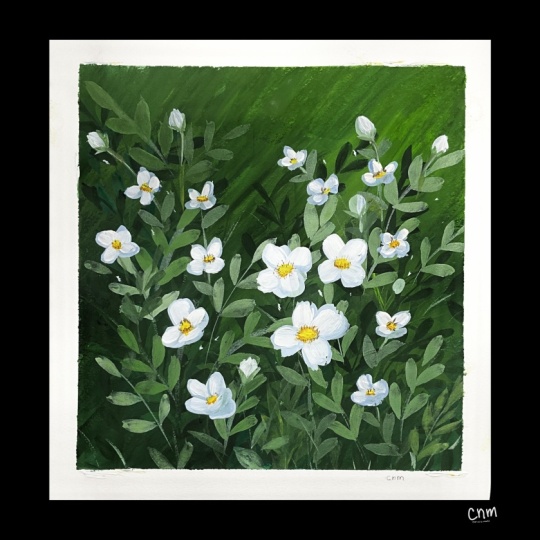
3. Colors: In this lesson, let's talk about the colors we may need
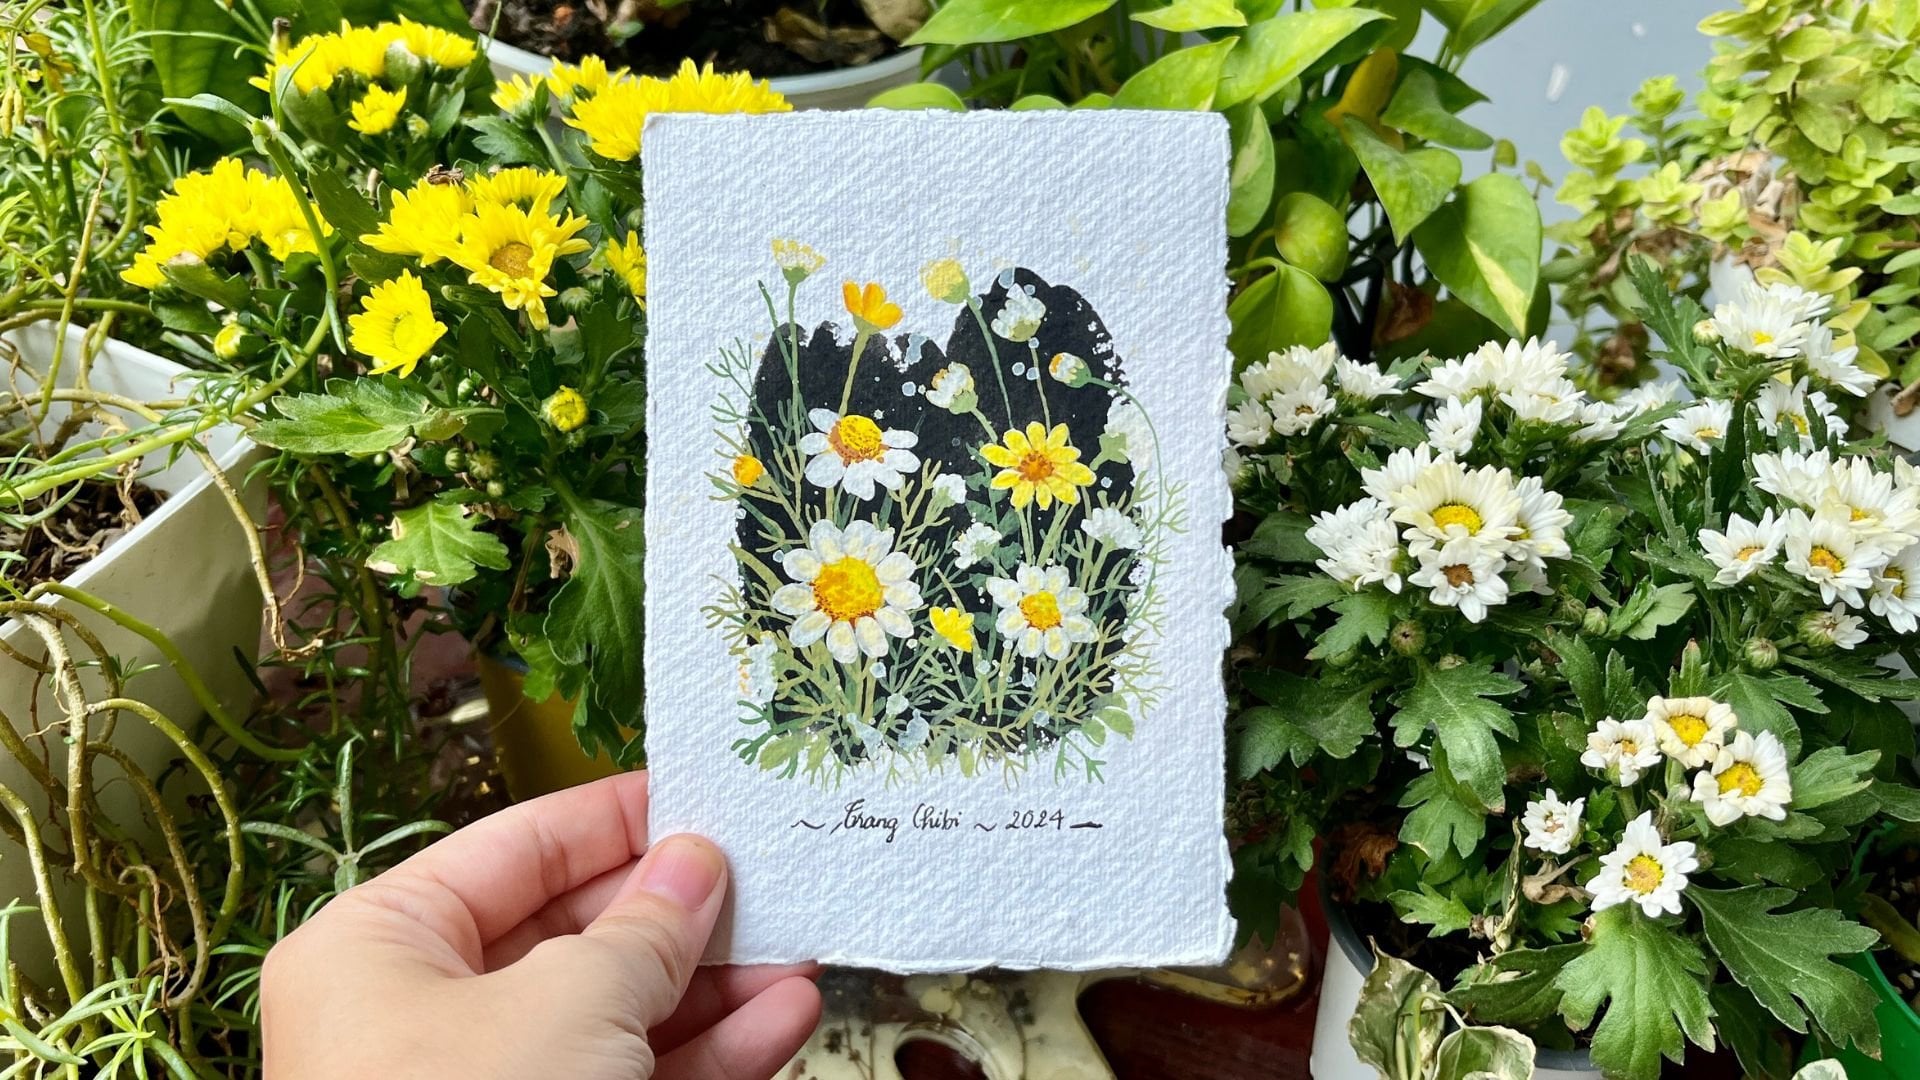
to use in this class. This is the painting I
painted before and I uploaded it on my social media and I got a lot of
positive comments on it. That's why I decided to convert this painting
into today class. For this class, we only
need very basic colors. The first color we need
is the black color. We need the black color
to create some shade. The micro, the leaves, and also to the area
in the flower petals. So this is the black. So in order to paint different different
shades of green on the background and on
the leaves I will use, use this is olive green, olive green on my paint box. And this is the color I will use for the base
of the green shade. And in order to create
brighter shade of the green, I will add it lemon yellow. But if you don't
have olive green, Feel free to use other green
color on your palette, for example, if you pick up some bright green like this one, just need to add some
opposite colors, for example, the red color into this very bright color and
it will make the color more muted and something similar
to this olive green. It is more natural,
in my opinion. So in order to create the locker shade of
this olive green, I will add with black, and in order to create
the brighter shade, I mean add with lemon yellow or sometimes with
some white paint. We need a lot of white paint
when we paint with the wash. That's why I purchased
a separate map of and you see in order to create the darker shade
of the flower petals, we can just add white and black. But in order to make the
color more interesting, I will add a little
bit of bit is violet, a little bit of violet, a little bit of black
and a lot of white with the darker shade
of the flower petals. For the lighter shade
of flower petals, we just white for the center of the flower Ives
this lemon yellow. Also for the sat here, I will use this yellow, it is medium medium yellow. We also need some
brown color and here I will use burn umber. To paint some small dot on
the center of the flowers. I believe that's on the colors we need for out
today glass pose. You don't need to
have a 36 pin bob i. You can just use, I believe in create
these colors with very basic six or 12
color glass pin box that's on the colors we
need for out today glass. In the next lesson,
let's analyze the reference photo before practicing some basic jobs
for our today class pulse.
4. Analyzing the Reference Photo: Before practicing
the basic strokes for the flowers and the leave, I would like to use
this lesson to analyze the shapes of the flowers so that we know why we've
been paint like this. This is our reference photo. So as you may see, we won't paint exactly similar
to this reference photo, but I will use it just to analyze the shape of the flower. If you look at the flower, the br rose flower, it basically have kind of sick petal and the
petal shape is like this. It is five petals. I don't think it have a fixed
number of flower petals, but it is somewhere
around 56 petals. It's not very important. That's why for today's class, I recommend to use this oval shaped petal
because with this oval shape, you can just use one shop to paint this two shops
to paint one petals. I use the raw brush because
it uses raw brush, the shape, it may be a little bit pointy, so you need to paint the the outline first before painting the
center of the petals. For the flower which is if
you see it on the side, we have the three petals, is similar to the flower which is but it have two small
flower petal here. Normally, In use this rust one, two, one, two,
one, two, and one. For the centre, you see there there is a centre
the flower here. As I mentioned in lesson, I use this lemon yellow to
paint the flower centre. But for simple, there's some area which is a
little bit dark. Here. There's some area. I will use this medium
yellow and also have dot here. So dot here. I will use this brow colour
bon umber to create this dot. Here you have a so
from this side, you will see there
is a dark shade. We also use brown color
number for this area. But, in our final painting, the flowers will be very small, so you don't need to create exactly similar
shapes the flower center.'s analyze some leaves. So you see the briar rose, it may have it have the cluster from five five or just three. This one is later, one, two, three, four, five, six. When we paint I don't think there is a fixed number of the leaves on each cluster. When we paint the leaves, I will at from somewhere
5-6 leaves on each cluster. In this painting, I
didn't paint the butt, but I think in our
painting today, I've been painting
some butt and we need to recognize the set
a bit like this. So I think the leaves, bro rose is quite similar
to the normal rose. I have another class
here on Skillshare, which is let up your skills
with magic rose garden, and I think the leaves
are almost similar. That's for this lesson. In this lesson, we
analyze the shapes, the flower petals
and the flowers. In the next lesson, let's
put on we have learned in this lesson into our paper to practice some basic shops
for our today class.
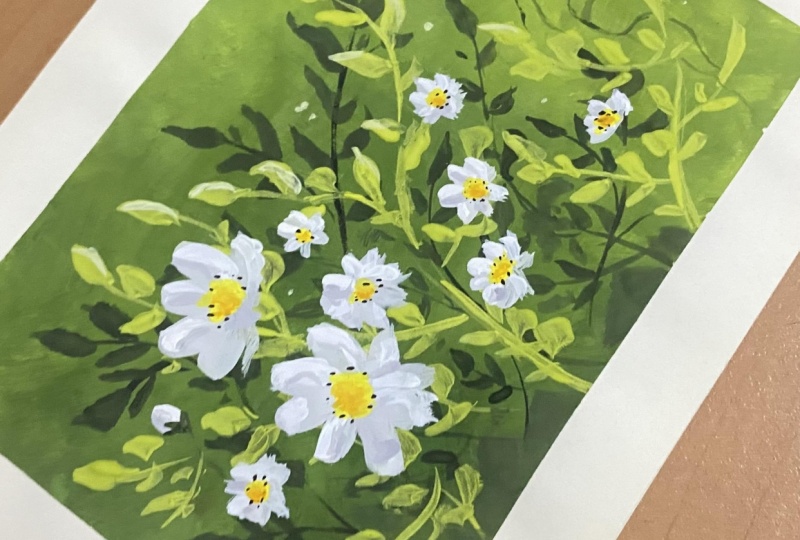
5. Practice Painting the Leaves: In this lesson, let's put on everything we analyzed
in our previous lesson. On the paper by practicing
some shot So first, we will practice to ten the leaves first
because it is easier. So keep in mind, we learn everything we need
to paint in our PV lesson. But in order to put what we know into the
chokes on the paper, we need to be practice. So if you are new to us, you may need to spend time to practice this
lesson again and again until you feel comfortable
with uh, using the brushing. So first, in order
to paint the leaves, I will use this
yl brush to paint the center of the to
paint the stem first. The leaves are quite similar to the leaves we learn
in with rose glass. If you have already
learned this glass, you may skip, you don't have to practice the leaves again here. But basically, we have thin some thin stem. And then you use this row brush. If sizes row brush to paint different
sizes of the leaves. So actually, in our
final painting, the leaves are very small. So basically, one
shop is good enough. We don't need to paint
exactly similar shape of the leaves here
because if we look actually what ill is a garden. Normally the leaves look
we have different shape. I look it from different size. Basically, it will just
different size of bruss but one brusho for one leaves
and that's beautiful Nina. We don't need to paint
the outlines and then and then try to create the exact shape of
the fleas here. And that's on our leaves. Now, let's practice to
paint the flower petal. First, we practice to paint
the flower when we look it up front and practice how to paint the flower when we look it
from the size from the side. I think I will stop this
lesson here because we will spend quite a bit of time to practicing to
paint the flowers. I want to dedicate
a lesson for you.
6. Practice Painting the Flowers: In this lesson, let's practice
to paint the flowers. In order to paint the flowers, in order to create different shades of white
of the flowers first, we will create the
grayish color first. We will use white, a lot of white, a little
bit of black here. Little bit for it to be violet and violet that kind
of grayish color. We need some adjustment when
we paint our final painting. But for this practice lesson, I think this color
is good enough, but in order to demonstrate different shades of the flower, I will add a little bit more
black and violet color than necessary so that you
can easily to see the contrast in the flower. This miture. If you have problem with mixing
how to mix the water and the colors and need
to know what is the perfect ratio
of water and wash, check out my *** for
absolute beginner class, black us and vintage style. This class is a little
bit easier than this class and I will focus more on teaching the basic layer in techniques and how to
make the was more opaque. Okay. So in order to
paint the flower petals, we will use this
fib apple shape. So we will paint the
flower face up first. So let me see. Shop for one petal. We don't need to create
exactly five or six petal, something apples and we
don't need to create the perfect the perfect shape
of the flowers too. Let's do this again. Is one. If I am not feming I
can turn the paper around so that it
is easy to paint. This is the flower
which is facing us. If you look at it, what I paint is a little
bit different. Not exactly much the shape
of the flowers here, but it is not very important because this is our painting
we don't have to copy. Now let's practice to paint the flowers which
look from the side a bit, we will paint you will pin two perfect petal and then one shop for two stop for
the side petals. If you look at
this, we don't see the petals separate
here, but it's okay. That's why we need to wait for this layer to dry before adding another
layer on top of it. So let's do it again, two, one, two. And it's very simple but
these two pain but here. Now we will need to
wait for this layer to completely dry
before painting the lighter shade of
the flowers and then we will also need
for it to dry again before putting the
center of the flowers. Now the first layer
is already dry. I waited for you to dry
naturally around 15 minutes, but feel free to use
hair dryer if you want to accelerate the process. Now I will add the poor
white from the back here. I will continue to use
this oval shaped brass. So in this reference photo, it is very difficult to see the difference between the
light and the dark shape. But in our final painting, I assume I will assume the
light is from this side. It is easier for us
to paint this way. I will add the poor Y in the area which
is facing the sun. But this is not math, so just add it where you want. And normally it is not, it is not that the petals on this side don't have
any light color. So I will add it in in in this so For now, I also at
here on the booth. For now, if you look at the
at the at the flower here, there seem to be the hush the heart distinction between the dark and light shade
of the flower petal. As I mentioned before
in our final painting, I will use more
subtle gray color. But in our patie, I want to use a
little bit more a little bit darker than
necessary mature so that you can see
clearly the difference between the dark shade and
the light shade, don't worry. When we will wait for it to to dry before
using a clean brush to soften to soften the
luck and the light area. So it is easier it is
easier for us to wait. Is to dry completely
before painting before softening the area between the duck and the light shade and also painting the flower centre. Now, wait for it to dry again. Now, this layer is already dry. I will use this I put water, and then I will tap
it on this piece of cloth to make it just moist to soften the area where the light and the
shadow of the petal meet. So we just need to use
this moist brush too, so and when it dry, it will be softened. Just by this, so I
don't want to spend all the time to soften the area, but you understand
the technique here. Instead, because we
need to you see, we need to wait for it to
dry to add another layer of the white because there are some layer which
is not opaque enough, but we want to use time to
add the center of the flour. So I will add this lemon yellow. Just is some dot. I mean, it will be small brush
to soften the area here. So now we need to wait for it to dry again
before adding the medium, yellow, some brown color and also the whitish
color of the petals. Now the pain is already dry. So now we add and we add this medium yellow into
the central of the flower. So we don't need to match
exactly similar area. I just want to add some dark color here to
have the illusion detail, so we don't need to
look at the flowers in the reference photo
to try to find the.in the center of the flower. Just add some dot
here and there. And if you assume that the
light is on this side, on the right side, we
will at it more in the left side of the
center of the flower. Then there I don't know how it con but
some brown spot here. I I eat around the flow. Okay. So why waiting for you to try, I mean I mean I mean
finalize the what's here? Just something simple
and fast like this. Now we add another
layer of the Y here. I will focus on the area. We will make it the late. Now, if you look on
the flowers here, we will feel a
little bit weird and they don't look similar to the reference photo
but don't worry. Later, when we put
everything together, it is a garden and it can be beautiful because if
you look at the garden, we don't focus on the
shape of each flower, but we will look at
everything as a whole. I think the white
paint on top of the flowers to make it
more even more dynamic. Now you see there is the con the connection
between the knot. The dot here and
the flower centre and I will use this
pencil. It is easier. We can use we can use
this lier but it is easier to use this
pencil because you see the line here is
also very subtle. I forgot to mention this the pencil on our
tones and material lesson, but I believe everyone have it, so it's not a big weapon. Add some line here
and there to create the connection between
the flower center and the brow here. That's on the tick mis, we need to win the leaves
and the flower petal. In the next lesson, let's
start our final glass project.
7. Final Project: Painting the Background: Let's start our final glass pj. So, I already use Whi taped to create the
border of the painting. I didn't film it because I know I think everyone
knows how to do it. So, um, I would like to spend this lesson to plan for
our final glass project. First in the background, if you look at my
previous painting, I use a dark green to create the background
of the painting. But this time, I want it
is a little bit different. So for the background, I want this area I want we
assume that the sun is here, so this area is a little bit lighter and this area
is a little bit darker. And later when we
paint the background, we will cover everything, but I want to spend this I
want to use pencil to create the outline for so I want to have some
flower in the central. It it will be somewhat similar but a little bit different compared with my
previous painting. So we will also have some
leases and some stem here. Because we load there is a
wound third a wound of third we divide the painting
into nine square here. We want the focal point will
be somewhere like this. I want to use this area to paint some bigger flower this area. It is some flower. So big flower, another
big flower here. I also want to add some little smaller flower
little smaller flower here. Okay. So this is our
plan. This is our plan. So I think I will continue
this video because we just it has already
been 2 minutes, so I want to this lesson to
also paint the back graph. Okay, so we will pick
up the black here. The olive green here and also some lemon yellow here. I will use this
brush to pale the. I want to start with
the olive green. First, then we will add other colour letter so that we don't need to have to clean our brush the background should be that colder than that, now it is time to add
the light color here. If you look at the color here, it is a little bit too diluted, but it is okay because we have a lot of layer
on top of this. You see the background
here is not perfect. There's a lot of
the brush shops, it is visible on the background. It is not perfect gradient. But it is okay because you see, it is a garden and we don't
see everything on purpose, we don't want the
background to be perfect. But it will be a little
bit lighter on this side. More blood and more
win on beside. Add more orange in here. I am using red on dry
technique but feel free if you want to be you can try. Another approach is
you can use red on wet techniques or if you
have watercolor at home, it is easier to paint the
background using watercolor. Because watercolor
as background, you can red on wed easier and and it is easier to add
another layer on top of it without lifting up
the color on the biora. I have a tendency overdo it so I will stop here
and we need to wait for this background
to dry before painting another
layer on top of it.
8. Final Project: Painting the Leaves: Now, the background
is on a right, you see, it is not
perfect background, but I did this on
purpose so that we have the illusion garden with
a lot of things going on. For the first layer
of the leaf here, I will use a dark shade, a green, which is darker
than the barou here. So actually, this
is just an option. It is okay if you create the
background is dark, black, and then you light shade of
green on top of it as we did in other wash classes
here on Skillshare. But in this guy, I want to make the bagrod green
and then even use the dark shade of the darker
shade of green on top of it, so I just went to lunch. Now the color here is on. I need to pick up more black
from the paint bobs here. It is the dark green and
it is almost almost black. I will start with you this
lila brush to paint the stems. So you can so as you remember, I sketch using pencil under this and now I
paint the background. Another option is
you make the sketch on another piece of paper so that you
remember everything. But I mean, the I didn't do that
because I think it is not too difficult
to remember. We just create the
random line here, but make sure we use the roller first so
that the focal point is going to be in
this area where we will paint some flowers. For other area, I don't
need to follow our plan. Now, I will start with this
I paint the leaf using this big brush first and even
a small smaller leaf later. So we don't need to follow any particular
shape and order, just one shot one
shot, one leaf. That is just very first layer
of leaves and we've been painting other layer on top
of it and it is a garden. So on the leaf here, don't need to be perfect. Now, I move to use a
smaller rough brush. I just want to use
different sizes of the brush so the leaf
is not too uniform. I want to create more lifts in this area because
this is the I want to create this area
a little bit uper than the rest of the pilding. That's why I'm
adding more them and I add more black here. Because after trying, I see that the leaves here now is
almost blend into the back ra So I mean I want to create the illusion
illusion of a garden. So I mean the splex technique to to ask some
random random spot. That's all for the first
layer of the leaves, you will wait for
it to dry before painting one or two layer
of leaves on top of it. For the second layer
of the leaves, I think I will the poor
olive green from the mops. And my bed. I think I just drop a
little bit of here, but it's not problem and it
is even this random mistake and even better to create the illusion of the
guidance in the background. I will start with we
repeat the same process, but we don't need to match exactly the so as you can see, with the poor olive green from the bop it is somewhat
similar to the rod. No problem because later we add another layer
ablaze, it is lighter. So we use it small the difficult part is when it wet, it has different shape and when it's dry, it
has different shade. As you can see, this
layer is almost too similar with the background and it also dry very fast. I will just add a little
bit of it and now I will mix the colour for
another shape. I will just add olive green
with this lemon yellow. So it is already dry, so I need more lemon
yellow from the box. What we are doing is we are different
shades of green here. So you don't need to have the exact number of
layers as I have. You can if you paint
a smaller painting, you can just use two layers
of the of the lips and if you want something more realistic or you
want to be bigger, you can add even more layer. It is not 100% dry, but we just have a
few of the naya. I mean, just add this
nay on top of it. If you feel difficult
to do this, wait a little bit because
when it is dry completely, it is easier because you can
put your hand on top of bit. Because this area
is the light area, so you see, we don't follow a If you find that the color is not op enough,
now it is okay, for us, we can always come back later to add another
layer on top of it. The pain here is a
little bit diluted. I don't want it to be too
thick because we need to put flowers on top of it so we can come back later after
finishing the flower to add more green on the lips where we want it to be more opaque. I think that's enough
for the leaves now because after
painting the flowers, we can always come back to paint to add another
layer of the leaf. I use the splash technique to want to add some more
randomness into the painting That is enough for the reafsF now later we will
paint the flowers, and then when everything is dry, we will revisit everything
later and we will add more layers on top
of the leaves here.
9. Final Project: Painting the Flower Petals: Let's continue our
fine glass project. So we will come back
with the leaves later, but now let's thin
the flower first. We use white pin, and I think I will ask I will pick up
some more that is black because this black
here has green there. It is okay to just emit
but that is violet. I will mix violet and black. It is little bit ck, so I will add more why. We can on way adjust the set of color later
because it is very difficult to know whether it is gray enough or it should be darker or
it should be lighter. After we paint it
on the painting and be design over on painting, it is whether the
color is good enough. Let's use this febd brass and we paint the big
flower here first. You see, even if the woop
the big flower is here. It will be either five or sick. Depend on whether it still so it is too crowded
if we try to sick, I will just at five. Because we have two is
already facing this, so I will try to this one, I will make it sway. So I will change the grass to greate to greate a
mid size flower here. Medium size. I think that's enough
for the big flower. Get a sideway. Sideview flower here. I've been changed to
even smaller brush to being some very small flour. So this area is a little bit. I mean, because it
is ugly over there, so I want to paint
a flower on top of it to cover a midst. I didn't paint any mast
in my previous painting, but this time,
let's paint some s. So I want to there should be a I want to add another bad here. And another a very
small flower here. I think that's for the first
layer of the flowers, now, we need to wait for
it to dry before adding highlight on top
of it using poor white. Now, this layer is already dry. We will add the white color
from the back on top of it. I think I will need this brush because the feeble
brush is too big here. So the light is from this side, so I will I will make a request to know
what will be the light area. For the side view flower, this opportunity to
separate the petal. It's a smaller brush. This one is number zero. I have several rubra. I think everyone
also have rubra. So it is not a big problem, if you want to create
a larger shop, bigger brush and if
you want to paint something small, smaller brush. And everyone's hand and
technique difference. I know some artists
who can paint very small very detailed
shop with a very big brush. Now you will see that it is
a little bit awkward here. But later we will make the
areas where the shadow and light meet softer we will also add another
highlight on top of it. That's enough now wait for it to dry before painting the
center of the flowers. So now the paint is very dry. As I mentioned before, now I want to soften the area between the dark
and the light color. But now I look at
the painting as of, I do find that there are some
areas of the flower petals. I want it to be darker, so now I will mix dose of the gray and I
will add this before the So as you can see I am creating a darker
side of this why colour. Just add more violet
and more black. So I will use this
mitchell to add it some area of the flower which I do feel that I want
it to be darker. So for the flower on top of the on top of the painting because we assume that the
light is over there, so we don't want to add. And I do find that
for some area, I don't want to add hi, I don't want to add more hi, but I feel that it
needs to be more opic. I also add the preview to
shade of gray on top of it. Because we cannot
soften the colors now, so I want to this time to add another layer
poor Y to the area. I think it needs to be more opic This is the biggest flower, so I want to make sure it
has on the shade of color. I think we forgot to add more highlight on
this flower so now. Now we need to wait
for it to dry again. We also in some cars.
10. Painting the Flower Centers and Final Details: So now the pain is already dry, I will use smaller brush to to make it wet
and then paint in the area where en shape me
so that it will be softened. I think is a bigger
but that it is easy to make sure there's only it is a d past we don't
have to try too hard here because it is okay
even the place where the duck and the light meat which
is a little bit hard, it is still not a big problem, but all so I just want to soften some area.
Not all of them. We don't need to even
drive very fast. So I think in this session, I will also add the center of the flour using
lemon yellow here. Just use the number zero plus to add the lemon yellow in
the center of the flour. One thing I don't like most from once is we
need to use a lot of paint. I cannot be stingy
as when we paint, we put the colour So now we need to wait for the
German yellow pin to dry before adding another
layer of medium yellow. So while waiting, we don't
need to wait for it to dry to paint the brown particles at the center of the flower. I won't mix the colour. So I think the lila brass because I want the dot
and be very small. Because the brow particle is around the center
of the flower, so we don't need to wait for the lemon yellow paint to dry before adding this. But it may be a little bit
easier if you wait for it to dry it is safer
to place your hand. Now, again, we need
to wait for it to dry before
continuing to paint. Now the pen is very dry. Let's add this time add medium yellow in the
center of the flower. For this one now every night I forget to add
the lemon yellow in the obvious date The palette
is very crowded now, but I think it is
okay because we are finishing this painting. As you can see, once we add the medium yellow in the
sense of the flower now, the painting look
it comes to life. This medium yellow really brighten up the
whole painting here. So actually, I can try to squeeze another
layer of the leaves here, but I think I want
to wait because later when we want some
stem of the butt here, I may need to put my
hand on the paper. So I really like this color, so I have some just random dot on the background to have a
feeling it's just optional, but have feeling of
something on the background. Now we need to wait for a bit to dry before coming back
to finalize this painting. The paint is already dry
so now I need to paint the it is not in my PBO bending, but this spending,
we need to paint the stem for the butt here. Now, I want to add
another layer, which is even lighter, I pick up the lemon yellow here. I add it here. I add some wine here. To add even lighter
shade of the green. Just put some high
light on some leaves. We don't need to cover on
the leaves with this sheet. I also in this to add highlight on the stem. We will some which is overlap with some
small flower here. I think that's enough for this light to
shut up the green. I do feel that this area, I want it to be rich bi tackle, so now I will pick
up the black one, the black green here. I will ask some Okay. Some more dark leaf here. So a duck. Basically, in this
stage of the painting, we will add more more dark value and more light value
on the painting. Overall, I think less is more. I think we finish this painting and wait for it to
dry and I will see you in the final lesson will
review our final painting and I will give you my final
words for our today class.
11. Final Thoughts: Now the pain is already dry and so let's review final coding. So there is a little here because I use this
eraser to cover it. I just want to make
a comparison with the painting I made before. I do like the bus that we just add into our
today glass or. But compared to this, I do fathers, I have to
paint this all over again. I want to make the
backgrounds a little bit darker and have the blue shade. I do like the color of
the background here, but I like how we make this
light in this painting. It's just small comparison. Your version must be
slightly different for me. Even me. Even me cannot
paint two painting. I mean, I cannot paint one
painting twice myself. So there's a little bit different
between two variations. I've been take the
photo and put all of them into the project
section so that you can refer to it when you paint
your final glass project, please please upload
your glass project and if you enjoy this class, please give me a review for this class and check
out my profile for other was and what the
color glass is here on Skillshare and see
you in another plus.
 Trang Chibi ❤️, Watercolor and Gouache Artist