Transcripts
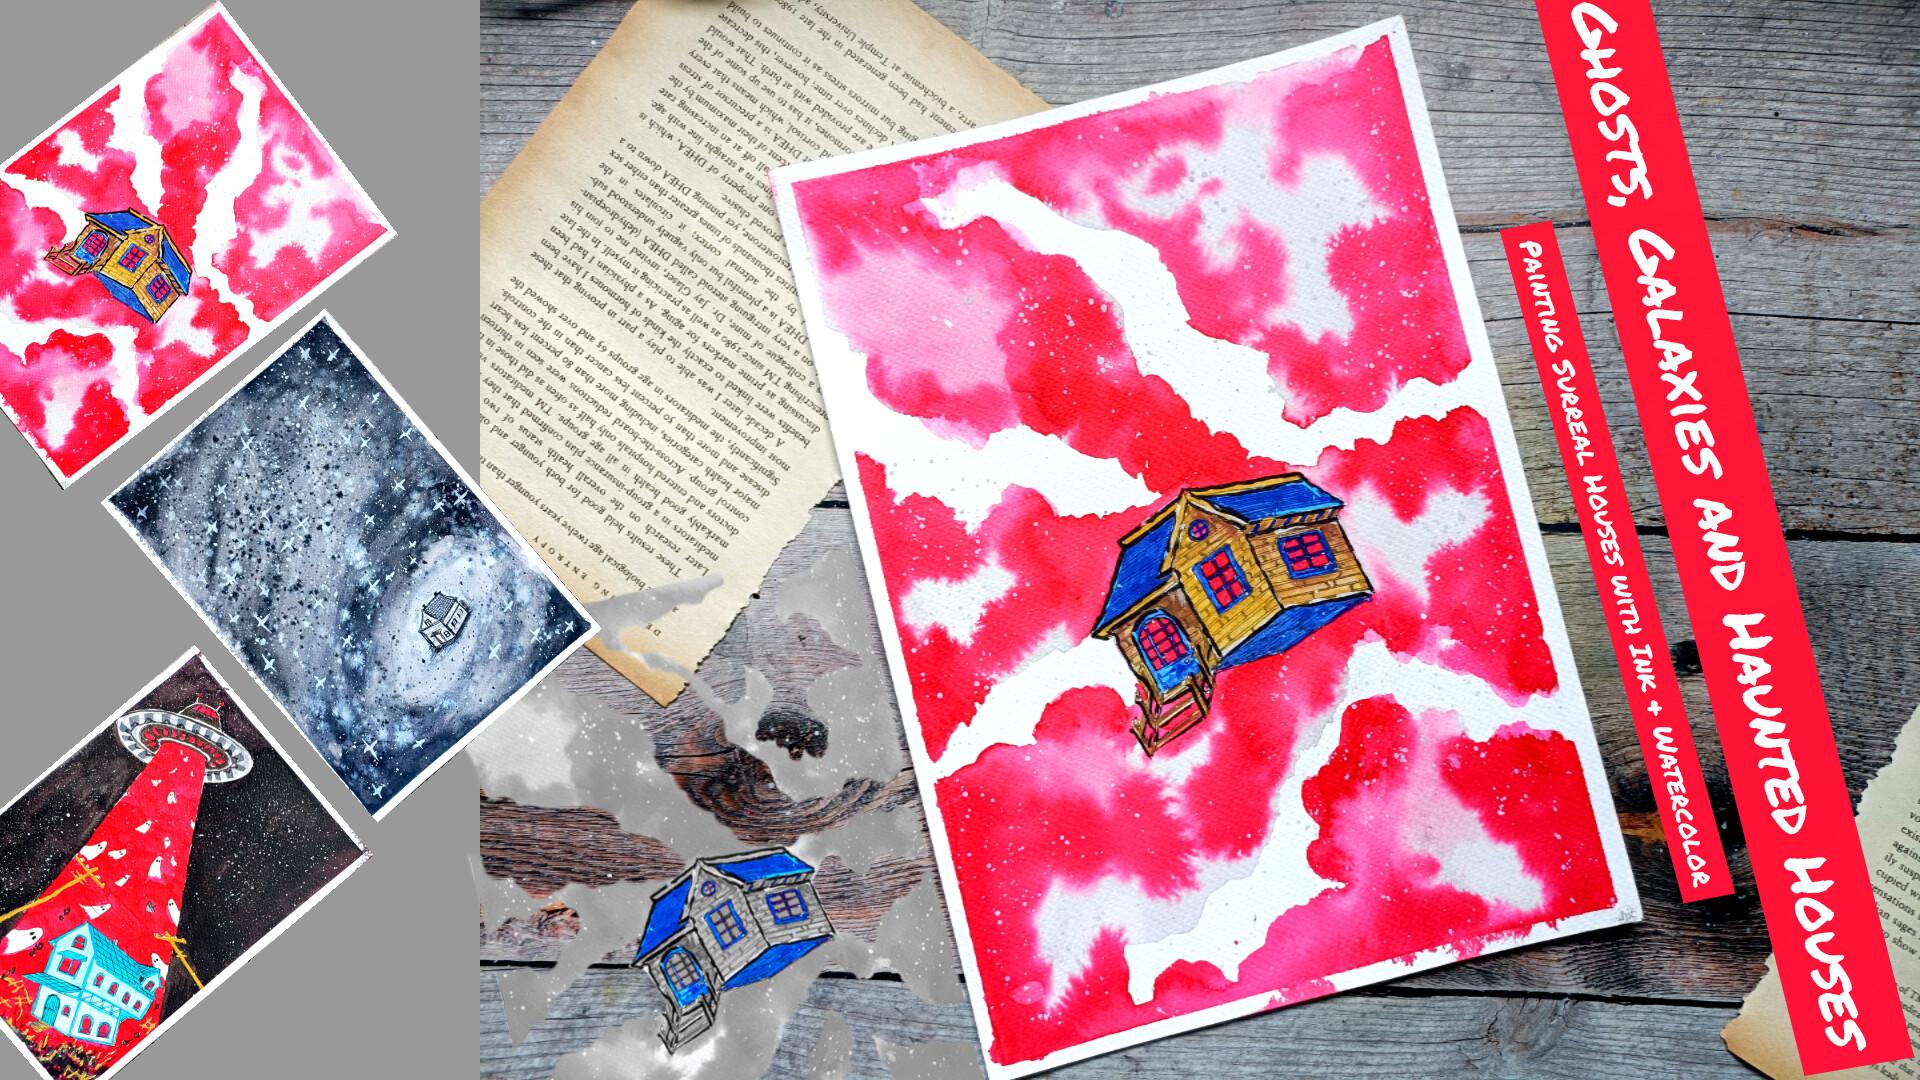
1. Welcome and Introduction : Hi, everyone, and welcome to my new class Ghost galaxies
and haunted houses. Painting surreal houses
with ink and watercolor. And this class will create three imaginative and
atmospheric illustrations that combine watercolor, ink, fantasy, and storytelling. Together, we'll be painting the Last House in the Universe. Then we have this
Drifting Dream House followed by the night
the sky turned red. Each project features a
unique surreal setting filled with vibrant colors, cosmic skies, mysterious houses, and haunting fantasy elements. If you enjoy dreamy
landscapes, galaxies, whimsical horror, and
creative watercolor effect, you are going to
love this projects. Before we dive into
the main project, I'll show you how to create the watercolor background
and how to draw simple houses that can be adapted into imaginative
fantasy scenes. Hi, everyone. My
name and Michelle. I'm an artist from India,
and on skills here, I teach a variety of
classes on watercolor, oil pastel, and
ink Illustration. These are the two classes
related to this class, and you can find
more of my work on my Instagram and YouTube. For this class, you don't
need any fancy supplies, a basic watercolor set, some watercolor paper,
and a simple ink paint or file liner are enough to complete all the
project in this class. So grab your supplies and join me as we paint
this colorful, mysterious and slaky spooky cosmic
illustrations together. I hope you'll enjoy the
process, learn new techniques, and have lots of fun creating your own surreal world.
Let's get started.
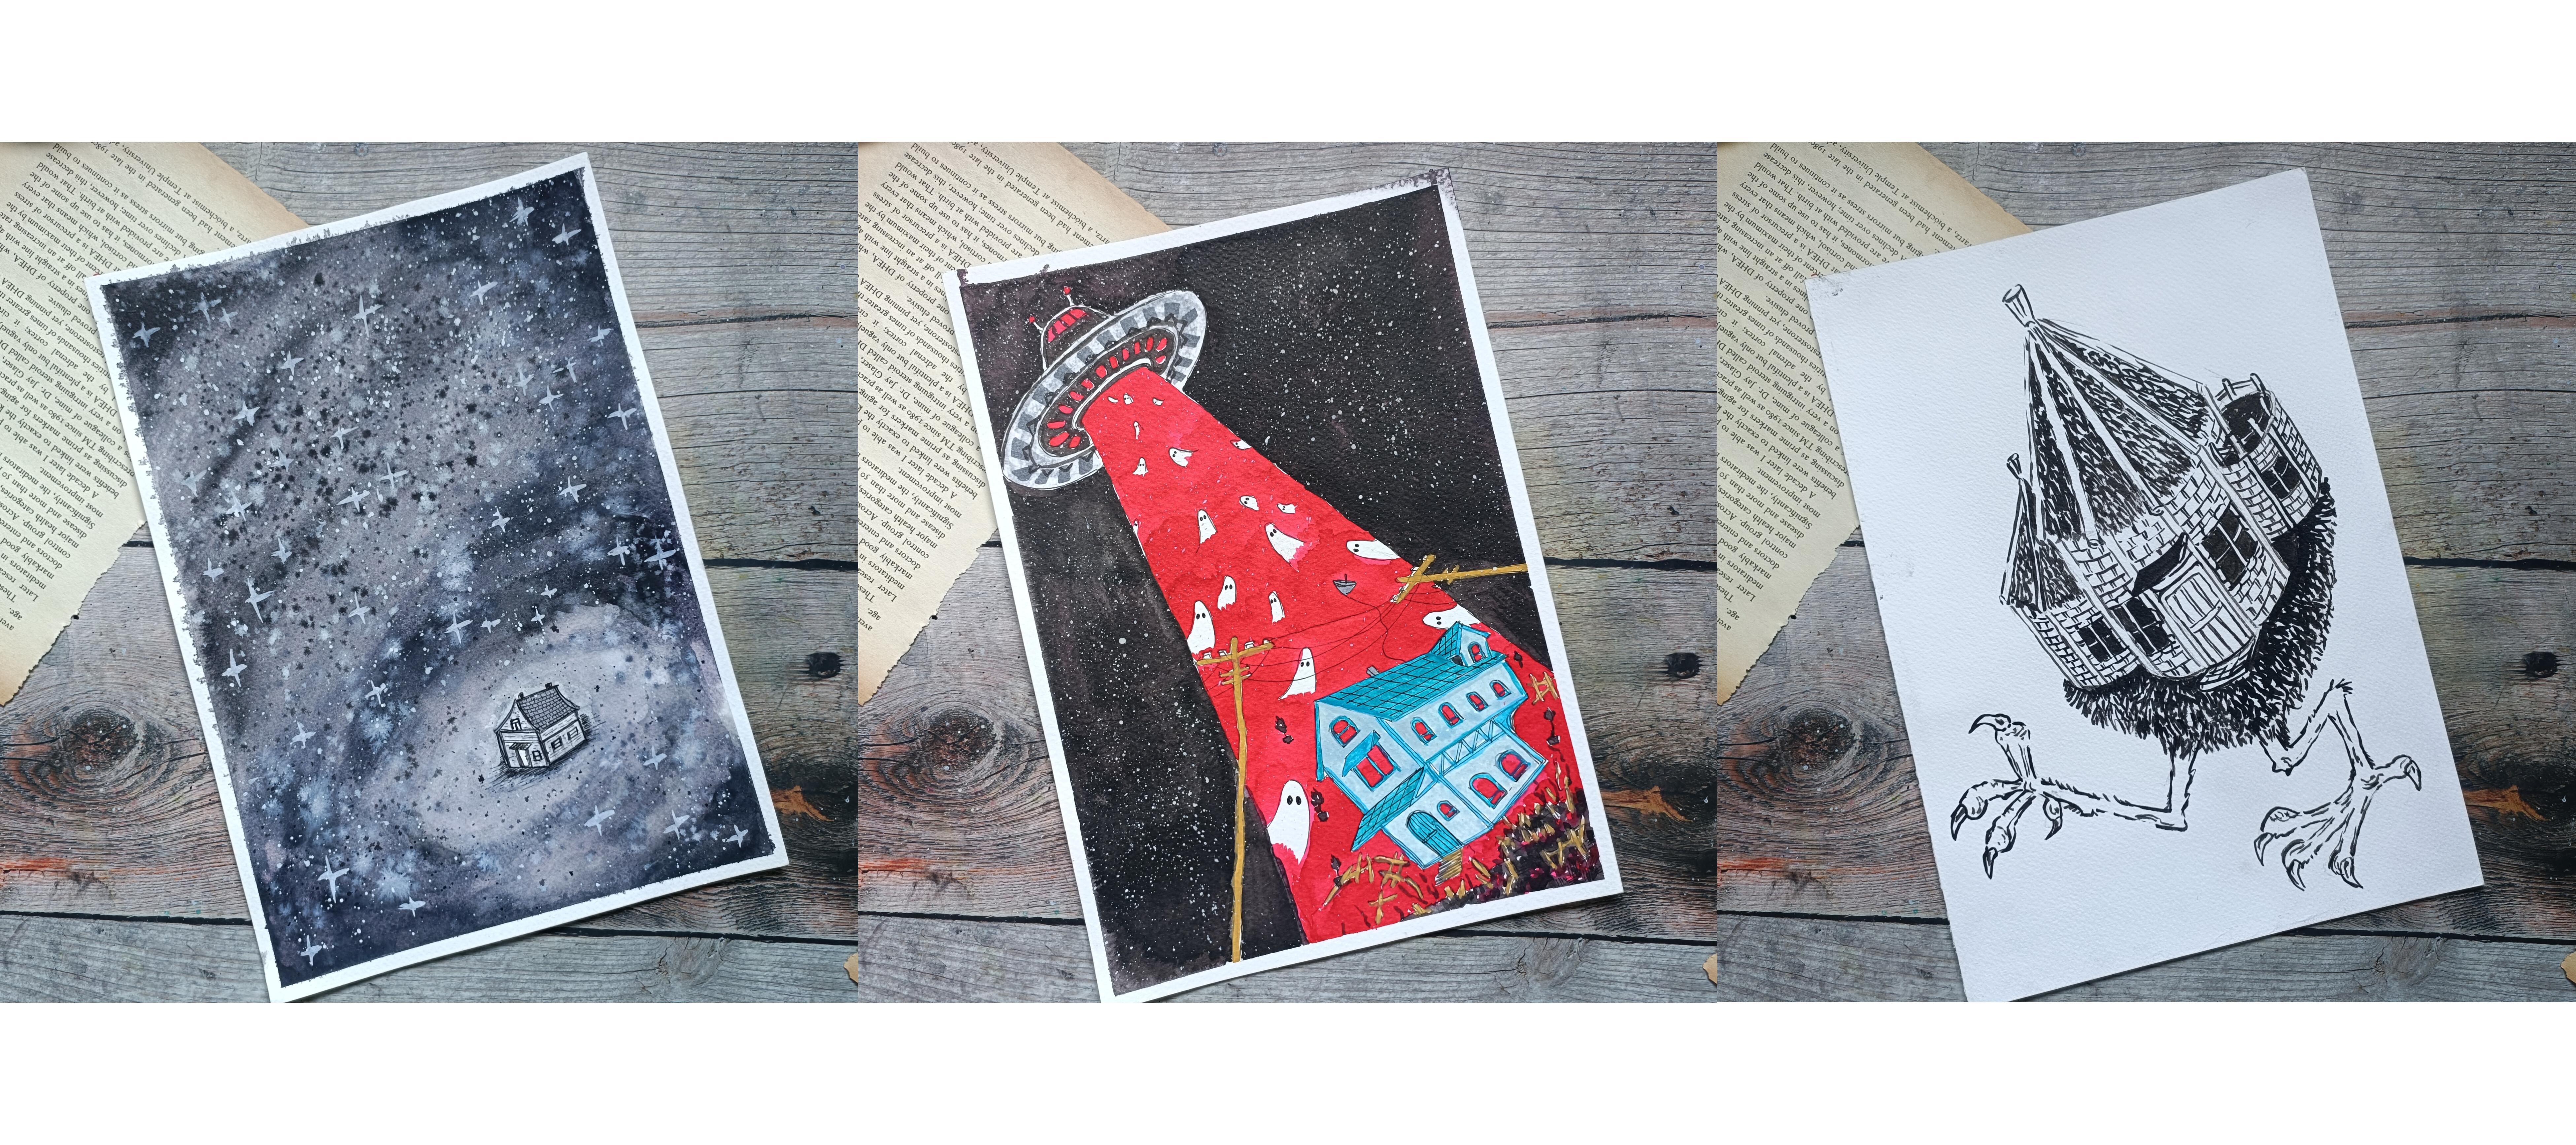
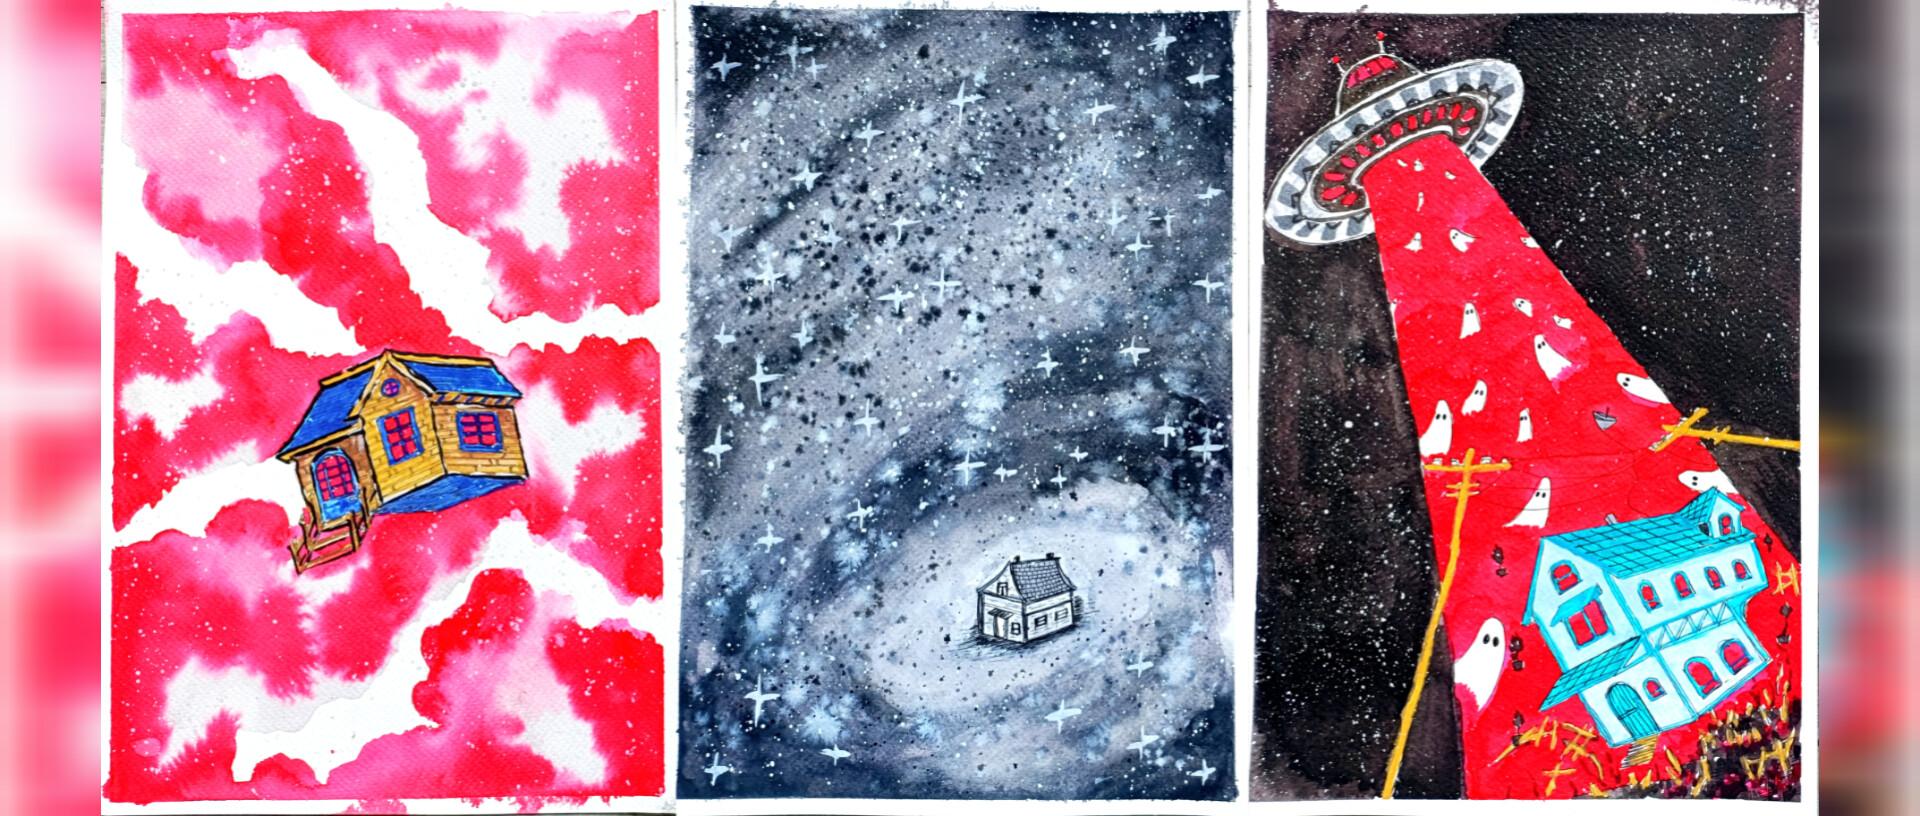
2. Class Project : For this class, we'll create three surreal ink and
watercolor illustrations. We have the Last House
in the Universe, followed by the
Drifting Dream House. And lastly, we have the
Night the Sky Turned Red. You can complete
all three projects or choose your favorite
one to create. Also encourage you to
upload your practice from the basic lessons
so you can track your progress and see
your learning journey. Feel free to add your own creative touches by
changing the colors, adding stars, ghosts, galaxies, or other fantasy element. You can make the scenes
more, spooky, colorful, or imaginative and even experiment with different
art supplies and mediums. Once you are finished, upload your artwork to the
project gallery, added love to your creation and your unique interpretation of
the surreal cosmic houses. Most importantly, have fun
and enjoy the process.
3. Supplies : Welcome to the supplies. For this class in here,
I'll be using pencil and erase it to do the
basic pencil sketching. I'll only be using
micron pen to do the outlining for the
houses and other elements. You don't have to use
the same fine liner. You can use breast paints or other normal pins or
wallpoint paint or gel pens, and in black paint
will do the work. To add highlights, you can use the white sakura jelly pen. Mostly, I'll be
using the white ink. As for the ink in
here, I haven't got ZikuraTaki black ink that I'll be using for some of the
sections of the project. I'll also be using this
white ink to create the spluttering effect in
the stars, apart from it. For one of the project, I'll be using red and blue ink
a little bit of it. You don't have to use the ink. You can get somewhat of same
effect with the watercolor. I'll be using two
medium sized brushes. You only need simple brushes to create all the illustrations. Then we have the watercolors. To make it a little bit
simpler, if you want, you can also use
the breast paints. I have got this dual
tip breastpins. You can also use the colored
breastpins if you want. You don't need all the
fancy supplies only with a single ballpoint paint
along with watercolor or ink. You can create all the three
projects in this class.
4. Basics Background : Welcome to this section. Here we have the Last House
in the Universe, Drifting green
house, and lastly, the night the sky turn red. So these are the
three projects that we'll be creating
in this section, starting with the first one, the Last House in the Universe. So I'll be dividing
this whole page into six different section. In the upper section, I'll
be creating the background, and for the lower section, I'll be creating
the rough outline of the sketches for the house. So here I have already started with the wit
and wit technique. So swirling galaxy. We'll have to do two or three or four layers of the coloring. This is just a simple demonstration
for our main project, I'll be using and
adding a lot of colors, various seeds of the black. Here I'm using a bit
darker tone of the black. You can use ink or watercolor,
whatever you prefer, but mostly mostly, you will get the best result if you will use the watercolor. With the waterproof ink, it would be a challenge to
spread the color evenly. Here I'm using the
watercolor and now let's spread it forming a
spiral like pattern. Here too we have to weed
when the first layer dries, and then I'll be
adding layers upon layers to create this
kind of background. For the sides and the edges, I'll be adding a
lot of blacks to make them a bit more darker. Now let's make it
a bit more darker. So going with a bit darker tone of the black and let's
spread it a little bit, wing it for the entire region, just for some of the region
and then spreading it, trying to create somewhat of a spiral pattern
for this galaxy. Put some of the region, try to create a bit thinner streaks, thinner curved streaks to create the feel or the
atmosphere for the galaxy. For the inside, try to make
it a bit of lighter in. Here as you can see
that I did not add any darker side of the
black for the center, just spreading the water to
get a lighter sine in here. Add the darker tone on
the sides and the edges. The edges and the corners
will be bit more darker. Here, I'll be trying to create
a bit of a spiral pattern. But for now, let's
add the darker tone for all the four corners. Instead of only using the black, you can also combine it
with a little bit of red. Let's try to create a little
bit of a spiral pattern. Extending this on
the other side too. Et's create a little
bit more spiral pattern for the lower regions, a bit darker spiral pattern. For our main project, I'll
be using white ink too. So I'll be using the
watercolor plus to do the tapping to
create small dots. I'll be using both white
ink and black too to create a little bit of texture and pattern for the
entire background. Let's wait it for
to dry and then we'll add a little bit
of more details to it. Now let's do this
sketching for our house. This will be at the
center of this galaxy. Very small and simplified
version of the house. There will be three to four
windows and a single door, two chimneys on the top. Feel free to make
adjustment and the changes. I'll be making this house
a little bit pattern. So for the upper sexion I'll be trying to create the
brick like pattern. And for the rest of the sexon, I'll be using the hatching
lines with a lot of gapping to create the texture
of wood panels along the sides of the house. The doors in the windows for
this house will be simple. And as we progress
in this section, the second and the
third house will be bit more defined
and detailed. Now, let's go over the
details with the fine liner. For all the project
in this section, I'll be using a combination of the brass paints and
the fine liners. Initially, I'll be starting
with the pencil sketch, then add the fine liner and later on for
the final details, I'll be going in with
the bras paints. Also for the insides of the house, I'll be
adding the color. Project The first project of the section will
be monochromatic. The second will be colorful, so I'll be using combinations of blue along with the red and
a little bit of ocher to, and the third one will
have more colors to it, black, red, blues and a
little bit of brown stew. With this stance, we'll be
adding colors to our projects. Here, as you can
see, I have created a simple brick like pattern for the entire
section of the roof. Instead of this kind of pattern, you can create the
scallops or do the tiling, or you can leave it as it is
or completely cover it with the black and we are done
with the upper section. Let's do the outlining for
the remaining section. For the edges and
the coordinates, I'll be adding two or
three or more lines to make it bit bolder
and more distinct. Here we have got a large window in here, two panel window. Let's add a semicircular
arc on top of this. The whole video is in real time. You can always follow
along with me. And if you have come up with
your own unique idea or unique creation or if you have added or if you've
added more elements, please share your project work. For the front of the
door, there will be this extended portion,
a small roof. Now let's create the door, a bit larger door in here. If we want to make it
a bit detail and add more details or pattern to
it, feel free to do that. Here we have a tiny
window on the right side. For the main project,
I'll be making the house more small as
compared to this one, and I'll be using
sets of the grey. For the upper section
for the roof, I'll be making it grayer and
for the remaining section, a bit lighter side
of the gray for the bees I'll be trying
to create a gradient from dark gray to a bit of lighter seds And I'll also be using a bit
of hatching and heading for the lower section of the house in
our main project. Here, as you can see,
I'm using hatching with a lot of gap in between them to create the
texture or you can say pattern for the
wood like panels. Let's add the same line
on the other side. Here, as you can
see, I've created different kind of windows
on the other sides. If you want, you can create the same windows on all the sides. The choice is yours and
here we are done with this sketch for our outline
sketch for our simple house. Now, let's add the simple
simple black dots using tapping to create
small dots throughout this spiral galaxy
that we have in here. As I was mentioning
that I'll be trying to create a gradient for
the best of house, adding a bit darker side of the black and then going
in with the water to spread it to get somewhat of gradient and from
black to the white. Adding water to spread it evenly and decrease in intensity
as we move away from it. In our main project, I'll
also be using bit of sading and hatching
for the ground. As I mentioned, this whole
project will be in monochrome, so lighter side of the green. The lighter side
of the green for the entire valves on both
sides of this house. For our upper section, the roof, let's use a bit darker
side of the black, and here, I'll be
decreasing its intensity. So I'm adding a lot of water and spreading it evenly
for the upper section. Even after adding the
watercolor on top of it, since I have decreased
it intensity, you can clearly see the
line that we created, the hatching lines, not
the hatching lines, but the brick like pattern
for the upper section. And we are almost
done with this. If you want, you can
add more details to it. Later on, I'll be adding
more details to the galaxy. For now, let's move on
to our second project. So here I've already
started with a base, so completely feeling this
entire region with the red. Here I'll be using wet
and wet technique, same as the first one. Let's do the coloring
for the background for our second project
of this section, the Drifting Dream House. Final artwork that we'll be creating and here I'll
be using this red ink. If you want, you can
use the watercolor too. But here I decided to use
the ink since it will provide me with uniform
consistency of the color. I'll be trying to create
this kind of streak a little bit of
cloudy red streaks throughout the
entire background. And in our main project, it will be concentrated at
the center of the house. But for now, let's create this small streaks throughout the entire region
for the background. Here too, I'll be
using a little bit of white ink later on
to add the stars. I'll be using the same
tapping technique to create the stars. You can create any kind
of background using. You can also create the
spiral like pattern, or you can combine
both the black and the red ink to create something completely
unique and different. Feel free to experiment on your own to create different
kind of background. We are almost done with this. For some of the regions, add a little bit more darker tone of the red to make it a
bit more contrasting. Also, if you have added more red or more water
on some of the region, you can use the tissue
paper to soak up that water or you can use the
dry brush to do the same. Now let's wait for it to dry. Here let me show you the house that I'll be creating
for this project, the Drifting Dream House. This house will be a
little bit different from all the other houses that
we have created so far. To separate buildings,
not separate, but they are connected, but we'll be seeing two
fronts of the houses. For this side, I'll only be
creating two windows and for the other section of the house that lies
behind this building, I'll be creating the door and I'll be creating a
small staircase too. You are free to use or
create any other houses, but I'll be using
the exact same house that I'm creating
right now in here. Try to maintain the perspective. If you are not
comfortable with it, you can start with a
slanted horizontal line and then use it as the reference to draw out the huts on the houses. If these two are a
bit complicated, you can only create a single one at the extended portion
for the staircase in here. On top of this, there will be this circular ventilation in here and two windows,
one on each side. And we are done with the
basic pencil sketch. Let's go over it
with a fine liner. Unlike the last house
that I just created, for our main project,
I'll be making this house a little bit larger. As I mentioned for the sides and edges use two or
three lines or use bolder lines to make them look more distinct and apart
from the rest of the house. Here, too, I'll be
creating texture, brick like pattern
or you can use the hatching lines to create
wooden plank like pattern. I'll be keeping the upper
section completely clean. If you want, you can
use scallops or use crosshatching or
crosshatching to create pattern or texture, but I'll be keeping it clean. Here for this
demonstration video, I'll be using the bras
paint to add colors to it, but for our main project to get a little bit of gradient
and light and shadows, I'll be using the watercolors. If you're not
comfortable, you can stick with the only ink or you can use brass paint to make it a little bit
more comfortable for you, but I'll be using the watercolor
for our main project. So here we have got
six panel windows. This two will be six panel, but this will be a
bit more broader. Create the outline for
this broader window, and now let's divide it into different sections.
Six panel window. For the insides of the window, I'll be completely
feeling it with the red and the outside or
the boundary of the windows, I'll be using the blue, the upper section in the room, the edges of the windows and as well as the Bs of the
house will be in blue. Let's go over the other side,
starting with the door. So here I created panel window, so the upper section will have eight panels and the lower
section will be simple. If you want, you can create
other kind of doors or you can or you can just
create simple to Dendor. The choice is yours, and now let's divide into
different sections. The door to will
mean blue colour and now let's create the
remaining section for this side of the house. Finally, creating the extended
portion, the staircase. We have got wooden
staircase in here. This is optional if it is a bit tricky or
challenging for you, you don't have to add this. Now let's add the stats
for this staircase. If you want to make
changes with the states, the doors or the window,
we agree to do that. Now let's slightly erase
the pencil sketch. Now, let's add the
details to our house. Here I'll be creating
the brick like pattern for both the buildings. This video is in two parts too. This is the first section and the second and in
the second section, I'll be showing you
the background for the third project as
well as the house. The house for the third
project is a bit more complex, so we'll have two story
building and that building is somewhat floating because
of the pull from the UFO. Continuing on with
the hatching lines. Now let's create the
brick like pattern for the entire section of
the walls for the house. Here, this is just for
demonstration purpose, you don't have to add details. I'm just showing you the
house that I'll be creating. You don't have to do
exactly same thing that I'm doing right now. Moving on to the other side. Here for the upper
section of the roof, I decided to create a little bit of distinction in between the roof and the
wall of the house. Now, let's create the
brick like pattern. Here I have already started
with the parallel lines, using hatching right now, and let's do the vertical
lines to create the bricks. As I was mentioning
earlier, if you want, you can use tiling or
other kind of cross hatching to create the
roof or add designs to it, but I will be
leaving it as it is. Now here I'm going with
the brass pin to show you the rough coloring of all
the element of this house. So as I mentioned earlier, that I'll be using
blues curs android. So here I've already
started with the blue for the upper
section roof of the house. If you want to use
other color scheme, feel free to do that. Now moving on to
the second one and completely filling the
upper section with it. For the edges in the
boundary of the house, I'll be using the cher adding this for the lower
section of the house. As I mentioned,
I'll be using this to do the outlining for
the doors and the window. So here I'm already
started with the door. Carefully adding it
beside the staircase. And now here I'm going with the cher The entire valve will be in ocher. Apart from this ocher, I'll
be using a bit brown too, and then I'll be trying
to blend them together. For now, let's continue
on with this ocher. Now, to create a little
bit of gradient and to sew a little bit of shadows
casted by the roof, I'm going in with the brown. Adding it primarily on
the sides and the edges, especially near the sides of the roof circling
the ventilation on the upper section
for this sign adding a little bit more shadows casted by the edges and the upper
section of the roof. Now let's try to blend
it with the ocher. I'll see you in the next part of this section where we'll
be adding more details to it and doing the outlines for our third project
for this section.
5. Basic Houses : Welcome to the second
part of this section. So here, I'll be showing
you this project, the Night the Sky Turned Red. For the second project, the
house of the second project, I added d for the insides of
the doors and the window, which I was not able to record. And I also used the cooker
and the brown for staircase. Let's start with the background
of this third project. Here we'll have red and black. Here, I won't be using the tan red technique because
here we need precision. So the black night sky and the red lights that
coming from the UFO. So I have already created out the outline for the red section, and the rest of the section
will be in complete black. To get a darker tone
of the black and a uniform consistency
for the background, I'll be using the ink. If you prefer, you can use the black and you
can also create a bit of gradient using the
black from the watercolor. Here I have already started
with this breast pain to do the outlining for
the red section and then I'll be filling
the rest of the area. To make this process
a bit faster, you can use the watercolor and use the ink to completely
fill the entire region. But for now, I'll
be sticking with the breast pain and filling
the entire section with this For the main project
of this demonstration, I'll be adding a lot of detail. The background for
the background, we'll be having lots of star. The ghost in this red
section of the light will be of different sizes. I'll also be creating the electric poles and
some of the debris that is floating from
the ground because of the house that is
getting set by the UFO. We'll have lots of
element for this one, and this is the hardest of all the three projects
of this section. Let's fill the rest of this
section with this black ink, and then we will proceed on with adding the red for
the middle section. Also for the main
project, I'll be trying to create a
little bit of gradient. We have got only a small portion to fill the black color with, and then we will proceed
onto the red section. With these we are done
with a black background. Now here I'm going with the red. As I mentioned earlier that here I'm using red ink, if you want, you can use the
red watercolor or you can also use
the red brass pan. Whatever you prefer. Also, you don't have to use this red. Instead of this, you can
use the white color. That will also create
interesting beam that is coming out from the UFO, or you can use green or yellow or any other color
will do the work. Adding it carefully
near the black region, insure that the ink has dried and then only add otherwise, the two colours will blend and
create a muddy appearance. Here I use a bit more ink. That's why it's a
bit more weight. Avoid using a lot of ink
or a lot of water color. And if you have added
that, you can use the dry brush or you can use the tissue paper
to soak it up. Let's wait for the background
to dry and till it dried, let's do this sketching
for our house. As I mentioned, this will be two storey building and we'll be adding lots
of details to it. So here I have already started with the upper
section, the roof. In the roof, there will be
this extended porton with a small window.
This is optional. If you don't want, you
don't have to add this. Also, you don't have to create this exact same house
instead of this, you can create or
instead of this, you can create a simpler
variation or simple version of the house to make your
project a bit easier. Since we'll be adding a lot
of element for this project, it will take a bit more
time and to simplify it, you can remove some
of the elements. Et's extend this portion. The upper floor or
the upper section of the house will
be a bit larger. The lower portion or
the ground floor will be a bit smaller,
comparatively smaller. Now let's create the outline
for the ground floor. Try to maintain the
perspective line, or you can start with a
reference line and then create the entire sketch beam that supports the upper
section of the house. For this side, I'll be
creating two windows. This is a smaller one, and
here we have a large window. This have an extended portion, a small roof on top
of this window. This will be two panel window. As I mentioned earlier,
feel free to make changes, adjustment to the doors roof or everything that
I'm showing you. You are welcome to
make adjustment, add or remove element. For this portion, too, here we have another extended portion, a bit curved door in here, and besides this, we'll
have a small window. So this is a small window. And on the side of the house, we have two large windows,
a chimney on the top. So this is exactly
the same replica of the house that I'll be
creating in our main project. I'll be making it a bit larger, somewhat larger, not
that much larger, but yeah, let's do now
let's do the outlining. So here I'm going
with the fine liner. So for the upper section,
I'll be using cross hatching. For this demonstration, I'll not be adding the
colors for the walls, but for our main
project, I'll be using two sets of the blues. I'll be using the darker side of the blue for
the upper section, the roof, the edges,
and the cornets. And for the and for
the rest of the house, mainly the walls, I'll be using the lighter side of the blue. In here, I'll only be using
one side of the blue, and I'll be leaving the
walls in white colour. So the white of the paper, and for the insides of the
windows and the doors, I'll be completely
filling it in the red. If you want, you can
create silhouettes inside the doors and
the windows to so that people or ghosts are present or the ghost are coming
out from the windows. For the upper
section of the roof, I'll be doing the cross
hatching with a lot of gap. And if you want, you can add more details to it. Also for the extended
portion on top of the door and on top of the
smaller window that we have, I'll be using the same cross
hatching to create pattern. Let's continue with
the outlining. For the edges in the
corner, as you can see, I'm adding more lines to make
it a bit more bolder and to show a clear distinction between different
sections of the house. In here, I'll only be
sewing you the house, but in our main project, the additional element
that I'll be using will be the electric pole,
then flying ghost. Some of the pots from the
house will be floating too, then debris, staircase, and some of the
fences of the house. So for the lower
section of the debris, I'll be using a colour
combination of ocher and brown. You can use other color
combinations, too. So for this upper section, we have two panel windows. For the lower section
two, we'll be having the same kind
of two panel window, but it will be a bit
larger in the same. Let's go over the outline of this extended portion here too, I'll be using the cross
hatching. Now let's do the door. This house is a little bit slanted
because it's getting uprooted because it's getting
uprooted from the ground. Instead of this, you can
create Instead of this, you can create house in
any other orientation. It can be upside down or it can be upside down or
totally vertically straight. Also instead of
the single house, you can do multiple small hearts that will be interesting too. If you want to add
more alignments to it, you can create small trees
that are floating around it. For this section, I'll be trying to create this kind of pattern, a bit of rectangular pattern. Now let's do the outlining for the two windows that
we have in here. Same as that of
the upper windows but a bit larger in the size. Here, I'll be using the
brush paint to color it, but for our project, I'll
be using the watercolor. Since with the watercolor, I can create a little
bit of gradient, but with the brush paint, it
will be a bit challenging. But to get a bit more precision and accuration you can use the red bras paint to feel
the insides of the windows. I'll be using the red, as I
mentioned, for the insides. Moving on to the top
to create this kind of broken cross hatching pattern
for the entire section. If you want, you can create
the scallops or tiling, or you can completely fill the entire section with
the hatching lines. Let's create the same
kind of pattern on this extended
portion of the roof. At the horizontal lines. In here too we have
got crosshatching. For the other two
extended portion, I'll be using the
same crosshatching. Let's remove the pencil sketch, and then we will add
more details to it. Now let's color it here, I'm using the as pin light
blue said, light blue. As I mentioned earlier, I'll be completely filling
the entire section, the upper section the roof,
the extended portion, as well as the border and edges of the
windows with this blue. If you want, you
can use two sets of the blue to create a
little bit of gradient. Some of the regions
will be a bit darker to the sado cast it why some of the upper suction of the roofs. But here to keep this
demonstration a bit simpler, I only using the single set. Gradually filling the entire
upper section with this. Let's do the sides
with this blue. Don't have to use the
same color combination. If you want, you can use
other color schemes. Mostly for this project,
I'll be using reds, blues and a little bit of ocher. The ghost will be in the white, but the remaining section, but for the remaining section, only the three color, the blue, the red, and bit of ocher. The electric poles will be in
the same color, the ocher. But if you want, you can
use a little bit of gray to so that the electric
poles are metallic. We are done with the upper
section with this blue. Let's add it for the
remaining section. Okay. Now, for this
extended roof in here, adding completely
filling it with this low here I forgot to add the cross hatching
for this extended portion for the door too. I'll be adding the aditil for the door and
extended portion later on. For the door, as I mentioned, I'll be trying to create
the d like pattern, so simple Oden planks. And we are done with the blue. Let's do the last
window in here. Let's color the
insides of the window. Going with the red to fill the entire section
of all the windows. As I mentioned earlier, you can create the silhouettes
of the people inside or you can create ghosts that are floating out
from the windows, or you can use two sets of the red to create
silhouettes in red, too. So that will be interesting too, a lighter set of the red and
the darker side of the red. With a darker side,
you can create the silhouettes of the
people or the ghost. Let's add the right for
the last window in here. I won't be adding the color
for the walls of this house, but for our mind
project, as I said, I'll be using the lighter
side of the blue. The above saxon has dried up, so I'm going in with
the white to create small stars tapping the bruss to create the small dots
to represent the stars. Here I'm using white
in. If you don't have, you can use the higher
consistency here. If you don't have, you can
use the higher consistency of the white watercolor or
you can use acrylic color. For this project, I'll be
creating this kind of a star for some of the white
dots that we just added. The larger ones, I'll
be extending them kind to create this kind of intersecting lines
to sew the stars. Some of the larger
stars with this one. If you don't want, you
don't have to do this, but I'll be creating
this kind of star for the background for
some of the dots. You can do the same for
the other two project, the background for the
other two, the red one, and the color combination
of red and the black. I'll also be using white to add a little bit of highlight
for some of the houses, especially for the second one. Now let's add the
white ghost in here. Put the mean project instead of using the whiting
to create the ghost, I left the space untouched so the white of the people
acted as the ghost. But in here, I'm using
the whiting to do that. Here I made a mistake.
The red ink was not dried up and I
added on top of it. So that's why the consistency of this white is a little less. Ensure that the
ink has dried and then only add the
colors on top of it. For the upper section
of this beam of light, I'll be creating small ghost. And as we move away
from the upper section, I'll be making the sizes
of the ghost a bit larger. Now let's go in with the black
to add is for our ghost. Here too, I made
another mistake. Both the white ink that
I added and the red was not dried up and on
top of it, I added black. So we got a little bit
of muddy colors in here. Please insure that the ink or the watercolor that you have used is dried up and then only add the color
here as you can see, Black dots that I'm creating
for the eyes of the ghost is getting a little bit
mixed with the background, the white and the red ink. Here I decided to rectify it and instead of this white ghost, I decided why not let's make
a ghost black in color. This did not look good. And to rectify it, I decided to use this breast to make
up the black color. This also did not turn out well. A little bit of the black got mixed with a white and the red. So I decided why not let's
cover it with a red breastpin. And this two turned out to
be another mistake because of the change in intensity
of both the colors. This red from the breast
pain of different tone, try to avoid this kind of
mistake that I am made in here. For our main project, I paid
more attention to it and instead of using the whiting
to create the ghost, I left that space
completely empty. The white of the people
acted as the white ghost. Even after adding another
layer of white to create more ghost to
cover this section, you can still say that I
made a mistake in here. With this, we are almost done with this
demonstration section. Try to avoid this small
and silly mistakes. Here I still try to rectify it by adding more
layers of white to make it a bit more intense
and to cover the dark area. With this, we are done with
this demonstration section. Later on, I decided
to create background for individual houses
and I did it on my own. I'll see you in the main
project, happy painting.
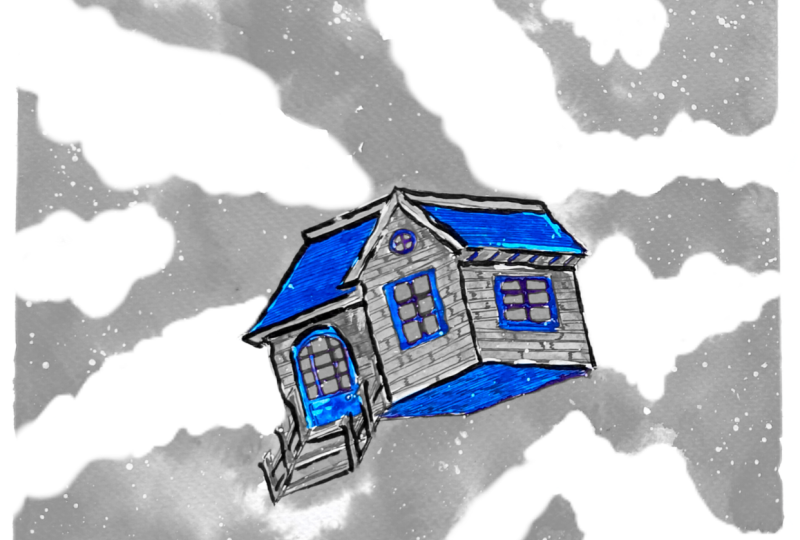
6. The Last House of Universe : Welcome to the first
project of this section, The Last House in the
Universe. Let's chart. Starting with a very simple
sketch for the house. This will be the scene
as we practice in here. If you want, you can
extend it a little bit. So I'm just showing
you as an example. I'll be making it a bit sorted. Here, as you can see,
I have made this house comparatively
smaller than the one we practiced in the
demonstration video. A small window on this side. All the elements, the doors, and the windows and the
chimney will be the same that we practice in
the demonstration video. You are free to make
adjustment and the changes. Create our second window. And as I mentioned, this
is a little bit longer. If you want, you can
create three windows, but I won't be doing this. I'll be erasing this part later. Instead of this house, you can create any other
kind of the houses. Now, let's create our
very simple roof. For this, I'll be
using the fine liner to do the outlining
and I'll be using a darker side of the grey
for the upper section of the roof and for
the entire section, the walls of the house, I'll be using a lighter
side of the gray. Now, let's do the outlining. And as we did in
the demonstration video for the upper section, I'll be using hatching
lines and I'll be trying to create
the brick pattern for the entire section. And for the remaining section, the walls of the house, I'll be doing the broken
hatching to create some to create wooden panel like texture for the entire
section of the house. If you want, you can use the breastpin to do the
outlining, too. With the breastpin, you
will get a bit more bolder and darker outline. And that will make
your house more distinct from the rest
of the background. Also, you don't have to stick
with the same color scheme. If you want, you can
use multiple colors. Let's go over the outlines for the two windows on this side. The last window on
the upper section. Now let's create the
brick light pattern. If you want, you
can do this tiling or you can create scallops for the upper
section of the roof. These are two panels window, dividing into two
different panels. Here we have got a simple door. If you want, you can add
details or patterns to it. Now let's make the edges and the corners a bit more bolder. The whole video is in real time, so you are welcome to
follow along with me. Now, let's do the
hatching lines to create the pattern for
the entire section of the was broken
hatching lines. And for the ground in here, I'm doing a little
bit of siding. The reason near the base of the house will be a bit darker, and as we move away from it, I'll be decreasing
the intensity. Now, let's do the same
on the other side. If you want a bit
more darker siding, you can use cross hatching. The region near the house
will be a bit lighter inside, but the bees will
be a bit darker. Later on, I'll be going with a black to create
the bees and I'll be diluting it and spreading it throughout the entire
section of the bees. Moving back to the roof
of the house and let's create the brick like pattern for the entire upper section. For this section of the W two, let's create the
broken hatching. For this extended
portion in here, I'm doing this cross hatching. And we are done with this very simple and very small house, the last house of the universe. Here we'll have to do
multiple layers of the coloring three
or four layerings I'll also be using
a bit of white ink. Let's start with
coloring it here. I'm using this dual
tip marker and let's make region the Base region for it a
bit darker inside. For the roof, I'm going with a bit darker side of the gray, completely filling this
entire section with this. Even after filling the
entire section with this, you can clearly see
the visible lines, the brick like pattern
that we created. Now for the base two, let's do a little bit of
seeding near the base, adding a little bit
of this dark gray. I'll be adding a little bit more details to the
house later on. For now, let's do
the background. So here, I'll be using the
wet on weight technique. Covering the entire
background with water. In here, I'll be
using watercolor. If you want, you can
use the black ink too. But with the ink,
you'll have to bit coucus since the
ink is waterproof, so it will be a bit
difficult in doing multiple layers of
it and blending the two layers might
become a bit challenging. As you can see for the
regions near the house, I did not add that much water. Now, let's go in this bit lighter side of the black to create
spiral pattern. As you can see the
watercolor is spreading screte more concentric circles that encircles this house. And as for the
edges of this page, I'll be adding a bit
more darker tones. This is our first layer. I'll be doing multiple
layers of the color. Add it for the
upper sections too. As you can see, for
this upper section, I added a bit darker
tone of the blacks. So for all four
corners of the pinch, I'll be adding a
bit darker sides. Also, I'll be creating this
kind of pattern with it. So tapping the brass to create this kind of small pattern dot likes pattern for
the entire section. I'll be doing this
multiple times too. So apart from this black, I'll also be using
the white to do this. You have to admit causes while creating these small
dots near the house. If you are not confident, you can use a small paper to cover the house and then
do this splattering. Let's set a few more black. As you can see the intensity has decreased as you can see the intensity of the
black has decreased a bit. Create the spiral
pattern for the galaxy. For the regions near the house, I'll be trying to keep
it a bit lighter. And as we move away
from the house, the spiral pattern will
also be increasing in size. Blending the colors a
little bit near the house, a little bit more black until you're satisfied with the background that you want
to create for this project, you will have to add layers of the colors the intensity
of the color will decrease since the intensity of the color will
decrease drastically since we are using
wet on wet technique. For the persection stone, let's once again add more black. You can see it's creating a beautiful blooming effect because of the wet
on wet technique. If you want to create some dramatic and
beautiful texture, you can use or sprinkle a
little bit of table salt. A little bit of water was accumulated in here,
so I use this. Here I'm using that dry
bras to remove that. You can also use
that tissue paper or any cloth to soak
the excess water. And now let's spread
a little bit of this black in here with
this larger brush. So with this, I'm creating a bit more defined
spiral pattern. If you don't have
this, you can use. If you don't have this, you can use any other watercolor brush. You can a dry brush
with the dry brush, you can create this kind of texture pattern,
the spiral pattern. And right now, it does
not look that good, but I'll be adding more layers
and it will be covered. As you can see, the multiple
dots we created using splattering technique is
not that much visible, so we'll be adding more layers of it, so more splattering. Now, let's make it a bit
more bolder and more black. Once again, try to create
the spiral pattern. As you can see, I'm not covering the entire section
with the black. I'm just trying to create
some undertone for this spiral see that
encircles this. Now let's spread it using
water to spread it. And I'm not spreading it evenly. Some of the section
are a bit darker, others are a bit lighter. So depending upon where I added, the darker tone of the black, that region is a bit darker. Let's do this
plating once again. Here I used a bit darker
tone and a bit more water, so the sides of the
splatters are a bit larger, adding it on the side too. Since the consistency of
this is a bit dilute, so I'll easily be able to remove the section
near the houses. So removing some of the dots
in here around the house. Let's add more splatters
for the upper section. And now let's add film Let's continue with
the remaining section, adding more black for the
corners and the edges. We'll have to one more
thing that you can do to wait for it to
dry and when it dries, then once again, reapply the
water and add another layer. But in here, I'll be continuing on with this
semiwight condition. Here I'm using the white. Here I'm using the white ink
to create the splatters. So this will create some
beautiful background. And as you can
see, it's creating some beautiful
pattern and texture, the blooming effect
that is creating and on top of the black, it's just spreading like
small flower or small stars. Add more platters. If you
don't have the whiting, you can use the watercolor. And now let's wait it
to dry a little bit. It has dried a little bit, and now I'm going
with another layer. So here, once again, I'm using a bit darker
tone of the black. Here I have diluted
it a little bit. The main advantage of
using the whiting is that it won't be
blending with the black. Since the whiting that
I use is waterproof, so it won't be mixing, but since it has not
dried up to par some of the section that is
still will be blending, but the remaining
will remain as it is. So it will create a
beautiful background. But since we are doing
multiple layers, you can see that there are multiple layers of stars
in the background. Here, once again, I'm going
with a black, a darker tone, but it's a bit diluted
and trying to create the spiral see Since the paper is not
dried completely, once again, it will spread and the intensity of this
plaque will decrease. Spread it a little
bit using water. And as a mentioning,
as you can see, the white is still visible, the blooming effect
that we created with the white The blooming efect that we created
with a splattered white ink is still visible. Now, spreading it.
As you can see, I'm not evenly spreading it, and the section where we added the sections where we added more black is a bit more darker. So that's what we are
aiming for in here. Moving on to the
center near the house. Here I'm using a bit
lighter tone of the black. Add more black wherever
you think it's required. But don't cover the
entire section with it. Continuing on with black and trying to maintain
the spiral pattern. Adding it for the cornet Insure that all the four
cornets are completely black. Now moving on to the
center near the center, a bit darker tone of the black, and let's create these
concentric circles that encircle the house. Here we'll have to
use a little bit of water to spread the
color a little bit since this region is a bit dryer compared to the other sections, going in with the water to
spread it a little bit and to decrease intensity and to decrease its intensity
near the house. Let's blend it in here too. As you can see, we have created a little bit of spiral
pattern is visible. So small strokes near the house. Don't add or create large strokes or
blacks near the house. Now, let's made for it to dry, not completely dry
but a little bit, and it has somewhat dried up, on top of it, I added more
splatters, black splatters. Here I'm going with
the white once again. Let's add another layer of
splatters, small white starts. Also, as you can see the pep
was not dried up properly. Once again, the whiting that I'm using in here will create
the blooming effect. Um, If you want larger dot, then you will have to move
your brass a little bit up, and for smaller dots, you will have to add it near the paper. And now let's wait
for it to dry. And as you can see, it's
dried it has dried, not completely dried,
but someone dried. And here, I'll be
creating the star like C. So four pattern stars. If you want, instead
of this four, you can do six pattern or eight patterns that will
be interesting too. But here, I'll be only creating
this four pattern star, 15 to 20 stars, mostly on the upper sections. Instead of this black
and white monochromatic, you can experiment with the red. That will be interesting, too. So only using the red ink or red watercolor to create
monochromatic red galaxy. Let's continue with
adding multiple stars. And as I was mentioning, when the wetn technique dries, the intensity decreases a lot. But in here, we were
successful in creating the spiral like pattern to
represent the galaxy, and it turned out pretty well. Let's set some larger
stars in here. We are almost done
with the stars. If you want, you
can add few more. You can also create comets or asteroids that are floating. For that, you'll have to add a large splatter of the white and then use your
finger to spread it. It will create
movement like texture that the object is in motion. I'll be creating comet or asteroid like projection
in one of the project. So if you want to do that, you can do that in here
too large splatters of the white ink and then spread it with your finger
in one direction. Here, I added the stars
in somewhat of seams. I just feel free to adjust
the seams in the sizes. And we are done with this. Add a little bit of more
outlining to the house. Now let's unmask our painting. It turned out pretty well. And if you want to make some
adjustment of the changes, you can add more splatters of the black ink and a little
bit of white ink too. Feel free to do that. I hope you enjoyed painting
this project Last House in the Universe, and I'll see you in
the next project.
7. The Drifting Dream House : Welcome to the second
project of this section, the Drifting Dream House. This is one of my favorite
from this section. Sketch of the house
will be exactly the same that we practice in the demonstration video.
This is going to be fun. The whole video is in real time, so you can follow along with me. I have divided it
into two sections, so this is the first
section of the video. And yeah, let's continue with the remaining
section of the house. Instead of this
kind of orientation of flying or floating house, you can make it or
change the orientation. You can make it upside down. You can make it vertical or
you can make it more slanted. Let's draw the other side. Also, you don't
have to create this a bit complex kind of house. If you want you can make or create a simpler
variation of the house. Instead of creating only
the floating house, you can create the house
is floating on an island. House on top of the island
and the whole island is floating for that in that case, you'll have to decrease the
size of the house for them. Let's create the upper
section of the roof. I'll be using the
same combinations. The one we used in the
demonstration video, but instead of the brass pants, I'll be using the
watercolor so that I can create much better
gradients and sading with it. In the beginning,
I'll be going with a fine liner to
do the outlining, but later on, I'll be
using the breast paint to make the lines more
bolder and more defined. Also, I'll be using
a little bit of white ink to do the highlights
for some of the sections. I'll be using the
white to do highlights and a bit of outlining too. If you don't have the white ink, you can use the concentrated
white watercolor or you can also use acral in
that will do the work too. Now let's create an extended
portion for the stairs. If the extended poison makes
it a little bit complicated, you don't have to add this. Apart from this floating house, you can also add other elements that are floating
or sir this house. So flower pots or
some plants that are floating around that
will be interesting to you or you can also
add floating cars and feel free to add any other elements to make
it bit more interesting. For our next project, we'll
have a lot of floating things that are encircling or
that is behind the house. And we are almost done with
the basic C for the house. Let's add the ventilation on the upper section on
the side of the wall, two windows, a vertical
one and a horizontal one. Let's create the
other window in here. And now let's extend the
remaining section of the house. So this will be the base of
the house that is visible. And, we add the with this simple pencil sketch
for our floating house. Let's do the outlining, starting with the fine liner. The same thing for the
edges and the outlines, I'll be adding two
or three lines to make it a bit
more bolder and more detailed to create clear distinction between
different elements. As for the windows,
the two windows in here will have six panel. If you want, you can
add or if you want, you can add or substract
the number of the panels. The door will be eight panels, and, yeah, let's do it. For the roof, I won't be adding any texture or
pattern if you want, you can use cross hatching, hatching or scallops
or even tiling. For the walls of the house, I'll be using the
walls of the house, I'll be using I'll be using hatching and a little bit
of cross hatching to create the texture or the pattern of the brick for the
entire section of the walls going over the
outlines of the fence. For the background, I'll
be only using the red ink. If you want, you can use
the red watercolor to. But with the red
ink, I'll be getting the somewhat obscene consistency throughout the entire section. Also, if you want to
experiment a bit more, you can use another color. So a combination of reds and the black or a combination of red with the blue or two or three color
combined together. That will create something very beautiful in the background. Et's create our door. So we have got a bit
broader door in here. If you want, you can make
it a bit smaller one. This section of the house
lies behind the other one. I'll be making this section
a little bit darker. Along with the
ocher, I'll be using a darker side of
the brown to make this region a bit darker
so it's in shadows, The cado casted by
the main house, the front building, going over the upper
section of the roof. Now let's do the ventilation and the other two
windows that we have. Bies of the house going over the outline circular
ventilation in here. A let's make the
window a bit longer. This is the vertical window. The other window will
be a bit horizontal. By horizontal I'm in it
will be a bit broader here, the window is a bit longer. Instead of the color scheme
of blues and the ocher, you are free to use any
other color schemes. Let's do the last window. This is the horizontal
one, a bit broader, let's compared to
the one that we created.This two will
be six panel window. And now let's divide it
into different sections. So starting with
the vertical line. And now let's divide
it into six section. So two horizontal lines. Doing the same for
this we need two, starting with the
vertical lines to divide into two different sections. And now let's add the horizontal lines to
divide it into six panels. For the door, as I mentioned,
it was eight panel, but that was wrong
it's 12 panel. For this portion of the roof, I decided to add a little
bit of more details to it. Adding the fine lines to add extra to add
extra details to it. Now let's create the pattern for the entire
section of the valve. Here I'm using the hatching, a little bit of
different hatching instead of the single lines. Here I'm creating two lines and then a bit of gap and
then two more lines. I'll be creating the
brick like pattern for the entire
section of the valve. For now, I'm doing the hatching and then I'll add
the vertical lines. You can consider this to
be brick like pattern or you can consider this it's
made of wooden beams. Two lines to create this kind of pattern for the entire
section of the valves, Alba doing the same for
the other two sides. If you want, you can
leave it as it is. It's more similar to the wooden planks than the brick one. So if you want to create
brick like pattern, you will have more you will have to add
more vertical lines, doing the same on this side. So after doing the outlining, I'll be erasing
the pencil sketch, and then I'll be
using the weight on weight technique to
create the background. I won't be covering the entire
section with the water. I'll be trying to create
somewhat of a streaks the kind we practice in
the demonstration now. So most of the regions
will be concentrated. All the streaks
will be concerted to the center of the house, and I'll be using a little
bit of watercolor rust to add a bit of details and
doing the outline for the upper and the lower
regions of the house to so that this red mist or
the red background is converging at
this house and is surrounded and it's surrounding the entire section of the house. Let's add the vertical
lines for this section. And if you have more ideas
regarding this project or if you have
experimented on your own, feel free to see
in your project. And we are done
with this section. Let's move on to the last one, the same kind of hatching lines. This is one of my favorite
project from this section. Let me know which one is your
favorite from this section. We have got the Last
House in the Universe. This is the Drifting
Dream House. The last project will
be the night the night the sky turned red. Let's check the details
for the upper section. For this side of
the roof, I'm doing the hatching to make
it a bit more darker. In the demonstration video, I did not add any lines, but in here, I decided
to make it like this. Let's do this on the side too. Sorry in the
beginning, I said that I won't be adding any lines or doing any detailing
for the upper section, the roof of the houses,
but I decided why not? Let's do it since I'll be using the watercolor even after
adding the watercolor, you will be able
to see the lines. This will give extra depth
to the painting and add another layer of
characteristics to the house. The lower sections
stone doing the same, completely filling this
entire section with the hatching lines and doing a little bit of sading to make some of the regions
a bit more darker. Now, let's erase the pencil
marks. Lightly erasing it. With this, we are
done with the main sketch for our house. If you want to make adjustment, add chimneys or add some more details to it,
feel free to do that. Here I decided to color the house first and then
I'll be moving into creating the background
using the low in here. For the upper section
of the roofs, I'll be using the blues. I'll be using the blues for the base, too, and
apart from this, I'll be using it to
do the outlining for the doors and the windows. It's completely filling the entire section with the bluws. If you want, you
can use the brass being that will do the work too, or if you want, you can
use the only black or red. If you decided to use red, then you will have to do
a little bit of sadings. The upper regions
will be a bit darker than the lower regions
will be a bit lighter. And for the walls of the house, you'll have to use lighter
states of the red. In that way, you can transform this project into a
monochromatic red house, moving on to the
base and completely filling it with the blue. I'll be going over the outlines of the windows and
the dots later on. For now, let's add the
color for the walls. Here I'm using the ocher,
so watercolor occur, and I'll be completely filling all the walls
of the houses with us. Here I used a diluted
watercolor occur. If you want, you can
continue with you want, you can use the breastban or if you want to change the
color, you can do that too. Adding it carefully near the upper sections and
encircling the windows too. For this region,
the wooden beams that I created in here
for some of the beans, I'll be adding the blue. Let's continue with the
remaining section of the valves. Carefully adding it
below the window, and we are done with this one. Let's move on to the other one. For the sir pieces too, I'll be using this along
with a little bit of brown. For now, let's do this
encircling the door. And now let's add it
for the other side. You're done with
the first layer. Now I'm going in with the brown. So I'll be adding the brown
primarily on the one side and blending it a
little bit with the char to create a
little bit of gradient. So for the sides and especially near the edges of the roof. For this side of the house, I'll be adding a bit more brown, since this is a
bit darker in seed because of the cado cast
in by this front building, adding it near the roof and encircling half section of the ventilation with this brown. As you can see, I
added a little bit of brown for the extended
side of the roof too. Now, going back once again with a diluted ocher and blending
it to get a gradient. This was a bit darker. Let's do the same
for this side too. Blending it a little bit
with a brown that we just added to get a
beautiful gradient. The upper regions and below the windows and the doors
will be a bit darker. So that's what I'm trying
to achieve in here. I think it's stand
out pretty well. Now, let's add it
for the roofs and the edges. Here I'm using ocher. If you want, you can
use a combination of ocher and brown too. For that, you'll have
to add the browns on the sides and then use
the ocher to spread it. Adding for the
sides of the roof. For the extended portion, the staircase that we have
got in front of the door. I'll be using the
brown later on, but for now, let's
add the ocher, and then I'll be going
in with the brown and a little bit of black
as the final detail. Let's add the ocher for the
last stair that we have. Now, going in with the brown, adding brown for some of the
sections of this stairs. I'm adding it on
only one side of it on the edges of the stairs, and let's add it for the stairs. And, we are done with this. It will blend a
little bit with ocher that we just added because
of the wet in wet. Here I decided to make this side a little bit more darker, so I added a little bit more
brown for the upper section. And now I'm going in
with the butter to spread it to create a gradient. For the sides, too. And yeah, we are done with this side. Now let's do the outlines for
the doors and the windows. So here, I'm using
the same blue that we used earlier for the
base and for the roof. So going over the outlines of the windows and
the doors with it. You'll have to bit
causes while adding this blue since we have
got very small region, adding the blues for this
larger window, the longer one. If you're not
comfortable with it, you can use the brass
pin to do this. Or instead of this blue, you can use the black bras pin to create the windows and
the doors with the black. Let's add it for
the door in here. Extra careful in here since the size is very small in here, careful adding it
near the stairs. Now let's fill the rest of
the space with this blue. And here, we are done with this. For the insides of the
doors in the windows, I'll be adding read later on. And with this, we are done
with this part of the video. I'll see you in the next part.
8. The Drifting Dream House Red Background: Continue where we laptop. I'll have to add the
heat for the insides of the doors in the windows and for the ventilation blue and red, which I'll be doing later on. But for now, let's
create the background. As I showed you in the
demonstration video, I'll be using the wet
on wet technique. Here I'm creating the streaks. So this is streaks of the water
that encircle this house. Here, as you can see, I'm not covering the entire section. I'll be creating the
same kind of streaks that we practice in the
demonstration video. All the streaks will be meeting at the center of the house. Here I used a little
bit of grease, water so that it will be
easily visible on the camera, but try to use clean water. Otherwise, you will
get a little bit of muddier color if you are going to use a lighter
shade of the color. For the reasons near the
staircase and near the house, you'll have to it costs
since we used watercolor. So if you add water
on top of it, it will reactivate
and that will lead to a little bit of
smudging of the colors. Let's create a few more
streaks or this section, and then we will go in with
the red ink to feel it. Here too, I'll be
trying to capitalize on the blooming
effect of the ink. If you want, you can
add a little bit of more water wherever you
think it's required, but I think I am
satisfied with it. Now, let's go in with the ink. To adding this randomly for the streaks of the water
that I just created. And as you can see,
it's spreading beautifully and creating
some blooming effect. Mostly, I'll be adding it for the inner regions
of this streak and I'll be leaving a little
bit of the species for the insides of the
streaks untouched. You'll have to be a
bit cautious while adding it near the house. Here, as you can
see, I'm encircling the upper section of the
house with this reading. Here, I did not add the water. So this region is dry and I'm using the watercolor
to do the outlining. And as I was mentioning
that I'll be leaving a little bit
of species untouched. So here I left a bit of
space, the white space. Now let's do the lower sections. Here for the insides of the
states or in between them, I'll be adding the red. I'll have to mit causes. You'll have to bit
causes while adding it. I'll be coming back to it
later on, but for now, let's add the red for the other water
streaks that we have. I will spread on
its own and will create some beautiful
blooming effect. If you want to greate
different kind of texture, you can sprinkle a little
bit of table salt, and that will create some very beautiful texture and patterns. Let's add the red ink in here, carefully adding it near the states and filling in in between the
different states. I decided to encircle this section of the
roof with the red. Let's add a little
bit of red for the upper section since
it's a little bit vacant. Spread a little bit of
ink here and there, wherever you think it's not
that much, spread it out. For some of the regions, you can see its greatest
beautiful blooming effect. Let's add a little
bit more red ink to make it a bit more intense. Here for this section, it's
not looking that great, so I decided to fill this
entire region with the red. Doing the outlining
for the house, you'll have to bit cuss. Ensure that your palm is
not touching the paper, otherwise you will get
smrging all over the paper. Now let's encircle some section of the house with a red ink. Go over the outline of the house and encircle it with this add more ink wherever
you think it's required. I'll be adding this red particularly for
some of the regions near the house to do a
little bit of outlining. And I won't be covering the
entire section that is I won't be doing the outline for the entire house
with this ray. I'll be leaving some of the
spaces completely white. Treat some of the ink
here and there wherever you think that its
intensity is low. You can use the ink that
is on the paper or you can use the ink from the
ink portal directly. Here I decided to
add a little bit of ink to spread it a
little bit more. The ink has dried
up a little bit, and if you spread it now, you will get a different look. Try experimenting and see what atmosphere you are able to create for
the background. Now let's carefully add this
ray in between the stairs. You'll have to be causes. If you are not that confident, you can use them us pain
we are done with this. Let's add the ds
for the insides of the ventilation, the
doors in the windows. I decided to add a little bit of red in here on the
side of the staircase, so carefully adding it in
between these white sections. Adding a little bit of
more red near the stair. And, I think we are done
with this background. Let's add the ds for the
insides of the doors windows. Here I'm being extra causes, so as to avoid merging of the colors, the
red with the blue. And we have got two more
windows to feel this right, and then we will add to add
the highlights and detailing. I'll be going in with
the bras pin to do the outlining for most of
the section of the house, and then I'll be using a
little bit of white ink to add a bit of highlights and a
little bit more outlining. Also, I'll be using
the white to create the flattery fat to create
the stars in the background. And we are done with the
windows and the doors. If you want, you can
add a little bit more red wherever you
think it's required. Here I decided to spread the
red a little bit to create a little bit of pinkish texture
or hue for this region. If you want to create more pinks hue for some of the other
regions, feel free to do that. Now, let's go in
with the blue to do the remaining section that
I did not add the blue, like the ventilation and
the sections of the roof. So the side section of the roof. Ensure that the watercolor, the ocher color that we added is dried and then
only add the blue, otherwise you will get
a little bit of wet on wet technique happening
in here that we don't want. Going over the outlines of the
ventilation with the blue. And we are done with our house. Now, if you want, you can use the fine line to make the
outlines a bit bolder, but it will be a bit challenging since we added the watercolor. So I'll be going in with
the bras mean later on. For now, let's go in
with the white ink to do this splattering effect to create the stars
in the background. Here, I won't be creating that much star, but if you want, you can add more white in to
do this splattering effect. And like the earlier project, you can create the interjecting
stars, a bit larger ones. M. Here I'm plating a bit
smaller starts, and let's add a little bit of outline or highlights for some of the sections
of the house. Specifically, I'll
be adding this white near the edges
and the boundaries. I'll not be adding it
for the entire section, but some of the sections to sew a clear distinction between
different parts of the house. If you're satisfied
with your painting, you don't have to add
the whites or the black, but I decided, why not? Let's add a little bit of highlights and do a bit of
outlining with the white since we'll be going in
with the black letter end to do the final
outlining and the detailing. So even if I make a mistake, I'll be covering
it with a black. For the sides of this house, too, let's add a bit of white. Here I'm adding the
broken white lines. Let's do it for the upper
section in here, too. As you can see, I'm creating
very small and fine lines and broken fine lines.
This is optional. If you don't want, you
don't have to do this. Add it a little bit
for the sides of the dose to make it a
bit more highlighted. If you want to create a bit of texture or pattern on the dose, you can do this with a white. If you want, you can add a
little bit for the states too. For this side, I decided
to add a little bit a clear distinction with the red background and the
upper section of this roof. So I think I overdid
a little bit in here, so I'll be covering,
as I said earlier, that I'll be going
with the bras pen. So let's wait it
for it to dry and then I'll be going
with the bras pen. Let's splatter a little bit of more white ink for the
stars in the background. And we are almost done
with this background. Going in with a
brass paint to do the outlining to make it a bit more bolder and a
bit more distinct. Are we covering most
of the sections, specifically the upper
and the lower sections. And yeah, let's do the
outlining here, too. I'm using the broken lines to create this kind of texture. So going over all the
important outlines with this plus pane to
make it a bit more molder. If you don't want and if
you are satisfied with how your project turned out,
you don't have to add this. And as you can
see, I am covering the excess of white
that I added. I believe that I overdid
the white a little bit. So I'm covering the excess of
the white with this black. Let's do this extended
portion of the roof. And for the staircase, too, I'll be adding a
little bit of black. Let's make the sides of the door a little
bit more pronounced. For the sides of the
staircase, adding one line, a single line of the
bras pan to make it a bit more detail and to sew a clear distinction in
between the reds of the background and the
browns of the staircase. And we are almost done with this plaque and the
rest of the project. If you want to add it for other sections like the
outlining of the doors and like the
outlining of the rest of the windows and the
ventilation, you can do that. But I am satisfied with
how it turned out. And with these, we are done with this project. I hope
you enjoyed this. I had a lot of fun
painting this. Let's unmask our second
painting of this section, and I'll see you in
the next project, the final project of this
section. Happy painting. M
9. The Night The Sky Turned Red: Welcome to the third and the final project
of this section, the Night the Sky Turned Red. This is going to be
another interesting one. Let's start by doing
the sketching. The whole video is in real time, so you can always
join along with me. This video is also divided into two sections. This is
the first section. Here I'll be doing the
pencil sketch outlining and some of the details
for our final sections, we'll be adding
the final details and finishing the project. The house will be
the same the house that we created in our
demonstration video. If you want to make changes,
feel free to do that. Instead of this two story
building or two story house, you can create totally
different kind of house. Or you can even
create a simple hut. And if you want to make it
a bit more interesting, you can create a farmhouse. And the floating things that
I'll be creating later on, you can create two or
three cows that are getting sagged that
are floating too. So that will be an
interesting idea. Here we are done with the
upper section of the house. Let's continue with
the remaining section. In our demonstration, we knew I did not add colors
for the valves, but in here, I'll be
using the lighter sets of blue to do the
coloring for that too. Also, you don't have to use the same color
scheme that I'll be using feel free to make changes. For the bottom section in here, I'll be trying to
create some kind of debris that is floating. I'll be trying to
create small fences and few bots that are floating. If you want, you can add other things that
are floating like small cars or vehicles
or cycle Mcycle. So normal things that
are around your house, you can even create
a small post box. So that is floating. You are free to
add any other kind of elements to make it
a bit more interesting. Now let's create the
windows on the other side. Here, this is just for
an example, if you want, you can create another
extended portion on this side and on top of that, you can add the window
that will spicing up, but I'll be creating
the same two windows I used that I created in
the demonstration video. Now let's move on to
the upper section four window, four
smaller windows. And we'll be adding the final
details to it later on. To electric bowls that I was mentioning about in the
demonstration video. Here I'll be creating two
wooden electric bowls. I'll be using the char
color if you want. You can create metallic ones by using a lighter
side of the gray. Now let's create the
outline for the red light. Doing the outline for the UFO. Somewhat elliptical
see for the UFO. Here I'm creating a less
defined version of the UFO. If you want, you can create a bit more detailed and
defined version of the UFO. If you want to
create street lines, you can use the ruler. Now let's create small
projections for the ghost. Instead of this small
projection for the ghost. If you want, you can create
bigger projections or you can also create smoke like ghosts that we did in
our first project. And we are done with the
basic pencil outline. Now let's go over it
with a fine liner. Here I won't be
using the bras pin. If you want to create
a bit bolder outlines, you can go in with the bras pin. But I decided why not? Let's
use only the fine liner. For the upper section, I'll
be creating cross hatching. If you want, you can do that
tiling or you can create siding using hatching line or you can also do the scallops. For now, let's continue
with the remaining section, two or three lines to create a clear distance in between
different parts of the house. So near the edges on near the outlines Moving on to the side for the
extended portion of this window and for another extended portion
on the ground floor, I'll be doing the same kind of cross etching that I'll
be doing for the roof. Now let's do the remaining
section of this large window. The window on top of
this is quite large, so I'll be making
it a bit smaller. As I suggested in
all the other videos for the inside of the window, you can create silhouettes
of the people or the ghost. In here, too, you can
do the same thing. Let some ghosts are coming
out from the windows. You can do the same
thing for the UFO, for the upper section where
I'll be creating the windows. You can create the silhouettes
of the two aliens. You can create the
silhouttes of the aliens that are flying the UFO. Now for the remaining
section of the house, the ground floor, as I showed you in the
demonstration video, smaller section, the ground
floor is a bit smaller. Here I'll be creating
the same kind of texture or design that we did
in a demonstration video, a bit of triangular seeps. If you want, you
can create totally different design to it, or if you don't want, you don't
have to even do anything. Little bit of extended portion for the support of
the upper part of the building and two
windows in here. I won't be doing the
sketch that I did earlier. If you want, you can
proceed with that, but I'll be creating
the same windows that I did in a
demonstration video. Now let's do the front section. We have got a door,
a small window, and here for the second window, I made a little bit of mistake. The side is a bit smaller. Now, let to the remaining
section of the house, the base and small
section of the stair that is visible or that is
still intact to the house. Now some debris flying here
and there, part of the house. I won't be creating any
detailed or defined debris that is in the ground, but some small kind of
lines to just depict that something is
present in the ground that was attached to the house. Plumbing and pipes
and electrical wires. You can create some plants too. This random shapes and a bit
of tiling here and there to create a little bit of a
little bit of dark regions. Now, let's do the windows. Four small windows in here, the same kind of window that we did in the lower section,
the ground floor. We have got one more window
in here. Same kind of window. Do the outlining for the electric post that
we have in here. For the street and uniform
line, use the rulers. Here, I'm creating
a little bit of sicky lines for
the electric pole. Here I have just created
a single electric pole. I'll be adding one more
on the right side. For now, let's add
a little bit of detailing for the upper
section of the electric pole. A very simplified version
of the electric poles. Now let's create another
one on the side. So these two are
floating a little bit, so this is a bit horizontal. Let's do the detailing for a if you want, you can
create few more, not few more, but one
more on the left side. Let's connect the two electric
posts with the wires, extending the wires
on both sides. And now let's extend the
wire on the right side. Most of the wire on both sides will be completely
covered with the blacks. If you want, you can use
a little bit of white. Now moving to the house, creating small pots
that are floating. Small tiny shapes like this. And now creating this
kind of seed to represent the entire plant, small plants. We have got a chimney in here. Add a few more elements
here and there. Add more elements
here than there. I'm creating this
kind of Oden planks. The portion of the fence
that is floating around. It's not floating, it's
getting sacked by the UFO. If you want you can
add more element, feel free to do that and Let's at a few more
here and there. Don't overcomplicate it. Try to keep it bit simple. I think we are done with this. As for the coloring for
this lower section, I'll be using combinations of ochre and a little bit of brown. Now, let's do the
detailing for the windows. Sorry for the fluctuations
of the light. We'll have two panels window. If you want, you can
create four or six panels, or you can just
leave it as it is. Simple windows. For the
insides of the windows, I'll be completely
filling it with the red. Moving on to the windows on the ground floor,
a bit larger one, same kind of window that we created for the upper section, dividing into two
different panels. And here, we are done
with the windows. I'll be moving back
to the door later on, but for now, let's do the outlining for
the upper section. Let's do the outlining
for the UFO. Here I created a very
simplified was on the UFO. Instead of this field key to experiment or create
a different kind of UFO creating semi elliptical
saves for the lower section. Another concentric
elliptical save that encircles the
entire section, the top of the UFO. It let's create the
viewing area for the UFO. The main thing, the
antennas for the UFO. And, we are done with a very basic and simple
seat for the UFO. Let's do the outlining
for the red wing. This is the area in which
I'll be completely covering it with a red color
with a red ink. Finally, doing the
outlining for our ghost. For the upper
section, we have got small ghost and as we move, we have got a bit larger ghost. I am not creating that
many ghosts in here. If you want, you can increase
the numbers of the ghost. Here we have a very simplified
version of the ghost. Instead of this, you can make
it a bit more defined one, so you can add the
hands for the ghost or you can also add
more details to it. In our demonstration video, I created the ghost using the white ink on
top of the red ink. But here, I'll be just leaving the white
section of the paper. But here, I'll be leaving
the white section of the paper and using the
white to create the ghost. I'll only be creating
two small circles to represent the
eyes for the ghost. Erase the pencil marks
and then we will proceed on to add a little
bit more details to it. Lightly erasing all
the pencil marks. Now, let's do the coloring. Here I'm starting with
the sads of the grey for the UFO using this darker side of the
grey to create this kind of pattern surrounding the
lower section of the UFO. If you want, you can create totally different
kind of the pattern. Now I'm going with a
bit lighter side of the grey and completely
feeling this entire section. Instead of this, you can use the watercolor to
create the same thing. You'll have to dilute
the watercolor to get a bit lighter consistency
and for the darker one, a bit concentrated watercolor. For the remaining
section of the video, I'll be adding the
colours to the house and a little bit more
detailing to the UFO. In the next part of this video, we'll be creating
the background, the red beam of light and the black as well as the small debris that is
floating around the house. Let's do the coloring
for our house. Here I'm using the
blue, blue watercolor. If you want, you can
use the breast pan or you don't have to
even use the blue color, you are free to use any
other color of your choice. I won't be creating gradient
in here, but if you want, you can use a bit darker tone of the gray to create
a bit of gradient. The upper section will be a bit darker and the lower section
will be a bit lighter. Adding the blue for this
extended portion in here. Same color scheme that we used in the
demonstration video. The entire boundaries, the outlining of the
windows and the doors too, I'll be completely covering
it with this blue. In our demonstration video, I did not add any
color for the walls, but here as I was mentioning, but here I'll be using
this lighter sad of the blue to fill
the entire walls. I just diluted the blue
a little bit and added a little bit of white to
it to get this side of the blue carefully circling the windows and near
the edges of the roof. Let's fill the entire section of the room with this color. If you want, you
can create a bit of texture and pattern
to the valves. Also, you can create a little bit of gradient
and the seeding. So if you want, you can do that, but I won't be doing this. I'll be keeping
this project simple since it's a bit longer
as compared to the other. So I decided not to do that. But if you want, feel
free to do that. Adding it carefully for
this extended portion. Now let's move back to
the remaining section of the upper part of the wall. Carefully in circling the
remaining windows with it, and then we will move
on to the ground floor. Also, instead of this color, you can use a darker
tone of the blue, mixing a little bit more
blue for the ground floor. Carefully adding this for the
triangular section in here. It's loving like this,
but when it dries up, it will lose some of
its intensity and will become a bit and will
become a bit lighter in color. Now let's do the remaining
section, this side. Carefully filling in
between the two windows. And here we are done with this. For the extended
portion on the side, I'll be going with the blue. Now going back once again with a darker blue to do
the remaining section. The outlining the extended roofs and the remaining
section with this blue. Before proceeding with this, you will have to
wait for the lighter shade of the blue that we use. When it dries, then
only use this. Other white, you will get a white on white
technique like effect. This blue will get
a little bit merged with a lighter blue,
and we don't want that. Ding over the outlines of
the edges and the corners. And I'll only be using
the blues for the house, and then I won't be using it. Now let's do the triangular
design on the sides. Let's do the windows and
the doors with the blue. Since the outlines are tiny, you'll have to be causes as we don't want the blues for
the insides of the windows. For more precision and accuracy, you can use the
breastpin in here that will ensure that you will get crisp windows and the doors. Now, let's do the
remaining section. We have got six windows. Instead of intact house, you can also create a
bit of broken house or some section of the
house is also floating. The upper section or the roof is completely missing or that is
floating around the house. We have got only two
windows in here and a door. Now, let's completely fill the entire section
of the door with it. With these we are done with
this part of the video. I'll see you in the
next part where we'll be completing
this project, the background and
the remaining thing.
10. The Night The Sky Turned Red Background : Et's continue where we left off. I'm going in with the red for this lower section of the UFO. So for all those projections, I'll be completely
filling it with the red. For the upper
section two, I'll be going in with the
red, the antenna to, the circular part of the antenna and add the small tiny red
dots for the upper section. Let's create the red beam. This is going to
take a little bit of time and you'll have
to bit causes while surrounding you'll
have to bit causes while surrounding the
tiny goes in here. For this video, I
will speeded up some of the section that
will take a lot of time. So if you want to join
or follow along with me, you can just pause the video or you can decrease
the player's speed. It will take around
four to 5 minutes to completely fill
the entire region. If you want to make this
process a bit faster, you can fill the
entire region and then use the white ink to create the silvette
of the ghost. Because of the
presence of the ghost, that's why it's taking
a bit more time. One more way in which you
can make this process a bit faster is that you can use
the brain breast pain to do the outlining of the ghost and then going with the ink to fill the entire
region so that you will get crisp outlines
for the ghost. And then you don't
have to be that much causes around the ghost. Here I will increase thep since it's going to
take a lot of time. If you want to follow
along with me, you can pause the video or you can reduce the player's speed. Yeah, let's continue with
the remaining section, outlining the ghost and being careful around
the electric poles. For the entire background, I'll be using black, completely filling
it with the black. I'll be using the uniform
consistency of the black. Instead of this
black, if you want, you can create a bit of
gradient or you can create a bit of mixture of both red and black for the background. We're almost done
with a half section of this red electric beam. Now carefully inserting
the electric fold. As you can see here,
I have decreased the speed to the normal. Now, let's speed
things up once again. Also for this red beam of light, you can create the
same kind of pattern that we created for
our last project. So for that, you'll have to use the wet and wet technique, and then you can create those kind of red
and pink streets. Now, let's carefully
encircling the house and the remaining
floating objects. For the smaller portion, you'll have to a bit more causes. Now, let's encircle this fence. And we are almost done
with this red light, and then we will move on to the remaining section,
the background, the rest of the foreground
of the house and the detailing for our
electric poles and tiny dots or black
eyes for the ghosts. Adding a little bit more
red in between the fence. We have a little bit more
space to fill this red in, and then we will move on
to the other section. Here I have decreased
the speed to the normal. Of this foreground. If you
don't want to create this, you can completely fill the
entire section with the red. Now, let's do the windows. So completely filling the insides of the
windows with the red. Also, as I mentioned earlier, you can create the
silhouettes of the ghost or the
people in insides. Four windows in here, then two windows on the ground floor
and a smaller window. Moving on to the windows
on the ground floor. And we have got only
a single window left. Now let's add a little bit of red here and there
to sew a little bit of reflection that is casted by the red light on the ground. We'll be blending it with a little bit of ocher and brown. For now, we are
done with the red. Let's do the main background. Here I'll be using wet
and wet technique, but here I won't be creating any gradient or any
kind of pattern. I'll be using watercolor ink to get a bit of
uniform consistency for the entire background and using this wet
and wet technique, the ink will spread
bit faster and I don't have to
use a lot of ink. As you can see how intense this ink is as
compared to the ink that we used as compared to the watercolor that we used
for our earlier project. Let's do the remaining
section with this, and it's spreading
quite beautifully. If we would have used this for the last house
in the galaxy, then we would not be able to get the kind of spiral pattern or texture that we
had and layering with this flaking is
not that possible. Since no matter how
dilute we make it, it will be intense and
since this waterproof, we won't be able to
reactivate it and the layering with this
will be quite impossible. H you'll have to bit causes while encircling
the upper section on the rest of the UFO. Here, once again, I have
increased they speed. Since this two is going
to take a lot of time, let's feel the entire
region with it. As I mentioned earlier,
the wires that we created will be completely
covered by this black. If you want to create a
bit of detailed wire, you can use a little
bit of white to go over the outlines later on. For now, let's do the
remaining section. Here, once again, I have
decreased the speed. Let's do the remaining
section with this. Instead of this small brush, you can use a bit
larger one that will also make the process
a bit more faster. Carefully going over the
outline of this red beam and then let's fill the rest
of the remaining section. Moving onto the other side, do the wet on wet technique in completely filling this entire
section with the black, completely filling this
entire section with this water and then
we will add the ink. A bit causes near
the electric pole. Now let's fill the remaining
section with this ink. Also for the background,
I'll be using this plattern technique to create the stars
in the background. Let's spread this ink and cover the rest of the
section of the side. Here, once again, I've
increased the speed. You can pause the
video or you can just decrease the speed to
follow along with me. Now only a small
portion is left. Let's fill this
remaining section and we are done with this. Adding a little bit of
black in here and also I'm surrounding and overlaying
it on top of the red. I'm not going to create detailed or defined debris in here, but if you want, you can see
it a bit more detailed one. Let's add a little bit
more black in here. I'm leaving a little bit of a space in between the strokes. If you want you can
completely cover it with the black
but I'll be going in with char to add a bit more
depth and details to it. Don't cover the entire ds, et a little bit of it remain. We are almost done
with the black. A adding a little bit more
black for the bottom section. And for the fence in here too, let's do it with black. Here the intensity of the black has decreased a little bit. Now, using a little
bit of grease color of black to do the pots in
here and the plants too. If you want, you
can use a bit of mutate tone of the
green to do the plants, but I decided why not let's use this lighter side of
the black somewhat of grease color to do the outlining and coloring for our
floating plotted plants. I forgot to add the
coloring for the chimney. I'll be doing that later on. Let's do the remaining
section of the UFO. Fill this entire
region with the white. Here I'll be leaving a little
bit of white to create a distinction between the
different layers of the UFO. Carefully inserting
these red parts. And here, once again, I have increased the speed. We have a lot to do
for this project. I'll have to color the
upper section of the UFO, then we have the electric post detailing for the
ghost and the debris. We are done with this section. Now, let's move on to
the upper section, creating outline with this, dividing the viewing section
of this UFO into four parts, and let's feel the
remaining section with the slighted
tone of the pla. As you can see for the
upper section two, I left a little bit of
space, a white of the paper. Now let's do the
outlining in here. If you want, you can
create a bit of pattern or designs in here or you can
do a little bit of sading. The regions on the other
side should be a bit darker if you want to do
that, you can do that. Now for the section
near the edges, I'm creating this triangular sades minute and small details here and here, random details. I think we are done with
the UFO if you want, you can add a little
bit more details to it, but I'm satisfied with
how it turned out. For the lower section in here, since I used a bit more water, you can see the left side
is bit lighter in sin. I'll be going back with
the black once again to make it a bit more
bolder and more darker. For this genta as you can
see it become a bit lighter. I'm adding a bit
concentrated black in here. We have got seeds of blacks
and a bit of grease. Et's create a bit
of random seeps here and there with this black. You can add as many as
random seeps as you want. Just don't overcomplicate it. For this region on the side
of this extended person, adding a little
bit of this black. Now let's move on to
the remaining section. As I was mentioning,
this section has become a bit lighter in seeds, using the blacking to cover
this area with the black. Using this blackening to cover this area for this region too. Since I use a lot of water, that's why it's
become like this. Don't oversaturate the
paper with the water. If you have added more, you use tissue paper or the dry
brush to remove it. So now I'll be adding the black wherever the intensity
is a bit less. And then I'll proceed
on to add the stars for the background and
the coloring for the electric poles and
some of the fences. Now here I'm going with the fine line to add
the eyes for our goes. So small dots, small
black dots for the eyes. We have got a total of
20 or 25 ghosts in here, let me know how many
ghosts you have created. I counted it and it's a
total of 19 ghosts in here. Let's add the eyes
for the last ghost. We are done with our
simple white ghost. Let's do the remaining section. Here I'm going with the ocher to add the color for
the electric poles. If you want, as I
mentioned earlier, you can use the gray
to create a bit of metallic coloring
for the electric poles. Carefully adding
it. We don't want this ocher to be on top
of the black background. Adding the color for the
second electric pole. Adding the color for
the remaining section. By remaining section, I mean
the floating fence that we have got in here and the
remaining part of the ground. For the foreground,
I'll be entirely covering it with the ocher. I'll also be adding a little bit of this ocher for the staircase. Completely fill this entire
section with this ocher. You don't have to be
that much causes. Adding this ocher
for the staircase, and we are done with the ocher. Now let's create the
stars for our background. So using splattering, here
I'm using the whiting, and let's splatter it
to create the stars. The closer you platter
near the paper, the smaller stars we look, and the farther
apart you splatter, the larger the larger dots
or splatters you will get. So here, I'm trying to create a bit smaller splatter
or smaller stars. That's why I'm tapping it
a bit closer to the paper. Let's add a little
bit of more stars. I'm not satisfied with it. So going back once again
with this whiting to do this plattering to create the stars for the background. And as I mentioned earlier, if you don't have this whiting, you can use the concentrated
white watercolor or you can use the acrylic. Also, if you want,
you can create the intersecting lines
to create a bit bolder and larger stars like we did in our first project
of this section. Now let's add the
final detailing. So here I'm going
with a fine liner to create the pattern, the cross hatching for the
upper section of the roof. Let's do the same for
this extended portion. And for this extended portion
in here on top of the door, and I'll be doing the same for the other extended portion
on top of the window. Before doing that,
let's do our doors. I would like pattern,
simple straight lines. Here, as you can
see, I'm creating a little bit of broken
lines for the door. Let's create the
horizontal lines to do the cross
hatching in here. Moving on to the extended
portion doing the same. And finally, moving on to the two small extended
portion in here. And we are done
with this project. If you want, you can make. If you want, you can
add more details or make finer adjustment, but I am satisfied
how it turned out. I forgot to add the cross searching for the extended
portion, which I did later on. And I hope you enjoyed
this project, too. It was fun to paint, and I'll
see you in the next section with three more amazing and
haunting strange houses. Happy painting.
11. Class Conclusion : You so much for joining
me in this class. I hope you had lots
of fun painting this airy and imaginative
illustrations. Together, we created the
Night the Sky Turned Red. Then we have this
Drifting Dream House, which is my favorite. And this one, the Last
House in the Universe. I hope this project
encouraged you to experiment with
watercolor and ink, practice your technique, and add your own creative touches
to each illustration. Feel free to continue exploring different color
combinations, background, and surreal elements to create even more unique artwork
inspired by these projects. If you have completed
your project, please upload them to
the project gallery. I would love to see
your artwork and your unique interpretation
of the scenes. And if you have any questions, feel free to ask them in
the discussion sections. If you enjoyed this class, you can also enjoy some of
my other related classes. You can check out
the dark forest and haunted homes
where we created atmospheric monochom haunted landscape using
ink and watercolor. You can also explore
haunted walking houses, where we transform
ordinary houses into strange working creatures
and fantasy structure. I'm also working on more classes featuring mysterious houses, dark, fantasy themes,
and surreal landscapes. So be sure to follow me here on skill set to stay updated. Thank you once again
for joining me. I hope to see you in
another class very soon. Until then, keep creating, keep experimenting and most importantly, have
fun with your art.
 Vishal Munshi