Transcripts
1. Welcome to the Class!: Welcome to this new
procreate illustration class where creativity
meets simplicity. It's all about focusing
on fundamentals, lines, and numbers to unlock the secrets of
balance and harmony. In your illustration
here, I'm Christine. After completing a Bachelor's and Master's degree
in fine arts, I've found such a
great joy exploring various art techniques
and fields today. I'm absolutely thrilled to introduce you to the
captivating world of procreate, where you can effortlessly craft beautiful
illustrations in no time, all while having a blast. But here's the exciting part. You won't need a vast
array of tools or brushes. Nope, just one brush
will do the trick. You'll soon discover the incredible power
of composition and elements and how they effortlessly breed life
into your artwork. Adding depth, perspective, and a touch of enchanting light, all with limited resources. Our primary focus is
to help you create a peaceful atmosphere
in your artwork. With the star of the show being that magnificent billowing
cloud in the background. You will learn how to use a limited yet harmonious
color palette to make the creative process not just easy but downright fun. From the tiniest trees
in the distance to the fluffy ship dotting
the rolling hills, and a graceful butterfly
is dancing in the sky. This class is designed to
feel like a gentle breeze. Best of all, is
beginner friendly. And I'll be here with you step by step on this
creative adventure. Grab your ipad, load
up the procreate app, and get your trusty
apple pencil ready, because we are
about to dive into a world of imagination
and creativity.
2. The Cloud: Hey there. Let's chat
about these awesome clouds that artists love to
use in their creations. Cumulus and Cyrus clouds. You've got these
fluffy and puffy, cumulus clouds that
artists often paint to bring out feelings of calm,
peace, and positivity. They are like the
embodiment of innocence. And when they hang
over scenic landscape, like a cozy countryside or a stunning sunset
by the ocean, add a sprinkle of
serenity and beauty, that's hard to resist. Then there are Cyrus clouds, those delicate wisps
that grace the high sky. Artists use this to a touch of lightness and
dreaminess to their work. They've got this whimsical vibe that can make you
feel like you're drifting in a daydream or maybe pondering the mysteries
of this universe. They are like the sky's secret
storytellers hinting at the vastness of the world above us and the fleeting
nature of moments. You know what's really cool? These clouds bodies
don't just look pretty, they actually pack
an emotional punch. They are like the
emotions in a painting, helping you feel things
without even realizing it. Whether they are creating
a peaceful background for a cozy scene or adding a dash of wonder to
something surreal. These clouds are like
the artists side kicks, making sure you have an awesome experience
with their art. Next time you spot these
fluffy cumulus clouds, or those wispy Sirrus
ones in a painting, remember that they are more
than just shapes in the sky. Hey, there, let's take a
look at the procreate app. It's open now to start, head over to the plus
button in the corner. After that, we want
to ensure that the canvas size is set to
4,000 by 4,000 pixels. Once you've input the
numbers at the bottom, simply tap the create
button in the corner. Fantastic, the canvas
has been created. Now let's explore
the color palette. When you check out the
landscape color options, you'll notice that they
offer a limited range of colors for our clouds
and cubed ship. We'll use the light
blue hues on the right. On the left, we'll work with these colors to shape the land, the beautiful flowers,
and the floating petals. When it comes to brushes, the amon brush will
be your go too. It's perfect for shaping and creating compositions with ease. No need to worry about textures. In this class, we are all
about playful shapes. With the canvas ready, let's dive into creating
those beautiful clouds. Begin by selecting the
second shade of blue from the left and apply it to the canvas to fill
the sky with color. Now for the clouds outline, pick a lovely white
shade from the corner. This big fluffy cloud will grace the entire
sky. Picture this. The cloud playfully glides
from the left to the right, following a gentle
flexible line. The chosen shape gives the illustration a decorative touch. Starting from the middle
and gently dipping down, the cloud rises and
forms a spacious shape. A small depression
is followed by a beautiful curve to
complete the cloud. That gives us three
unique cloud shapes ready to outline the cloud focus
on shaping semicircles, varying their size and direction
for a delightful effect. Wind swept lines give the
cloud a dynamic appearance, making it seem as though the wind is playfully
guiding it. Complete the clouds outline with a couple more semicircles
on the right side, filling the base with
the same white hue. Now that the main cloud
shape is in place, take a moment to
refine the outline. Remember, perfection isn't
necessary for the start. Make those adjustments
and have fun with it. As you tweak the clouds shape, follow the larger shapes, and add smaller
ones around them. It's all about keeping
the creative flow. Don't hesitate to introduce
more small cloud shapes. They'll beautifully overlap
with a larger cloud. Imagine these little clouds
mingling with the big one. Feeling adventurous,
you can even use the sky color to create
shapes within the cloud, softening any sharp edges. These cloud gaps lend a sense of movement flowing
gracefully toward the top right direction. Let's zoom in for
a closer look and make sure we are satisfied
with the cloud shape. As you can see, the
three groups of cloud shapes blend harmoniously, creating a dynamic and
engaging composition. Now let's add a touch
of decoration craft, some semicircles
around the clouds. Larger shapes to infuse
movement and energy. Just like outlining a
character to convey motion, a few lines will do
the trick enough to enhance the clouds form
without overpowering it. Check out how these lines
gently hug the clouds shape. Maintaining a close connection. A couple of lines on the top will soften any harsh angles. Adding a graceful touch
to the clouds movement. Now return to the
left side and add a few lines across the
smaller cloud shapes. Remember, smaller clouds are just as important
as the big ones. Zoom out and take in the clouds. Notice how the
lines contribute to the overall sense of
movement and liveliness. To finish things off, sprinkle some small cloud specs
around the larger shapes. These delicate bubbles bring a playful and fresh
vibe to the cloud. Starting from the bottom left, add a couple of these charming
circles to the blue sky. Gradually move higher and include more of these
delightful specs. With that, the clouds
shape is complete. You'll notice it's
quite intricate, composed of three main shapes, each containing smaller ones. The surrounding lines infuse the cloud with
motion and airness. The tiny specks add
a lively touch as if the cloud is playfully
living behind its essence. Now that we've crafted the
grand white cloud head, over to the color
palette and select the darker shade of
blue from the middle. Now with a selection tool
set on automatic capture the entire sky color. Once you have that, grab your brush and
let's create lines starting from the center and extending to
the canvas edges. These lines have a gentle
semicircular flow to them, giving a unique character
to the clouds lower edges. Now let's work on the
top side of the clouds. Think of it like the
little prince's hat. Create a weekly shape on top, suggesting the cloud forms. Repeat the process for the
clouds on the right side. Adjusting the size of the
bottom one if you like. These clouds introduce movement and circularity to
the composition, drawing the viewer's
gaze towards the center. That's the first step done. We've created an intriguing dynamic with the white
cloud and these new shapes. But before finishing the
white cloud with shadows, let's complete the bottom
part of the composition. Ready for the next step. Let's create a stunning
landscape at the bottom.
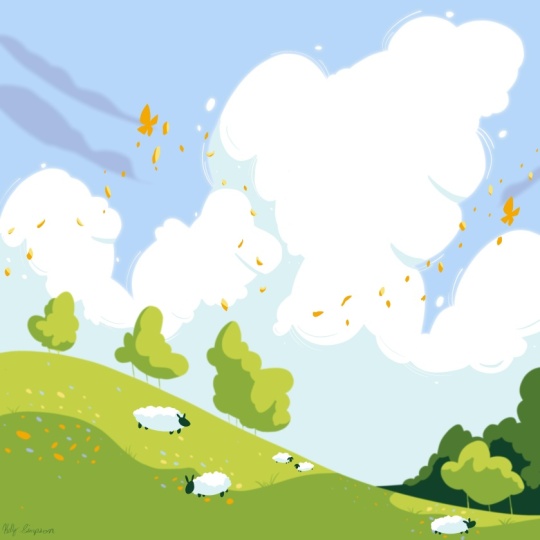
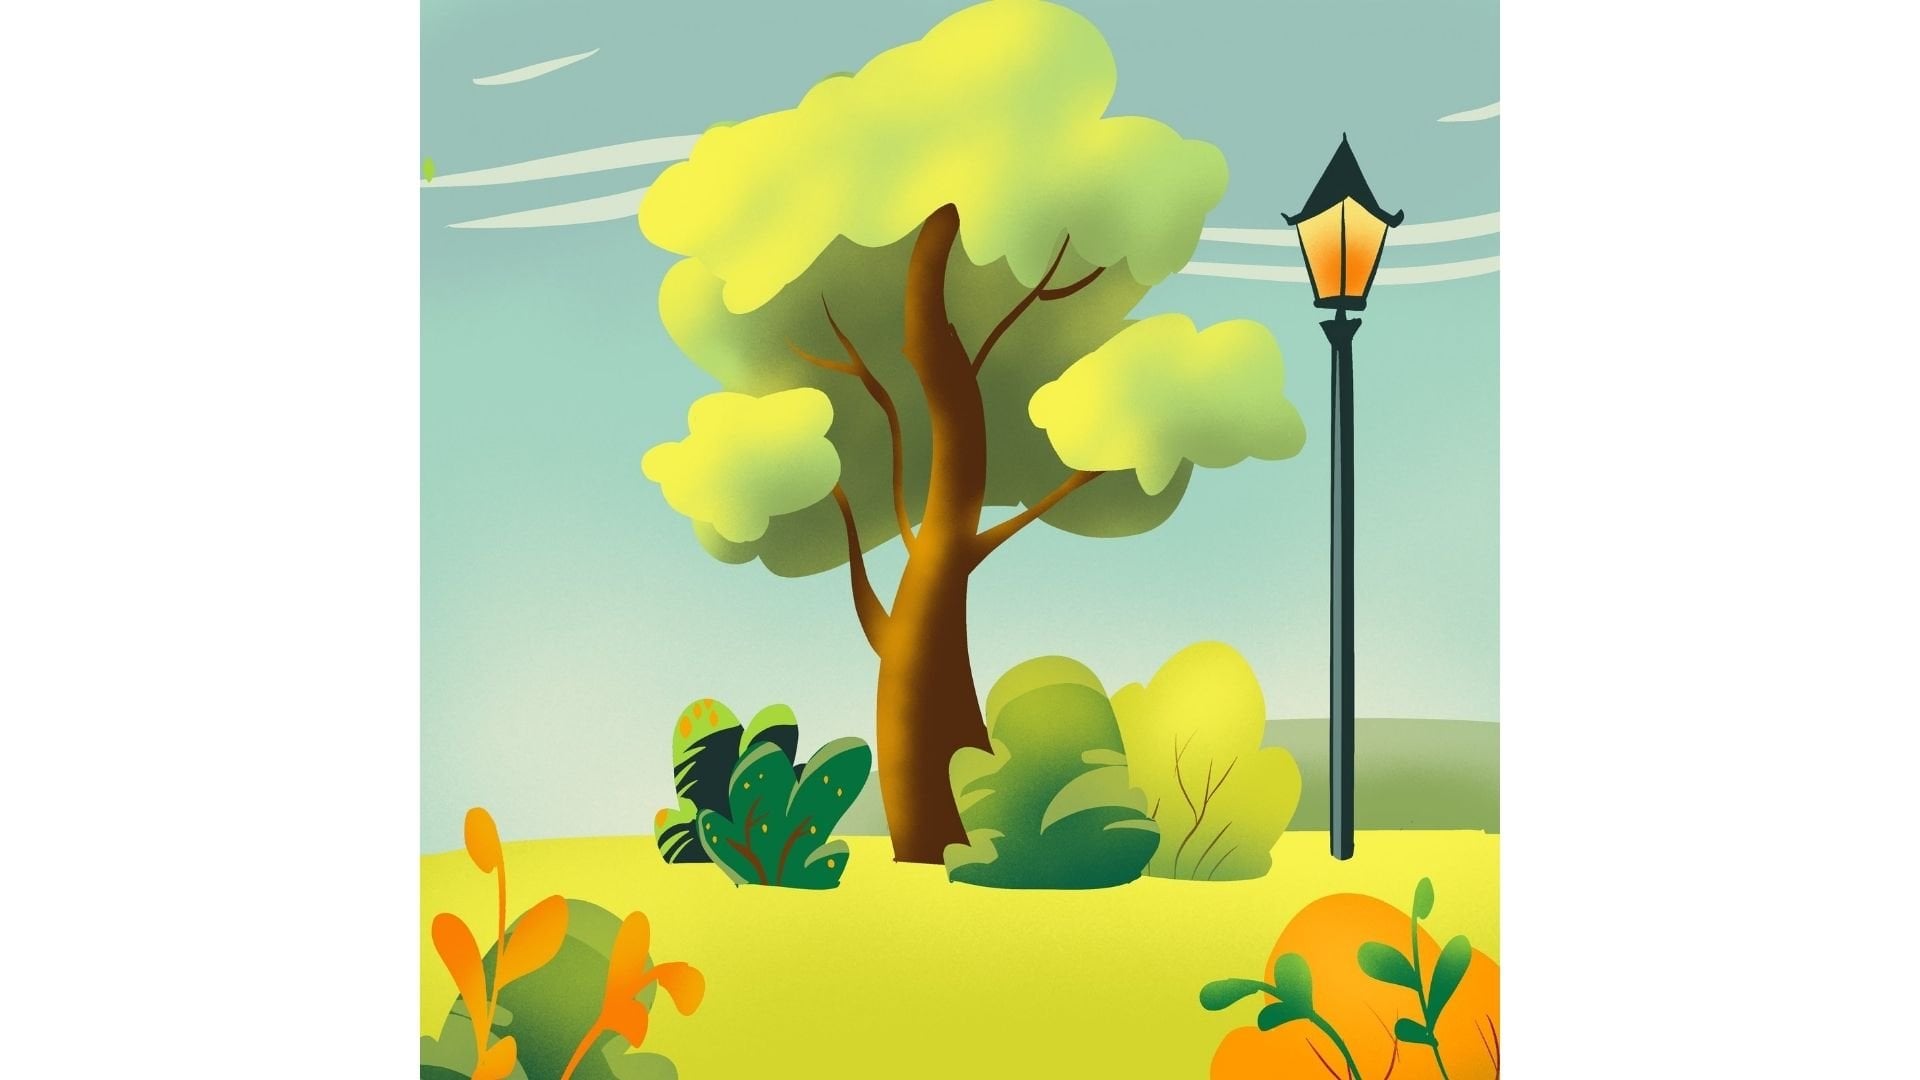
3. The Hill: The Windows XP Bliss Desktop
image stands out as one of the most iconic and
recognizable pictures in the world of computing. In the image,
you'll find a lush, rolling green hillside beneath a bright blue sky adorned
with fluffy white clouds. Looking at it just brings a sense of calm and
natural beauty. Its arrangement follows a bunch of artistic rules
like the rule of thirds and those
leading lines that guide your eyes more
than just a picture. Bliss is a wonderful example of how technology
and art can come together to make
something everyone can enjoy no matter
where they are from. In this step, we are
going to bring to life that gorgeous we've
been talking about. But wait, there's more. We are also adding
some beautiful trees to the top of the hill
to complete the picture. Perfect landscape, all following our delightful,
uneven number rule. Let's kick things off by
heading to the layers and creating a fresh one
right on top of the first. Now let's take a trip to
the color palette and pick a lovely shade of green,
the middle range. With this color, we are
all set to start sketching a simple and charming line
that will outline the hilltop. Feel free to practice this
line a couple of times until you're totally content with its grateful curve for the hill. Imagining it rising higher
on the left side of the canvas and gently sloping
down towards the right. Once you're satisfied
with your hills shape, go ahead and grab that color and feel in the bottom part
of the hills outline. Now we are ready to introduce
our charming trees. Let's dive a bit deeper
into the world of the rule of uneven
numbers in art picture. This, you're crafting a
scene, be it a painting, a photograph, or even arranging
objects in a collage. Instead of using even numbers, like two or four, going for the charm of
uneven numbers like 35 or seven can work
like magic. Why you ask? Well, uneven numbers
add a touch of dynamic energy and a dash of natural flow to
your creations. Like giving your artwork a lively heartbeat
that draws people in. When elements are
grouped in odd numbers, it creates an
interesting tension and visual rhythm that keeps the viewer's eye
moving and engaged. Let's say you're painting
a landscape with trees. Instead of placing two or
four trees side by side, try arranging three trees. See how that instantly adds a sense of
balance and harmony. Now we are ready to introduce
our charming trees. They'll be grouped into
four lovely clusters. Here's how we'll place them. The first group sits
at the bottom right, while the next three
groups find their home at the top left of the hill to
bring these trees to life. Vertical lines emerging
from the hill. These lines represent
elegant trunks of our trees. Feel free to space
out the groups a bit so that you can create the
perfect tree arrangement. The number of trees can vary. Don't worry about
the exact count, just aim for a
nice mix of trees. The foliage of these trees resembles the fluffy
clouds from above, creating a charming similarity. When you are ready color
in the foliage and voila, the first group of
trees is complete. Now let's move on
to the left side and finish the other 33 groups. We'll start with
the smaller group nestled near the
edge of the canvas. Crafting a vertical shape that adds character
to this corner. Now follow the contre of the hill to shape the
next group of trees. Finally, let's tackle
the biggest group of trees on the top. Play with the contre to create the illusions of a
bustling forest. You'll notice that
you can even spot a few individual trees
within these groups. With these wonderful
trees in place, our small forests are
taking shape atop the hill, creating a lovely scene, ready for the next step. We are about to craft a
distant and shadowy forest. To achieve this, let's start by selecting the upper
portion of the layer. Use the selection tool
on automatic mode, making sure to
capture the sky's top and the small windows
picking out from below. The trees now dip into
the palette for a deep, intense shade of green
as you continue create a new hill tucked behind the first on the
bottom right side. It's a subtle addition, barely visible behind the trees. After tracing the hilltop, go ahead and fill the entire
shape with the chosen color. Now let's replicate that cloud
shape from the background, forming a trio of semicircles representing
a large group of trees. This forest appear
denser and more distant. Begin at the hills, lower edge and work your way up ensuring the shapes
are filled with color. Upon closer inspection, you will see a harmonious pattern emerge. The serene white clouds
in the background, the forest adorning the rear, and the youthful trees
on the hill upfront. It's like a delightful motive repeated across different
layers of our artwork. At this juncture,
the shapes are set, let's infuse some color
variety to give them depth. We'll use the lighter shades of the colors we've
employed so far. Head back to the
color palette and select the lightest shade
of green available. Now let's pick the
Almon brush and use the selection tool on Automatic to select
the foreground El. After that, return to the brush and zoom
in on the left side. Three group with
circular motions, add some gentle light
to the tree shapes. Focus on the top
and the right side to create a sense of
volume and depth. Remember, when working
on these shapes, vary the brush pressure
to generate diversity. Proceed to the second
group of trees on the left and bring some
light to the right side. Now let's move on to
the bottom right group of trees using circular motions. Once more illuminate
the top side. With this, the little
trees are done, and it is time to create some light over
the hill as well. For that, you will create two spots of light
over the hill, One on the left side, on top of the hill
below the trees, and another one on the right
side, significantly smaller. Let's start by
drawing the shape of the light following the
direction of the hill. You can even create some
imperfections over the contre of this light that goes on
the hill, but not too many. After conjuring the
left side light, let's create a smaller
light on the right side of the hill under the
second group of trees. After closing this line on
the edge of the hill shape, let's make sure that this shape is closed on the
base of the trees. You will want to strike a line over the tree trunks
on the base of them. After that, you can
feel the shape of the light batch Moving
onto the left side, as you can see, we
need to firstly close the shape of this color
on the base of the trees. And then you can drag the
color inside the shape. With this, the il, together
with the trees are done. Look at how soft and
beautiful that light dances over those shapes. It's time to pay
some extra attention over the group of trees
from the bottom right side. That beautiful dark
forest reach for the second shade of green from the right side
of the palette. And once again use the selection tool to choose
the shape of the forest, including the ******
between the tree trunks. Zooming in, apply
circular motions to bring light to the
top of these trees, infusing them with a soft glow. Remember to add light
to the bottom side as well for adding
depth and realism. And just like that,
our magnificent trees are bathed into a
gentle top down light. Now that we've wrapped
up creating new shapes, it's time to focus
on the grass and add a touch of magic
with some small flowers. Let's start by grouping these flowers in three
spots of the hill, left, middle, and right. They'll blend harmoniously where the light grass means
the shadowed area. To start head over
the color palate and pick a vibrant orange
hue from the left side. Now let's create small circles on the dark side of the grass, playing with the size
for a natural look. As you move to the next spot, continue crafting
these charming flowers on the darker grass area. Remember to place them only on the shadowed
part of the grass. Don't hesitate to mix big and small flowers,
a delightful variety. Repeat the process
for the next group, adding a lovely organic
touch to the patch of grass with some flowers
scattered further away. After you are done creating the third group of
orange flowers, let's go to the color
palette and grab the beautiful light yellow
that's next to the orange. This time, you'll
repeat the process from before shaping smaller
and bigger flowers, but on the light
side of the grass, remember to place them
randomly and vary the shapes, making some of them
smaller and other bigger. Moving on to the next ones, make sure to create an organic shape for the patch
of grass that has flowers. Throw some random dots further away from the
group of flowers. Let's move on to the last one and doodle some cute
little flowers, some of them bigger and smaller, to make the illustration more
decorative and interesting. Now that you are done with
the orange colored flowers, you will create some
blue ones as well. For that, let's pick the
darkest nuance of blue from the palate and create these flowers on the
dark side of the grass, placing these small flowers
between the orange ones. Moving on to the next group. Getting closer and spreading
a couple of these beautiful, small flowers around the canvas, making sure we have shaped
variety and color variety. Take your time to find a sweet spot for these
cute bundles of color. If you want, you can add
your favorite color. Making sure to pick
a lighter nuance for the light side and a more saturated one for
the shadowed side. Let's now pick the second nuance of blue from the right side, the one that is less saturated. Now it is time to create the same blue flowers on the
light side of the grass. This will create a feeling that the light is roaming
freely on the pasture, creating beautiful color
variety around the flowers. After the last patch
of flowers is done, you will create some
small grass plates to give an extra
touch of detail, But with very little effort. Let's pick the green
from the palette, the one that was used for
the base color of the hill. And create on the
edge from between the light side and the
dark side of the grass, some small grass
plates directing them to the left or
to the right side, making sure they look cute and diverse in shape
and rather small. This is not a big grass place. Let's move onto the
right side patch and create once more
some cute blades. This is very simple and you don't have to think
too much just to break that even line created between the light and the
dark side of the grass. With this, the step is done
and we are ready to create some beautiful shadows for
our big and fluffy cloud. Let's move on to the next step.
4. Cloud Shading: Hey there. In this
step we are going to work on the shadow
side of our cloud. Remember when we shape
the cloud earlier? Well, we are going to repeat
some of those fun steps. We'll make some semicircles, add contre lines, and sprinkle in some little
cloud specs around. This step is like
what we did with the light part of the grass
in the previous step. Just like how we made that line, to bring out the light
side of the grass, we are going to do something
similar for the cloud, but this time we'll fill the bottom part with
a darker color. Now let's focus on the
bottom layer of the cloud. Grab your selection
tool and select the clouds shape,
ready? Awesome. Now reach for your
brush and choose that lovely light blue
from the color palette, the same one you used for the pretty blue flowers
inside the cloud shape. Let's get creative. Again, make some more
of the semicircles, just like we did before. This will cross
the clouds middle, adding a cool dark side
and a bright top side. Let's head to the right side of the sky and finish
with a wiggly line. Before we fill the cloud
with a darker color, let's add another
semicircle line to the left side of the cloud. Remember it should stretch
from one end to the other, staying away from the top to
keep lots of white cloud. After those contar
lines are done, pick up the color from the corner and fill the
shape on the bottom. Take your time and shape
those beautiful clouds. Big and small variety is
the spice of cloud life. Now let's create
some little shadows under the big cloud shapes. This will be like the
clouds under sides draw short curved lines under
some of the big clouds. Looking good so far. Got your white color ready. Tap and hold on it. Then let's make
those movement lines we did in the beginning. These lines will go over
the dark part of the cloud. Make a few of them but
not too close together. Adjust the brush size to make the lines that feel
just right for you, move around a bit, find new spots to draw
these gentle lines. This adds a bunch of
life to the cloud. Guess what? We are not done yet. Use that cloud
color again to add some small spots on the
shadow side of the cloud. Just a few here and there. To make the cloud look
even more interesting. Look at that big
cloud you've created. It's got a cool
shadow underneath. Making the sky colors blend
beautifully is like a piece of art in the middle of the sky adding complexity and charm. But hold on, there's more. In the next step,
we'll add a touch of color in the front
of the illustration. This will make it
come alive with a sense of energy
and creativity. Get ready, because
we are about to draw some flying flower
petals across the sky.
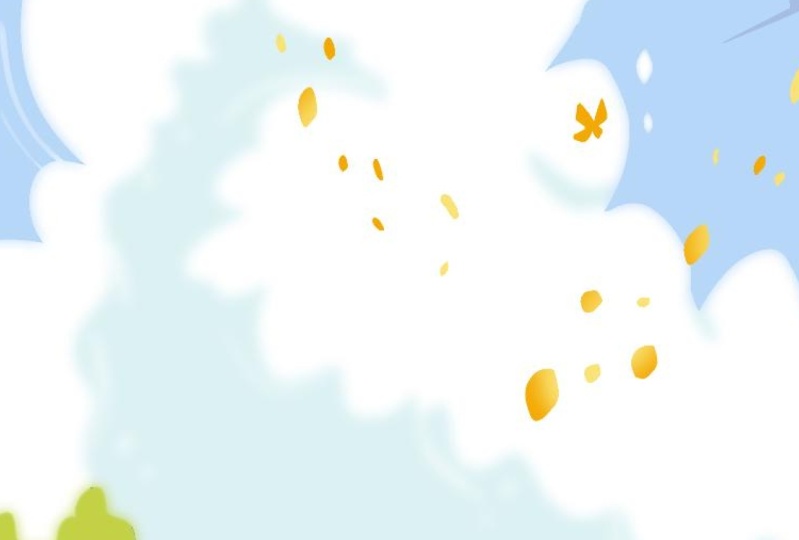
5. Drifting Petals: In this step, let's create some lovely petals that
will adorn the sky. Your journey with
these delicate petals will take you across
different cloud shapes, drawing attention towards the
heart of the composition. To begin, we'll fashion a beautiful line
resembling a clouds shape. Using gentle curves that
capture the essence of wind, air, and open space. To achieve this, we'll
start by selecting a beautiful orange color from the corner of the color
pallet on the left. Next, head over
to the layers and create a new one atop
the existing ones. Once the new layer is set up, begin from the left
side of the canvas, moving towards the middle and
upwards craft some petals, each with its own
unique direction, form a variety of shapes resembling these graceful,
free flowing petals. As you approach the
middle of the canvas, guide the line created
by the petals downward, forming another exquisite curve. Upon completing the lower side, retrace your steps with the
petals gradually decreasing the size as they ascend towards the upper right
corner of the canvas. With the first line
of petals finished, focus on two particular spots
to add further interest. These spots, one on the bottom right and another
one on the top left, are perfect for a few
additional petals enhancing the lines appeal. Now let's introduce two
small charming butterflies, amplify the sense of
aairness and openness. These butterflies will have
wings shaped like triangles, with the upper triangles being larger and the
lower ones smaller. These distinct
triangles converge at a single point in the middle, creating a simple,
yet pleasing shape. Adjust and refine the shape until you're content
with its appearance. Proceed to create
another butterfly above the cloud where
it meets the sky. Once more, arrange
the triangles. A sizable one on top, a smaller one beneath, and another small one beside it, connecting at the center. This arrangement resembles
a delightful bow tie. Fill these beautiful shapes with color to complete the butterfly. Now let's revisit
the first butterfly and refine its shape
to achieve symmetry, mirroring the second
butterfly's appearance while the petals are
nearly complete. Remember that light plays a crucial role in
defining shapes. To incorporate this, select
the layer of the petals, activate the alpha
lock for this layer. And then choose a soft yellow
from the color balled. Moving closer to
the larger petals, apply a gentle wash of this
delightful color over them, leave a hint of the original
orange beneath the surface. The goal is to create a
subtle contrast between the dark sky and the vibrant
yellow of the petals, making them stand out against the background of
the sky and clouds. With that, this step
comes to a close. It has been a
delightful experience working with these dainty
petals in the air, Choreographing a beautiful dance between the fluttering
butterflies, the gracefully drifting petals. Now let's transition to the next phase and infuse
a touch of the clouds, hue into the heels, crafting adorable
little sheep that will frolic across the
lush green pasture.
6. Grazing Sheep: Sheep are like these cute, fluffy bodies of illustrations. They often team up with the sky to create cozy and
heartwarming vibe. Think of sheep as
these adorable symbols of innocence and simplicity. Just like when you
see a clear blue sky, it instantly makes
you feel at peace. When you picture sheep munching on grass beneath the open sky, it's like nature giving you a warm hug and saying,
hey, everything's alright. Next time you see sheep
and the sky hanging out together in an
illustration, just remember, it's a heartwarming reminder of how the simple
things in life can bring a smile to your face and make the world feel like
a friendlier place. Step by step, let's create adorable little sheep on the hills to bring a
touch of the cloud like color to the front side of our illustration and
down to the bottom to begin head over to the layers and add a new one above
the existing layers. Once that's done, open
up the color palette and select the white color
from the top right corner. Now let's focus on
the bottom part. To start create four oval shapes on the left side of the hill, place one under the trees, another where the light meets the darker side of the greenery. And two smaller ones
in the distance. To add depth and variety on
the right side of the hill, Let's craft a larger shape
to keep that delightful, uneven number pattern going. Once the ovals are set, take your time to fill them
all with the chosen color. With the almond brush, use it as an eraser to carve out cute semicircles within
the oval shapes, especially at the top, mimicking the clouds design. On the bottom side, you can leave the ship rounded, but at the top create some gentle Ns to
make it look fluffy. Now let's refine the
shapes by adjusting those at the back to make
them appear more natural. Move on to the one on the
right side and play with its oval Conchers will define some wool texture
and enhance its fluffiness. Feel free to sculpt the
shape to your liking. Stepping back, you'll notice the lovely cloud color now
extends to the bottom, as if small clouds are
wandering through the grass. Once the woolly side of
the ship is complete, it's time to give them little
faces and floppy ears. For the faces, we'll use a dark green from
the color palette. Don't worry. This shade blends seamlessly with the rest
of the illustration. Starting from the left, create two small ovals at one end of the
oval for the ears, then add a slightly larger oval below for the nose
and the mouth. Repeat this process
for each ship, making sure the ears are
linked smoothly at the top. As we move to the ship
further away on the heel, adjust the shape of it. Create curved down ears and form the nose for the
ship in the background. Simplify the head shape, keeping in mind that our minds naturally feel in
details from a distance. Finally, for the
ship on the right, create two oval
shapes for the ears and connect them with
another oval for the face. This ship seems to
be gazing skyward, perhaps admiring the scenery. Now it's time to add some little legs to these
adorable creatures. Use the selection
tool on automatic to easily select the
areas around the ship. Then use the brush
to create legs. For instance, near
the last ship, add short and stumpy legs, both in front and the back. As for the ship in
the background, add three tiny legs and leave the last one's belly untouched
since it's less visible. Now let's add a touch
of shadow to the wool, just as we did for the cloud. Start by selecting
the wool shapes using the selection tool. Then using the brush. Choose a light blue shade from the sky and create soft
shadows under the ship. Remember to blend and play with textures for a realistic effect. For instance, the ship
on the left can have a larger shadow because it's
under the clouds shade. Likewise, apply shading
to the other ship. Let's take a step back and approach the ship
from the right side. This way we can cast a large
shadow on its left side. As you zoom out, you'll
see the beautiful result. Clouds and ship harmoniously
enjoying the hillside. With that, our delightful
little sheep are complete grazing
peacefully alongside their cloud companion
and lush heel. As we wrap up this illustration, let's play around
with the layers to create a sense of
light and perspective. To begin access the layer
and choose the cloud layer, go on to the selection
tool and set on automatic. You will want to select the sky's color once
you've made the selection, ensure you have
everything chosen. Now head over the
Adjustments menu and click on the
Gaugan Blur option. Gently slide your pen or finger to the right until
you hit around seven or 8% This will give the cloud a
lovely halo effect, softening its edges and
making it brighter. Turning our attention
to the hills layer, repeat the process, access
the adjustment panel, find the gagen blur option and notch that slider
to the right at about three or 4% This subtle adjustment
will lend the softer, more relaxed conter to
the trees and the hill, allowing the little ship in the foreground to pop out
beautifully over the hill, making them even more prominent. There you have it. Our
illustration is now complete. Thank you so much for
joining the class. I truly hope you had a wonderful time crafting
this scenic landscape. I'm eagerly looking
forward to seeing your projects and hearing your
thoughts about the class. Once again, Thank you
and until next time.
 Cristina Handrea