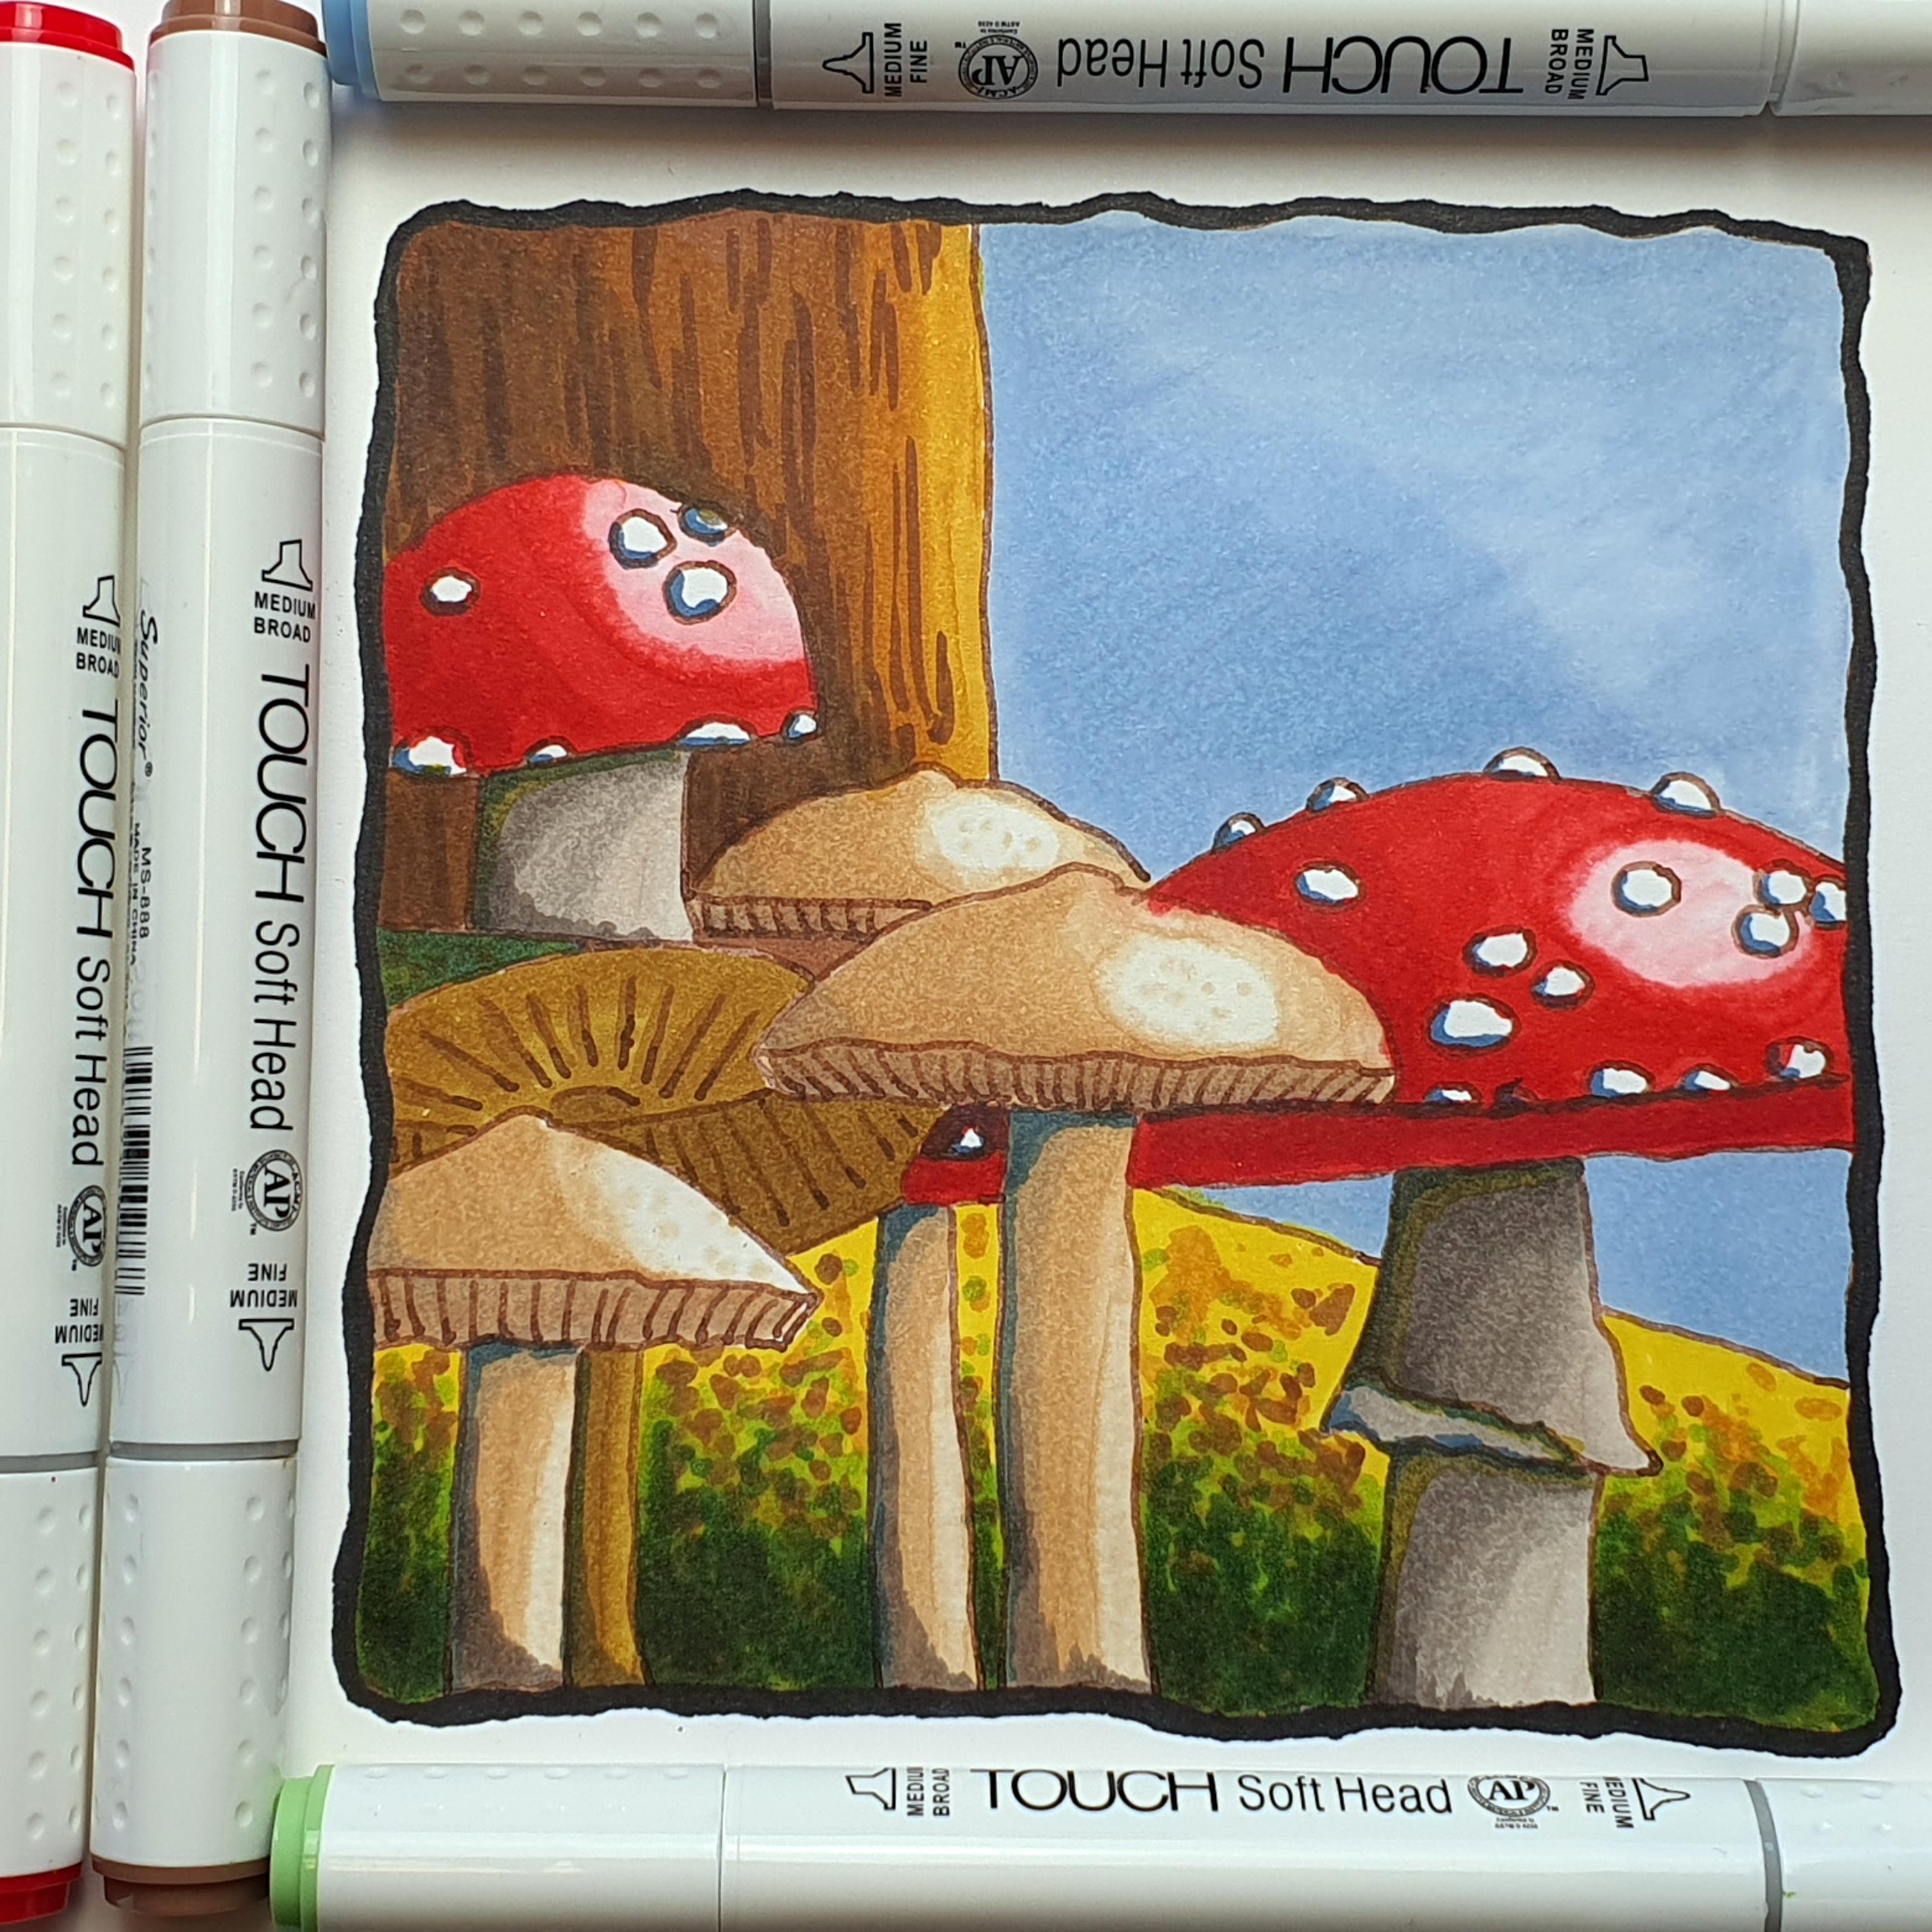
Transcripts
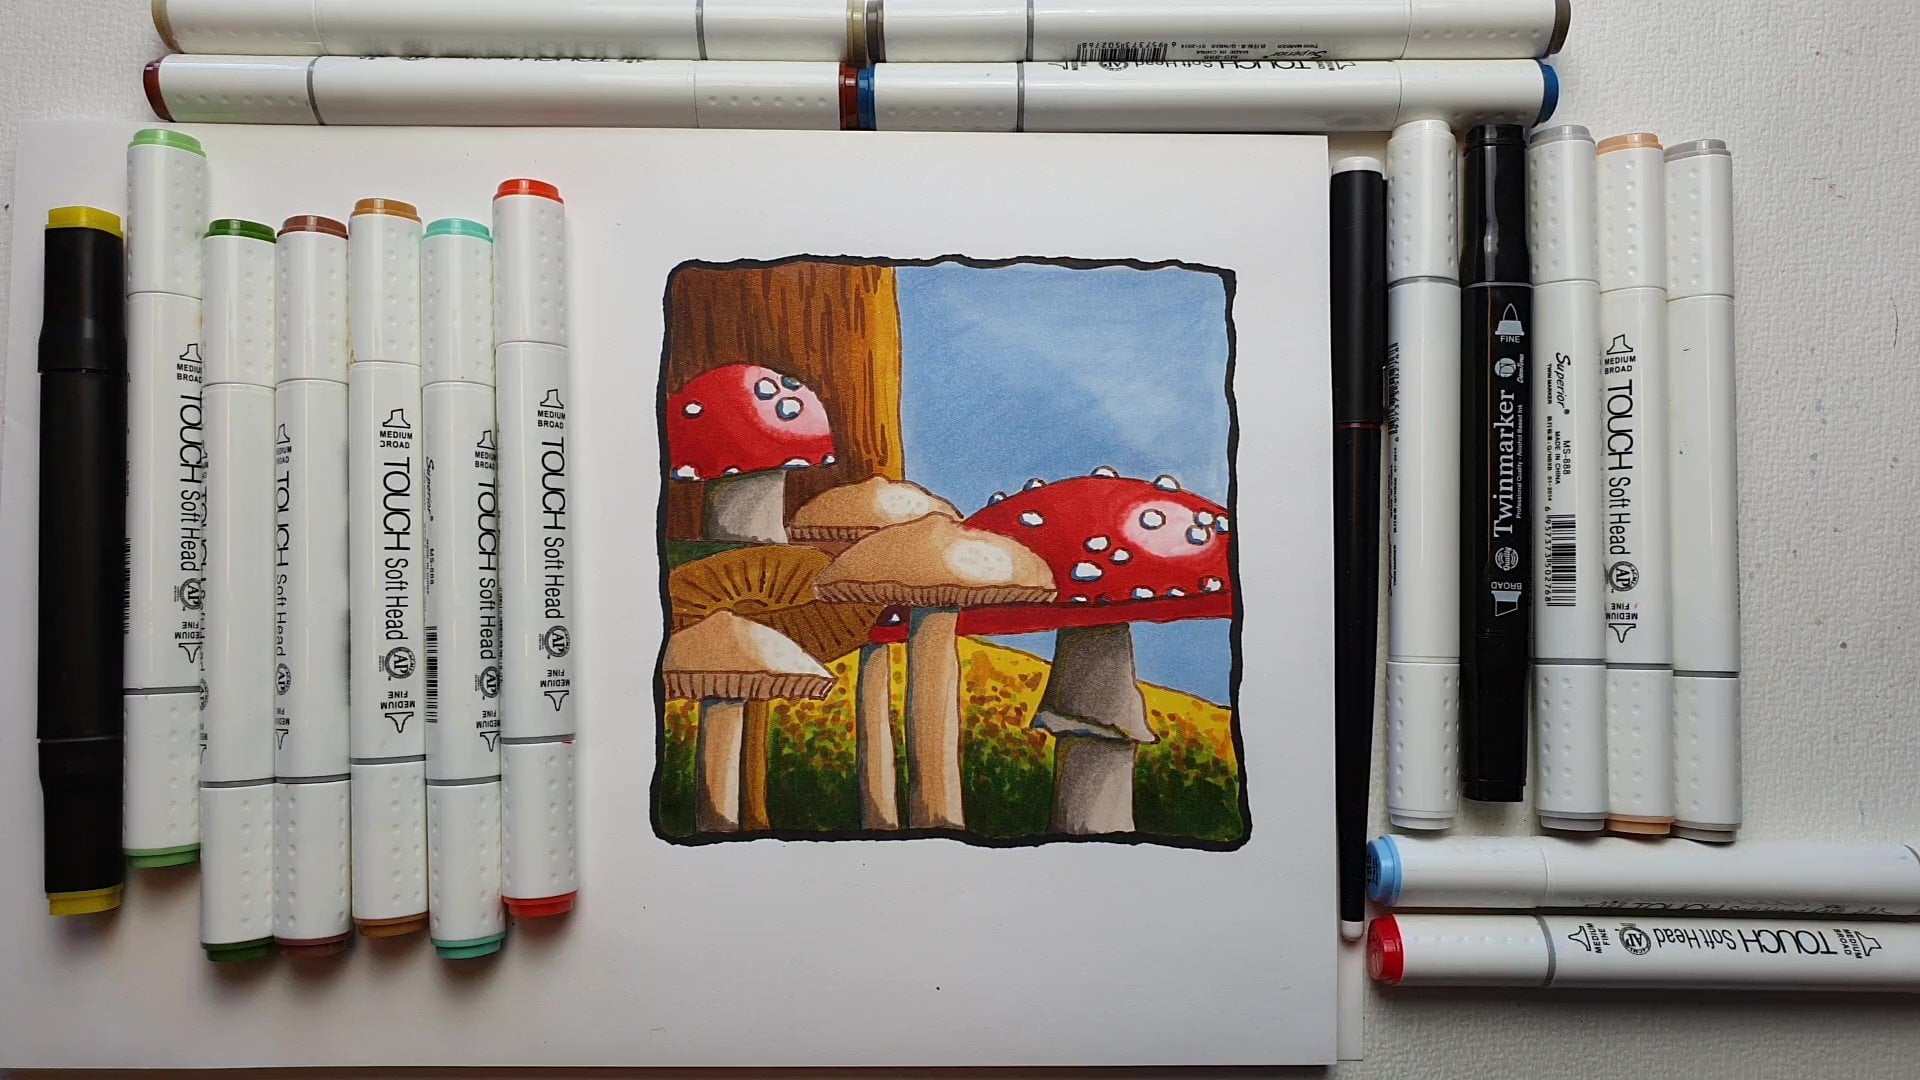
1. Introduction: We're going to have some fun in this session of from idea to finish illustration. And we'll have some fun with a brush pen, really fun to use. I'm just gonna show you some techniques. Maybe not every day techniques people use, just my techniques are used and we are going to work on this illustration. And this is indeed a session belonging to the art class from idea to finished illustration. And if you haven't done those previous sessions, I encourage you to do so. Just watch them, do them. And then once you have done them, and especially once you have created this image, show the final image and the shaded image. Now I'm actually going to use this one. Once you have these, then you're ready to go with this art class, this session of that art class. What we're going to actually bring that idea to life with a brush pen. And I'm going to show you various techniques, how to use the brush pen, how to get the effects in it, and just how to have fun with it. I would say join me and let's have some fun with that brush pen.
2. The Materials: In this video, I'll be showing you what you need now. Most important things you need up paper, I'm you sketch paper. You could use watercolor paper, a regular copy paper, mixed media paper, whatever paper you like, and you need a brush pen. Now, I'm using a core attack, a number 13 brush pen with these has some hair, some synthetic has. What love people use is, this one depends on pocket brush would work fine to bit similar. You could use this really small that is also a signature brush. What you need is a brush that will be bit flexible and which you can Like this, push a little bit. And so if you have something like this one, the fabric Estelle and this is an pits artists brush still would work. Though it might be a bit more tricky because it's not as flexible, but that would still work towards us at paper, you need that pen and you need, let me see two drawings. You need to have this finished drawing and then transfer it to the paper we're going to work on. And then you may need a pencil eraser, a brush to get rid of the erase rubble, and maybe a sharpener. And you're going to need either DIS, finished liners, shadow drawing for this finished live and shadow drawing and all these drawings we've made in previous sessions. So you could always go back there. And if you have done them, then you have these and we can work them. You transfer your finished drawing to a paper. I'm not going to demonstrate that in this video, there's a different video, the different session for that. But once you've done that, then you can just come along with me and we're gonna have some fun with a brush. Pumpkins brush pens are really fun. I think that's it. Yeah, so kinda paper, brush, pen and transfer that drawing and then you're ready to go to the next lesson.
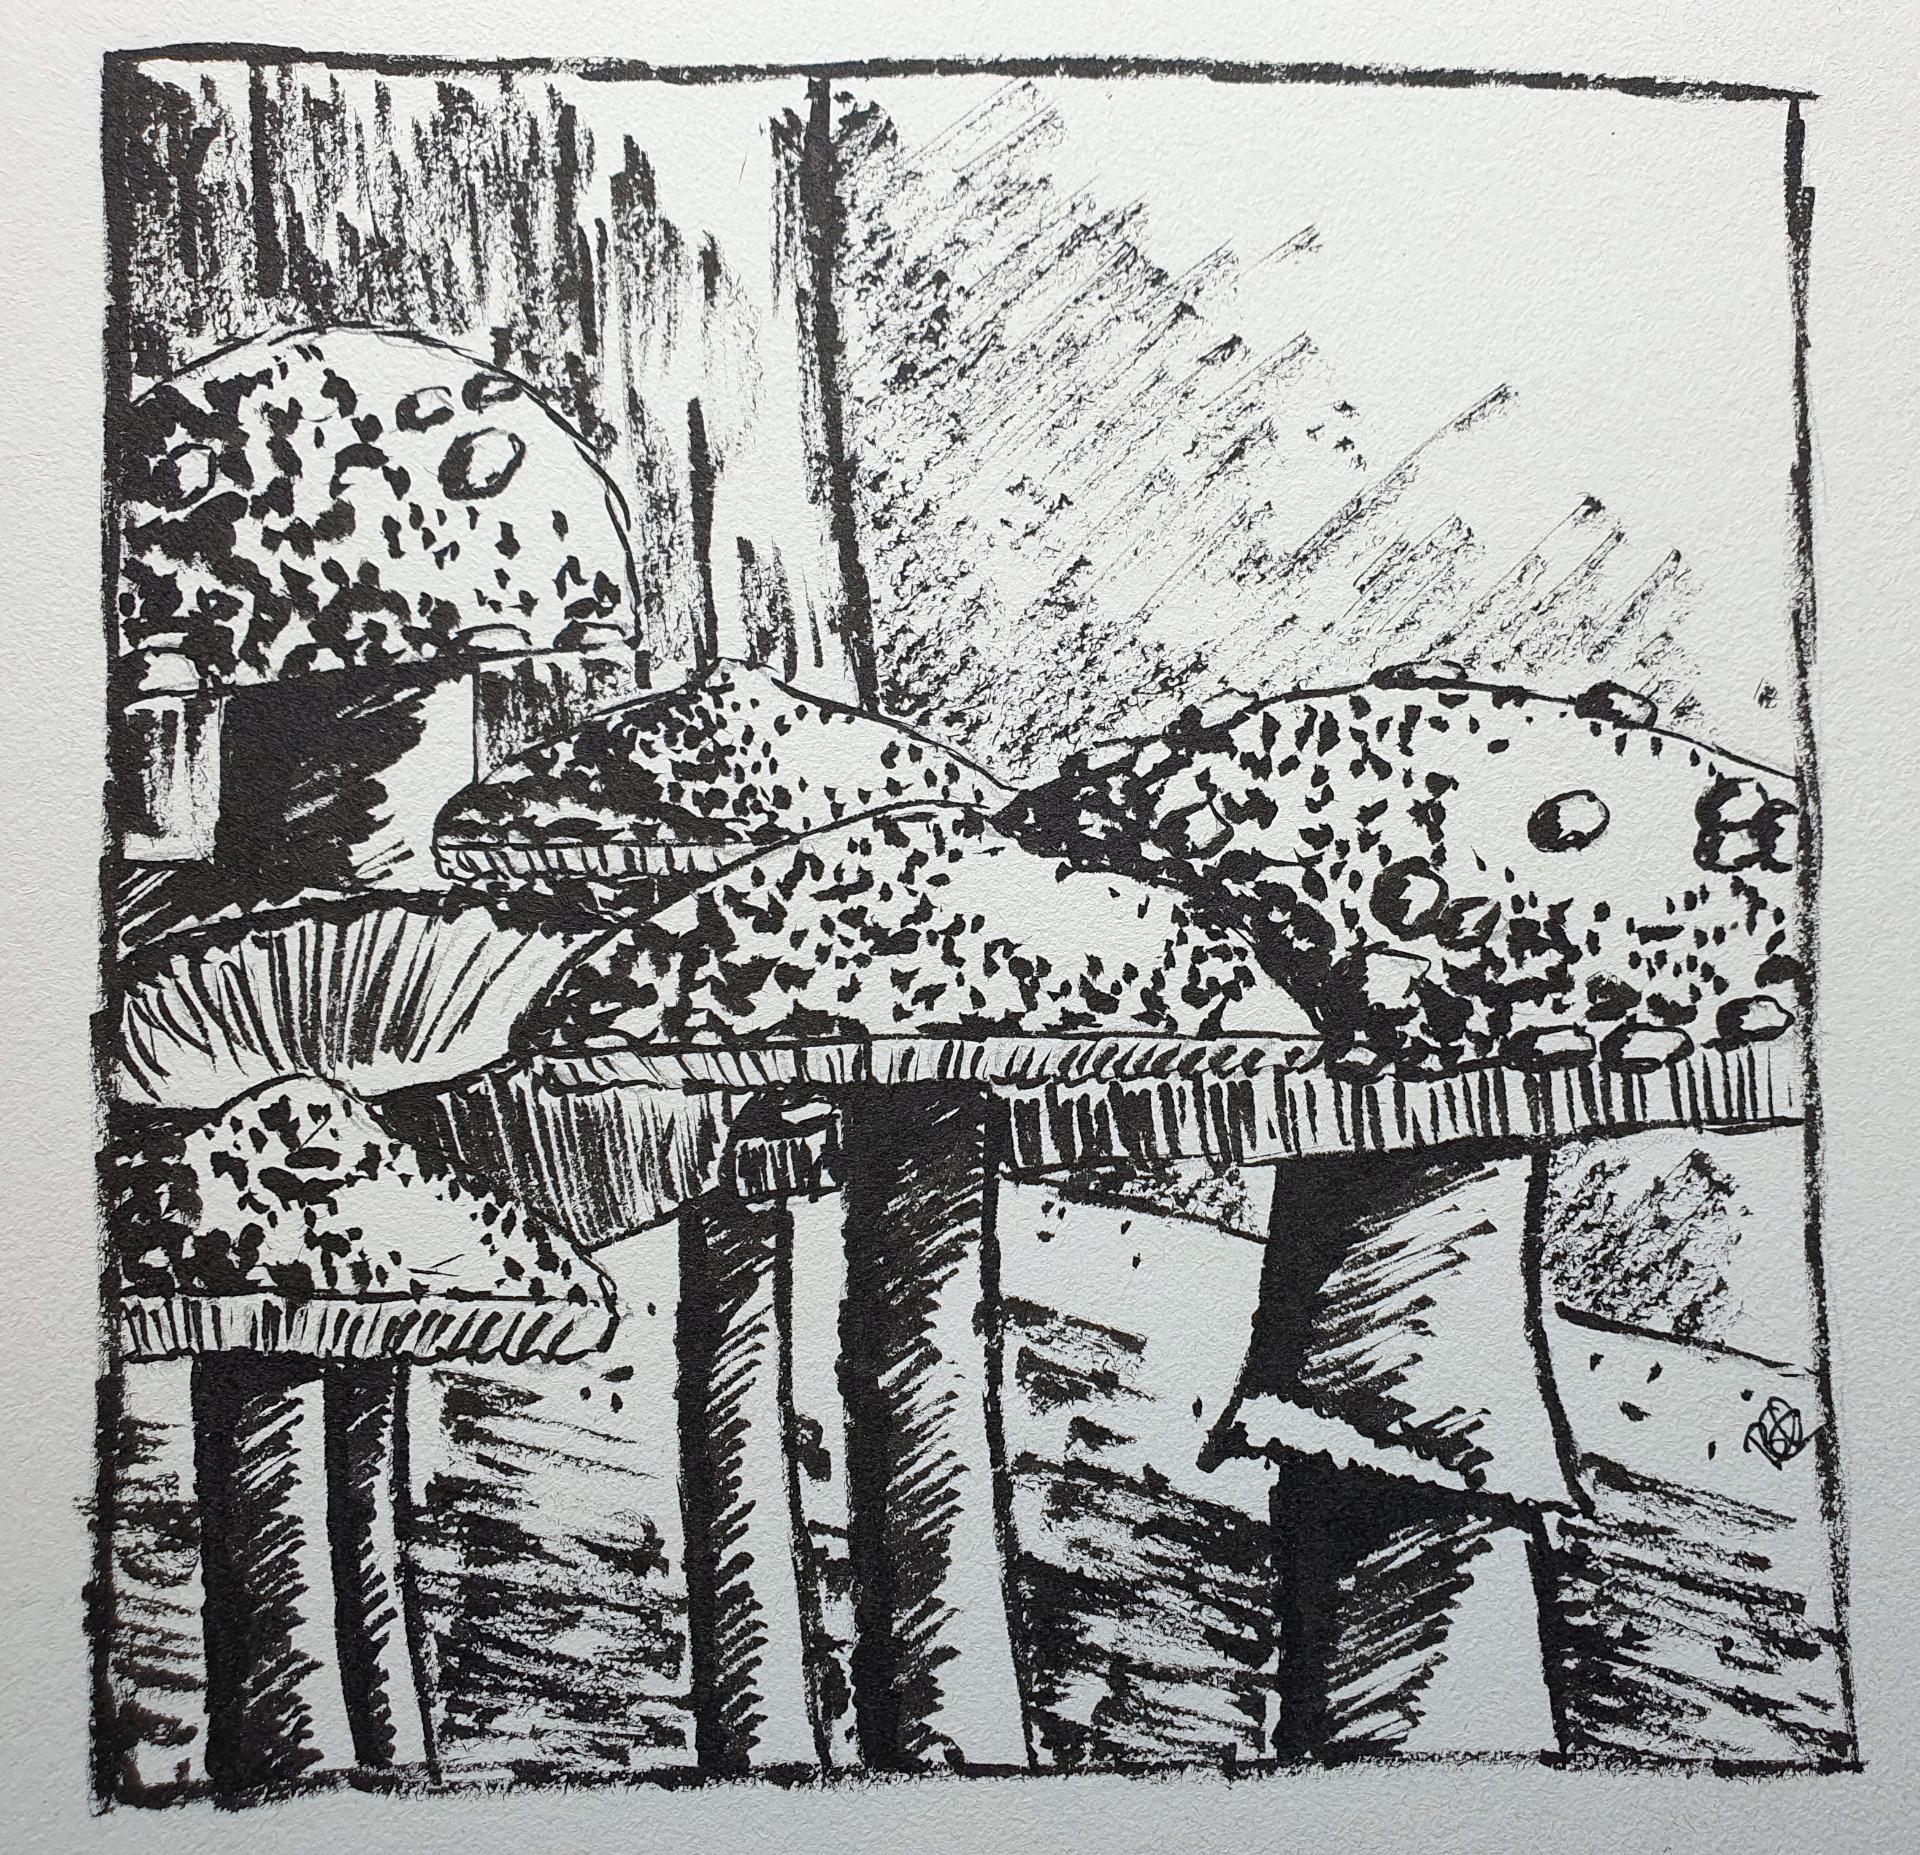
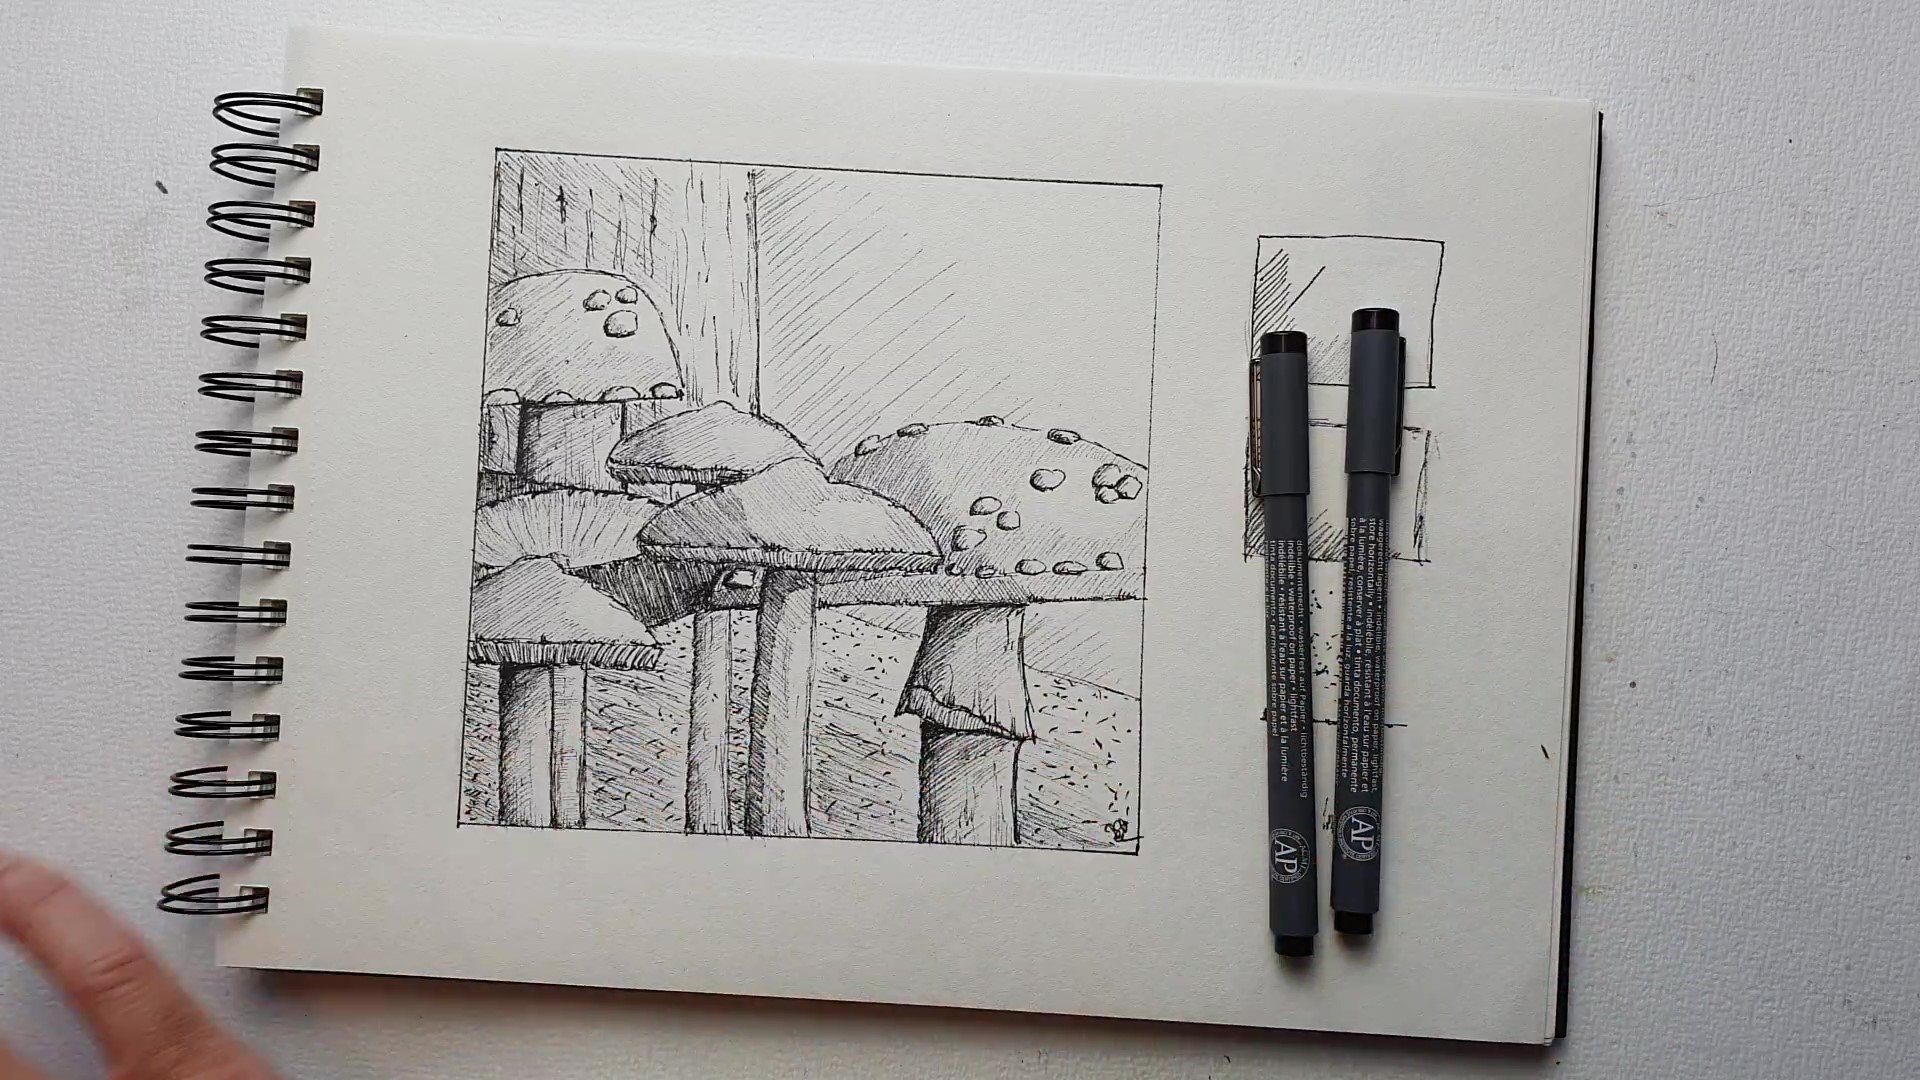
3. Outlining with a Brush Pen: Welcome to this video and we're still working on from idea to finished illustration. And the next thing I'm going to use this brush band now I got a few press brush plants is seen in the materials. I'm picking this one, the query attack a number 13. And we're gonna work with that one. And let's see what do you need? You need to first have this drawing. We made that composition and you need to transfer it to another paper. Or yes, you can work on this one too, if you wanted to do and fill it in and then erase it. But if you want to do one of the other projects, then you're going to have to do it all over cancer. I would keep this one transfer to another paper. And as you can see, I did it quite roughly. And that is fine. And what we're gonna do, this first video is take a look at this brush pen. Now, a brush pen is of course a brush pen. It has a brush obviously. And the nice thing about brush pen is you can go from thin to very fixed for lumpy demonstrated, I'm doing some really thin lines here as Phanerozoic and get, and to get thin lines, I'm holding it straight so that it only touches the edge, sorry, the tip of the pen, Not the edge. And I'm not pressing. I'm just doing this very unlikely and other pending on the brush pen you have, you get either thinner or thicker lines than I have. And if I wanna do a bit in between Einstein to press a little bit, you get this effect. And if I want to go really dark, you get this effect. And depending on your brush pen, you might get this effect at the end. Dry brush they call it effect, looks really nice. When the ink runs out, you get that effect. And we're going to use this. What I'm gonna do is I'm gonna do the outlines from this whole drawing as lightly as I can. And then we're going to shade it. And for the shading, we need that finished shading image that is in another lesson. If you haven't done that less than I encourage you to go back to that one and get this drawing, either this one or this one. And I'm going to use this one as a guide. So we had the hatched one and the shaded one because we're going to get closer to this one with the brush pen. All right. That's it for this, we're gonna do the outline industry video. So I'm going to just work from my right sorry, from my left to my right because I am using my right-hand. If I would use my left hand, I would go from the right to the left and that is simply not to smudge. If I go over this, this is a smudge because this ink needs a bit of time to dry. So I'm just kind of start right here. And as lightly as I can, I'm going to sketch this n now, sketching is, she can see you have two ways. You could do one line like this or you could do it a bit like that. Interrupted a little bit, and I'll leave that up to you. If you wanna do continuous lines like this, you could kind of take a bit more control. And if you do sketching agendas, follow me along with the sketching. And I'm just sketching it in as lightly as I can. And this is going to be, as you can imagine, not a nice accurate drawing. This is gonna be a rough drawing, which makes it pretty cool though. If you do it. If you have nice rough drawing. Let's see, let's do this one. And I'm going to put in a little bit of an edge like that, straight edge, but a bit of a edge like that. Let's see, underground is under here. Then we have this toads to now's not hostile fungus behind it. Now I need this line first. I got that one. And I need this line first two. So I cut that. And now I've got to be careful if I go back and I'm not going back yet, let me then do this bottom two. And if I go back down, I'm gonna smudge everything. And I might just as well pulled in tos once the Hager, alright. And let's see, I might do to bottom and the bottom here and these problems here. Later on. Let's do the edge now let's do the action that I'm gonna do that roughly to pressing a bit harder to create a bit of a thicker edge like this. Alright, now I need to go there. Okay, that's my edge. Now we need to wait for it. A little bit too dry. Secco over this, then I'm gonna smudge that. So I'll be back in a second. Okay, my ink should be dry. So the nice thing about video is posted. In real life. You just have to wait while this is real life, but I can do some pauses during this edge. And as you can see, I'm doing a bit of a wave, not here. Alright. Let's do. This side. Has a white spot there and there's this pot of fungus. Then we have this part of that fungus. Alright. And then this, okay, I need some there too, but I'm doing that later, letting this dry first supporting those white spots so that I know where they are. Okay. And then this one here. Alright, and I said, I'm trying to not to push and keep it as high as I can, so don't push it down on the paper. Tear you go. Do roughly scribble that into and the same air. And there you go. Now I just need some Florida. Good. Okay. Let's see. Missed a little bit of a line there. And I missed some here. I'll go this way. I should be able to bring that in and do that straight to, alright, okay, that will be my basic drawing. Let's see. We need some markings on the tree. Let's put them in a little bit. Okay. And the floor. Now let's leave the floor for now like this. Alright, that's it. For this one. Let's see, bringing up this a bit there. And we're leaving this too dry and you can draw a two if the brush pen, so do it as likely as possible, depending on your brush pen, you get either very thin line, you could get really, really, really thin lines if you wanted to like that. But I will take a lot of time. So you may do to slightly thicker as I have done, but not like this stuff. Okay. A fun, I'll see you in the next video.
4. Shading the deep shadows: You have this. And then we need to go to this. Once you can do now is what you could, you could bring with your pencil all these lines in where the shadows are. I'm not gonna do that with this one. I'm just going to make sure I'm not touching certain areas or be an interesting challenge. What I'm gonna do, I'm gonna start with the stems first. And what I do, I bring in that shadow. And I'm just going to press with this pen. And I'm gonna paint. Now. I'm painting more like Dad. I want that nice dark shadows around there. If you have drawn a line, of course, you follow that line. All right, that will be here to now. I really need to make sure that I am not going to touch certain parts because diseconomies smudge terribly. Alright, here too. I'm just doing the same here. Painting in some shadow. And I'm doing this a little bit playful. And the more of these kinds of shapes I get, the more interesting this will become. Now this doesn't have that same shape as you can see here, but more a straight line. So I'm going to put in that straight line there first. Same here. But make it a little bit playful like that. All right, and let's do that with this too. At some playful edges. This one, we're gonna go up here again for sure. And I'm using it as a paintbrush. That's the nice thing about this kind of pen. You can just paint with them. As you can imagine. Costs a little bit of ink to do that. But hey, it looks fun. It is fun to do. Alright, and here I'm going to make sure I'm painting it in, but I want to keep some of that rough edge alive. And now I'm painting it in like that. Alright, it's good. And even if I go over my line, that's not a big issue because just looks pretty cool as add a little bit there too. So now I've got some nice deep shadows with it. Haven't die. Okay. And those are the deep shadows you would get. Now, would there be more deep shadows? Pretty much not. So I can go up here, this is not dry. I can see that this dry, so I'm going to be carefully going in here. Now here, I'm going to use prince, not as hard as I did. And leaving some gaps in for that. And I'm doing it like that. So more like I've done here. Here. I'm not pressing hard, I'm hedging a little bit, but once in a while, I'll just press a little bit extra to get that depth in it, but still get a nice transition. That's the idea from light to shadow. Now if you have followed and you align at Pitt debt and then Kent that light down here. And I'm just following, I'm looking at my picture which is right there and I can see what I wanna do here too. I want to bring in that light a little bit. And there you go. That's nice. Here, a bit more. Now this one too. Let's bring in that light. Go all the way there. And let's do the same here too. Okay, and let's bring in that light. Nice, I get a nice dark, deep colors with it. And I'm not colours of course. But you get the idea. Pit there too. All right, that would be the easy part supported away. That is the easy part, definitely. And we're going go, gonna go up here, do these paths, and let's do another easy part. Another easy part would be, so thin. Adds these edge is a little bit here too. Alright? And do these two. Just a bit of a shadow, etch it. Okay. Go nice. And I'm going back here. Shit out under it's only fair to shadowed at K. And I forgot this one. Let's do two. Alright, that's dead. Okay. And let's see. Let's for now, stop here and I'll let you do that. Then this can dry. And I'll say, once you've done that, I'll see you in the next video.
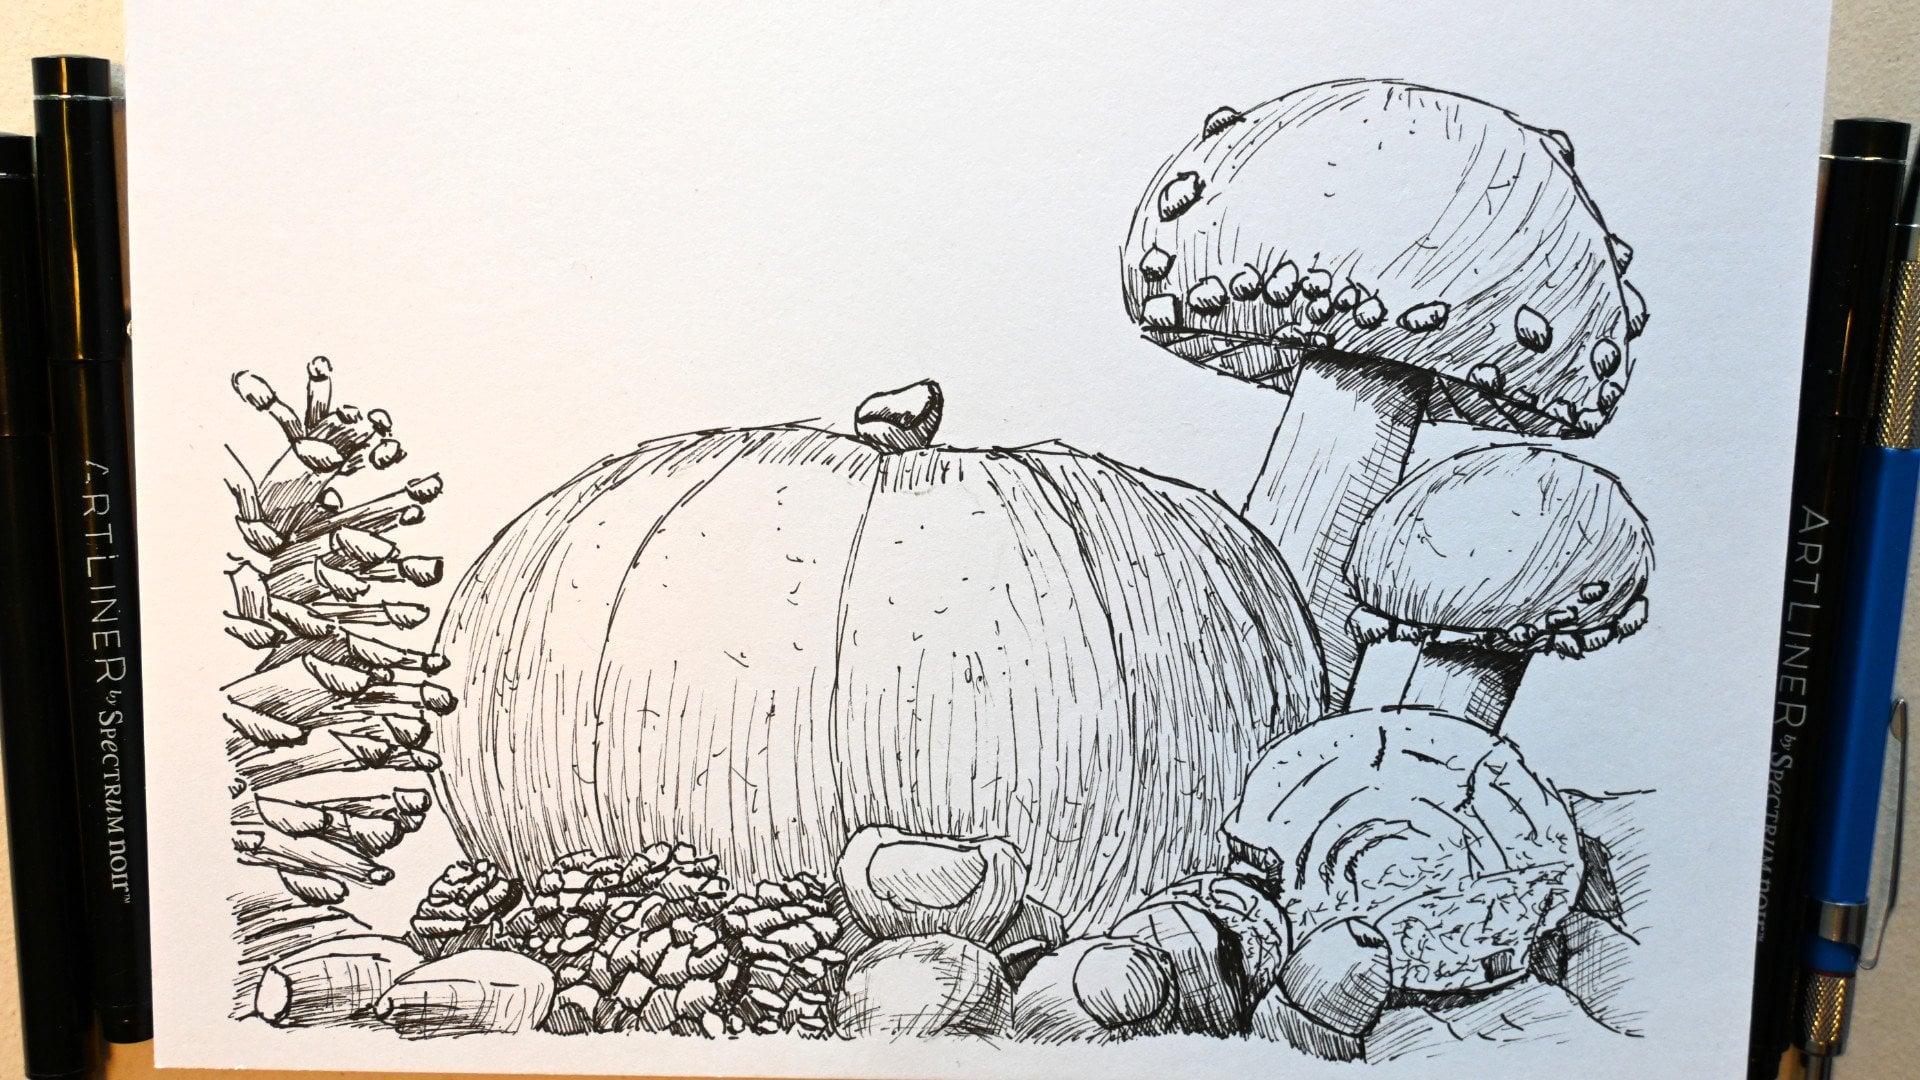
5. Shading more tones: Next step, now we have this and I was just looking nice, but this is definitely nowhere finished. So we're gonna go up here again. And what I want to do that lies highlighted areas there. So I want to create that midtone ended DRM, that core shadow. And of course the easiest thing is to start with as core shared about what I want to make sure I don't want to go dark as there. And what I'm gonna do for this, I'm going to use slightly different techniques and let me draw a little box. So what we've done is we've painted like that and you get that nice deep shadows. What we're gonna do here, we're gonna use this, we're gonna press C. We're going to get that effect and we're going to leave spots in it here. So I'm pressing down my brush like that. And then when I get to my core shadow, I'm gonna do that very lightly, sorry to my midtone. I'm gonna do that likely starting with the core shadow here. Now if you have done the lines, then keep the lines. Keep your eye on those lines. And we'll start here. I'm going to press nice and thick like that. And I'm going to create that edge myself here. And now I'm going to go carefully, a lot thinner. And I'm gonna do it like that. Okay? And keep those white spots in it. And I'm doing the same here around that core shadow. And then I'm going to go and I'm checking. Alright, and I keeping an eye on my picture, I have where you can't see it. Alright, this one, let's do the same at that core shell around here. And I want to have and round lighted area there. And I want to have a lighted area there. So I'm gonna carefully, Finley, do this n. Okay. What are we doing next? We're going to do this one here. Same recipe that has a big area there. So let's start with that core shadow, pressing the brush a bit. And now I'm going to do the same, but I'm pressing a lot less around the edges, a little bit. And there you go. And that is an x one. So you get a nice, interesting effect. It could have painted it all into, but then you just don't get this difference between everything you could have used hatching to. You could have done that five demonstrated here to your box. If it is, you could have gone to, you could have used that. But this way, we're going to use just a slightly different technique, get a different effect too. And we want that here to see that goes around. There are some pressing really hard, really hard. I'm pressing a bit more to get that effect in. And the rest, I'm gonna do a lot more lightly. And I want to create that's lighted area there. So let's make sure I'm not touching that. We'll do a bit more around this edge to get that away. Good. All right. And now I have this bottom here, and I'm going to do so straight lines like this. Okay? And I'm not going to touch this and we're gonna leave these light as they are. And I want this to be a bit dark. Now you get that effect. All right, we've got those, we've got these, we only need this one. With this one, let's do the same as here. Paint that in straight lines, but not overlapping them completely. And we need to bring in some light here too. And we're gonna do basically the same. We do it like that. And let's go on the edges. Follow the edge, paint that in a little bit more, and do that on this edge E2 and here too so that we get a different arrive. Let's leave that like this. Okay? So we got most of it. We now only need to shake that tree and the ground here. And what I'm gonna do if this ground, OK, let's do it like that. That's good. Now let us see the ground. What we're gonna do that I'm going to put my brush down a little bit. Paint that in, as you can see, very flat. And letting that brush touch the floor lightly, creating this effect. You may want to practice this here a little bit. You can see I'm happy touching the paper. I'm painting theory very lightly, as lightly as I can do. Little bit spots here and there to get the effect. Okay, good. And I wanna do this very lightly. And between here to do this little bit more, to get a bit more the effect of light and shadow, alright, carefully. And now we've got that light and shadow effect on the floor too. Okay, and let's add a bit of a line on the toadstools on the edges, creating it. Thicker edge, diego, Nice. Ok. And now I just need to do to tree. I'm gonna do the same on the tree, but what I'm gonna do is we're going to go like that. Brushing but hardly touching that tree. Nut there. It'll be there. Around there a little bit, good. And go a little bit there. Do that here too. Okay. Now we'll put up my pen straight again and I'm gonna bring back some of these lines. I did arrives that says, okay, the tree. While I'm adding an edge. Alright, sky. Looking over my drawing and I'm noticing that I want a little bit darker so that you get the background to okay. And the rest, I'm just going to leave like this. All right. Good.
6. Adding the sky: And we just have one big, large open space here, you say, yes, we do. So we need to do something about that sky. And what we're gonna do is we've done this one straight. We've done this one like that with the sky will go in like this. And I'm gonna put it as flat as possible again, making sure I touch it as little as possible. To get this effect. I actually more let the pen touch the paper. Then I'd let the SHE touched the papers. So I get this effect almost straight. And if you're missing a lot of spots, that is totally okay. If I have to be careful the ACO and on to around this edge just a little bit more. Now if you would be working with water, we could get a whole different thing here. But we're not working with boiler Degas on that's the sky. Let's add just a little bit up there. He got a bit of a variation there. Okay, good. And that's it. We're not going to touch this anymore. It's nice. You would normally put a signature on it, which I'm not gonna do with this pan. I'm just going to take a fin pen, just fine liner and put my signature right there. Okay. And let's take a look at it for a minute. Always do that on shutdown. And even though I put a signature, I'm saying, OK, nice. We've cut this light and shadow transition going on Docker, bad lighter parts, some really dark parts, some interesting pieces. We might add a bit of an edge there. That looks really nice. Okay, and then the rest, we're just going to leave it like this. I've got this nice interesting drawing like this with a brush pen, quite different than what you would normally do with a regular file line of ink. Some different techniques, different effects. But for a nice drawing. All right, dead ends this session from idea to finish the illustration. And here is our finished illustration with a brush pen. Looking good, enjoyed creating it, and I love to see what you come up with.
 Benjamin A, Art Teacher, illustrator Art by Benjamin