Transcripts
1. Introduction: Welcome to this class. We're going to create some spring time in soft pastels. This is an introduction to soft pastel. So we're not going to do complicated things yet, which kinda have some fun with them and just getting used to the soft pastels. And for that we will use the snowdrop. Now the snowdrop is pretty much the first spring flower that starts to grow here in the Netherlands, even often or at the end of winter. You know, once these start growing debt, spring is getting closer, but could still be quite awhile away. And we're just going to draw the snow drops together. We're going to start with a scene of snow drops, then move on to a bit more detailed snow drops. And I'm just going to show you how to use the soft pastels. Just a quick introduction into soft pastel. How to just have some fun with them. How to sketch a quick scene with him. And how just to make this beautiful snowdrop end to create this little bit of a scene with a clutter of snow drops. All right, good, That's it for this introduction. And I would say move to the next video where I'm going to walk you through the materials. See you there.
2. Materials you can use: Well, in this first video, we're going to look at materials and I'm just going to show you what I'm using. The first thing you're going to need is some paper. I'm using Fabriano TCR know that is a great paper to use with soft pastel, but you don't have to use this paper. You can use any paper you like as long as it is suited for soft pastel. So you could use talents tone paper. You can use Claire from 10, Ingress, Talmud M brand pastel. All kinds of papers there are, as long as it is suited for soft pastel, what I use is a darker tone. I recommend that to you could use a tone like this. I got some this is cleft from 10 English here you could use the green tone would work to a gray or black would even use, don't use a white or cream, we need a darker color because we're going to use the paper to create some contrasts that saves us creating a whole background. Starting out simple, just sketching a little bit, having fun with these things. So get a paper that is a bit darker. So another light, like a light gray. But you can go DACA UK, you could line, this would work to a color like this would bring it out nicely too. Although this, this fits the scene probably, but again, gray, but you can really go a lot darker too. That's okay. But don't go lighter, right? That's for the paper. The next thing of course you're going to need is a kitchen towel or a kitchen towel or some kitchen paper towel. That is to clean your fingers. Once we start learning this stuff and mixing, as you can probably see, you're going to get dirty fingers and you need to clean them once in a while not to contaminate your colors. Create two handy tool. The other thing you need are your fingers. While there's an obvious for blending, we're not going to use a blending tool but just fingers. And it also is very handy to have some soft pastel. Now, you can pick any soft pastel you like. But I'm using the Rembrandts for this one. But if you have different brands, find, pick any branch you have. If you have soft pastel pencils, something like these. Fine, you can use them to yeah, That's okay. That doesn't really matter. And I'm just going to show you some of the colors we're using. We're using quite a few colors, but you don't need all these colors you could do with a light green, mid green, and a dark green. You could work with a white and a very light yellow and very dark blue and then a light gray and a slightly darker gray, and that's it. But I've got some colors here, so I might as well make use of them. My material are these soft pastels if you don't have the exact colors, that's okay. So I have a very light gray and a slightly darker gray. We need that for the bigger flower. I have a light yellow ocher and then a white. And this is not a y-type. Think this might be dark yellow, yellow. And a light. There's the white. I've got a couple of lines but you just need one wide. I've got some greens and I'm using a very light green. And then the most of these are cinnabar greens in a fall from a light to getting darker. But you don't need all of these, but you could do with less, but we're using them. And let's see this also cinnabar green. And we're having a Prussian blue and the dark side, but not the darkest to create some shadow effect, right? And that would be the main colors. But if you don't have all of these colors, that's okay. Then just use a little bit less color. And if you don't have, like I've arrange of cinnabar greens. If you have different greens, just as long as you get some dark tones, light tones, very light tones, that is fine. Yeah. Mix them up a little bit at that is that is okay. All right. That will be it for the materials. Yeah. So that would be the amusing a very light yellow ocher, a very light yellow and a white. Then to graze these cold mouse grays are very light on the dark one, dark push in gray. These are all cinnabar rays going from light to dark. And then there is one grade, this is a permanent yellow, green, gray and a screener not agree. A permanent yellow, green and very light one to create some accents. Okay. Right. That's it. I don't think it even more materials. We've got paper, we've got our towel, and we've got our pastels. That's it. And your fingers while you bring them anyway, and that's it. Let's move to the next video where we're going to start our introduction to soft pastel and just have some fun with them and sketch some snow drops. See you there.
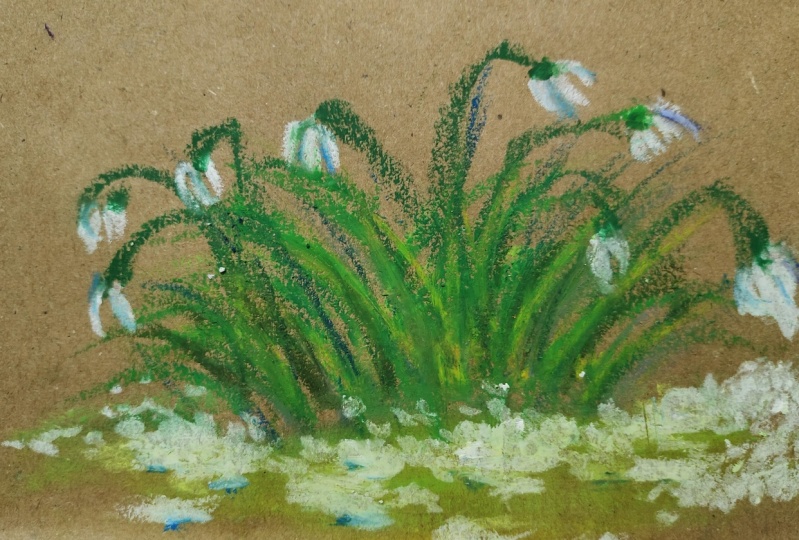
3. Sketching the Leafs: Welcome to this lesson 1, springtime arrives in the Netherlands, the first flowers that will appear, our snow drops to a beautiful little flowers and you may have seen them. You may have never seen them, you may only have seen pictures of them. Well, today we're going to draw them with soft pastel. And these little flowers may appear already at the end of winter. So we're going to make also a little bit a winter scene of fit. And we're going to use reference photos for this now I didn't pick these flowers, I just left them where they weren't. These are very delicate flowers. So I took some photographs with this lesson. There are some photographs attached so you can pick the ones you like. And I'll be using this one. So I got these on my iPad. And these are the snow drops. Now as you can see, there's some farm, There's some background. We're not going to concentrate on that. We're just going to start simple. We're going to sketch with our soft pastels. And we're just going to sketch these snowdrop. So I'm gonna put my reference aside, so I gotta put it up so that it stays in my view. And I'm just going to work off this photograph and the photograph, you can see it anymore, but I have a good few on it. And we're going to use this gray paper. Why am I using this gray paper? First, what we do in the next lesson, we're going to create some backgrounds and things like that. But what we're going to do here is just get a little bit familiar with the soft pastels and just sketch a little bit with them. And we're going to sketch this scene and do probably a little bit of ground and try to add some snow to it. And that's why I've got some darker paper. Now the snow drops are white. If you would use white paper, then of course, you wouldn't see it anymore. Now instead of this grayish paper, you could use a green tone like this. You can use any color tone you like, as long as it's tonal, bit darker tone. And I'm using this grayish and that will bring out these flowers nicely. So when you draw a soft pastels, That's one thing you have to consider. Either create a whole background first with your soft pastels, which we're going to do another time. But for now we're just doing this and we're going to make use of this paper. Well, what we're going to start, let's start with the leaves. So I'm going to get the photograph again. Here you go. We're going to draw these leaves in the little stacks of them and I've got a few colors for them. And snow drops don't have bright leaves and that's because they're growing already in wintertime when the sun is weak, so they don't get these nice bright leaves that other plants do. So I pick some colors and I've got a few colors which are want to use. Put them here for my, for the leaves and for the stocks. And let's see, we're gonna start with the lightest one and that will be a permanent green, deep permanent green but not a dark tone bottom in total, what I'm gonna do is just, I'm going to sketch. I'm going to say, Okay, I want the snow drops just right here, bit in the middle. Now, normally when you make a composition, you don't go for the middle, but we're gonna go for the middle today. And what I'm gonna do is I'm looking at the reference and I'm not seeing, okay, make it myself quite easy. Now they're not straight, but they're a bit curved, but not in a curve like this, but slightly like this, this. And you just look at the photograph and what I'm gonna do it. I'm just going to draw some of those leaves as you can see. And I'm using the side of the stuff, soft pastel know if you have new ones, you will have a really strong edge like this one. Once you use them, they get a bit angled so they're not having a sharp side, but still they're having a pretty decent shop as you can see, I can pretty decently sketch with it. And what you can do is turn the soft pastel once in a while so that you keep a nice, clean, crisp edge. So I'm just doing that. And as you can see, I'm going to just add some leaves. And this side too, and I'm I'm not too worried about making a very accurate picture. Picture. I just want to get used to these soft pastels. Now. I'm used to to soft pastels, but you'll want to get used to them. And just by sketching out a little bit of a feel how they go. And, um, I just add a few there. Now, there will be some of those major leaves. Now if you have some rubble and it's like probably you can see it right there. Pull it up and right there then just giving that to the side where you don't see it. I'm just pushing it away or you can blow it away. I wouldn't use a brush if you do that, you might smear stuff so it'll blow or put it on its side and just let it slide off. All right, a bit more here now, okay, that would be the leaves, maybe some few in front to create a little bit of depth in this image. And that's right. That's it. And that is all we're gonna do for this one. And we might just bring a few to create a little bit more depth down like that. Maybe some grass through it and I will be the first step. Now, we're going to back to these snow drops. Let me show you. I'll see if it works. Yep, That should work on snow drops hanging down. So the stem is the stock is up straight and then goes in a curve. And we got that, simulate that a little bit too. And we're gonna use a different color for that one. It's a bit lighter. Let me see if this this one works. This will be a cinnabar green deep and I'm going to try and use those for the stocks. And I'm just going to draw nice some stocks in like that courtesy. And that is a distinguished color right away. Is that works, that works good. So then a bit of curve and then we'll bring it back. And that already determines where we're going to put our snow drops. And most of them are hanging on the same side. But to make a nice composition is just put a few on this side, put a few on that side. And maybe one here, put that right there, and add a second one right behind it. And we're not going to worry about dimensions. We're going to work pretty flat. And let's add one there too and make sure we curve it nicely. Smaller one here. And let's add one in the back. They're going the opposite way. Now that makes an interesting composition, right? That will be few of the snow drops. And I'm going to just hang the snow drops on there. Okay, Now, the next thing we're gonna do, we're not gonna do the snow drops yet. I'm going to pick up a darker green to create some dimension in this because now it's pretty flat, Isn't it? And this will be a cinnabar and green deep, the same as this one, but as you can see, a much darker one. I want, I'm gonna do, I'm just going to add some more of these leaves. And then we're going to meet a really light one in a minute. And just along the edges, back edges of these leaves I've already done, I'm adding this slightly darker color. Let's do a little bit in the front to right. And then now we're creating, as you can see, you get the idea. There is some depth now going on here. We're playing with some light here, some more rights. And I'm not gonna do that on the snow drops themselves yet. I'm picking a lighter green. Let's pick this one. This is just a cinnabar green. The same cinnabar green, but a very light color. And let's add with an edge some more leaves in it as you can see. And now you get the idea of, of nice step finish three. And so we're using our soft pastels and a sketching. Probably the most easiest way you can use them. And that's it. All right, Now we've got to think about all gonna do with these stems. And what I'm gonna do is I'm going to get another green, a very light green. And to give those stamps a little bit of definition, do I have a lighter cinnabar? Definitely NADH, it's probably the same green. That's the cinnabar green. This is a cinnabar green light, very light one, just get a light green and I'm using for greens, you could use free greens to a dark, a mid-tone and a very light one. And what I wanna do is I wanna go and these Starbucks gift him a little bit light color too. And the only reason we do that is to create some dimension. I will get rid of my thus in here too. All right, and that's it. Now don't go too often over it. If you sketch because then it's going to blur or don't. And I'm not pressing hard, hard, I'm pressing really light. And the last thing we're gonna do, I'm gonna get a blue. This is a very dark blue, Prussian blue or dark, not the darkest I have, but really on the dark side. And what we're gonna do is we're going to add some more leaves with DevOps, this is a very hard one, a brand new one. Well, I have to push this slightly more. And we're just doing this to create some dimension. I can move this paper a little bit, making it little bit easier. And with the stocks, I'm gonna do that to add just a little of their color, their offer now this is right, that will be the start. Now the next thing, of course we're missing are the snow drops. Drawing is nice, but the snow drops are missing. Now I've got a few choices. We're gonna go with white. We could go with a very light yellow ocher, but that would be yellowish. So the better picks would be PLO. There's also a deep yellow, but the lightest you have, you could use audios, pick white. And I've got two choices. I've got a irregular whites are and a super soft white. And I'm going to use the super soft wide. You can just pick white because the snow drops are just whites. And that was my reference, fell down. But here we're going to go, Oh, well you just draw these shapes in. And they have a bit of a drop. Leaf are like a water drop a bit. So we're going to just create that. I put my reference back again. All right, good. And that's the next step we're going to do. But for now, I'm going to leave this and stop this lesson here. And in the next lesson I'm going to go with these snowdrop. So I would say, start with this. Pick up, pick your paper and just draw this. You can go larger. You can go. Don't go small and it's a four, don't go smallest and nice sized. Later on we're gonna do a little bit with the foreground, but you could go larger too. That's okay. All right, good. That's it for this lesson. And we've prepared the first step. I'll see you in the next lesson where we're going to do the snow drops themself.
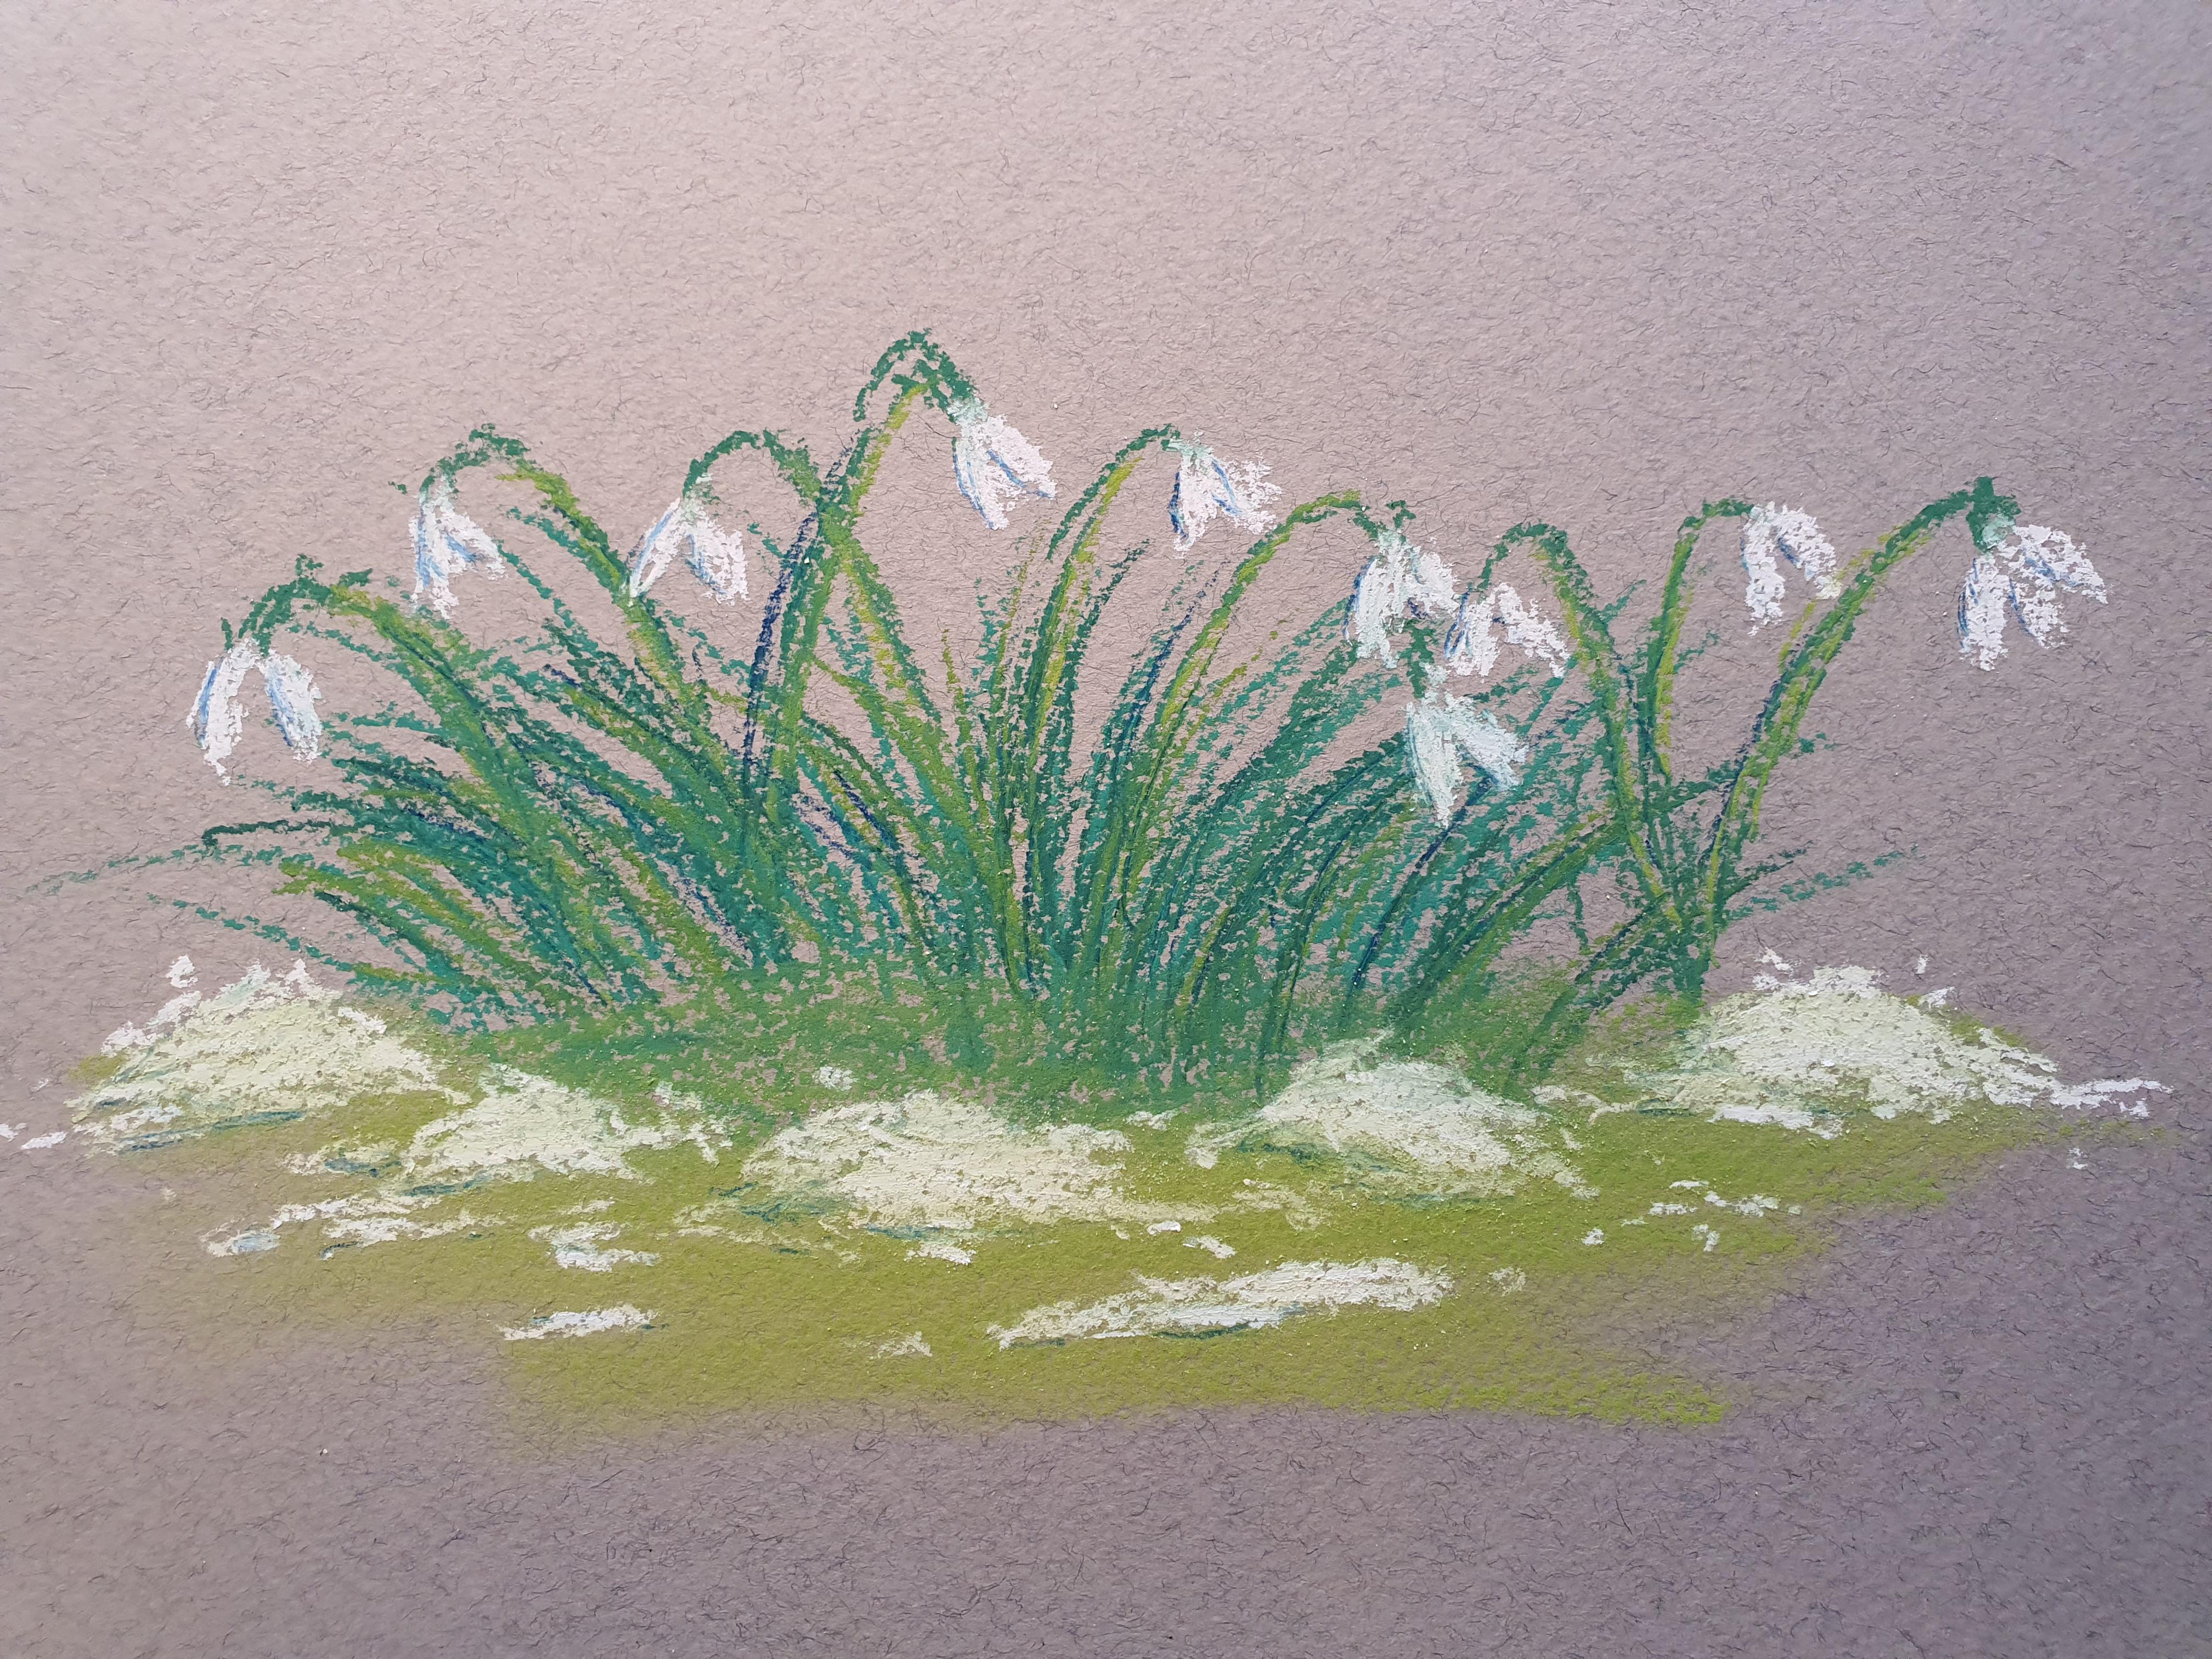
4. Sketching the Snowdrops: Welcome to this next lesson where we're going to do the snow drops. We've prepared our drawing. We've done some leaves, we've done the stocks, and now we're just gonna go and create those snowdrop. So I'm gonna make it myself easy. This is the white and I'm just going to add that snowdrop shape like that. And one in the middle. And that is it for this one. And I'm going to do one here and simply do their end. And basically making use of the paper, which is a bit dark, makes that white pop out right away. Let's do one here. I'm using again the site now here one. And you can go, That's the nice thing with soft pastel. Even if you've been somewhere. You can go over it again. Let's do add one here. And I'm trying to recreate that snowdrop shape a little bit. Now the bigger your work, the easier. You can create some shapes with it. But if you do that work bigger, then you may have to consider to add some more detail to. Now it's quite easy. I'm just adding their right and that's pretty much it. And there you go. Now we've got our first scene, basically, very easy, very quick, and we used our soft pastels, decide to sketch. I want to have a bit more there. Now. Nice. Now what you can do with these, pick up that dark blue again, and I'm one of the sides and then we have to decide where the sun comes from. Let's say the sun come from here on this opposite side of the sun, create a very little bit of that blue, just a thin line. And that makes the snowdrop stand out a little better. There you go. See, that's not too much. Just a little bit of edge. There you go. I'm here. All right, and now I pick up my wide again because I want to see if I can create that a little bit better. There's two good. Last one is pretty good. All right. There you go. Now, we have the impression of snow drops and that's all we want for this lesson. The impression of snow drops. Now as I said, it is, let's say it is snowing. So what we wanna do first, we want to create a foreground a little bit. We're going to take the, not the lightest, but the cinnabar green, not the lightest color. So we're going to need, I'm going to look at the numbers. This is seven and this is a five, so I need that seven. And we're going to create a little bit of fun foreground here. And what I'm gonna do is I'm going to put it flatter, not used the edge, but tried to use a bit of a flat side. Now if you don't have paper on it, has broken out of paper, then you can use it like that. But I don't want the whole so I'm using it on a flat side a bit and I'm just adding a bit of interest color like this. And I'm mixing that very carefully where I've drawn, create a bit of a horizon line and that's it. And I'm gonna take my finger and smudge that part. But I don't want to smudge there because then of course my leaves disappear. So I'm gonna do that very carefully with my finger. And there you go. Now, this now I've have some darker green probably picked up some extent in now. That would be my foreground. Get rid of the dust. And clinically my finger get paper towel. Clean that off. Now, look, that looks already interesting. Now, we could stop here, but it would be interesting to add some snow.
5. Adding some Snow: It would be interesting to add some snow. So what I'm gonna do with that, I'm going to pick that yellowish, that light yellow ocher, or you can pick your y's. Now, let's start with this yellow ocher and we're going to just add some snow to this. And pretend there still is some snow. And others just will be, as I doing here, random smudges like this, random bit on the side, not on the edge, but slightly a bit on the sides, but not everywhere. Let's add some here too. A bit of a hint of snow and I'm on purpose not using that very wide. We're gonna do that in a minute, but we want to create with the snow a bit of depth to a bit of dimension to it. Well, this is good to know, not, not front here. Let's add a bit more snow right there here to snow that pals up a little bit. And just a little bit here. That's good. All right. Now, same as we've done with the flowers. We're going to give the snow a little bit of an edge and we're going to start at the bottom and a bit of the site and have just at the bottom. And lightly on that side a little bit here too. To create just a little bit of shadow effect. And on that edge a bit, and that's it. No more. Are eight. Good. Now, that is our base. Now. Now we're going to get that white again the same wide as you have for your snow drops. And I'm going to add on the side where the sun comes from. Ads bit more highlighted, wide, day you go. And now we're going to have the impression. There are still some snow pushing it now really in. I'm smearing more or less with this wide and some bits and pieces right there. Good. And then we have the impression that snow drops, but they're still. Let's do this one a bit higher. There are still some snow left. All right, Good. Let's move this one up a little bit. Outside the picture. Let's do that here too. Good. Now we've got our snow drops in the snow. Alright, and that's what we're gonna do for this lesson to just a first introduction on your soft pastels, getting a little bit used with them. Lean a little bit of blending, smashing with them. But my mainly what we did was all the sketching. Now, that's, that's basically it. Now you could do more white if you wanted to. That's up to you. You can go along with this and you can say, all right, this is good. I like this, might want to try get this one another layer of white where it's in the green. All right, Get this one. Okay. Probably a little bit of shape. Now, that's nice. This one, It's a bit of attention to. And these would be the last bits are gonna do. I'm gonna create a little bit of a top on them. Where they go into the stark. Create a little bit of white there, right? Good, That's it. Now for this one, what we could've done to us, we could have taken an eraser, erase first part we want and then draw it in. But for now this is a really good. Now, what you may notice, I'll show you that in a minute. Minus dirty. Now, see, there's all this green in it. Just pick your paper towel and wipe it off and now it is nice and clean again, that's all there is to that. And now it goes on slightly whiter again. Good. All right. Well, that's it. We'll leave it like this. And I will be our first scene, our snowdrop now in the next one, what we're gonna do the next, yeah, the next lesson part of this one, we're gonna do a bigger snowdrop. So this is the first we're going to sketch a larger snowdrop and just pick up a few different techniques there too. But for now, for this drawing, this one is done, I would say, have fun with that, recreate that and bade a little bit of a foreground, some snow to it. And that's basically it. All right, good. I'm going to get myself a new paper, but it's actually exactly the same color paper. And I'm going to just do a biggest snowdrop and we're going to play a little bit with that. So I'll see you in that next video.
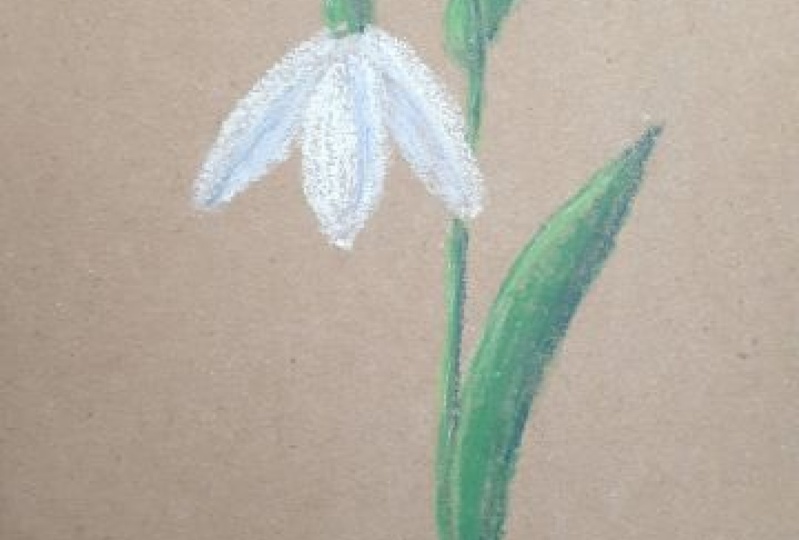
6. Drawing a Detailed Snowdrop: Welcome back. You see I have a clean paper. Again. That's not a clean paper, it's just a new paper. And we're going to just do a snowdrop on this. And the nice thing as well. Put this, the paper around it like this, yeah, achieves the paper the ligand is. So I'm going to look at my reference. I still have the same colors pretty much laying around picking up their reference, kind of flatten it. All right, and what I'm gonna do is zoom in a little bit and I'm going to pick this one. This is nice, see. And this time we're not going to start with the stock and the leafs. Now we're going to start with the white bit. And as you can see, there is some new answers in it. So what I'm going to need now for this one is not only white, but I'm going to need some light gray to, and I'm going to pick that up these, I'm going to use a little bit to add some shade to it. And what I've picked up is a mouse gray. And this would be a 0.8. So going towards the lighter side, I think. Yes, probably to us the lightest side. And I've got a mouse gray and this is a 0.9, and that is a lot lighter. So I'm having these two. And let's see if we can get away with dose. I'm going to pick up my white first. And I'm not gonna start with white. I'm going to use a little bit of nuance. I'm going to pick a yellow, a very light yellow. This is a deep yellow, but the latest one I could get, and I'm going to use this as my base, the base. So what I'm gonna do, I'm gonna draw in that shape, that drop. And then we're gonna just do a lab. But this time I'm going to do it really big and cut it off right there. So unless you can see, I'm not doing this with a pencil or something like that because if you use a pencil, you're not gonna get rid of it anymore. You're going to see it. Everything you put under here, you see it. So either it is charcoal, you could use touch charcoal to sketch, or just as we do now use your soft pastel or a pastel pencil, something like that would work fine too. And I'm going to just color it in, sketch it in a little bit like this. And we're gonna just in a minutes blend this. All right, that's the first one. Now there's a second one. And I'm going to draw that right into, and that one is right here. And it's on the sides. On my reference, There's all shapes and shadows and feeds. I'm ignoring that. I'm just drawing in the rough shape. Yeah, I'm blocking in as they call that blocking in the shape and that goes around. There, needs to connect though. Or the last is fingers fallen down a bit more up and I'm gonna just 50 AD1. Color that in a little bit. And then the next one again, I'm going to just draw the shape that comes out here and goes a bit like this. I may need to drop this one down. And this one I want to drop down a little bit too so that it gets more, a better dimension. So there you go. And that's good. And the next thing I'm gonna do, I'm gonna use a great tool besides the soft pastels and your papers. The best tool you can use. I'm right there. And that is just simply your finger. Make sure it's clean and just smear as we've done with that background. I'm smearing in my first layer. And I'm on purpose and not using white so that I can bring in some tones. So that's why I'm using a very light yellow are right, and that will be our rough shape. And now the shape is gone, but I need the rough shape blocking it in. Okay, What I wanna do next, we'll put it down a little bit clean my finger. I'm going to work on their green. And let's see, we're going to need to that lighter green now this is the cinnabar chlorine and that is a lighter color. And I'm going to add that top. I'm basically doing the same. And what we're gonna do is Midas awhile add it's dark and are going right here. Well, I think we're gonna do only in one. We're adding a leaf in a minute too. Let's go with this stock first. There you go. Nice. Now, that's nice, isn't it? Good Now that looks very different from what we've done in the previous one. And what I'm gonna do, use my finger again, plan this and blended also in with the white a little bit to get a nice transition. And I can't get rid of the mass. And do that too. Now that will be coming a slightly too large probably. Let me add an edge. Right now. I've got this one we're going to do now. We'll look at the reference photo and I'm noticing this one is darker, one is darker and it surrounds this edges darker. So I'm going to get that light mouse gray, this one. And we're going to bring in those shapes. So first I'm starting here, and I'm just coloring that in. And you can see that this already good. And I'm doing the same here. It's starting there. All right. And I need that here too. Let me see that stops around there and goes there and this, I need this nice gray. And let's add just a little bit there to creating a bit of that illusion that it is elif C and now it gets a little bit of depth right away. And the next thing we're gonna do, get that darker color, the darker gray. And I'm going to go just only around the edge here to bring in a little bit of the edge. And here we're going to do the same too. Bring in that edge, clean it a little bit. And there you go. Now see that looks pretty nice. The only thing which wanna do is now we're gonna go back to our whites. I'm still using that same soft white and I'm going to bring in some highlights on this side, see on that C and now this petal right away distinguish itself from the second petal here. And this petal I'm going to do on the edge too little bit there, but not right there, because then this one disappears. Now this one, we're going to give an etch rate here on the top a little bit. There you go. And let's see, we're going to add a little bit of an edge right there to this one. We need some stripes and here very carefully in it, right? And let's add a little bit of an edge there, right? And that looks nice, doesn't it? Well, just work on the stock a little bit. We're going to create a shadow edge here. We're going to pick one of those darker greens we had that will be a cinnabar green deep. What I'm gonna do, I'm gonna do the same as I had it there. I'm going to create that edge right there. And create a little bit of interests, their ego. And I'm going to give this talk a little bit of an edge here too. And their two, and now this is too thick, but it's not a problem. We will add simply. They got some leaves and let's do that right away. All right, so this has some leaves. It's, one leaf is definitely growing out there. And it's going around here. There is one leaf, it should go a little bit loud shock and you see that? And that's one of the leaf. Now I'm not going to smudge right here, but I might do that right there. And we're going to create some shadow edges in a minute. All right, and let's see. We're going to have a leaf from down here. It's not pointed, it's a bit around us. So let's do this right. Now. It looks interesting. And let's see, we're not going to do one here. No, let's only do one side. And we're going to draw that in blended for rights or blend this into a little bit. And I'll clean it up. Clean my finger to no, not yet. Blend that in a bit better. Now if you're not happy with your blend, what you can do is you can simply add a second layer and blend that in until you get the perfect blend that you want. Until you think Now this looks great. I wanted like that, okay. Right. Now we're going to pick that darker color again, and we're going to just create an edge. This would be the leaf, and we're just creating that edge of the leaf right there. And with this one I might just well blended in. There you go. And that is really nice. And now I'm going to recreate the edge a little bit. All right, get some markings in it. Right? Do this one again. Some shadow right there where the petal casts a bit of a shadow. And we're gonna do the same right here. Created edge blended in a little bit. That's the nice thing about soft pastels. And now recreate that edge just a little bit again. And we're going to need to add a little bit there so that we can get the curve. And right here, right? We're gonna do that. Let me pick up that green again. Okay, now what I wanna do here, I want to blend this in a little bit, not too much. There you go. Then add some green to it here to bring back the darker green on the edge. Right, now Midas while co-opt the top. A little bit like that. All right. And to a little bit there, Kurtz well, pretty much be. The second one. Looks good, doesn't it? Just went from simple strokes. We create a beautiful flower. Let's see. Am I happy with this? I want some more here because now the there you go. Now the stock gets thinner to see. So didn't matter that we have had a bit too fixed stock, which has recreated it nicely. There you go. Now. That's it. Yes, that's definitely there except for that bit. That is not nice. Is it? Add some green there? So you want to look your artwork over and say, Okay, am I happy with it? Is, is this what I envisioned or not? Right now? That's nice. Now if you have a very light green, let's do that as the last bit. If you don't have it and leave it like this. But if you have a really light green color, what you could do if debt, we simulate a little bit of light on this edge there. Take a bit up here, right? And do that here too. Even there a little bit. This leaf. And on this stack here, create a little bit of a light effect. Now, in real life, this couldn't happen because now we have, mix it up, but it's okay for this drawing because it looks quite interesting. Just a little bit more and an edge to do that here too. Yeah, Good. And create a little bit of an edge right there carefully and makes it stand out a bit. So there you go. Then you get a bit more dimension in it. And now this is not my screen anymore. Let's add just softly a little bit of the base screen here. And let's get rid of our mess. And that will be pretty much it. Let's see. Yes, what pretty much leave it like that. We can do a little bit on the flower here still, but then we pick that base color and at that in just a little bit here to right there you can. Now, you could in theory create, with that really dark blue, Create, add some other edges. But we're not gonna do that with this one. We're going to leave this like this, create some subtle edges, some subtle effects. And not really dark, dark, but some nice transitions this way. Let's get that darkest gray and add just a little bit of a line. And there are two, some shadow and do that here too. And this edge, a little bit too. Alright. And that is nice. Look at that. Good. Well, if you'd like that, I would say that concludes this lesson. Move on. The next video. We're gonna talk about the project or right, see you in the next video.
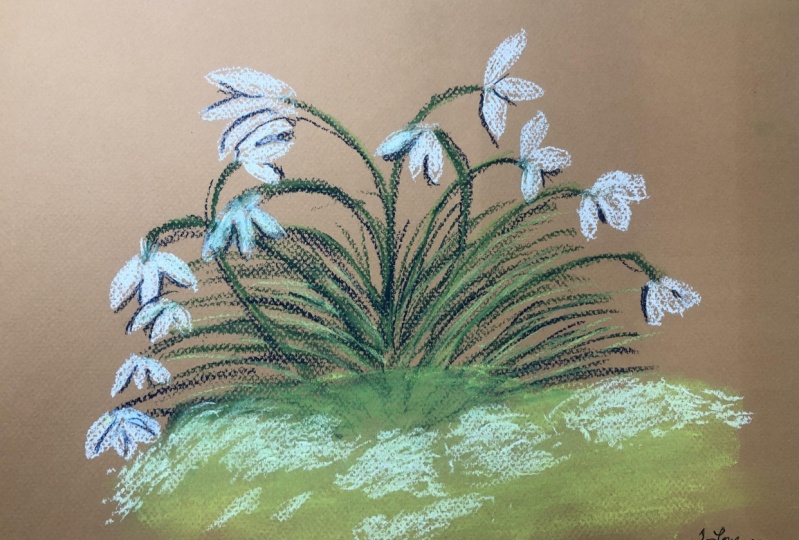
7. The Project: Welcome to this video where we're going to talk about the projects. Well, I've demonstrated these two drawings. I've drawn, first of all, a scene and quickly sketch it, did a little bit of blending. Then we moved on to the second one, the single flower. And we did quite some more blending, use some colors to create some nuances and tones in it. And the project will be, well, you can guess what the projects will be. Creating your own snowdrop scene. Create too. Create a scene like this. You can use the reference photos I supplied with the lesson, or get your own reference photos or pick from the Internet fine with me, and then create a scene and do that. It just roughly and quickly. Don't pay a lot of attention to it. Just quickly sketch it, bring in some of the snow fades down here, create a snowdrop and some light and dark, but that's about it. Then next thing, move on to a single snowdrop. Now you can draw a couple of singles snow drops in an arrangement that's up to you. And then pay a little bit more attention to the complete hole because it is a single drawing. It needs some more attention and some light and shade going on. So we did do some blending. Start with a base color first block that in. Once you've blocked it in, then start blending it. Once you've planned it, then start adding the new ancestor, darker color, the lighter colors. Looking at your reference really well, you might need to zoom in and to your reference if you have it on a, on a photograph, not printed, but on a bestest on your mobile phone or your iPad or computer, so that you can zoom in and just notice the little details and start bringing them in quite nicely, but still keep it a bit rough. Don't go really detailed and smeared and nice nuances, but just go a bit rough with these soft pastels. We're just getting used to the soft pastels, just having some fun with them. We don't want to spend hours on the drawing yet, yet, but we want to just get an introduction into the soft pastels and how they work. All right, well, have fun with that. Looking forward to what you create, enjoy it.
 Benjamin A, Art Teacher, illustrator Art by Benjamin