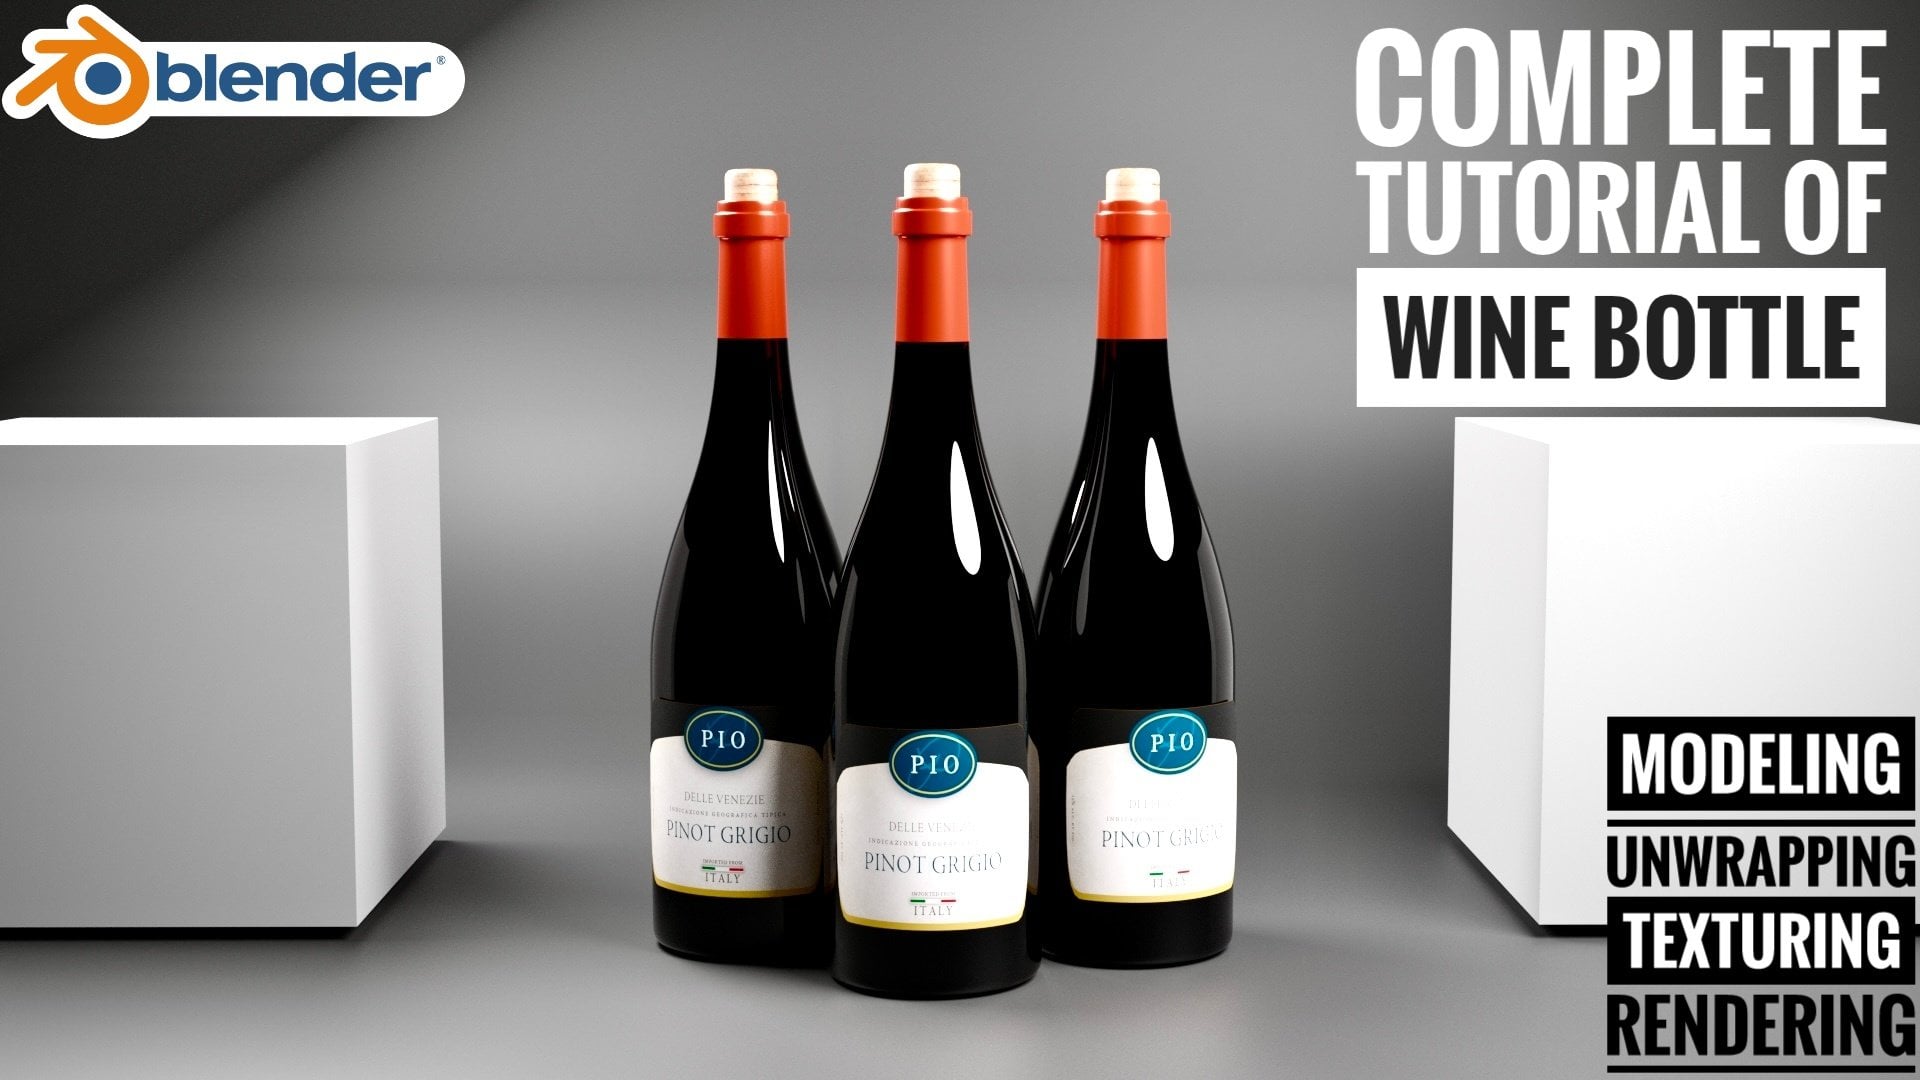
Transcripts
1. Introduction: Hey, everyone, welcome to the
new series in which we are converting a three D animation
into two D in the blender. This series is total divided
into the sixth episode. In the first episode, I will sow you the
basics of how to convert a three D animation into two
D using the linet modifier. In the second episode, I will show you how to download a blender kit and install it and also explain how we can use the blender
kit for our scene. In the third episode,
we will create our first chain in which the motion of two
tree along with the sky with the
full of clouds and explaining about how you can
create the different type of trees and also
explain how to apply the material that's looked like a two D without any line att. The fourth episode,
we will create another scene of
the juice machine, in which we create some of the scene and also
use the blender kit. In the fifth episode, we will create our third scene, in which we create a
paper strip on the window and also explain how to blow the strip using win modifier. In the sixth episode,
we will create our last scene of the slices
of watermelon with knife. All the resources which
I used in this video, I provided into the
project and resources. Join to this amazing
journey and learn something new and meet you in
the first episode.
2. Basics Of Line Art: Hey, everyone. Welcome
to the first episode. In this episode, I will show
you how to easily convert any three D emision into two D. This episode is totally
about a basic fundamental, which I used for all the scene. Now I start with deleting all
the stuff in the viewport. So by pressing to select all
and press X to delete it. First, I adding a cube
and then also add a plane for the background by pressing to increase
the scale size. It looks like a background
and placing the cube, spear and tours above the
surface of the plane. Suppose I'm creating a scene, and I'm placing and adjust
all the object as I needed, but all the object are three
D. To convert the two D, first, I have to add the camera
and give position to it. So by pressing num zero, I'm going to the camera view, and by pressing Shift ten tal, I can move the camera
by using W A S and D, like a gaming moment and also adjust upward and
downward by using Q and E. The camera
setup is important because every object I
converting into the two D, which I can see perfect
from the camera angle. Okay. So I will explain. Suppose I give the basic
animation to the spear. So I give the two
random keyframe at the different position and also give the key
frame to the cube, so it also will be animated. So after giving the key frame, every object which I want
to convert into two D, I have to place in
the one collection. Suppose I want to convert this three
object into the two D, so I have to place this three objects in
the one collection. So after placing in
the single collection, I'm going to add and
in the grease pencil, I'm adding a stroke. So you can see that
the curly black pencil sap is up here. So I placing outside
of the camera. And by selecting the stoke, I'm going to the
modifier section, and here I'm adding
a line at modifier. And here, I'm select
that collection, which I want to
convert into a two D, select the layer to line, and select the material
to black color. So you can see that our three
D objects now look like a two D and the line can
also perform the animation. And in the line att modifier, you can also adjust the
thickness as you want. By the way, this line can only we see perfectly in
the camera view. So by using this fundamental, we can create our
most of the scene, but not every scene, like a tree or sky or
maybe the cloud. Here the tree and the cloud is not the linet but
it's looked like a two D. But I will explain it how we can create
this type of scene. By using the linert and
some other fundamental, we can create the scene like
an anymF making the scenery, we will take the help
of a blender kit. In the next episode,
I will teach you how you can download the
blender kit and use it. Meet you in the next class.
3. How To Install BlenderKit Addon: Okay. Hey, everyone. Welcome to the second episode. In this episode, I'm going to show you
how you can download the blender key and for making the scene,
we can also use it. So for download the blender kit, go to the browser and
in the search option, simply set the blender key. Okay. So here you can see that the first website,
blender kit.com. So I simply open it. And here you can see that the interface, it's look like it. I simply click on the
download blender Kitopson here also provide
the step of how to download the blender
kit by the website, but there is no need it. I simply click on the
download blender Kitopson here my zip file of the blender
kit is start downloading. It takes a two minute
to download it. Once it downloaded, simply exit the browser and
open the blender. Okay, so we have to
enable the blender kit. So here, I'm going to
the add it preference and in the add ons and
open the install menu. And here, we have to select the blender kit we
have just downloaded. And then click Install add on. So you can see that the
blender kit option is up here, and here you have to
tick mark this option. So the blender kit is enabled. So in the layout menu, you can see that our blender kit is successfully installed. By using the blender kit, we can easily take
a ready made object or maybe the material scene or HDRI and different type of
brush for making the scene, we can use the blender kit. There is nothing wrong to
use of the blender kit. The blender kit is totally made for working out
the easy and fast. By the way, you cannot download the every object that you want. Sometimes you have
to make by yourself, but most of the necessity object and the material
you find easily. So in the next episode, we will create our first
summer scene in which the two tree and the
sky with full of cloud. So meet you in the
third episode.
4. Creating The Opening Scenery: Hey, everyone. Welcome
to the third episode. In this episode, we can
create our first two D scene. The scene includes two trees along with the sky with
the full of clouds. So I start with deleting all
the stuff in the viewport, and for making the tree, I'm going to add a co
sampling tree cove. If you haven't any option
of sampling tree gen, then simply go to the
edit preferences, and add on search the cow CURE, and here you can see that the air cove sampling
tree on option. You have to simply take
mark on this option, so it will be enable. By the way, you can also serve the diment tree in
the blender kit, simply type the tree. And here you can see that the different type of
tree are free of cost. You can simply use it. Onto the tree, if
I select the tree, then the customization of
the tree option is disabled. Here I have to add again, so I'm going to add an sampling tree and
at the left corner, you can see the
customization option. At first, in the
geometry option, you can simply change the
shape of the tree as you want. If you want a forest type tree, then you can simply take it. If you want any other type of shape that you can
also select it. There are a bunch of
different type of shape where you can fully customize
the tree as your way. So I select the Japanese tree, and there are some option where you can customize
or change you want. Now I want to add the leaves, so I change the geometry
to leaves and here, tick mark on the
sole leaves option, so you can see the
leaves on the tree. Now I want a more leave, so I change the leave number
to like 200 or maybe two 50. So you can see that
the tiny leaves are attached to the branches. These leaves are so tiny. I simply increase
the scale size. Here, I just simply mess with some property so I can
get a different result. So the scale size is too much. I change the 0.55 value. Now, I think it's look perfect and I also mess
with some property. I change the 0.5 value. And yeah, it's perfect. And there are a bunch
of value you can mess with to get a
different results. So I just simply check it how it can get reflected by the
changing some value. Here I set the value to like spherical and yeah,
it looks different. Now I'm changing the property
in the spitting option, and here I simply
increase the one level. Now, our tree is full of
leaves, and it's good. The sampling tree en
opson has a bunch of different value where
you can simply change the value and get the
different result as body one and make sure that the left property box
can be appear only one, so you have to change
only in one time. Now I'm going to the render view and change the cycle engine. And device to GPU. If you don't have a
GPU in your device, then you can simply use a CPU. For now, there is no light. I simply going to
the world property and change the color to
environment texture. In the open menu, simply open a DR which I provided
into the reference. This R is used to give
a three 60 light. If you want only light
not for the background, then simply go to
the render property and in the film option, simply tick mark on
the transparency. You can see that the
background is removed, but the light is still there. Now you can see that the lint is suited for the object
like the watermelon. But for the tree, the line that is not suitable. But for making a two D, we have to assign a material
in such a way that it's look like a two D. Now for
applying the material, simply go to the sading menu and we are in the
material view to change the render view
and simply select the leaves and click
on the new option. The material property
value is a here, and here you can simply
change the color or maybe the roughness and metallic value and
many more things. But these are making
the tra realistic. So I simply delete it. And for making two D, I simply add a color
rap by using Shift A. Now, simply connect
the color two surface, so it can be become a silver, which is the mixer
of black and white, which is already default
value of color ramp. And by adjusting the bar, you can simply increase or decrease the mixing
value of any color. To avoid the mixing
of two color, I simply add a gradient
texture and place left to the color m and
connect color to factorial. By using the gradient texture, you can see that the
black and white color is not mixing together, but it can be a sading
type like a gradient. By using the color ramp, you can agt how much
sharp a color you want. Now here, I select the
gradient texture and press control t. Then you can see that the
two nodes appear, which is called
the node wrangler. To enable it, simply go to the edit reference and in add on serves
the node wrangler. And here, tick mark on this opson that by
pressing control T, these two node are appear. By the use of mapping node, you can change the
location rotation and scale in particular X Y Z. Now I change the white color to a lime green type and change
black color to a dark green. You can see that the
color sad is on the tree. The most of the two D tree are nothing but the
color gradient. But we have to acchat the color gradient
in different angle. That's why the mapping
node is too much used. In the color popson you
can add a many color, like I want to add
a third color. And here you can see how it can be worked in the
different o son. Here it is the linear, so it can create a
pattern like this. If you change the
linear to a constant, then it will create the
pattern like a constant color, and the B spline color is
almost mixing the color. Here I select the opson it almost unable the color
and slightly mixing it. And here I change the third
one color to a purple type. I mean the dark purple type. Here, I had a purple type color because in the most of the part, the sad of the tree beside the sun is mostly the
purple type color. Just assume that
here is our sun. So I have to put a lime
color to like above surface and place the dark green to like under the first one. So it appears to be
a set of the tree, and the purple type is
opposite of the sun. Here, that's how I
adjust the color, and by using the mapping node, we can adjust the
location rotation and scale in particular XYZ. And by using the color, we can adjust how much
sarp color you want. If you want any
another color of tree like a pink of cherry tree, then you can simply change a pink or dark pink color instead of green and dark green. After giving the color, I simply change the name. Now, I select the branches and copy the material
of the tree. But if you change the color, then it can be effect
on the leaves also, because it is the
copy of material. To duplicate the material, you have to simply
prese these two number, and now if you change the color, then it only affect
on the branches. And now for the trunk, I only need the two colors, so I remove the one and give the color to like a
brown and dark brown. The main thing is
for the two Dimon, the color gradient or the sd of the two or more color
that look like an an. Here, I simply mess
with the property of mapping node until it's look like a tree
branch or the trunk. After giving the material, I simply go to the layout view, and for better view, I simply add the camera. So by pressing num pate zero, I simply go to the camera view, and by pressing Shift and tail, I can move the camera
by using W A SND. Here I have to place the camera in such a way
that it can be looked from bottom to up like someone watching
the sky from the ground. Here, the tree is too
close to the camera, like the most of the view
is catching by the tree. I simply decrease
the focal length. Now, our tree is like
a far from the camera, and I have to adjust
in such a way that it can be only see
the sum of the branches. Here I adjust the
camera by using shift and teal and for forward, backward, left and side, I press the SD and for
upward and downward, I press the Q and here I also change the position
of the tree in direction, so it can be looked
like a little far away. Here, the area, catching by the tree in the camera is fine. I just rotate in direction to see the perfect
view for the camera, by pressing R and Z. Now, I have to place the
tree right side also. I select the tree and
branches and press swiftly to duplicate it and then drag it to the right
side of the part. Now, it's look perfect. But here, I simply
increase and decrease the scale size to see a better result,
and it's look good. Now for adding a sky, I simply add the plane, increase the scale size too much and grab in jet direction by G j and placing above the tree
and camera and increase the scale size too much so
that it covers the whole area. Now for adding a sky and clouds, it's all about the material. In the setting view, I
simply give a new material, and here's the
principal SDF where you can change the color
and any other property. But I do not require
a principle SDF, so I simply delete it, and now I simply give
the tree material. Here, I add the tree
material because I want a sad on the sky, like a blue to white. Now, I'm just adding a
sky sad, not a cloud. So I simply give
the two material to sky blue and the sky white. So by changing the light blue
and the sky white color, I simply add a sad on the sky. Here you can explore a different option with
a different value. You can have an idea which value is affecting
on which part of the sky. Here I create a
shade on that way. After giving the material, I simply pre sift A and
add a mixed cedar node. A mixed seder node is used for adding a two material at once. In the cedar one socket, the sky shading is connected
by using the factor value, you can adjust how much
powerful you want. And in the socket two, I'm
adding a cloud material. So for cloud material, I simply select this part and duplicate it by shift D. Now, I connect the color
to the bottom socket, but we haven't given
any cloud material, so the factor remain the same. To make the cloud material, I simply add a muscular texture instead of gradient texture. And here, connect height to
vector and vector to vector. By using the mix cedar, we can add a two
material at once. In the Cedar one socket, we can add a sky cedar
in the cedar two socket, we can add a cloud material. Here, I change the
factor value to one, so I only see the
cloud material at now. If I increase the scale
size of the muscu texture, then it changed the
size of the cloud. Here, I say six for
big size of the cloud. Here I am changing the
mapping value to a default. Now, for the sarp cloud, I simply change the
dimension value to 0.5 and for more
gluing add ison node. Here, I place the Emison
node after the color mp. Emison node is containing
with the strange value, where you can increase
the strange value, then it can be more
gluing or brighter. For increase the
sarpness or the detail, I simply increase the
detail value to ten, and the 15 is the highest
number of detail, maybe a 15 value. So I think our cloud is sarp but it is not look perfect
because it's a gray color. So I simply change it
to pure white color, and yeah, it's look fine now. And for opposite of white, I simply dark the blue color. So most of the cloud is
work on the dimension. If you slightly increase and decrease the
dimension value, you can get a different result. Here, I recommended you to
mess with some other value. You have an idea which value
is affect on which part. By adding a musculo texture, you have a fully
customizable cloud, where you can change the
size of the cloud and also how much sharp
and rough you want. Now, I change the factor
value of mix cedar to 0.5 and for Cloud
increase themson value. The changing of factor
value to 0.5 is the 50 50% of a sky
cedar and a cloud. And for the exit view of camera, select the camera and go
to the camera property, and in the view part display, select the prospective
value to one, so you can clearly see
only the camera part. Here I mess with some property, so I can get a perfect
result as I want. And the other thing is, in the musculo texture, if you change the three
D value to like four D, then you can create a running cloud by
changing the W value. So here I simply pull up the
bar for the animation by using horizontal splint and change the window to timeline. So here I take the frame to
62.5 second or something. Here, I want animated cloud, so I will give you the
keyframe in y location. So the cloud is look like
moving in the y detection. So I give you the key
frame at the first frame by pressing and now I'm going to the last frame like
a 60 and change the position of the cloud and
then give you the keyframe. So the cloud is moving too fast. So I decrease the
last key frame value. So at the last frame, I change the value and now
see it's too much fast. So I decrease the last
position until it's look good. So now it's fine. And if you press the, then here you have to select
the linear option, so the movement is now constant. And here I also
decrease the value like 0.03 and give the key frame. Yeah, so now it's perfect. Now it's the same way, I have to give the animation
to the camera movement. Here I select the camera
and by placing I, select the location rotation and scale and then go
to the last frame and give the camera movement a little And after
giving the position, I simply give the keyframe
and in the timeline, press T and select the linear. Now the camera is the
constant movement. Cloud and the
camera is animated. Here I am just changing the sky color to like
a dark blue color and austate proper and
make sure you are saved the file after made the
progress by using controls. And also slightly decrease
the speed of the cloud, y 0.01, yeah, it's
perfectly fine. Now, everything is set up and only one thing is remaining
is the render setting. In the render property, make sure you are the cycle
engine and the device is GP, and in the render setting, I change the render sample to 200 and the denoise is selected. If you want more sample,
then you can change it. Here is my camera resolution,
which is default, and at the 24 Ps make sure the frame range is 1260
and the output folder, I recommended you to create a new folder for
the each animation. And after making a new
folder and accept it, change the file format
to a FFmpeg video, and in the encoding section, change the container
to MPEG four. Now, everything is set up, and the only thing is to do
is render the animation. Before they render
the animation, make sure you are
in the layout view. Otherwise, it takes
twice a memory. Here, each frame is
rendered one by one, so that it takes some
time and after that, it is my final result. I hope you like it.
In the next episode, we will create another scene
by using line at Modify. So meet you in the next lass.
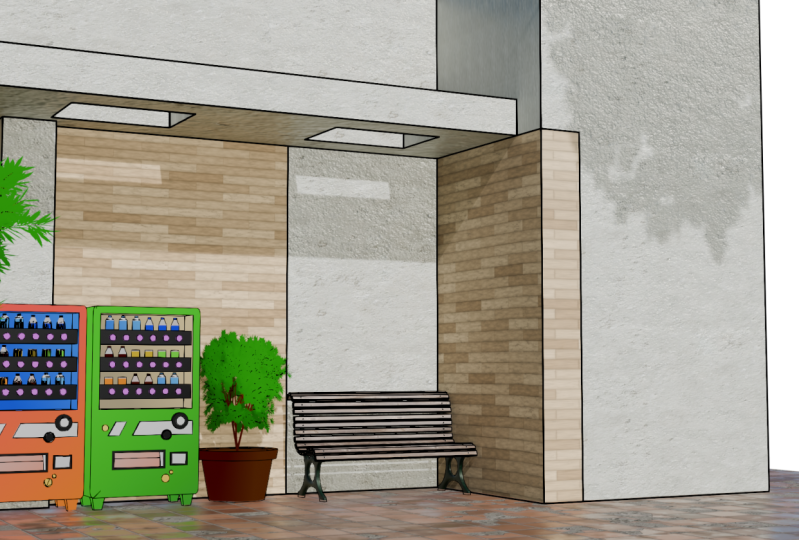
5. Creating A Vending Machine Scenery: Hey, everyone, welcome
to the fourth episode. In this episode, we create our second scene
of juice machine. For this scene, I create a juice machine
with the material, which I provided into the
project and resources. And here I create a juice
machine with the cube by using some basic modeling
command like grabbing, extend and cut insert
and many more. But here, the detailing
takes some time. I already model and provide
into the resources. And if you want to
change any material, then you can go to
the staging menu and simply change it
whatever you like. In the most of the case, I use the gradient dexer
so it's look like an ym. So now back to the layout view. Here, I go to the world
property and add the HDRI, which I provided
into the resources. I use the sunlight HDRI because
it is the outdoor scene. After adding HDRI, make sure
you are in the cycle engine. I use DRI which
includes the sun, so I have to adjust the
DR in such a way that the sunlight can
come for the front. Here I'm adding a cube so that I know where the sunlight
can come from. To adjust the
position of the HDRI, I simply go to the sing menu and here I change the object
property to word property, and by selecting
the image texter, I press control T
so that I fully control the HDRI position
by mapping node. So here I change the rotation of z value so that I can move in. And you can see that
the reflection of the light is changed
on the cube. Here, I change even
more rotation value, so the light can come
from the right side. So you can see that
it slightly come from the right side
like an afternoon. For the second set, I also want a tree. What I do, I simply go
to the first file and simply copy the both of the
tree by using Control V, and you can see that the
four object is copied. Now in the main file, I simply paste it by
using control V, so you can see that
both tree appears. So I select the one tree
and place left side to the drink machine so that the trail use can be
shown in the camera view. First, I'm adding a camera
and by using ump zero, I'm going to the camera view, and by pressing Shift and tail, I can move the camera
by using W A S and D, like a gaming movement
and also adjust the camera upward and
downward by using Q and. Here, I'm placing a
camera in such a way that tree leaves
can be come from the left side and I
create a space to right side so that some other
stuff can be placed later. Here, I adjust the
size of the tree so that it looks good
in the camera view. Now onto the second tree, I simply decrease the size and placing the right side
to the use machine. And placing in such a way
that it is look like a plant, and that plant is
totally right side to the second juice machine. For the plant, we
have to make a pot. I select the bottom one vertices and by
pressing sip test, select cursor to select it. The cursors appear at
the selected part. Now, if I add a circle, then it can be appeared
to that selected part. Now, I grabbing in
that direction by g z and placing like touch to ground and by
pressing tab to go to edit mode and by
pressing F to feel it. Now I am extrude
in z direction by pressing and then scale in size by pressing S. Here I nothing but just create
a shape like a pot. But it's look like so simple. By selecting the top fertilizes, I simply extrude in z direction, and then pressing to
insert it so that it's create a little thickness and then extrude it in z direction. For smoothness, press
tritic and sad to smooth. So it's look fine, but I have to add some
little thickness to the top, so I select the top part
and by pressing Alt, select extrude face
along normal so that it creates a thickness
in all four of the direction, and part is look nice. So here, our plant is ready. So now we create some
other skin like a bench. For adding a bench, I use the blender kit. Here I select the free first
and then search a bench. So you can see that
the multiple types of bends with the different safe are available for free of cost. Here I select the one of
the bench like this one. Add the three de
cursor, benches appear. I select the bench
and go to the top and adjust in right
side to the pot. So you can see that the bend
height is too much sort. So I increase the size
in direction by S z and also adjust the size
in y direction by S Y and place it proper. That's how the blender kit
used for the fast work. Now, I'm adding a cube and
place at the right corner. This cube is ad
for making a home, not a proper home, just
a back side of the wall. I start with grabbing in y
direction in added mode. And then select the
top face of the cube and grabbing in direction
for the height. Now for the thin wall, I extrude it and then extrude
again for the second floor. Now, select the left
face and extrude it in x direction by and x until
it's out from the camera. And for the thickness, select the back side of the wall and extrude it in y direction. That's the same way, select
the side wall and extrude it. It's look like a home. Now here, I'm adding
a loop cut by using control R and
place it like this, and by phase selection,
select this phase, and extrude, so it can
create a little design. And at the second floor, I want a little gap. So I place the four
look cut one by one and create a
shape of that gap. And by selecting the
phase selection, I select the gap and
delete this two phase, and for feeling the
vertical stuff, I select the edges and then right leak and
select brig loop. So now our whole cenar is
ready, except the material. And here, I'm
placing a camera in such a way that it's
look from below to top. Okay. So now for the ground, I'm adding a plane
and then place under the object and then scale
in size by pressing S. So you can see that our
ground is also ready. And at the right corner
here some space is left. What I do, I simply
add extra vault. I select the face
and then extrude in x direction and then
extrude in y direction. Now all the extra space is eliminating by the camera view. Now I'm going to the render view and in the render property, make sure you are
in the cycle engine and the device is CPU. If you don't have a
GP in your device, then you can simply use the CPU. Okay. So here, I first
adjust the tree, I select the tree
leaves and rotate in direction by R z so that the lime green and
dark green part in sown in camera and
adjust the actual size. Now I select the part and
then give the material. I go in to the shading view
and in the camera view, I open the render
view and change the wall property to object and simply give
one of the color, which is mostly like
a gradient color, and by duplicate it, I change the color to like
a brown or a dark brown. And then after give the color, I simply mess with
the property in the mapping value and
also adjust the color. So it's look like
a pot a soil pot. Now, I have to give
the color to wall. But here, I have to assign
the two different color. I select some of the
part by face selection, like a pillar and a wall
behind the juice machine. But first, I have to
assign a single material. So I select the new
material over here, and if I change the
color or any property, then it can be effect
on whole wall. Now to give the different
material to selected part, select the new material, and in the edit mode, select those part and then
select the assigned button. Now if you change the color, then it can be effect on
the only the selected part. That's how you can create the different material
in the single object. Here, for the selected part, I use the blender kit. By selecting the
material section, I am simply type a wood wall, and here you can see
that the bunch of walls and different
type is available. I select the one of the wall. And for the other
part of the wall, I simply give the
cream type color, like a little yellow is. If you want any different color, then you can simply give it or if you want any
different scenery, then you can simply use the blender kit or maybe
a modeling technique. Here, I also adjust the
z rotation value of the wall property so that the light is come from
the different angle. Here I set it to
value minus 1408, it's come from a slightly right. Now for the ground
plane material, I simply select the plane
and here in the blender kit. I simply write the road, and from the material, I select one of the road, and you can see that the
material is up here. Now I want a little
brighter road, so I add a rzBcve node
and place between the base color and gesto
graph in upper direction. Whenever you are applying a material from a
radiant material, and if you want a little
brighter and darker, then you can use this fundamental like placing
the argyic cove and austin. I'm also using this argyic cove in my most of the project. Now our sun is too
much brighter, here I adjust it and then decrease the strength
value to 0.6. Now for making the
three D scene to two D, I create a new collection, and then every object, which I want to convert a 3d2d. I place that object into
the new collection. Here I want to convert
a drink machine and the pot and wall
and also a bench. Every object I placed
in the new collection. Make sure you saved the file
by using controls because the lint modifier is not perfectly work
in the low end PC. Make sure you saved the file
after I made the progress. Now, I'm going to the air
grease pencil and select the stroke and place the
stroke outside of the camera. And by selecting the stroke, I simply go to the modifier
section and in the modifier, I'm adding a linear modifier and select that collection
that I want to convert, select the layer to line
and color to black. I think I pick up the
wrong collection, so I select the pen
and see how it's look. But here it's too much lagging. Okay. And yeah, it's look good. But first, I remove
the collection, so I can make the change easily. Now I give the
animation to camera. I pull up the timeline
and select the camera, and here I adjust the
camera position proper like not create too much
space upward and downward. And after giving the position
proper at the first frame, I simply select the camera
and give the key frame. Here I change the end frame
to 60 and at the last frame, I zoom the scene or change
the camera position, and at the 60 frame, I give another key frame, and by pressing t,
change the linear. It creates a constant movement. So here I turning back on a linear and by
selecting this stroke, I simply increase
the line thickness. I change the line thickness to 30 and here it is
too much legging. I think 28 should be fine. So I change the value to 28. Now for the shadow, I simply duplicate the leaves and
place in front of the scene. By using the DRI, the tree leaves can
create the shadow, and it can be reflected on the wall and it pretends
to be a afternoon. Here, I simply remove
the linear for whenever I want to change
because it's too much legging. And here, I adjust the shadow by grabbing its
position in the camera view. So now, shadow is fine, and here in the camera property, I simply increase a focal
length to like a p I mean a 55, it's slightly zoom in, and here I adjust it
and at the first frame, I simply change the key frame. So, the animations look fine. Now, everything's fine and
by turning on the linear, I simply change
the render sample to 200 and in the
output property, my camera dissolution is default and in the
output folder, I simply create a new folder. And I also recommended
you to create a new folder for each
of the animation. So after exhibit the folder, I simply change
the file format to FFmpeg video and
in the encoding, change the container
to peg four. And here foro the
final touch up, I simply rotate the leaves in set direction for
their based position. So after setting up
all its property, I simply give the neut
modifier and then go to the layout view and select the render and hit
the render animation. So here, it will take
time to render it, and after that, here
is my final result. I hope you like it.
In the next episode, we will create our third scene
in which a paper strip are floating on the window by
using the wind force field. So meet you in the next last.
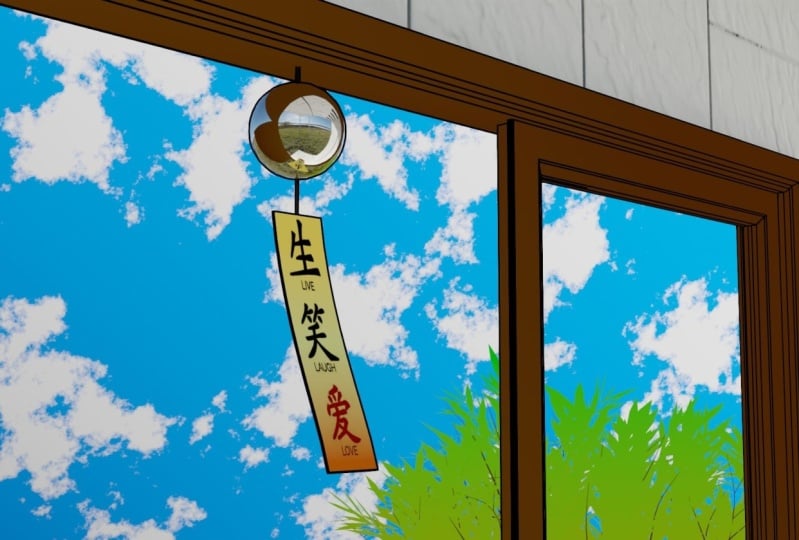
6. Creating A Window Scenery with Fluttering Paper: Hey, everyone. Welcome
to the fifth episode. In this episode,
I'm going to make our third summer scene in which the paper strip are
blowing on the window. So I start with adding a cube. I'm going to add a cube to
give the shape of the home. So here, I increase the size
of the cube by pressing S and then increase the
size in z direction by SZ. I use the cube for
just little shape. Not the perfect home.
So for this scene, I require a window.
So what I do? I simply select the one of the face inherit mode and then si test and
cursor to selected. So the cursor is move
on the face area, and now I search the
window in blender kit. Yeah, there's too much window, but first I select
the free first and select the one of the
window. Yeah, like this. So now our window is directly appeared
to the cursor part. Here, we can't see the proper
because it's too small, so I increase the size by and it little
inside to the face. I grab in wide direction
and grab to outside. So yeah, it's perfectly fit
on a middle of the face. Now, I want to require
a class of the window. In the edit mode, I select the face and by pressing
delete the face. But it's not look perfect. I beg to control that
and I have to give some cut for the particular
window area to cut out. Okay. So I'm adding a loop
cut by using controller. So first, I'm going
to the front view and by using controller, I give some loop cut of the
glass size of the window. And it's the same
way, give a loop cut vertically and give it to
the size of the window. So now I easily delete the
face of the particular area. But first, I have to delete
the window of the glass. So I select the window
in the edit mode, select the face and delete
the face one by one. And as the same way, I select the cube and
then delete the face. So now it's perfect. And I also delete some of the outer face
because I don't need it because our camera can sew the window from
inside to outside. So there is no require of
the back side of the wall. So I simply delete it. So here, our window part which is attached to
the wall is ready. Now, I want to add a circular safe ball on
the window. So what I do? I simply change the
cursor position, so I select the
window and select the face and dens test
and cursor to select it. So the cursor is move on here. And now I'm adding a spear, and I missed the property box, so I delete it and
add again a spear. And at the left corner, you can see the
property box where you can change the segment
and the rings. So I change to 6030. By the way, the
default segment and ring is 32 and 60,
which look like that. But for the maximum detail, I change the 60 and
rings to like a 30. So it can be a square size
of the shape like this. I created the square
shape because I easily extend the red shape. I grab in direction by g z and just the scale
size by s and then rotate in x direction
and r x 90. Now that square shape can be
upper and lower direction. What I do, I select any
random middle phase, so I can extend easily
in upper direction. But it's even number, so it is not perfectly
middle, but Here, I adjust in middle by rotating a little by
r and y direction. So it's look like it is from
the middle and also exist in x direction by turning on the extra mode and just
like it is middle. And after the adjustment, I select this phase
before I just selected and extend
in z direction. So that's like a thread, but there is too much thickness. I select this phase and decrease the scale size in x and y
direction by and Sip z. So now it's thinner and
it's looked like a thread. And as the same way, I extend the thread in
downward direction. So what I do, I simply turn on
the x ray mode in the bottom view and
select that phase, which is opposite of the first one and then extend in
downward direction. So after selecting that, I'm extend in E and Z direction and also decrease
the scale size. Now it's perfect and then pre right click and do s smooth. Now I will bring the
cursor over here. I select this some of the
vertices in X ray mode. And after I select
some of the vertices, I received test and
cursor to selected. So now cursor move
at that point, and I'm adding a plane which is directly
placed at that point. So I'm rotating in x
direction by r x 90 and then scale in z direction by S
and z's like a paper strip. Now, we have to do
a blowing strip. So first, I make this
plane to a cloth type. So I'm going to the
physics property and then add a cloth modifier. So once you add the
growth modifier, it's become a cloth. And if you hit the space bar, then it started falling down. So we have to attach in the
upper vertices to do that, go to the data property
and in the vertex group, select these two
vertices and create a new group and then
pres on a sign. Now, these two
vertices are assigned, but we have to tell
the cloth modifier. In the cloth modifier, bring down to the shape
and in the pin group, select this group that we just
added to the vertex group. Now if you hit the space bar, then it is not fall down, but it attached to the
first two vertices. Here, our plane is
become a perfect cloth. So now we have to add a wind
so that it can be blowing. So I'm adding a force
wheel and then add a wind. So you can see that the wind
is appear at the cursor. I grab over here by
using G and then rotate by r so that wind
come from outside to inside. And by selecting the wind, you can see that wind property, where you can
change the strength and flow and many other values. So I change the
strain to like 20. Now if you hit the space bar, then plane start moving. But it's look kind of weird because there
is no subdivide. So in the added mode, select all and press right
le and then do subdivide, where you can change the value. So here I subdivide
by level two, and then if I hit the space bar, then it's blowing
like a two stage. So here I do say
smooth and yeah, it's not perfect, but
it start blowing. And there is too much strength, so little decrease like 15. So now it's looked like a blowing but not
a perfect shape. So I think I have to
add some more loop cut, I mean a subdivide. So what I do, I simply
add some loop cut in edit mode manually by using controlled R. So it
creates some square shape, but this is the plane. So Here I select all and
then extrude it slightly. So it become thicker
and then do it smooth. So here, the thickness is okay, so I increase the strength
value of the wind like 50, so it starts blowing fastly. So yeah, the air
flow is look nice, but I have to fix the
cloth here I increase the mass value to like one KG and yeah, it's
smoothly blowing. So now I'm adding a camera. So by pressing numbed zero, go to camera and by
pressing Shift ten tail, I can move the camera
by using the AS and D and go upward and
downward by using Q and. So here, I'm adjusting
a camera in such a way that someone looking at the window outside from
the inside of the room. And I'm adding a tree that we just made in
the third episode. So I select this file, and I'm going to
select this tree and controls it to copy it and
then paste it over here. But here, I mostly
use the tree part. So here I grabbing in
that direction and then increase the scale size so that the tree leaves look
inside from the windows. Okay. So here I adjust the tree so that it can be covered the half
of the window. And yeah, it's look fine. Now, if I open render view,
there's totally dark. So I have to first add an HDR. So in the world property, change color to
environment texture, and here I open one of the HDRI, which I provided
into the resources. And if I open the
render view now, and yeah, it's look fine. Another thing for the
background scenery, I made a far background
building scene to open it, go to the add image
and image as a plane. And here, open that image which I provided
into the resources. By the way you can enable
a image as a plane to go to edit reference and in
add on search an image, and here tick mark on
the image as a plane. So now onto the plane. So here I increase
the scale size and then drag in wide direction, so it can be a
little far away from the window and cover the
whole area to the window. So it's looked like there
is city behind the home. And here for the cloud, I also copy the cloud plane from the first file and paste it over here and simply rotate
and place over the scene, so it can be looked like there is cloud over
the buildings. Now, I have to assign the material to the
spear and tread, but there is a single
object. So what I do? I simply select this part of
bifase selection manually. But before I have to
add a single material. First of all, I'm going to the render view and in
the render property, I select the cycle
engine and device is GP. If you don't have a
GPU in your device, then you can simply use the CPU. Now for applying material, I'm going to the sading view, and by selecting the sphere, I first add a single
material by pressing. Here I made a material
to a glass type. I simply decrease the
roughness value to a zero and increase the transmission
value to fully one. And yeah, it's
become a glass type. But the thread is also
become the glass type. Now to apply the different
material to the thread, I select the thread part in the face selection manually in edit mode and then create a
new material and then assign. Now, if you change the
color in new material, then it can be on the
effect on thread part. I give it to a black
color to the thread, and now I have to give the
color to a paper strip. I select it and give
it to new material. But here, I directly copy
the material to the tree, so it can be gradient color, and here I change
the color to like a light blue and white. Here, I just nothing but use the same color effect as we
did in a gradient color. If you want any
other color effect, then you can simply give
it in a color ramp. And if you like any
different pattern effect, then you can use the
different texture instead of gradient texture. So yeah, it's fine. Now I give the color
effect to a window. So I select the window and simply remove all the
material to the window and select a new material or maybe I give a
gradient texter material. By the way, it is the copy of material, makes it duplicated. Otherwise, it can be
effect on both object. And for making it con, I give you a dark brown and the light brown color
in the color ramp. And also making
change in mapping, so it can be give a
nice gradient effect. And it's look fine
as a wooden window. So now I go back to the
layout view and simply make a new collection and place every object
in that collection, which I want to
convert into a two D, like a spear, a paper
strip, and the window. But I already have a collection, so I place in there. Here, I'm not placing
a tree branches, a plane and the
sky in collection because the linet is
not suited for it. Now, before I give
a linet modifier, I simply give a
camera animation. What I do I simply select the camera and set the
proper position at the first frame and
give the keyframe by precing here I set
frame to eight, so it can be like 3.3
second animation. Now I go to the last
frame and change the camera position to like a little zooming in and
then give the keyframe. And in the timeline by pressing t and
change it to linear, so the camera animation
become the constant movement. And now for making a two D, I simply add a stroke
in the grease pencil and placing outside to the camera and placing
in that collection. And by selecting that stroke, I simply go to the
modifier section and add a line at modifier. Here, I select that collection layer to line
and material to black. So that it becomes
the outline and my animation will look
like a two D. So yeah, it's look nice, but
the line is too thin. So in the modifier, I increase the
thickness value to like 30 and yeah, it's looked nice. First, I remove the collection because it's too much legging. And make some of the changing
in the cloth modifier, I simply bring down
the cloth modifier, and in the case property, I change end frame to like 80 because there is no matter
after the 18th frame, and I simply make. Once you make a cloth modifier, then the blender can remember
the movement of cloth. And at the last for
the war material, I use the blender gate. In the material, I type the wall and find one of the
suited material. So there are lots of material. By the way, you can
select any material, like if you want a wooden type material or
maybe a marble type material, then you can simply give it. So here I select that material, and I have to make it
a little brighter. So in the sealing menu, I simply add B cove
and then ajust in it. For making it brighter, I grab in upward direction. In most of the cases
in my project, I use the sb cove for a
little color difference. So by increasing the roughness. So I think it's look fine. So now back to the layout
view, everything is set up, and I give the collection so
that the line can be appear. So here I increase the
line thickness to like 35 and now it's
perfect, I think. And yeah, it's fine. So now everything is set up, and only thing remaining
to do is gender setting. So I go back to the layout view and in the render property, I set the sample to
a 200 in the render, and in the output property, there is my default
camera resolution, and here for the output folder, I make it a new folder. Here I recommended you to create a new folder for every
animation render. So after accept the folder, here I change file
format to FFmpeg video, and in the encoding, change the container
to pec four. So now everything is set up and only thing is to
render the video out. Whenever you are ready
to render the video, make sure you are
in the layout view, not the render view,
and after that, it render and render animation. So here, it takes some
time to render it out. And after that, here
is my final result. I hope you like it.
In the next episode. I will do our last summer sort of slices of watermelon
with the knife. So meet you in the next episode.
7. Creating A Scenery with Watermelon Slices and Knife: Hey, everyone, welcome
to the sixth episode. In this episode, we will
create our last scene in which slices of water melon with
a knife is on the table. For the table, I use the blender kit and in the
object, I search the table. There are many tables. I select the one
of the table like a flat type with
the safe texture. So here, I select the stable coffee table
and the table is up here. So I increase the size in
x and y x by manually, and by selecting the top by pressing shift
test cursor tooted, I bring the cursor over here. Now, I'm making a test, so I'm adding a circle and here and here
at the left corner, I change the vertiz like 16
property can only appears in one venue object and at the border so that
direction by the inside. So take shape of
the d by present to the t extradite inside. I taking the shape of the d. Now I have to make a slice of watermelon for making
that I'm adding a cube and then decrease the
scale size and for thinner, I decrease in x
direction by and x. Now I have to make almost
a triangular shape. What I do, first I
turning on the x remote and in the side view I
select the top ties and decrease the scale
size and also rotate slightly by r. But it's too much clear from the top
to the top scale in x direction by x and make the
size like the bottom Okay. So yeah, it's perfect. Now I'm adding some
pies and control and by Now the tiles and grab
it and take some time. So to so can be very
and I take the same then around the ages are
also be according to the prop it did
take a term slide. But I know mood mod after selecting
the mole modic the segment I totally mood. And it here, I select some of the top side now it's look good. For the finishing, I place right lick and do sad to smooth. Now I touch to the dish, grabbing in jet direction by G that it's look like
placing on the dish. Now, I will make a seat
of the water melon, so I'm adding a spear and then decrease the scale
size and in the side. I select some of the
vertages in mode and then grab in that direction by turning on the
proposed or object. Here, I grazing until
it looks like a steed. Here I select some of the
vertages by turning on the x mode that behind the
vertices are also conected. Of the water water of the water water for the And now I simply duplicate it and place on the surface
with the random rotation, so it can be stick
automatically. Here, I dublicate the seed
one by one by using a Shift D and then place to a random rotation and
a random scale value, and also rotate in particular
xy in dandom rotation. There is okay if some seeds
are go inside the surface, and I place all the seeds to
like half of the bad Now, at the same way, I have
to place the sat to the front side of the
watermelon slices, but there is a
automatic mistake. So I automy pick and place, I'm placing both of them. And also cytize now it's covered the I simply duplicate it and grab it to the plate
and place it horizontally. Now here, I simply duplicate the whole piece of
the watermelon. First, I select
all of this seed, which is attached to the
piece of watermelon and then joining together so it can become a single
object by control. Now I have to first make the parent so that It
can be easily moved. I selected and then select the piece of
the water and then control P and select
object with keep trans Now if I rotate
scale or grab the object, the heat will also keep up. Now I select both of the object, a slice of watermelon
and seed and then give some random rotation and
increase the size it ps and it can be comp and now by the part and by and x and then grab in x djection it can be
a little left side. Now here, I'm extending the face for the
shape of the knife, and then and in that selection, select the one of the corner
and then control to bay. So it takes the
shape of the knife, but there's no
surfness what I do, I select this face of the corner part and then increase the scale side
in that direction. So it can look like
a little surf. And it looks like a knife. So now I'm grabbing
on to place at the side of the plate and then grab direction and
place on the table. And finishing and here, I'm grabbing the knife by n came to the now Yeah. It's Go to the word property of the DRI. Both of the DRI I provided into the resources
so you can use it. The SDR is applied, and here I have
to rotate the DRI so that the light can come
from the right side to go to the sting menu and
change the word property here by selecting the image
text brise control t. Now, back to the layout view and
here in the world property. I change the rotation z value. By viewing the actual seal. Here, I change the
rotation value and place to the right
side of the sea. And there is too much time. I something like
0.5 or maybe a 0.6. So now onto the material
of a piece of waterm. I gave the material to green and suppose I add a material
for the actual s now I'm adding a porter. And the. Now in and then apply the color and then node
wular in the color, select the dark green and almost the black
type of the color. It looks like outer part of the watermelon and also give the same material to
the actual watermelon. I simply give it and duplicate it and give the red and
white instead of dark green. In the mapping node here, I simply in wide and then
scale inside direction. So it looks like a a part. And at the top surface, I also add one of the color
and give it to the extra artl's now for the state, that is a new material and
the color and for later so the same process
again side of the and then the part by selecting the s now again, select this handle part, the material and then aside. Material material of the rest
of the part like a knife. Here, I select the
handle material and then give it to the
gradient texture and here I change the color to
a brown and light brown. Okay and here I mess
with the mapping value. It's look like a shade of the
brown for the knife part, I use the principal BSTF it to gray color and increase the
roughness all the way down. I think the top
part also be left. I select the one
of the vertices. I mean the two vertices
of the top part and then fail in direct to
become that star part. Now the last part is
remaining, which is the dish. I select the disc and
ve great y color. And here I simply
use the tree use for the seated brown and for the It's balance proper, and here
also as a set of the tree. Now, to make the scene today, I select every object
like a piece of watermelon plate and a knife
in the one collection, and then add a grease
pencil of the stroke. After adding them, place it outside and add a
line and modifier and select that collection
layer to line and color to b. And here I increases
value of the line, so the line can look. I think the six
would be perfect. So I fine. And these in the line at
motif I change individuals. So the middle line
would be e by the way, there is a brother of of the Now, I cyst from the camera view for the percept to the now
to the render property in the render down to property. I select or create a new
folder for each eimation. I also recommended you to create a new folder for each eimation whenever you render and after
I accept the folder here, I change the file permit to
pec video and in then coding, change container to MP four, it's look nice, but I think I have to decrease
the sun strain. I set it to three, that's fine. Now, everything is set
up and I go back to the layout and tender
and animation. So here, it takes
some time to render it out and here
is my final rest. So there's my art summer scene. I hope you like it. So
in the whole series, we mostly use the
same fundamental of the linear and also use
the most of the same. So I would really happy to try this ation O.
 Nityam Patel