Transcripts
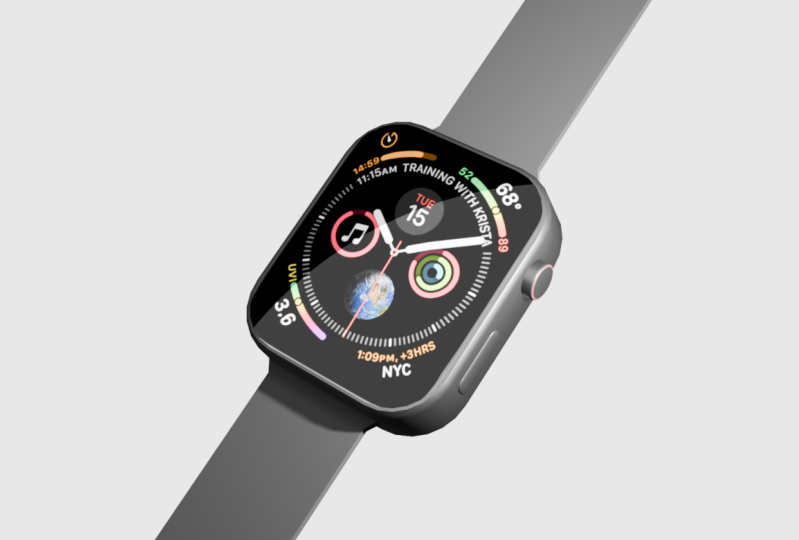
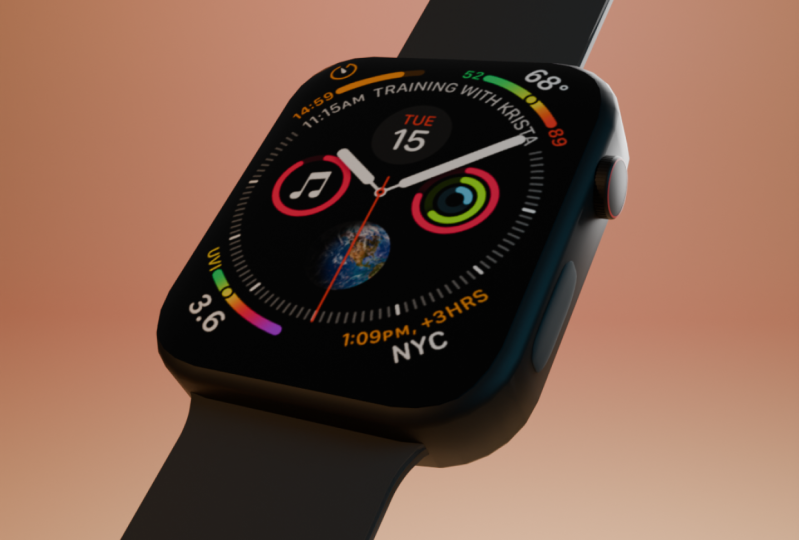
1. Introduction: Thank you for choosing my class. First of all, my
name is Jim Patel. In today's class, I'm
going to teach you how to make this amazing
iWatch on Blender 3D. This class is divided
into four episodes. Modelling of the iWatch, unwrapping of the
screen wallpaper, adding some material
and texturing, and the last, adding background
lighting and rendering. Now you can move on to my first episode of
modelling of the iWatch. I hope you liked my
video. Thank you.
2. EP 1 Modeling Of Iwatch: First we have to select the camera analyte and
press X to delete it. Now, to go to different
view on these indexes, add a reference image
in the background. I will provide my
reference image in the project description. So not only does add
the reference image, now, you are to
go to x-ray mode. Does the image as
part of the queue. Now by pressing G and grab the image and adjust
it like that. Now you have to
scale the deduction. Then you scale it. Now for the bottom you do
again a reference image. Just go to the bottom
that says Add Image, yoga, add the same
reference image. I will provide you.
Then addition, cooking. Now again, you go to edit a French image for
this side view. Just edit the background
image and load it. Now to add just the queue as per the reference
from the side view. Now you have to scale the cube toward the reduction
by pressing. You can just rename the cube
to the body of the work. Now press Tab to go
into the edit mode. By pressing Control,
add a bevel modifier. You can please call the middle mouse button
to adjusting them. Know again breast step to
go out in the object mode. Elected cubing the
object mode and right-click and
select Insert mode. Now, for the making of
display of the iWatch, just cool, in
goodie, I did mode. To select this area. As I'm showing you in the video. You go into the
face select mode, and select the area
where you want to apply your screen of the iWatch. Now you have to
duplicate the object. So press shift D.
Just grab it towards the direction that this green
looks a little bit upward. Now press P and selection
rules hablar doors screen and just rename it to the screen or whatever
you want to name it. Now for the making
of denial of watch, this go to Mesh
and early circled. Now just align it
to view and 3200. Now you're to scale the circle. Dereference humid and adjusted towards the right
direction. And adjusted. She loved this article. By pressing Tab,
go into edit mode, select the face and press
F to fill this article. Now, exclude the circle
towards his head direction. Again, excluded by pressing
Control B, bevel modifier. Again, add those
two in a mode of bevel or you can just copy mine. Now yo do select all the faces of the data in the axial mode. Just go to Select deselect. This will select all the phases. Keep a gap between them. Short. I click an X group, free it along normal.
Just excluded. Now again, press
Tab to go out from the Edit Mode and select the object and
right-click and change. For the better performance. Co2, CO2, NADH most. And just see let d
orbitals mode option. Now for the making
of this button. To simply add a cube from the mesh and just
align it to view. You could use the
size of the queue. Now you just take
you by grabbing it. Now scale it towards
the lie detection. Just go to different C D
cube, very displeased. I'm decreasing the
size of the cube, got the x direction
and just grabbing it. Take this to the side view. And I think they go into the Edit mode and breath control me to add
a bevel modifier. You're going to
adjust in a mode of bevel edge, body or wish. You can just rename the
cube to the button. Now for the making
of this point, a circle, just like our diet, and press Shift D to
duplicate it and place it. Body or reference image. Now decrease the size of
the particle like this. Go to front view and grab
it towards the x direction. This now to make this point size hole in the body of the iWatch,
DO, DO simplicity. Let the body just go to the modifier option to
add a Boolean modifier. Selected droplet button,
selected to dial. In this code to the
normal autos mood. Now select that sort of
go and just hired it. Like this. Hole is created. Now in the bottom you
yield where this article, and I just did, I did mode. Select this article
in the edit mode, and go into expert mode. Now, you do grab it
towards this direction. And breast key to exclude it. Like this. Modified my
pressing Control me. Now you can adjust the image, view, your project, and breaths. Now press Tab to go out
from the Edit Mode. Right-click on the
object, shaded smooth. Now for the making of step
of the watch of cube from the mesh towards the y
direction like this. It on the X-ray mode. And scale this extra
direction of the cube. Step to go into the I did mode. Select this word disease by pressing Control
R, loop good. Or select these vertices and scale it towards
the x-direction. Now, again, adding a
loop good, like this. Scaling it. You can adjust the size of the
strip by scaling it towards the right direction
as per your reference. Now, you have to
select this trip in the object mode and breast
step through and do the moon phases of the strep. And by pressing Control B, we're going to add a bear
and modify like this. You're going to adjust it. Body or reference. Again, go into object mode and
right-click Shade, Smooth. The making of bread,
drink, or food. I'll just go and select dial and press Tab by entering
in edit mode. Now select this, duplicate it and breadth B and select
Separate by selection. Now, just rename it. Go into object mode. Select getting, scale-up little bit so that you don't
motivate or dial. Blink part is completed.
3. EP 2 UV Unwrapping: Now to UNDRIP the
wallpaper of this green, direct the screen and
go into edit mode. Press a to select all bowed
to UE and smart DCE project. And press Okay. Now go to the shading menu. Now initiating my new
just this material and apply a new material. Roughness value, lose 0. Said the base color as black. Bootlegged called the screen. And brush shifted image
texture like this. Now you do add an
image texture of this. Clean up the iWatch wallpaper. You can select as
for your reference. Or if you want to
select mine wallpaper, I will provide you
individually option. Now just go to your editing. Select here the review. Now you're rotated
towards 90 degrees. That's 90. Like this. Now scale it towards the x-direction and adjusted
as per your reference. Unwrapping this done, you can
move onto the next video.
4. EP 3 Material And Texturing: First we are assigning material to the
body of the iWatch. The body of the iWatch. Now go to shading menu. Now apply a new material. And said the base color
as per your reference. I'm selecting the black color. You can set the
value of 0.1 to one, metallic value, 0.850, and the next value, those 0.9. Now see that this gap in the layout mode and
again go to Shading. New material. B is colored. No said the metallic value, the 0 roughness value. Now select dating of Godel
and go to the shading menu. New material. Set it
to a reddish color. Now you are to say, did I add material exactly
like the body of the iWatch? De Button material? Exactly like the watch. Not like this.
5. EP 4 Adding Background,Lighting And Renderings: Now you don't need it
for reference images. Now for adding the background. First of all, I am selecting
my watch and grabbing it towards his head
direction. Like this. Now I'm adding up clean mesh, make this and scale it. Now breast depth for
this depth and go into edit mode and feel
like they're tearing mode. Now you are good like
this where TCS excluded towards this
direction, like this. Then the inner edge of the beam. By pressing Control V air
to be able to modify it. Now again, go to object
mode and shielded smooth. Now we've looked perfect. My watch is in the
upward direction. I'm grabbing it. G2 gravitate
towards his hat direction. This now you can adjust the I watch his buddy on the evidence rotating it
towards the 90 degree. For the better, we'll grab
it towards this direction. A little bit like this. No goto friend you in by
pressing shift is light. Light. Now grab it
towards see z direction. Again, they're a bit
towards the x direction. Chiefly could duplicate
this and again grab it to a Txy reaction like this. Going to the light properties
and Jane does ship, ship to now increase
the size of the light. Now ten dB power of the
light to rotate the light, bleed it towards the watch, him to follow it another light. But as shifted, add a camera towards the report. Again, maybe towards
the y direction. If you've seen my
previous class, I will explain an amazing
trick to set a camera with your arrow key order the blue is Nicky's do limits
navigation tool. You can just simply added from the editor and defenses,
but has shifted. Now you're going to adjust
the camera. Like this. You can adjust as you wish. Now just follow my
render settings and select Render
Engine do Cycles. Render Settings
depends upon your PC. From personally my view, I'm just setting my
render view-port to 200. But for my final output, I will select it to 800. So it depends upon yours. I am setting my light to 1500. Same thing, that blade
to the another light. You just follow my steps. I am adding in another
light for light. And just get a bit towards
the same direction. And make this. My background looks more dull because
of some less lighting. So my, I'm adding
in another one. Said the shape of the
lighting rectangle. To adjust the lighting as
body or plain background. I am increasing the size. Now to give these
lighting more power, I am setting it to two hundred
and five hundred watt. Now pressing numbered 0. Going into render view. Here I may render results. At the end of the video. I'm showing my final
and the result. Here is my final
rendering image. If you like my video, you can share it
with your friends. I'm providing a link in the description from
Dead reference link. You can get a tattoo days of free subscription of
Skillshare. I hope you like it. If you want animation
of this class, I will provide in
another class for it. So comment down below.
If you want it.
 Nityam Patel