Transcripts
1. Introduction : Can't draw well unless you're
willing to get a bit messy. This is especially true in perspective when
perspective drawing can feel especially intimidating
or exact or precise. This class is all
about getting messy. In this class, we're going
to go small to tackle big themes and concepts in
freehand perspective drawing. Over the course of
seven exercises, hopefully done over the
course of seven days, you'll have the chance
to try your hand at different techniques in freehand perspective drawing, learning different concepts, thinking about techniques
in different ways, and hopefully gaining
some confidence, encouragement, and new
skills along the way. You can bring into bigger
perspective drawing pieces, paintings, digital
artwork further on in your artistic endeavors. Hey. My name's Sam Gillett. I'm a skill share top teacher. Perspective has been
a foundational part of my drawing practice, whether it's sketching and
sketchbooks on trips or tackling immersive
three D scenes that exist or some that
don't exist at all. Perspective drawing is
about how you perceive the world and how you connect what you see to what you draw. The connection between hand
and eyes is so important, and that's what we'll
be just practicing throughout these
next seven days. I'm going back to the basics and practicing how we draw
lines and how we think about the lengths
and scale of what we draw to talking about
vantage points, horizon lines, about distance, about scale, about depth,
and about composition. Each of the seven
days will take you through a different
five minute exercise. You can do it while
you have your coffee or while you unwind from work. By doing little studies of free hand
perspective sketching, my theory is that you'll be
better prepared and more confident to take on larger
artwork after this class. Let's do the math.
Seven days plus 75 minute or less
drawing exercises. Plus, let's say one pen
and one sketchbook. I think that's a
winning combination, and I'm so excited
to draw with you, talk about free hand
perspective with you, and see what you create, as well. Let's get sketching.
2. Project Video: This class is broken up
into seven projects. And ideally, it's
designed to be done over the course of one
week with a drawing, little sketch each day. This is made possible
by the fact that we're doing these sketches
in a small format. Each one is small, meant to be bite sized and welcoming for you
to draw quickly. For this class, you'll
be drawing seven different small, sketchy
little sketches. It might not be work that
you're super proud of. Maybe not pretty enough
to go up on your fridge, but I want to see it, and I think the other students in this class will, as well. I'd invite you to post at
least one or two sketches in the project page and include some notes about
the sketch you've drawn, what you found difficult or easy or helpful
about the exercise. Let's talk about
the materials and supplies you'll need to
complete this class. Skin is a brand in a kind of sketchbook that's really
synonymous with sketching, whether it's urban sketching, whether it's jotting down ideas, whether it's taking
notes in university. These sketchbooks
have accompanied me through so many years, through so many countries and through so many
times in my life. I love the fact that
they're hardcover, meaning you can lay them out
on a table and draw flat, but they're also small
enough to fit in a day bag, and they don't take up muchroom
in a backpack as well. However, on a lot of
my trips recently when I'm doing smaller
sketching in particular, I love to use these
Muji sketchbooks that are even smaller and
even thinner, as well. I used up this entire book
on a recent trip to England, and it kind of set me
into this pattern, and each time I do a trip, I take a book like this and
try to fill up all the pages. However, for this class, I don't think you should think too much about the
sketchbook you're using. The key is that it's small. The reason we're drawing
on small sketchbooks is because I think that limits the size of the
drawing we can create. And it makes it feel
more manageable. We can focus more on the techniques on the concepts and on the subject
we're drawing, rather than how we kind of fill a page or rather than getting overwhelmed by maybe the time it might seem like it takes
to fill in that page. The exact drawing tool you use doesn't matter
too much here. The focus is going to be
on perspective techniques, not really, you know, how we lay down the ink
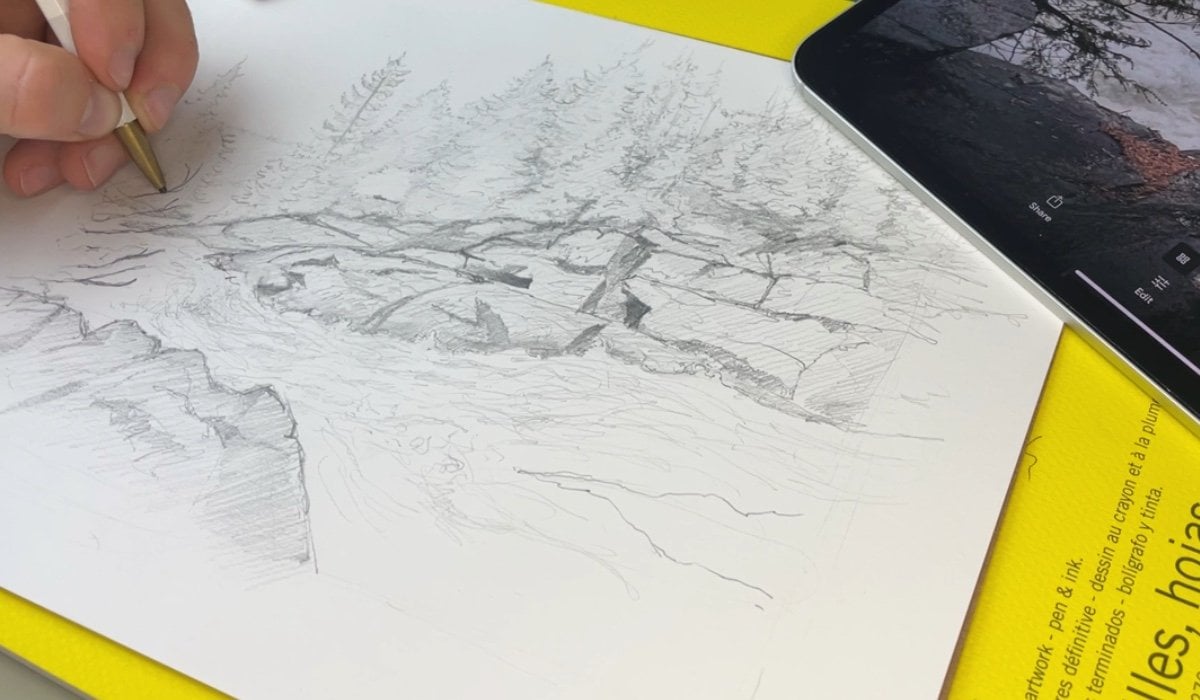
or graphite on the page. Being said, my main daily driver when it comes to sketching is a Penco timber
mechanical pencil. It's about a two B softness, which means it's a little
bit on the soft side. The reason I like drawing with a softer pencil when it
comes to perspective is because I like
seeing the marks that I'm leaving on the page. Sally, and this is
totally optional, but one thing I found really
useful when it comes to my drawing practice is by associating drawing with
something I really enjoy. And it can seem a
little bit obvious, but especially if drawing
is something that's a little bit tough for you or you're just getting
into drawing, associating it with
a great snack, hot chocolate, coffee, tea, or a great, you know, cookie, something like that
can be such a great way of making it a little lovely
ritual, a part of your day. I often draw at night while
I'm listening to a podcast, and I find associating art
with another art form or with a lovely treat or an indulgence can really make it
seem like a more, you know, treasured part
of my daily routine. In the next lesson, we're
going to talk about line. We're not even going to
talk about perspective in the first day of this challenge. So
I'll see you tomorrow. We're going to talk
about line. We're going to talk about the
marks we make on our pages and how those can translate into three
dimensional spaces.
3. Day 1: Drawing Lines: If you are watching this, that means you have taken
the plunge and joined my seven day free hand
perspective drawing challenge. So excited to draw
with you today. But unfortunately, we're not going to be drawing
perspective today. We're just going to be making
marks on our sketchbook. The way that we
think about laying down lines on the page can change how we tackle three dimensional scenes and perspective drawing writ large. That sounds like a pretty hoy, toy lofty statement, but let's dive in and talk
about what I mean. In this day, one lesson, we're gonna practice drawing lines. So first, I want you to put down your pencil and pick it up. How you pick up your pencil
and how you hold it, that'll change from
person to person. I'm not going to tell you
how to hold your pencil, but you can see that I'm
holding my pencil in between my thumb
and my forefinger. But the key here is that
I'm holding it lightly. I think gripping
your pencil lightly is so important when
drawing in general, but especially when figuring out how to draw in perspective. The tighter you grip your
pencil often makes your lines wobbly or makes you draw too dark or too light.
Let's try it out. I if I draw slowly with my
hand gripping the page, I, for one, find
that very tiring. My hand might cramp up, and for two, I find it helps
me it makes me draw slower. If I'm drawing a
little bit looser, I find it easier to
draw lighter lines, and I find often it's
more sustainable in the long run when I'm drawing
larger scenes, especially. Next, the control over your
lines is super important. You might have a hard
time drawing lines that appear straight like
these ones here. But there's a couple of tips
that you can keep in mind to make your lines
even straighter. Straight lines are really key when we're drawing in free hand. We're not going to
make lines perfect, but we want to make
them appear to be going in a straighter direction. Notice that my hand is kind
of parallel to the line. When I'm drawing a line upward, I'm drawing it up like that. I'm not trying to draw a
line sideways like that. You'll notice when you
compare the two that these lines appear a
little bit different. This one has an uneven
structure to it. It's thin and it gets thicker, there's also a little
wobbly little bit there. You try it yourself and let
me know what you think. Draw a line straight up with your hand
parallel to the line, and then one across with
your hand perpendicular. I'd be interested to know
what you find easier. I find drawing my
lines up really follows the flow and the way
the muscles in my hand work. I can move my hand up rather than crunching my fingers and then drawing a
line across the page. That means that you
can even switch the page around when
you're drawing. Next, I want you
to try seeing what it's like to draw
with your whole arm, not just the rotation of your
hand. Here's what I mean. When you see experienced artists draw and draw in perspective, especially, you'll see
them using the whole page. You'll also see them moving their arms across the
whole page as well. That's often it's
useful to have your arm and your hand in a neutral position when you're sketching. As we talked about with
how we grip the pencil, having your hand and your
wrist relaxed can help your lines appear more natural and often more straight as well. Let's try a couple
examples here. For this line, I'm going to keep my wrist in
the same position, I'm going to rotate my wrist
as I move up the page, you can see
especially right here when my wrist is curved out, it's a little bit
harder to maintain that control because right here, your hand is in a
different position and I'm gripping the pencil differently than when I'm drawing up here. See that difference? I find it more effective to
move my whole hand as I'm drawing these lines. So I'm starting with my
wrist in a neutral position, and I'm moving my
hand up the page. Try those and let me
know what you think. Which method works best for you. Now, we've added a lot of lines to this page so far today, and we're going to
add a few more. When drawing in free hand, one thing that you'll
find is that you're often drawing over the
same lines you've drawn. That's because often we don't get it right
the first time, and drawing shapes
over and over again can help us perfect them or
perfect them to an extent. Here's an example. I want
you to try to draw a circle. Now, my circle
looks pretty good, but you can see how it's
a little bit wobbly. There's some uneven edges there. It can be far more useful or efficient when you're drawing free hand to draw over
shapes multiple times. This makes your drawing look
a little bit messy, sure, but I think it adds
some nice style, and it also means that
your shape becomes the median of all the
lines you've drawn. Here's what I mean. If I
draw this circle again, I am going over those
lines quite a bit. And, you know, maybe this
is a little bit thick here, but you'll see how the shape
of the circle actually comes out after I've drawn
a whole bunch of circles. To me, at least, this
circle appears a little bit more
circular than this one. Now, you can do that a
little bit neater, you know, if you don't have to
draw as many lines as I've drawn on
the right there. But you can see this
shape on the left. I think this one
looks even better. Try it yourself. Try drawing a circle just like
this with one line, and then with quite a few lines, see what works best for you. This method is used in
perspective all the time. And when we're sketching,
especially sketching a streetscape or making
a rougher sketch, going over your lines
many times can help you kind of learn the
shapes that you're drawing. It's a really effective
method of sketching. Lastly, for today,
we're going to practice some line weight techniques. That's because as we'll talk
about in further lessons, the way that we draw
lines and the density of these lines can
convey a sense of distance, scale, and space. Those are all really
important techniques when we're thinking about
free hand perspective. I want you to draw
five or six lines that start really
light and get darker. You'll notice that
I drew those lines a little bit larger
each time as well, and we've almost created a little bit of
perspective here in the lines that I've drawn
because they get larger, as they come closer to us. Now, having these darker shapes, often they appear
closest because as objects recede
into the distance, the way that light works
and travels and things like smoke or clouds or just
the atmosphere in general, often obscures objects
farther away from us. Their colors become duller and they become
fainter themselves. In this part of the challenge, we really dipped our toes into the fundamentals of
perspective drawing. And sure, we didn't actually do any perspective
drawing today. But we developed a
groundwork, these, you know, intensely valuable tools
that we're going to carry on into the next few
days of this challenge. We talked about how we position
our hands when we draw, and we talked about the
direction of our lines kind of corresponding with how our hand and our wrist sits on the page. We talked about moving
our whole wrist as we're drawing lines, and then we talked about two
super important concepts in perspective sketching. And that is drawing
over shapes multiple times in order to
really nail the shape, as well as drawing in
shapes darker to make the shapes appear closest
to us and farther away. Now I know we did not actually draw anything in perspective
today, but have no fear. Tomorrow, we're going
to really dive into it. So I'll see you in the next part of this perspective
sketching challenge.
4. Bonus: Perspective Key Words: In this lesson,
we're going to talk about vantage point,
horizon line, and focal point
and how those are really fundamental aspects of this free hand perspective
drawing class. If you feel like
you have a decent framework for those concepts, feel free to skip
to the next lesson. First, the horizon line. The horizon line is where
the sky meets the ground. It's also your eye level. So everything above
a horizon line appears to be tilted downward
or appears to be above us, and everything below
a horizon line tilts upward or appears
to be below us. If I draw the horizon line
in the middle of the page, that means that anything up
here is above the viewer. Anything below here
is below the viewer. Now, artists use
the horizon line to tell us kind of where we are
in relation to the scene. If the horizon line is at
the bottom of the page, that means the majority of what we see is going
to be above us, and that can be used for making drawings
appear intimidating, like we're looking up
at huge skyscrapers or maybe that we're
very, very small. Where we place the
horizon line in our page really forces us to choose where we're going
to place the most important objects in our scene. And that has to do
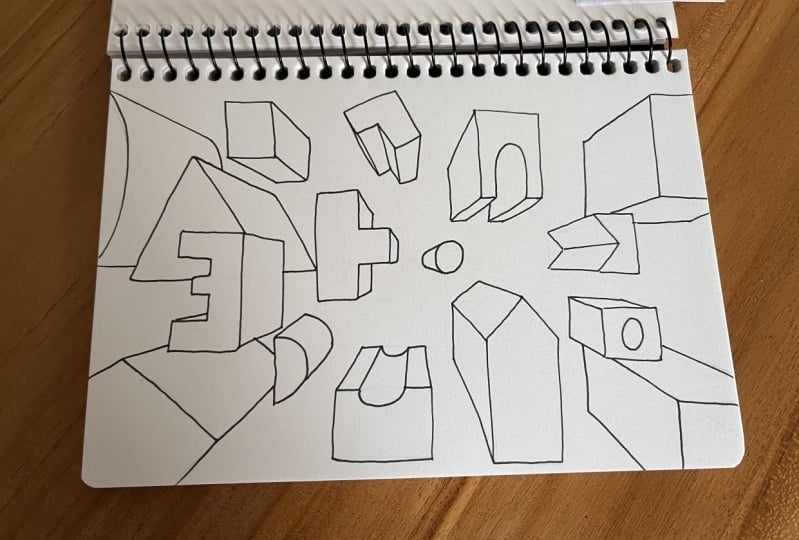
with vantage point. The vantage point is where
we are in our scene. If we are standing
at ground level, we're going to be seeing more the underside of
objects above us, you know, like that
box I drew earlier. However, if we're
standing up in the sky, we're going to see
the tops of objects. Or if we're standing beside
objects like we are here, we're going to see the sides
of these objects as well. And don't ask me what these boxes in the sky
are because I don't know. But this is how we
create a sense of scale in our
perspective drawings. And often, if you're drawing, especially out in the wild,
in a city, for example, you're gonna be placing
the horizon line fairly low because so many of the interesting things
and cities that we want to draw tower above us, you know, like a lovely
cathedral or huge skyscrapers. Now, vanishing point the third concept we're
going to talk about in this lesson is where all
these perspective lines meet. It's on the horizon
line. That's key. You can see how these lines don't all directly
go right there, because I drew them
in with free hand. But the focal point is where
those lines go towards. And there are kind of
infinite focal points because objects in a three dimensional
space are not always perpendicular
and horizontal. For instance, these
boxes are both parallel, so their parallel lines all lead back to the same
point in the horizon. However, a box moving
the other direction this would be going back to the horizon in a
different direction. You see if I added a box going the same direction
up in the sky, it's going to have a
different vanishing point. Now, these are infinite and
we talked about how we can place objects on the horizon line that
appear to be above us. Their vanishing point is going
to be way up in the sky. If you follow these lines, they're going to meet way
off the paper up there. When you hear me
talk about vanishing point or the focal
point in our drawings, that's kind of what
I'm referring to. It's the area where
those lines converge. And in this class, I'll be talking about
the vanishing point quite a bit because that kind of directs how we draw our lines and where we draw
our lines on the page. I'll also be talking about
the Horizon line too. But that's kind of a groundwork
for perspective drawing. I went through that
very, very quickly. But if you want a more in depth exploration of perspective, you can check out some of my other classes that I've linked in the class description.
5. Day 2: Boxes Above and Below : It's day two of this
drawing challenge. I'm excited to see
what you create today. Today, we're going to be
sketching a small little house. However, we're going
to be doing so in a couple different ways and from a couple of
different vantage points. So this second day of the
challenge is focusing on just that Horizon
line vantage points, and our perspective of
the scenes we're drawing. Now, if you remember the
lesson where I talked about, um, vanishing point and Horizon
line, I drew some boxes. I didn't explain
how I drew them. Well, this part
of the challenge. That's what we're going to do. We're going to start
out our journey into actual perspective drawing by drawing some boxes in different parts of our page. But first, we need to add
a trustee vanishing point. For this part of the challenge, we're just going
to do that across the middle of our page. Doesn't matter if this
line is straight or not. And then let's put a
vanishing point on the line. Remember, the vanishing
point is where all the parallel lines in our drawing on one
side of the drawing, at least, are going to converge. We now want to draw a box above and below our horizon line to experiment with what it
looks like to actually see an object that is
above us and below us. Let's start with above us. What we want to do is draw
two really light lines like you're drawing
a very long triangle out on a 45 degree angle. Now, these lines can kind
of be any angle you want, but they should lead towards
that vanishing point, and the top line should be a little bit longer
than the bottom line, so they end in a
90 degree angle. Well, that's actually
more than 90 degrees, but the one side should be straight up
and down on your page. Let's do the same thing
here on the bottom. Lines very lightly that form a little triangle where the bottom line now is going to be longer
than the top one. We're going to draw
it off, so there is a vertical line kind of going
right up and down the page. It doesn't matter if these two vertical lines are aligned. Now, what we're going to do is draw one more line on each side. This one a very light line
kind of going down to the right hand side to
form a right angle, and this one kind of coming up here to
form a right angle. You notice, I tried to make
these lines pretty light. And that's because they're
kind of like a guideline. I just find it's much easier
to judge the angle of a line to meet the vanishing point if
I draw the whole line. We don't want the whole
line in our shape, though, so we're going to cut it
off here with another line that's parallel to the first
vertical line we drew. And then a line that's parallel
to that horizontal line. You can probably guess what
we're going to do next. We're just going to square
off this shape here. You'll notice that these
lines are not perfect. There is some wobbliness. There's some wiggliness to the lines themselves,
and that's all right. In fact, I think that should be encouraged because especially
when we're thinking about free hand
perspective sketching, this is what gives
your drawing character and helps you develop your
own art style as well. You'll notice I'm also drawing over these lines multiple times, just like we talked about in the first day of this challenge yesterday when we
talked about drawing over shapes multiple times
in order to get them right. That's helping me
to kind of define these boxes and cast off their little guidelines
that we use at the beginning. And you can erase
these lines or leave them whatever works for you. We have our boxes
below and above us, and you can see how this
is such a great way to add building blocks in our
perspective sketching technique. You know, right now,
these are just boxes. They don't mean anything. But just by adding
a few details, we can make them into houses, maybe a helicopter, you know, floating planes,
anything like that. We just kind of keep
those fundamental ideas in mind about the lines going
back to that vanishing. Now, some might say this
is one point perspective, and it really is
because we just used one vanishing point for these horizontal
lines to go back to. But I find thinking in such rigid kind of
guidelines sometimes cannot be super helpful because if we want to add details
to this drawing, you know, or boxes that
go other directions, then we have a whole bunch
of vanishing points, and it can be kind
limiting if we think, Oh, we just have one
vanishing point. We can't add in other
objects that are, you know, in other
directions or other shapes. We have other vanishing
points here above us, right? Like, these lines would eventually converge if we
drew them high enough. Lastly, today, I want to shade
in the boxes we've drawn. Now, I'm drawing some lines with my pencil here
on the bottom of the box because I just
decided for us that the light's going
to be coming from the left hand side of the page. And that means this side
would be in shadow, as well. You see how we've
really quickly created a three dimensional scene that has depth and space and scale. Now, we have boxes
below us and above us, but this really is also a good lesson in determining what you're drawing
and where it needs to be. If we are drawing in perspective
a small little house, we probably want it to be below us or at least on
the vanishing point. But if we're drawing a
huge hulking skyscraper, then we probably want
it to appear to be above us or above
the vanishing point. You can see that these
shapes we've drawn can so easily be transformed into
whatever you want them to be. We drew over the shapes multiple times to give them
dimension and depth, and we started out
with some really light lines using these as sort of guidelines as we create these boxes above and
below us, the viewer. But remember how we talked
about shading in this lesson. Well, that's going to be key in the next part of this challenge, because we're going to draw
a sphere floating above us, but we're going to
add some shading and talk about the importance of light and shadow in creating three dimensional spaces when we're sketching in perspective. So I'll see you in
the next lesson.
6. Day 3: A Floating Sphere: A perfect sphere is something we don't often see in nature. You know, you can look
up at the sun and see the shadow on the face
of it on the side of it. But we don't often see
floating orbs up in the sky, except for today because that's exactly what
we're going to draw. While we talk about
the shape of a sphere, we're also going to be talking about shading because shading is an integral part of how we make things appear
three dimensional. I'd say it's a foundational building block in
drawing in general, but it's also going to help us further on in this challenge. In the last lesson of this free hand perspective
sketching challenge, we drew a horizon line, and then from that horizon line, we drew two boxes above us and below us all
without a ruler. Today, we're going to be drawing another shape
and perspective, a sphere, but we're not
going to use a horizon line. The horizon line is
going to be imaginary. The focus of this
lesson is learning how to imply perspective without having to use those
guidelines or without having to have a vanishing
point at all. What I want you to do is start off with just drawing a sphere. You'll remember in the video
about line that spheres are, you know, a hard shape to draw, and it can be effective
to kind of go over that line multiple times in order to make sure
your shape looks very sphere like or spherical. But hey, it doesn't matter
if the sphere is not perfect or if it doesn't appear
completely circular. That's totally fine. Right now we have a shape
in a two dimensional space. This sphere is not a sphere
at all. It's just a circle. In order to make it a spherical, in order to make it look like it's we're drawing
it in perspective, we have to define
a light source. In the last part
of this challenge, we figured out that the sun was coming from the left hand side. But now let's try it
from the other side. So if we're imagining the
sun is coming from up here, it's shooting its rays towards our sphere from
that side of the page. That means we want
the shading to be on the left hand
side of the sphere. But when we're shading objects
like this in perspective, we have to be really careful
that we observe how they, you know, cast shadow and how light plays off the
different surfaces. When we were drawing a cube or a rectangle in
the last class, it was really easy to identify
where the shadow would be because there's harsh lines that the sun would
only hit one side, the other side being in shadow. But for spheres, that
is a lot less defined. Keeping that in mind when we're drawing shapes like spheres in a three dimensional space
is really important. That means the shadows
are going to be gradually getting darker as we kind
of curve around the shape. If there's a coffee cup nearby, you can see how this
works or soccer ball, basketball, any spherical shape. In order to start shading in, I'm going to add
some hatching lines, some up and down lines
in that crescent shape. I'm kind of mirroring the
outside of our sphere. I'm going a little bit lightly, and I'd suggest that you
start off lightly as well. And then I'm making them
more spaced out and lighter as we get to that top right hand
side of the sphere. You want to make
sure that you have a smooth transition period between the density and
darkness of the lines. That might involve adding some darker shading
here on this side. Until we have a whole side of this sphere that is in shadow and a whole
side that's in light. You know, you might not
be happy with how you added shading to your
sphere, but that's right. We can figure that out later, and you'll figure that out
as you continue to draw. However, the key elements
that we need here is one side of the shape in shadow with a
highlight here as well. We have the highlight,
we have the shadow. And there's some
technical words for what these parts of this shadow actually mean and what they do. I'm not going to go over those in this part of the challenge, but if you want more
info on shadow and the technical words behind it, check the class description. Currently, we have a sphere. It now looks three dimensional. But if we want it to
exist in a space, we need to add a shadow, and that's what makes our drawing transform
into a drawing of a sphere to a
drawing of a sphere within a three
dimensional space. We can think of this
in a couple of ways. If the light is hitting
the sphere like this, that means that the sphere is
casting a shadow like that. We know that the
shadow appears larger when the place is
hitting is farther away. There's a shadow underneath
my pencil, right? When I move my pencil closer to the light and the
shadow is farther away, the shadow gets larger
and less defined. When my pencil is quite close
to a surface behind it, the shadow is
darker and smaller. The same applies to objects when we're
sketching in perspective. Pretend that the shadow is going to be right here
on the ground here. We've drawn out the
sides of our sphere. We know it's going
to be roughly around there and roughly around here. However, it's not a
spherical shadow. It's going to be a sorry,
it's not a square shadow. It's going to be a
spherical shadow. However, we know that we're viewing this
shadow in perspective, which means it's going
to be flattened. By drawing a really thin
flat spherical shape, we give the sense
that the viewer is viewing this sphere
straight on and maybe we're standing on the surface
that's underneath it. You know, I said weren't
going to draw vanishing line, but if you draw a vanishing
line kind of halfway between the sphere
and the shadow, then it becomes clear that we're sketching a three
dimensional space. These basic ideas are
super key when you're drawing scenes in perspective
or objects or even people. Let's recap the key parts
of this challenge today. And that is that
when you're drawing spherical shapes like this, the shadows are less defined. They should transition from highlight to shadow gradually. Next, is that the
light really defines the three dimensionality and the perspective of our scene. Without the light in this scene, this sphere would not look
three dimensional at all. And lastly, the shadows that are cast by objects in a
three dimensional scene, they are determined by first the distance
between the object and the surface that the shadow is on and also by where
we're viewing the shadow. This shadow appears
flatter and more oval like because we're viewing the shadow on this space in perspective rather than
straight ahead of us. So we know we have a
sphere floating above us, but tomorrow we're
gonna be talking about scale and about layering
different objects.
7. Day 4: Drawing Complicated Shapes: But today, we're going to be talking about a
single object again, but a more complicated a
more complicated object, a multi sided object. And unfortunately, for us, as sketchers, most objects
do have multiple faces. From humans like myself with the side of my head
and the front of my head to the camera. I'm filming this on. Objects are made up of different shapes. Thinking about those shapes and how it can
break them down to basics is a key part of
perspective drawing, especially when it comes to
drawing without a ruler. So let's dive into today. In the last two
lessons, we drew boxes, and we drew a sphere. And we're going to combine
those in this challenge, which is all about drawing irregular shapes because today, you're going to draw
your coffee cup, your tea mug, your
favorite glass, whatever you have it. If it holds water, chances are it's what you're
going to draw today. Drawing irregular shapes can be tough because you're dealing
with a whole bunch of curved surfaces or
uneven angles that don't seem to comply with our one point perspective rules. If you draw shapes like mugs and maybe they
start end up like this, or maybe they end up like this. This challenge is for you. What we're going to do is define our handy dandy horizon line. Let's say that Horizon
line is right here, that's our eye level, remember? Let's draw some eyes on it, so we remember that's
what we're looking at. And we want to add in
a vanishing point. Just like in the second
lesson of this challenge, we're going to start by adding in a triangle of guiding lines. We're going to first break our complicated shape
down into the basics, and that is making
it into a square. Now, you already
know how to do this. We talked about this before. We're drawing in a long
rectangle and then extending that
bottom line back to the vanishing point
and squaring it off. Now we have our basic shape. But when we're drawing complicated
shapes in perspective, we use these basic shapes
which are easier to draw to help us draw
the irregular shapes. So first, before we kind
of round off our mug, we're going to draw in
the handle, as well. We know the handle
is going to be round as well, but for now, we can just add it in
as another rectangle or another squared object
right off the side. How now what we want to do is practice the
technique we talked about, which is drawing
complicated shapes like spheres or circles by
drawing the shape multiple times in order to practice
the angle and make sure that the circle we draw is kind of the average
or the median between all the lines
that we've drawn. Means that the top side of our circle hits the
top side of our box, and the sides roughly fit
in the sides of our boxes. This is a great way of making
sure that the circles you draw kind of roughly match up to that one point perspective
guideline that we've drawn. These boxes almost act as
the perimeters of our shape. And we're going to do
the same on the bottom. Now, we don't have
the other sides of the lines on the bottom, but we can kind of
mirror that top shape. And again, it's okay
if this is rough. We're going to
connect those shapes here and connect
that shape here. You'll see how this shape
can be kind of perfected or kind of adjusted
over time as we draw. We have this
spherical shape now, and that's kind of the
basis for our mug. Coffee is often a
my mug, but, hey, if you're a tea
drinker or if you have something else in your cup, that's fine to include as well. Currently, we have the mug handle kind of sticking
out directly to the side. However, you'll notice
in mugs like this, that handle is kind of awkwardly shaped and
often irregular, too, and it rarely ever sticks out directly to the side of the mug. The handle could be right here, off to this side or
could be even invisible. One thing for sure,
it's bigger than I currently have it drawn here. I'm going to extend that square using the
square as a guide, but curving the handle
down towards the bottom of the mug and adding some weight and thickness
to that line as well. Now, you notice the mug I have right here has a
little lip on it. If you like, you
can add that too. Then when we add liquid to it to really make it look mug like, we're just mirroring that
top line of the mug. And then shading in. You know, well, coffee is
usually black, but hey, no matter what you're
drawing, we're just going to shade in some of the liquid,
whatever's in that mug. And then just like
in the last class, we need to think about light
direction and shading. If we say that the light's coming from the left hand side, that means the
right hand side of our shape is going
to be in shadow. So just like last time, we're going to add
some hatching here. You'll notice I'm
kind of curving the hatching around the side of the mug with the darkest spots coming on the right hand
side of the mug. And getting gradually lighter until we hit the left hand
side of our mug shape. Just like last time,
if we're going to extend the shape of the mug, we know that as shadows
get farther away from the object, they appear larger. You know, I've drawn this
off to the side of the page. We don't have that much
room here, but hey, we can just extend a little
bit of a shadow that roughly follows the sides
of our mug backwards, and then it's going to curve upwards because we know that the sun's coming
from this side. So this angle is going
to catch the sun, creating a upward curve on
the top lip of the mug. This little handle here
would also catch some of the sunlight and block some
of the sunlight as well. We're going to add little handle to the side of our shadow. By taking first a
square shape like this and then chiseling away
our perspective into it, we can more easily create complicated shapes like mugs and add on shapes using those
easier shapes that we've drawn. Method could be
infinitely expanded, and it is when you think about
artists drawing, you know, billowing fabric or ships or other curve shapes and
three dimensional scene. In the fifth lesson
of this class, we're going to be talking about how layering these objects, whether they're
complicated or not, can also create a deep sense of perspective and
how the size and scale and light and
darkness of these objects is integral to creating
immersive scenes. I'll see you in the next lesson.
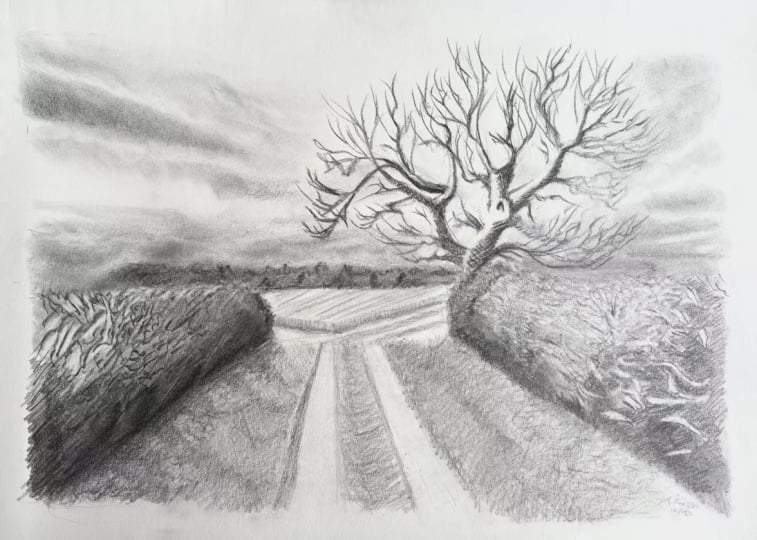
8. Day 5: Layered Objects (Depth and Distance) : If you have a window, I
want you to look out it. Now, you are looking
out the window and you're seeing the
scene outside the window. And when I ask you to
describe your view, you probably describe what
you see outside the window. However, your eyes are also picking up the frame of
the window itself and maybe the desk in
front of you or the garbage that you have
on your window frame. Now, maybe I'm just speaking for myself as far as the
garbage thing goes, but the general lesson
still applies here. We see the world through
layers, layers of objects. And in today's edition
of the challenge, we're going to be talking
about how we layer in objects in our scene to create
space and depth and scale. Way that we draw objects in a three dimensional scene
is really important, and that might sound obvious
the way that we draw. But I mean in a very literal
sense, how we draw them, the darkness of the objects and the size gives us clues
about the environment. Today, in this free hand
perspective drawing challenge, we're going to be
practicing just that. First, we're going to add
our trusty horizon line. It doesn't need to be straight. In fact, maybe today we can add some mountains or some
other shapes like that. We're going to practice
drawing different objects close to us and far away and talk about what to
keep in mind when doing so. If we do the same thing
we've done before, drawing that
alligator mouth here, that gives us a framework to a framework to work
with if we pretend that this is the
vanishing point. We're then going to draw a
couple up and down lines. Now, these do not have
to be evenly spaced out, but there's a couple of
things to keep in mind. If we start with a line
down here at the back, you want to add one maybe
another distance here. Then this third line, the third shape should be a little bit farther away
from the other two. That's because when we view
objects in perspective, the distance is compressed. You can see this in the
real world when you're viewing lines on the
road in front of you, those lines and the distance
between those lines appear smaller when
they're farther away. Right now we have
these three lines. And if we make them into a recognizable three
dimensional shape, we can then experiment with
drawing them light and dark to accent how close
they are to the viewer. Let's make them into trees
for this lesson today. If you've taken any
of my other classes, you know I love drawing
evergreen trees. Especially when drawing in perspective and
drawing free hand, it can be easy to shy
away from drawing organic shapes because
it seems like they might be really difficult to draw without a ruler or difficult to draw
three dimensional. We don't really
need to worry about shading in these trees
for this lesson. You see that I'm just drawing really light and jagged
side to side lines, creating the little
outline of this tree here. We're going to repeat that
in this tree back here. You'll notice that the up
and down vertical lines are our defacto or
stand in trunks. We're building the tree around. But we went into a problem here, whereas this tree is now
overlapping the tree behind it. And that is not a
problem at all. That's actually what we want. The overlapping of
objects is what makes a scene what makes a scene
appear three dimensional. It's really important
that objects can overlap because they
appear layered. It appears that one
is behind the other. You'll notice that
this trees following the line the vertical
line behind it, it means that it's a little
bit smaller as well. We're now seeing how
visual clues and patterns can evoke a sense
of distance and scale. What I mean by that is when
we draw the third tree, our eyes instinctively
know that, A, these are trees, and we assume that they are actually the same
size in real life. Because we've spaced them out farther as they get
closer towards us, they appear like they're receding into the distance
and getting smaller. When I view this scene, I instinctively know
that this tree is likely the same
size as this tree. It just appears smaller
because it's farther away. It's that layering
of objects that is so key to making
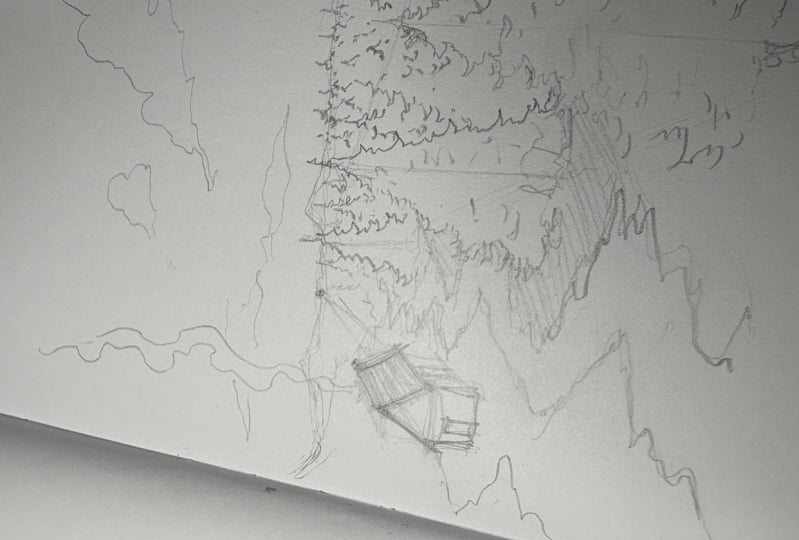
them appear far. If we draw in more
trees back here, we have the
foundations of what is a really cool three
dimensional landscape scene. However, it's important
to make sure that the trees behind these trees get lighter and lighter and less detailed as they go
back into the horizon. Adding some trees layered
behind these ones as well, we can make these trees
a little bit bigger and using our alligator
mouth as a guide, not a rule for how tall
the trees have to be. You can see how
you could continue this pattern now forever back into the horizon
until these trees themselves form
our horizon line. Making these conical shapes
or the triangle shapes at the top of the trees less detailed and more
distant and lighter, it appears to me like the trees are receding
into the distance. As you finish up this
challenge today, I'd invite you to
add some objects to the left hand side of
your page as well. What else can we add
to the scene using the shapes that we've
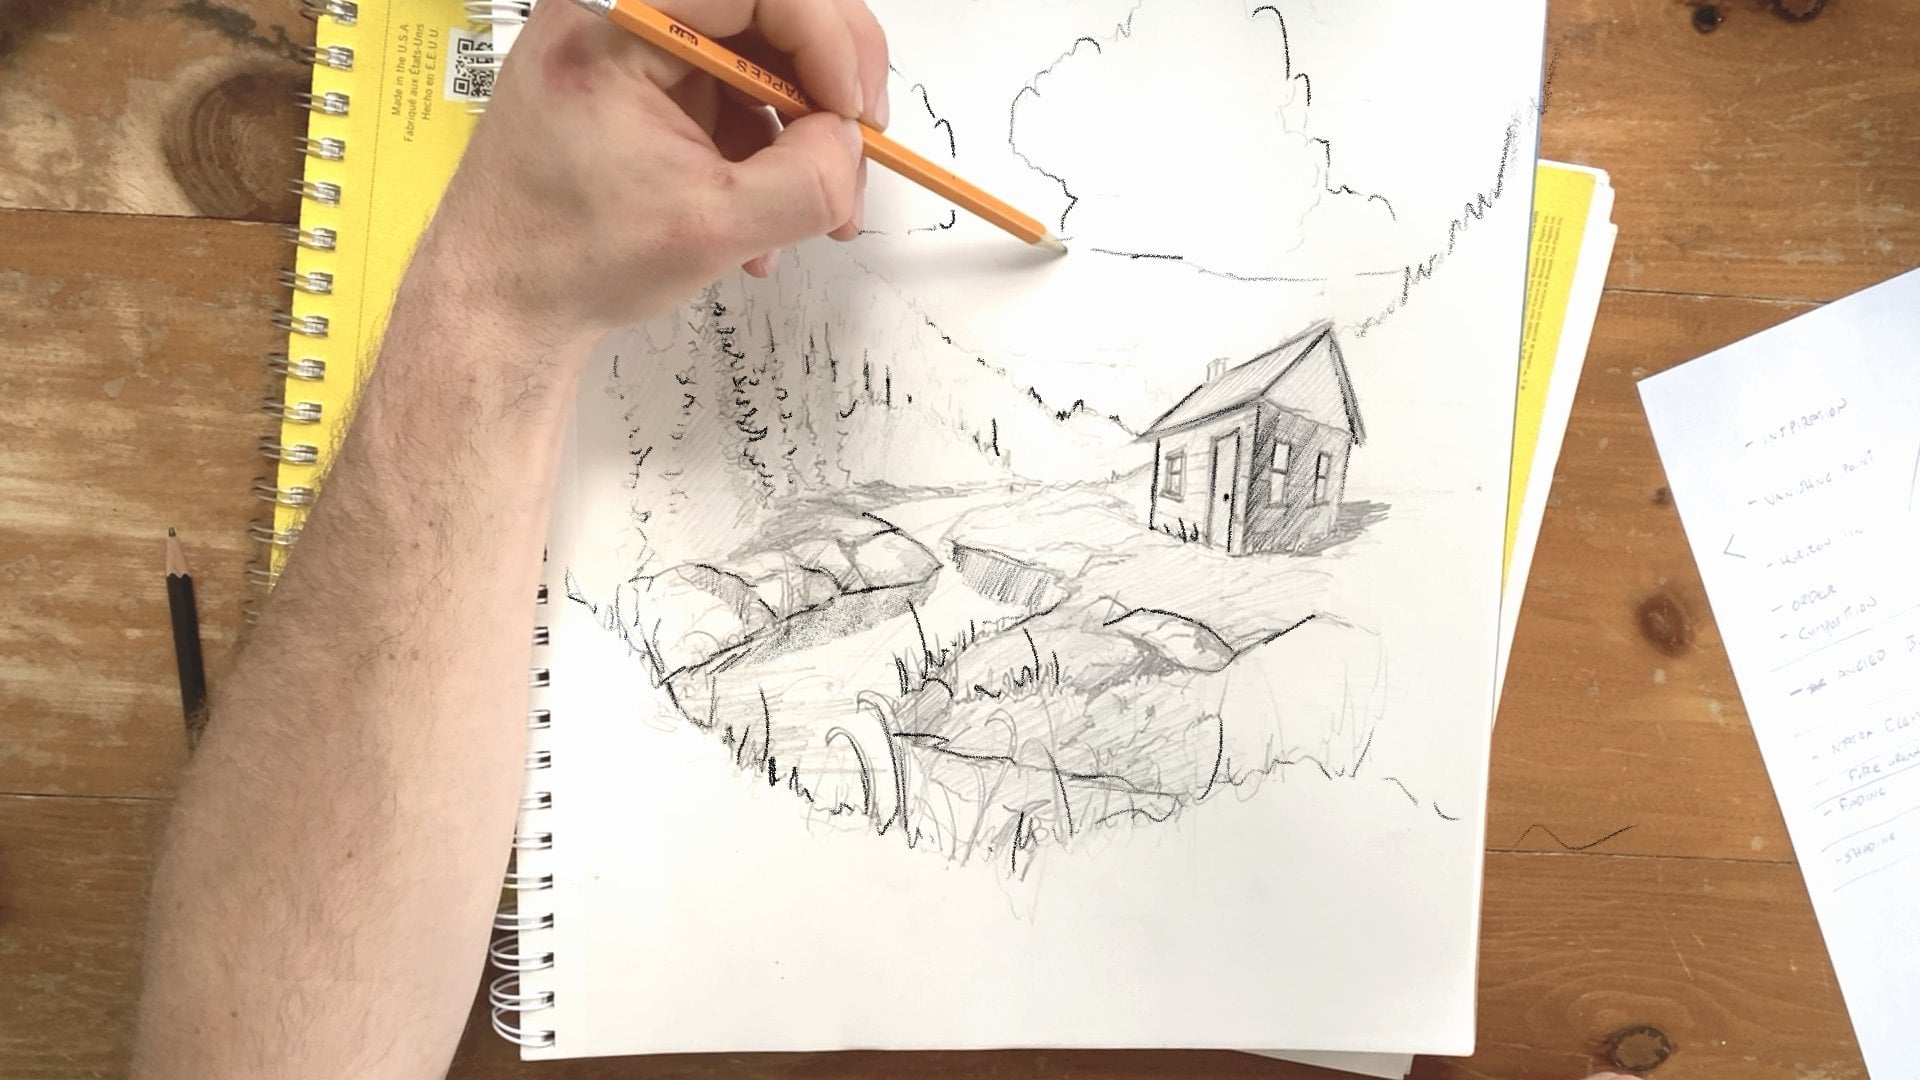
already drawn in this class? One thing could
be a little house using our guidelines
that we've drawn, we know by now how to sketch in a free hand
perspective rectangle and we know that to draw
complicated shapes, we can further break down these shapes into perhaps
the roof of a house. You can see that to
draw this little house, I've added another
rectangle on top of it and drawn a triangle
in the middle of that rectangle face facing us. And I just mirror that
line of the rectangle. Now we have a little cabin
stretching into our scene. We could add a little
river or a pathway. That also recedes back into the distance and is
layering into the trees. You can see how quickly
we've added objects into the scene that really
do serve a purpose. They tell us about
where we are and how far away the
other objects are, how far away the trees are, how far away this house is, and how far away these lovely distant
mountains are as well. I'd invite you to
continue on drawing this cabin scene adding in
little details as you see fit, but making sure that
those details are faded out as you get farther
back into this scene. That can include
texture on the trees, clouds in the sky,
or even grass on the fields and the river
banks in front of us.
9. Day 6: Three-Point Perspective (Draw a Skyscraper!): The point perspective
is how artists make you feel like
you are very close to an object looking
down or looking up and it's going to be
what we focus on today. It's going to start with drawing a vanishing point
above your sketchbook. This might seem weird,
but hear me out. This vanishing point is gonna be a guiding line for our vertical
lines in this drawing, making it appear like the
skyscraper we're going to draw is receding
up into the sky. We also want to draw
a vanishing point to the right and to the left, effectively creating a triangle. And this triangle is going
to be very important. It's going to guide how we draw the vertical sides
of our skyscraper. First, we're going to
add a horizon line. It's going to be a little
bit farther down than halfway in your sketchbook because as we've
talked about before, we want to add more space above the horizon line when we
want the viewer to look up. We want to be at a
vantage point where we're closer to the ground with more space above in the sky because we're
drawing a tall, tall object. What we want to do next is
draw a vertical line that generally aims up towards
that vanishing point. And if you like me, move your
sketchbook a little bit, you might have to
shift because we want this line to be
generally straight. But again, we're not aiming
for perfection here. What we want to do now is connect this line to
these vanishing points. And this is a great
way of practicing drawing lightly without
worrying too much about getting exactly
the right darkness of line or thickness of line,
just light guidelines. About halfway down
each side line, we want to draw a little
bit of a dot to guide us. And then this is where
we're going to start using that top vanishing point. We want each of these
lines heading upwards to generally point towards
that vanishing point. That might involve drawing
the line over and over again, but it certainly won't
involve a ruler. We want this to be natural. We want to seem like these lines are kind of stretching
upwards into the sky. And the tops don't matter right now because
we've had the bottom, the base of our skyscraper. It appears like we might
be flying a little bit. We're looking down at the
bottom of the skyscraper, and the skyscrapers
towering above us, as well. That's when these
vanishing points really become important
because we need the top angles of
the skyscraper to be pointing downwards towards our left and right
vanishing points. You notice these lines,
if I continue them down, generally trend towards each
side's vanishing point. Not exactly, but we're not
aiming for exacts here. We just want to get
the general angles. We now have a box, and it appears like we
are pretty close to it, looking upwards and
looking downwards. It's almost like
a fish eye view, and I think that
adds a lot of fun, you know, dynamism to
our perspective sketch. However, we've just drawn a box. We haven't drawn
a skyscraper yet. We need to add details. How we're going to
do that is keeping our vanishing points in mind. We're going to start
a little ways up the skyscraper with a line that goes down to the
left and to the right, generally aiming towards
those vanishing points. I like starting in the middle
because I find that allows me to keep an eye on the
spacing of my lines. It's much easier to
space lines when you divide the space in half
and then in half again, rather than working our way
up because then you can kind of have a
more holistic view of how much space you have left. We can then go halfway up the skyscraper with another
line that generally trends towards this
vanishing point and another one on
the right hand side. Then we can go down our skyscraper and
seeing how these lines appear to get more shallow and less angled as they get
closer to the ground. When we go below
the horizon line, we can see how these lines
have to then trend upwards. What you want to
make sure, though, is that the lines
get closer together, the higher you are
up this skyscraper. That's because of the
term foreshortening. And foreshortening, as we talked about a little bit in
this class already, is the idea of objects
appearing closer together and smaller the farther
they are away from you. It's a great way of using
forced perspective, and you'll see that in
street art or murals, when objects appear to get shorter and the angles
appear more condensed, they appear like
they're farther away. And you can really
see that here, right, with these windows being much wider than the windows up
at the top of our tower. The same is true when we draw vertical lines on our three
point perspective as well. If I draw these lines
here, this window here, and then I'll divide
the space in half, I can then add smaller and
more close together windows. So the windows up
here farther away from us are much smaller
than the windows down here, which are closer to us. But the vertical
lines all generally trend towards that
top vanishing point. And you'll notice my lines
are not super straight here. That's right. That's by design. We want to be
focused on sketching and the idea of free
hand drawing here, which often means mistakes. It's about generally getting the feeling of the
perspective right and not really worrying about
those small little details. But we've effectively created a new perspective plane here with these three
points that we've used. If you flip your drawing
upside down now, you can see that three
point perspective can just be flipped
around to make it appear like we are right above this building looking downwards. You could see how this
could be infinitely changed to make it appear
like this skyscraper, goes down into a city or into a cavern or something
cool like that. For now, I want you to finish off this part
of the challenge by adding more perspective
elements into your scene. And you can do this by ensuring that the vertical lines you're drawing generally aim upwards towards that top
vanishing point, and the horizontal
lines you're adding generally trend down
towards either side. This can be useful when
adding other buildings here, whether they're tall or short. Or even streets in front
of the skyscraper. You can see how just
with a few lines here and a few
perspective points, we've managed to
create a city scape or a city scene
that's very messy. None of these lines
are straight, none of them are
technically correct. But we're capturing the essence
of this perspective just by using a few perspective
vanishing points. What details are
you going to add? I'd love to hear about it in
the class description page, and you can finish
off this challenge by adding some shading
because shading is a great way to add dimension and scale and depth to
our drawing here. Oh by using some lines here on the left hand
side of our skyscraper, we can make it appear
like the sun is hitting it from the
right hand side, bathing the right hand side or the left hand side in shadow. It's this contrast that
can make buildings, especially drawn in perspective, appear that much more robust
and three dimensional. By adding shading,
we've effectively given the scene a
little bit more depth. You can even add a shadow on the ground as well to
make it appear like this three point perspective
building is taking up a little bit more space in
this scene that we've drawn. I love adding some trees here, some nice elements in the foreground to give it
a little bit more depth, as well. But I invite
you to keep going. What else can you add to this scene to
really make it pop? I'd love to hear from you in
the class discussion page. I'll see you in the
next edition of this free hand perspective
drawing challenge.
10. Day 7: Draw your View: Today, we're going to
be sketching your view, what's in front of you
right now or what's near you in the room you're drawing in or the space
that you're drawing. But along the way, we're
also going to be talking about scale and
how you can better measure the things in your field of view
to make sure that the scale of the stuff in your perspective
drawing makes sense. Now, I'd invite you to look out your window or look
at your front door, maybe even snap a photo, so you have a reference of
it, and then come back. We're going to be using
that reference to draw a simplified version
of the scene in front of you using the
techniques we've talked about in previous editions
of this challenge. When you look at your
photo or your scene, I want you to identify
three parts of it. That's the foreground,
an object that's interesting or more central
that's closest to us, the midground, objects or a part of the drawing
that's, you know, halfway between us
and the background, and just that the background. Objects that are
the farthest thing that you can see
in your drawing. Identifying these three planes or these three types of objects is really key because when we're sketching a three dimensional
space from a photo, it can be kind of demoralizing if we think we have
to draw everything. Drawing any sort
of scene in a lot of detail would
take a lot of time. You could spend hours
drawing a scene. For our purposes,
we're going to do a light sketch of the
scene in front of us. An important place to start can be thinking about
that horizon line. Finding a horizon line in your photo or in your scene can be a little bit difficult, especially if in my scene,
there's buildings in the way. However, one valuable
exercise can be tracing some of
the lines that appear parallel to you as
in leading directly back into the distance down
and seeing where they end up. If we do that with
the top the building on the left in my drawing and the top of the wooden
slats of my deck balcony, we can see that they meet down behind the buildings
in the background. Tracing those lines
down gives us valuable clues as to where
to put the horizon line. Since I'm on the
second level here, I know that we can add
the vantage point a little bit of ways off the
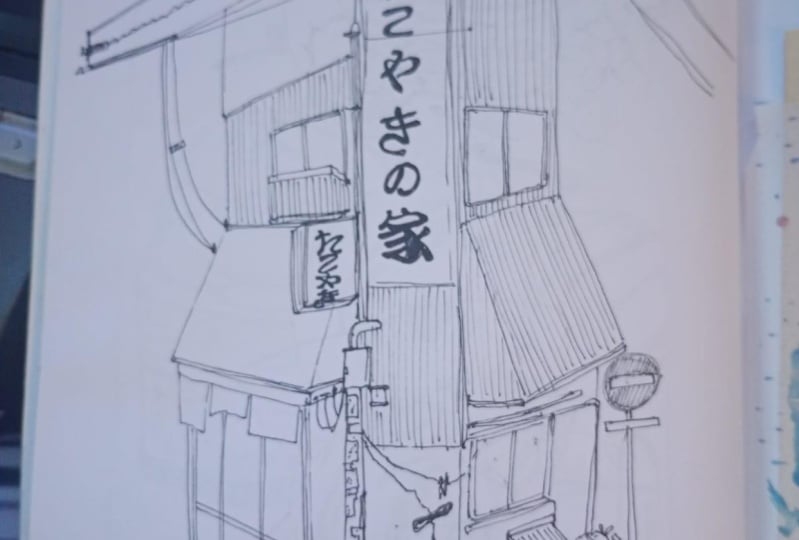
paper, just over half. That's because we're looking down on the scene a little bit. I then want to trace a very
dominant line in my drawing. For me, that's going to
be this gray building on the top left hand
side of the page. I'm going to use that as a guiding line for the rest of the perspective
in our drawing. I can guestimate the
angle of that line, but then continue it down
to that horizon line. I'll draw in this side of the
building very lightly here. And that now gives
us a clue as to how we can draw the rest of the lines in our
perspective scene. For example, this building, the brick building here is a very dominant part
of the drawing, and we can make sure that
it's a square that kind of roughly leads back down to that horizon line
advantage point, as well. I've identified two important
parts of the drawing, one in the background and
one in the midground. We don't see the bottom
of each building, and so it's only important for our purposes to draw the
tops of them for now. The tops are what we observe and what sticks out
at us the most. We can then kind of
sketch in some of the other parts of
our background. For me, there's a little
house back there in front of that brick building and a
couple other vertical roofs. And you'll notice I'm
being very loose and sketchy with how I'm
drawing in these spaces. I'm not trying to capture all the details because that would be really difficult to
do in a short class. However, what's
next is we can draw in objects in the midground. For me, that's this
balcony ledge, the railing, and
the wooden slats. Making sure that this
railing kind of generally goes back towards
that vanishing point. I can then continue it down and add the glass railing along
the middle of our page. You'll see that if you look at my photo and then look
at what we've drawn, some of the perspective
lines don't really add up. For example, the railing
is actually seems more like it would be right on the horizon line rather
than just below it. However, some of
those little quibbles or mistakes can actually be right and not super noticeable when you draw
in the rest of the image. If I draw in lightly the bottom of this balcony ridge here, I can then add some of the
slats or the metal parts. You notice I'm
kind of going over some of these shapes
multiple times, but not worrying too
much about the details. We're focused on the
overall big picture here. If I'm going to
draw something in the foreground of
my scene, as well, I can think about
this table shape in the same way we thought
about drawing our mug. And that's making a
complicated shape out of an easy, basic shape. If I draw a nice wide triangle kind of coming down from
that vanishing point, I can then kind of square off
a thinner rectangle here, extending it down onto the deck. Like so. Just like before, I now want to kind of sketch
out a very thin table shape, drawing it over multiple times. We have the top of our table right on the deck
in front of us. Again, this one appears
a little bit below us, whereas the table in my photo appears a little thinner
because it's more on eye level. But I think that's
right for our purposes. I'm going to draw the
legs down here as well, extending from the
middle of the table. And the legs at the back, I'm making sure that they fall shorter because they're a little bit farther away from us. And yeah, this table
is not perfect. It's not exactly how it
appears in the photo. But for our purposes, we just want to capture
the big picture items and the big picture
of our scene. So now we have an object
in the foreground, our table, objects
in the midground, the balcony and the wooden slats and objects in the background. Just like in the
previous lesson, we want to keep a
couple of things in mind when we start to add details into our rough free
hand perspective sketch. First, is that the
objects closest to us are going to be
the most detailed. That means it might be
important to add a couple of details to the wood that
surrounds us on the deck here. One, we can see that there are slats horizontally,
wooden boards. Kind of coming across the deck. Just like before, I'm using the vanishing point as kind of a guideline here for how I draw these wooden slats
or wooden boards. The boards themselves
get wider and larger as they come
towards us on the deck. And again, this is not exactly like it
appears in the photo. But I'm capturing kind of the essence of the
perspective of the scene, not exactly all the details. Next is the horizontal slats on the side of the balcony here. When I'm drawing repeating
shapes like this, I find one thing that
can be helpful to keep in mind is dividing the shape in half in order to more accurately get these lines. So if I divide the shape
in half with a line going right back towards
that vanishing point, it's much easier for me
to guess the angle of this line as well that should also kind of go back towards
that vanishing point. The same goes for a line
down here and maybe lines in the middle that all lead back towards
that vanishing point. When you think about drawing
windows in my scene, you can add some guidelines
or kind of guestimate, making sure that
those lines appear to recede back
into the distance. And from here, it's about adding the details as you see fit, making sure that the objects in our midground and
foreground are darker, more dynamic, and more fleshed out than the objects
in our background. Perfection is not the goal here. And if objects in your drawing are
appearing a little wonky, just like my table,
that is right. This is about
practicing perspective. It's not about getting
perspective, perfect. There are some further
details we can add here in the background in my drawing, some other elements here on the skyline behind us and some light poles,
stuff like that. Maybe even a fire escape
on this building here. You can see how we've
been giving ourselves the building blocks of
a perspective scene. The next steps would be learning detail or learning texture or more complicated
aspects of perspective, and maybe three year four
point perspective as well. Those are all really
valuable to learn, but these vital building
blocks hopefully give you a little
bit more confidence in sketching the
scenes that you see. We haven't created
a masterpiece here, but we've created a
miniature little sketch that tells a story of
our neighborhood or the view in front of us. And that's what I love about
perspective sketching. It tells the story of a
three dimensional space. So I'll see you in the
end of this class, and I hope to see
your work, as well.
11. The End: When you look back
through your sketchbook, I really hope you
see a progression from the first part
of this lesson, the lines we drew to the last where we talked about
distance and detail. Throughout these seven days or throughout these
seven lessons, no matter how long it
took you to watch them and do these
sketching exercises, I hope you gained a little bit of confidence and developed an appreciation for what
free hand perspective can really add to
your art practice. Perspective drawing
doesn't need to be intimidating and it doesn't need to be done on a big scale. Sketching in a little
sketchbook can be such a valuable part
of your art workflow. But don't forget to post your work. I want
to hear from you. I want to hear what
part of the class you liked best and what lessons you thought were most applicable to your hang ups in perspective. Most of all, I hope
you keep sketching. I'd love to see what
you create and thank you so much for
taking this class.
 Sam Gillett, Pen // Pencil // Procreate