Transcripts
1. Welcome to class! : Hello dear friends
and welcome to class. I'm Elise and I'm a
watercolor artist and teacher and I love lowering the
threshold to get started, making it easier for you
to have art and creativity as part of your everyday lives. It's not just a
special occasion. I have three hours of free time, hyper-realistic lots
and lots of layers, and waiting and patience so that it can be
a bigger part of who you are and how you
show up in the world more often than just
those big occasions. For today's class,
we'll be painting some beautiful flowy,
splashy trees. If you've taken any
of my other classes, you know that I love combining the wet-on-wet technique
with a wet-on-dry. Both how that flowy,
uncontrollable element where we let the
paint flow in water and at the same
time, balancing out, contrasting that with
those sharp crisp details that we get from the
wet-on-dry technique. We'll also be doing some
sneaky color mixing when we mix granulating colors where the colors
split in the water and create these
beautiful effects. Some paints have
them automatically and we can replicate
it by mixing the paints that we already have. You don't have to go buy
all of them like me. I'll be showing how you can mix your colors directly
onto the paper, as well as using a palette just to make it even easier
for you to get started and lowering that
threshold again and again because if the goal
is to paint more, why would we make it making more difficult than we need to? At the end of this class, you'll end up with
some lovely trees, this flowy top bit
and in the ground, and then the details and these little branches
that we're using, the wet-on-dry technique
which gives us more precision and more details
and more control. To get started with this class, you will need to bring
your watercolor paints, watercolor paper to paint on preferably 100
percent cotton, which I recommend
for any wet-in-wet flowy technique where we're
using a lot of water, water and paper are
not really friends, so making sure you
have the tools to accommodate for that and bringing your
watercolor brushes. For this class, I'll
be using two brushes. One that constantly stays clean, the clean water brush, and then one that
I use for paint, that way I know that that
seamless blend into the paper, the white of the paper will stay as crisp and clean and smooth
and seamless as possible. I hope I'll see you
in the next lesson. Go and find your
watercolors supplies or wait for the supplies video to make sure you go find
everything you need and I'll see you in
the next lesson.
2. Class project: Welcome to your class project. In the spirit of
learning by doing, at the end of this class
you will have finished your own flowy
watercolors classic tree and I'd love
for you to share it in the project gallery
below when you're finished. That way, we can all keep
inspiring each other. You can see other
people's projects and get feedback on your own. I always comment on all
of my students projects. I love seeing them, seeing how you make
them your own, see which colors you've chosen, see what mixes you've made. That way we can keep this
sharing our experiences, inspire each other right back. I would love for
you to share yours when you're done and
also how you felt about this approach to making
it easy to get started. Whether or not you have
the creative habit that you'd love to do
every day, every week, however often you
love to sit down and put your brushes on paper. Just have mentioned this out or remind you again at the end. If you would like to share your creations on Instagram
and social media, I would love it if you tagged
me, just @elise.aabakken. That way I can also share
them with my stories. I love seeing your version
all over the social medias. I just wanted to
remind you that, I consider you an artist, whether or not you ever share what you create with anyone. You can just walk away
from this class with your painting and
think, I'm an artist. I created this. The only reason it exists
is because I made it. That feeling is so valuable and so precious that
if something like, I think I have to share
this on social media, I don't want anyone
else to see it. If that's stopping
you from creating, please let that expectation go and don't show it to anyone. Just like when you're
wearing fancy underwear that makes you feel good when you don't have
to show it to anyone for it to have an
effect on how you feel about yourself and
your creativity and who you are as an artist. That being said, if
you want to share, I would love for you to tag me. Also if you wanted to share
how you felt about this class. If you have a
creative habit that you really like,
that you've started, how are you making it easier
for yourself to show up to that creative practice
and how might that be translating to other
areas in your life? Just like yoga will
affect the body that you then walk off
into the world with. I think creativity
shapes our brain, shapes our
problem-solving skills, and I'd love to hear from you how you feel about that as well. In the next lesson, I'll be sharing supplies
I'll be using for today's class as well
some suggestions. You don't have to have
the same supplies as me, of course, but bring
your watercolor kit. Main main thing is bringing
watercolor paper that can handle all the amount of
water we're putting on it, 100 percent cotton
is my favorite. But use whatever you have and
see how that works for you. Because one of the reasons
I love working like this is because when you get to
know your supplies better, when you were exploring,
playing with their colors, playing with your paints, playing with your
paper, you get to know how your supplies
work together. No matter how many tutorials
or classes you watch, the only way to really
know is by doing it. Feel free to explore, play with these techniques
and make them your own. I'd love to see your version of these flowy watercolor trees.
3. Supplies: First things first,
watercolor paints, everyone's favorite. Here I have a selection
of white nights paints and some Roman Szmal
here in the middle. Some of the Roman
Szmal colors have this beautiful
granulating effect, which means they're already mixed with a couple
of different colors. It's really clear here
on this mineral violet that there's two different
colors splitting and playing in that water, and this is one of the effects that we were playing with later creating this for ourselves because it's just two
different pigments. This ultramarine, which has
that granulating effect, that texture, and this really smooth software, an
quinacridone pink. That will be a beautiful mix which we can use to replicate
something like this. Bring your favorite
paints that you only really need one paint
for this whole class. As per usual, I love
painting in monochrome and that way we
don't have to worry about eye color mixing it all. But I'll show you an easy way to get started with color mixing if that's something
you're interested in so that you can get even
more out of the paints that you already have. When you found your
watercolor paints, you want to find
something to paint on, and I bought a couple of
different options here. There's these postcards. I really like working
on cold-pressed paper, and for this textured
flowy technique, I find it easier to
use something that has a bit of texture
on the surface. A bit difficult to
see in this light. But it's not as smooth as something like
hot-pressed paper, and then we can also use
something like a rough paper. Here's one of the
examples from this class. You can do those sheets
of papers like this if you want to make
postcards, hot tip. I usually always paint
on them upside down because I never checked the back of the print of the postcard. If you want to check that first, feel free to do that before
you start painting on them. Then I also brought my
little sketchbook here. This is also 100 percent cotton, which is my favorite kind
of paper to paint on. Because it deals really
well with a lot of water, and as per usual, water and paper are
not really friends. When we're adding
a lot of water, we want a paper that's
able to hold that and spread it evenly
and dry evenly so we get those
smooth transitions. We had to watch that
paint flow on the paper, and this is also where
I'll be demonstrating some of our brushstrokes, how I will hold my brush to
get the precision that I want and how to use my brushes
in the most functional way. Give me some tips about that. As well as we're going through
our technique practice in the beginning
and then showing how I put that
together for our tree. Then of course we'll
need some brushes, and for this technique, because we want to put
down clean water first, flat flowy, splashy
top of the tree. I'm going to bring
some of these looser, fluffier brushes, and the general rule is
the bigger the brush is, the more water it will hold. The bigger your paper is, the
bigger the brush you want. For these ones, I'm not going
to paint super large today. If you had a much larger paper, you might want to change your brushes to a bigger size just so we don't have
to go back and forth between the water so many times. But for something like a
postcard or the A5 and smaller, I would probably be using
these brushes to pick up that clean water and
put it on the paper. Then using that as my
dedicated water brush, I would use the smaller
brushes for paint, adding more precision, and these are snappy brushes. I could also get those little fine details of the branches, making sure that
I have one brush that then has all
the paint in it. So it doesn't
contaminate that water, and I can make clean, beautiful flowing
into nothing trees with that clean
water on the paper. If you want to,
you could also use a travel brush like this and just keep that as
your clean water brush as the first thing you go in
with every single time. That way, you know that you
won't have any contamination because this one
never touches paint. Bring the brushes that
you love the most. Those are all the fun supplies and we have our technical, less exciting supplies,
but equally as important. I really love using jars
from a clean water. That way, I can just close
them up when I'm done, leave them on my desk, and you can also use the
lid as an extra palette. If I want a mixing
space for my paints, for example, so I have two. This will be my dirty water
as it has a bit of paint in the bottom there. When I go into rinse off
my brush with paint on it, I'll erase it first
in my dirty jar. Then I'll go in and pick up
clean water from my clean jar, going into new paint in
the not contaminating, especially for going
from a darker, more painting permanent
paint into a lighter pink, so say from blue to
yellow, for example. Bring two jars of water, and then I always
like to bring a rag, something to wipe my brush on. This one is well loved, but having something
that's a light color. Say for example a black napkin
would be difficult to see if you've gotten all of that
color out of your brush. You'll see me using this to
control the amount of water that's in my brush and also
to rinse off my brush, checking that I've gotten all
of the paint out of my brush before going into a new color. Then because we're
doing a bit of this color and mixing magic, I've actually brought
a palette today. I usually lay in it and I actually don't know this. But I'm going to
show you how to mix it on the palette if you'd
like to do that first. Say you want to do
three different ones when you use the
exact same color mix, then it would be nice to
have something like this. I always love having a
palette that is white and also in porcelain. It's just much easier to
clean and the colors show up as they will on the white
paper as opposed to if you had something
like a colored palette or something that was already
tinted, a different color. Not necessary, but
I'm going to show you how I would use a
palette for it. Or you can mix
directly on the paper, which is also
something really fun. But I'll show you how I do, which is how I usually do. Get your supplies ready, and I'll see you
in our first video where I'll just be talking
about the technique, some other brush techniques, and the vocabulary will be using the wet in wet
technique, wet-on-dry, and some dry brushing as well. I'll see you then.
4. Watercolor vocabulary 101: Jumping into our painting part. This is my little sketch
book that I have here and I just wanted to show you some of the different techniques that we'll be using in class. The two classic
techniques of watercolor, which is the wet-in-wet. When we put water down first
or even a layer of paint. Then we put wet paint
into that wet layer, which allows that
flow and spreading because watercolor will
go wherever it's wet. We still contain it
within that wetness. Sometimes or maybe tape
around all the way and you'll wet your tire
paper and you can work with a soft blurry
background like that. Today, we're going to
make a bigger space than the space we want that
paint to flow into. The goal is to let that
flow almost to the end. As that pink keeps
flowing outward, it's going to leave
pigment behind and gets lighter and
lighter and lighter until there's nothing. That's how we get that
seamless transition from paint into the water, on to the paper
out into nothing. We don't get any
hard edges around, which is not a problem. But if you want to try
out this flowy technique where we can somewhat control how our paint is flowing
and playing in that water. Just to show you an
example of that. For this one, I've probably
put water at least a couple of centimeters
further out than I needed this paint to flow. Then the wet on dry technique, which is exactly
what it sounds like, which is putting wet
paint on dry paper. That's how I make
these crisp lines. That's how you would
achieve something like this line where it's clear. Where the paint is put
exactly on the paper. It won't go anywhere else. It's going to stay
exactly where we put it. Whereas here we lose
control a little bit. It's going to keep
flowing outward. The same here at the bottom
where it grows downward. Then the transition into these more hard edges
as they're called, where it's a clear
differentiation between where the paint stops and
where the plain paper begins. Getting this contrast
between this beautiful flowy top of the tree that's like
growth flowing outwards. I describes it
just so beautiful. It's one of my
favorite techniques, which is why I wanted
to create this class and talk about this one today. Just to see what sometimes
gets in the way of creating an effect like this is what we call a water control. Water control means controlling
the amount of water in our brush and the amount
of water on our paper when we're working in
wet technique because since watercolor is a
transparent medium, it also matters how much
water we mix into our paints. If we have 50 percent
water, 50 percent paint. That's going to give us
a very different color than 90 percent paint and 10 percent water or
the other way around. The more water we have, the lighter the pink becomes. The more transparent it becomes. Which is one of the cool
beautiful effects of watercolor that we can make those transparent layer on
top of each other. From one paint we get so
many different colors and shades of color because we can work with
a light in the dark, which is why it's so beautiful to work with watercolor
in monochrome, just using one paint
for an entire painting. As you'll see from this
paint box that I have here, my swatches that I've made. I made them in a gradient. That at the left side, you'll see the full
density of the color, as dark as I can
possibly get it. Then mixing it with
more and more water as I go to the right. That way I see like I
can actually make this with dark bluish turquoise
to almost like a pastel, super nice and light blue color. All colors have a
different range. The lighter colors will
have a smaller range. That arc portion of the
color it's not as dark as some of these richer colors. If I took a black and
white photo of this, that would show more dark
grayish tone over here, whereas the darkest
part of this indigo would be almost black. Exploring the range
of your paints, getting to know them better. Getting to know how
they flow and spread. What qualities they
have as far as are they really smooth
and blends really easily? Or do they have
texture like this really fascinating a
query as black over here, which breaks into these
particles and this granulation, just a terminology for that. Some of these also do that
and have that same effect. It's in these various
pigments as well. Without going into
too much of that, this is a way to get to know
those paints even better. Getting all those
qualities that they have.
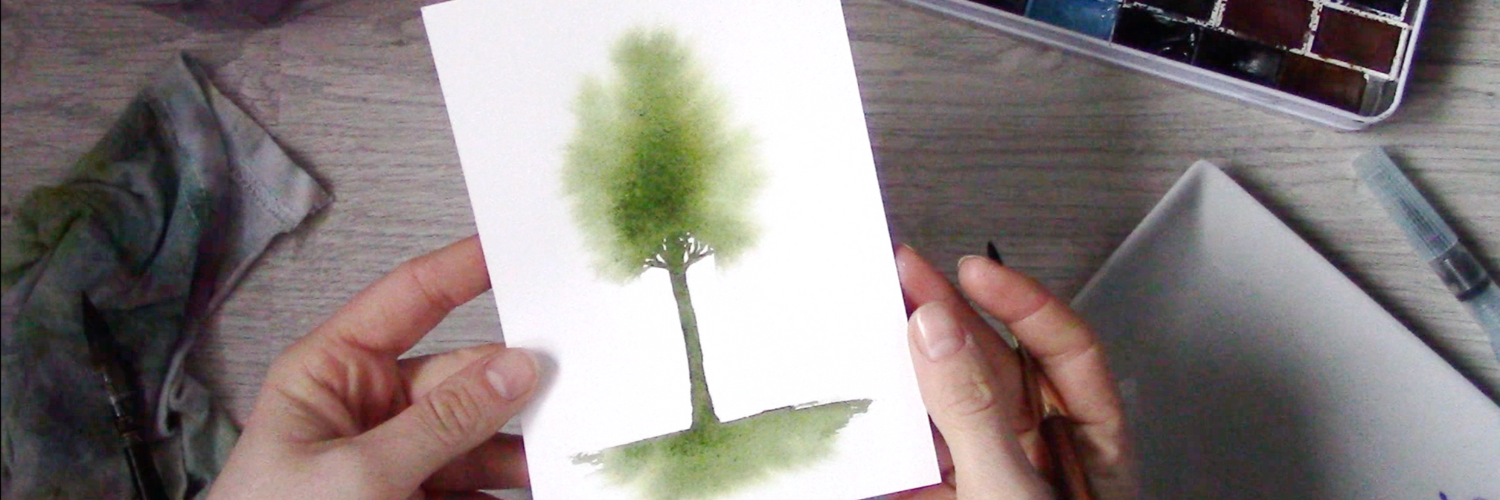
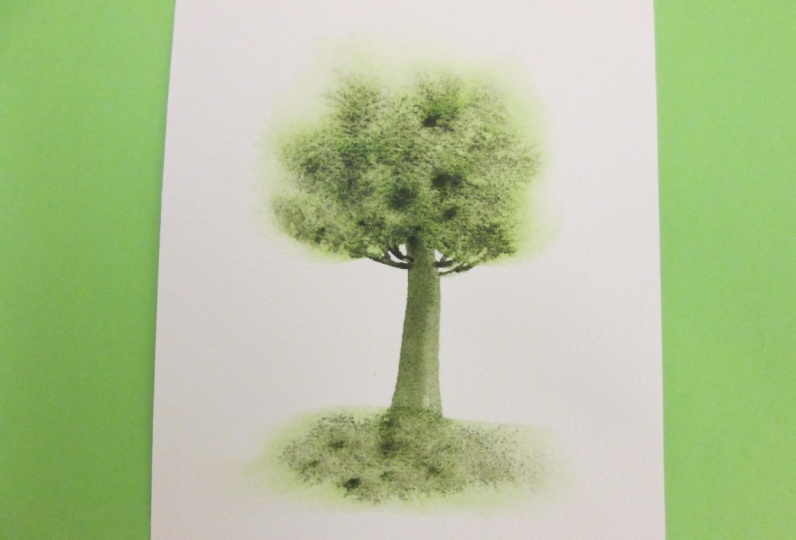
5. Wet on dry - Precision and control: Just because I think it's the easiest way
to start painting, just get some paint
onto that paper, best going in with our
wet-on-dry technique. This paper is dry. There's nothing on this yet, to get some water on my brush. Then I'm going to activate
or soften because now since these watercolor paints
are in pens, they're dry. If I touch them, I don't get any
paint on my hands unless some of them
are very sticky. To start painting
with our paints, we'll get some
water on our brush. I'll just go into, what colors should
we choose today? Let's choose this
quinacridone violet, why not? I usually don't use violet. Let's play with this one. I'm just using the
tip of my brush. I'm going into that violet paint and it's moving it around. I don't need too much water. You maybe saw me wipe my
brush on the edge there. This one activates
rather quickly, some paints are harder
than others to activate, to soften that binder, which is what holds
the paints together. Then other paints are
really easy to activate and you just touch
your brush over and get a whole lot of
paint on your brush. The easiest thing
just to get started, just to get to know
your brush is just putting brush to paper. That's it. That's a terrible swatch which actually gives us
some other information. But just getting that
brush onto some paper. As you can see, even just in the
swatch like this. I have gotten the most
darkness over here because my entire brush
is filled with water. As I move over to the side, I leave more pigment on the
paper and more water is being mixed into the paint color
that I'm putting on my paper. Also you'll see at the end here that I'm starting to skip
the texture of the paper getting into what we
call dry brushing, which is what it sounds like, that the brush is getting so dry that it starts
skipping the paper. Which can also happen if you're too fast
in your painting and you just put your
brush down and drag and you're not letting
it get the time that it needs to
really start spreading that paint onto the paper. That being said, the
wet-on-dry technique is one of the more
controllable techniques, just going back into what's already activated
over on that violet. You might have seen that when
I was doing this swatch, I was holding my brush more like an angle flatter
towards the paper. This gives me more of
that painting side. You'll see how that
gives me a wider swatch. Whereas the more I
tilt my brush upwards, the more of that
point I get straight down to the paper
as with a pencil. If I hold closer to the
brush head as well, closer to the bristles,
I get more control and I feel like I
can do more precise, thinner lines in details. I'll say if you're going
in painting trees, painting little
branches for example this would be how I
would hold my brush. Getting those really
light strokes and getting both keeping control and letting it be loose
and free at the same time. One of the main things I did was to tilt the back
of my brush upward so that I'm using it
more like a pencil. This also depends on how much water your
brush is able to hold. Because some brushes will
run out very quickly and some papers are
really absorbent. So the moment you put
your brush down, it goes, and then there's no more
paint left in your brush. Knowing how your brush works together with your paint,
together with your water, together with your
paper is also some of that fun exploration
that you can do while you're learning to paint with the tools that you have. This wet-on-dry technique
is something to practice. Having not practiced
this control, especially for those
branches for the tree which we're going to use
this technique for the trunk and for the branches to have that ability to go in
almost like color in, blending those colors together. You can work in short strokes
or longer strokes as well, because we're going to
put water on the top and water on the bottom. This trunk right here would start blending
outward and upward, and down into the
water on the ground and the water for
the top of the tree. Getting to know your
paints like this, getting to know them for
that wet-on-dry technique. This is a technique you can
use for almost anything and it is a really
safe place to start because your paint will
go where you put it. It won't suddenly jump over
to another part of the paper. It won't start flowing
and dripping around unless your brush
is incredibly wet. Actually, since that was mentioned, let's
show that as well. If I was trying to do
something like this, something like a
precise little branch. But see how I'm just
dipping that brush in, not letting any of the
water come back out again. This brush is now very wet and it will be much
harder to control because my brush
is wants to let go all of that water that's in it. I'm trying. But you can see that
that's ball lobby in wet and watery and might
start flowing around. Whereas this up on these
swatches right here is worked more is like
a marker, I would say. Just knowing that the precision of how you're using your brush with the amount of water that you're using
will make an impact. Also now, because there's
more water in the brush, a swatch like this will
maybe be lighter, number 1, because there's more water, but also probably be able to
drag it a little bit further because I have more water. It takes longer for
my brush to run out and start skipping the paper. You can see there's more flow. My brush let go off a lot of
water there at the beginning, and then it's getting
lighter and lighter. Then with this light wash that I already have in my
brush, starting to layer, starting to get into
that dry brushing. As you can see it's
gone more transparent making layer on top
of itself there. Water control in
the sense of both controlling the amount
of water in your paint, and the amount of
water in your brush, putting that down
onto the paper. Also, yes, it's going
to dry a lot slower and when it dries because
it's drying unevenly, this might also create what
we call watercolor blooms, which is when one part of the paper dries
quicker than another. We get these backgrounds, which is where the water and
the pigment is pushing back into a part of the paper
that's already dry, which is a cool effect
to you sometimes, but not necessarily
always what we want. So having some practice
and controlling that, controlling a little bit of
this uncontrollable medium is also a fun way to explore. Just knowing that too much water will result in less control and that the precision
of the brush doesn't depend as much on
the size of the brush as it does with how much
water is in it and how fine you can
get those details. You can also create that
dry brushing effects without having to go to
the end of the swatch just by dabbing your
brush off on the side and then getting that
side of the brush. Like we did in the beginning, holding it flatter to
the page is an effect we can play with as
well letting that skip. If you want bark on
your tree, for example or you would like
that flowy ground and then some dry
brushing at the very end. That's also an option for that. Turns out I had a
lot to say about dry brush technique, the
wet-on-dry technique. That is something to play
with, something to explore, something to investigate,
and moving on, we're going to talk about
our wet-on-wet technique. How to know if you have too
much water, too little water, and how to get that flowy beautiful watercolor
effect for this tree. We'll see you in the next one.
6. Wet in wet - Flow: Onto maybe my
favorite technique, which is the wet in wet, which is my favorite technique. If you've seen any of my other
classes with the splashes, that's also what
that's based on. Letting the watercolor
do what it does best, which is flow in water. This effect is one of the
most beautiful things I know, [LAUGHTER] and it's fascinating
and it's also quite easy when you have a little bit of tips and tricks
to know what to do. I'm getting my
clean water brush, putting it into the
clean water jar, which has stayed very clean. We haven't wiped off
this brush very much, which is our paint paintbrush. But still, this water
is quite clean. Just moving my brush around, I push it against the
side of the glass, side of the jar here. Then so that it's not too wet, I'm going to wipe it off a bit on the side
of the jar here. That way I'm just controlling the amount of water
that's in it. It holds a lot of
water but it's not dripping off, so dripping wet. Because we're trying to
control it somewhat, we want to have a
sheen on the paper. The effect that
we're looking for is not to have a
sopping wet page where the water is moving
around in its own space. We just want the
sheen of the paper, and this is what we can call a controlled wet
in wet technique, which is an illusion. We can't really control
that [LAUGHTER] but we can control it
more than nothing. Just starting from the side, I'm holding my brush in
the same way as I did for our first wet and dry
technique, the swatch. Holding it quite flat, that way, I'm not pushing my
bristles onto the paper, and I don't really
need any precision in the same way as I do with
the wet on dry technique. For this one, it's getting a little bit
more wet from there. I'm just dragging it alongside. This way we can go a
bit back and forth, although it is recommended. If you go backwards, just be careful that you're not bending the bristles backwards, but going in the same direction
saturating that paper. Cotton paper is usually
very absorbent, so you might have to go back
and forth a couple of times, but it's going to get
that sheen there. You see how you can still see
the texture of the paper, and there's not a lot of
water running around. It will start drying
pretty quickly. My recommendation to you is
just to play with this a bit. Just getting to know your
paper and your supplies. You might want to reboot and refill a bit of
water on that paper. We have what we want,
is just this sheen. How much water you need
will also depend on how warm your house is and
how wet your paint is. Going back into that
violet from before, I'm just going to put it
in just on the side here because this is the angle
we're at right now, so the tree would usually
start at the bottom. Just putting it
in from the side, it will start to
flow where it's wet. It won't flow outside
of the wet area, but it will flow
wherever there's water. This is also something
that we can help encourage by giving it more of that gravitational
pull by moving it. It will flow with
the direction of gravity and also with the
direction of the water. I like this dotting in motion, especially when I'm
creating trees, and this gives us the freedom to get a
little bit more paint. To also concentrate, maybe we'd like a stronger
color in the middle, and more of a soft blurred
out effect at the sides. Then here at the
edge of the water, which is where I would
be making my trunk, as you can see,
maybe I'll put up a little lighter
trunk than that. But this is the effect
that we're looking for, is that beautiful
flowing outward. Let me hold it
like this instead. What we don't want is for this paint to flow all
the way to the edge. That can happen either
if the paint is too wet, I'm going to show
that in a moment, or if we have too much
water in our brush. Where this would be going is
then I would start making this trunk downward
the other way, and also out of this
trunk creating. Again now we're doing
the wet on dry, angling my brush, and making those little branches upward into that tree while the tree is still wet just so you already know
what's going to happen. We can also make them darker, and make them go up into that
tree using that technique, and still keeping half an eye on how far is my tree flowing, how far this leaf is
flowing outwards? What's important to note about the wet in wet
technique as well, is that when it's
starting to dry, so you can see there's still the shine in the middle there, but those edges have dried. I can't go in and put
in more wet paint there without starting to, I hesitate to say
sabotage [LAUGHTER] but it wouldn't get
that same soft, smooth, blurred out effect
because it's starting to dry. The only place I would be safe, comfortable putting in
more paint now is to just add that middle part. For this one, I will
just leave it like that, and then that flowy effect. Of this going not, of this this not going to
the edge of the water. The water went all the way almost until the
edge of the page, and it's still getting that seamless effect flowing
in, outward into nothing. That works out wonderfully
for our first try. But what could happen, I'm just going to
show you what happens if I put too much water down.
7. Too wet? Hard edges? NOW WHAT: As you might already
have guessed, if we don't put enough water and it starts
drying immediately, we won't get that
outward flowy effect. But if you put down
too much water, you might get the effect
of adding a hard edge, the paint running all the way
to the edge of the paper. Let's say the
pigments is spreading and spreading and spreading and it really wants to
go as far as it can and adventures paint. It comes to the
edge of the water and then it stops there
and it dries right now and then that edge
becomes the new edge. Where it if it keeps flowing but it doesn't really
quite reach the edge, and then it dries there. We get that soft
blurred out effect. The edge of the
water stays clean. Hopefully that makes sense. I'm going to do
another very clean. I'm just going to dry
it off a little bit because it will drip everywhere, but not really drying off
my brush you can see that, see that big water
drop underneath there, and just putting on so
you can see already it's belonging up on the side
there and flowing around, which means it will be
very difficult to control any type of paint that
we put into this, which is not going to lie, a super fun technique
to play with and just exploring your
sketchbook, for example. Let's say you wanted to make
this fully seamless tree, this amount of water. As you can see, we
can't really see the texture of the
paper anymore. You can just see all that
let water flowing around. That's not going to give
you that same effect if that is what
you would desire. So going in with the same paint. Now when I put it in, you see how that does not
give the same effect. Even if I tried to drip it in, might start flowing a little bit and the when I start
tilting the paper, see how that water is just going on an adventure
with all my paint, going to the edges of the water. Yes, it's not going to flow
to the rest of the page. But where did my tree shape go? It just disappeared? I have lost all
sense of direction, all sense of control. Even if I now try to, but I wanted there to be more
color here at the bottom because there's so much water. It can just flow everywhere. Of course, I'm now
exaggerating it and manipulating it to
move all the way outward. But I think you can tell that this would happen regardless if I let the paint
flow all the way to the edge in that way too wet. Wet swatch. Fascinating to watch for sure. But also don't get that range from the darker to the
lighter because now everything is mixed evenly
because everything is mixing into each other
and the way that it will dry is that maybe
it will gather over here. This part will dry faster. This will dry slower and bloom back into the rest of the paint. Even though this one now
has a couple of places where the paint didn't flow as much as they
might have wanted. When it was still wet, I could have gone
in with more water, started to blend that out. Whereas this one
looks very delicious. That's gone over to the side and will drive very unevenly. Whereas this one has, even though I might have
wanted to fix this. I might have wanted less concentrated pigment
in the middle here. It still has that
seamless outer edge into the white of the paper. One trick that I
wanted to teach you, which is one of my
favorite savior tips, is using that paintbrush. Still this is the one
that has the color and I'm going to rinse it off. This is for when you
have too much water. This would be
difficult to create that seamless effect from
unless you expanded it, which I'll show you how to do. But if you don't have
more space on your paper, like here, it's too
close to the edge for me to expand it into nothing. But I'm still going to show you how to potentially rescue a little bit of
that excess water. This is what we call
a thirsty brush. I've just rinsed it
off in my water. Then I've dried it
off on my cloth here and this now works as a sponge. I'm just going to
touch that over to this very wet puddle here and it starts soaking
up that water. Then I will just wipe
that off from the clock, go back in, slurp it up. This might take some
back and forthing, which is 100 percent
vocabulary for this. It might also be a good
idea to rinse it, wipe it, then go in, letting that
soak up that excess water. Because excess water can also
happen when you're working, like we saw when you're
working wet-on-dry, if your brush holds too
much paint and water. Then we can just use it
as this sponging up that excess with the very fitting
name thirsty brush like so, and then suddenly we have not
too wet like this wetness, this shiny texture of
the paper wetness. Now, that would actually be a good base for
a wet and wet tree. That being said, if you wanted that seamless out
to the edge effect. Another trick is we're
troubleshooting as we go here. Another trick would be to
get a very clean brush is going to rinse this
first in our dirty jar, and then in our clean jar
so using a clean brush, this whole brushes
will clean water now and then wiping it somewhat so it's almost the same
wetness as a thirsty brush and then while it's still wet, we have some
opportunity to go in and use this as a
bit of an eraser, as a bit of a blender. To try to manipulate
that paint a little bit. Blend it outward into nothing. Now, this wasn't a
perfect example. But I think you can see that this has picked up a
little bit more of that, allowed it to spread
into more water. We can also add more
paint into this. If it just happened
in one corner, for example and then
this would be a way to camouflage that hard edge. When we're doing our tree later, you might see me do this, for example along the bottom where we might reach
the edge of the water to avoid those hard
edges as well. Those are the techniques that we'll be using for
today's tree painting and I'm excited to
see your version so these are all in monochrome. What I'm going to show you
is going back and forth into two different
colors as well so we'll first do
a monochrome one, and then we're also going to do one with two different colors, mixing them together as we go
as we're painting the tree, which now that you have
these different techniques, you can do immediately. You can just go in and be, I wonder what happens if I mix this yellow
with this blue. Probably get some green. Let's see what happens. Instead of mixing them in
advance to check the color, would you also can do but you
don't have to efficiency. I will see you on the next page.
8. Let's try a tree! Monochrome: Welcome back. After finishing up our
technique practice, I'm going to put all that we've learned together
and we're going to paint this lovely tree
over onto the other side. Just to demonstrate
because I want to mix these colors myself, afterwards, I'm going to go in with
that mineral violet that I showed you
at the beginning, this one that splits into different colors on its own because it's made with
two different pigments. This quinacridone
violet is famously a very smooth color
where you want pigmented color and
then we can also have, which I know a lot of handmade
brands are doing now, and also [inaudible] some
bigger brands are making these really beautiful
granulating mixes of colors that split into different
colors all on their own. Go has them, Daniel Smith has them and you don't have to
buy all of them. Even though that's
usually my tactic, apparently, you can also
try to mix them yourself. But what you can do first because it's a bit
time-sensitive, as you saw with cotton paper, especially the paper
dries rather quickly. If we can prepare
our paints first, so just going into that
with my paintbrush, brush that is for paint and just activating that
softening it a little bit. That way I know I have
lots of pigment to play with on my brush and that's
leaving that over there. I'm going in with
my clean water. What you can do, you don't have to do both
at the same time. You can do at the
top of the tree first and then do
the ground after. Or depending on
how big your paper is and how fast you feel
you want to be with this, you can do both at the
same time of creating two spaces of wet in wet areas. I will make one bigger
one up here and then a smaller one at the bottom
connecting it with the trunk. I love this embolism of trees growing upward and
downward at the same time. When you see a tree
out in the wild, you won't be seeing the
top bit but most likely there's a bottom bit that goes downward into the
ground fooding, making that tree feel safe, making it able to stand so strong in the strong
winds for example. It's because of those roots, those elements of
that tree going downward into the ground
under the surface, which I think is just
a fantastic metaphor for humans as well. That well, we're growing
upward and outward. Everything that we can see. There's also so much
growth happening inside us going downward, inward grounding us
into who we really are. That being said, I'm going to make significantly
[inaudible] in page, going to make an area here. They wanted to mention that
there's the brush technique. The brush that picks up that excess water is also a technique that
you can use to pick up if you put too much water down for the layer of water that your wet-in-wet
technique goes into. I'll do one soft-tune
square shape up there first and then I'll also
do a smaller shape, more of a stripe at the bottom. There's two areas. I just put my brush
into the wrong jar. I'll start with the
trunk and you try to aim that for the middle, that's where that's going
to start going downward. I like to wiggle my
brush a little bit, making that trunk a little
bit wider at the bottom, letting that flow,
making that ground, and then also starting to tap that brush going upward,
letting it flow. As you can see, I have quite a thick pigmented
amount of paint on my brush. What I'd like to do is, I can just go to that dirty jar, pick up a little
bit of extra water, and go into that paint, letting it flow further. I'm still careful with
it, still controlling it. But this allows for
more of those pigments to play and separate and split apart so that we can get those beautiful
granulating effects. I might go in and
get some more paint, moving that around the middle. Maybe you're starting to see those blues coming
through in the middle here and those pinks
starting to travel further into our wet paint. Then I'm angling my brush again quickly going into that
wet-on-dry technique, connecting some of
those branches and maybe letting some of the
branches not connect, going up into the
rest of the tree. As you can see, the moment that wet paint touches the tree, it starts flowing
outward as well. Then as you can see, there's still a lot of wetness there and there is still wet down here
at the bottom. Maybe allowing and getting
dirty water because why not? Because we're going
into the paint letting that flow a little bit more in that bottom
part as well. You see them splitting. You see the paint
splitting apart. Over here, as you can see
with a perfect example of that little gathering of water at the bottom there
and also up here actually. For this, I'm going
to go in with using my paintbrush first in dirty water than in
the clean water. Then going in
expanding the space, pushing a bit upward and inward, going back and forth, allowing it to spread out more. Then going down here, picking up some of that. I don't really mind
here on the ground part if it flows seamlessly as much as I may end up in
that top of the tree. But I can still go
in carefully pick up some of that excess water
and excess paint at the bottom allowing for some nice soft little dry
brush strokes as well. Now, for me, this tree is looking very
flat at the bottom here so wanting to go in with
a bit more freedom. Wanting to go and push
some of that paint around. Making it a bit more organically shaped
so it doesn't look like it's in a fancy
French garden. Making it a little
softer around the edges, making them, allowing them
to flow a bit further. You'll see that I'm
holding my brush quite parallel to the
paper, quite flat, and then working
with brush inward, I will also say that
some paints flow crazy. No matter how little
water you give them, they're going to flow
outward anyways. If this happens
to you over here, this is already starting to
make a tiny little hard edge. Just not a problem. If you want to avoid it, this could also be a time
to pick up a little bit of a tissue or use your
rag and just with a clean portion of your rag
just stop the water blending it and allowing it to stop not letting it flow
all the way to the edges. There that's beautiful
splitting down here and all of this
lovely pink flowing outward and then blue
staying in the middle there. It's some and I've traveled a bit further
than the others. I don't really mind
that this bottom part has a bit of texture on the side if it'll dry brushing here. I loved the fact
that it looks like these roots are crawling outward downward into the ground
routing this beautiful tree, allowing it to spread
outward and upward, having all these lovely branches and colors and I don't
know what tree this is. This is a fantasy tree. Then of course you can add
more branches if you want. If you want to add a little bit of grass here on the bottom, rock on the side, a little swaying, a little
bench, whatever you like. Birds up here when you've
dried your paper, of course, take it in any
direction that you want but knowing that now have the techniques that
you want to use to get that soft blurred-out
effect and the precision and the tightness in the detail level that you'd like for those other
parts of the tree. I'm getting that contrast
really beautifully. [NOISE] In the spirit
of testing this out, I would like to show
you how you could mix a color like this. This is classic
quinacridone pink and ultramarine blue mix and
mixing that yourself on a palette first could be a really fun way to get
this effect without having to buy a specific paint
that is premixed for you.
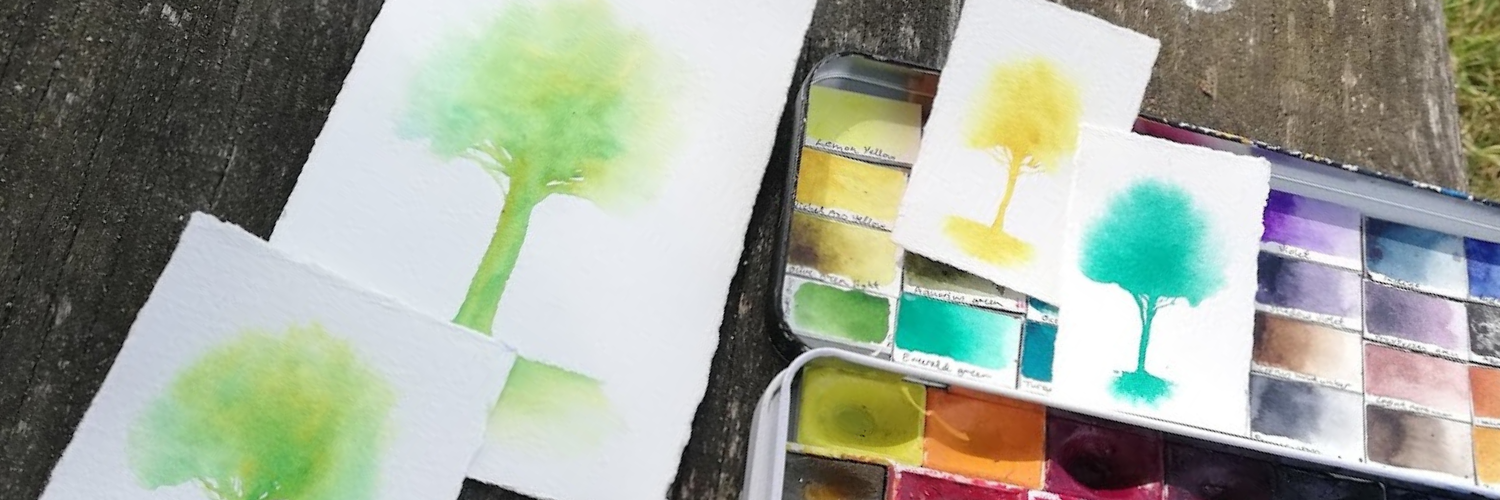
9. Color mixing n.1 - Premix: Now that you know how to make
this tree with one color, but this one color
splits into two colors. You can also try to
create that color with the paints that
you already have. Now, classically, most
watercolor palettes come with an ultramarine. It's a very classic color. A lot of people use it
and it's a great mixer. I personally, don't tell anyone, I don't love it on its own, but I love it in mixes. I'm just going to take
my porcelain palette. I have my clean brush and I'm going to go
into that ultramarine. I'm just getting rid of
that onto my palette. This may be two
little puddles here, and then we can mix in
that pink afterwards. Then rinsing my brush and going into that
quinacridone pink, just a nice bright pink color. The moment we start mixing, you'll see that
going into purple. Color mixing is much fun. It's definitely magic. This color now doesn't look like it's going to split
into different colors. It just looks like a purple,
but adding more water into it or when you leave it on
your palette to dry, you will start to see
how it starts splitting, mixing into those
different shades, splitting some of the
pink out from the blue. It's still having
this core of purple. Then you can also do
this in different ways. I'm showing how to
put this on the side and then letting them meet and get a lighter purple and get more of a
blue-based, darker purple. Very light, very pinky purple, depending on what
you want to explore. This is one way of
mixing them in advance. I see this one
splitting and mixing. Beautiful. Let's do a test. Just remember, it just
going into science mode. Letting that tree be
on the side here. You can also note this down, say that this one
is mineral violet and I'm going to make a
little wet-on-wet area. Doesn't have to be the same
size as the other one. Then going into our
own mix over here, picking up some of
that, your special mix, and then letting that
play and it flow and spread into the water. See now when you start
to manipulate it, it might do a similar thing. You see how that
is splitting from the blue, into the purple, into the pink and allowing that to be your
version of this paint. Just to show quickly how this
would potentially turn it into a lovely tree. You can also add in
more colors at the end. Just rinsing your brush, going into that clean water. Wet-on-wet doesn't have to
happen with the wet first. You can also add more
wetness afterwards. If I make a little
wet space down here and then just connect upward, that paint starts flowing into that wet space
at the bottom. It's so cool. Knowing that you can give
your paint space to flow, then going back into your mix, maybe you want
more of that blue, maybe you want to
mix it back in. Adjusting as you go, playing with it while
it's still wet. Seeing how you want to add
these little branches again. This one seems to be
very flowy pink side. As I'm seeing this flow
out to the side here, doing the same thing, giving it more space, pushing inward,
allowing for more play, trying to dry it. You guys understand
me correctly? Just playing back and forth with your paints, with your supplies. Seeing how you like
to make these. Then maybe I felt that gold
has a lot of pink down here. We have some more of that blue, maybe some dry brushing. Maybe this horizon. Then suddenly you have a paint mix nobody
else in the world has. How cool is that? You can see just the
difference between the mixes of paint
that you already had. I had this paint in this paint, and I can mix them in
lots of different ways, and I can also add in more
paint of the color that I feel might be missing
while it's still wet. But that's not all. This one, we mix them on
this palette, to begin with. There's a third way. There's a last way to do this where you mix it
directly on the paper, which is what we're
going to do on this tiny little square down here. I'm going to make a
little baby tree, and we're going to make
it directly on the paper. I'm all about making it easy, saving time, exploring,
playing, learning as we go, so if you want to
skip this entire part and you just wanted to go
directly into this, you can. I know that seeing
these rough edges, they're making my heart a little
bit unhappy, that's okay. It's seamless over here, so I'm just going to
scrub a little inward. Not a big deal. It's tinting the paper a bit, just making it flow all
the way to the edge. It's just me being a
silly perfectionist, but that's okay. We can love and accept
ourselves anyways in all our silliness. Like that. It's making it a
little bit smoother. Ready for the last version? Let's try that at
the bottom here, and mix directly on our paper.
10. Color mixing n.2 - Mix on paper: Now that we've gone
through using one paint, one color that we already have, and mixing in advance two
colors that you think might work really well
together especially something like this where
it starts splitting, playing, we can also do our
mix directly onto our paper. Being efficient and all. I'm going to try to
make this very small. I'm going to be a little
bit extra precise. I'm going to make a little , the technique is
always the same. The steps are always the same. A little square over here. Now, because I just learned that this
pink flows very far, I'm not going to
make it very wet, I'm going to make it little
bit extra wide to allow for some of that pink to just go wild and party in this water. Allowing that and then adding a little bit of that
ground down here. I now have that wet portion
at the top and at the bottom, not letting it be too wet. What I usually like
to do is start with the lightest color or
the less dominant color, which I believe in this
occasion is the pink. Adding pink too match out the blue would be
more difficult than adding blue to
match out the pink. I'm going to make
the trunk first, make that here in the middle. It's getting a nicely
pigmented bunch. Just looks like a strange
little worm, that's okay. This is where we can load up
the color at the beginning, then at the bottom here and then rinse my brush
in the dirty water jar, going back into that blue which was activated
a little while ago. It should be quite easy to
get nice pigmented amount and now mixing it directly. It's starting to push away, some of that pink starting
to turn a bit purple, starting to play and
flow and become friends. Then dragging some of
those branches as well. What you might notice is that all of these are getting
quite flat at the bottom, which is making me realize
that sometimes when I do this, I don't make them flat, I make that top
part as a top hat. I'm going to show that
in just a moment. Just going to finish
this little friend. But after going in
with a bit of blue, you might realize that, oh no, I felt like this middle
there's only blue. Now I want to go
back in with some pink to balance that out. Maybe you want to just
rumble it around, mix it directly on the paper, not being too aggressive with
it as it is still paper and you still want to
treat it kindly. But brushing it around, mixing it into this part. I love a bit of dry
brushing for the ground. You see how that came as a
completely different effect. It looks exact same
colors as this. It's the exact same thing. For that bottom part,
just allowing that to be a bit softer. That little bit more space
to play. Just a little bit. Not too wet. It was called back in and the same with
the other side. When you start putting your
clean brush into paint, make sure that you
go back out again, rinse it and then
go back in again. Yes. I'm going to do one of the postcards next just to mix it up with a bit
of another color. But as you can see, look at this magical
little tree, from the unexpectedness of it, not knowing how it's
going to end up entirely and how big
it's going to be. Maybe it needs more space, but was using the
exact same colors. See you see how
fascinating this can be? Or if I'm the only one
who's fascinated here, that's also fine by me. But I invite you to
start playing with this, start testing it out, maybe try any combinations
you would like. But these two colors will
never work together. Then seeing what happens when you mix blue with
a brown, for example, seeing what happens
when you mix a green with a red and you get this beautiful fall color tree maybe with some
brown in the middle, the splitting out
into reds and greens. It's so much fun. I highly recommend
trying it out, mixing your own favorite colors. Surprising yourself with what is possible with this technique. That being said, always let
it be a learning process. Let it be okay that
it goes to the edges. So this is why I'm also not going to do this
twice and edit out the fact that some of
these went to the edge and they go back in and I
play in and I dry it up. That's also what
sketchbooks are for, that's also what a
painting practice is for, is making those mistakes and not going back and fixing them, pretending like, oh,
there's nothing happened. It was perfect the whole time. I never make any mistakes. That is less likely to happen
than making lots of fun, new different mistakes and knowing that you can trust
yourself to fix them. Knowing that you
can trust yourself to love yourself through that. This is not meant to be a
perigee self help video, but do you see what I mean? Did I have fun making these? Yes, I did. Did I learn lots
of different fun things? Yeah. Did I have a super
fun time testing out this, going back and forth, doing some dry brushing, mixing my paints over
here? Yes, I did. So am I really going to
make this hard edge up top here and this little
mushroom around over here? That's called ruin that for me. Can I allow it to be this knowing that going
in another time, making more space for
the water to flow while learning from it is so much more valuable than immediately nailing on your technique when you're learning
something new. Even me, I've told
these so many times and I still after having not
done them for a while, after trying out a new paint
on a new type of paper, knew unexpected things are
going to happen anyways, and it's part of that growth. So I invite you to embrace
the fact that this will not turn out exactly
the way you hope it will, but it might give
you something else. Cell bringing out our postcards, I just wanted to show
you how you can make this with that other
shape at the beginning, making sure that those
trees will get that weird, very groomed park garden, square tree shape and then
we'll start wrapping this up.
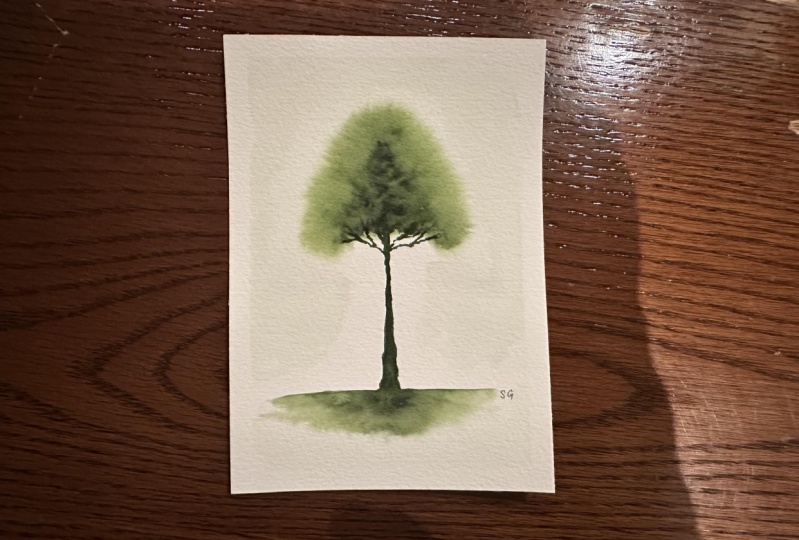
11. Individual tree - Monochrome: Carrying on, moving on
to this postcard size, because postcards might be my favorite size of
watercolor paper. It just feels like it's
big enough to put up and use as a little wall art or something to
decorate your desk and it's small enough to
get it done in one setting, not having to wait
for layers to dry, which is also why
I love this kind of painting these kind of trees, because it's just one layer. It's just one, sit down, go, let it dry and
it's finished. Lean onto these two, I'm going to make two
different ones just to show how differently behaved
different types of paints are. I'm going to do
one with one color and one with a mix
of these two colors. I'm going to mix them
directly on the paper just to show you how you
can play with that light when we're using
bright lighter color and softer and more muted, darker not very muted, it's still very bright,
but a darker color. Starting with this one, and I wanted to show you, instead of making
that flat box shape, which makes that
flat bottom tree, we'll be making more
of a curved lines so that the paint
can spread outward and those branches
makes sense that they end up into those leaves, whatever that tree it's made of. In the spirit of exploration, let's make this one a little
bit taller instead of light, we can make that other
one a little bit wider just to show that there's no right or
wrong way to do this, we can do all kinds of different trees and
shapes and sizes. Also nature is not perfectly
symmetrical all the time and perfectly squared
out, spaced out. So, if your tree
is a little wonky, it's just you being a realist. Making this side more
of like a green, wants to say mushroom-shaped, more of a mushroom shape. Making sure that the paint
has space to flow outward, we can always put
more water inward into where we want
our paint to flow. But we can't take it back. If me put water down, that is where there's
going to be, what? For this one, I'm going to use
one of my favorite paints, and the groundwork, you
just do the same as before. One of my favorite paints, it's called Aquarius green, and you guessed it, it does have different pigments
mixed into it already. It's this one over
here is the only one that I've touched
the bottom of. Again, to know where
your water is, turning your paper in the light, see how that middle
part is open. Going from that, and that start to
flow and spread, knowing that you can always add both more paint and more water. Connecting it down
into that bottom part. If you want to widen a little bit of that
trunk allowing it to float outward as you wish. Then just touching
a bit more water, bringing that back up again, making it a bit of
a narrowly tree. Actually, I think
that's super cute, I could also just
leave it like this. But for the sake of demonstrating
this mushroom shape, you have this outward
slowly situation matching that outward motion. Keeping quite narrow
but letting it descend a little bit more around
the sides of the trunk so that it doesn't get that
perfectly symmetrical, and perfectly straight
bottom like it could. Let me just expand
a bit on my trunk because it looked like
it was wider on the top, which was strange to me. I'm just adding some more. I usually don't go with realistic proportions
and sizing and whatnot. But it can be nice to add a bit more color underneath
like a normal tree out in the woods would have one side that might be darker and
more shade than the other. That's also something
to play with. I want to add more
paint to one side, keeping the light coming
from this side than this. These branches, this
side of the trunk, maybe this side of the
ground has more color. These are all just
options to play with. Now, you can see how this was given a lot
of space to flow out, it flows in a really
different way than that purple and pink did and even here at the bottom, you can see how that's
splitting off into more of the yellow is running
away, flowing further. Then that dark green, which is actually the
same ultramarine blue that's keeping, that's
staying more in place. There we have it. How fast was that? Here we go, this
is what we like. This is how fitting something
like a daily art practice into your normal human life
doesn't need to take hours, it doesn't need to be this big, extravagant setting
up for hours, immersing yourself
in the painting. It doesn't have to be that
to be something valuable, beautiful, something
you really enjoy. That it doesn't
have to be all of this pressure to work for hours, and that it can be just this. It can be just you
playing with your paints, making this beautiful card. I would frame this and put
it out into the world, show it to the people
that you love like, hey, I created this. This didn't exist
before I made it, and now it exists in the
world and I created it, you are a creator. How beautiful is that? I love that idea and I
encourage you to try this out, try it out with your
paints, make it yours. Enjoy the fact that you're
constantly learning, constantly getting
new information, in the way that you move
around in the world, the way that you show
up for things that you find fascinating and wonderful. I want you to consider if you
created a tree like this, what else can you do? What else is there for
you to explore, to learn, to maybe expand into
that you're like, "I've never done it before,
so I don't think I can." Give it a try, see if it works, and I'd love to hear
how that goes for you. We're going to do one
last one, just for fun, and it's just to show you my
favorite green color mix. It's beautiful, glowy other tree and we're going to
do it this way, just to do a bit of
a different variety, bit of a flat funky tree. Last one.
12. Individual tree - Color mixing magic: The last one, I wanted
to show you what happens when we mix something
that we can play with when it comes to light. When it comes to this
glow of this bright, very warm, yellow,
and this cool green. Now, I don't love this
color on its own, but it's such a fun color
mixed with this one. Just to show that
there are options for how we mix our tree sketch. Just going to put
those over there. I wanted to show you how to
make this the other way. I almost didn't check the back. See, there we go. It's going to paint
it the other side. With the same mushroom shape instead of that flat shape
that we did earlier, I'm going to go in
with that clean water. Just like Savannah tree is. I really should look
these things up before I start talking
about them on the Internet, but here we are. It was like flat, flowy asymmetrical trees
been out all winter's night. My mushroom top hat situation. Do we see any sign
of this paper? Yeah, a little bit. See how I've moved where the trunk would
be over to one side. Then the rest of
this flowy water. This is also 100 percent cotton. This over to the side, and then a bit of
background as well. Just going to balance
it out on paper, does not need to
be proportionate. You're very welcome
to make your tree anywhere you want on your paper. Just really rinsing this brush because I know I'm
going into a yellow, which is famously a
very tentacle color, if I had blue on my brush, for example, just going in. I'm already starting
to flow a lot. There we go. I had quite
a wet brush for that. That's okay. It's making
some of those branches. What I'm doing with
this first layer is also just laying
down the initial, putting flow of it over
to that side as well. Make a weird supportive
branches out to the side. What I'm doing with this yellow is also just establishing, putting down a lot
of that pigment so that when I go in with this emerald green
that wants to mix in, I can go in with a bit
of, not the turquoise. Sorry. Say that one more time. This emerald green going
in with quite a thick mix, blending as I go, see how that's already
changed its color a lot into that trunk. Trying to keep it wet
for as long as possible. Also, down here, letting those
colors mixing and blend. Now, this is going to need a little bit more encouragement. Just mixing these, letting them fall together. This is not flowing as far as
I was hoping, which is fine. Then we need to
manipulate a bit more, mixing it onto themselves. Adding a bit extra water, letting that flow, grow. I think I want to make
this trunk a bit bigger. Making a little bit lower. See I'm constantly
editing as I go. Now I feel like we've got
a lot of that enrolled. Maybe lost a bit of yellow and treating this as the
exploration than it is. To get curious more. Just friend of mines
question which I love, which is what if? Asking what if, rather
than not asking. Wonder what happens if I do this rather than
limiting what's possible from the experiences
you've already had, which might not be
the full picture. Might be things you
don't know yet. I don't know what's
going to happen if I put this over
here on the side. If I mix this up into that, getting it more abstract, allowing this flow to be wilder than I maybe thought
it would be. Can you tell I'm also soothing
myself for this moment or I don't know what's
going to happen. Seeing if there's little dots
of pigment that seem like they're a bit not on their own. Actually, I feel
like if this tree was this far out to the side, this part of the tree would
need to really sturdy. Maybe lean a bit the side. Then again, going in if you want to get
that thirsty brush, if there's any way
that looks too wet, it's going to try. A bit of strange
shape, strange way. Allowing these paints
to flow into play. Some new shapes. Easy for me to say. Not to make-merry
the first idea. How very generous. Allowing it to grow into a
tree that it was meant to be. Now, because this is an
excellent example of this, now I see that the pigment has gone to the edge of
the water up here. Just going to encourage that flow all the way to
the edge of the paper. I don't have to, but then also gives
the option of that water flowing back
down into the tree, allowing it to be this gigantic. It's filled a very Lion
King circle of life tree, allowing it to flow
and be itself. With a tree that is now having a lot of
wetness just here, I would probably try to
let it dry at an angle, so it didn't dry. While it's drying, allow
it to keep flowing upward. I probably want to let it dry, just propping it up
against something, letting it dry so that
the paint can flow downward because I
would love that soft, seamless blend up
towards the top of it, so a very different adventure. But see how this tree now
doesn't resemble its roots. It doesn't resemble
these two colors. They're just blending
and flowing into, I feel like graffiti
lives in this tree. The color mixing
that we get from two colors that I probably
wouldn't have picked this out as maybe the color
that the tree would be if I mix these two
colors together. That is also such a fun part
of this whole exploration, playing with the different
paints and colors that you've now created all
of these different trees, all of these different shapes, all of these different versions with the same type of technique, and I already know that yours are not going
to look the same as mine. Yours are not going to
have the same flavor. You're going to move
your brush differently. You're going to choose
different paint colors. I'm really excited to
see how you create these and what you discover
about paints, your paper, your brushes. How you'd like to make them. How you'd like to move
your paint, your brushes. How you explore this adds another thing in your toolbox that you might want
to keep with you. Join me in the last video
for a couple of final tips, some final tricks,
some final words. Thank you so much for joining.
13. Thank you for being here!: Just like that, you've made
it to the end of the class, and I'm really excited. If you want to share, to
see what you've created, and how your flowy tree
is different from mine, and how you've chosen
the colors that you wanted to mix the
monochrome paintings, maybe you've done something
completely different. Maybe you've made
a splash one color and a trunk a different color. Go wild. Use whatever
techniques you want, use all the paints
that you have. Make them bigger,
make them smaller, make them something, paint bananas in
your apple trees. I am so excited to see
what you take from this, and how you make it
your own because it's never going to be the same. It's never going to
look the same as mine, which is, again,
the whole point. Let me know what
you got from this. I would love to see
your creations, and at the same time
I 100 percent respect if you do not want
to share them. In my case, your art
supplies can that workshop, I have a workaround for this. If you actually would like to share the fact
that you did them, and the fact that you
learned something, what you got away from it, you can also share your
artwork from the back and say, this is a tree painting, I
don't want anyone to see it, but I know that I've made it, and that's all that matters. If that's a way for you to open up a conversation about it, I would love to see that too. To summarize important
things from this class, you are an artist regardless of whether or not
you share your art. Number 2, I would love for
you to share your art in the project gallery
below if you're on Skillshare or on Instagram, if you want to tag me there, or send it in a private message. If you send me something
that you've made and would like me not to share
it, of course, I won't. If you want to only
show it to me, feel free to reach out, and I would love to
see what you made. Number 3, I would love for you to leave a review of
what you've learned, what are your takeaways
from the class. Has this made it easier
to sit down and paint? Maybe there's another way for you to cleave that creativity, bring that into your life. Also, if you'd like
to follow along, get notified for new classes, I sometimes do
behind the scenes, sometimes do posts to see what classes you would
be interested in, and I love hearing
feedback from you as well. One final thing,
at the very end. I want you to know
that I don't take it for granted that you are here. I don't take it for granted that you take time for
yourself to be creative, to do something that
brings you joy. I know probably that you
have a gigantic full life, full of things that are
asking for your time, for your focus, for
your engagement, and to take time to do
a watercolor class, to feed your creativity, to play with your paints, is incredible to me, and I'm so grateful
that you're here, and I really appreciate you for showing up for
yourself like that, and through me to continue
making these classes, for continuing to spread this ripple effect of joy
and creativity out to you. When you create something, someone else sees it
and they're like, oh maybe I could also do that, then they'll create something or they will follow
one of their dreams further down the line. This ripple effect of
creating more good, more joy, more creativity, more color, more of works of
art in the world. Maybe this has opened up
a door for you as well, be like, I didn't
know I could do this. What else is possible? Leaving you with this. Thank you for being here,
and until next time. What else can you do?
 Elise Aabakken, Voice Coach - Teacher - Performer