Transcripts
1. Class Introduction: Throughout this class, I
will teach you my method for creating breathtaking
hairstyles in Procreate. Also, you will learn
intermediate to advanced tips and tricks to use Procreate, such as using different
layer settings and advanced coloring methods for a graceful render
using creating maps, you will use these
skills to create your own hairstyle
for your portrait. My name is Rodriguez and I
am from Managua, Nicaragua. This is actually my third
Skillshare class, right? Teaching intermediate skills
to draw and color hair. I was self-taught
through Skillshare and I have developed a fascination
for the human figure. I've been developing
my own versions of portraits and of
character Fenner. This class is for any
intermediate level student who liked to take their
procreate chlorine skills to a whole new level. For this class, you will need a basic understanding of
how to use Procreate. This class is great for any concept art
creator, cartoonist, or even art Hobbes
wants to bring their coloring skills into a
whole new different level. You will learn how to
coloring grayscale and then using gradient
maps give color to any image by foolproof method will
allow you to recolor your artwork with no hassle and create different color
versions in a nutshell. By the end of this class, you will be able to create
any hairstyle you want and use intermediate skills
to call her any image. Do not wait any longer
to begin this class. Let's get started.
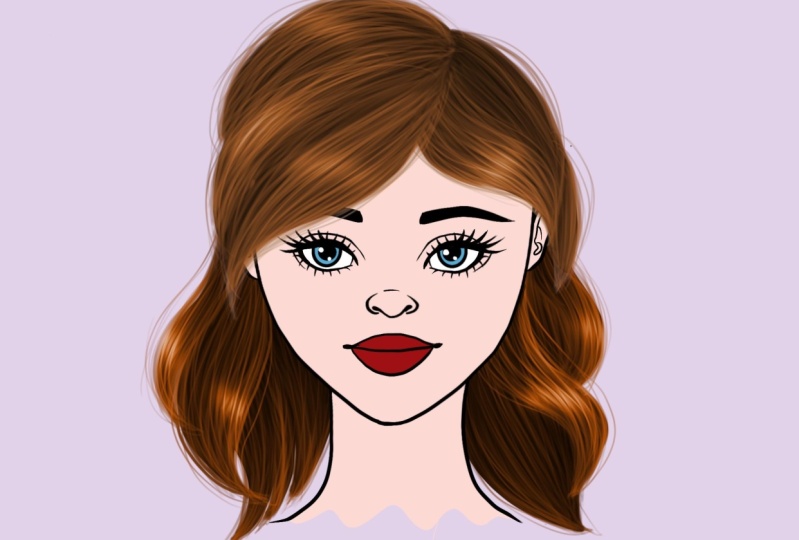
2. Project Introduction: Hi, Welcome back. I actually want to
introduce you to someone special, me, Kimmy. She will be our model
for today's project. Hobbies here to support
you into practice and into creation of any hairstyle
you want to try. This project should
be uploaded into project section as a JPEG image so we can all take a look at it. If you wanted to include
a 30-second video of your work that is also, well, I chose this project because my favorite part of creating art is actually
growing the hair. I find this method belt relaxing and very
rewarding at the piano, I'm always leftover
with an end product that I'm always very proud. I also wanted to share my failed proof method
for coloring here. Before I developed this method, I would create hair using this specific color palette up a hair color I
wanted to draw. This gave me very
little flexibility as I was enabled to make adjustments to the hair color
at anytime in the future, I always struggle with
light hair colors as I felt the hair strands
did not look natural. If you want to begin
with a simpler project, I suggest you begin
with straight hair. However, I have chosen
this hairstyle as he provides a complexity of
different layers to work with. Make sure you have a
reference image to follow. It could be up any hairstyle, airflow, or even hair color. I suggest you check my
previous Skillshare class. You want to practice a similar yet more basic
method for growing hair. Police had the brushes
you like the most ready download the ones provided
in the project resources. Also have your reference image ready and saved in
your picture set. So let's begin and see
you in the next lesson.
3. Sketching Hair: Welcome to our hair
tutorial class. To begin with, I
will show you some of the tools that
we will be needing. First, we will only be using the medium airbrush and the studio pen
brushes in Procreate. This had been made available
in the class resources. As part of this class, we will also be
learning how to use my grayscale palate in order to create more
realistic hair. With this pellet, we
will be able to color and give texture to
any color of hair. Then we will be using the Gradient Map tool in
order to color or hair. So I will be showing
you how you can do that in our next lessons. Finally, we will be learning how to use the different
layer tools in Procreate in order to give different effects to the
hair that we create. The first thing we will do, it will be to create
our sketch and we will be using our studio pen. This pen has a streamline, so we'd eases the way you do
things behind like polar. So for example, it will be doing that very briefly
sketch at school. Today we're gonna do a poll. You can also sketch
and we're gonna make a long strand of hair. Also. We could catch
what would clearly here. So I will be curly
here on this you see, buried somewhere we know. And then some of those ways are that we will
be following your sketch, how the hair is following. We will see how the
same method applies for somewhat wavy hair
in some curly hair. One of the things
that begin with, this will be our reference. We will be creating a layer
underneath fats and we will lower the opacity from
layers, the top layer, one on the bottom layer of hair at and I will focus on now, we will continue with
the first type of hair which I will be showcasing. The three are next lesson.
4. Straight Hair: Welcome back. And now we're going
to start creating our straight hair strand. To begin with, we're going
to set our brush to 7%. And to begin with, we're
going to create the lines outside of her
hair. Very general. And up here on the
screen you will see some troubleshooting
tips so that you can fix some of the
things that you might encounter while
coloring your image. One of my favorite
tips is that you can actually hold and
drag the pencil to the right or left to
adjust the filling area. Now we're gonna
create a new layer and this time we will make sure not to clip
mask it As we need. Those trends appear
to be free flowing. From now on, most of the
things that we will do will be in this layer. We will not be creating
enemy anymore. New layers for the
different layers of hair that we will make, only for the shadows
and lighting. We will start creating a few strands of
hair very lightly. We will make sure that our pen
is around 9%, kind of big. And all we do is stress of hair in the same
direction as this is as trade hair just to
fill in most of the area. But we are not going to
try to fill in everything. We were going to make sure
that we leave some areas a dark as this will
give us some volume. So do not overdo it. That's my biggest tip. Try to not overdo it. Generally when
working with hair, what we're gonna do is that
we're going to move from the darkest color to
the lightest color. And we're going to be
adjusting the size of her brush tip to a
lower percentage. This time we're moving
down to a seven and we're going to start creating
new strands of hair. And each time we
start drawing hair with a lower brush setting
and a lighter color, We're gonna do less and
less strands of hair. The other tip is not to press your pencil too
hard on the iPad. So if you have trouble
pressing lightly, credit hold your pencil a
little bit further upwards. And the idea is that you keep drawing new strands of hair. It is okay if you
go out of the area, you know that there's
sometimes some, some strands of hair that
are flowing outside. And this will give it a
more realistic sense. So again, each time we move downwards the color scale
to a lighter color, we're always going to lower
the size of our brush. Sometimes as you go down to the color scale
to a lighter color, you will encounter that
some lines might not be that smooth and may not
blend well with the hair. You can use the blending
tool to blend them. And just make sure you use the medium airbrush
and just try to blend those lines so that they are better blending with
the rest of the hair. This way you can make
it look a lot better. As we reach the final layer, we're going to continue to
create less and less trends of hair with the
lightest color and with a very light or low
percentage size of her tip. And make sure you always
press very lightly. Do not press hard
with your brush. You're trying to make
lines that are very smooth and don't worry about going out of this strand of hair that will give it a
more realistic look. Now we're going to create
the shadows for our hair. We're going to
create a new layer. We're going to clip mask
and we're gonna make sure we put it on multiply with a dark gray and the studio
pen on a high percentage, we're going to create
some lines around the area where we want
to create that shadow. It could be on either
side of the hair, but make sure you
make it consistent. Then with the blending tool, with the overlay brush, we're going to blending
those shadows and this will add a lot of depth
to our strand of hair. Finally, we're going to create the highlights on
a new layer and we will make sure we clip mask
and we do the add feature. Then we're going to create some vertical or horizontal lines. And we're going to
start experimenting by Gaussian blurring it until we find a
highlight that we like. Try creating horizontal or
vertical lines experiment to see what you like best
for your strand off here. This is our first trend of
hair and on our next lesson we'll do as trend of wavy here.
5. Wavy Hair: Welcome back. Now we're
going to learn how to do the way we hear strand. We're going to start with
our airbrush on a dark color and medium airbrush with a tip
size about seven or eight. We're gonna color as a general tip whenever
you feel into color, if you drag your pencil
while holding in, you will see that you will
be able to adjust the size of the chlorine on a new
layer without clipping mask, you're going to do all the
other strands of hair with our airbrush and
the same size and one tone of gray lower, we're gonna start
creating the strands. We're going to start filling in. And remember to keep
your pressure low. With the blending brush, you can soften the edge of the hair that connects
with the head. And that way, it's going to be a little
bit more realistic. And we're just going
to fill in that gap that was left by
creating that new area. Now we're going to continue with filling in
the hair and we're going to lower the tone of
the gray to a lower one, and we're going to lower the
tip size in one percentage. We're gonna keep
on pressing very selfless and continue
filling in the hair. Just remember that this molar your strands the less they're
going to be filling out. So you don't have to
fill out everything. As a general tip, you
should be careful not to cross this transferred this way. Rather have them flowing on the same direction
and not having sections of them crossing two drastically on
top of each other. Keep them creating the
strengths of here, this weight by lowering the
tone of the gray 1to1 down and then lowering one percentage down the size of the brush. And we're going to repeat
this process until we get to the lowest tone of gray. Remember that as lower you go, the less trends you make. Just to reminder, try to keep your brush pressure or very low. If you do a too strong, you will have a line that
it's too noticeable. So you want to make sure you
keep that pressure very low. Remember that hair is not always perfect and you will
always have strands of hair that go outside or that are flowing freely outside of
the journal strand of hair. It's okay if you
create some strands of hair that go outside of the general area
and on the tip, make sure you fill in
with some strands of hair so that this looks a little bit more realistic and
you can always use a blending tool to soften the
edge of that end of here. One thing I like to do is
to solve them times soften the edges of the
background color. Once you're happy with the
result of your strand of hair, we're going to create
a new layer on top of the little
strands of hair. And we're going to clip mask it and select the multiply option. And by using the studio pen
with the dark as great tone, we're going to create
the dark areas or the shadows of her hair. In this case, I've
decided that the light comes from the top
and I'm going to create the shadows on
the bottom part of the wave using the
blending tool, we're going to blend
in the dark areas. And usually where our strand of hair connects to the hair, that's a place where we have a dark area or a shadow
inner strand of here. Now we're going to
create highlights by creating a new layer on top clipping mask
it and selecting Add. And we're pretty much
going to add highlights where the curves of her
hair change direction. And we're going to
experiment a little bit by making them a little
bit larger or thinner. And using the
Gaussian blur tool, we're going to blend
in the highlights of her hair and experiment
on different percentages. If there's more light, it
should be a lot brighter. If it's less light, it
should be a lot dimmer. In our next lesson,
we're going to learn about curly hair.
6. Curly Hair: Welcome back. Now we are going to
go over the process for creating our curly hair. As before, we're gonna
start by filling out the whole strand of
hair with our base color. If you have any
trouble coloring in, your whole image
is like right now, remember to drag your
pencil to the left or to the right to adjust
the filling settings. We can see these hair strand
is having three sections. We're going to create
one layer per section. This will allow us to color it in without having any hassle. So the first section
will be on top, then the second one
will be on the bottom, and the third one will be
on the third layer beneath. Darkest color is too
similar to black. I always like to
lower the opacity to be able to see this trends
of here I am drawing. We're going to follow the shape of this trend and then we're going to continue filling in. We're gonna be careful to
make sure we draw this trends on the correct layer we have defined for each of the
sections of the hair. From now on, we're
gonna continue the same process that we
learned in the previous videos. The only difference is
that we're going to focus on each layer at a time and make sure we draw their strands on
the correct hair layer. One advice that I
gave you to save time when drawing different
sections of hair is to make sure you don't
switch to a different shade or to a different brush size
until you have finished all the strengths in
the different sections that are of the same
shade and size of brush. This will allow you to work more efficiently as
you don't have to go back and forth between
shades and brush sizes. Now we're just going to continue drawing the different strengths of hairs into different layers. And make sure we follow the same process as we did
in the previous videos. Once you're done drawing over the friends
strands of hair, we're going to
create one layer on top of each of her
hair sections. And we're going to
select them, multiply option in all of them. This way we're gonna
be able to create shadows and we need to select one area from where the light is coming so that we know where
to put all those shadows. Remember that eats always on the opposite side of
where the light hits. This is what I'm
gonna do now create those shadows and this is going to give
depth to your hair. Once I'm happy with
the end result, I like to combine the layers so that I'm
able to render them. And I combine the whole
strand of hair even with the base layer. And then I create a top
layer with the Add option, select a really light
color and I Gaussian blur it until I am happy
with the highlights. And this is what we do to
create the strength of here. Now that we have the grayscale version of her hers trends. In the next section, I will
show you how to recolor them.
7. Coloring Techniques: Welcome back. Now I'm going to show you
my EC foolproof method for recoloring our hair strands. To begin with, what we're gonna do is we're going to
select the hairstyle and we went to recolor and
we're going to duplicate it. Then we're going
to select overlay. And we're gonna go, and we're gonna go
into great and men, as you're gonna see, there are different
pre-established colors. And you can select any of their pre-established or
create your own. If you're gonna create your own, my suggestion is just like
one of the ones that already exists and duplicated for you
to edit it as you please. Here we see that we have change the color by just
selecting Gradient Map. And then we can also play
with the different settings in the layers section to see
which color we like best. We can also play around
with color balance, Saturation, Hue and
Saturation and Brightness. And this can allow us
to recolor the hair to any color you want with no hassles and no need to
select different colors. Now we're going to repeat
the process with one of the other hairs trends
that we created. And we're going
to go into one of the gradient maps that we have. And as you can see, we have four to five squares
that we can move around to highlight
certain colors or to make some shadows
or certain highlights. Show more. Play around with these until you find a hair color that you like. And also play around with
the brightness, saturation, and hue to find a
hair color that you like best with the curves. You can also play around, and this can allow you to
create different hair colors or even lightened
certain colors that make your hair colors trend. And play around
with the sections of the different
settings until you find a color of hair
that you're happy with. Where now just gonna see the same process we've done
to the other strand of hair. And you will see how I play around with different
hair colors. Sometimes some hair
colors are too dark. So always strike go into
the settings to adjust the brightness and
saturation until you find the color you like. So look around the
different settings, look around the
different layer options until you find a color of
hair that you're happy with. As you can see,
we've been able to recolor it to a
very light color, to a darker color. And we can even play around with very extreme colors
like purple, green, or other hair colors
without even having to worry what would be the
color palette for these? Because by coloring
in grayscale, you are taken care of the
highlights and shadows of your peas without even
having to worry about selecting the right colors for the highlights and shadows. Your pieces might look
even more realistic. And the transition between shadows and highlights will
be much more realistic. I hope you take advantage of these method for coloring
any of your pieces. You can also apply these to even skin clothes or any other coloring
pizza you're creating, allowing you to have
better color transitions between highlights and shadows. In our next section, we will work in our
class project by creating the hair
for our model habit.
8. Final Project: Welcome back. Now we
know all the skills we need in order to create
our final project. First, we're going to introduce our reference images and
procreate allows you to first, we will follow this
image and this hairstyle for our model. As always, we will
begin by sketching f first draft over here. And then we will be doing a
final sketch that we will be following in order to create
the hairstyle for our model. Now that we're having with the
first draft of our sketch, we will create our final draft
with much cleaner lines. Once we're done,
we're ready to start filling in the colors
and we have to make a decision which strands of hair will be in front
of our image and which strands of
hair will be behind our, our model's head. We must be careful
to put the hair that it's in front of our model's
head on that top layer, on top of the head. And the hair that will
be behind our model has to be on a layer that is
behind our model's head. We will fill it in
and then we will proceed with creating
the strands of hair. Now we will proceed with
the steps that we learned previously and we
will start creating this transfer of hair
in different layers, working from the front
all the way to the back. Sometimes it's not necessary to create a different
layer for each section. It just makes sure that we
begin always from the hair, that it's always to
the front and then we move slowly backwards. As a suggestion, just as
we did in the curly here, I suggest that you
work with one shade of color and one size
of brush at a time. And then once you finish
with all the layers without that same shade of color
and that brush size, you move to a different
shade and color of hair. Continue following
this same process that we've been doing
and we've been learning about until you're done
with all your strength of hair with different brush
sizes and shades of gray. Just as in our previous video, we will create a
new layer on top of each hair section in order for us to create the shadows
of fair mixture. You clip mask it, and you multiply it so
that you are able to fill in the shadows of the
hair and just blend them in. As you will see, this will start creating some death in her hair. And it will be looking each
time more and more realistic. Once we're happy
with the shadows, we will proceed to render it by merging together the
two sections of hair, the ones on top of the face
and the ones below the face. That will create a new layer with the Add option
on the layer. And we will Gaussian blur it in order to create the height. We will now duplicate
our two layers of hair and select overlay
on the new top layers. And we will recall her them
and I'll show you how I recolor it and I want to
make my character array. In this section, I will
show you how to create your own gradient map. As you can see, you always
begin with the darkest color. And each time you
begin and select a lighter color until you
reach the lightest one. But the lightest
one, I don't suggest you selecting that full wide, but a very light
version of the color. And this is how we create your own shade in grading
map of a realistic hair. So what do we can do
here is that if you have a hair color color palette, we can actually select that palette in order
to color our hair at, play around with the settings until you're done with
a result that you like.
9. Class Outro: Congratulations on
finishing hemispheric. You made it remember to
keep them practicing these skills to create
breathtaking hairstyles. We covered everything
from sketching to planning the policemen
over hair strands to coloring and adjusting colors as you desire for any
pair of drawing. If there's something I want you to take away from this class, is that nothing is perfect. The first time you've had, we must embrace her
mistakes through prove. And I encourage you to try different methods to bring
your own method for tone. Please remember to upload
your final project in the project gallery section is wherever you are located. Remember to upload a JPEG or any other image format
image of your work. Also, if possible, a
30-second time buttons, appropriate videos, and we
can all see your process. If you liked this class, please leave a review. Also follow my profile
so you're the first to know whenever I publish
a new class last week, if you publish your
work on Instagram, please tag me using
this hashtag. Thank you so much for joining. I cannot wait to see your
work. See you next time.
 Rodrigo Diaz, Skillshare Teacher and Art Enthusiast