Transcripts
1. Welcome and introduction: Hi, and welcome to my new
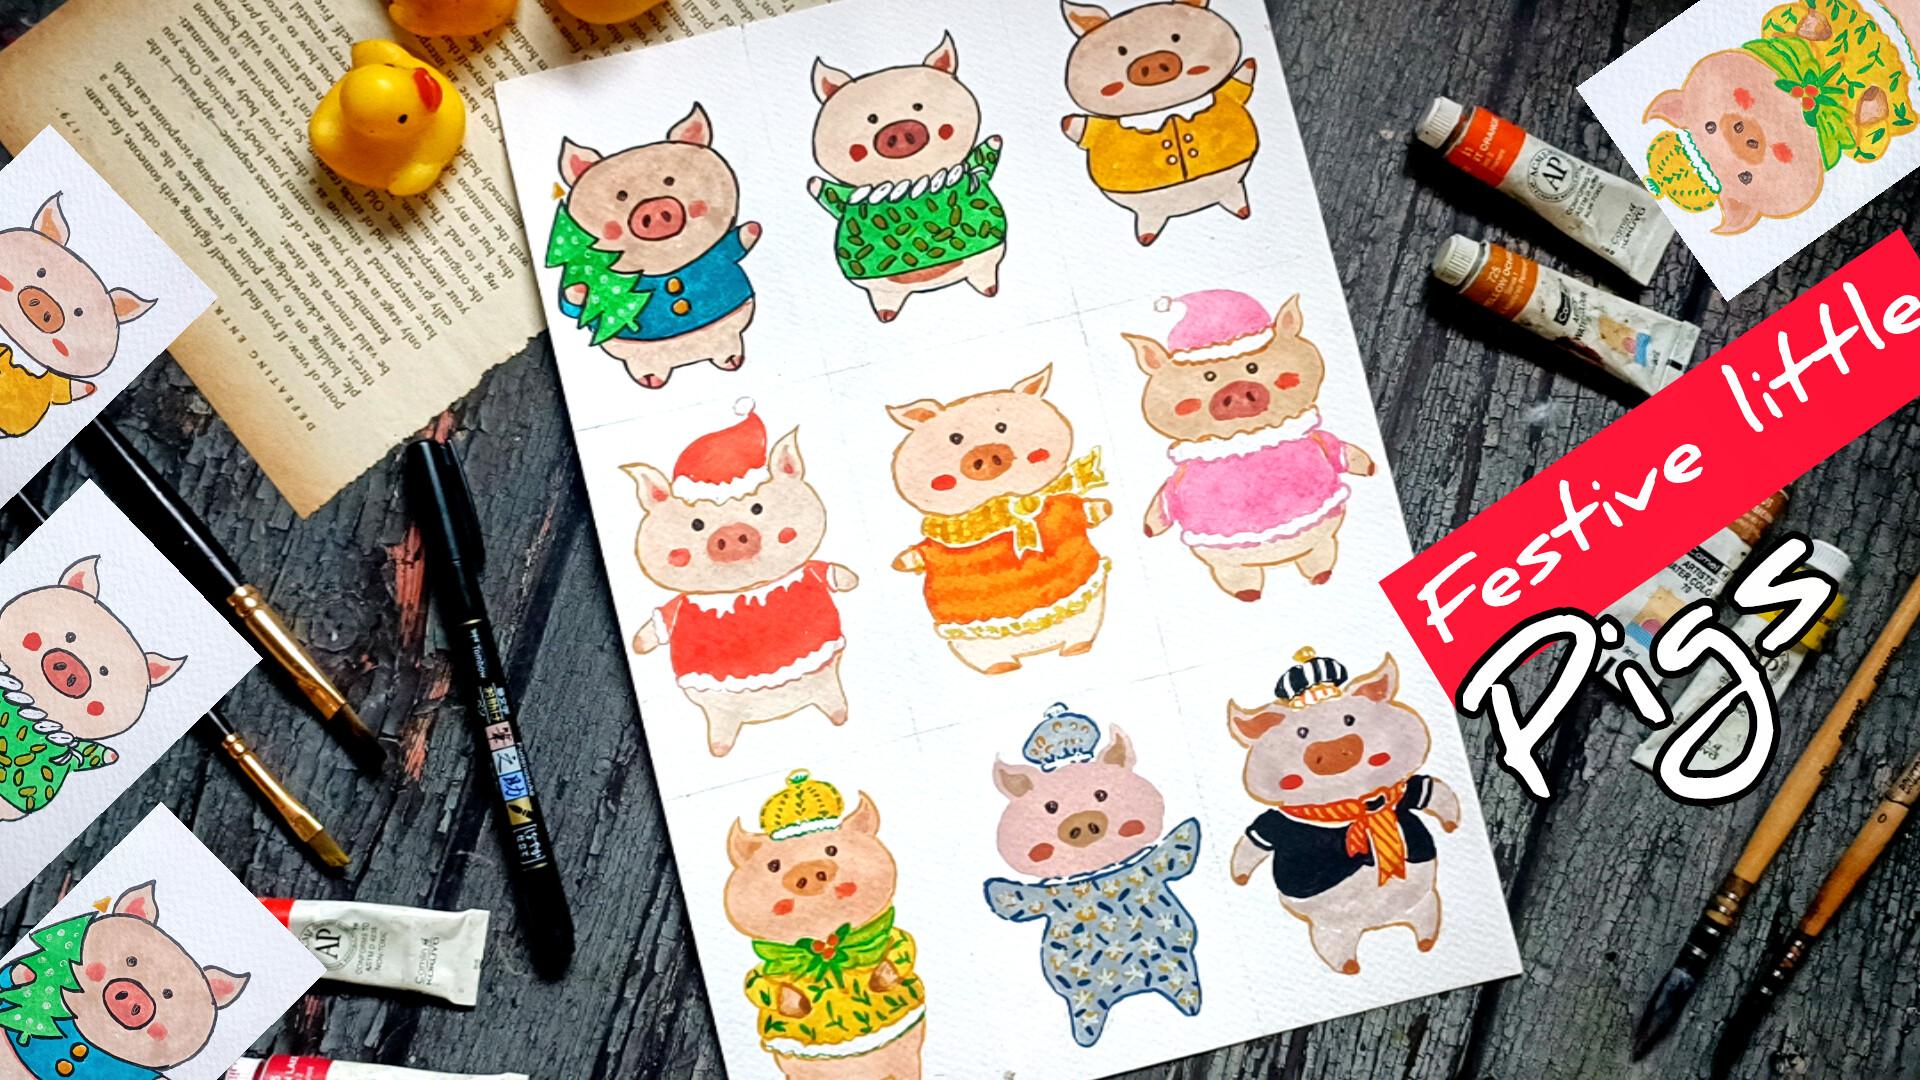
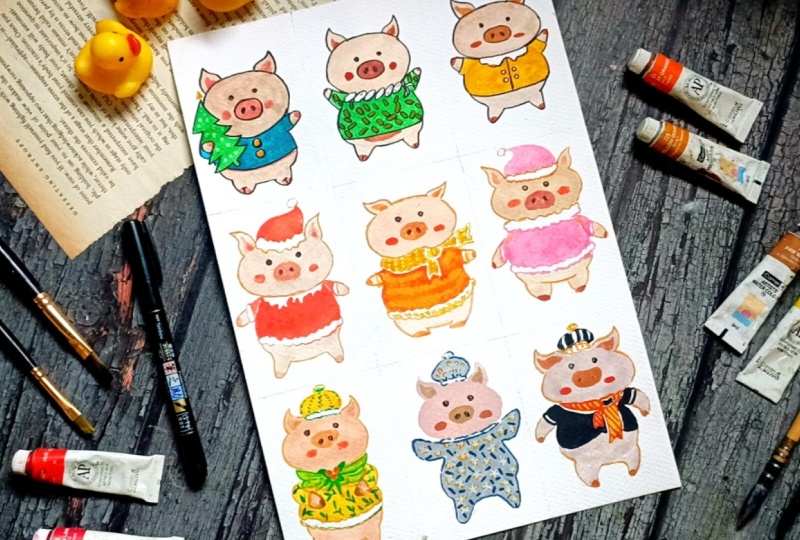
class Festive Little Pigs, cute watercolor and gauze
characters and cozy outfits. In this one and Festive class, we'll be painting nine
adorable pigs and piglets, each dressed in charming
holiday inspired outfits. These characters are simple, cute, and full of personality. And they are perfect
for beginners and intermediate artists alike. Here are the nine projects that we'll be creating
together in this class. So this is Merry Mistletoe Pig. This is Winter Pajama Piglet and the last one
Festive Party Pig. These are all the nine piglets and the pigs that
we'll be creating. We'll begin the class with
a demonstration video where I'll show you how you can sketch different
types of pigs, give them various
characteristics, add small details that make
each character unique. We'll also explore simple
outfit designs and decorative element that you can use throughout your project. For the main projects, I'll be using water,
color, and gauze. But you are welcome to use
whatever supplies you prefer, colored pencil, acrylic, brass paints or even oil
pastel will work perfectly. The focus of this class is
to create these simple, cute little pigs in this
cozy and festive attire. Hi, my name is Vishal, and I am an artist from India. This is my skill set profile, where I teach a variety
of watercolor ink, gauze, and character Based
illustration classes. You can also find more of my work on YouTube
and Instagram. So join me in this class, and let's paint nine
delightful little pigs, each with their own warm
and cozy holiday char.
2. Class project: For your class project, I would
love for you to paint any or all the nine
festive little pigs we will create in this class. You can follow along
with me step by step in real time or mix and match outfits and expressions to design your own
unique pig characters. You can use watercolor, gauze, bras paints, colored pencil, or any medium you prefer. The goal is simply to
enjoy the process and explore character illustration
in cozy festive style. Once you finish your artwork, please upload your project
in the project gallery. I truly enjoy seeing
everyone's interpretations, and your work also inspire
other students in the class. Feel free to share your
final Pig illustration, any practice sketches you did, different outfits idea
you experimented with, variation or completely new
pig characters you design. I also encourage you to leave a review and share
your feedback. It helps me improve
future classes and reach more students. I'm excited to see your
adorable fester pigs, have fun creating,
experimenting, and bringing your coji
characters to life. I'll see you in the next video.
3. List of supplies: This class, the supplies
depends upon you. Basically, you will be
needing a pencil and eraser for the basic
pencil sketching, masking tape if you are
using loose papers, tissue paper, then fine liners and fine liners Operas
mean to do the outlining. I'll be using this 300 GS and watercolor p as I'll be using gauze and watercolor
to do the coloring, watercolor brushes, simple small sizes watercolor brushes
will do their work. You can use the spins to do the colorings.
You can use gauze. You can use watercolors. You can also use oil
pastel to do the coloring. The choice of supplies
depend upon you, but you are going to use. You can also use the
colored fine ans to add the additional elements and add a little bit of highlights and detailing or outlining. I'll also be using
jelly paint to add highlight for
one of the project. Instead of this, you can use white from the gauze
or the watercolor.
4. Sketches: Welcome to the first
demonstration video. Let's start with this getting a few different kind
of faces for our peg. You can start with this kind of intersecting line to draw the guideline, the
set for the face. Just by wearing the length
of the intersecting lines, the horizontal and
vertical lines, you can create
different kind of face. Mostly, I'll be
adding this kind of nose at the center of
intersecting point, small nostrils for our peg, and this kind of bit
curvet triangular seat for the ear of our peg. So this is just a
very simple example of how we'll be
creating the pigs. To make this a little
bit more clear in here, I'm just doing the outlining. We'll be basically starting
with a simple pencil sketch, and then, but as we add the
colon or do the outlining, we'll be adding
more details to it. So all the pigs in this project will be somewhat like this. We'll be wearing the
placement of the eyes, nose, ears a little bit, also we'll be playing with
the sees a little bit. And with these, we
are done with our very simple sic sketch for our first P. Let's
do another one. In here, too, I'm starting
with the intersecting lines to determine the length
and the width of the pig. For this one, I met the
length a little bit larger. So this has a bit larger fees as compared to the
first one we did, simple kind of ear. In here, I met the ears
a bit more curvier. Now for the nose, instead of placing it at the
intersecting point, in here, I added
it just below it. Here's another variation
of a simple pig. Let's create one or two more. But in this time, instead
of creating it bit larger, in here, I'll be making
it a bit broader. I'm also making a saves a little bit different
triangular see for its ears and add curvilines to making it tilt either towards the right
or towards the left. Or you can make both the ears piece in different directions. Adding the nose just below
the intersecting point, two tiny eyes, and this is our third simple
sketch for our big space. Let's do one more. We don't
have that much space in here, but another simple one. This two is a bit broader
like the third one. But instead of making
the piece a little bit triangular like we
did for the third one, we'll be keeping it a bit
like this elliptical sea. Tiny ears for this
one. These are facing towards the
different directions, adding the nose just above
the intersecting point. So this is looking a little bit more like the cat than the pig. You have got the rough idea
how you can easily create different kind of pig faces by using the intersecting
lines to act as a reference and wearing
the seats and the sizes of the face and
changing and wearing the siges as well
as the placement of the nose and the eyes, you can create
varieties of pigs. For most of the projects, I'll be using interchecting point. Otherwise, if you
are comfortable, you can directly
start the outline for the fix phase for
some of the projects, I'll be directly
starting with it. I won't be starting with
intersecting point. Here, too, I'm starting
with its space. I'm using this horizontal
line to determine its right. For its face, I'll be dividing into three
different sections. The middle section
in here will be representing stomach
and abdomen. The lower section will
be combination of both the stomach as
well as the ping. Creating very tiny
fits and the legs. What I mean to say is that
the middle section will be comparatively larger as
compared to its face, and the legs and the
hands, as you can see, are quite smaller, adding
its ears and nose and mouth. So this is just a simple sketch. How we'll be creating the
different kind of pings. We'll be wearing the length we'll be wearing the length and the width of the body too. We'll also be making some
genes and adjustment to its feet and the
legs. It's outlining. And I'll be showing you
one more example of the ping that you can create using this kind
of reference line. Feel free to experiment
with different cigs instead of dividing its body into three different section, you can experiment with four
or five different sections. Now let's do the outline for its remaining
section of its body. In here, as you can
see, I'm making adjustment to the pencil
sketch that I created. So you don't have to stick with the pencil sketch that
you have created, feel free to make changes and
adjustment as you see fit. I'll be starting with
a pencil sketch, but whenever it's required, I'll be making changes to
the seats and the sizes of the pencil skit by going over with the color or
using the outlines, black marker or black
pine and do the outline. Yeah, what I mean to say, don't stick with the sketch
that you have created, feel free to make changes and
adjustment as you see fit. Let's create another
fixed body in here. I mean, it feels a
bit more broader. Let's create its ears. So the placement of ear, you can also play with
the placement of the ear. You can add the ears much
more closer to each other, or you can wearing them or you can add them
farther apart. It's to its body. Most of our project, I won't be using
the reference lines to divide its body into
different sections. I'll be starting
with this kind of oval see for its stomach and then add this kind
of small projections for its hands and the foot. In here, I'm creating a bit
different kind of food. So these are the
two simple kind of food that I'll be
creating for our pigs. Instead of this, if
you want, you can experiment on your own and
create other kind of food and the hands The goal for this class is to
keep the pig simple, so I won't be adding more
detailings to the body, the face, as well as the
hands and the links. If you want to add a little bit of detailings, you can do that. Now let's do the outlining for the pig that we have
created in here. You can also play with
fecal excretions. I'll only be creating
its eyes and the nose. If you want you
can add mouth too. You can also experiment with
the different kind of eyes. You can make some big
eyes or smaller eyes. You can also make you can also make the different kind of facial expression
with the mouth. I won't be adding it, but if
you want, you can do that. You can also add a little bit of characteristics by
adding moustache, ear rings or glasses
for the pigs. You have got lots of options. If you want, you can
experiment with it. And with this, we are done with our first part of the
demonstration du. I'll be seeing in the
next video where I'll be showing you different
kind of elements that will be using N projects.
5. Assersories: Welcome to the second part of the demonstration video in here, I'll be showing you how
I'll be doing the coloring, as well as the disney
elements that we'll be using. Mostly, I'll be using
watercolor and the gauze. But if you want,
you can also use the breastpin or color pencil. In here, I'm using
breast pain to do the coloring just to show you how I'll be doing the coloring. For the entire
section of its body, the feas its legs and arms, I'll be using the skin color. And to add a little bit of detailing for its
ears and the nose, I'll be using a bit darker tone, either a bit more
intense skin tone or a little bit of pink
color or bit ocher. And for the rosy cheeks, I'll be using a little bit of
pinkish color or red color. So this is how we'll be adding
the coloring for our pigs. Either using the gauze
or the watercolor, completely filling the entire
section with this color, completely filling
the entire section with the skin color. So basically, we'll
be doing a flat vase, spreading the color even
for the entire section of its face and the remaining
section of its body. And then on top of it,
we'll be doing overlying using a bit darker tone of
the colors for its nose, ears, and the rosy cheeks, I'll be using red
or pinkish color. A little bit of gradient
if you want to create, you can add you can add a bit of darker tone just
below its stomach. And for the clothes, too, we'll be starting with a flat vase. And for the clothes,
too, generally, I'll be doing a flat
vs. By flat vase, I mean completely covering
the entire section with a uniform consistency
of the color. And for patterns and designs on the shirts and the clothes, I'll be using a bit
concentrated color and overlaid on top
of the flat vase. In here, I'm using
pink for the chicks. And yeah, this is how we'll
be doing the coloring. Instead of the
breast pain, we'll be using gauze and
the watercolor. And for the additional element,
for the first project, I'll be creating this kind of very simple variation
for the Christmas tree. If you want to make
it a little bit more detailed or defined,
you can do that. And with this, we are done with a very simple C for
our Christmas tree. And now for the cap, the Santas cap that I'll be adding for one
of the project. Here, I would advise
you to use the supplies that you will be going
to use for our project. If you are using gauze or watercolor or pencil
color or screen, use that to do this exercises. So this is how we'll be creating
very simple Centas cap. I used a little bit of green
for the bottom section. Let me show you some
other kind of caps that I'll be adding for
some of the project. In here, I'm using
yellow for the cap. For our main project,
I'll be using either watercolor or gauze to create a flat vase and then use blacks or
blues or greens, whatever color to add a little bit of
designs for the caps. In here, I'm creating another
cap with black and white. I'll be creating this
kind of stripes with a watercolor or using
the umbra spin. The elements that we'll
be adding for our picks will be quite simple
and easy to create. And you don't have to stick with the watercolor and the
gauze, for the elements, you can use the sketch pins pins or whatever you are
comfortable with. Now for the scarf, for
some of the scarf in here, I'll be adding this
kind of red berries, simple circular seeds
for the berries. And for the scarfs
and the mufflers, I'll be using two
seats of the colors. In here, I started
with the green. The light side of the green. For our project, we'll be using the flat v with the
light side of the green. And when it dries up, we'll be going with a
bit darker side of the green and overlay it on top of it to create a
little bit of outlines, as well as a little bit
more characteristics to it. I'll be adding another layer
of green on top of it. When this dries up, here's
another scarf with the yellow. These are the different kind of scarfs and the mufflers
that I'll be adding. Instead of this, if you want,
you can also add bow ties. Simple bow ties. Here's another
example with the black. I have not included the
bow ties in our project, but if you want, you can
add in your projects. You can also add different
accessories like sunglasses. Here's very simple
wed sunglasses. You can use the red
fine line to do the outlining with it
and use it to color it. Et's create another
sunglass in here. So this time I used yellow. And for the insides
of the sunglasses, you can use blue or black. I'll be using the black for
this demonstration purpose. Adding the black
for the second one. If you're going to use the
breast pain to insert that the first layer
after the color has dried and then add it otherwise, the two colors might mixed up. Now for the ears, I won't be adding any
accessories for the ear, but if you want, you can add it. In here, I'm showing you
three different kind of ears that you can create. These are the three
different kind of ears that I'll be using. Instead of this, if you
want, you can create other kind of ears
for the pigs stub. And for this first one in
here, I'm using orange. For the second one in here, I'm going in with the ocher
and for the third one, and for this third one,
I'm just overlaying the skin color once again to make it a little
bit more darker. So these are the three
different shapes of ears that I'll be creating. You can add the accessories
in the form of earrings. In here, I use yellow
to create the earrings, and I'm using this red
to create gemstones. You can create other
kind of earrings. Here I'm using breast pain
to create black earrings. These are some of the
additional elements that you can use
for our project. Apart from that, you can
also add this kind of leaf, hol branch leaves and berries, use two different seeds of
the green to create it. You're going to start
with the pencil sketch and then add the coloring, filling the entire
section with this, creating this kind of
very simple hexagonal sap and we will wait for it to dry and then add
leaves and the veins, creating this kind
of simple leaves just beside the berries that I created and using this darker green to
do the outlining, adding a little bit
of more detailings for the center part
of this scarf. Let's add the mid ribs and the veins and a little
bit more detailing. Apart from this kind of
simple leaves and berries, you can add other elements. If you have practiced
along with me and created this practice seeds and apart from the elements
that I sowed in here, if you have created
other elements, we see it in the
project section. I will be very
delighted to see it. Using red to create
small berries. I'll also be using a
little bit of white to add the highlights for
the berries and for some of the section
of the clothes. Mm. And apart from
the flat pass, I'll also using a bit darker
set to create a bit of ci dose for the berries
and other elements. Here for scarf, you can
keep it simple like this, or you can use other
colors to create simple pattern and design.
These are optonal. I here I'm using red
to create pattern, simple pattern on top of it. All hatching lines to create
this kind of simple pattern. Instead of using this red, you can use other colors. Instead of using
this red and yellow, you can use other color
and create other kind of patterns and patterns
and designs. Now for the yellow cap, in here, I'm using green and creating this simple
kind of design. You can give it as a
simple yellow cap or simple single colored cap or you can create
simple designs, different kind of
patterns as you see fit. Most of the projects
in this class will be under 15 minutes. I won't be creating much
detailed version of the accessories and
caps and scarfs. I'll be keeping things simple. Also, I'll be creating this
kind of pattern and design for one of the project
simple leaf like pattern. And with these, we
are done with this due to a real section
of this class. And I'll be seeing
in the next video where we'll be starting
with our first project.
6. Holiday helper pig: Welcome to the first
project Holiday Helper Pig. Let's start with
the visi outlining. Starting with this elliptical sp for the fees for our Pig, instead of this elliptical
sip, if you want, you can make
adjustment and create circular Sep or kind
of oval seeps too, creating this line to determine
the length of its body. Outlining for the remaining
section of its body in here. Instead of this, if you
are not comfortable, you can divide this into
three different section and then do the outlining for
the stomach and the legs. Now let's sketch the
legs, very small legs. Very small semicircular
sees for the legs. Now for its tiny hands. If you want, you can
increase the size of the hand a little bit, and the Christmas tree he is holding very simple sp
for the Christmas tree, just one triangle after another. Instead of creating one
Christmas tree, if you want, you can add more to like eye audio in a
demonstration video. Sketching its ears. Let's sketch its nose. Tiny eyes, buttons
for it shirts. With these, we are done with a basic pencil outlining
for our first pig. The whole video in real time, so you can always
follow along with me. And for our first three project, I'll be using the fine line or the rasping to do the outlining after knowing the coloring. In here for this Christmas tree, I decided to make this
a little bit curvier. It's not looking clear, so
let me show you what I mean. So once again, I'm knowing it. If you are satisfied
with your pencilskis you don't need to do this, the same simple type of the same kind of Christmas
tree that I showed you. Instead of making it
bit straight in here, I just made it a
little bit curved, making the sides of
its hand a bit larger. And a small section
of its hand will be visible on this side holding
this Christmas tree. With these, we are done
with a pencil sketch. If you want to make
more adjustment, feel free to do that, but
I am satisfied with it, how the pencil
sketch turned out, making the upper part of its cloth a little
bit curved in here. Yeah, with this, we are done with the basic pencil sketch. So. Now let's erase it, insert that a small section
of the outlines would be visible so that we can
use it to do the coloring. For this first one in
here, I'll be using gauze, feel free to use watercolor,
gauze, ombre screen, and you can also use pencil
color to do the coloring, starting with the green for the coloring for
our Christmas tree. For most of the project
we'll be keeping things simple and using one or two
colors to do the coloring, we won't be doing the seeding
or creating gradient. If you want to make it a
little bit more detail, you can do that. In here, you have to causes, create a outline for
its hand and then feel the remaining
section for the tree. Doing the outlining for
it sand in here too, and I'll be adding
one more triangular see for the bottom of
this Christmas tree. Instead of this, if you want
to make changes adjustment, you can change the
sea and side as well as coloring
for Christmas tree. Now, adding the bottom section, the stem for this
Christmas tree. And with this, we add
with our Christmas tree. Let's do the coloring for the
remaining section in here. I'm starting with the face. In here, I'm using a bit concentrated skin tone
to do the coloring. You'll have to be a
bit careful while adding the color near
the Christmas tree, or you can wait for it to dry the green color and then add
the coloring for the feast. Spreading the color
on this side. On top of the Christmas tree, I'll be using a
little bit of yellow. And when this dries
up, I'll also be using a little
bit of white to add a little bit of ornaments on top of the Christmas tree. Adding the color for
the ears of our pink. For this painting, I named
it Holiday Helper Pig. Feel free to name
your painting and let me know what you
name this project. Let me know in the discussion
or the project section of this class what you name
this first project. And with this, we are done with the coloring for
its face and ears. Now let's do the
coloring for its hands. This side of the hand, a
small portion of its hand will be visible in here that is holding the Christmas tree. Moving back to the stomach,
spreading the color. For it food and the hand, I'll be using a little
bit of darker side of the brown for the bottom section of both the foot and the hands. And with this, we are done with the skin color for our pink. Now, let's do a little bit
of coloring for the ears, the nose, as well as the
cheeks for our pink. So in here, I'm using
a bit pink color. Adding the pink
color for both here. You can wait for
the colour to dry or you can overlay
it on top of it. In here, since I use bit concentrated and
saturated color, so I can easily overlay
this color on top of it. But in your case,
insure that the color is dried or that you can
apply it easily on top of it. Otherwise, the two colors
might merge with each other. Now let's create the nose for our ping using a thick layer
of this color for the nose. In here, too, as you
can see the color I am using a bit concentrated. Now, adding it for the
bottom section of its feet, small knots, a little bit
just below its serve. And with this, we are
done with the pink. If you want, you can do a
little bit of blending with the water for the lower
suction, this below it SAT. Now let's do the coloring
for the remaining. In here, I'm using yellow
for the buttons on his sert, small circular seeps
for the button. Instead of this color
combination yellows and the blues for the
Sirt and the buttons, you can use other color
combination S you see fit. For the top of this
Christmas tree, I'm using the yellow to create this triangular see of ornament. Instead of this triangular sep, you can create a star like
soep or any other kind of sep, or you can just keep
it simple as it is. Let's do the coloring
for it sort. Here, too, you'll
have to be a bit cautious to add the
color in between the Christmas tree as well as surrounding the buttons
we have created. Instead of outlining
the buttons in here, you can just completely
fill the entire section of the sat with the
blue, and then later on, when it dries up, you can use a bit concentrated
yellow gauze to overlay it on top of it
to recreate the buttons. In here, I'm outlining
the sert and then I'll be filling the empty
spiece with the colour, carefully outlining its face. Incot the colour that
he used for the fees and the Christmas tree in
the buttons has dried up. Otherwise, they might mix
up, and we don't want that. Moving on to the middle and carefully outlining the
circular sep of the buttons. Now, let's peel the entire
section with the Bow. Here, too, as you
can see, I'm using a bit concentrated color to get this kind of dark blue
for the entire region. Instead of using gauze, you can use the watercolor. With the watercolor,
you can create some kind of cooler
seeds for the coloring. Carefully adding this blue in between the two
buttons we have, carefully adding it in
between this small region. Now, let to the coloring for the remaining
section in here. Small brass in here to
feel this small region. Let's add the color
for this hand. Only a small section of its
clothing is visible in here, a little bit on this side, too. I'm using this
concentrated blue from this side and spreading it in here to create a
little bit of shadow. The shadow cast it by
the Christmas tree. And, yeah, with this,
we are done with the coloring for the
sad for our pink. I waited for it to dry, and it has dried
up, and in here, I'm using and in here, I'm using jelly pen to create ornaments, simple
white ornaments. Instead of this, if you want, you can use bit
concentrated yellows, red, mills to create varieties of ornament on
top of this Christmas tree. But in here, I'll only
using this jelly pen and create a small white
dots, circular sap. And with these, we are done with the white chilly paint
for the ornaments. In here, I'm going
with the rust paint to do the outlining.
This is optional. If you don't want, you can
just leave it as it is. Instead of this, if you want, you can use a little bit
of concentrated color. You can use ochre or
a mix of ocher with the skin colour to
do the outlining for its face, its
hand and the leg, and a bit of concented and a bit of concentrated
blue colour to do the outlining for its
sort and then a bit of deep green colour to do the outlining for
the Christmas tree. Carefully doing the outline for the fees going over the
outline for its ear. As I mentioned for all the
first three project we'll be doing the outline to
saw a clear distinction between different section
as well as to make the whole project
a bit more bolden and a bit more contrasting. Let's do the outline
for its hands. I'm using the brush paint to do the outlining since
it's much easier. Instead of this, if
you want, you can use the watercolor brushes
to do the outlining. Finally, let's do the
outlining for the two buttons. And with these, we are done with our first project,
Holiday Helper Pig. I hope you had fun
painting this one. This was quite simple and easy. And I'll be seeing
in the next project.
7. Cozy sweater pig: Welcome to the second
project, cosy sweater pig. Let's start with the
vertical line to determine the entire length
for the pigs coding, creating the face this
elliptical C for its face. In here, for this project, we'll be using the fine liner or the breastpan to
do the outlining, creating triangular
C for its ears. You can vary the
placement of the ears. You can make the ears bit closer orbit more farther apart. Now let's do the remaining
section of its budding. If you're not comfortable with directly creating its body, you can divide it into
different sections and then add the body
and legs and the hands. Tiny little triangular seats
for its hands and the legs. So this is a very simple
sp for our pig now. This peg is wearing a
chain around its neck. Very simple eptical
seeps for the chain. A ribbon is tied on
the end of the chain, adding the nose and the eyes. In here, I added the nose just below the
intersecting point. And, if you want, you can
make the eyes, nose, bigger, but smaller lightly
ase the pencil sketch, inset that a small
section should be visible so that we can use
it to do the coloring. Oh Now, let's do the coloring. Starting with the skin color. Doing a flat pass
for the skin color. In here, I'm using
a bit diluted color to do the flat vase. You can clearly see
the difference, the first pig that we use. For the first pig we created, I used a bit concentrated color, but in here, I'm using
a bit diluted color. So feel free to experiment with a different skin sates for your pink adding the
coloring for its ear. And with these, we are done
with the face and the ear. Let's move on to the
remaining section. Stomach as well as its feet. Here, if you want to
create a gradient, you can use a bit concentrated, color just below its clothe Adding a little bit of coloring for its hand, tiny little hand. And now let's do the coloring. In here, I'm using grass green, carefully outlining the
chain that we created. You can wait for the colour
to dry or otherwise, you can just carefully
do the coloring in here. I see that the consistency of
the color remains the same. Here, too, we are doing another flat pass with the screen. Instead of using this green
to create its sweater, you can use other
color as you see fit, carefully outlining
for its lower region, just above its abdomen. Now, outlining this side. Finally, filling the entire
section with this green. So with this, we are done with its
stomach and the abdomen, moving onto its hand, starting
with creating the outline. And with this, we are
done with this hand. Let's do the second one,
outlining the ribbon that we have in here and filling the entire
section with the green. With these, we are
done with the green. The color that we use for
the fees has dried up, and in here, I'm
using pink colour, a bit concentrated pink
color for the nose, creating this kind of
elliptical see orthomto oval see for the pig's nose. A little bit for its food, and a little bit for stomach. Moving on to its hands, adding very small strokes
of the pin for its hand. Moving on to the ear, creating small and simple triangular
see for the ears. Moving onto the second ear, doing the same thing,
small triangular see. In here, I'm going
with the burnt Siena for its rosy checks. Instead of using
this, you can use pink red or a mixture of that, or you can also use orange. I waited for it to
dry. It has dried up. Now in here, I'm using
the Bras beat to do the outlining. This is optional. If you want to keep it as it is, you don't have to
do the outlining. With this, we are done with
the outlining for the chin. I decided to create
some simple pattern and design on top of
the screen sweeter. So in here, I'm using a bit
concentrated Camboo zoom, a sad of yellow to create
this kind of simple pattern. You can create any kind of pattern and design
as you see fit. Also, you don't have
to use the same color. Instead of using
this Cambo zoom, you can use other color or you can just leave it as it
is simple green sweater. Adding few more random dots. Adding few more for this region. Adding this for the hands, creating smaller strokes with
the Camuiu And with this, we are done with the Camuiu. Now, once again, going back with the breast paint to
do the outlining. Insure that the color has dried up and then do the outlining. And as I mentioned,
if you don't want, you can just leave it as it is. The green we used for the
sweater has dried up, so outlining the
sweeter and the hands. For our first three project, I'll be using the breast
pin to do the outline. And for the remaining
six project, I'll be using the colors
to do the outlining. For a skin color, I'll be
going with the pale ocher or a combination of
ocher mixed with pink or something like that. And for the remaining
section like it's clothes and the
other accessories, I'll be using a bit
darker seats of the same color to
do the outlining. And with this, we are done with the outlining for
the pig's body. Now let's do the outlining for the ambuji sweeps
that we created. Doing the outlining
for all the patterns and the designs that we
created with this Camboji. If you don't want
to do the outline, you can leave it as it is. And to add a little
bit more detail, you can use a little
bit of white too. With these, we are almost
done with the outlining for most of the designs. Finally doing the outlining
for the last one. And with these, we are done
with the outlining for the designs for its sweater,
moving on to the face, outlining its nose,
adding its nostril, tiny little circular
dots for its eyes. For the chain around its neck, creating this kind
of broken lines to add a little bit of texture. And with this, we are done
with our second project. I hope you enjoyed
painting this one, and I'll be seeing you
in the next project.
8. Sunny white piglet: Welcome to the third project
Sunny Winter Piglet. Let's start with the outlining. This time, instead
of intersecting lines to create the outline, here I am directly creating this oval C or elliptical
C for the face. If you're not that confident, you can start with
the intersecting lines to do the outlining. So for this one,
I decided to make its face a little
bit more larger. Now let's do the outlining
for the remaining section, a bit larger stomach. Creating this kind of curvy
triangular C for its hands. Let's do the outlining
for its clothes. Another set of two
triangular C for its legs. Creating the collar
for its uniform. For this one, I'll be using yellows and creating
four buttons, two on each side, adding very
simple ear for its head. This is one of the
easiest project. This is under seven minute. And here, this is
the simple pencil sketch that we have created. Later on, I'll be creating
buttons on each side, two on each side, a
total of four buttons. Lightly these the pencil sketch. Sure that a little
bit of it should be visible so that you can
use it to do the coloring. In here, I'm using
a bit medium seed of skin color for its face. So this seed that I'm using is in between the first
and the second one. I just added a little
bit less water as compared to the second one and a bit more water
as compared to the first one to get this
consistency of the skin color. Now, adding it for its ear. Instead of using the skin
colours to do the coloring, you can also use pink colour to do the coloring for the pink, adding it for the small section of its hands that is visible. Now, moving on to its
stomach and the leg. For one or two of the project, I'll also be using pink colour to do the coloring for its fees, legs and the hands, making this region a little
bit more darker. So another layer of
color on top of this. And with this, we are done
with the skin coloring, spreading the color
a little bit, a little bit of color
was accumulated in here. And with this, we are
done with the skin color for the fees and remaining
section of its body. Now, let's do the coloring
for the remaining section. And here I'm using Camboo
hue to do the coloring, outlining its color,
freely color. Outlining the two
sides of its clothes, small button seves
that I was mentioning, creating this small circular
seep for the button. And now we'll be filling the entire section
with this Cambou. And here, I'm using
a bit concentrated colour to do that coloring. Instead of this, you can use
a bit diluted consistency to do that coloring just by mixing a little
bit of more water. In this project
Sunny Winter Piglet, if you have any other name that you have given
to your project, let me know in the
discussion section or in the project gallery. Carefully feeling the color in between the four buttons
we have created. You'll have to a bit careful
while adding the color above just above its stomach. And with this, we are
done with this section. Now let's move on to its hand, carefully doing the coloring, moving on to its other hand. With these, we are done with
the Camuji for the coloring. Add a little bit more amuji
wherever it's required or wherever or wherever
the color has accumulated a little
bit, spread the color. Now for its nose. So in
here I'm using, once again, pink mixed with a
little bit of ochre, creating this kind of bean
like see for its nose. And if you want, you
can keep it as it is, or you can just create normal
simple nose like this, adding the coloring
for its ears. But. It's making the nose
a little bit larger. Now let's create its rosy chick. In here, I added a little
bit of red for the colors that I use for its
nose and the ear, using the same color for
its feet and the hands. Adding it for its left hand. And yeah, with this, we are done with this color. And now let's do the outlining. The skin color that we used as the primary laying on
the flatb has dried up. Over the outline for its face. And this is often
if you don't want to do the outline, you
can keep it as it is. Tiny nostrils for our
thing, outlining its nose. Creating circular
C for its eyes. If you want, you can make
the eyes a bit larger, you can add eyebrows, you can add eye lasses. And yeah, you can play with the different
positions of the eye. You can make the eyes much more farther apart or a
bit more closer. Feel free to experiment with
different kind of eyes, nose, and you can
also add the mouth, outlining the four buttons
that we have created in here, outlining the middle section. Moving on to outlining the
shirt that he is wearing. Let's do the outlining for
the remaining section. And with this, we are done
with our third project. I hope you enjoyed this, and I'll be seeing you
in the next project.
9. Little claus pig: Welcome to the fourth
project, Little Claus Pig. Let's start, starting with the vertical line to determine
the length of the pig, horizontal line for the
width of the pig's fin. Creating this elliptical
C for the entire phase. Feel free to make adjustment
to the intersecting lines. You can make the
face bit larger, more broader, bit longer. Experiment on your own. Let's do the remaining
section for its body, creating this kind of oval C. Let's extend the
see a little bit more. Small triangular C for the legs. Creating its hand, once again, small once again, small
triangular s for its hand. Adding the cap. For the clothes and the cap that he
will be wearing, I'll be creating this
kind of fur like taxian. Now, let's add the ears. And and and, once more creating for a
pens just below its neck, adding it just above its stomach and for
both of its hand. If you want, you can also add a pocket on this side
or on the other side. You can also add buttons and do a little bit of
designing and pattern. I'll only be using the ds. But if you want, you can use other color schemes,
create designs, pattern with the wet with the basic pencil
sketch, let's erase it. Insert that some
sections would be visible so that we can use
it to do the coloring. And here, I'm going with the skin colour to do the coloring. We'll be creating a
flat vase for its face, outlining the upper section. Later on, I'll be using
the other colour to do the outlining for all the
remaining six project. I won't be using the fine liner or the breast pin to
do the outlining. Elliptical seep for
the face of our pig. Let's add the coloring
for the pig's ears. In here, I've
created the outline. Now let's feel the ear, filling both the ears
with this skin color. Moving on and with this, we are done with the
flat pass for its face. Let's add the color
for its hands and the feet and the stomach. Small curb triangular
see for its hands. And now let's move on to
the remaining section. In here, I used a little
bit of more color, so I'm using this color from
its feast and applying it in here and applying it in here for the stomach
and the legs. Small and simple triangular
see for its feet, small and simple triangular
see for its legs. Now for its nose, I decided to create a little bit
of fluffy texture. So in here, I'm using a bit concentrated skin color mixed with a little bit of pink. So the steel colours will
blend a little bit on its own since the flat was
we it has not dried up, using the same colour
for its sweets and the hand moving on to its ears. Instead of this, you don't
want this kind of texture, you can wait for the flat was to dry and then add the
colours later on. For this project, I decided to create a little bit
of fluffier nose, so that's why I use this. Now let's do the
coloring for its cloon. In here, I'm using flame red, outlining the frills that we have created just
below its snake. This kind of rough scribbling
lines for the outlining. And now let's feel
the entire section. Once again, here we'll
be doing the flat was. The color that we
use, the flat was feed it with the skin
color has not dried up. You can wait for it to dry or you can just add the
colors carefully. For the bottom section, too, creating this kind of rough
outline for the frills. Now, let's fill the remaining
section with the red. And with this, we are done
with art for the stomach. We'll be doing the same
thing for both of its hands. I'm moving on to its hand. I'm leaving a little
bit of a space in between its hand and
the rest of its body. A very small thin strip of white is visible, the
white of the paper. Here, too, we'll be creating
for leg texture later on. Using this read and creating very thin strokes
with the red to create the outline for leg texture for the
bottom of its cloth. Instead of this, you
can use the fine liner or the colored pencil to
do the outlining later on. Doing the same thing for
the upper part in here, creating very thin strokes
with the brush to do the outlining just
below its freeze. Moving on to its
hand, the same thing, small strokes with the brush
to create the outlines. I won't be adding the
color Alvey leaving it as it is simple and plain white. If you want, you can use a
little bit of grade two. And now let's feel
the remaining section for this cap with the red. In here, if you want to create
a little bit of gradient, you can use a darker
side of the grad and add it on one sides to
create a bit of gradients. Overlaying a little bit
of red for the year. Now using this red to create
the rosy chicks for our pig, adding it on the other chick. And with this, we
are done with this. In here, I'm not
using the mds pin or the fine liner to do the
outlining instead of this. Instead of this, I'm using
cha to do the outlining. Carefully creating small
brush strokes with the orchid to do the outlining
for the entire section. By entire sexon I mean the face, it sends stomach and the leg. Instead of this, you can
use the colored pencil if it's a little bit difficult
for you or like earlier, you can use the fine
liner or the brass pin, or you can leave it as it is. With these, we are done with
the outlining for its hand. Now moving on to the
remaining sexon, it's the stomach and the legs. In here, using a
little bit of ocher to define the see for its
nose a little bit, spreading the color
a little bit more. It has not dried up, so the
ocher will blend on its own with the other color that
we use for its nose. To quicken the process in here, I'm using the blow
dry it to dry it. Going in with the black
create its nose and the eyes. With these, we are done
with our fourth project. I hope you enjoyed this. S.
10. Cozy scarf cutie: Welcome to the fifth
project, Cozy scarf Cut. Let's start with the
basic pencil sketch. In here, I'm using
this horizontal line to deterwine the
width of the field. You can also use
the vertical lines, but the shapes are
quite easy to create, so I believe you can
easily create it. Moving on to creating
the outlining for remaining
section of its body, this kind of bit tapered, circular C for its
stomach and the abdomen, triangular C for its hand. For this two, I'll be
creating this kind of fur like texture for the bottom
section of its cloth. And for this one, I decided to create a little bit
different kind of fit, this kind of leg, following
the curved see of its body and creating this
kind of s for its leg. Now, for its ears, small triangular
seams for its ear. The ears that I created
in here are quite smaller as compared to all the ears
we have created so far, outlining for its nose. This pink will be wearing a scarf switching out the outline for the scarf around its neck. We'll also be doing
a little bit of weight on weight
technique for this one. I'll be using orange
in the red to do the coloring for its
cloth and for the scarf. I'll be using yellow Cambo. And with these are done with
the basic pencil sketching. I'll be creating this kind
of fort on both hands, just like we did for
the fourth project. Lightly reach the pencil
sketch that we created. Is that a small section
would remain visible that can be used to create that can be used to
do the coloring. And now, let's do the coloring. Once again, here I'm
starting with a skin color. So a flat vase with this
color for the entire face, it's hands, as well as
the foot and the stomach. For most of the
faces in this class, I'll be using the same
kind of skin color. If you want, you can play with different seeds of the skin
color for the pigs face. For one of the project,
I'll be using pink, but for most of them, I'll
be using the same color. I'll be wearing the
consistency a little bit. For some of them, I'll be using a bit saturated color for
others a bit diluted one. But overall, the color
will remain uniform, adding the color for its ears. And with these we are done with the coloring for its feel, moving onto the remaining
section for its body, stomach and the feet. Mm. Spreading the colors a
little bit for its face, I used a bit more
colors of spreading it. Now, let's do the
coloring for its cloth. In here, I am using orange. We'll be doing a flat
pass with this orange. I am using a bit diluted
consistency of the color. We'll be doing a wet on
wet technique in here, outlining the lower
portion of the scarf in here for the upper part of this fur coat
that he's wearing. Moving on to its hand. And for this portion too, I'll be adding a little
bit of color in here. For the remaining section, we'll be filling it
entirely with the orange. A small section of what
scarf will be visible. Now, let's fill the remaining
section with the orange. You don't have to use the
same color that I am using. Instead of this, feel free to use other color combinations. And with this, we are
done with the orange. Mixing these two regions, the hand and the remaining
section of its cloth. With these, we are done
with the orange for the flat for entire clothing. Now let's move on to the
lower section of its cloth, the fur coat that he's wearing
outlining this in here. Creating small brush
strokes for its hand, doing the same thing,
creating the outlining. And with this we add
with the orange. Now for the scarf
around its neck. Here I'm using Camboh. I'll be leaving a little
bit of white piece in between the scarf and
the remaining clothes. A small thin strip of white
of the watercolor people. So leaving a small
white thin strip of the watercolor to be visible, adding this for in here,
the middle section of the scar, and on the side. For all the sections, I left a little bit of white
piece in between. Instead of this, if
you want, you can cover the entire section
with the cambuco and use a little
bit of ocher to do the outlining or create a
little bit of gradient. Now, as I was
mentioning in here, creating small r strokes with this to create a bit
of fur like texture. Adding this in here too, where is palm strokes. And with this, we are
done with the Camucio. In here, I'm using flame red and doing this and using
this to create a little bit of wet
on wet technique. Using this to go over
the outline section. And we'll be creating
thinness stripes with this on top of the orange
that we just used. Adding it for the
lower section to the outlines we created
with the orange. Now, let's create this
kind of thin strips. The two colors, the orange and this flame red will blend
on its own a little bit and create a beautiful
gradient as well as the kind of stripes throughout the entire section of its cloth. And with these, we are done with the flame red and the
coloring for its clothing. In here, I'm using ocher to do the outlining for its face. I'll be using the ocher for
all the outlining its face, its legs, and the feet. Creed small thin strokes with the breast to
do the outlining. And instead of this,
as I mentioned, you can always use
the fine liner breast pin to do the outlining. You can also use colored pencil, or you can leave it as it
is moving onto its hands, outlining the triangular
seep of its hands. Fine knee, moving onto
its stomach and the feet. Adding a little bit for its
hand and using this ocher to create this kind of texture or you can see pattern
for the scarf. Instead of this,
instead of this, you can also use orange or flame led to create this kind
of simple pattern. The patterns are optional. If you don't want, you can
just leave it as it is, or you can also create other
kind of pattern or designs. Doing a little bit of
cross hatching in here, fine lines with the rush to add a little bit more
texture for the scarf. And with these, we are
done with the scar. Now for its nose, creating this kind of elliptical
see for its nose. Moving on to its ear, a little bit for both the ears. And finally, adding
it for its feet. Small semicircular
sees for its feet. And with these, we
are done with this. Now going in with the
red for the rosy cheeks. Very small elliptical
see for the rosy checks. And finally, let's add the tiny dots for the nose and the eyes
moving on to white, simple circular
seeps for the eyes. With these, we are done
with the fifth project, Cozy scar cute. I'll be seeing you
in the next project.
11. Pretty in pink: Welcome to the sixth
project, pretty in pink. Let's start with the
intersecting lines to draw out the
guideline for its fare. Instead of using
this reference line, instead of using this
vertical and horizontal lines as a reference to
create the field, you can simply create
elliptical seep or circular seam or
other kind of sap that you want to create
for the face of the pink. Now, let's do the
outlining for the ear, simple triangular
seeps for the ears. This will be somewhat similar to the fourth one
that we did little glass pin. I'll be making a
little bit of changes. The color will be different. But yeah, overall, it will be somewhat similar
to the fourth one. Its face is a little bit broader and the stomach
will be a bit broader too. But otherwise, apart
from that color, this is somewhat similar
to the fourth one. Creating this kind of bit, the one we did for
the fifth one, adding triangular
see for its hand. And now let's do the rough
outlining for its cap. With these, we are done
with the basic pencil sketch for our sixth project, lightly erase it, see
that a small sections remain visible that can be used as the reference to
do the coloring. You don't have to use the
same coloring that I'm using. I'll be using pink.
Instead of using pink, you can use other
color combinations. You can also add
designs, patterns, textures and accessories
if you prefer. Starting with the skin color for the flat pass for a space, it's ear, hands, and foot. In here, I'm using a
bit diluted consistency of the skin color
for the flat pas. Using this colour to
do the outlining. And now let's feel the entire section with this skin color, spreading the color in
here. Moving onto its ear. Adding the coloring
for its second ear. And with this, we are
done with the face. A small section of
its sand is visible. So adding the coloring in here, we have a lot of
color for its feet, so I'm using this
colour to spread it for the rest of the section, its hand, its stomach, and the feeds, moving
on to its feet. I'm creating an outline, and now let's feel
the entire section. Adding the coloring
for its feet. In here, I made the feet a
little bit more broader. So instead of this, if you want, you can create the other kind of feet when we need
for the fourth one. And yeah, spread the
color a little bit more wherever that
color has accumulated. And with these we are
done with the skin color. Now in here, I'm
going with the pink, starting with doing
the outlining, this kind of rough outline for the fur coat that he's wearing. Here, too, we'll be doing a flat was using this pink to
create the outline, and then we'll be covering the entire section with the pink. I'll be leaving a little bit of white piece in
between his hands. I'll be leaving a little bit of white piece like this in here. If you want, you can
follow along with me or you can completely fill the
entire section with the pink. No. Using the pink to create
another outline in here, too, moving on to
the lower side. In here, the color
was not dried up, so a little bit of pink got
mixed with the skin color. Doing the outlining
for its sand, a small strip of pink
for this region in between both the outlines
that we have created. Instead of this, if you
want, you can cover the white sections that we
have created beside its arm. Now, let's feel the
remaining section, Istoma. We'll be doing another
flat as in here. If you want, you can also
create a little bit of gradient using red or a bit darker side of the pink to do the coloring. And in here, I completely fill the entire
region with the pink, moving on to the cap, using the pink to
do the outlining. And now let's feel this somewhat of triangular seep of
the cap with this pink, spreading the color a
little bit in this side, spreading the color a
little bit on this side. And with these, we are
done with the pink. In here, I'm using burnt sienna, creating this kind
of a small see for the feet and the hands. Using this burnt
sienna for its nose, somewhat more bean
like se for its nose. Moving on to its ear, a little bit of this
burnt sienna for its ear. And for the top of its cap, using this to create
a small outline. Now for the rosy checks, a little bit of orange, adding it on the other side, increasing the
consistency a little bit. Adding a little bit of it on the outlines region
of this nose. Put the outlining in here, I'm using ocher to
do the outlining. So I'll be outlining its face, its ear, both of
its hand, stomach, and the feet with this cer Also using this to
do the outlining for this within the
upper part of the care, doing the outlining
for its second ear. And as I mentioned, if you want, you can use the fine line or the breast pain to
do the outlining. You can also use colored
person to do the outlining, or you can just
simply keep it as it is without any outlines. Doing the outline for its hand. I'm using a little
bit of this color, the pansiana and spreading
it to use the outlining. Moving onto its stomach. And finally, let's do the
outlining for its legs. And with these, we are
done with the outlining. Adding a little
bit of this color for the white region
that we left. Now, going with the black
for the nose and eyes, if you want, you can use
a little bit of pink to do the outlining for
the clothe and the cap. And with these, we are
done with this project.
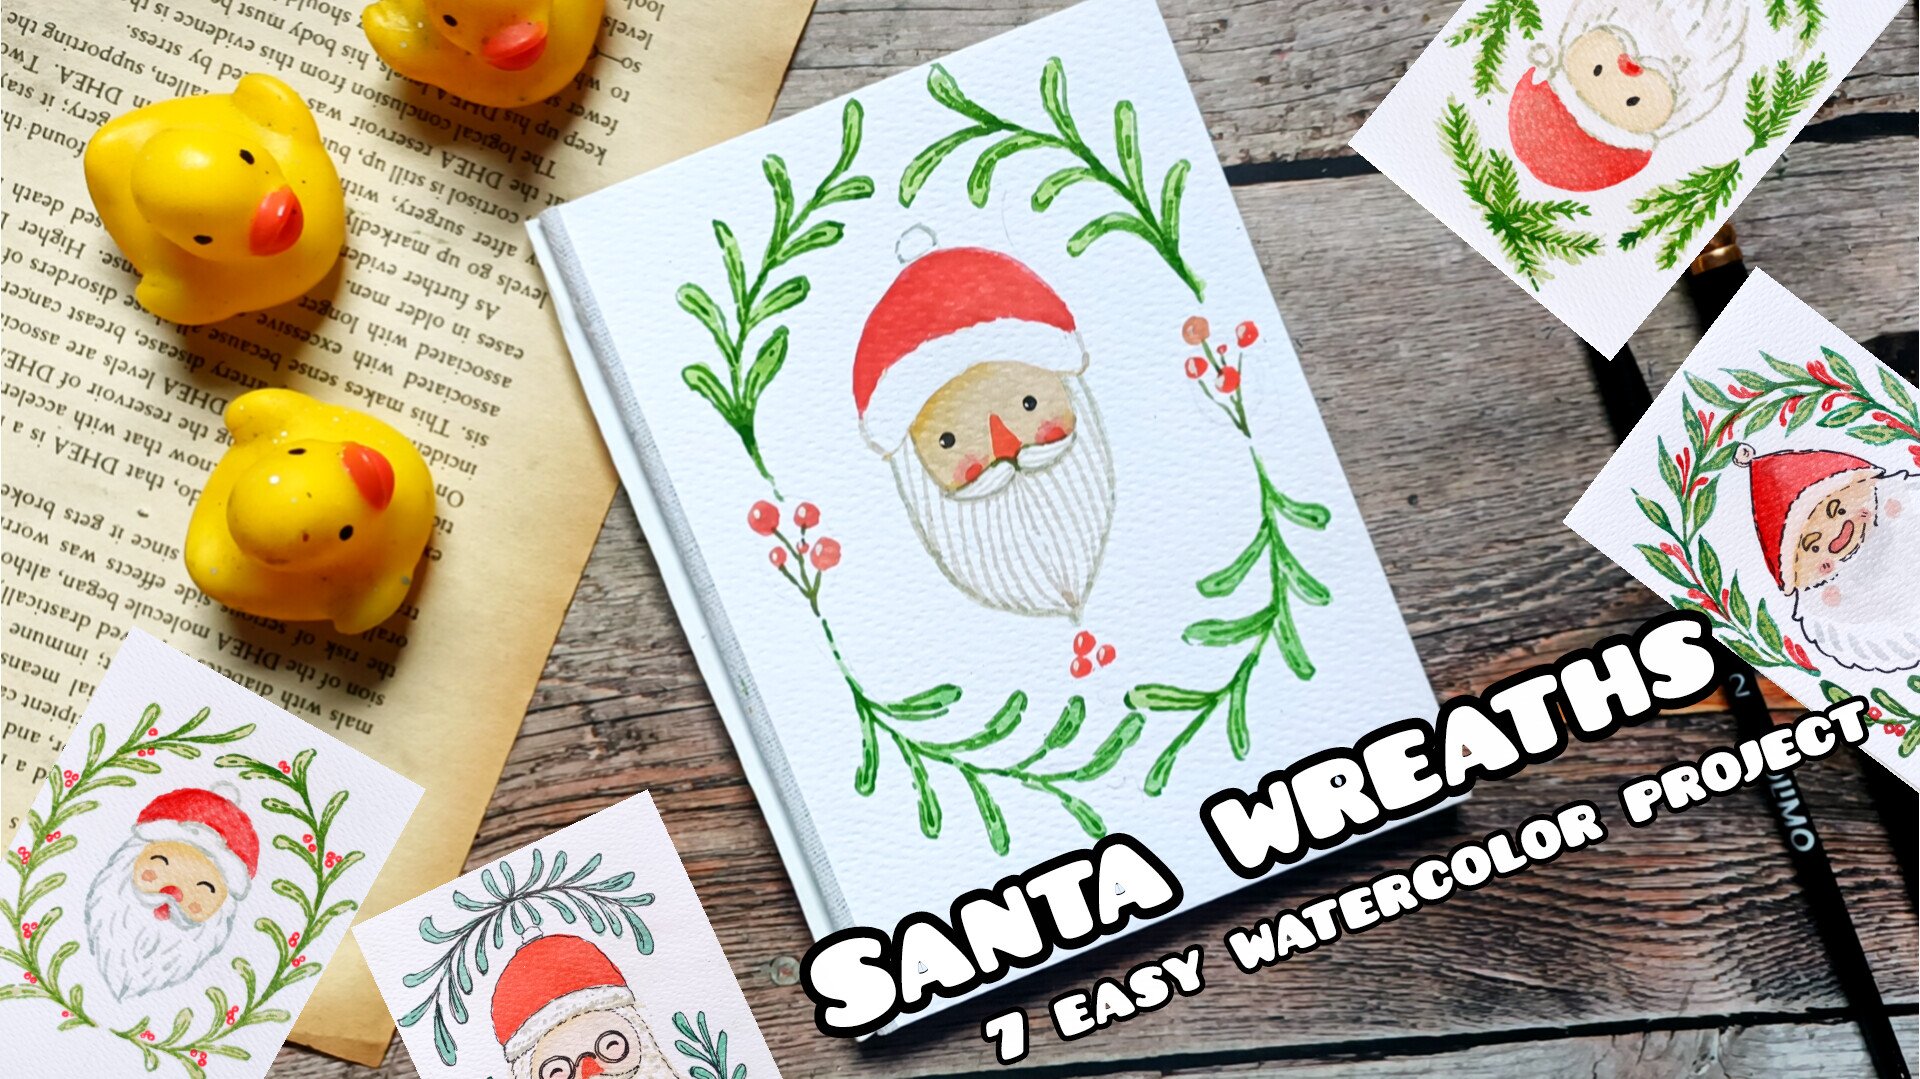
12. Merry mistletoe pig: Welcome to the seventh
project, Mary MisaltoPinglet. This is going to be exciting, and this is one of my favorite. This is one of my
favorite painting of the pig from this class, starting with this kind of
elliptical s for the fees. As usual, if you
want, you can use the intersecting lines
to create the fees. Now, let's create its ear. Simple triangular
sees for its ear. Scarf in here, I'll be
adding three berries, few leaves, and as
for the clothes, I'll be creating
mistletoe like patterns. And as for the clothing, I'll be creating mistletoe like pattern for
the entire section. In here, it's stomach. I made this kind of
roundss rectangular see sketching out the remaining
section of its stomach. Both of its and are folded
in here in front like this. Using this triangular shape
to create both of its free. And with these, we are
done with the basic pencil sketch. I'll
also be adding one. I'll also be adding
a cap on top of it, yellow and white
colored cap like I showed you in the
demonstration video, lightly raising
the pencil marks. Now let's do the coloring. I'm using a bit
concentrated skin color, using this to do the outline,
and now let's feel it. Now let's weel the
entire section with it. In here, since I used
bit concentrated color, spread the color for the
entire section to get a flat vas adding
it for the ears, now feeling the entire section. Feeling the entire outline
section for the ear, outlining the second ear, and now feeling it now spreading the color
for the inside. And with this, wed with
the face and the ears. Moving onto its hand. Small triangular
seeps for its sand. And now, let's do the remaining
section for its stomach. In here, the consistency
decreased a little bit. So using the color from the
feast to spread it in here. Small triangular
see for its food. Coloring the second foot. And with this, we are done
with coloring for the face, hands, stomach, and
the feet with this. Now for the remaining section
in here, I'm using Camu. Once again, in here I'm using
a bit concentrated color. Concentrated camo for
the entire section. For the lower section of
its clothing in here, we'll be creating fur like textia surrounding
the circular seeps of the hand that we
created dust earlier. If you're not that confident, us wait a little bit for the colour to dry and
then do the coloring. Otherwise, there is a chance
that these two colors, the cams you and skin color might mix, and we
don't want that. Spreading the color
a little bit. Now, using the Camus to do
the outlining for its hands. Covering the entire
section with this am z. Later on when the stru will be going into the bit darker
side of the colour to do the outlining the outlining for its cloth and for the entire
and also for its face, hands, and the leg. For the upper section,
I did not add any color as I'll be going
with the reds and the greens. Now let's do the colouring for scar using red to create
three circular berries. Rosie hikes adding
the t for its chicks. In here, since the
color has not dried up, so we'll have to use a bit
more concentrated color to do the coloring for the nose, I'm using ocher to
create the nose in here. A little bit of this
ocher will mix with the skin color and
a subtle gradient. Make the nose a little
bit more rounder. And with these, we are
done with the nose. I'll be adding the coloring for the ears later on for now, let's do the cap. Once again, I'm using Cambo creating the outline
for the cap. And now let's cover that. And now let's fill the
entire section with this. Adding a little bit of
camoji for the upper part. Using the orchard to
do the outlining, use a bit more
concentrated orchard to do the outlining and see that
the color has dried up, otherwise, the two
colors might mix. Carefully doing the
outlining in here, using a bit concentrated
ocher to do the outlining, as well as creating
small strokes with the brush to
do the outlining. And as usual, if you want, you can use the fine liner or the brass pins wall point
pen to do the outlining. You can also use the colored
pencil to do the outlining, or you can leave it as it does. Soothing thee to do the
outlining for the face and et. And also using this to do
the outlining for its hand, feet, and the stemmer. Adding a little bit of ocher
at the end of both hand. Now, moving on to the
remaining section for its feet and the stemmer, a little bit at the bottom
section of its foot. A little bit for the bottom
section of the foot, adding it for this too. Now for the lower
section of the scarf, a little bit just
below the scarf. And with this, we add them with the ocher for the outlining. Now let's do the
coloring for the scarf. In here, I was going to use a
little bit of lemon yellow, but then I decided
to use light green. Using this light green
to do the flat was, adding it carefully just above the outline that we
did with the ocher. I'll be covering the
entire section with the light green liter on
liter on when the dries up, I'll be going darker side of the green grass green
to add more leaves. I'll be surrounding
the berries that we created with rain with
three or four leaves, and then I'll be using
the grass screen to do the outlining
for the scarf, as well as add few lines to so some of the folds
present in the scarf. Spreading the colors
a little bit. We are not creating
a flat as in here. I'm making some of the
regions a bit more darker. I waited for it to
dry. It has dried up. And in here and in here,
I'm using the grass green. And as I was mentioning, creating three or
four leaves with this grass green carefully adding it near the three
berries we have created. Use this grass green to
do the outlining for the red berries and then extend the grass green
in the seep of the leaf, adding two large lemon like
seep with grass green. And with these, we are
done with the leaves. Now, let's do the outlining
for the scarf as well as feed this kind of mid broken lines to sow the
folds present in the scarf. Doing the same thing
on this side too. To get this kind of bit
rough texture for the scar, that's why I did not do a uniform flat baa with the
light green earlier on. And with this, we are
done with the scar. Now moving on to
the cap in here, creating this kind of bit
broken lines to create this kind of pattern on top
of the camo Go for our cap. Instead of this kind
of pattern or design, you can create other kind of designs or you can just leave it as it
is simple yellow cap, choosing the grass screen to
do the outline in here too, and a little bit of grass
screen for the upper part too. Making the lines a little bit more darker for
some of the region. If you want, you can also use the grass screen to do the
outlining in here like this, or you can leave it as it is. Now, in here, I'll be creating this kind of simple
small leaves, a set of two or three leaves. Right now, I'm just
creating single leave. Then I'll be using it and
extending it to create a stem. And on those stems, I'll
be adding more leaves. So a set of two or three
leaves for the entire section. Leaves like this. If you don't want, you
can just leave it as it is simple, plain yellow cloth. And if you want to add a
little bit more detailing, can you can also use a little bit of red to
create simple red marries, or you can also create silvets
for the flower using pink, red, orange, blue,
or any other color. Let's add a few more. Use breast to create
the smallest strokes in this manner to create the
leaves and the stems. Adding one more
leave in here, too. If you want, you can add more leaves or different
kinds of leaves too. And with these, we are
done with the grass green. Now for the ear, I did not
add the color in here. So once again,
using the augur to add the detailing for the ear, a little bit of triangular
see for the ear. And finally, going with
the black to create the eyes and the nostrils for our pig, adding
the nostrils. And with these, we are done with our seventh project,
Merry Mistletoe Pig. This is one of my favorite. And yeah, I'll be seeing
you in the next project.
13. Pajama pig: Welcome to the Eats project
Winter Pajama piglet. Let's start with the
pencil sketching. This is a little bit simpler one as compared to the others. We'll be using two or
three different current to create simple
patterns and designs. In here, I already started with intersecting
lines to create the C for the fees simple
elliptical C for the fees. Now let's create the
triangular C for its ears. For this project to, I'll be adding the cap on top. Creating this kind of
bit curvier hands. Now let's do the
remaining section. It's stomach and the feet. As compared to its hand, I decided to make the feet
a little bit smaller. If you want, you can make
the feet bit larger too. So with this, we are done
with the basic pencil sketch. If you want to add
more elements to it, you can do that, lightly
raising the pencil sketch. Now let's do the coloring. We'll only be using the
coloring for its piece. And here, I'm using a
bit diluted pink colour to do the coloring for the fees. If you want, you can use
the same skin colour that we are using for
all the projects. But as I said, I'll be using the pink colour for
one of the project. Here I'm using the pink
colour for our piglet. Let's create the
outline for the ears, filling the entire section
with this pink colour. And with this, we are done
with a flat pass for the face. I will be leaving a little
bit of face in between the face and the remaining
section of its body. Here I'm using a sky blue. Going over the outline
of the hands and the remaining portion of
its body with this and we'll be doing a
flat pass and we'll be doing a flat as for
the entire section. And waste. And with these we are done
with the upper section. Now let's do the remaining one, starting with doing
the outlining for its stomach and now
spreading that color. Here we are creating a flat vs. Let's do the outlining for
the remaining section of its stomach and now spreading
the color for a flat vs. Instead of using this color, you can use any other
color as you see fit. And with this, we are done with the hands and the stomach. Let's do the outlining for its feet and then we'll be feeling the color
for the insides. Making the feet a
little bit more curvy, moving onto the second feet. And with these, we are done with the sky blue for the flat
was for the entire section. Spreading the color
a little bit. Creating a small
outline in between the face and the remaining
section of its body. I waited for it to dry
and it has dried up. Now, once again, in here, I'm using a little bit
of sky blue for the cap. Rounder cap in here, bit more curvier, using the sky blue to
create the outlining. And now let's fill the entire
section with the sky blue. Make this side a little
bit more curvier too. Adding a little bit of this
to do the outlining for the upper part to small
strokes with the sky view. In here, I'm using the
concentratin Cambochu to create this simple yellow dots as the pattern on
top of this cap. Simple plain dots where there's
Cambochu instead of this, if you want, you can
use other colours, too. Now, using Cambochu to create
this star like pattern, you'll have to use a
bit concentrated colour to overlay this on
top of the blue. Since earlier too, we used
a bit concentrated color. It would be a little
bit difficult to do it with the watercolor. For the entire section,
I'll be creating this kind of simple,
star like pattern, and on top of this, I'll also be adding a
little bit of white, using white to
create another star on top of the yellow ones. Apart from that,
I'll also be using Prussian mit to do the outlining and create simple patterns. You can create other kind of patterns and design or you can keep it simple and you don't have to add any
colours on top of it. Plain and simple single
colored cloth for this. You'll have to ensure that the consistency remains the same. If it's become a
little bit diluted, there is a chance that it
might mix with this clyb then there is a chance that it might mix a little bit
with the sky blue. And also when this dries up, its intensity will
decrease if you are using a bit
diluted consistency, then it won't be
that much visible. And when these we are done
with the CUG for the stars, I'll wait for it to dry
a little bit and then add white on top of
it till it dries. In here, I'm using fusin blue and creating this kind
of simple pattern. Instead of creating this kind
of simple straight lines, you can create other pattern. You can create a star like Zep, or you can create crescent
moon like e. Apart from that, you can also create
circular saps, triangular seeps or other
simple patterns or designs. Let's add a few more seeps. And with these we add
a simple patterns. Now using this Bruton ue to do the outlining for
the entire section, the entire jumpsuit, three small strokes with the
bras to do the outlining. Instead of using this,
you can also use a bit concentrated skyb
to do the outlining. You can use fine linen or the breast pain to
do the outlining. You can also use other color
to do the outlining, too. And with this, we are done with the outlining for the jams. Now, let's do the
outlining for the top, outlining the lower part
of the cap in here too, overlaying this on
top of the lines that we created with the
sky blue a broken lines. Now for the cap to, in
here too if you want, you can also create a
little bit of pattern, the same kind of patterns that the same kind of patterns
that we did for the jumpsuit. I waited for it to
dry a little bit. And in here, I'm using white and overlaying this
white on top of the camo Jue stars that we created and creating
the simple star like, say. This is optional. If you don't want, you can
just leave it as it is. But since it was looking
a little bit dull, that's why I decided to
add white on top of it. So I'll be creating this
kind of star shape on top of all the Camuji stars
that we created earlier. You can also use this white to create another kind
of simple patterns, or you can also
overlay this on top of the prosen blue that we used and create another kind
of pattern or design. We have got only three
or four more stars to overlay this white on top of. And with these, we
are done with this. Now, moving on to the top,
doing the same thing. Instead of creating small star, say, I'm just creating
simple small circular dots. And with these, we are
done with the clothing. Now let's add the
coloring for its nose, rosy cheeks and the ears. Here, I'm using the
ocher to create the a little bit of
cher for its ears. Adding the car for the second e. I won't be doing the
outlining for its fees. If you want, you can
use the darker tone of the pink to do the outlining. Using this dark pink colour
to create doji checks, and now going in with the
black to create its eyes. And with this, we are done
with our eight project, and I'll see you
in the next one. I forgot to add the
black for the nose, but I added it later on, and this is how it turned out.
14. Festive party pig: Welcome to the ninth
and the final project Festive Party Pig. This is also one of
my favorite one. Let's start with
the basic Pancasqi starting with a simple
elliptical Cp for its face. You can always use
the reference line, the horizontal and vertical intersecting lines
to create the CP. Adding the simple
Cp for its ears. Now let's do this sketching for the remaining
portion of its body. In here, I'll be creating
this kind of sort. I'll be using the
black color for it. Let's create a scarf, a combination of yellow
and orange for the scarf. Now, the remaining
section of its stomach. Finally, let's create its legs. Instead of creating
this kind of playing, you can create
another kind of link that I showed you in
the demonstration we need and that we used
in the fifth project. With this, we're done with
the basic pencil sketch. Let's slightly erase
it instead that a small section is visible so that we can use it
to do the coloring. I was not able to record it, but in here too, I
use the pink color. I added a little bit
of white with it. Now using this colour to do
the coloring for its hand. Instead of using this colour, you can always use
the skin colour to do the coloring for the face. Now, for the remaining section of its stomach and the feet. Using this to do the outlining for its clothes as
well as the scarf. In here for the fees, I used
a bit more diluted color. So using this so
using a little bit of this color from the fees for
its stomach and the leg, adding the color for its leg. And with these we are done with the coloring for its fees, hands, and the stomach. Now, let's do the
coloring for this scar. In here, I am using the cambucio Let's do the
remaining section of the scarf, using this camo u to
do the outlining. Let's feel the entire
section with this camo hue. For the white region
in the middle, I'll be adding black later on, creating another section
of the scarf in here. And with this, we are done
with the camo And with this, we are done with the
camou for the scarf. Choosing the camo to create the outlining
for the cap in here, the lower part of the cap. Creating this small
outline on the top. In here, I'm using black. Let's do the coloring for the entire section
with the black. I'll be leaving a little bit of white piece in middle
for the hands. Create smaller strokes
with black and leave a little bit of
white piece in the middle. Also, I'll be leaving a
little bit of spiece in between the scarf and the remaining section
of its clothing. Instead of using black, you can use other colors. The color that I
use for the hands and the stomach
has not dried up, so carefully using this
black to do the outlining, and then we'll be filling the entire section with the black. Carefully outlining
near the scarf. Instead of this, you
can use the file or the spin to do the coloring. You can also use
the colored pencil to do the coloring
with the black. It won't look that good
with the colored pencil, but with the breast
pain or the file liner, you can create minute details
and designs with the black. You can also use red, blue, black, or green, fine liner to create
different kind of pattern and designs and to do the
coloring for the sort. Carefully filling
the color in here, starting with doing
the outlining near the scarf and then filling the remaining section
with the black. Now for this side, carefully creating the outline for
this region near the scarf. And now let's fill the entire
section with the black. If you want, you can
use a little bit of white or mid
concentrated yellow, concentrated red
or other color or other concentrated light
colour to create to create different kind of pattern or design on top of this black. I'll be keeping it simple and I won't be creating any
designs or pattern. But if you want, you can
proceed with that, too. Now for the cap, starting with the black to
do the outlining. And now doing the outlining for the upper part of
the camo Je too. Ticker stripes with the black. Instead of using black
to create the stripes, you can also use the Camboje
to do the stripes or you can create or you can create alternate pattern with the
camo je and the black. And with these, we are done
with the black for the cap. Now for the nose, in here, I'm using burned
Siena for the nose. In here, I'm using burned
Siena for the nose. Making the nose a
little bit more larger. And with these, we are
done with the nose, now moving on to the feet, adding a little bit of burned
Siena for the lower end. And now moving on to the hands, a little bit of burned
sienna for the hands. Finally, using this burnt
sienna for the ears, adding it for the second ear, going in with the rate
for the rosy checks, small elliptical set
for the rosy checks. And in here, I'm using the
rape to create simple pattern, simple hatching lines to create simple design
for the scarf. If you want, you can
keep it as it is. Or instead of using this ray, you can also use
the black to create simple pattern on design on
top of this yellow scarf. I'm starting doing the outlining with this ray and then
creating this kind of simple hatching lines and
creating this kind of simple hatching lines and creating this simple
pattern on top of the scar. Doing the same thing in here
for the upper part too, and fin knee on this side, simple one or two lines. And when these we are
done with this scarf, find knee going in with black
to create the simple eyes. For this one, I forgot
to add the nose, adding nose for this
eighth project. The color in here,
the color that I used for the nose
has not dried up, so I'll wait for it to dry
and then add the black for the nose till
it dries in here, I'm using cher to do the outlining for the
remaining section of its body. Uh, instead of using ocher, you can use other color
like gray or bit darker or concentrated pink color mixed with a little bit
green or white. Doing the outlining
for this hand, and finally, let's do the
outlining for its space. Create thin and small stroke with the breast to
do the outlining. Doing the outlining
for this here. Finally, doing the outlining
for the last here. And with these, we are done
with the ninth project. And when this dried
up, I added the nose.
15. Thanks and conclusion: Thank you so much for
joining me in this class. I hope you had a
wonderful time painting this festive little pigs
in their cozy outfits. Each character has its own
charm and personality, and I truly hope
the process brought you joy and a sense
of creative play. We explored simple
character shapes, watercolor and gauze
layering, outfit designs, and lots of fun
decorative details, and I'm so glad you painted along with me through
all nine projects. Now it's your turn. Please upload your class
projects in the project gallery. You can see your final
Pig illustration, practice the sketches,
outfit variations you experimented with. Or even your own original
pick characters. I would absolutely love
to see what you create. Your project always
inspire me and help inspire other students
in the class as well. If you enjoyed this class, please consider
leaving a review. It really supports my work and helps new student
discover the class, and don't forget to follow
me here on the skills here, so you'll be notified
when I release new class. Thank you again for being
here for painting with me and for bringing
this adorable festive piglets to life. I'll see you in the next class.
 Vishal Munshi