Transcripts
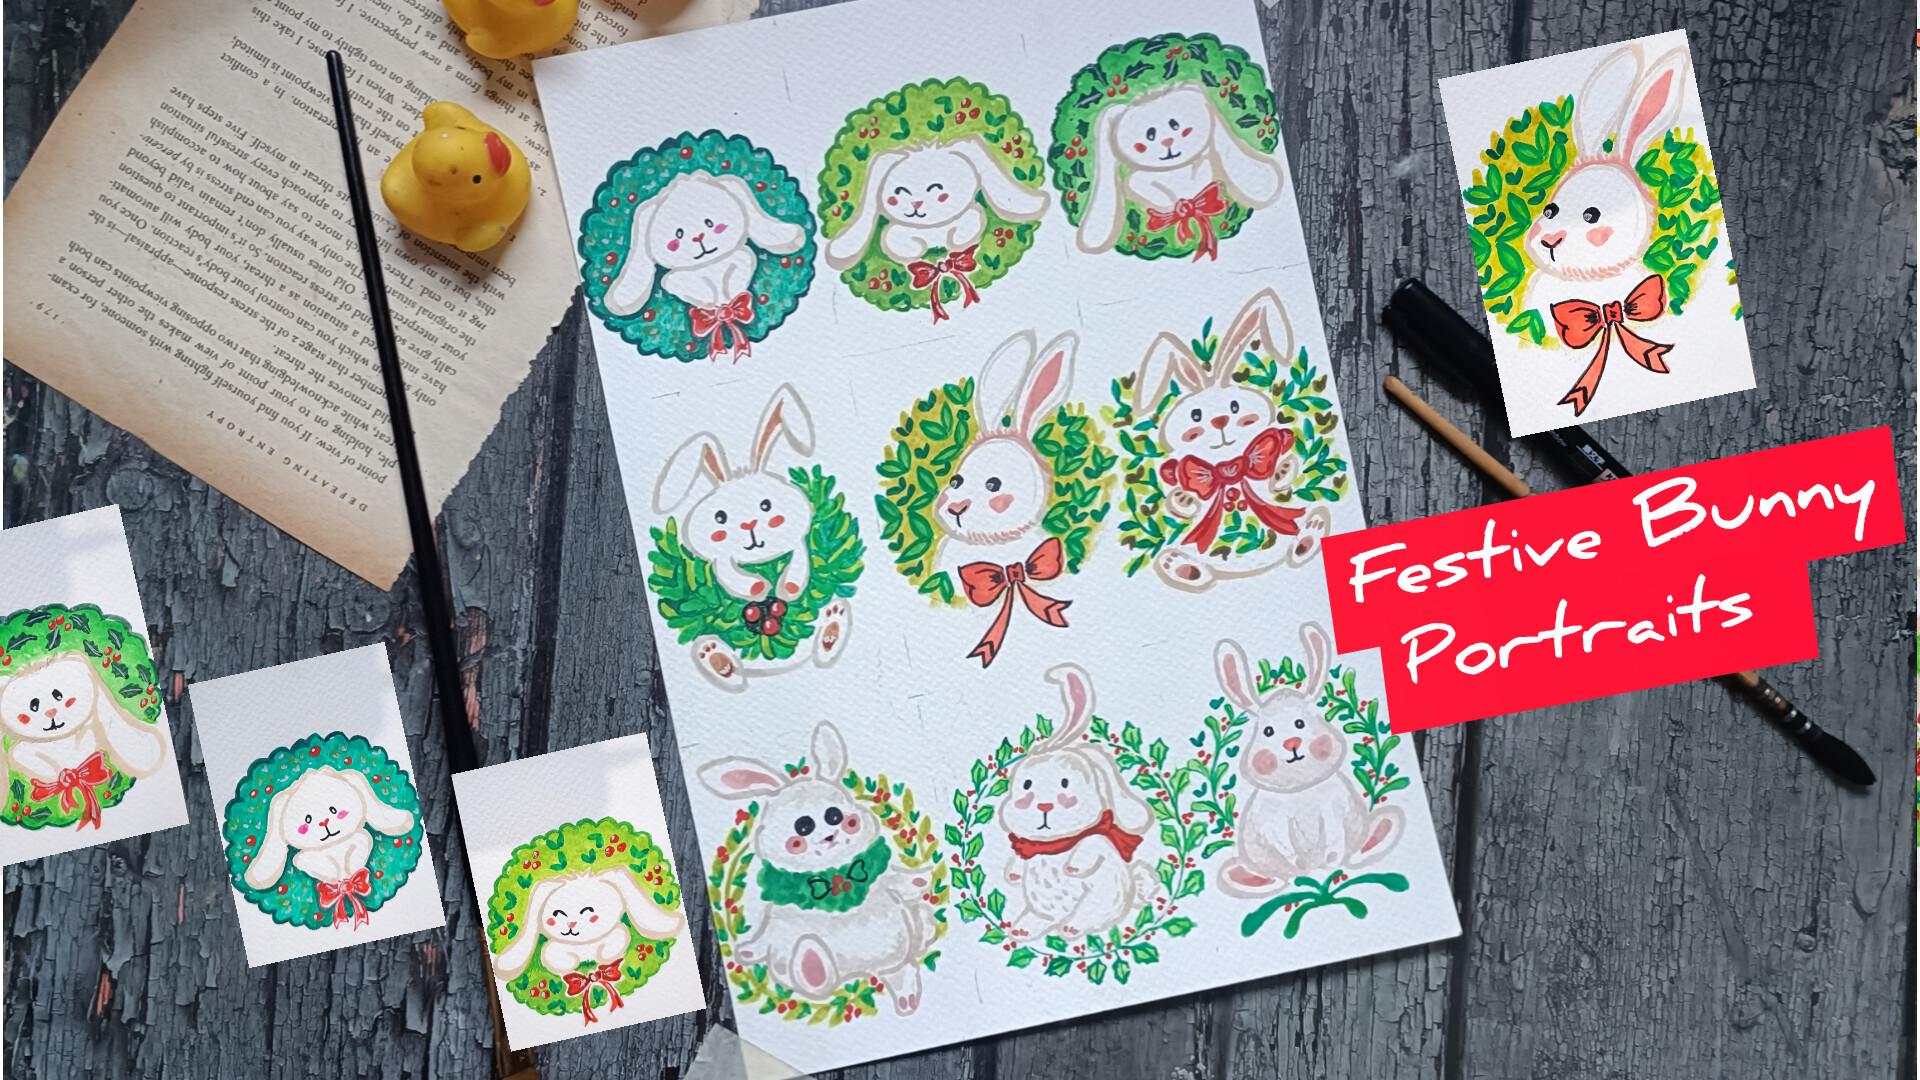
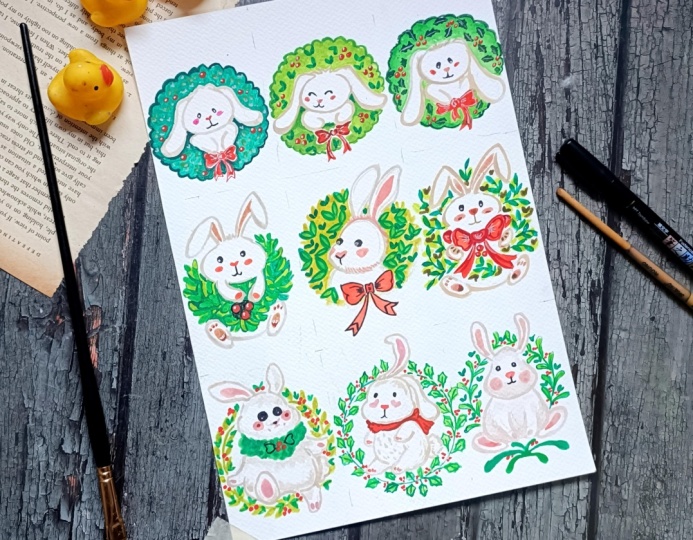
1. Welcome and Introduction : Hi, and welcome to my new
class Fest Bunny portraits, cute holiday wreaths in
watercolor and gauze. In this class, we'll be
painting nine beautiful, vibrant and cozy bunny illustration each surrounded
by festive holiday wreath. The projects include
winter snuggle Bunny, smiling holiday bunny,
Holly hug bunny. Then we have this
green snuggle bunny, golden wreath bunny, festive Bow Bunny, mistletoe Snuggle Bunny
winter meadow bunny. And lastly, Holy scarf bunny. Each painting is simple, beginner friendly
and designed to be completed in ten to 15 minutes. Most of the lessons
are in real time, so you can easily follow along
with me at your own piece. We will start the class with
basic sketching we'll show you how to draw
cute bunny pieces and bodies using simple saves. After that, we'll explore how to paint festive
wreath background, including different
types of leaf, berries, color combination, and small decorative details using
both watercolor and gauze. Once you are comfortable
with the basic, we will dive into the
nine mean projects painting each bunny
step by step. Hi, my name is Wichel and
I'm an artist from India. This is my Skillshare
profile where I see your fun Bginner
friendly art classes. You may also enjoy my
other festive class, festive tal peg,
and you can find more of my work on
YouTube and Instagram. This class is perfect for
Bgner an intermediate artist, and you don't need
many supplies, just a pencil, reser 300 GSM, watercolor paper, and
either watercolor or gauze. Feel free to use whatever materials you are
comfortable with. This is a relaxed, joyful class focused on creativity and fun, and I can't wait to paint this
holiday bunnies with you. I'll see you in the next
video. Let's get started.
2. Class project : For your class
project, you will be creating one or more
festive bunny portraits. Inspired by the
lessons in this class, you can choose to paint any of the nine bunny wreaths
designs we create together, or feel free to mix
and match elements, try different wreaths, see, leave style, merry colors, or even add your own
accessories like scars, bows or winter details. Start with simple pencil sketch, and then paint your bunny
and wreath using watercolor, gauze or a mix of both. Keep it loose and playful. This project are meant
to be fun and relaxing. Once you are done, upload your finished artwork to
the class project section. I'd love to see
your color choices, where eason and creative ideas. Also welcome to
see your practice, sketches or color taste if
you didn't like feedback. Don't forget to
leave a review or comment and let me know how
the glass went for you. If you enjoyed the process, I really appreciate
your feedback. I can't wait to see your
festive bunny creations, wishing you all the very
best, happy painting.
3. Simple bunny sketches: Welcome to the first part
of the tutorial video in here and I'll be showing you four different bunny sketches, as well as we'll be using the watercolor and gauze
to do the coloring. You can simply
create this kind of oval seeps or you can use this kind of intersecting lines, vertical and horizontal
lines to create varieties of wearing this length as well
as the width a little bit. This will be our simple
sp for the bunnies. For top of its heat, you can create this
kind of small spikes. Mostly, I'll be
creating this kind of droopy ears for our bunnies. Let's do the second
one. I'll also be wearing the sides of
the face a little bit. I'll be using the oval seep as the reference,
and as required, I'll be making the face
a little bit smaller, bit broader or making
a bit elliptical. For this one, let's make it a little bit like triangular same. And in here, I'm creating a
bit different kind of ear, so a little bit band. For all of our project, we'll be creating a little
bit of variations in the ear. The ears will be quite
easy, simple, like this. And for this one, we
have standing ears. Here I'm keeping the face oval. And as for the hands, very simple curved
hands like this. If you want to make a little
bit more defined hand, you can do that. For most of our project, I'll be creating this very
simple and basic hands. Some of the hands will
be folded like this and others will be open
a little bit like this. For most of the project, I'll be making something in between the hands like bow tying gift wrappings or
trees or berries. So these are the
very simple sieves that we'll be using to
create our bunnies. Now in here, I'm using the fine liner to
do the outlining. If you want, you
can use the fine liner to do the outlining. For our project,
I'll be mainly using watercolor and gauze
to do the coloring. By coloring, I mean outlining. I won't be adding any
color for the inside. I'll be keeping all
the bunnies white. If you want, you can do a
little bit of coloring. This is very simple
outlining for the bunny, creating this kind of small
circular s for the eyes, for the nose and the chicks, I'll be using a
little bit of red. You can use fine liner
el pin, breast pain, or you can use the
watercolor to create the nose and the rosy chicks. Now for the remaining
section of its mouth, a small straight line and a little bit curve
line for its mouth. So this is how we'll be
creating all our monies. Now for the second one, lightly
raising the pencil marks. I'll be using the watercolor
to do the coloring in here. For this one, creating
a bow tie in here, very simple and basic sketch.
You can use any color. You can create any
kind of bow ties or you can also add
other accessories. Mostly, I'll be using watercolor or gauze to do the coloring. You can use the sketch pen, breast pain or ballpoint
paint to do it if this makes the process a
bit more easier or simpler. Just mainly, I'll be using two or three
cults to do the coloring for the bow ties to
create a little bit of seeding and a little
bit of highlights too. In here, just for demonstration, I'm using the fine
to do the coloring. With the fine and
the brass paint, you will get a little bit more
accuracy in the precision. And with the brass paints
or the watercolor brushes, you will have to be
a bit more cautious and careful to do the
coloring since we'll be creating much smaller bow
ties and other accessories. Now moving on to the second one. In here, I am using ocher mixed with a
little bit of grey. Here I'm using gaze
to do the coloring. You can use gauze or watercolor. So for the project where I want to make the things
a bit more darker, a bit more vibrant,
I'll be using the gauze to do the coloring
and for the other project. And for some of
the project, if I want to make things
a bit more lighter, I'll be using watercolor. You can use both the
watercolor or the gauze. You can use both the
gauze and the watercolor. So it depends upon you
what you are going to use or what
supplies you have. As for the bunnies,
as you can see, I'll be making the ends like the ears ends and the hands
a little bit more thicker. So for those line, adding a little bit more
thicker lines to make that region a little bit more bolder and bit more distinct. Once again, using the breast
pain to create the eyes. So here we have got closed dye. For all the eyes in the mouth, I'll mostly be using the fine
liner or the breast pain, since this makes the
process bit more easier and it provides bit more
precision and accuracy, a little bit for its hands. These are option if
you don't want to use the coloring for the
hands, you don't have to. Now using the d to
create the Bowtie, leave a little bit
of white space in middle to sew a little
bit of highlights. These are just a
simple demonstrations. For our main project will be making it a little
bit more detail, a bit more vibrant and colorful. Moving on to the
third one, lightly erasing the pencil
sketches that we created, ensure that a small
section would remain visible so that we can easily
overlay color on top of it. M In here to create a bit lighter
coloring, I am using pink. I'm using watercolor in here, a bit concentrated watercolor
to do the outlining. Mostly, I'll be
using a little bit of green and a little bit of ocher or skin colour to do the outlining for our
projects, the punis. You can use other lighter
sets of that color as you see fit, outlining the ears. Since this ear is a
little bit folded, the other sides is
visible in here, so small section with this
pink, creating the other ear. For this ear, the
front side is folded, so we can't see the other side, creating small hands for it. The one we'll be
using the watercolor ses to do the outline. We'll also be wearing
the lines a little bit, depending depending upon
the bends and the curve, using red to create heart
like see for the nose, a little bit of red
for the rosy cheeks. In here, I'm using Camo
jiu for the bow tie. Most of our project,
I'll only be using red, but you can use any
other colored schemes to create different
kind of bows. You can create any other
kind of pattern design. And mainly using two
or three colors, you can use other colors. Going with the breast pain
to create circular eyes. And now let's create its mouth. If you want, you can
also add whiskers, small strokes with a
breast pain on both sides, just below its chin to
create the whiskers. I'll wait for this yellow to dry camozu and then
I'll be going with the red to do the
outlining and add a few lines to create a
little bit of sealing. In here, I'm using gray
to do the outlining. You can vary the
consistency of the grey. Mostly, I'll be using a
bit more lighter set of the grey to do the
outlining for our bunnies, outlining for its ear. Now for the hands, here
we have got folded hands. Very simple outline for it, now adding a little bit of gray for the insides of the ear, creating very thin
strokes with a gray to do the outlining in here
for this middle region. A small section in
here soon be visible so using this to create
a smaller stroke. Using red to create small
berries, three berries, small nose, heart like
save for the nose, two small dots on its che. Now, once again, going back with the breast pain to
create tiny little eyes. You can also play
with a different kind of expression with the
face and the mouth. I'll be keeping things
simple and creating the simple variations for the
eyes, nose, and the mouth. Now for the leaves in here, I decided to create this
kind of holly leaves. Mainly, I'll be using
two or three sides of the green to do the coloring. But if you want, you can use only single colour
to do the coloring, you can use bras pin or other
darker side of the coloring to do the outlining and add
a little bit of detailing. Adding it carefully in here, just beside its hand and a
little bit near its mouth. Now, we will wait for
it to dry and then add another layer on top of it. This ambuji has dried somewhat. So using red to do
a little bit of outlining and creating this kind of small detail and pattern. These are optional.
Instead of using this, you can also use
the darker side of the yellow or orange
to do the outlining, or you can just
leave it as it is. Doing the outlining
for the last section. And with this, we are done with this first section of
the tutorial video. I'll be seeing in the next video where we'll be creating
different kind of
4. Wreaths and leaves: Welcome to the second part
of the tutorial video. In here, we'll be creating
different kind of wreaths, using both watercolor and
the gaze to do the coloring. In here, I'm using watercolor
to do the coloring. We'll be starting with a bit lighter or darker
side of the green, and we'll wait for it to dry. When it dries up,
we'll be adding another colors on top of it, creating different kind of
leaves and the berries. In here, I'm using gas to
create the second wreath. We'll be starting with
creating a flat vase, spreading the cover
for the entire region while keeping the consistency, while keeping the
consistency uniform. Here's third one. In here, I'm using dark green. You can start with any
seeds of the green to create the primary
layer of flat vase. And when this dries
up, we'll be adding more detailings on top
of it in form of leaves, berries, and a little
bit of highlights. Also, you don't have to
start with the flat was. You can also create a
little bit of gradient or you can also do a
little bit of grated was. By graded, I means that some regions
will be a bit darker, others will be a bit lighter. Like in here, I'm not spreading
the colors uniformly. Some of the regions
are a bit more darker, and I'm also using a bit
darker side of the green to do the outlining and I'll also be spreading a little bit of
this green for the inside. This is a kind of graded vs. So you can also create this
kind of wreath now for the last one for the
last one in here, I'm using a bit darker or thicker consistency
of the color. I'm using watercolor in here. And I'm going to
create a little bit of gradient for this one. You have light side of the
green for the meadow region, a bit darker side of the green, and then for the final
layer in here, grass green. So three different
seeds of the greens and we'll be blending
it a little bit. When this dries, it will create a gradient in between three
different seeds in the green. Now for the leaves, I'll be creating three or four
different kind of leaves, and in here, I'll be
sewing four or five examples that you can create
other kind of leave too. Mostly, I'll be starting with a bit lighter seeds in the green. If you're not comfortable,
you can start with a pencil sketch and
then do the coloring. The seeps of the leaves
are quite easy and you can easily create it for the second kind of leaf somewhat similar
to the first one, a little bit larger and a
little bit more carban. For most of the leaves, I'll also be using
two or three seeds of the green, mostly two seeds, starting with the
lighter seed and going with a bit
more darker side of the green to do the outline, as well as add, as well as
add mid rips on the veins. And if required, I'll also be
using a little bit of white to add highlights so do a little bit of
outlining with that. Here's third one, a
little bit simpler one. Very simple seeps like this
to create this kind of leave. The leaves that I am creating
in here are quite large. For our meat project, we'll be making it a little
bit more smaller, and I'll also be adding a few
berries among the leaves. Here's the fourth
example, holleves. Very simple hexagonal
seeves making the hexagonal seeds a little bit curvier to create
this kind of leaf. For our wreaths, I'll be using two or three different
kinds of leaves as well as berries and use a
bit of white to create a bit of highlights
in outlining too. Let's create one or two
more leaves for this one. If you want to create a
bit more vibrant color, you can use gauze or you can also use
watercolor to do it, but you will have to use a
bit thicker consistency of the watercolur to
get this kind of bit consistent and
vibrant colors. Now, it's fifth one. So this is similar
to the first one, but in here, I'm just using a little bit of different con. So you can see this
is a combination of both first and
the second one. The stem is a little bit more curvier and the leaves
are quite larger. I won't be creating this kind of large stems for our wreath. We'll only adding
two or three pads of the leaf or two or three
shades of the leave. Here I'm just showing
you as an example how you can create this
kind of simple leaves. Here's another one.
So this is small. So this is a simpler version of the third kind of leaf
that I sowed you. For this kind of
leaf, I'll be using two or three different shades of the green to create
this kind of leaf. I'll also be using a bit of
white to do the highlights or add a little bit of white to
do the outline if required. I'll I'll be using to create very simple
sons for the berries, simple circular seeps
for the berries. If you want, you can also do a little bit of seeding using two or three sets of the
rats to create the berries. In here, I waited for
the greens to dry. It has dried up, and creating small circular
seeps for the berries. For our wreaths, designing
when the first layer dries up, we'll be adding red or green. We'll be using red to create the berries and greens
for the leaves. So depending upon the kind
of wreaths we have created, we'll be either
starting with the rats or with the greens
for the leaves. For this one, I decided to add the berries in the middle
bit larger berries. For this one, I
decided to create the berries bit more smaller. You can vary the seeds and the sizes and the
cluster of the baries. Instead of eating the three
or four cluster the baries, you can create single berries or sets of two berries or
even multiple ones. Instead of using the watercolor brush to create these berries, you can always use the fine
liner brush pins or gel pins to create a bit more precise and more accurate circular
seeps for the berries. Here to lm adding two or
three berries for leaves. And as you can see, I'm not adding the berries
for all the leaves, but for some of them, Wait for the eats to dry. And in here, I'm creating this simple person
of the wreath. So very simple basic
saves for the leaves. The leaves are not
attached to each other. Just very plain and simple, this kind of leaf pattern
for the entire section. This is a very simple
example of the wreath that you can create using
only two or three colors. Now for the second one, here, I'll be using two or three
shades of the green. Here I'm starting with
darker sad of the green. Simple seeps like I saw you in the last example of the leaf. You can alwaysvry the seeps and the sides as well as the
coloring for the leaves. And with these, we
are done with this, I'll be adding another
layer of green to add more leaves when it
dries up. For this one. Since in here, I use a bit
darker sd of the green, dark green for the flat ones. In here, I'm using a bit
lighter seed of the green. It is not that much clearly visible in here, but later on, we'll be doing a little
bit of outlining to make it a little
bit more distinct and a little bit more clear. For all the darker wreaths, we'll be using a bit
lighter shades of the green and we'll be doing the
outlining either with a bit more darker side of the green or using a
bit lighter side of the green or white to do
the outlining to make it a little bit more clear
and a bit more distinct. Mostly, we'll be
using lighter side of the flat as and add darker side of the green for the designs and the
pattern for the wreaths. For in here, we'll be
using two or three sets of the greens and two or three
kinds of leave for this one, starting with this very
simple kind of leave, creating this kind of seed for the leaf surrounding the
berries that we created. Now in here, creating this
kind of holly leaves. For our projects,
we'll be making the sizes of wreath a little bit larger since this will be
encircling the bunnies, so we'll be creating the leaves
a little bit more detail, a bit more defined,
and a bit more bigger. We'll wait for it to
rise and then add a little bit more
detailing till it dries. Let's do the
outlining for some of the leaves we have
created in here. I won't be doing the
complete outlining. I'll be creating this kind of bit broken lines to
do the outlining. For some of the
sections, I'll be adding a bit more thicker
lines to make it a bit more organic
and for the others, I'll be making the
lines a bit thinner. You can always use
the green colour fine liner bras pain to
do the outline, or you can just leave it as it is simple single colored leaves. Let's do this holly leaves. Using a bit more bolder side of the green to do the outlining and I'm also creating the
mid drips and the veins. Here, too, if you want, you can create a bit
of broken lines, not covering the entire section of the stems and the leaves, only covering a
little bit of it, using broken line like this. Adding the mid robs
and the veins. Let's do the remaining two
leaves we have in here. And with these, we are done
with the holly leaves. For this one, in here,
I'm using olive green. In here, I'm using
a bit darker side of the olive to create
this kind of leaf. Just another variety
of leaf in here. Instead of two leaves in here, I'm creating three
or more leaves. If you want, you can
also use this to do a little bit of outlining
for some of the leaves. These are some of the example that you can use
in your project. You don't have to stick with it. You can create other kind of designs pattern leave
as you see fit. Put this one, adding another set of leaf using this
dark olive color. In here, I mistaking, use a bit more darker side
of the olive colour, so it's slipping a
little bit like black. I mixed a little bit
of brown with this, so it n out like this. But for our project, we'll be using a bit lighter
sads of the green. And as I was
mentioning for this, using this to do
the outlining for the light seeds of the green
that we used to create the leave Instead of this, you can always use the fine line or the brass pin to
do the outlining. And you can also use
the white colour to do the outlining that
will make the things a little bit more interesting. For this one, I'm only adding the mid drips in the middle. If you want, you can
do the outlining for other sections too. I'm just doing the opposite, just outlining the outer
edges of the sleeve. I'm not creating the
mid drips or the veins, mostly focusing this
on the outer edges, adding a little bit more
green for the curve sections. Later on when this dries up, we'll be also using a
little bit of white, adding stems for some
of the leaves in here, the lighter side of the green. Using the same seed of the
green to make the outlines of the holly leaves that we create a little
bit more distinct. Since these leaves
are quite small, I'm not able to create the kind of more distinct and
precise outline. I would advise you to use the breast pin or the fine
liner to do the outlining. Adding few more leaves in here to make it a little
bit more colorful. Going with the ye to add a
little bit of highlights. For the larger berries, I'll be creating this kind of exclamation mar and
for the smaller ones, single one or two dots
to add the highlights, or you can see a little
bit of reflection. If you have white
gelmen you can always use that to create this
kind of small highlights. In here, I'm using gauze
to add the highlight. You can always use
the white jelly pen. If you have, you can use bit
concentrated acrylic color or bit concentrated, white water color for this one, too, adding small
dots for the berries, a little bit of white lime in the middle midrib for
the holly leaves. You don't have to add the
white for all the berries. You can just add it for
some of the berries. In here, since we created
very small berries, adding very small and
minute dots for it. Moving on to the berries that we have in
here at the bottom. Using this white to create
the mid drips for this one, a little bit of broken lines. A bit smaller than
thinner lines to create a bit of mid drips and a little bit of small
section of the stems. You can experiment on
your own and create different kind of
varieties of the leaves. You can admit more
patterns to it, a bit of more designing
as you see fit, create this kind of bit
broken lines to add a little bit more texture and characteristics to your leaves. Adding more tiny dots for the remaining berries
we have in here. Another kind of a small
pattern or design using this white to create this
kind of leaves. Small we like saps, or you can say small
leaves set of two leaves. In here, I decided to
use this white to do the outlining and add
mid dips in the wins for the small holes I created. Apart from this, you can
also use the white to create the small random dots. And you can also
create this kind of star like scene to add a little bit more
highlights or to sew a little bit more to sew a little bit of
ornaments present. Here, let's use this to add a
little bit of more designs, simple, small we like
s with this white. And with these, we add with
this demonstration vine. I'll be seeing in the next
video with our Falls project.
5. Winter snuggle wreath 1st Project : Welcome to the first
project Winter Nagal Ri. Let's start with
a pencil sketch. Starting with this
kind of triangular oval se for its face. If you want to make adjustment with the seep of the
piece, you can do it. You can make it a bit more
roundest bit more circular. Let's create simple droopy
ears for our bunny. And now let's add the hands. A small section of its
hands are visible in here. Very small round sep for
the hands and find me, creating the outline
for the bow. This is our first pencil
sketch for our bunny. Let's create the circular
outline for the wreath. Instead of creating
this circular shape, if you want, you can create
other kind of seeps too. You can also create a
bit of triangular see. With this, we add with
a basic pencil sketch. Let's lightly erase it. Insure that a small section of the pencil sketch should
remain visible so that we can use it to do the coloring.
Let's do the coloring. And here I'm using a
bit diluted ocher. I mixed a little
bit of white with it to get this
seed of the color. Going over the entire outline of the money that we have created. Creating this kind of bit
rounder seeps for the head. Now, let's do the
outlining for its ear. Make the lower part of the ears a little bit more
thicker like this. Now, for its hands. Very simple and basic
seeps for its hands. Going over the outline
for its other hand. And finally, let's do the
outlining for the ear. If you want to add a
little bit of coloring, you can create a bit lighter
flat was for the face. Use a bit more diluted
color for that. I won't be doing the coloring
for any of the rabbits. In here, I'm using gel paint to do the outlining
for the boom. Instead of this, you can
always use the watercolor, gauze or brush pin, sketch pin, whatever you
are comfortable with. Since this is your
first project, I decided to keep things simple. That's why I use this gel pen. Now let's do the flatw. In here, I'm using the
darker set of the queen. And in here, I'll be
creating this kind of outline for the entire weak. Instead of this,
if you want, you can feed simple circular see. I'll be doing the
outlining with this and then filling the
entire section with it. Moving onto the other side, adding it carefully in here. Instead of using bit
darker side of the green, you can always use
bit lighter side of the green or other sides of the green or combinations
of the green. Now for the insides,
adding this green in here in between the ear and the remaining
section of its head. In here, I'm going to
do the outlining for the entire section of the
rabbit and the bow and then filling the
entire and then fill the rest of the spice
with the green carefully, doing the outline for
the entire section. Here you'll have to
be a bit cautious and careful to do the outlining. We don't want the
two colours to mix. And instead that
the color that you used to do the
outlining has dried up, otherwise, we might mix up, and we don't want that. Adding it carefully in here for this small triangular region. Now let's do the
outlining for this hand. Now let's do the
outlining for this hand. And with this we had with the outlining of
the bunny's body. Now, doing the outlining for the bow that we have created. And now let's do a flight pass. So filling the entire
section with the screen. If you want, you can create
a flat or otherwise, you can also create a
little bit of graded vase. So for that, I would
advise you to add a bit more darker
scene of the green near the buny as
well as the bow. And for the remaining section, use a bit lighter scene, or you can just dilute it a
little bit with the water. In here, I'm going
to create a flat vs. So in here, I'm keeping the consistency of
the green uniform. And with this, we are
done with the upper part. Let's do the remaining section. Adding it for this
bottom left side. And now moving on to the
other side, the right side. I see that the
consistency of the colour remains seen if you are
going to do a flat pause. And with this, we are done with this side of the green
for the flat vase. We will wait for it to
dry a little bit and then add reds and
greens and whites. In here, I'm using a
bit more darker seed of the green to go
over the outlines. The colors will mix a
little bit on its own. If you want to create a bit more clear and precise outline, you can wait for it to dry, or you can just follow along with me and do the outlining. I'm also going to
add a little bit of the green for some of the
regions to make that region a bit more darker to sew a little bit of sadose casted
by the ears as well as its hand and a little bit by the bow and little bit by
the bow that we created. Oh creating these kind of small strokes with this
darker side of the green to create this kind of little
bit sadose in here. Continuing on with the
remaining section, going over the outlines. This has dried up a little bit, so only a small portion of this green will mix with the
remaining flat was winded. I was hoping to create
a little bit of subtle gradient in between these two different
seeds of the green. And with these, we are done with this dark green
for the outlining. Adding a little bit
more green in here to make the sados
a bit more darker. Surrounding the outline in
here with this dark green. If you want, you can also add a little bit for the upper part. And now let's blend these
two colors a little bit. In here, I'm using
water and spreading this dark green to blend it with the remaining
flat as we created. Here we are trying to create
a graded vase or a bit of gradient in between these two different sides
of the green. Now, let's add the
facial expressions. In here, I'm using breast pain to create the ice for our bunny, doing with a to create
heart sp for its nose. I am using seal pain to
create this heart sep? Very simple straight
and curved lines. If you want, you can
always add whiskers with bras pain or using
the watercolor brushes. For rosy chicks in here, I'm using a little
bit of pink colour. Adding it just
below the eyes and a little bit apart
from the nose. And with these, we add
them with the piece. Now let's do the
coloring for the bow. So in here, I'm using flame red. Instead of this, you can always use the brass pain, jail pin, screech pain to make this
process a bit more easier. I'm leaving a little bit
of white piece in between the outline section to act
as a little bit of outline. If you want, you can cover the entire section with the red. As you can see, I'm
leaving a little bit of white piece in between
the outline regions, adding it for this section. And with these, we add
with this flame red. The flat mass that we created
has dried up in here using light green and creating the simple simple
leaves, a set of 23. It is not that much
visible in here, but when it dries up, it will become a bit more visible
and bit more lighter. And now going in with the red, creating these small circular
saves for the berries. In here, I'll be
creating single baries If you want you can
create cluster of berries or pair of berries or three or four
berries as you prefer. Simple circular
seve with this y. You have to use a bit more concentrated red
if you are using watercolor to overlay this
on top of this green. Let's add one more in here. And one more in
here. If you want, you can add more Mary's,
but I'm satisfied with it. Adding a little bit more
of this raid on top of the lion raid to create
a little bit of seeding, not covering the entire section, but just near the center, a little bit of small strokes with this to create
a bit of seeding. Now going in with the white to create this kind of
small simple saves, small leaves like pattern. Right now, you can also use a bit darker side
of the green to do the outlining for the lights
of the green that we use. You can also use this white to do the outlining
for the leaf. And you can also wait for
the light green to dry and then use Membraspen
to do the outlining, or you can leave it as it is. Since when this dries up, the light seeds of
the green will become a bit more gleser
and more visible. I won't be doing anything
with the light seeds of the green that I used
earlier to add the leaves. Using this white to create more simple
sets like this, you can also create stars and add some simple ornaments
on this wreath. Using this white for the board to create a little
bit of highlights, small strokes with the white. And with these, we add with our first project,
Winter Snuggle wreath. And as you can see, the
light greens that we used earlier has become a bit more lighter and a
bit more distinct. And I'll be seeing
in the next project Smiling holiday bunny.
6. Smiling holiday bunny 2nd Project : Welcome to the second project,
Smiling Holiday Bunny. Let's start with the
basic sketching in here. Instead of starting
with the bunny space, I am starting with the
circular S for the wreath. For this one, I decided to use the watercolor to
do the coloring. You can use watercolor or
course as you see fit, creating this circular see for
the outline of the wreath. Now, let's create a little bit of oval see for the
fees of our bunny. To make this process
a little bit easier, you can always use vertical and horizontal intersecting
lines to create the fees. Creating this kind of oval see a bit smaller oval
see for its face. Instead of this, you can create
the same face like we did for the first project,
creating small hands. These hands are
comparatively more smaller and the hands are
both folded in front, creating the outline
for the bow. Instead of this bow,
you can also add other kind of accessories
or ornaments. Let's create the droopy
ears for the head, and here I created this
kind of spikes for the top of its head. Droopy ears. Instead of this kind
of droopy ears, you can also create
standing ears just I saw it as I showed you in
the demonstration video, doing the outline
for the second here. And with this, we are
with the basic pencil uske for both the
read and the bunny. If you want to make adjustment to the seep side,
you can do that. Lightly raise it and ensure
that a small section remains visible so that we can use
it to do the coloring. So let's do the outlining. In here, I'm using a skin color. I added a little bit of white to it and using a bit thicker
consistency of it. This time. In here, I'm using
gauze to do the outlining. But for the remaining
section for the wreath, I'll be using the watercolor. Doing the outlining for
the piece of our bunny creating these kind
of small spikes for its top of the head. Let's do the outlining
for its ears. As I mentioned, for the
lower section of its ears, I'll be making them
a little bit bolder, so a bit more thicker
lines in here. With this, we are
done with this first e. Let's do the outlining
for the second one. You don't have to stick with the pencil outline that you created. You can make the adjustment,
and you can make adjustment as you see fit
going over the outline, making this region a
little bit more thicker. And with this, we are done with the outlining for its
face and the ears, moving onto its
sand, small hands, doing the outlining for this. Here, too, if you
want, you can make the lower ends of both the
hands a bit more thicker. And with these, we are done with this color
for the outlining. Now, let's do the coloring. In here, I'm using a bit thicker consistency
of the light green. Instead of this
thicker consistency, you can always use a bit
lighter consistency. But for all the
projects in here, I decided to make them a little bit more vibrant,
bit more colorful. So that's why I'm using a
bit thicker consistency of this green watercolor. You can use the lighter one
just as I showed you in the demonstration vineo in here, I did outline for
the bow that we created and now I'll be
doing the outlining for all the sections of
the money that we created so that the two colors
don't mix with each other. We'll have to
presides and create small brass strokes
to do the outlining. Here too, I'll be using
a bit darker side of the green to do the
outlining later on. Moving on to the other side, starting with doing
the outlining and now. Adding this light
green care fully beside the hands and
the ear of our bunny, filling the entire section, the outline section
with this light green. In see that the consistency of the green remains the same. If you are going to create
a flat v, otherwise, you can also create
a graded vase or you can also create gradient. Let's do the outlining first, and then we'll be adding
the color for the insides, creating this kind of outline for the entire section
of the wreath. Let's feel the entire
section with it. Right now, I'm starting with spreading the color
from the outline, and then I'll also be
doing a little bit of outlining for
the bunny's head. Here for this upper region and decided to create
a bit of gradient. To do that in here, lm decreasing the intensity
of the green a little bit. Ali spreading the green from the top to the lower section. So Al spreading the green from the top to the
piece of the bunny. This spread the
color from top to the bottom and thus reducing
its intensity a little bit. You can also use a little
bit of water to spread the color and make it a
little bit more diluted. You can clearly see the region close to the bunny is
a little bit lighter, and the outlined section is
a little bit more darker. Now in here, I'm using
a little bit of red to create this hot seed
for the nose of our bunny, a little bit of red
for their rosy cheeks. We will wait for the
green to dry and then add the berries and the
leaves till it dries. Now, going with the
breast pain to create this kind of smiley eyes. So both the eyes of this
one is closed, small mouth. You can always use
the breast pain or the end to create
small whiskers. And with these, we are
done with our bunny. Let's do the coloring
for the bow tie. In here, I'm using this red. And as I mentioned, you can
always use other color. You don't have to create
this kind of bow. You can also add ornaments
or other accessories. I'm leaving a little bit of
white spiece in between. I'm using this whites
piece as the outline. Instead of leaving
the whites piece, if you want, you can cover the entire section with the red. For the lower
regions in here too, I'll be leaving a little
bit of white space. You can always use the
fine ended bra spin or ski spin to do the coloring
for the small sections. This will be our primary
layer or you can see flat mass for our boti. When this dries up, I'll be going darker side of the rain. Now, let's create the berries. I'm using a thicker
consistency of the red and overlaying this on top of the
green that we used earlier. I waited for the green to
dry and then I'm adding it. Otherwise, if you add
when it is not dried up, the two colours might bleed a little bit and mix
with each other. Here for this one,
I'm creating cluster of the berries, two
or three berries. Instead of this, you can create single bellies like we did
for our first project. Adding one more berry in here. And with this, we are
done with the baries. If you want, you can add
a little bit more baries using a bit thicker consistency of the red to do a little bit of sdingT sew a little bit of
sado cast it by the hand of our bunny and also using this to do a little bit more
outlining for the bowtie. A little bit of more red
for some of the berries. This red for some of the
bariesT sow a little bit of sading that one side of the
baries are a bit darker. Adding a little bit
more detailing in here in form of small lines, a little bit of hatching lines. And with these, we
ade with this red. Let's create leaves. In here, I'm using grass green and creating this
kind of small leaves. You can create single
leaves or you can create pair of leaves like this. You don't have to
create the same kind of leaf I am creating. You can create other
kind of leave that I showed you in the
demonstration video. I'll be adding this kind of
leaf for the entire region. I won't be over saturating it. But if you want,
instead of this, you can use other
kind of leaf or you can also use other leaves
in combination with this. Instead of using
the single leaf, you can use two or three
different kind of leaf and make it a little
bit more interesting. You can also use a little
bit of darker seed of the green to do the
outlining for these leaves, or you can also use white
to do the outlining and add and add mid ribs and
the veins for the leaf. Since this is our
second project, I won't be adding that
much detailings to it. But if you want, you
can proceed with that. Making these regions a
little bit more darker, a little bit of greens in here, just below the ears and a
little bit just above its hand. And with these, we are
done with this green. In here, I'm using jelly
paint to create highlights, and it was not working on it. Using this jelly pin to create a little bit of highlight
for the bow tie too. Instead of this,
you can always use the concentrated
white colour gauze, white ink, or you can also use acrylic to add
this kind of highlights. It's not working
the way I hobed, but yeah, instead of this, you can always use other
things to do the highlighting. So this time in here, I'm using a bit
concentrated white. So white from the
watercolor to create this kind of small highlights
for some of the baries. Small dots with this
white for the highlights. Adding a little bit
for the nose too. Adding a little bit of more for the bow tie
that we create in small streaks with this
wine. This is optional. If you don't want, you
don't have to do this. For the first one, I forgot to add the highlights, so
adding the highlights, tiny dots with the
white for the highlight for all the red
baries that we create in a little bit of detailing
for the bow tie in here, too, small streaks
with the white. If you're satisfied, you
don't have to do this. We are done with
our second project, Smiling Holiday Bunny. If you want to add more details, you can do outlining. You can add mid drips in
the veins for the leaves. You can add another
kind of leaf. But I'm satisfied with
it, how it turned out. And I'll be seeing
you in the next project Holly Hug Bunny.
7. Holly hug bunny 3rd Project : Welcome. Welcome to
the third project. This is the smallest
of all the project. In here, I only did the flat
pass for the background. I did not addit any
lements like leaves, berries, or flower or ornaments. One of the simplest project, creating very simple
seeps for the hand. One hand is in the front
and other one is waving. Let's create simple ears, droopy ears for our bunny. For the first three bunnies, I decided to create this
kind of droopy ears. Instead of this,
if you want, you can create other kinds of ears. Let's do the outlining the
circular C for the wreath. Instead of creating circular
see for all the wreaths, you can experiment on your
own and create different kind of seeps triangular,
rectangular, hexagonal. And with these, we are done with the basic pencil sketching. In here. Let's do the outlining. This time in here,
I'm using gauze, and I was sure that
with the gauze, I can simply overlay it on
top of the pencil sketch, and it won't be visible. But when I applied it in here, it was not able to cover
the pencil sketch, lightly raising the pencil
sketch and continuing on with creating and continuing
on with going over the outlines that we
created with this pencil. Going over the
outline for the ears, making the side a little
bit more thicker. For all the nine bunnies that we'll be creating
in this class, I'll be using mostly this color. I'll be wearing the
sets a little bit. Either I'll be
making it a little bit lighter or a
bit more darker. Instead of this,
you can always use different colors to create
the outlines for the bunnies, creating the outline
for the hand. In here, I decided to make
the hand a little bit softer, creating this kind of
small dust stroke for the spikes on top of
the head of our bunny. And with these, we are
done with the outline for our bunny. Let's do the wreath. In here, I'm using green. Oh for this project,
I'm using gauze. Let's create this
kind of circular see. I won't be adding any details, leaves, berries or ornaments. For this project, we
are keeping things simple and just
creating simple flat as and just creating simple
background for the wreath. In here, if you want, you
can create flat base, but I'll be creating a
little bit of gradient. So I'm just spreading
that color. The upper part will be
a little bit darker, and as we move away from it, I'm just spreading the color and thus decreasing its
intensity a little bit. And with these we are done
with the top right side. Let's do the same thing on this left side.
Spraying their color. Increasing in intensity
a little bit for the regions closer to the bunny. You can also create gradient. You can use other
color in here too. I'll be spreading the color
in here, but for now, it's to the For now in here I'm using
red to create the bow. You don't have to
create the bow. Instead of this, you
can create other kind of accessories or ornaments too. Very simple say, a small portion of this bow is covered by
the hand of our bunny. Here, too, I'm using a bit thicker consistency of the red, as we have to overlay
this on top of the green that I used
to create the outline. Overlaying this red on top of
the green outline sections. And with this, we are done with this first layer for the bow, continuing on with the green. You'll have to add it a
little bit carefully in here. You can wait for
the red to dry or you can just add
it carefully and precisely treading the colour to get a little bit of gradient. Adding green in this
triangular region, just in between the ear and
the piece of our bunny. Carefully spreading
the green in here. Now, let's feel the
remaining space with the green just
by spreading it. Here, the intensity of the green is a little bit more darker, so I'm spreading the
color a little bit more. Spreading the color
on this side, too. Now, I'll be spreading
the color more wherever it's required and
trying to create a little bit of gradient in
between the darker side of the green and bit
lighter stat that we created just by
spreading the color. If you want to make the region
a little bit more lighter, you can use a little bit of
water and make that region a little bit wetter and then use tissue paper to soak it up
to decrease in intensity. And I'm satisfied with it how it turned out
the background. Now, using the breast pain to create the eyes
for our bunny, a little bit larger
eyes for our bunny. You can create other kind of fecal expressions,
different kind of eyes. You can make it a bit
bolder, a bit more bigger. You can add eyebrows
or eyices too. Using the pink colour
to create the nose. Triangular see for the
nose of our bunny, creating rosy chicks, using red, small oval seeps with the red. And now, let's add the mouth. Using raspine to create
very simple mouth. And with these, we are done
with our third project, Holly Hug Bunny, a
very simple one. I was not satisfied with it, so later on, I added a little
bit of more detailing. I added this kind
of holly leaves using olive color and I used
white to create mid ribs. Apart from that, I
also added berries. So this is how it turned out, and I'll see you in
the next project.
8. Evergreen snuggle bunny 4th Project : Welcome to the fourth project
Evergreen Snuggle Bunny. This will be a little
bit different from all the projects we
have covered so far. In here, we'll be
creating somewhat of semicircularsy
for the wreath. Starting with the
simple heap for the feast kind of
ovals for its space. In here, I also made the fest a little bit more larger
and a bit more rounder. For all the three
projects in this section, I'll be creating this kind
of bit large and bent ears. Instead of this,
if you want, you can create the other kind of ears that I sold you
droopy ears or standing ears. Let's create its sand
very simple hands. Both of its hands
are in the front. In here, I'll be
adding three berries. You can increase or decrease the number of the
berries as you see fit. Now for the remaining section, both of its feet will
be visible in here. Simple aliptical
save for the feet. A. For the entire section, I'll be creating leaves
in here and using two or three different sads of the green to do the coloring. Instead of this, if you want, you can create the
secular wreath that we have created so far, adjusting the feet a little
bit towards the ring. For the insides of the ears, in here, I'll be adding a
little bit of pink colour. And with this, we are done
with our pencil sketch. Let's erase it,
lightly erase it, ensure that a small
section would remain visible so that we can use
it to do the coloring. Start with the outlining. Here I'm using the same color, skin color mixed with
a little bit of gray. You can use other
colors as you see fit. Let's do the outlining for
its hands for the hands, making this region a
little bit more thicker. So for all the bends
and the curve region, I'll be making them a little
bit more thinker like this. Let's go with the
outline for the ears. Vary the thickness of the
lines a little bit to make it a little bit more organic and add a little bit
more characteristic. For some of the regions,
make the lines a bit more thinner and for others, make the lines a
bit more thicker. Apart from that,
you can also create a little bit of broken lines, creating this kind of
small brusse stroke here in here for the second ear, making this bend portion a
little bit more thicker. With these, we are
done with the face, here, and the hands. Let's do the
remaining section of its bonding Let's go over the outline for the
feet that we have created. The soles of its feet
are visible in here. I'll be using a little bit of red along with the pink
to do the coloring. I'll be using greens to add a little bit of leaves
in between the foot. And with these, we are
done with this outlining. Let's do the coloring.
I'm starting with the light green and creating this kind of
very simple leaves. C. Apart from the slighter
side of the green, I'll also be using bit more
darker sets of the green. So this is the lightest
side that I'll be using, and on top of it, I'll
be going with the grass green and then a
little bit of dark green. You can wary the seeps and
the sides of the leaf. Instead of creating
this kind of leaf, you can create other
kinds of leaf, too. Mainly, I'll be creating
this kind of leaf only and I'll wearing
the seeps a little bit. Moving on to the
other sites too. This process a little bit
more faster and easier. You can also start with the stems and then add
leaves alongside it. Otherwise, you can just
follow along with me and add a simple leaves like this. And as you can see, I'm leaving quite space in
between the leaves, so I'll be using
another seeds of the green to add another
layers of the leaves. And with these, we are done with the lighter
side of the green. Let's go in with more
darker side of the green. In here, I'm using grass green overlaying this grass green on top of the light seeds of the leaves that we create. In here, I won't be covering the entire light green section,
but some of the sections. And also, mostly, I'll be adding this green on top
of the white sections. Instead of creating
this kind of leaf, you can create other
kinds of leaf. You can create holly
leaves or smaller leaves or a bit more brown
and longer leaves. Since I used a bit thicker
consistency of the color, the green that I used, the light green that
I use has dried up. Otherwise, in your case,
if it's not dried up, you'll have to wet
a little bit and then add another
layer on top of it. Otherwise, the two will mix with each other,
and we don't want that. Getting smaller
leaves in here too. For the upper regions, I'm adding a little bit
smaller leaves. And with these, we are
done with the grass green, and now going in
with the third seed. So in here, I'm
using dark green. For most of the white
spice, I'll be using this. I'll also be using this
to do the outlining for the light seeds of
the leaves that we created for the first layer, mostly filling the
white empty spaces as well as doing the outlining
for some of the green leaves, the light seed of the green
that we used in sailing. You can also use this to create a little
bit of mid rips in the veins for some of the lighter seeds of the leaf
that we created earlier. Carefully doing the outlining
for the leaves like this and filling the
white space with it. So this is going to take a
little bit of time since we have to fill a lot
of empty spaces. Instead of this,
if you want, you can also add another layer of leaves with this dark green
and cover the white spaces. So this will be the third layer of the leaf if you
are going to do that. Or instead of this, you can only use this green
to create mid ribs in the veins and doing
the outlining for the two layers of leaf
that we created earlier. Adding it for this
triangular region in here in between both of its hands in
between both of its hands. Let's do the outlining
in here, too. For outlining, you
have to create bit thinner strokes
with the brush and just do simple outlining. If you want to add a
little bit of detailing, you can make the rounder. You can make the edges a
little bit more thicker. Now for the middle
region in here, outlining some of
the green leaves and feeling the whites piece
with this dark green. And when this dries
up, I'll be going with a thicker consistency of the rate to create
three berries. Instead of creating
three berries, you can create multiple ones. I'll be creating somewhat of
larger seed for the berries. You can vary the seed sizes as well as number of
the berries stew. Moving on to this right side and carefully adding this color
in here just beside its hand. Now for the top, doing the outlining for some
of the leaves in here. Empty region in here, completely filling it with the wing. You can also use this
dark going to create another outline for the wreath that we have created in here. Now, I'll only be
adding it wherever it's required or to make the
outlines a little bit more defined or to make
the soup a little bit more carve adding a little
bit on the side too. Make the outline of the bunny a little bit more
clear and distinct. With these, we are done with
three seeds of the greens, we will wait for it to
dry a little bit and then use to add the berries
on top of the greens. Now, in here, I'm
going with pink, adding a little bit
of pink for its ear, small thin streak with
the pink to add this. Adding it for the second year Adding it a little bit for
its paws and for its fee. So this kind of oval
s for its food. For the pause of its food, creating this kind of oval sin. The small dots like this,
adding it in here too. If you want, you can also
use this for its hands too. I'll be using another side
of the color for its hand. In here, I'm using
this clem rate to create nose, heart
see for its no, adding a little bit
for the chicks, small circular see, small oval seep like this
for the chicks. Now let's add the
eyes and the mouth. So in here, I'm using
the breast bean and creating this kind of simple
circular C for the eyes. Creating this kind of
simple see for its mouth. You can always add whiskers for your bunnies if you prefer. Going in with a little bit of concentrated
seed of the pink. Adding a little bit of pink
for both of its hands. Instead of adding it like this, you can also create a small
pause for its hand stew. I also decided to use a little bit of this
pink for the hand. Now, in here, I'm
going with the red. Use bigger consistency of the red to create
the berries in here. Adding a little bit of
rain for the pas too, a little bit on the
lower section of its paws small dots in here too. Apart from the three
large berries, you can also create
a bit smaller or numerous berries
if you prefer. Now, in here, I'm going with the bras pin to do
the outlining for the berries to
make this bit more clear and distinct
from the rest of the green wreath that
we have created. Also, if you want,
you can use a bit of darker side of the green to create a little
bit of sding here, but I'm using this breast pin
and just slightly creating this and just lightly making this region a
little bit darker. This is optional. If you
don't want to do this, you can just leave it as it is. Instead of this,
you can also add three holly leaves
surrounding the berries. That will be interesting too. You can use lighter state
of the queen to create the holly leaves and use darker state of the green
to do the outlining. Now, going with the white to add the highlight
for our berries, and dots for the highlight for its eyes and a little bit of detailing for
both of its foot. And with this, we atturn
with our third project, you queen Snuggle Many. I'll see you in the next
project Golden with money.
9. Golden wreath bunny 5th Project : Hi, and welcome to the fb
project Golden Wreath Bunny. Let's start with a
sketch for the outline, starting with the circular
C for the Wreath. So this will be a little
bit different kind of bunny that we'll be creating. We'll be creating a side view of the bunny with standing ears. Creating this kind
of C for its face, a combination of
both elliptical and oval C. Instead of this, if you want, you can
create the front view. Now, let's add the here, creating this kind of
bit slanted front ears. Let's do the second here. Instead of this,
if you want, you can create the other kind of ear droopy ears or normal
ears or bent ears. In here, I'll be creating
its nose, a bit larger nose. One of its size will be here and a small portion of
it will be visible. I'll be creating the
both eye in here. Instead of this, you can create other kind
of accessories, berries, or you can add other lement
ornaments, if you prefer. For this one, we'll be starting
with the light seeds of the color and use a little bit of darker seed to
add the leaves. I won't be adding any berries, but if you want,
you can add them. I decided to make the seep of the wreath a
little bit larger. So just extending the
side a little bit more. And with these, we are done with the basic pencil sketching. Let's slightly erase
the pencil mouths. Suit that the small
sections would remain visible that can be used
to do the coloring. Let's do the coloring. In here, I'm starting
with the light olive. In here, I'm starting
with this gray mixed with a little
bit of pink colour. Let's go over the outline of the bunny that
we have created. For this section in
here, for its face, I'm creating this kind of
bit broken lines to add a little bit of furry
texture for its face, making this region a
little bit more darker. Now for the ear. So this ear
will be facing in the front and the other hear will be
facing towards the other side. So for this one, I'll be adding a little bit of pink
for the inside. For this one, the second one. So this is facing
on the other side. I won't be adding any pink, but if you want, you can add the pink color for both of them. Or instead of the pink color, you can use other lighter
sides of the colour. Only a small section of its
body will be visible in here. If you want, you can also create a little hands. I
won't be doing it. With these, we are done
with a simple sketching. Let's add a little bit
more texture for it. Creating these kind
of small lines to add a little bit of texture, a little bit furry texture. For its ears too, adding a
little bit more details, adding this kind of simple lines just beside the outline regions. And with these, we are done with this color going with the pink, a little bit of pink for
this front facing ear. If you want, you can add it
for this tub and decided to make it look that it is facing towards
the other direction, using pink for its nose, a little bit for its sticks, a small portion
on the side tube. I decided to make the outlines a little bit more
pinkish in color, overlaying a little
bit of pink color on top of the earlier
outline section. Also creating this kind
of small strokes with the brush to create a little
bit of fern like texture and also to create a little
bit of here like texture for the top and the remaining
section of its fees. If you want, you can also create fur like texture
for its here too. And with these, we are the
outlining with the pink. Now going in with the
red for the bowtie here, too, I'm leaving a little bit
of white spies in between. Instead of using this red, you can use other
color or you can also add berries instead of
this simple bow tie. Adding the color for this one, here we are doing a flat base. When this dries
up, I'll be going in with a bras pain
to do the outlining. If you want, you can use another sides of the red
to create a little bit of sading and you can
also use black or white to create a little bit
of highlights or shadows, creating another ribbon in here. And with these, we are
done with the red. If you want, you can
add a little bit of red on top of
the pink chicks. Let's do the remaining section. So in here, I'm using
this olive color. Filling the entire section of this wreath with
this olive colour. Right now, I'm just creating this kind of rough
texture for the outline, and then I'll be spreading that color for the
entire section. Adding a little bit
for the ensign? No. Let's spread the colour to green little bit of flat was. This is not a true
flat pas since the outside region or the outlines are a
little bit more darker, and this region closer to the
many a little bit lighter. So you can say this
is a little bit of gradient with this
light olive color. Spreading the color
a little bit more. Now let's move on
to the other side, doing the same thing,
carefully spreading the color in here just beside
its face and the body. A little bit of color
just below the red. And with this, we are done with this color now going
with this light green, adding it just beside
the money's face and mixing it with the light
olive that we just used. To mix this color or blend
it a little bit properly, you can use a little bit of you can use a little bit of water and spread it so
that the two colors will blend perfectly
and create a gradient. Otherwise, you can just simply spread the color like
in here I'm doing. The two colors will mix
on its own a little bit. I will wait for it to dry
and then add another layer of leaf on top of
it till it dries. I'm using this span
to create the yes, simple circular see for
the eyes of our bunny. Now for the nose and the
mouth, simple i see. If you want, you can
also add whiskers. Now moving on to the bow tie, simply doing the outlining with this bras pan. This is optional. Instead of this, as I mentioned, you can use other sides of
the red to do the coloring, creating a little
bit of gradient and doing a little
bit of shading. Also, you can use white to add a little bit of highlights
and reflection for it. In here, if you
want, you can create different kind of
patterns or designs. Now let's do the outlining
for the remaining section. I'm not following the exact outlining that I
created with the red. If you want, you can follow it. And with these, we
are done with this. Now, let's create
a simple leaves. In here, I'm using
a bit concentrated green and creating this
kind of simple leaves. Simple leaves like this in here. And for the insides, I'll be using a little bit of more
lighter side of the cream. You can vary the seeps in
the sizes of the leaf. Instead of using this
single kind of leave, you can use multiple
kind of leaf. You can also add berries
in between the leaves. And with these, we are
done with this side, moving on to the other side, doing the same thing, creating this kind of simple leaves. Let's add a few
more leaves in here for this space in the middle. Now, let's spread the color. So completely filling
the insights with this. In here, the insights are a little bit of lighter seed since we use the darker consistency of the colour to
do the outlining. So the insights are quite lighter than sand,
as you can see. If you want to make it a
little bit more lighter, you can just was a little
bit of color and then use the lighter side
of the green to do the coloring for the insides. In here, I'm using a
bit more darker side of the green and creating
another kind of small leaf, the same kind of leaf
that we created earlier. But in here, the
leaves are quite more darker and a
bit more smaller. Instead of creating
this kind of leaf, you can always create
other kinds of leaf. For this wreath, too, I'll be keeping it quite simple. A main focus for
this wreath will be the cute little
bunny in the center. So I won't be adding more
detailing for our wreath. But if you want,
you can always add berries or other
kind of leaves too. And you can also add
different kind of ornaments. The contrast between
the two seeds of the green was
not that apparent, so I decided to use this darker side of the
green to redo the outlining. So just going over
the outline section and making it a little
bit more darker. And with these, we are
almost done with this side, moving on to the other sign. This is optional. If you
don't want to do this, you can just leave it as it is. Or to make it a
little bit faster, you can always use the bra spin. And to make the leaves a
little bit more detailed, you can also use this colour to add the mid
drips in the wing. You can also use white to add highlights or do done detailings in the form of mid rips in the win. These are all opsonal. And with these, we are done
with the greens going in with this white jelly pin to add the highlights for the
eyes of our bunny. And with these, we are done with our fifth project,
golden Wreath money. Theme in the next project
with a festive no bunny.
10. Festive bow bunny 6th Project : Welcome to the sixth
project Festive Bow Bunny. Let's start with a simple
sketch for our bunny. This one will be
somewhat similar to the fourth project we did, same kind of see,
same kind of ear, and the same kind of the body. Instead of the berries,
we'll be creating bow tie and we'll be creating different kind
of circular wreath. Creating this kind of simple
elliptical see for its face, creating this kind of bent ears. Let's do the outlining
for the second bent ear. This is a little bit
longer than the first one. Now, let's do the
remaining section. A large bow tie in here. For all the projects
in this class, I'll may be using red
tie for the bow tie. Instead of this,
if you want, you can use other colors
as you prefer. You can also add patterns
and designs to it. I'll be keeping it simple, but instead of this bow tie, you can also add ornaments and
other kind of accessories. Creating these kind
of small hands for it on both the sides. Now let's create the
pass for our bunny. Simple elliptical seat. And just below the bot eye, I'll be adding few berries, creating this kind of
circular seed for the wreath. In here, I'll be
creating a little bit of different kind of wreath. In here, I'll be using two
or three different seeds of the green to create
different kind of leaves. And that's, I won't be doing any flat pass or
gradient for the wreath. And yeah, with these we are done with a simple
pencil sketching. Let's slightly erase it, Insure that a small
section would remain visible that can be used
to do the coloring. And now, let's do the coloring. In here, I'm using skin
color to do the outlining. So a bit concentrated skin color for the outlining for our fees. The fees of our bunny, create a little bit
of dynamic lines wearing the thickness
of the line. For the regions of the
bends and the curve, make the lines a little
bit more thicker, making this region a
little bit more thicker. Doing the same thing
in here, making the sides a little
bit more thicker. And with these, we are done with the outlining for both the ears. Let's do the outlining
for the sand. A small section of
its sides is visible. Now for the remaining section, both of its spas and bottom
section is visible in here. Making this region a
little bit more thicker, so adding another line over it. And with these we add
with the outline in here, I'm using light ring to create this kind
of simple leaves, the same kind of leaf that we
used in our fifth project. For all our project, you can use and create
other kind of leaf, you can use varieties of the leaf or you can
just follow along with me and create
the same kind of leaf that I creating
in this project. Instead of using
the lighter seeds of the green, you
can use other sands. Adding a few more leaves. Let's add few more leaves. You can also vary the sizes
of the leaf a little bit. Instead of creating
this kind of leave, you can add the leaves
in circular pattern or in trigolar pattern. Adding a little bit of leaves in here for the middle sextant. I'll also be adding a
little bit of leaf in between the bow tie later on. And here I'm using red to do the coloring
for the bow tie. Using flame red for this one. Let's do the coloring for
this triangular section. A little bit of this is
covered by the hand. Carefully adding it in here
just beside both of its hand. Now let's feel the entire
section with this red. Doing a flats, a simple flat
pass with this flame red. Now we'll be grating
ribbons, berries, and a little bit more
detailing on the sides. The ribbons on this side too. Now for the large
ribbons in here. Filling the entire
section with this red. Now another amon
in this side too. You can always create
different kind of pattern designs with it. And I'll also be adding
three marries in the middle, adding another layer of red
on top of this to make it a little bit more darker to
sow a little bit of seeding. Instead of this, you can use
a bit more darker seed of the red to do a little bit of gradient creation and a
little bit of seeding. Going back once again
with the same green to add few leaves in
this middle region. Adding few more leaves
here and there. And yeah, with these, we are done with the leaves. If you want, you can
add few more leaves. You can just vary the
sizes of the leaf and add small leaves in
between the larger ones. In here, I'm using pink, adding small elliptical sieves for the pause of our money, creating this kind
of small three dots on the feet of our money. I'll be adding a
little bit of this for the ear for this lower
part of the ear, a small streak of the pink, adding it for this ear too. Now, let's add it for its
nose and the rosy checks. Small elliptical s
for the rosy checks. For both of its hand stew, a little bit of this
pink color in here. And now, once again, going in
with the red for the nose, triangular see for the nose. And I waited for it to
dry. It has dried up. And here, I'm using a
darker set of the green, dark green to create
this kind of leaf. I'll be creating this
kind of stem in the leaf, a set of two or three
leaves on the stems, and I'll be overlaying
this on top of the light greens that we used
earlier to create the leaf. Instead of this kind of leaf, you can create
other kind of leaf. You can also create
holly leaves, large elongated leaves
or the simple kind of leaf that I showed you in
the demonstration video. I won't be covering
the entire section, mostly adding this kind of leaf on top of the
white regions, the white of the peeper Instead of this, you can use a bit lighter
side of the green and and then use a bit darker seat of the green to
do the outlining. Or for this darker
seat of the green, you can wait for it to dry and
then use a bit darker seed of the green mixed with
brown to do the outlining. Adding one in here at the top. Let's add a few more in here. If you want to create
the same kind of look for the wreath as
the fourth project, you can use you
can use a bit more darker sad if the green air completely filled
the entire region, the white region of the people to make it a little
bit more darker and also used to do the outlining for some of the lighter
sades of the green leaves. Let's add a few more leaves. You can add as many
leaves as you want, but try not to oversaturate it. You can also add few
baries in between it. I was not able to record
it, but later on, I used a bit darker side of the olive and create this
kind of small leaves. I also use black to add
the ice for our bunny. And in here, I'm using
a bit darker side of the red to do a little bit of seeding and a little bit of detailing for the bowed
ice we have created. Small strokes with
the breast to create a little bit of detailing
and outlining in here. And this is how it turned out. I added three ries just below the bowtie and used a little bit of wine to create this kind
of detailing for the bowtie. This is optional. You can
always use the black fine to do the outlining to make it a little bit more bolder
and a bit more distinct. These we had done with our
project Festive Bow Bunny, and I'll be seeing
in the next project, Mistletoe Snuggle Bunny.
11. Mistletoe snuggle bunny 7th Project : Welcome to the seventh
project misltosNgal Bani. So this will be a
little bit different. All the three project, the seventh eighth
and the ninth project will be creating full
illustration of the monies. Starting with this
kind of semicircular C for the top of the bunny's head and creating this kind of bit elliptical see for the
remaining section of its face. Instead of this, you can use intersecting lines to make
it a little bit easier or you can create oval seep or elliptical seep for
the face of our bunny. This will be the scarf
wrapped around its neck. Let's do the outlining for
its hands and the legs. I'll be creating
very small hands. And small and career
pots for our bunny. This is the left of our bunny, and this will be the
right p or the right leg. Let's create simple hand, the right hand of our bunny. This is just a
simple pencil skit. If required, I'll be making
a little bit of adjustment, creating the tail for our bunny. Let's create the outline
for the ears of our bunny. Instead of this, if you
want to keep it simple, you can only create the fees or you can only create the fees or up to the hands of the bunny. Mm for this one, I'll be creating
large circular eyes. With this, we are done with
a simple sat for our money. Let's erase the pencil sketch. Instead that a small section of the pencil sketch
should remain visible like this so that we can use it
to do the coloring. Once again, in here
I'm using skin color mixed with a little
bit of white or gray. We'll be going over the
outline of the bunny's body, and for some of the section
of the bunny's body, I'll also be doing a
little bit of color. So I'll be using this color and add it a
little bit just beside the outline section and then use water to spread it and blend
with the white of the paper. The outlining in here, I'll be creating a little
bit of broken lines. I'll also be wearing the thickness of the lines
for some of the sexon. I'll be making the
lines a bit thicker and others a bit thinner. Now moving on to the upper part. Make the cheeks of this money
a little bit more rounder. Here we have got a chevy rabbit going over the
outline for the ears. And in here, we'll be
creating mistletoe and a simple circular wreath
surrounding our bunny. As for the scarf
around its neck, I'll be using shades of green, and I'll also be adding
three berries at top of it. Instead of using greens, you can feed proper
scarf or you can create bow die or other
ornaments as you see fit. Doing the outlining for
the tail of our bunny, make it a little bit fluffier, creating these kind
of small strokes just beside the outline section. And with these, we are done with the outlining with this color. Now, let's do the coloring for
the scarf around its neck. So in here, I'm starting
with the grass green, a bit concentrated grass green. Using this grass screen
to do the outlining. And then we're covering
the entire section with this grasscreen I'll be doing a flat was with
the grass green, then I'll be going
with dark green and then create a little
bit of graded flats. So small strokes with a
dark green for some of the regions to create
that kind of graded vs. Instead of this, you can
always use other colors. And yeah, these, we turn with the flat vase with
our grass green, spreading the
colors a little bit more for more uniformity. And now in here, I'm going with a dark green. Let's convert this flat
vase into a grated vase, small strokes with this
to create a little bit of this kind of texture
for the entire section. This is optimal. If you
don't want to do this, you can just leave it as it is, or you can wait for
it to dry and create different kind of pattern
or designs using greens, yellows, or other
seeds of the color. We will wait for it
to dry and then add red for the berries
till it dries. In here, I'm using
pink for the pose of our money to small
dots for this one. Now, for both of
it and tiny dots. Now moving on to its here. Only for one year I added it. The other e is freezing
on other direction. If you want, you can
add it. If you want, you can add it for
the other here too, adding the pink for the
checks of our bunny. I decided to use the
pink for the nose. Instead of the pink,
you can also use red, making the nose and
the mouth a little bit detailed as compared
to the other bunny that we have created so far. And as I was mentioning
that we'll be doing a little bit of
coloring for our bunny. So I'm using the same
color that I use for the outlining and adding it just above the
outline section, primarily on the lower side, primarily on this
bottom section. Add it a little bit in here
too for the right lane, a little bit just below the
green scarf that we created. Leave a little bit of a
space in between the green and leave a little bit of a
space in between the green. Now, for its space too, carefully adding it just above the green Scarf we created, a little bit just middle of the ears and a little
bit for the ears too. Spreading the color and blending it with the rest of the paper. By spreading it just
decrease in intensity so that it will merge with
the white of the paper. Or instead of that,
you can also use water to blend it with the rest
of the white of the paper. I waited for it to
it has dried up, and in here, I'm using
this once again, using the pacellskis to create the circle C for the mistletoe, the mistleto leaves and the
berries around our bunny. Instead of this, you can
create other kind of seeds. Now let's do the coloring here, I'm using olive green going over the circular outline
that we have created. No creating this kind
of simple leaves. You can create
other kind of leaf. You can add varieties of leave instead of just adding
this kind of leaf. I'll be adding two
kinds of leaf. This is the first one and
then I'll be going with a grasscreen to create
simple seep like leaf. Carefully creating this
kind of small leave just around the bunny's body, around its feet and the paws and the remaining section of
its body in this region. And now in here, I'm changing the direction of the leaves
facing towards the right. For this side too,
only a small section of the leaves will be visible, others will be lying others will be lying behind
the bunny's body. If you want, you
can also connect the leaves to the stems. And we will wait for
it to dry a little bit and then add another
layer of green. So it has dried up, and in here, I'm using grass
green and creating this kind of a bit simple
and bit smaller leaves. Apart from this, if you want, you can also use other sad of
the green or use brush pen to do the outlining for the olive green leaves
that we created. Or you can also use or you can also add other kinds of leaves like holly leaves beside some of the leaves to make it a
little bit more interesting. Adding more leaves in here. I'll be adding this kind of
leave on both the sides. Put this one too. If you want, you can use black
brush pan to do the outlining or
use darker sads of the green to do
the outlining for the small leaves that we are creating with
the grass green. Adding it just beside
the money here. Let's add it in
here in the middle. Adding a few more on this side, too, just beside the money spa. If you want, you
can add few more, but I think we are I'm
satisfied with it. Now in here, I'm going in with the flame rate to
create small berries. So small circular
see for the berries. If you want, you can
add a lot of berries, but I won't be adding that much. Apart from the
baries, if you want, you can also add bow
ties or other kind of ornaments just beside the was that we are
creating in here. I'll also be adding
three berries for the green scarf that we
have created for our bunny. Let's add a few berries in here. I'm creating the
berries in a cluster of two or three baries you can increase the number of the
baries in the cluster. And now let's add
the baries in here. Three berries for the
green scar in here, a little bit of this red for
the checks of our bunny. Let's create the
eyes for our bunny. And here, I decided
to make the eyes a little bit more rounder
and a bit more bigger, leaving a little bit
of white piece for the pupil of the eye or the
highlight for the eyes. If you want, you can always create whiskers for the bunnies. And, with this, we are done
with the piece for our bunny. If you want you can
create bowtie in here, I'm just using this brass pin
to create the outline for the bowtie and just
leaving it as it is. And with this, we are done
with our seventh project, Mistletoe Snuggle Bunny, and I'll be seeing
in the next project.
12. Holly scarf bunny 8th Project : Welcome to the eight
project Holly Scarf Bunny. Here's another full
portrait of the bunny. Let's start with the seep
of our bunny's fees. So this will be somewhat
similar to the kind of fees that we created for
the seventh project. A combination of circular and elliptical see for its face. Our bunny facing
towards the left, both of its hands, and both
of its feet will be visible, creating this kind of
small hands for the bunny, creating the right leg. Sketching out the left foot, sketching out the left
paw, and finally, the left hand of our bunny, a scar will be wrapped
around the bunny's face, making the side of
the bunny's head a little bit more broader. For this one, I decided to
create a combination of both standing ear and droopy ears
one of the ear standing, and this one is a droopy ear. Extending the siege a little
bit for this standing here, and we'll be surrounding this
one with the holly branch, creating this circular sap for the sp of the wreath
for this eight project. With these, we are done
with the pencilskech. Let's slightly erase it and
see that a small section of the pencil sketch would remain visible so that we can use
it to do the coloring. I'll be making a little bit
of changes and adjustment to the outline that we have created with the pencil
sketch if required. And now let's do the outlining, starting with the piece
of our bunny here too, I'll be wearing the thickness
of the lines a little bit. For some of the regions,
I'll be creating a bit thicker lines and for
the other bit thinner lines. And I'll also be using a bit of broken lines for some
of the sections. Moving on to the top, doing the outlining for the
ears of our bunny. Let's do the outlining for
the second ear in here. Instead of writing this
two different kind of ear, you can create the same
kind of ear for the bunny, either extending ears or
making them both ears droopy. And with these we are
done with the outlining the fece and the ears. Let's do the remaining section, starting with doing the
outlining for the hand. Let's do the outlining for the small foot or the small
paw that we have created. Now let's do the outlining
for the furry tail, creating these kind
of small strokes to make the tail a
little bit more furry. And finally, doing the
outlining for this hand to add a little bit of texture for our bunny and
to sew the fur, creating this kind
of line in here, moving onto the stomach, creating small bruss
strokes to create this kind of texture for
the stomach of our bunny, adding few lines in here to add a little bit of texture for
this section of its food. And with these, we are done with this color now going
with the pink, adding the pink for this
standing here we have in here. Using this pin to
create the rosy chicks instead of creating
elliptical or circular sep, he decided to create
this hot like sap. Now, going in with the red
for the nose of our bunny. A little bit of this
for the pause of our bunny and a
little bit in here, too, for the hands, small dots
with this d for the hands. Going with as me to create a tiny little mouth
for our bunny, small circular C for the eyes. And with these, we are
done with our bunny. Once again, going back
with the ray to create the scarf wrapped
around the bunny snack. Filling the entire
section with the ide. Instead of this scarf, you can create other kind
of accessories. You can create bow tie. You can also add
ornaments strapped around its neck or you can also
add different lights. Feel free to experiment
on your own. Creating the outline
in here and carefully adding it just beside
the hand of the bunny. When this dries
up, I'll be going with a bit darker
side of the right to do the outlining as well as to create a
little bit of foils. And we will wait for it
to dry till it dries using this pencil to sketch out the circular see for the wreath. In here, I'm going with the
light green and creating this kind of somewhat
of hexagonal see for the holly leaves. You can create
other kind of leaf or you can also
create combinations of combinations or mixture of other kind of leaf
with other ornaments. In here, I'll only be
creating this kind of simple verson of
the holly leaves for the entire section for both sides of the circular
wreath that we have created. I'll be keeping it plain and
simple and I'll be adding small circular baries
just beside some of the leaves a cluster of
two or three berries. When this dries
up, I'll be going darker side of the green
to do the outlining, as well as add mid
ribs for the knee and also go and also go over the pencil sketched
outline for the stem. For most of the project, I did not add any kind of accessories. But if you want, you can add other kind of accessories
like sunglasses, earrings or hat, caps, walking stick or other kind of accessories beside and
on top of the bunny. Adding the leaves on this side, simple curved hexagonal
saves for the holly lm. With these, we are almost
done with this section. With these, we are almost
done with this side. For the bottom section,
I'll be adding the leaves facing in in
different directions. So with these, we are
done with both the sides, moving on to the bottom section. Ensure that the consistency of the colors remains same
or uniform somewhat. In here, I used a bit thicker
consistent of the color. So try to ensure your
consistency remains the same. For this side, the leaves are
facing towards the right, and on the other side, we have the leaves facing
towards the left. For the middle, we'll be
creating leaves facing towards the opposite direction or in the same direction or just simple vertical
leaves like this, a little bit slanted
towards the left. And for this one, let's make it simple and straight
vertical facing leave. And with these, we are
done with all the leaves. I waited for it to
dry a little bit, and in here, I'm
using dark green. Going over the outline that
we created for the stem, I'm creating a bit of
broken lines to add a little bit of characteristics
to the stem and the leaf. And apart from that, we'll also be going over
the outline to make that sweep of the leaves a
little bit more detailed and add mid rips apart
from the mid rips. If you want, you can also
add the veins coming out from the wind drops to make it a little bit more detailed. Or instead of using the
screen to do the outlining, you can also use the breastban
to do the outlining. You can also use white color to add a little bit of detailing them in the form of adding veins or going over
the mid rips that we created. This is going to
take a little bit of time energy repetitive process. So I decided to do the outlining for all the leaves on my own, and this is how it turned out. I waited for it to dry and it
has dried up, and in here, I'm using red to green this simple circular
seed for the berries, just beside the holly
leaves we have created. I'm adding this bar in a cluster
of two or three berries. I won't be adding it
for all the leaves, but for some of the leaves,
majority of the leaves. So just beside the leaves,
two or three berries. Instead of the breast pin, you can also use the gel pen, fine liner or simple
ballpoint pen will do the work or simple ballpoint
pen will do the work, create small circular
see with that. In that way, you can see a
little bit of time and you can clean somewhat of more precise and more
circular berries with that. And with these, we are
done with this side too. Now, let's add few
more berries where we think the number
of berries are less. Adding one or two more berries for some of the cluster
of the berries. Adding few in here at the top. And with these, we are done with the berries and the leaves. Now, using a bit darker
side of the red to do the outlining for the scarf
around the bunny's neck, as well as adding few lives to sow the fold present
in the scarf. With this, we're done
with the eighth project Holly Scarf Bunny. I'll be seeing you
in the ninth and the last project
Winter Meadow Bunny.
13. Winter meadow bunny 9th Project : Hi, and welcome to the last
project Winter Meadow Bunny. This is going to be a little bit simpler as compared
to the eighth, seventh and eighth project. Let's start with the simple
C for the fees of our bunny. For this phase, I
decided to make it a little bit of triangular C, a bit curvet triangular C
for the face of our bunny. You want you can create a kind of variation for the
seep of the peace, you can make it
elliptical bit oval or downside triangle C. Sketch out the guideline for the
stomach of our bunny, creating this kind
of elliptical see for the paws of our bunny, two small hands in
front of the bunny. And in here, I decided to create standing ears to large standing
ears at the top of had. So this is a very simple
sketch for our bunny. In here, I'll be adding pink, and I'll be creating a bit
of simpler wreath around it, circular wreath
around the bunny, creating this kind of simple circular see
surrounding the bunny. And with these we are done
with a pencil sketching. Let's lightly erase it and
see that a small section of the pencil sketch would remain visible so that we can use
it to do the coloring. Now let's do the outlining. In here, I'm going in with
the same kind of skin color. Don't do the outlining.
Skin color mixed with a little bit
of white or gray. Continuing on with the
remaining section of its face. Here too, I'll be
creating a little bit of dynamic lines by wearing the thickness of the
lines a little bit. Moving on to the
remaining section, its body, its legs,
and its hands. Doing the outlining
for the legs, the pause of the bunnies. In here, I made a little bit of change to the pencil
skis that I did. I made the seep of
the body a little bit larger just by
extending a little bit. You don't have to stick with the outlines that you have created. Feel free to make changes
and adjustments as required. Doing a little bit of
seeding just beside both of its hands and a little bit
for this middle section too. A little bit just above the
outline section for its face. And now going with
the water to spread the colors to mix it with the remaining section,
the white of the paper, spreading the colors to subdue its intensity so that it will blend with the
white of the paper, doing the same thing
for the upper side too, extending the color from the
outline a little bit and just making it blend with the remaining section,
the white of the paper. Now for the pause, adding
a little bit of pink. Adding a little bit of
pink for this part too. I'm moving on to the ears, a little bit of
pink for the ear, adding it for the
second ear too. And then here, I decided to create a little bit
of blurring effect, creating this kind
of circular see. The color has not dried up, so the pink that we just applied will bleed a little
bit with the paper and create a kind of blurring effect using bit more concentrated pink for the triangular
seep of the nose. Adding this bit darker side
of the pink for the pause. And this will blend with the
lighter side of the pink a little bit and create
a subtle gradient. Now let's do the
coloring for the wreath. You hear him using light green? Creating the stem
for the branch as well as creating this
kind of simple leaf. With these, we are
done with this side moving onto the other side, where a simple leaf like this. Apart from this kind of leaf, I'll also be creating
one more kind of leaf, bit smaller we sp leaves that we use for
most of the project. Now adding the
leaves for the top, a little bit more caviar
leaves for the top, decreasing the size of the
leaf in here for the top. If you want to add a few more
leaves, you can do that. You can also add
leaves at the bottom. I'll be adding the
leaves for the bottom, but a different kind of leave, bit more and larger ones. Now going in with the dark green and creating this kind of simple versin for the
leaf. This is optional. If you don't want to do this,
you can just keep it as it is simple leave that we
created with the light green. When the light green
writes a little bit, I'll be doing the outlines a little bit using bit
of broken lines, and I'll also be adding mid ribs to make the leaves
a bit more detailed. Now for the bottom,
as I was mentioning, creating this kind
of bit larger, bit more rounder leaves.
This is optional. If you don't want to
know this, you can just leave it as it is
simple and plain. Let's add one more pair
of leaves at the bottom. If you don't want to do this, you can just keep it as it is, or you can use other
seeds of the green, other kind of leave
or you can only add berries or booties or
other kind of ornaments. Now going in with the d
to create simple berries, simple circular see
for the red barries, adding it in cluster of
two or three berries. We are done with this side
moving on to the other side. Same thing, simple circular
see for the redbrries. I have not added white to add reflection or highlight for
the baries, but if you want, you can add white for the highlights for
all the bailes that we have created so far, the seventh and the
eighth project. Two more varies in here, too. The light green has
dried up somewhat, going with the darker side of the green to do the outlining. And here I'm also wearing the thickness of the lines,
and apart from that, I'm also creating a
bit of broken lines, so not doing the outline
for the entire section. And for the curves section, you can make the lines
a bit more thicker, adding a single line
for the mid ribs. Apart from that, if you want to make it a bit more detail, you can also add veins
coming out of the mid drips. You can also use a
little bit of white. You can also use a bit of
white to make it more detail. Atomic things simply, you
can just leave it as it is, or you can use the breastbin or the fine lining to
do the outlining. Creating small
brusses strokes to do the outlining and with these, we are almost done
with the outlining. We have got two more
leaves in here. And with this, we are done with the outlining for
the leaves in here. Adding a little bit of pink
for the hands of our bunny. And with this, we are
done with our ninth and the final project
of this class. But
14. Conclusion : Thank you so much for
joining me in this class. I hope you had a
lovely time painting this festive Bunny portrait surrounded by cozy
holiday wreaths. Each bunny was designed
to be simple, joyful, and relaxing to paint, and I truly hope
the process brought you a sense of calm
and creativity. Throughout the class, we
expload basic sketching, breath designs,
color combination, and simple watercolor
and gauze technique. Whether you completed
one bunny or online, you should be really
proud of the time and effort you put
into the artwork. Now it's your time to
say, please upload your finished paintings in
the class project gallery. You're welcome to
include your sketches, practice seeds or color
experiments as well. I absolutely love seeing your work and how you
make each one your own. If you enjoyed this class, I would really
appreciate it if you would leave a
review or feedback. Your support helped
me continue creating more fun and bigne
planning classes for you. Thank you again for
painting with me. Keep practicing, keep experimenting
and most importantly, keep enjoying your art. I'll see you in the next
class. Happy painting.
 Vishal Munshi