Transcripts
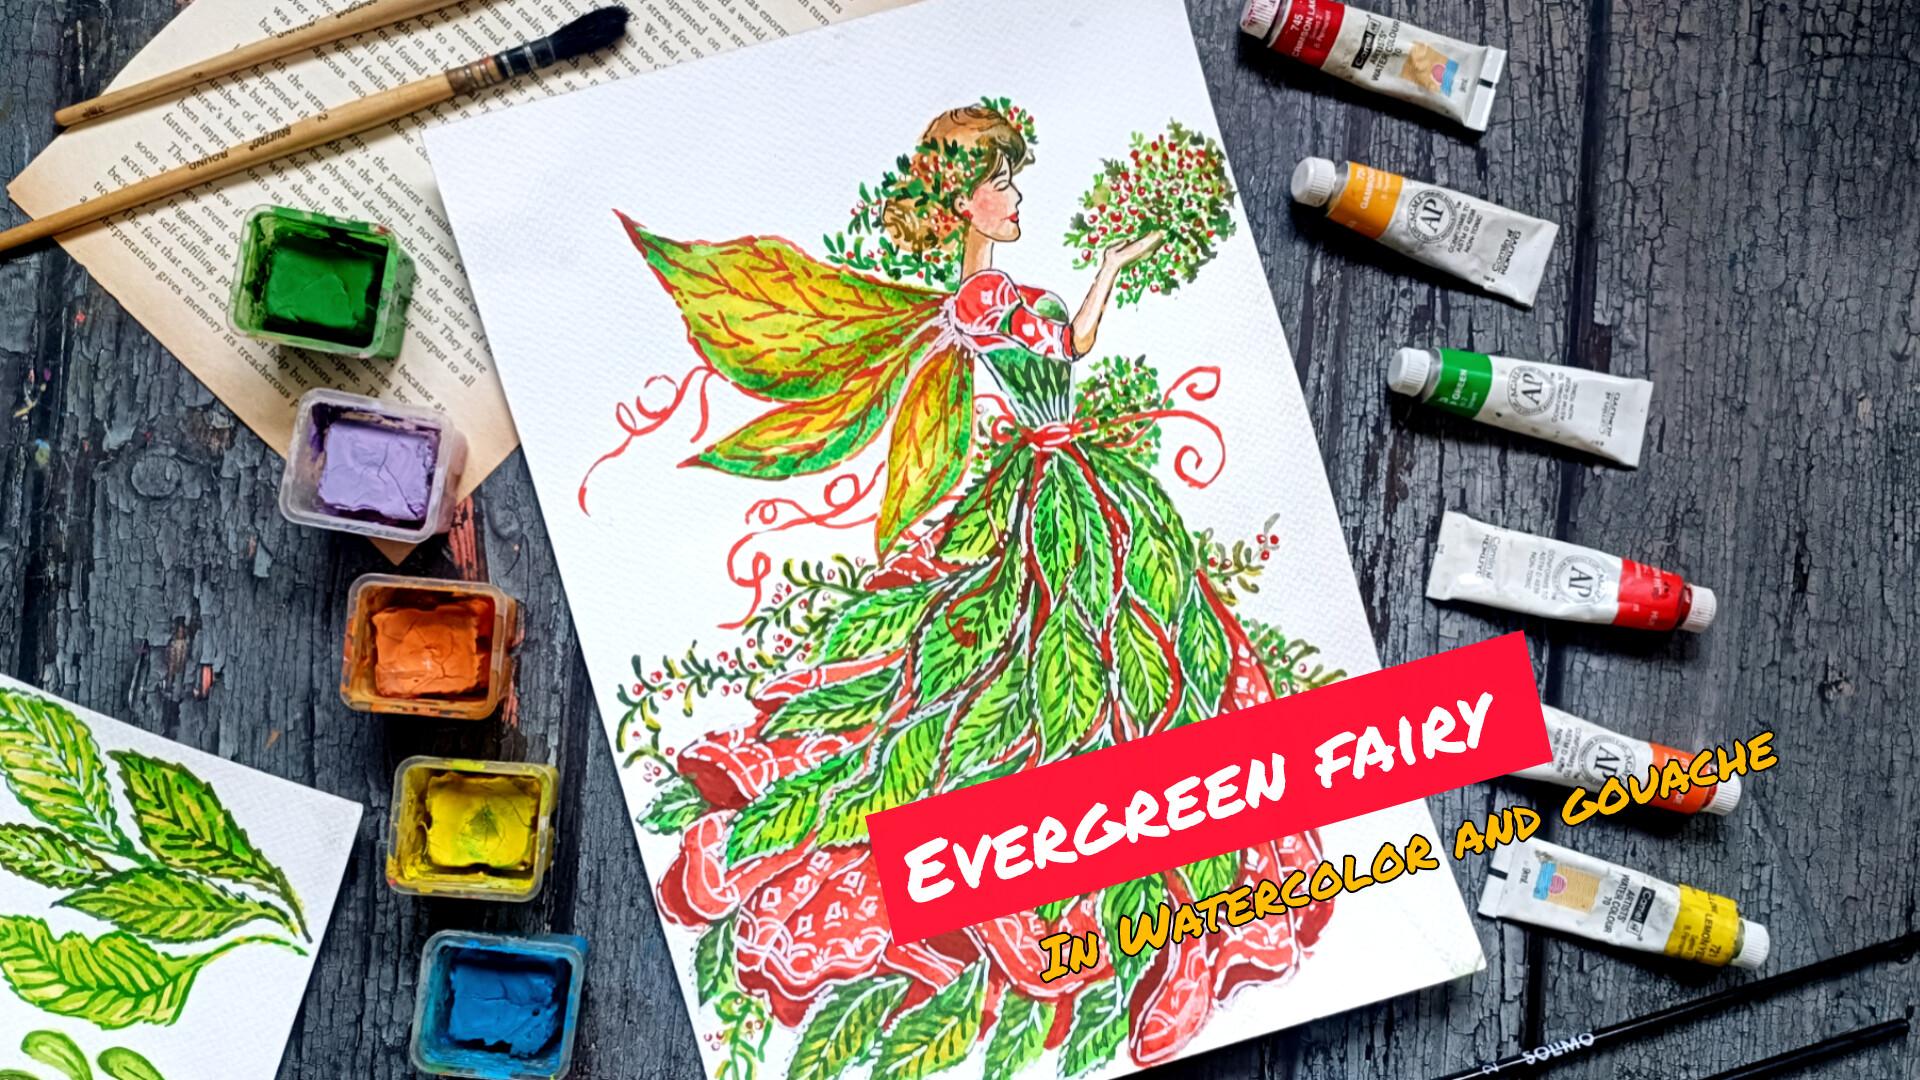
1. Welcome and Introduction : Hi, everyone. Welcome to my
new class evergreen Fairy, painting a botanical fairy
with gauze and watercolor. In this class, we
will be creating one simple yet vibrant project, a beautiful evergreen fairy inspired by botanical
elements and festive color. We will begin with basics
where I'll show you how to create simple seeps and
sketches for the fairy. I'll also be showing
you different types of wings that you can
create along with a few additional elements that helps bring the
corrected to life. After that, we will move on painting techniques
where I'll be using both watercolor and gauze to getter to create
expressive leaves, ribbons, marries, and
other decorative details. Hi, everyone. My name is Wishal and I'm an
artist from India. On a skills here,
I teach a variety of art classes
including watercolor, gauze, oil, pastel,
and ink illustration. You can also find
more of my work on my Instagram and
YouTube channel. This class is suitable for both beginners and
intermediate artists, and most of the lessons
are recorded in real time, so you can easily follow along
with me at your own piece. I hope you will join me in
this class, and together, we will have a lot
of fun painting this beautiful and
vibrant ever green fairy. Let's dive in and get started.
2. Class Project : For class project, create your own ever green fairy
using watercolor or gauze. You can follow the
project exactly or add your own touches by
changing the leaves, colors, wings or
decorative elements. Once you are done, upload your final painting to
the project gallery. Add love to see your work and how you
personalize the fairy. Apart from this,
you can also see your pencil sketches and different kinds of
leaf you have created.
3. List of Supplies : For this class, we
need a pencil and easy to do the basic
pencil sketching. Then I'll be using
this tombosspin to do the final outlining for the face and a little bit for hand. Then we have got the
sakura micron jelly pen and white colored pencil. I won't be using it,
but if you want, you can use it to
add highlights and reflection for some
of the sections. Watercolor brushes, small and large brush will do the work. Then we have got a skin
tip to secure the paper. Tissue paper, tissue
paper will come in handy. Watercolor, I have got this
gameling artist, watercolor. You can use whatever
watercolor you have, gauze. You can use either gauze or watercolor or if you
want, you can use both. And here, I'm using 300 gsm watercolor
paper from Bristow. So these are the basic supplies that you will need
for this class.
4. Sketches : Welcome to this
first video in here. I'll be showing you
how I'll be creating the simple pencil
sketch for our fearing. You can start with a
simple restrat line to determine the length for our faring and then divide it into eight equal
different section. Start by dividing
into two equal parts, then further divide into
four different sections. And then further divide into
eight different sections. Now. Now for our fairy, I'm creating this kind
of simple slanted line following the different
section that we have created. This first three lines
that we just created will represent different
section of her body. For the first section,
we have her head, so simple ovals for her head, and in here, the second
and third section. We'll be creating her
chest and that torso, simple cylindrical
set for her hands, circular seat for her shoulder, and the remaining section, the remaining five sexon, I'll be creating her gown. So I've divided it into
eight different section. For the first three
sexon we'll be creating the upper
part of her body and for the remaining five sexon we have the remaining
section of her body. Instead of it, if you
want, you can divide into other different section. Instead of dividing
into eight equal parts, you can divide it into six. So this is basically
how I'll be creating the simple ancelskech
for our fairy, we'll be adding more details, but this is how I'll be creating now for Feres space in here, I'm showing you a
very simple version for the face facing
towards the right, starting with a vertical and horizontal
line intersecting. We have got the horizontal
line a little bit above, below the horizontal line. I'll be adding the here and this is how we'll be creating very
simple version of the face. If you want, you can divide into more section instead of dividing into two
different section, you can add one more
horizontal line for her nose to make the
process bit easier. This is basically
how we creating the face facing
towards the right. Here's one more example of the face facing
towards the front. Let's make it a little
bit more defined. Starting with the same thing, vertical and horizontal
straight lines. In here, I created a little
bit of oval see for the face. Now let's divide into mode section, another
horizontal lines. So this will be her nose. For this upper part,
we'll be adding the eyes and just below
the nose, small mouth. We'll be adding the ear, just below her eyes like this. You can use the
simple guidelines to create the simple face
facing towards the front. You have got two simple
sketches for her fees. You can also
experiment on creating her fees facing towards
the left, if you want. Now, let me show you some
example for her wings. I'll be keeping her
wings quite simple. I'll be creating a little
bit of butterfly like wings and divided into
three different sections. So you can start with
simple straight lines to determine the
length for her wings. And you can create
any kind of wing, but I'll be creating
this kind of simple variation for her wings. You can just keep it simple with two different section
of the leaf or you can just follow along with me and create three different
sections for the wing. Instead of this kind of
butterfly like wing, you can also create
angel's like wing. So here's a very simple
example for the angels wing. So you can create this kind
of wing for the fairy. You can make the outline a
little bit more thicker. And we can create lots of
feather for the inside. Simple seeps like this, bit curved see for the feathers. Bit curved seed for the
inside for the feather. You can also create this kind of scaling for the insides
of the feather. And I won't be creating
this kind of wings, but if you want, you can
proceed with it, too. And mostly, I'll be
creating this kind of very simple variation
of the leaf and the stems beside the fairy. Here's a very simple
sketch for the kind of leaf and the berries
that we'll be adding. In the next video,
I'll be showing you how I'll be creating other kind and
other variations of th leaf using watercolor
and the gauze. But this is simple pencil
sketch outline for the leaves that I'll be creating
for most of the section. And as for the ribbons that I'll be adding beside the fairy, very simple and spiral
like seeds like this, I'll be adding this
kind of riven. These are some of
the basic simple pencil sketches
for this section, and I'll be seeing
in the next video with different kind of leaves.
5. Leaves sketches : Welcome to the first section of leaves and additional elements. In this section,
I'll be showing you three or four different kinds of leaves that you can
use in the project. Mostly, I'll be using
only two types of leaves, but if you want,
you can incorporate other kinds of leaves too. I'll also be showing
you how we can create simple berries as
well as ribbons. Let's start with a simple
sketch for the leaves. So these are the
simple kinds of leaf that I'll mostly be
using for the project. I'll be showing you three or four different colored variation to create this kind of leaf. For coloring all the leaves
and the additional elements, I'll be using both
watercolor and gauze. So you can feel comfortable
with using them both, and it depends upon you
whether you are going to use watercolor or
gauze to do the coloring. Here's a simple sketch
for the second version of leaves that you can use. Creating this kind of curb
elongated see for the leaves. I won't be using
this kind of leaf, but if you want to
include this kind of leaves in the project,
you can do that. This is a very simple
version for the leaf. Now, here we have got
the third kind of leaf. So in here, we'll be creating
the holly Branch leaves. I'll be creating a seed
of five or six leaves, creating this kind of bit
curved hexagonal seeds for the holly Branch leaves. We'll be using variations of the greens to
do the coloring. I'll also be using
a little bit of white to do the
outlining for some of the leaves as well
as a little bit of detailing in the form of
midribs and the veins. And with these, we're done
with a simple pencil sketches for all the three kinds of leaf. Now let's do the coloring. So for this one in here, I'm using the watercolor. With the watercolor,
you'll get a lot of transparency and layering
becomes quite easier with it. W the layering of
watercolor green can create very subtle gradiation and all the layers of the colours will be visible with
the watercolor. For this one, I decided to
start with the olive colour, a bit diluted consistency
of the olive colour. A bit diluted consistency
of this olive color to act as the primary
layering for the leaves. By diluted consistency, I mean, I used a lot of water with the colour to make it
a little bit diluted, and when I'll be using
concentrated color, in that case, I'll
be using less water. This is going to our primary
layering for the leaf. For our projects, we'll be using other color combinations
to create the leaf. But in here, I'm
just showing you a rough demonstration
how we'll be using two or three different seeds of the greens to create the leaf. In here, I'm using
light sd of the green. Once again, this is a bit
diluted version of the green. Adding a little bit of greens, particularly more
on the left side to make that region
a bit darker. I'm considering that the light is falling from the right side, so the left side will
be a little bit darker. Now, let's spread the
colors a little bit. You can just use the breast
to spread the color or you can use water to
spread the color. But in here, since the
primary layer with the olive has not rind up, so you can easily
spread the color. Now for the second one in here, I decided to use gauze. Once again, for this one, too, I'm using a bit diluted
consistency of the ring. With the gauze, the
main advantage is that we can do lots of layering. We can even apply lighter color on top of the darker color, which is very hard in
case of the watercolor, but with the gauze, using a bit thicker consistency
of the color, we can overlay we can overlay the lighter color
on top of the dark ones. And since in here we are using a bit diluted consistency
of the color, the seeds of the
color will differ a little bit consistency
since it's a bit diluted, so it won't remain
uniform and consistent, but you don't have
to worry about it, as it will add another layer
of characters to the leaves, and we'll also be doing
more layers on top of it. Now for the third one,
the holly leaves in here, in here, I decided to use a
bit concentrated watercolor. In here, I'm using a bit
darker side of the green. And as compared to
the other two leaves, I'm used a little
bit less water. So the consistency so the
consistency is great in here. You can see a bit more
concentrated color. Now, for the first or
second leaves that we use, I added a lot of color to it, so I'll be using the color from it and spreading it for
the remaining leaves. In here, I'll be using the same color and
creating different seeds with it just by reducing
its intensity a little bit. For these leaves, we'll be getting various
seeds of the green. And you can clearly see it. The first three leaves
are quite darker than the remaining ones are lighter,
comparatively lighter. Now, adding the stems for
the remaining leaves. And with these, we
are done with the primary laying for all
the three kinds of leave. This has dried up
a little bit now, using the same side of the
green that we used earlier and creating the midribs
and the veins for the sins. This two will merge
with the first and the second layers of
the coloring we did, but we will get a
subtle outline for the midribs and the
veins, and on top of it, when it destroys we'll be going with bit darker
side of the green to create a definite and
crisp outline as well as add the midribs and the
veins for the insides. These are a little bit more
defined in our project. We'll be making it
a little bit more simpler since we'll have
to create lots of leaves. You can do experiment on your own and try different
techniques to create a little bit of variations for the kinds of
leaf you will be creating, adding the midribs,
the middle portion of the leaf and then adding
the veins coming out of it. Make the veins a little bit curved following the
seep of the leaf. So right now, it does
not look that great, but intensity of the color will decrease a little bit
when this dries and it will also merge with the
remaining two layers and create a subtle gradient. Now for the naps in
here, once again, in here, I'm using watercolor
instead of the gauze. But if you want, you
can use the gauze tube. In here, I'm taking a little
bit of different approach. I'm adding only the midribs and doing the outlining
for one side. The one side will become
a little bit darker and the other side will
remain a bit lighter. I'll be particularly
adding more greens on the left side to make
it a bit more darker. And for some of the
leaves that are lying underneath or
beneath the other leaves, I'll be adding more
greens to make it a bit darker to sow the shadows. Now, in here for
this kind of leaf, using a bit concentrated green, the green from the
gauze and using it to create this kind of
bit broken lines for the midribs and the veins. With these kind of lines,
a bit broken lines, you can add bit of
more texture and a bit more characters
to the leaves. So mostly, I'll be using this
kind of bit broken lines. But if you want,
you can also use uniform and consistent lines. And I assure that the color has dried up since
we are used gauze, but it has not dried up, so the midribs in the veins for the three leaves
are not that great. So I will wait for it
to dry a little bit, and then add another
layer of during on top of it to make the midribs and
the leaves once again. So this is one of the
mistakes you should avoid. And yeah, we will wait for it to dry a little bit until it dries. I'm using a little bit
of this cream in here. You can mix both the
gauze in the water color. It won't create that
much of a difference. So in here, I used
a bit of gauze. And now I'll be spreading this gauze a little
bit with the water. To create a bit darker region near the stems of the leave. Just using simple water and spreading the
colors a little bit. And with this, we have created
a bit darker region for the stems and the upper
side for the leaf. The three leaves in here turned out not the way we expected. So fasten this
process a little bit. So this is Jobson. You can just wait for
it to dry naturally or use the blow dry to
quicken the process a bit. Now let's do the outlining. In here, I'll be showing
you two different kinds of outlining for the leaves. In here, I'm using olive color, olive green to do the outlining. I'm creating this
kind of bit detail and crisp outlining
for the leaves. As I was mentioning the vibrancy of the colors has decreased a little bit when this
dried up, the watercolor. But you can see the
greens that we use for the gauze has
remained vibrant. The kind of green
that we use is seen. The kind of greens
that we applied is seen even after
when it dried up. It depends upon you
what you'll be using. Mostly, I'll be
using the gauze for the darker regions and it's quite easier to overlay
the colours on top of it by using thicker
consistency of the gauze. With the watercolor,
it becomes a little bit difficult
or challenging. And now I'm creating
this kind of simple broken lines to
create the outlines, the midups and the veins. You don't have to
use the same color. Instead of this, if you want to make the process a
little bit faster, you can also use the bras pins. You can also use fine liners and create outlines using black. You can also create this kind of a bit broken outlines for some of the sections
of the leaf. Now adding the veins. So I'm just overlaying the lines on top of the earlier
greens that we used. And as you can see, it's
looking quite good. The colour that we
use as the first and the second layer has mixed
a little bit and created some kind of subtle gradient and overlaying this color
on top of it to create the mid drops in the
veins it little bit more makes it look a
little bit more real. For this one, since this is
a little bit curved in here, I'm using a bit lighter
state of the green, I am using grass green here. Instead of this, you can also use other
states of the green. You don't have to stick
with the olive green. You can use dark green. You can mix a little bit
of brown with it, too. In here, I'm creating a little bit more detailed variation for the midribs in the veins. At the maze of the veins, I'm making it a little bit
more thicker near the midribs. This process will take
a little bit more time, but it will create more defined and more real like leaves. So if you want to create
this kind of leaf, you can do that. And with these, we are
done with the third leaf. For the remaining
two leaves in here, I decided to use a bit thicker
consistency of the green and instead of creating the
kind of outlines wedded, I decided to make it
a little bit curved. So creating this kind of
outline for the leaves in here. You can also experiment
with other kinds of outlining for the
different kinds of leave. Making this kind of
curved lines for the entire outline for
this fourth teeth. And now let's add the mid drops in the
veins for the insides, creating this kind of
simpler variation, simple broken lines for
the midrps in the veins. If you want, you can
create the kind of veins and the midribs that
we did for the third leaf, creating simple lines following the curved shape of the
leaf to add the veins. And with these, we are
done with the fourth leaf. Now for this one, I decided to mix a little bit of
brown with the green and creating a bit darker
color for the outline. The same kind of outline that we did for the fourth leave now. Let's at the midribs and
the wins for the inside. We will wait for it to
dry a little bit and then a little bit more detailing in the next section
of this video.
6. Layering the colors for leaves: Welcome to the second part. Let's continue
where we left top. We'll be waiting for it to dry a little bit the five
lefts that we did outlining for and
then add a little bit of bound detailing with the
white for some of them. Till it dries in here, I am adding a little bit of
detailings for these leaves. I'll be primarily
doing the outlines on particularly one side and adding this kind of simple
variations for the mid ribs. If you want, you can also
add the veins in here. Creating this kind
of dynamic lines for the outlining dynamic lines, I mean line with
varied thickness. Creating this kind of outlines
for the remaining leaves, I'll also be using a little bit of water to spread
the color to mix it with the remaining colors to
create a subtle gradient for the outlines and
the remaining section, the insides of the leaf. You can also experiment
with other colors, and you can also
create a little bit of different kinds of outlines, a little bit, a little
bit curved outlines or a little bit
pointed outlines. Now, in here, I'm
going with water. So this brush contains only water and I'm
spreading the colors, the colors for the
outline section. For some of the leaves,
I'll be doing it. Doing it creates a little bit of subtle gradient and the
transicen becomes quite smooth. So this is how you can create a little bit of
gradient as well as a subtle transition in
between the outlines and the remaining section
for the insides of the leaf. You can also mix a little bit of the outline of the midrib stew. And with these, we are done with the outlines in the mid rib. We will wait for it to dry
and add a little bit of white for some of the
sections till it dries here. I'm using a bit thicker
consistency of the gauze, and I mixed a little bit of
brown with this olive color and creating outlines
for the leaves, the hexagonal leaves,
the holly leaves. Adding the mid drops and
the veins for the insides. So the leaves did not turn out the way I was
hoping to create. But you have got the
rough idea how you can create the
different varieties of the leaves using a little bit of colour to do the outlining for some of the leaves in here, too. So a different seed of the
green in here, olive green. I'm using white to
create the little bit of detailing form of mid drops in the veins for these leaves. Overlaying this white on top of the earlier outlined section for the mid drops in the veins. In here, I'm using white,
and as you can see, when this dries up, it will lose its intensity a little bit. And in here right now, it's not looking
that much white. It looking a little
bit of gray color. Using the same white, the concentrated white
from the watercolor. Let's overlay it on top of the lines to make it a
little bit more bolder. So if you're going to use a bit concentrated
white watercolor, you have to do two or
three lines to make it look a bit more vibrant
and bit more distinct. Otherwise, you can use the concentrated
white ink white gauze or white acrylic, if you have. You can also use the
sakura jelly pen. Adding a little bit
of detailing in here too on top of the mid
ribs and the veins. The outlining that
we are doing in here will fade a little bit
when this dries up. Let's do the outlining for
the remaining leaves in here. If you want, you can also
use a little bit of water to subduate a little bit by lending it with the
remaining section. Let's do the outlining for
the remaining leaves in here. And for the last one, I'll
be using white later on. Until it dries in
here I'm showing you a very simple version
of the leaf that I'll be adding beside the fairy. Simple estem and simple
kind of leaf like this, the second kind of leaf
that we practiced. Adding this kind of
corm leaf in here. For our projects, we'll
be using variations of the green two or three seeds of the green to do the coloring, but in here, I'm showing
you simple example. And since in here, I'm using diluted consistency
of the color, the seeds of the
green is a little bit different for different leaves. Simple stem like this. Let me show you another
variation in which I'll be using two seats of
the olives to create it, starting with broken
lines to create a stem. Now let's create simple leaves. Here, too, I'm using a bit diluted consistency
of the colour. So these are very
simple kinds of leave. We'll be adding
multiple branches alongside the fairy
for her head, for her hands and on top
of her cloth and beside it using a bit
thicker consistency of the olive and adding it
for some of the sections, the two colours will mix
on its own because of wet and wet technique and
we eat a subtle gradient, making it a little bit
more darker in here, too. Now, for some of the
leaves in here too, adding a little bit of
greens, darker green. Adding a few more leaves, and we will wait for it to dry. Let me show you how we'll be creating very
simple versions for the merries since we'll be creating very small
and manue berries, all you have to do is to create the simple circular
seeds for the merries, leave a little bit of white
speech for the highlights. So we'll be adding
multiple baries for the branches like this. Either you can add
single berries or a cluster of two or three
baries as you see fit. Instead that the green has dried up and then
added, otherwise, the two colors might mix like it happens in here for
a single berry. It got mixed with a
little bit of the green. And for the ribbons, we'll be
creating this kind of very simple and curvy seeps like this using bit of broken lines. Instead of it, if you want,
you can create are you can create a little bit more
detail and define ribbons. But I'll be keeping things
simple and creating this kind of simple
variation for the ribbons. We'll be continuing on
with more detailings and a few more examples in the
next part of this video. So yeah, see you there.
7. Additional elements : Welcome to the third
and the final parts. In here, I'm using a
bit concentrated gauze, and let's continue with it and see that the
color has dried up. And the white that we use
the white watercolor, as you can see it
when it dried up, the intensity has
decreased significantly. You can use bit
concentrated gauze and create this
kind of outlining. In here, I overdid it. I added more whites and added more details in form of
mid drops in the veins. For our main project,
as you can see in here, I did not add this kind of
outlining with the whites. I used only a little bit
of white for some of the sections to make it a little bit more bolder,
a bit more distinct. So you don't have to follow along with me in here and try to add and try to add
less amount of white for the highlights
and the outlining. Now, moving on to
this kind of leaf, adding a little bit
of broken lines and overlaying this on
top of some of the veins. Also going over some
section of the outlines. Let's do the same thing
here a little bit more detailing in the form of
mid reps and the veins, not covering the entire section, only a small portion with it. As for the highlight
for the berries, a simple single dot
will do the work. For the larger
berries, you can add two or three dots to make
it a little bit more shiny. You can also use white to add the mid drips and the veins
for this kind of leaf. Bit of broken lines to
create the mid drips, and you can also
create the veins. Since it's not
looking that great, I would advise you to not
create the veins with it. But if you want, you can create only single lines
for the mid ribs. And now I'll be showing you
two different example of the mary buses that
you can create that the fairy will
be holding on. So starting with the red
to create simple dots, the simple dots for the Marys We will wait for it to dry. Since I'm using a
bit concentrated, using this concentrated ride
and overlaying it on top of the green to add
multiple berries in here. We'll have to use a
bit more saturated red to overlay on top of the greens. Adding a few berries here and there for some
of the sections, I'm adding the marries
underneath the leave so only a small portion of
the berries are visible. Let's set one or
two more in here. And one more in here,
beside this one. When this dries up, I'll
be going with the white to add a little bit of
reflection and highlight. To make it a bit more detail, you can use two different
sets of the riots, but since the sizes
of the berries will be quite small
for our main project, I won't be using two or three
sets of the I'll only be using a single set of the d and create simple variations
for the berries. Now, in here for
the holly branch, I am leaving a little bit of larger spiece in the
middle for the highlights. You can play with
a different kind of highlight for the insides. Let's add a few more
cluster of the baries. Let's add one or two in here. To make this process
a little bit faster, you can use the red
sketchin red fine liner or red breast pain to create the barries Adding few
marries for this branch, too. I decided to add
few more in here, adding one more just
beside this one. The red that we use early for the smaller made
has not dried up, so let's add a few more baries. And yeah, with this, we
are done with the berries. Now in here, I'm
using yellow green, and as you can see, it's a bit diluted color and
try not to overlay this on top of the lad and create this kind of bus like effect
for the entire section. We'll be using different
seeds of the green. Now, in here, I mix a
little bit of light green, and since the earlier color
has not dried up for parli it films on its own, yeah, creating these kind
of small bruss strokes to create
the texture for the uses This is not going to meet
that much details. Since we'll be creating
very small versions of this for the main project. But if you want to make
it a little bit detailed, you can add small leaves at the outline sections
or near the outlines. For now, I'm just creating the colours from the
inside and yeah, creating this kind
of simple appearance using small brussel strokes. The goal in here is to cover the entire section with this
kind of small brass strokes. For the outline section,
as you can see, I'm creating a small resemblance
of the leaf by creating this kind of by creating this
kind of outlines like this. In here, I'm using olive green. So you can create this kind of outline for the outside regions. I decided to sew another
variation of this kind of buses using different shades of the green to create
the outlines in here. And for the right side, I used a bit darker
sides of the green, and in here, I'm using a bit
lighter side of the green. Also spreading a little bit of dark seed of the green from
the left to the right. And we will wait for it to dry
and then add more berries. Till it dries, I decided
to spread the color a little bit more
in here by using a little bit of darker
seed of the olive. The goal in here is to
create a little bit of different regions of the
greens for this entire bush. The other thing that
you can do is to start creating the bush
first and then use a bit concentrated green and add
it over the green and use a bit concentrated
red to overlay it on top of the greens
to create the berries. For some of the reasons in here, I'm using a bit more
concentrated green, olive green, not covering the entire second but some of
the section in the middle. Gritting small red dots
for the berries in here. I'm adding the berries
on the section where I did not
add their colours. You can wait for it to
dry or just add the red in the empty spaces in
between the green mouses. Here too, adding a little bit of red for some of the sections. I would advise you to wait for it to dry and then
add the colours. Otherwise, it colours
might mix with each other, as you can see, it's
happening a little bit here. But I decided I was going
to be a bit careful, but some of the
colours got mixed, so try to avoid this
kind of small mistakes. Now, in here, I'm using sakura
micron jelly pen to add a little bit of highlights and reflection for some
of the berries. I won't be using it as I find it a little bit
difficult to add highlights and
reflection on top of the watercolor and gaze
with this jelly pen. But if you want, you can use it. And with this, we are done with the leaves and
additional elements. I'll see you in the next video.
8. Pencil Sketch for the Fairy: Welcome to the first
part of this project. This project is divided
into six different section. Let's start with
the basic simple pencil sketch for the query. So in here, I'm directly
started with this kind of slanted line as I practice as we practice in the
demonstration video, a set of three slanted lines and this kind of s for the
remaining section of our gown. If you're not comfortable
with this outline, you can start with a simple
sketch that we practice, starting with a simple
asteroid line to determine the length
for the fury. Now dividing into
different sections. So a total of eight
different section. Start with dividing into two equal parts and then
four equal parts and lastly, and further divide
into eight equal part. For the upper three
part, we have her face, her soldier and her torso, a little bit of this kind
of oval see for her face, and I'll be creating a little
bit of bend s for her back, creating a small cylindcal
seep for her neck. For her soldier,
the same kind of seep that we created in
the demonstration video, a little bit curved
as like se so this kind of s for her
torso and her waist. Now for the remaining
section of her upper part, this kind of simple S
circular C for her shoulder, cylindrical C for her forearm. And this kind of bit
conical C for her arm. For her palm, we are creating
this simple oval se. We will be making
adjustment later on. But this will be the
simple C for the top of our firing And for this
remaining eight section in here, we'll be creating her gown and adding the details with
leaves and other lement. If you want to make changes to the proportion,
you can do that. If you want to make
the face facing towards the front,
you can do that, too. But I'll be creating this
simple sketch for the fairy. In here, I made the
gown a little bit more flafy as compared
to the practice. Now, let's create her wings, the same kind of wings that I saw you in the
demonstration video. As compared to her body, I decided to make it a
little bit more larger. I'll be creating the
three wings for it. Butterfly like wing,
if you want to make changes and adjustment,
you can do that. And if you want to create angels like wings, you
can do that, too. For that, you have to do a
little bit of adjustment to her gown to accompany
the large wings, the angle like wings if
you're going to do that. In here, I created somewhat
of butterfly like wing. If you want, you
can create it like birds like wing or
angel's like wing. So feel free to make adjustment and changes
as you see fit. Now, let's add a little
bit more detailing, starting with drawing a rough
guideline for her here. I'll be creating a
large bun for her here. For most of her clothing, I'll be adding lots of ribbons. Let's do a rough
outlining for some of the leaves that we'll be
adding on top of the gown. In here, I'll be creating
a simple kind of leaf that I showed you in
the demonstration video. Instead of this, if you want to create other kind of
leaf that I sowed, you can create holly leaves or mistletoe leaves or
other kind of leaves. I'll be creating this kind of leaf and I'll be
wearing the siges. Some of the leaves
will be quite large. Others will be quite smaller. For some of the leave,
all the sections will be visible for the others. Some of the section will be
lying behind other leaves. So what I mean to say
that you can create any kind of leaf in any
manner as you see fit? I'll be covering most of
our gone with the leaf. But if you want,
you can only cover the upper section or
the lower section. In here, I'll be
trying to start with the smaller leaves for
the middle section, I'll be creating a
bit larger leaves and for the bottom section, once again, a bit
smaller leaves. Try to create a sense
of depth by showing that some of the
leaves are lying behind the other leaves. So some of the section of the
leaves are covered by it. Try to create a little bit of non uniform leaves by wearing the sides and making
some of the leaves a little bit more crooked or
a little bit bent like this. You can also add
stems if you want. And apart from creating
only a single kind of leaf, if you want, you can add
more varieties of leaf. The whole VT is in real time. So if you want to follow along with me, you can always join me. For the sections where
I'll be increasing the screen, I'll be
letting you know. So if you want to
follow along with me, then you can just pause the VD or you can reduce the spen. Now, let's create
folds for her gown. I'll also be adding few
leaves just below the gown. This is Opnal if you
don't want to do it, you can just leave it as it is. You can create the leaves only for the upper part of her gown. Or you can just follow
along with me and add few leaves just below
and beside the gown. Adding few leaves in here, too, as well as sewing
some of the folds of her gown on the side. Creating smaller leaves, simple rough outline
for the leaves. This is just a simple
pencil liskee If required, I'll be making adjustment. I won't be sticking out
with the guidelines that I created for the
pencil lskege in here, feel free to make changes and
adjustment as you see fit. Let's create a rough outline for her facial feature,
nose and mouth. The fees in here
seems a bit broader. So I'll be making
changes and adjustments, erasing the fees and making
it a little bit more defined. A bit more cylindrical
neck for her. Let's create this kind of
bit curved C for her face. Creating a rough guideline
for her hair line. A small section of her head will be covered by here in here. Let's create a rough outline for the meaning section of her here. So in here, if you
want to create the fairy facing forward,
you can do that. But as I mentioned,
I'll be making the fairy facing
towards the right, adding a little bit of
detailing for the face. Now, let's make our hands a
little bit more detailed. And with these, we are done with the first part of this project.
9. Fairy wings: Continuing on where we left off. Lightly raising the pencil
sketch for the upper part, the hand, the mouth,
and upper section. I'll be raising the
pencil sketch in different sections
so that we can have a rough idea
of where we'll be doing the coloring
for the next step. In here, I'm using a
bit diluted consistency of the color for the face. I'm using a skin color in here. I'll be adding a little bit of darker tone to it later on. Now adding it for the
hands of the fairy. The hand is a
little bit lighter. Now moving on to the here. In here, I'm using the ocher mixed with a little
bit of burnt Siana. So this is a little bit
thicker consistency as compared to the color
we used for the face. Starting with doing
the outlining for the outlined section, I'll be making it a little bit darker for the inner section. I'll be keeping a bit lighter, creating this kind of outline to add a little bit of
texture to it, too. Now, using water to
spread the color. Try to spread the colours evenly and instead that
the middle section, the middle section remains a little bit of
lighter consistency. Later on, I'll be going in
with the different seeds of the greens and the reds to add the berries and the
leaves on top of it, extending the hair a little
bit just beside her forehead. Now, we'll be doing the
primary layering for the wings, lightly raising it. For all the elements
for this project, we'll have to do multiple
layerings of the color. And here I'm starting with a Cambo So using this cameo j and spreading it for
the entire section of the wings that
we have created. You are free to
use other colors. If you want, you
can use the grease in the loose for the wings. But in here, I decided to
mostly use the yellows, greens and reds for all the
elements in this project, adding it for the second wing. And the final one. Instead
of creating three wings, if you want, you can add only
two wings for the fairy. The largest wing is
a bit more darker and remaining two wings
are a little bit lighter. Now going in a bit
diluted form of this light green and yeah, adding it primarily
on the edges. And now spreading
it a little bit. I'm not going to cover
the entire section, but just spreading it to create this kind of wing like
appearance for the wings. Let's do the same thing for
the remaining two wings. If you want, you can make
it a little bit more darker by adding a
little bit more Cambojo. I decided to make
the other two wings a little bit more darker, so I am not adding
the yellows in here. Later on, I'll be going with
a bit more darker sides of the greens and the reds to make it a little
bit more darker. The upper wing, the first
wing will be a bit lighter, so that's why I used a bit more concentrated
yellow up there. Now using a little bit of more concentrated
green and yeah, adding it in the same manner. Adding it near the
outlined sections, starting with the lower
parts of the wings. I won't be adding this
screen for most of the section like we did with
the earlier light green. But for some of the
sections and yeah, here too, spread
it a little bit. Using it to make the outlines
a little bit more crisper. Doing the same thing in here
too, spreading the green. Let's do the same thing in here for the third
and final wings. Now, I'm using water to spread
the colors a little bit. The three colors that
we have used right now will merge a
little bit on its own, since the yellow that we used earlier and the light green that we used has not dried up
properly in this green too. And this green two
is a bit diluted, so it will mix and create a little bit of subtle gradient. Now, moving on to the chest. So in here, using the
lighter side of the green, so for her clothing in here, I'll be dividing into
two different section. This section will be in green. And the remaining
section and soldier, her hand and upper part of
her chest will be in red. Here, too, I'm using a bit lighter consistency
of the green. I used a little bit of green for the middle section in between
her soldier and the arm. Now, let's make
some of the section a little bit more darker
to sew a little bit of satoPrimarily adding
this darker side of the green on the left side, a little bit just below her arm. Adding a little bit
above her waist. Now, using water to spread the colors a little
bit here too, since we are doing
wet on wet technique, the two colors will mix a little bit and create
a subtle gradient, adding a little bit more
green just above her arm. And yeah, with this, we
are done with this now. Let's move on to
the lower section. Here to lightly erase the pencil marks and see
that a small section of the pencil skate should remain visible that we can use as the guidelines
to do the coloring. In here two, I'll be
starting with the greens to do the coloring
for the leaves, the leaves we have created. For the leaves too, we'll be using multiple layers
of the coloring. In here, I'm using
the lighter side of the green for the coloring. This will be our primary
layering all the leaves. Here to, we'll be
trying to represent a little bit of
light in the sados. So for some of the sections, I'll be making it
a little bit more darker with darker
side of the green, and for the other section, we'll be using this
lighter side of the green to so that this legion
is a little bit light. Going over the outlines
of the leaves and completely filling
it with the greens. You don't have to stick with the pencil outlines
that you have created. Instead of it, if you want
to add more leaves or change the placement of the
some leaves, you can do that. The whole we do it in real time, so you can always
follow along with me. The consistency of the green will be changing a
little bit since we are to add a little bit of water and a little
bit of coloring, so you don't have to worry about it for the change of
consistency of the green, since this is our primary layer, and most of it will
be covered later on. Tinning on with feeling the insides of the
leaf with this green. Wherever there are two leaves, try to create a little bit
of sepreson by leaving a little bit of white in
between them like this. So this process is going to
take a little bit of time since we have got lots and
lots of leaves in here. And this is what I
was saying using this darker side of
the green to add it on one side to make that side a little bit more darker here, too, because of the
weight and wet technique, the two colors will
mix on its own and create a beautiful
subtle gradient. And since we are adding a little bit more colours
toward the upper part, that part will become
a little bit darker. Add a little bit more green, especially near the regions
where there are two leaves to sow a little bit of
sadosF the other leaf, add a little bit more greens. You can use the water
to spread the colors, or you can also use the
lighter side of the green to mix it with the darker
seed that we just added. Also, if you want to extend the seep in the
side of the leaf, you can use this darker seed
of the green to do that. Let's do the remaining leaves. We'll be adding the coloring
in the same manner. So once again, I'm starting
with the lighter set of the yellow green as the primary
layering for the leaves. And I'm leaving a little bit of white space in between all the leaves that we are creating. And for the leaves that are
lying below the other leaves, we'll be adding a little
bit more green to sow a little bit more darkness
or what I mean to say to sow a little bit of
more Sadows Using the darker side of the greens. Now, continuing on with
the remaining leaves. Since we have created
this many leaves, this process is going to
take a little bit of time. If you want to make this
process a little bit faster, you can just reduce the
number of the leaves, and if you want to make
it a little bit more challenging and a little
bit more interesting, instead of creating
this size of leaf, you can make the size of
the leaf a little bit more smaller and thus increasing
the numbers of the leaves, it will take a little
bit more timing, but the result will be much more better and much
more beautiful. And as we are moving
away from the top, I am increasing the size of
the leaves a little bit. I'll also be creating
a bit smaller leaves, but mostly I'll be trying to create a bit larger
leaves in here. Going with the darker
side of the greens for the leaves that we
have created just now. For this one, I use the
darker set earlier using the yellow green to
create the see for the leaves and using this to merge with the darker
sad of the green, Let's create a few more
leaves and then we'll be mixing the dark green or overlaying the dark
green on top of it. In here, extending the
dark greens a little bit. And as you can see, primarily, I'm focusing the dark
green on the one side, spacly on the left side. Now, here I'm using a bit
more thicker consistency of the dark greens to sew a
little bit of more sados. As I was mentioning, primarily adding it on the left side, a bit thicker consistency of the same dark green
that we used earlier. And since the light yellow that we use has dried
up a little bit, so the two colors will
mix, but not that much. For some of the leaves, I'll be completely filling
it with the greens. For the others, I'll be creating a little bit of veins
like structure, and for some of them, I'll be doing a partial
blending of the colors. And here, as you can see, I'm also using this darker side of the green to create a little bit of rough outlining
for the leaves. You can also create this kind of rougher texture for the
insides of the leave. If by mistake, if you've added a little bit more green
for some of the leaves, you can just use the
brush to pick up that colour and spread
it for the other leaves. Like in here, for this leaf, I added a little bit more green, so I'm using the green from this leaf and using it
for the other leaves. Adding it for the remaining
leaves that we have in here. When this dried
up, we'll be using a little bit more darker
consistency of the green, dark olive green, and create the mid drips and the
veins for the leaves. I'll also be using a little bit of white to add a little bit of highlights and do a little bit of outlining for some
of the sections. Spreading the color for
this larger leaf in here. And with these, we are
done with this section.
10. Coloring the Gown: Come to the third part. In here, I'm starting with a bit
concentrated right. You'll have to add it a
little bit carefully, try to leave a little bit of white space in between
the cloth and the leaves. Instead of using a larger brush, you can use a bit smaller brush. It will take a
little bit of time, but you will get a little
bit more precision. Or you can also use
breast pains or sky pins to do the
outlining for the leaves first and also create
the outlining for the clothes and then feel the insides of the
clothes with the red. If a little bit of this color overlaps on top of the green, you don't have to
worry since we'll also be doing the outlining
for the leaves later on. Try to leave a little bit
of white space in between, but if a little bit of
the colour touches, you don't have to
worry about that. So for the entire
section in here, we'll be filling
this with the red. This red will be the primary
layering for her clothe. On top of it, we'll also be adding a bit more
darker side of the red. And when this dries up, we'll also be going with
the white to create some simple patterns
and designs as well as add a little bit
of outlining with it. So carefully filling this
red for the entire section. This process is going to
take a little bit of time, so be patient and yeah just fill the entire
section with the red. And you don't have
to worry about it if the consistency of the
color in is a little bit, since for the regions
in between the leaves, we'll be adding a little
bit of darker side of the red later on to make
those region a little bit more darker to so
that the shadows cast by the leaves has made
that regions bit darker. In here, since we have
different section of the cloth and
different folds present. So for those sections, I'm leaving a little
bit of white spice. This white piece is acting
as both separator as well as as the outline for the different sections
of our cloth. In here, you'll have to be a little bit more careful since we'll be adding few leaves
in here at the bottom. I decided to add the
colors in between the leaves first and then
we'll be doing the outlining. By outlining, I mean, encircling the leaves and then feel the rest of the
area with the red. Instead of creating
this a little bit darker side of the
red for her cloth, you can also use a little
bit darker side of the yellow color combinations
that we used for the wings. So you can start with the Camuju and then add a little
bit of red on top of it. In that way you can create a little bit of orange
color for her cloth. Before adding the coloring for the remaining section
of our cloth in here, I decided to add the
coloring for the leaves. So using this olive
color for the leaves in here for the leaves in here, I decided to use a bit different consistency
or different color. Instead of it, if you
want, you can always use the yellow green for the
primary layering for the leaves and add
the coloring in the same manner as wedded for all the leaves
for the upper part. In here for the leaves,
I decided to use the same color combination that we use for the
remaining leaves. Instead of starting
with the yellow green, I just use the arcs
consistency of the green, but I diluted consistency of it to create the first laying for the leaves. You have got the option. If you want, you can use the
olive greens or you can use the same color
combination that we used for the leaves earlier on, or you can just dilute
the darker consistency of the green with
more water and create the primary layering for
the leaves and then add a little bit more darker
consistency of the greens. In here I'm going
darker consistency of the green to add it
particularly on the left side. Using this to
create a little bit of outlining for the leaves too. A For one of the leaf in here
on the right side, I did not add the kinder for it. Instead of it, I'll be
going with the red to cover that leaf and to so that
it's a part of her clothe. Going back with the red,
once again, in here, we have got different
sections of her gowns. Try to leave a
little bit of whites piece in between the
different sections, adding it carefully and encircling this red as the
outlining for the leaves. In here, we are using a
bit darker consistency of the d for the coloring, but when this dries up, it will lose a little bit
of its vibrancy. So we'll be adding more
layers on top of it. Overlaying this on top
of the earlier red to create a little bit of
folds for the cloth. Using this to
create a little bit of foldings for the clothes. Now adding it in here in the front for the other
section of her gown. Adding one more layer or one more section in
here in the front, and I'm also leaving
a little bit of whites piece in between the different sections
of the clothes and the folds that
we have created. This is going to be a
little bit trickier, so we'll have to feel the feel the rats for the insides
in between all the leaves, extending this ray in here and overlying this on top
of the outline of the leaves that we created and converting it into
a part of our gown. Extending some sections
of our gown a little bit. So the red and
between the leaves, I'll be adding a bit
more darker tone of the red later on
when this dries up, so the cytos casted
by the leaves has made those region a
little bit more darker. Now continuing on in here, adding the red in between all the leaves that
we have created. So this is going to be
a little bit trickier. Pcentenia fill the entire
region with the red. You don't have to worry
about it if some of the red overlays on
top of the green since we'll be doing the outlining for the greens later on with a bit more darker
send of the green. And to save a
little bit of time, instead of using this red, you can use a bit darker
consistency of the red and blend it with this red
for the remaining section. In that way, you can save
a little bit of time, but you won't be able to create a subtle gradient and the effect that we can get with
the different layerings of the watercolor.
It's your choice. If you want, you can
add the darker red or you can just follow
along with me with this I'll be adding the red for the middle
sexton later on. I'll wait for it to dry. Other white, I'll get the
colours masked by my palm. In here, I'm adding the red for her clothes for
the upper part. The same red, but a bit
more concentrated form. I just use a little bit
of less water for it, creating this kind
of circular see for her solsu adding
it for her chest, adding it in here, leaving a little bit of white piece in between the
different sections. Adding a little bit
more for her waist, adding a little bit of rains. Now in here, I'm going
with a green and extending the stems a little
bit for some of the leaves, overlaying this green on top
of some of the section as well as using it to create the stems for some
of the leaves. Make the stems, as well as some section of the leave
a little bit more darker. Adding a little bit
more green in here to make this region a
little bit more darker. In here, I mixed a
little bit of red with a green my mistakes.
Try to avoid this. I waited for it to dry a
little bit. It has dried up. In here, I'm using a bit
thicker consistency of the dark green and broken lines to do the outlining
for the leaves. I'll also be creating the mid drips and the veins
for the insides of the leaf. Instead of it, if you
want, you can create the simple and uniform line. Otherwise, you can
just follow along with me and create this kind
of bit broken lines to add a little bit more texture and bit more characters
to the leaves. For some of the leaves, I'll be creating broken lines,
and for others, I'll be creating this kind
of bit rougher texture, rougher outline, this kind of jagged outline
for the leaves. And for the stems too, I'm not covering the entire
section with the screen. I'm leaving a little bit of
the le color to be seen. This do is going to take
a little bit of time. For the regions that you want to sow a little bit of sado, add a little bit
more greens there. Apart from this, I'll
be using white to add another layer of
outlining as well as add a little bit of
highlights using water to extend this darker
shade of the green to make the sados a little
bit more prominent. Adding more greens, extending a little bit more to blend it with the remaining
section for the leaf. We'll be doing this
for all the leaves. To make this process
a little bit faster, if you have brose pins,
you can use that. You can also use
the sketch pens, and you can also use
the colored pencil that will add another kind of texture and a little bit more detailing. With those, you will
get a little bit more precision and more control. You can just follow
along with me and do the outlining at texture. Extending the greens a little bit with
the water to make this region a bit more darker. For this lead to extending
the green a little bit, now, using the water to spread the color and mix it with
the remaining section. Now continuing on and doing the same thing for
the remaining leaves, doing the outlining, adding a little bit more greens to sados for some
of the sections. I'm making the
left side a little bit more darker to sow
the sadosO those region. I'm considering that the light
is falling from the right, so the left side will be
a little bit more darker. Going with the water
to spread the in here, I'm using tube brush
to make this process a little bit more easier
and bit quicker. Going over the outline for
the stems and creating this kind of rough
outlining for the leaves. Making this region a
little bit more darker, asado is cast by the
larger leaf on the right. Now, once again,
going with the water. Spread the color a little bit. Now, for the larger
leaf in here, a combination of
broken lines and this kind of rough
outlines for the leaf, making this region
a bit more darker. Let's do the same
thing for this one. Let's do the same
thing for this one. Now going with the water to spread the colours
to mix it with the remaining section for the insides, spreading the color. And as I mentioned, I'm using different brus to make this process
a bit more faster. Moving on to the leaves
on the left side. Doing the same thing, creating the outlines
for the leaves, adding a little bit more dark
for some of the section, particularly on the left side to make those region
a bit more darker. And then we'll be going
with the water to spread the colours to mix it with
the remaining section. M you can also create the mid drips
and the veins in here. For this region, added a little bit more for
the upper part too, so the cado casted by the
flowing cloth, the gown. I'm creating mid drips
for some of the leaves and I'll also be creating the veins coming
out of it later on. If you want you can
do it right now. But since we spread the
water a little bit, the two colors will
mix and we won't be able to create a
bit crisp outlines. Going with the water
to spread the colors. We have got one, two,
three, four, five, six, seven, eight, eight or nine leaves to do the outlining. I'm also adding the mid ribs for the insides of the leave
for some of the leaves. So this is our third
section of this project. After that, we'll be adding the color in between the leaves. For the other sections,
we'll be creating different kind of smaller leaves as well as the red berries. We'll be adding ribbons, adding more texture and
detailing for the wings. We'll be adding leaves
and berries for her hair, and on her hands,
we'll be holding lots of berries and leaves. We have got three
or more sections to complete this project. In here, I added a little
bit more bolder outlines. By outlines, I made bid drips
for some of the leaves. Now using water to spread it, spreading the mid rips, too. With this, I'm also
creating a subtle gradient for the mid ribs for
some of the leaves. Now for the leaves in here, I'm using a bit more
concentrated green. So we have got dark green mixed with a
little bit of olive. Particularly, I decided to
use this darker sad for the greens for the
green for these leaves, the olive green leaves
that we created the two leaves and using it
for the remaining leaves too, add a little bit more green
since the leaves will be a little bit more darker
because of the sados casted. Now using water to
spread the color. I'm not covering
the entire section, as you can see, just
spreading it a little bit. Now for the remaining
two leaves. And yeah, with these, we are done with the
leaves in here, spread a little bit of more coloring for some
of the sections. Now let's add a little
bit of designing or you can see pattern for the middle section
just above or west. This is optional, creating this kind of simple
pattern in here. If you don't want
to do this, you can just keep it as it is. And I would suggest you
to not do this right now. Instead of it, you can create other kind of
pattern and designs. It did not turn out
the way I wanted. So I would suggest
you to not do this and create other kind of
pattern or designing, blending the colors a
little bit in here. And with these, we are done
with the third section, we will wait for it
to dry a little bit, and yeah, I'll see you
in the next section.
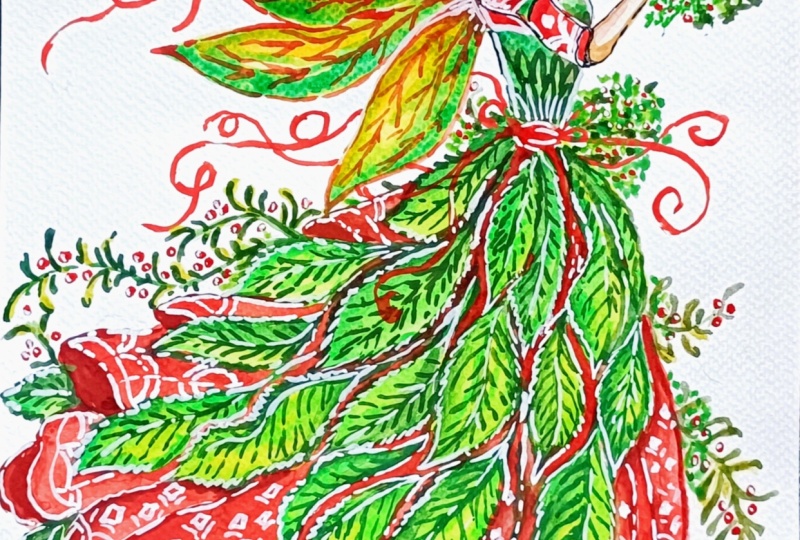
11. Midribs and veins for the leaves: Let's continue
where we left off. I waited for it to dry a little
bit, and it has dried up. In here, I'm using a
bit darker side of the green mixed with a
little bit of olive. Now I'll be creating mid drops and the veins for the
insides of the leaf. For some of the
sections, I'll be creating a little bit
of broken lines to add a little bit more texture or a bit more characteristics
to the leave. I'll also adding a little bit more details
for some of the section, the outlines for the leaf. Let's do the outlining
for some of the leaves, and then we'll be
adding the insides, the mid drops, and the veins. I'll also be going
over the outlines of the stems and making
it a little bit more bolder, a bit more darker. If you want, you can
make the mid drops a little bit more
thicker like this. And instead of creating
this kind of broken lines, you can also create uniform
and consistent lines. To make this process a little
bit faster if you want, you can also use the fine liner or you can also use
the fine liner or the brass pans to do the outlining and add the mid rubs in the
veins for the insides. So in this video, I'll mostly
be doing the outlining, adding the mid drops and
the veins for the inside. So for the most
part of this video, I'll be adding the mid
drops and the veins and doing the outlines
for the leaves. We have got lots of leaves, and for some of the sexin
I'll also be trying to make the shadows a little bit more darker using this gray. You don't have to worry
about variation in the consistency of the color that you are using
to do the outlining. A bit of variation will make the whole outlining and the
whole project much better. And instead of adding
the mid ribs for the middle section of all the leaves for some
of the section, I'll be adding it
a little bit on the left on the right so that the leave is
a little bit bent or orange facing on left
or right direction. Apart from this,
when this dries up, I'll also be using a
little bit of white to add a little bit more detailings to the outline and to add a little bit of highlights for
some sections of the leaf, particularly on top
of the mid ribs, a little bit for the veins and a little bit
for the outlines. The whole video in real time. So you can always
follow along with me. And let's add the midrops and the veins for the remaining
leaves we have in here. If you want, you can
also add the midups and veins like structure for the
wings that we have created. Instead of the screen, later on, I'll be using the reds to create the midups and veins like
structure for the wings of this fairy adding it carefully in here and between the different
folds of her gown. This process is a little bit quicker as compared
to the adding the colours for the
leaves and the gown. And yeah, follow
along with me and add the dribs and the veins for the remaining
leaves we have in here. I think we have around
ten or 12 leaves. And as you can see, the
two or three colors that we use for the leaves has blended very smoothing and
created very subtle gradient. Some of the regions
are comparatively lighter than others
are a bit darker, and it looks very pretty, but instead of using
two or three colours, if I only use one color, then I would not have
been able to create this kind of effect or the
background for the leaves. Using this many colours had
taken a little bit of time, but the result, I
think it's worth it. The leaves look a little
bit more lifelike. Now for this leaf,
a small section of it lies behind
the larger leaf. So making the midrps and the veins a little bit
shifted towards the right. Gritting broken lines
with the brush to create the outlines for
the midrps and the veins. Now for the larger
leaves in here, For the upper section, just above her torso, the pattern in the design that I added does not look
that much appealing, so I'll be using
the white to cover it and add another
layer of coloring. By coloring, I mean
adding pattern or designs to make it a
little bit more beautiful. You have got one, two, three, four, five, six, six leaves at the top, and one, two, three, four or five
laps at the bottom. I'll be adding the midrps and the veins for the
remaining leaves and then I'll be using a
bit darker side of the red in between the labs, the white piece that we have. Moving on to the
lower leaves in here. For this one, most of
the section is folded, so only half portion of the veins will be
visible on the side. So adding only the half portion of the veins for this one. Small broken lines, and yeah, following the following the
cut sweep of the leaf and creating the bit bent veins
coming out from the mid ribs. Now we have got a larger leaf. I think this is the
largest leaf in here. No, this is the
second largest leaf. We have got a larger
leaf just beside it. So for this project in here, I have created a total of one, two, three, four, five,
six, seven, eight, 19, 11, 12, 13, 14, 15, 16, 17, 18, 19, 20, 21, 22, 23, 24, 25, 26 leaves. Let me know how many
leaves you have created or instead of
using this kind of leaf, if you have added other
variations of the leaf or a combination of all the
leaves that we have practice, let me know in the
discussion section. Now adding the mid drops and the veins for the larger leaf. And you can clearly see
the difference just by adding the detailings
for the leaf. I look a bit more
realistic and it has given a little bit more
depth to the whole painting. Adding this kind of minute and tiny details take a
little bit of time, but it adds a lot of characteristics and a bit more volume to the
whole painting. Now we have got only
six leaves in here. Creating this kind
of bit rougher texture for the
outline of the leaf. Let's add the insides, the mid ribs, and the veins. Simple broken lines a little bit carved following the seep of the leaf and creating the veins coming out
from the mid ribs. And with these, we are done with the last leaf of the upper part. Now, let's add the
outlines the mid drops and the veins for the
remaining leaves at the bottom, starting with this. Now moving on to this
one. For this one, we used olive cutter. It looks a little
bit different from all the remaining
leaves we have created. But by just adding the detailing in form of midraps
and the veins, it looks somewhat similar to. Since we have covered
most of the sections, the olive sections with
the midrips and the veins. Let's do outlining for the leaf. Et's do outlining for the leaf. Now, moving on to
the last two leaves, a bit of broken lines
for the mid robe, adding the veins coming
out from the mid ribs. And with these, we are done with the second one, second last one. And this is the last leaf. And it took us around 9 minutes, 37 seconds to do the outlining
for most of the leaves, not all of the leaves. And with this, we are
done with the outlining, adding mid ribs and the
veins for the leaf. Now I'll be adding a little
bit more detailing for some of the section in
between the leaves. So I'm using a bit
thicker consistency of the red and going over
the empty spaces, the empty spaces in
between the leaves, so use thicker consistency of the red or you can also
use maroon color and yeah, filling the entire
section with it. The region I'm using
this darker side of the red to do the coloring
in here to so that the shadow casted by the leaves has made this region a
little bit more darker. As I move away from the top, man decreasing the
intensity of the red a little bit to mix it with
the remaining section, the lighter side of
the red that we have used for the remaining
section of our gown, using water to spread the color, to blend it with
the lighter side of the red that we
have used earlier. Adding the red in here
in between the leaves. So in here, as you can see, the consistency of the red
has decreased a little bit. I added a little bit of water. I added a little bit of
water to decrease in intensity to match it with the remaining
coloring of her gown, adding it carefully in
between the leaves. You don't have to
worry that much, even if you overlay a little bit of red on top of the green. We'll be adding a little
bit more detailings with the white later on also
be doing the outline for some of the leaves using
this thicker consistency of the red to add more
detailings for the gown. In here, I was not able to record a small section,
but I use this, but I use the sicker consistency of the red and
overlaid in top of the lighter seed and used it to create a little bit of sadose
for some of the region, especially near the
folded regions by adding more reds and blending it with the remaining section. So this is how it turned out. And since we are done
with the lower sexion moving on to the upper section, using the thicker consistency, a darker consistency of the red. So going over the outlines of the soldiers that
we have created and adding a little bit
of detailing in the form of this kind
of bit curved lines, making the upper part of our
forearm a bit more darker, adding a little bit of the greens that we
used for her chest, a little bit of
red for the back, covering the entire
section with it. Now, for her too, a little bit of darker
consistency of the red, extending a little bit and
overlaying it on top of the other reds that we used just earlier to make it
a bit more darker. Since the consistency of the red decreased a little
bit when it dried. Now, I'll be adding that
details for the wings. So in here, I'm using CambojG over the outlines of the wings that
we have created. I decided to make it a
little bit more yellows. So mostly for the
upper section and a little bit for
the bottom section, I'll be adding this Camboj and using water to blend it
with the remaining colors. I'm trying to make it a
little bit more yellows, and when this dries
up, I'll be going in with the red to
add the outlining I'll only be covering up
to here in this part, and I'll be seeing in the
fourth part of this project.
12. Detailing for folds and leaves: Now continuing on
where we left off. And here, I'm using a little bit of burnt sienna
woods with the red, and we'll be adding a little
bit more detailings for the folds and a little bit
for the insides of her gown. So using this colour
to do the outlining and add a little
bit of detailing for the insides of her gown. Use a bit thicker consistency
of the colours and avoid overlaying this on top of the outlines of
the greens that we did. But if you overlay
it a little bit, you don't have to worry since
film using a little bit of white itteron to add more detailings for the leaves
as well as for her gown. So what I'll be doing in here? So I'll be going
over the outlines, and for the lower sections, I'll be adding a little bit of more colors for the
insides of her gown. Do the outlinings and add
the colors for the insides. And for the earlier region, that I was not able to
record a small section. As you can see the two colour
cells mix beautifully. I use a bit thicker
consistency of the red and mix it with the primary layer
of the red using the white, and this is how it turned out. Now for the folds in here, adding it carefully in
between the leaves and, yeah, doing the outlining
for the remaining section. Adding in between the leaves. So this person is
also not visible, but you have got the
rough idea how to add the coloring for the
sections in here. If you want to make it a
little bit more darker, you can use a bit thicker consistency of the
red mixed with the browns or a little bit of black for the
insides of her now, but I decided to use
the color combinations, put the folds in
here for her gown. And for some of the section
just beside the leaves, I'll also be adding these darker consistency
of the colours and extend it in a little
bit and blend it with the remaining colour to sow the shadows cast it by the leaf. And as you can see, I'm also
covering the white section that we left off
earlier, so cover it. And for the final layer
in here at the front, a little bit of folded region, a little bit of folded
region in here. And with this, we
are done with it. I'll be adding a little
bit more detailing later on when this dries up
until it dries in here, I'm using a bit
lighter consistency of the greens to
create the stems, a bit crevi stems. You can create multiples, one, but in here since I
have a small spiece, I'll only be creating
this three on this side. I'll also be adding two or
three on the front side. A bit smaller stems in here. Adding one more in here, a bit curve towards the bottom. A few in here just
beside her torso. Now, in here I'm
using red to create ribbons wrapped
around her torso. So ribbons wrapped
around her waist. Make it swirly by making it a little bit
spiral like this. Adding more folds for
the rivens in here. Now, extending the
rivens in here, overlaying this on
top of the leaves. Adding few ribbons in
here on top of the leaf. Later on, we'll be adding
a little bit of white to make it a bit more
clearly visible. Now for this side in here. So adding two or three ribbons
just beside the wings, the lower part of her wings
for the upper part two, I'll be adding few
ribonsEtending it just beside her west in here. Now adding the vans in here. Is that the content that you used for the gowns has dried up. Otherwise, the colours
might merge with your palm. Using this light to
create small berries. I'll be creating
multiple berries alongside the stems
that we have created. Small berries, small circular
see for the berries. You can add as many
berries as you want, but just don't oversaturate it. Otherwise, it will
become a little bit hard for you to add
the leaves later on. Adding the circular seeds
for the baries in here. For some of the saxon I'm adding single marries for a cluster of two or three merries in here
too, alongside her mist. For the stems that
we have created in here, adding few marries. The large stems that we have a little bit of colouring from my palm was smuched in here, so using erase it to
lightly erase it. Now, let's add the
barries in here. Small circular seed
for the berries. In here, we'll be
creating a little bit long and curved seeds for the leaves. When
this dries them. I added a stem in here, too, so adding the berries
for this section too. Adding few more baries in here. And for the last stem
that we have in here, few berries, four or
five berries in here. Beside her torso, I'll also be adding few berries later on. And in here, I'm
using light greens and creating this kind of
simple variation for the leaf. This is our primary layering for this kind of
leaf on top of it. I'll also be using a
bit darker consistency of the green when this
dries up somewhat. Creating the simple
variations for the leaf for the stems
that we have just created. You have to bit cousus so that the two colours don't
mix with each other, since the red that we just
use has not dried up. You can wait for it to
dry or you can just be causes and carefully
create the small leaves. So I'll be creating
multiple leaves and trying to fill the entire
region of the stems with it. And as you can see,
I'm also wearing the sides of the
leaves a little bit. Adding the leaves in here since we have got a
smaller region in here, so I won't be adding
that much leaves. Adding the leaves for
the stem at the base. Now for the two stems that
we have created in here, Adding it costly just beside the marries that
we have created. Now, let's wait for it
to dry a little bit. And if you have the blow dry, you can make the process
a little bit faster. For this section in here, I was not able to record the baries. So you have got the rough
idea how I created it, as you can see in here, the upper part of the video. We did the same
kind of thing that we did in the practice session, and this is how it turned out. So I started with the riots
and then use varieties of the greens to create
the leaves around it, and we mixed it in a little bit by doing a bit and
wet technique. If you want, you can
pause the video and create this kind of
leaves and the bariesput the top of her hands
and this beside her torso and then
continue along with me. In here, I'm using
the same consistency of the red that we used earlier. So using it to create the
details for her wings. Starting with doing
a little bit of broken outlining for the wings. In here, I'm also
making the seep of the outlines a little bit
different from what we created. Earlier, there was
a little bit of sep resin in between
these two wings, but I decided to overlay the larger wings on top
of the smaller one. And for the insides
of the wings, I'll be creating this kind
of in like structure. You can consider this
to be similar as the mid drops in the veins that we
created for the leaves. Instead of creating
a single mid drops and the veins coming out of it, I'll be creating multiple, three or four mid drops
for the wings and then add this kind of bit broken lines for the
veins coming out of it. This is option if
you don't want, you can just leave it as it is, or instead of using the red colours to create this kind of pattern and design for the wings, you can
use other colors. You can use yellows,
you can use greens. You can also use
white or otherwise, you can just follow
along with me and create the detailings that
I'm doing for the wings, creating this kind
of bit curved veins coming out from the mid ribs, like structure that
we just created. So for all the three wings,
I'll be doing the same thing. I forgot to mention that I
also added few leaves and stem just beside her head
on top of her here too. On top of the wings,
I added few stems and small leaves just like
the leaves that we added besides her gown, a little bit on top of her
head on the right side. So you can pause
the vein and create the kind of leaf or if you
want to keep it simple, you can just leave it as it's simple hair that
you have created. Creating one or
two mid ribs like structure and then adding
the ins like this. So in this video, we'll only
be covering up to here and add a little bit of more detailing for some
of the section. And in the last video,
we'll be adding the fine detailings using
whites and add more detailing for some of the
section and also cover some of the mistakes that
we have done or that I did. Adding the right for the last
wing that we have in here. Creating small wings like
structure with broken lines. In here, just beside her souldier adding in
a little bit of more red and merging it with
the remaining sections, making this region a
little bit more darker. And yeah, with these, we
are done with the wings. Now going with the red to add more berries in here and see
that the color has dried up, adding multiple berries in here, creating small berries and yeah, overlaying some of the red on top of the greens that we used, adding just below her hands too. Later on, also be using
a bit darker side of the skin color for her hands as well as for
her neck and the face. Then I'll also be using black
to do the outlining for of those actions to
make it a little bit more distinct and clear. Adding marries on this region
on both sides of her waist, small circular see
for the marries. Use a bit thicker
consistency of the colour to overlay it on
top of the greens. Later on, we'll also be adding
a little bit of white as the highlight on the reflexion
for some of the berries. Now for the stems in here, doing the same thing, small circular see for
multiple berries. I'll be making this region
a little bit more darker, and I'll also be adding a
few more stems and the lems. Mostly I'll be covering these
sections with the leave. But for now, just add the berries circular seeds
for the berries, a few berries on the top. And since I'll be covering most of the section with
the greens in here, so I increase the
numbers of the berries in here just beside her head. I decided to create
one more ribbon. Adding a little bit of
detailings for her R, using consistency of
the d that we used for the berry and using it to
do the outlining, too. And with these, we
are done with this. Now, as I was mentioning. In here, I'm using a bit
darker side of the green. So this time, I am
using olive green, and I'll be creating multiple leaves as well
as overlaying this green on top of the
light on top of the light side of the
green that we just use. So I won't be covering the
entire section of the green, but some of the section or one section or one part
of the leaf with it to add a little bit of
more characteristics to the stems and the leaves
that we have just created. This is going to
take a little bit of time since we have
got lots of leave. And as you can clearly see, I'm not covering the entire section. So continuing on with going over the outlines of the leaves
that we just created. I'll also be using
this darker side of the lives for the upper
part a little bit, a little bit for the berries
and the leaves that she is holding a little bit
for the weights like here. Creating small strokes
with the breast to add this kind of
texture for the leaves. Just don't oversaturate it. Add it a little bit less as compared to the lighter
side of the greens we use, doing the same
thing in here too. Adding a little bit more
beans for the region beside her hand to make this
region a little bit more darker to so the cado
cast it by her hand. Extending the greens in here. H. Now, moving on
to the other side, here, the consistency of the green has decreased
a little bit. If you want to ensure
the consistency remain the same, you
can use the same seed. Otherwise, you can wary
the seed a little bit and continue on with the greens
that you have on your breast. I am not worrying about
it since I'll also be adding a few more
leaves with other side of the green later on. And here I'm also increasing
the number of the leaves a little bit since I
had a little bit of empty spieces in between
some of the leaves, so I added a few more
leaves with this colour. Now, creating this kind of smaller branch
coming out in here, extending it a little bit
in here too on this side. And as was mentioning making
this region a bit more darker to show the shadow
cast it by her hand. I'll only be covering up to here for this section
of the video, and I'll be seeing
in the next part the last part of this project. We will wait for
it to try and then add more coloring
and more details.
13. Final detailing : Welcome to six on the last
part of this project, and here we'll be adding the final detailings and
completing the project. So in here, I'm using white. So with this white,
I'll be doing the outlining for some of
the sections of the gowns, as well as create
simple patterns and designs for the gowns. This is jobs if you don't
want to create pattern or designing or using the
white to do the outlining, you can leave it as it is. But by just using this white and adding more
designs and pattern, it will make the whole
project bit more vibrant, bit more colorful and
a bit more beautiful. I won't be creating
an intricate design. I'll be creating this simple
variation of the design, simple broken straight lines
following the curve of her gown and creating
this kind of spiral saps. So for most of the
sections of her gown, the lower part of her gown,
I'll be doing this thing. I'll be creating the border with the white and also
doing a little bit of outlining for some
of the sections and simple spiral like seeps. As you can see, I'm using
broken lines to add a little bit of more
characteristics to the outlining. Instead of it, if you want, you can create consistent
and uniform outlining too. For the middle section in here, I won't be able to create that kind of designing
or detailing. But for the leaves, I'll be doing the outlinings later on. But for now continuing with the remaining section
of a gown and creating the outlines and
simple patterns and designs. Instead of this, if you want
you can use other colors, it will be a little
bit challenging to overlay the other colors
on top of the darker red. But if you can use
other colors too. Let's do the outlining first and then we'll be adding
the retellings. And in here, we have
got a larger section, so I'll be creating a little bit of different patterns too. So I'll be adding kind
of rhomoid like seeps. By rhomoid I mean polygonal
sap, a bit of a square like. I'm not able to
properly convey it, but I will be showing you how I'll be creating
those simple saps. For now, containing this
kind of bitter spiral saves, semicircular saves like this. This is the simple kind
of seep I was mentioning. Simple square like seeds. I'll be adding multiple months since we have got a
bit larger area in here for this section and
for the other sections too. If you want you can cover
the insides with the white. For some of the section or some of the squares that
I'll be creating, I'll be filling the
insides with the why. Continue on with the remaining
section of her gown. Apart from this,
I'll also be coming back and add a little
bit more detail besides the square seep that we have just created
by adding a few lines. And you can clearly see just
by creating this kind of bit broken lines it adds more characteristics
to the outlining, creating a half circular
seat or semicircular saves. Now, the square like patterns. Instead of this kind of pattern, or you can create other kind of pattern designs as you see fit. You can also use the
white jelly pan if you have to make the
process a bit faster, but I find it a little bit
challenging and difficult to overlay the jelly pan on
top of the watercolors, watercolor and the gauze, and it takes a bit more times. With the brush, you can make
the process a bit faster, but you will get a little
bit less accuracy. But I'll be sticking
with the brass to do all the outlining and
adding the detailings. In C to the consistency of the white you are using is thick, otherwise, when this dries up, it will lose its vibrancy.
It might also feed. But in here since I very thick
consistency of the white, I am sure that it
will remain and the consistency and the vibrancy of it won't be fading out. And as was mansoni, for
this region in here, for the insides of the simple square shapes that we are creating, I
am feeling the insides. So if you want, you can
create this kind of simple square shapes or the other kind of hollow
ones that we did earlier. I'm also decreasing
the sizes of the seeps a little bit since we have
got lots of folds in here. And the extra additional
details that I was mentioning, adding a few more for some
of the empty species. Detailing for the upper part. We will wait for it to dry and then add more detailing
for the lower part, but for now using the
white to do the outlining, a little bit of patterns and designing for the upper
part of her cloth. The red section of her
clothes, simple square. Now for her Soulier starting
with doing the outlining. Now, here too, I'll
be creating somewhat of semicircular sieves
that we used earlier. A square seep in here, doing the outlining
for this section, too, beside here two. And this section, I was not satisfied with and
how I used the green. So overlaying this white on top of this section to
cover it a little bit. Now, as I was mentioning the detailings and outlining for some of the
section of the leave. I'll be doing the outlines for some of the
sections of the leaves partially overlaying the ray a little bit for the ribbons
you created earlier. I won't be covering
the entire section of the outlines that
we did earlier, but for some of the section, as you can see, a bit
of broken outlining, as well as for some
of the metros and the veins too, if you
want, you can add it. Adding it for the
leaves in here too. So the sections that
are more darker, I'll be adding this white to add a little bit of highlights and to draw a little bit more
attention to the leaves. Mostly, I'll be using kind of broken lines to do the
outlining for the leaves. If you want, you can also use
uniform and straight lines. As was anon overlaying
a little bit of white for some of the
sections for the insights, the midrps and the veins too. This is open. If you
don't want to do this, you can just keep it as it is. Doing the same thing for the remaining leaves
that we have. Instead of this, if you want, you can also use
the black to make the leaves a little
bit more distinct. So you can use black instead of the white
and do the same thing. Now for the regions in here, the larger regions of the red gown that is visible
in between the leaves, I'll be adding a little
bit of white later on. Now continuing on with
the remaining leaves. You can clearly see the
white that we are using here to make the leaves
a bit more distinct. Is making the
leaves a little bit more distinct from each other. And so the leaves are separate, especially for the upper
part on the right side. Now let's do the outlining for
the remaining leaves here, the larger leaves
that we have created. Adding a little bit
for the insides too, overlaying it on top of the
mid rips that we created. Also going over the outlines of the stems that we created. And now, using this white
to add a little bit of highlights for some of the
small tiny dots on top of the red beerries
adding it here too. Now for the berries at
the top, small tiny dots, ensure that the red that
you use has dried up since we use thicker
consistency of the color. Ensure that it has dried up. Otherwise, the two colors might mix with each other and
create pinkish color, making this region
a bit lighter, adding a few more
strokes in here. Adding a few highlights for
some of the berries in here, small dots in here, Now, as I was mentioning, small dots in here for the large
section, for the clothe. And now we are going to add the highlights for the
remaining berries we have. This will take a
little bit of time. So continuing on
with the remaining berries we have with this white. Adding the whites on the
other berries on this side. Adding a little bit
more details for the simple patterns
that we created. So simple lines like this. If you want, you can also use a little bit of white to add more details for the midps
and the wins for the wings, like we did for the leaves, but I won't be doing it. I'll only be adding
a little bit of white in here just
beside her sulder. And with these, we are done
with the white for now. Now, in here, I'm using a bit thicker consistency
of the skin color, primarily adding it just beside the hair a little
bit for the neck. Adding it for her hands, too, to make the hands outlines a bit more distinct
a bit more clear. Also creating the resemblance of the fingers for her hand. Make this region a
bit more darker. Making the neck a
little bit darker. And yeah, with these, we
are done with this one. Adding a little bit
for her ear, too. Now going with the red colour to create rosy chicks for her. Extending it a little bit. Now, let's use the
water to spread it and blend it with the remaining
color for her face. Gradually blending it with
the remaining section, adding it a little bit
for her neck, too, a bit for her hands, extending
it a little bit more. Since we used water, it will march with the
remaining color. I decided to add a little bit more coloring for some of the
leaves in here to make it a bit more darker to create a bit more contrasting effect
for the green leaves and the fairy skin of the fairy using this olive green to add more leaves
for this section. So add a few more leaves
for this section. Making the outline
of her hair and the ears bit more
distinct with this. It the color has
dried up in here, I'm using brastpin
to make the outline, the physial feature of
her bit more defined. This is optional if you
don't don't have to use the breast pain or the fine do the outlining instead of it, you can also use the
darker consistency of the skin color to
do the outlining or you can leave it as it is. But by using this, I can make it a bit more distinct,
a bit more clear. So that's why I'm using
it. Adding the detailing for her fingers and the hand. I'll be using it to create
her eyebrows, eyes. Now, adding it a little
bit for her here, too. Adding more details for the
upper part of her hair. Now, using it to
create her eyebrow. I'll be creating closed
eye for this sphere. Instead of it, if you want,
you can create the open eye, but closed eye will
be a bit easier, so I side it to create this kind of simple
variation of the closed eye. Now for the lips, I'll be using a little bit of red
and create somewhat of triangular C. Instead
of using the red color, and here I'm using the red fine liner to make this process bit more easier and I will get a little bit more
accuracy with it. Also creating red
colored earrings. Making the seep of the leaves a bit more curbed
with the black. Also doing the outlining for some of the section
for the upper part. Making that distinction
of different section a bit more keger with
the black outlining. If you're satisfied, you
don't have to use this. But the we are done with
the Evergreen theory. I hope you enjoyed this. It was a lot of fun
to do this one, and I was not able to record
a small section of it, but I hope you can create
it on your own since I sold you the scene section in the
practice session videos. And yeah, I'll be seeing
you in the next video, the class conclusion video.
14. Class Conclusion : Congratulations on
completing this class and painting your
evergreen fury. I hope you enjoyed working
with watercolor and gauze and learned some new
techniques along the way. Don't forget to upload your
project and leave a review. If you enjoyed this
class, I really helps. Thank you for painting
along with me, and I'll see you in my next
class. Happy painting.
 Vishal Munshi