Transcripts
1. Hummingbird Class Trailer: Would you like to switch from copying reference photos to
creating your own art? In this class, I
will show you how to workout with several
reference photos, get inspired, and to create a beautiful dreamy
hummingbird painting in your unique style. Taking this class
will help you to simplify the
subjects is which is essential when you
are painting in loose style without
any pencil sketch. Secondly, you will overcome
the fear of white paper and we'll feel more confidence to enjoy the flow of watercolors. Lastly, you will develop your very own personal
painting as something which is not limited by a pencil sketch gains
its own personality. Hello, I'm Nina. I'm a Watercolor Artist
painting in loose style, also known as nyusikart
on Instagram. I started my watercolor
journey back in 2015 and spent quite a time mastering my watercolor skills and
searching for my style, so I have discovered the beauty of expression of loose style. I'm inspired by the
beauty of nature, and you might know me from my
expressive flowers classes. Now it's time to explore
new subject and this is my second class where
we paint expressive birds. If you're new to this
channel, welcome. Press the Follow button on
the top to to join me in this creative journey
and to be the first to know when my
new class is live. In this class I will show you in real-time all stages that
are from the shape study till the final painting of this amazing hummingbird where I share with you my
tips and tricks. If you are new to my technique, I would suggest first to
watch my brief to add more watercolors
where I show you in detail how to
loosen up your style, and how by adding more water to your watercolors you
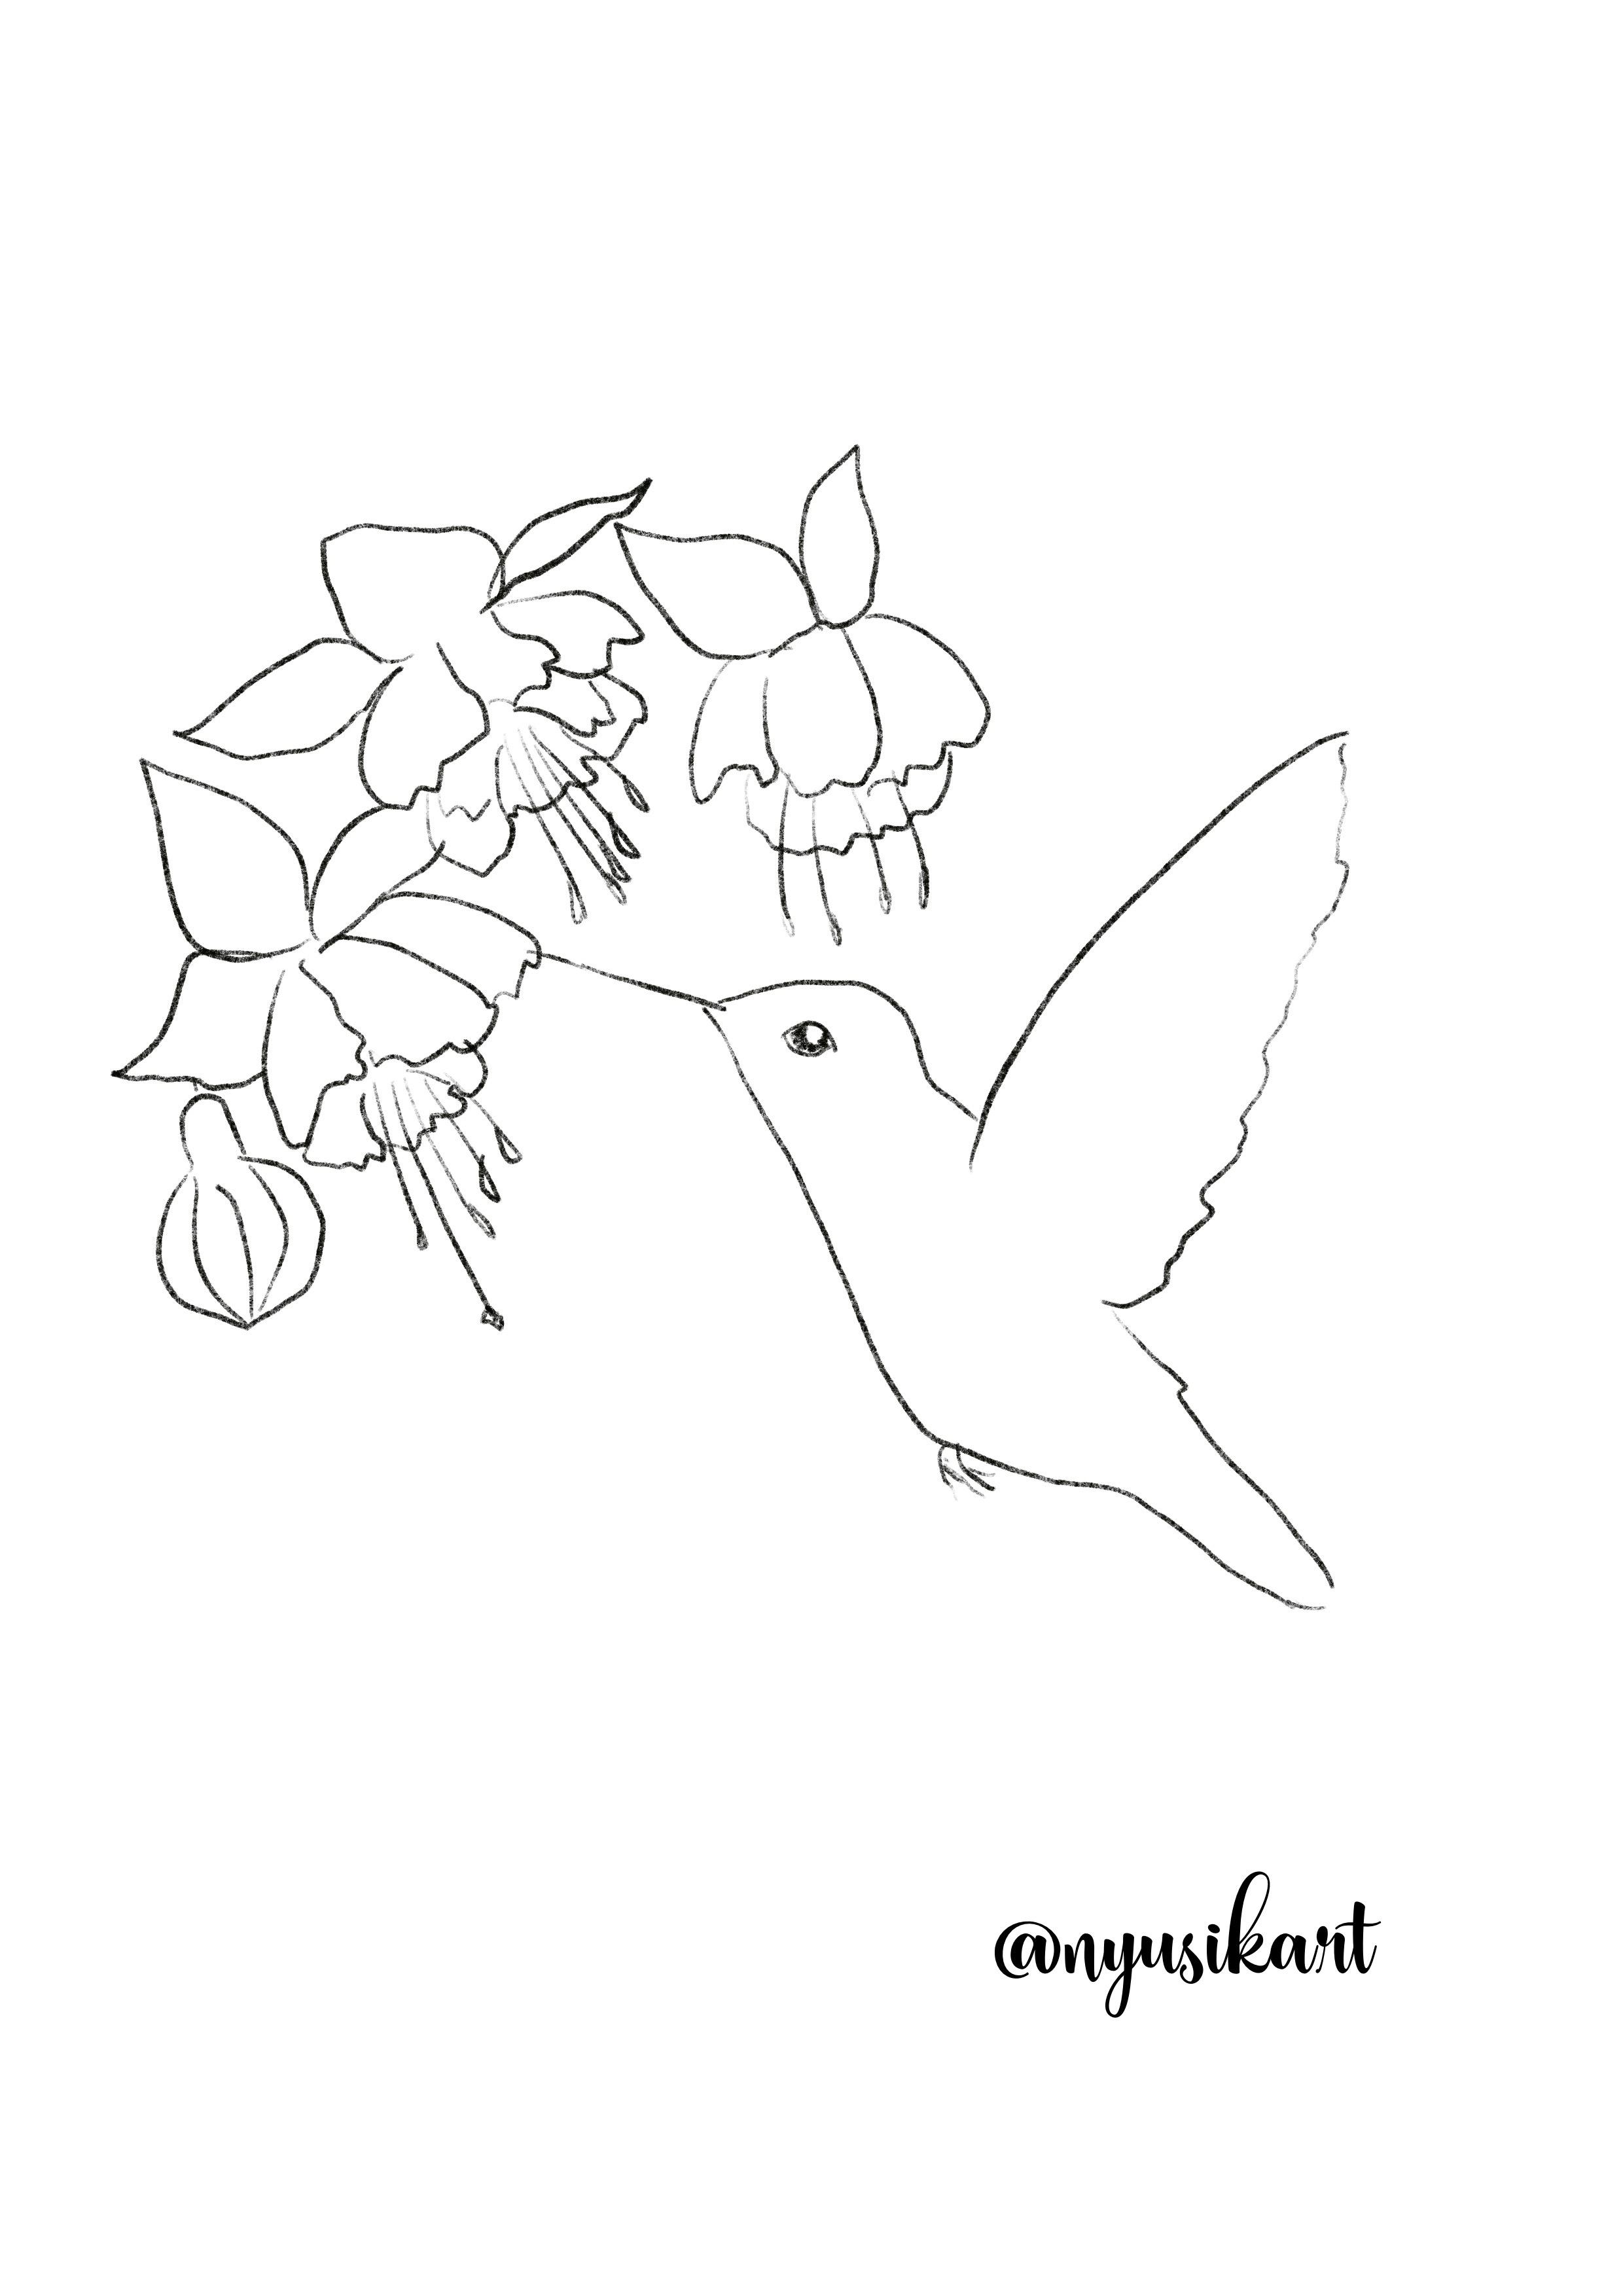
can create magic. If you feel more confident or when you have some guidelines, I also have provided
a template of hummingbird in the Class
Resources section. I'm looking forward to seeing all your paintings on
the Class Project page. I enjoy seeing them. Don't forget, I'm here to help you in case you got stuck
or have any questions. Are you ready to develop your very own painting skills and to grade your
unique painting? Grab your brushes, and let's get started.
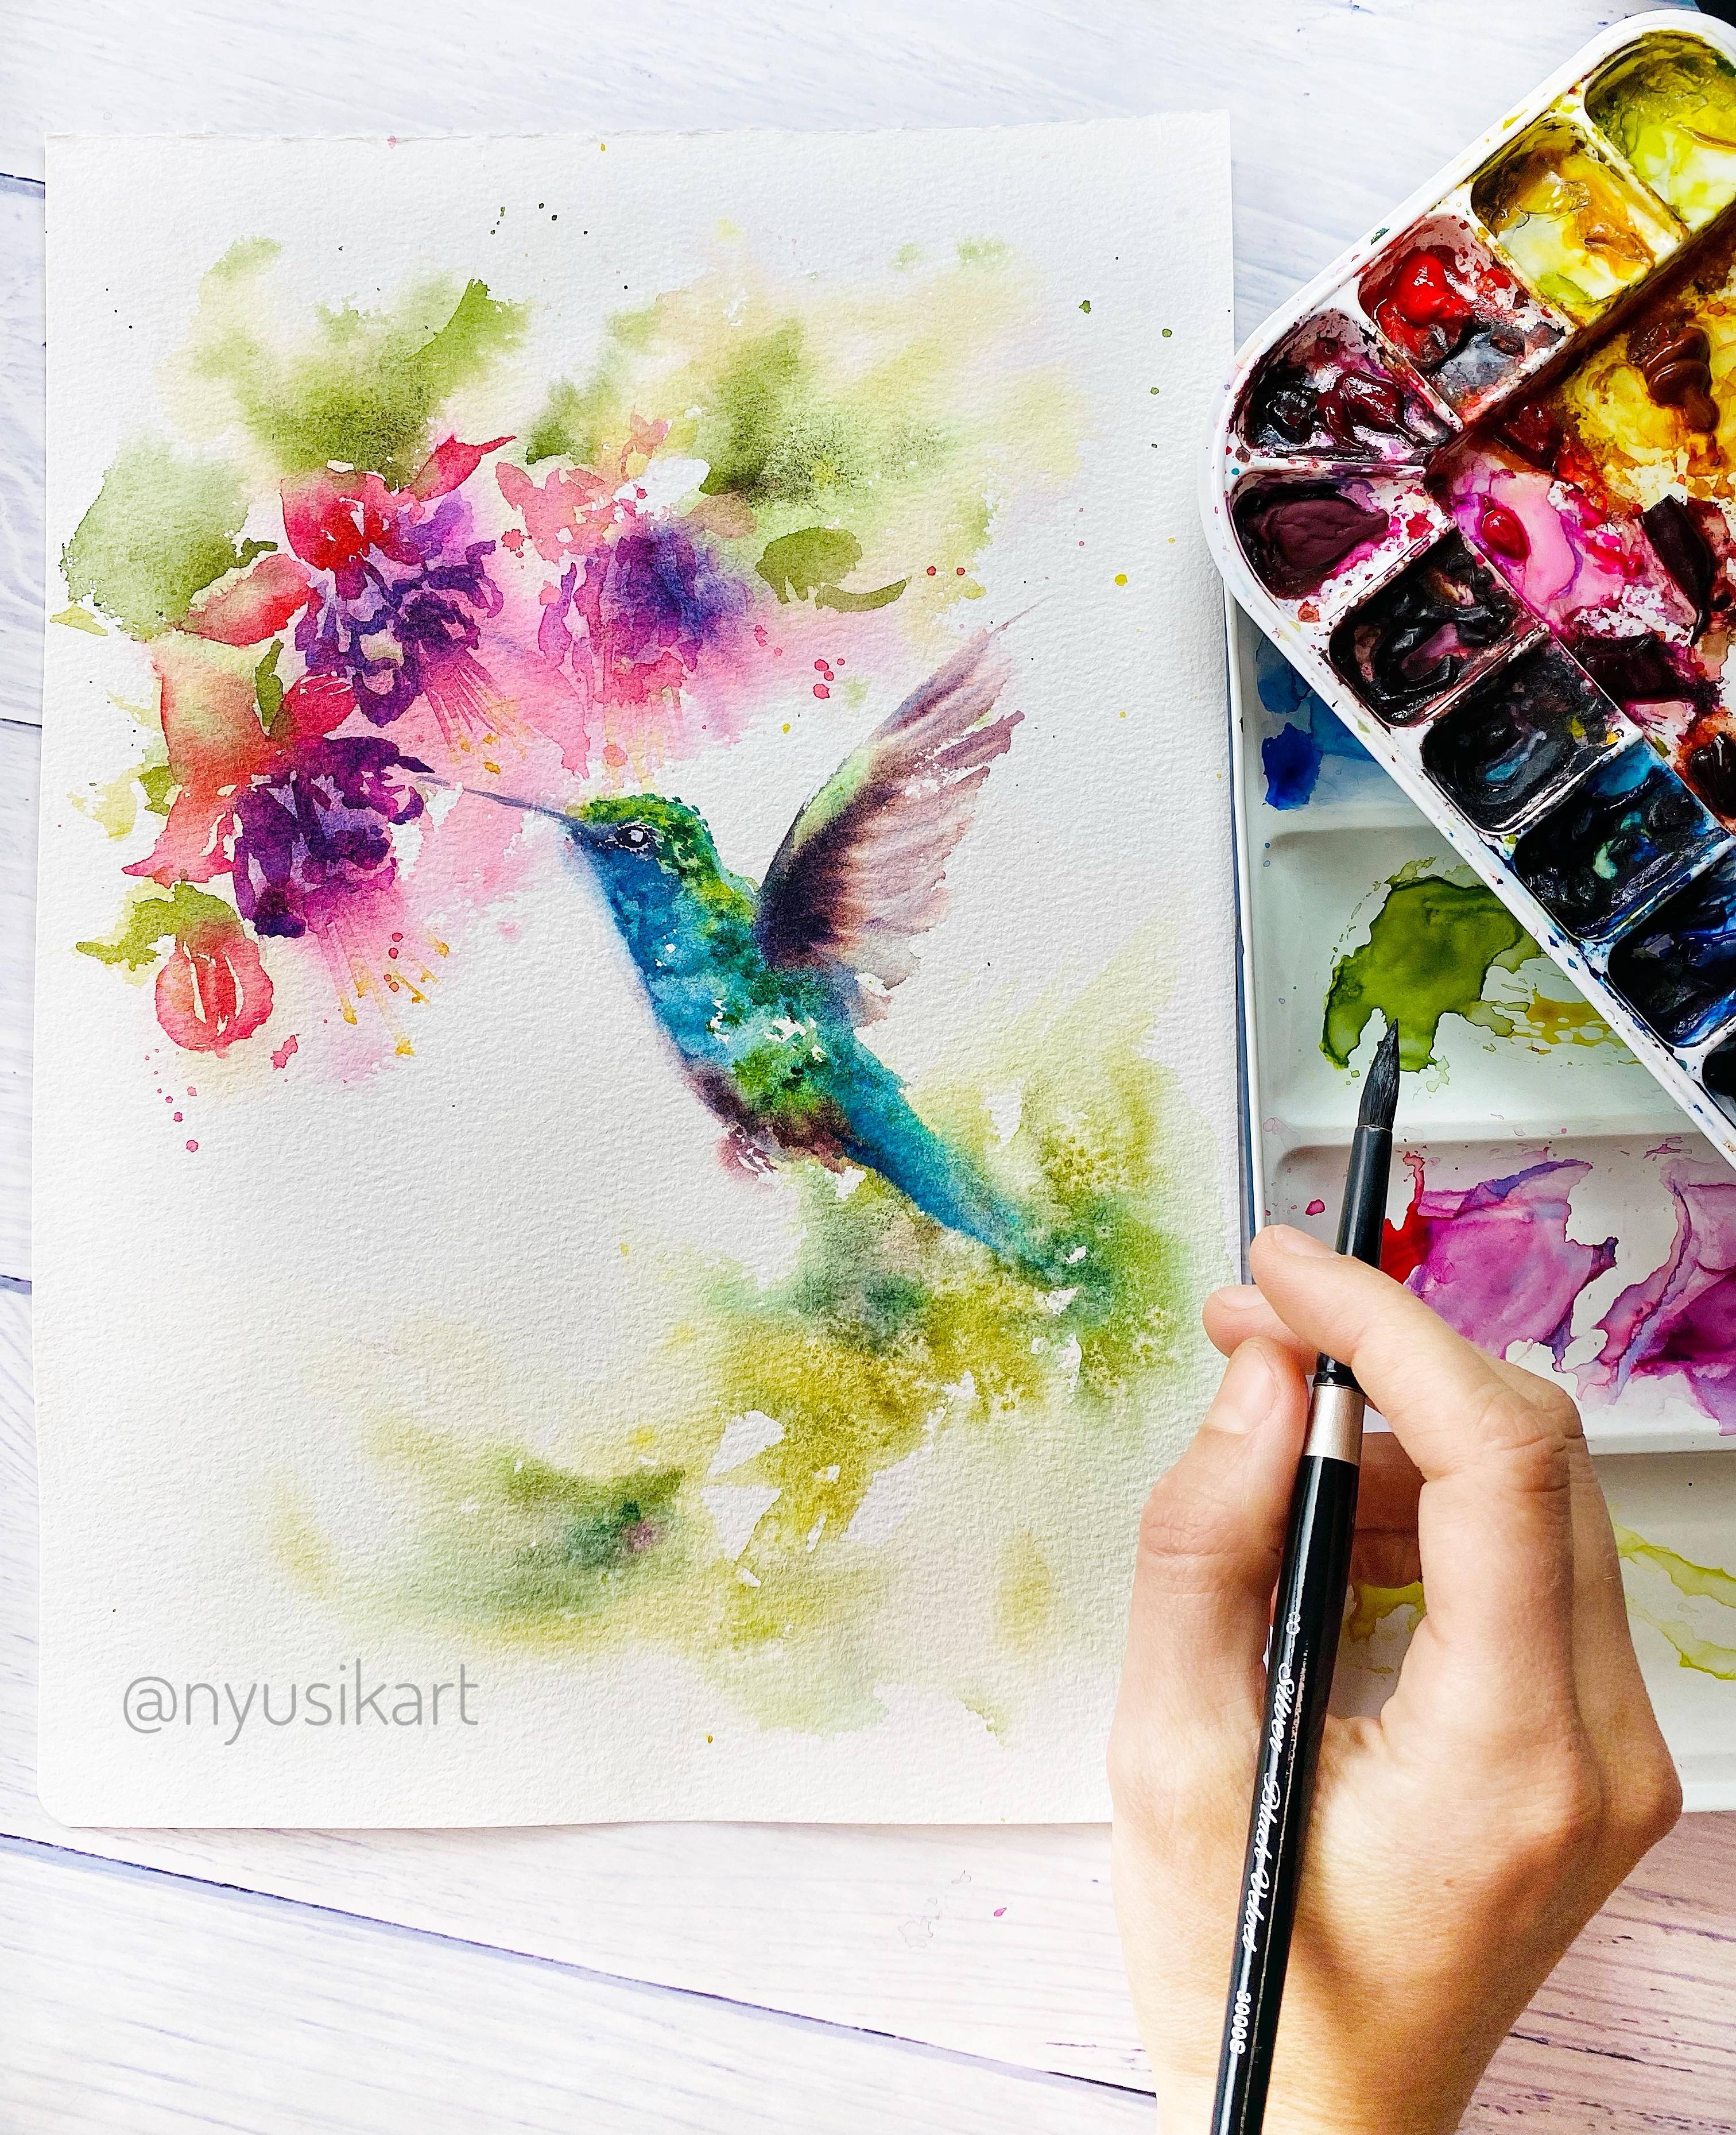
2. Materials: [MUSIC] Let's prepare
our materials. In this class I will
use watercolor paper, that is 100 percent
cotton paper A4 size, cold-pressed one. This one is from Etchr
Perfect Sketchbook. Then we will need
for sure brushes. Here I will show you
the ones which I will use along the class, my ones. That is mainly round brushes, Black Velvet numbers
4, 6, and 8. Also, some striper this one
is not necessarily at all, so just always two or three. These one will be enough. Also, I will use big
brush, mop brush, mainly that is for
making wet the paper. For the same purpose, I have also a water
brush with clean water. This one is medium size, mainly also to make
wet some areas or to make soft edge in some areas. Watercolor paints. The color so we will have a
look in a separate lesson. Watercolor palette or
just plain white plate. Ceramic plate would be fine. Water. I will use two jars. One for cleaning my brush and another one to rinse my brush so that to be sure that
it would be clean. We will need some office
paper or a sketchbook and pencil for our lesson where we are studying
the shape of the bird. Paper towels for removing extra
moisture and [inaudible]. So just prepare [LAUGHTER] your art materials and supplies. Let's start to paint our
hummingbird [MUSIC].
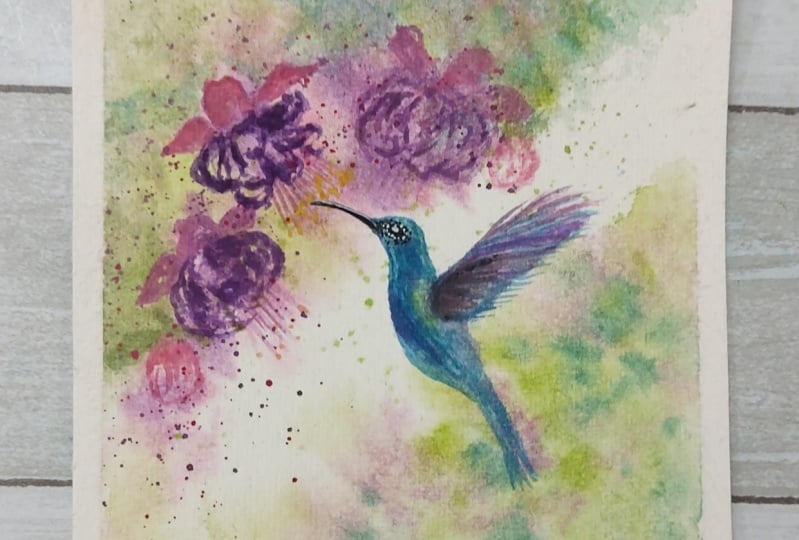
3. Simple Shapes Study: [MUSIC] Welcome to our
hummingbird painting class. I have got really many requests
for painting hummingbird. Here is this class, and let's enjoy painting
these really beautiful, tiny, fast, and strong birds. Let's start with
the most basic part of painting in this style. First is we need to study
really well hour subject, and we will do it
through simple shapes. In the class resources
section you can find several references
of hummingbirds, and you can choose any of them, and we can practice. I think that I really like
this one, this position. I will show you how we
analyze this position, and you would be able to
apply it to the other ones. I will use my
sketchbook and pencil, and that's how usually I work. I start out with first
just the basic shapes. You can see that here it
looks like this oval shape. You don't need to make
it really precise, but making this several
times your hand will remember the moment and it will find
find exact shape. Then we can see that here it joins with another oval shape. Here it is, another oval shape. Another thing what
usually you can do, you can take a pencil
and to measure how many these oval shapes in this can fit into the next one. This is one, this
is another one, and you can just
measure. Here is one. You can see that in the
body it's size of 2, like head oval, so that
is more or less the size. That is our body and now
we will have to polish it. First, let's observe the shape that here it goes
really like straight, and then it starts to bend. That is important to build
like this, the shapes, and to understand actually the shape because then once you will start with watercolor, you will see how to correct your shape and where
to lead your brushstrokes. Please don't skip this
[LAUGHTER] stage and paint. Another line is this one. Also you can see that
here is one oval, that is another oval, and it's like joined
by this triangular. Let's say this is
the triangular which joins these two ovals
more or less like this. Here is going to be the beak. Another curve here. Once it has joined
this triangular, then starts here, the curve of the body. Where another moment so it will go more or
less like this. Another thing that also, where it starts
this curve starts also the wing, so these parts. You can see for example here, you may notice at this
stage the mistake. I have bended it too early, so here I don't
have enough length. In this case, I will have
to check this this area. You know that what is missing
because now now I know that here it was too early. Here is going to be my wing. Like this you can check your
proportions by checking different connections between different parts of the body. For example, if we go over here, it's going to be first the head, then we have some part of body, and only then starts
their wing like this. This means is that
this wing goes here. I am following this line. For here, that is
our proportions. They are a bit failing because
this line is much longer. I think that I have done
really, like you see, that this distance is too long, and in fact it's not so long. Here is where it
starts like this, where the body starts to change. All this line is
this triangular one. Now it looks much better
[LAUGHTER]. Can you see it? That's why, don't
be afraid to make some ugly shapes
on your sketchbook because that is how you study the shape without any
constructions or whatever, how you can find your mistakes. Because sometimes
you are drawing or painting and you aren't
happy with the result, but you're unsure
what went wrong now, and how to find what
exactly went wrong. That is the way that you start checking different
parts of the body. Let's finish this area. Here it's more or
less like this. Then there is line for the tail. It's really important for
a painting in loose style to study really well the
shape of your subject. It's better to get mistaken in these sketches while
you're studying the shape than later once
you will start to paint, then you will discover that no, something wrong with my shapes. Yeah, it's also possible. [LAUGHTER] But then you will
know the ways to follow for how to correct your
shapes if something is wrong. Then the next part is eye. You can see that it's quite big. Remember to leave the eye light. Here it has like this shape
that it has some angles. This shape, and then bit by bit. Here you can see that
under the eye there is some blue color, a bit darker, and then the beak. You can see that again, if we will measure, here is the head and the beak is a
bit longer than the head. Here is going to
be more or less. It's quite straight, and being really tiny I think that I will leave
it just like this. For here we can also correct this shape, the head. Now, you may notice that also to correct the shape of the head, that it probably is
not so big like my one , and like this. Here we have our sketch. For here it goes more and
then it starts the wing. The shape of the wing
is really beautiful. More or less, it's like this. Here is my wing. Then we can see that over
here it's really dark hair, so also let's make it. Yeah, this has this
line is not correct, but I do not use eraser
so that don't spend so much time to go really
correct with everything, because at the end my aim
is to paint in watercolors. [LAUGHTER] Here we
have our rough sketch. Just play and see
the main thing. For example, this
distance, this point. This point, more or less
as they are that way. Another point, it
could be a beak, eye, and where starts the wing. By the way, yeah, that is another point to check
whether they correspond. Then the line between
an eye and the beak. It could be also
maybe like this line. You can see that it's
quite straight and then it turns farther apart. The lower part is
not so important, the only thing for sure, don't make really long so that it will look
like a really tiny bird. Just play. That is the
shape of the bird. You will see that once you
will make mistakes here, you will find them, you will correct them. You will see that once
you will start to paint without any pencil
sketch on watercolor paper, it will be much
easier because you will know already
where you can fail. [MUSIC].
4. Basic Techniques: In this lesson, we'll
have a look quickly at which watercolor
techniques we are going to use with our humming bird. Mainly is that
it's the same one, so which we have used
for choosing our colors. That is wet on wet technique when you are
adding paint, wet surface. Then you introduce
different shades, one color and into that color you introduce
another color. Here what is important it
depends on how much you would like the second
color will bleed, so if you wanted to
bleed it quite a lot, then you add it
immediately after the first color or just
wait till it won't be so shimmering this surface and then you can
introduce a second color. Another thing because that
depends how watery is you're paint so that
if it's really watery, then you can get some blooms. Let's make it even. My one is still wet, so with
that we still can play. But here it is and let's
see how it would be if I will take really thick
and concentrated color, so then that it won't
spread really a lot. It depends which surface
you would like to cover. Then you are using
the second color, more diluted one or
more concentrated one, so that you can
see that this one, for example, it's like with
water and still you can move. But this color, it
doesn't really move, that you have placed, it has
spread a bit and no more. For example, we can, the same really
concentrated one, we can add here and
it will stay there. That is one thing
which we are going to use and second part, we will need also to make soft edge so that your
watercolors won't look so hard. Also depends. In some areas, you need to leave them
with defined edge. But somewhere, for example, this is hard edge so that you can see it's really
a straight line. From this one just with water, when I'm touching with water, you can see that it
starts to bleed. The paint moves in that
direction where the water goes. Here is dry paper and it
won't spread anymore, but you can invite it, invite your paint and then
it will spread even more. Here it is. If you're adding too much water, for example, you have seen that
I have touched just with a tip of my brush. Here I have the color. You need to move quite
quickly in order to invite. You see in those areas where
I have touched the water, it has got really soft and I
invited the paint to flow. If you see that you
have too much water, just with paper
towel you remove. But for example, from this side, I add really a lot of water and you see that it was too
much water and it stays. It's not like here that it moves in the direction of water. If it's too much
water, then it stays. It doesn't move and
you can see once you will start to create the way out for the
water, it will move. But if not, it will
start to create these kind of
watercolor cauliflower, so like watercolor blooms. One more technique
which we are going to use that is actually negative edge technique that we will have some area and then, for example, we will start
to create the flower, the outer side of it and
here leaving some areas. Again, introducing
one color to another. That is going to be like, when we are going
to paint flowers, so we will apply this
technique of negative edge. Just play, It's really
quick and basic. I assume that you won't
find it really hard. Now let's move to the fun part.
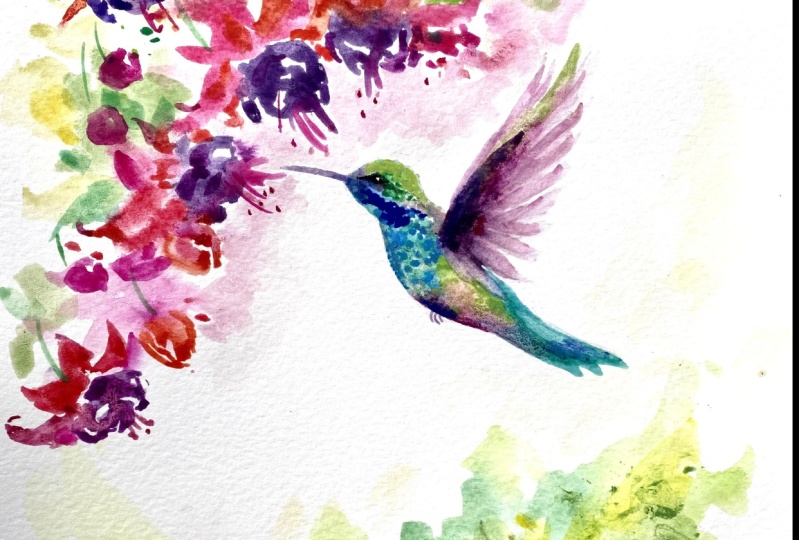
5. Colors: [MUSIC] Let's choose the
colors for our hummingbird, that is really exciting
because I love these colors. I think that I will do
something similar between this one in terms of colors because I like how
bright these colors are. Probably this blue area, I will leave the
way it is and here, I really like this area of really greenish
and blueish tail. Let's choose our colors. I suggest you too
take some watercolor. Paper maybe not so good
as the one which you will use for the main class
project and make it wet. [NOISE] Why? Because then once you
are placing your colors, you will see how they
blend one with another and which beautiful color
combinations that you can get. I will start with some here. I see that there is some yellow. My one is going to be Hansa
Yellow Light, I think. That is this color, and then it's beautiful green. For this green I may use, let's see, also this
color, I can use this. This is green gold. I have here olive
yellowish-green, but that I think it's not the
color what I'm looking for. I have another green. This one is really beautiful
green for these things. This green is called
Jadeite Genuine. That is by Daniel
Smith PrimaTek Syria. I think that I will
go for this green. Then here this really
beautiful turquoise color. For turquoise color, I will use color which is called
ultramarine turquoise. It's a bit granulate
and so it will give me also some beautiful textures. Then some blue. I will go for yellow
blue in this area, so that it could be a
mixture of yellow blue with ultramarine blue [NOISE]. It's up to you, the
one which you have. I have another beautiful color
that is cobalt turquoise. Here I can add
[LAUGHTER] this color. Now, it's like a
play with colors. Play them one next to
each other and to see which ones work well
and which ones not. Then for example, for this
area is really beautiful. I will try this one
is Quinacridone Gold. Let's see how it will work. This Quinacridone
Gold, I will add a bit of this Jadeite Genuine, which is also
really bright color and a bit more concentrated. It looks nice. Another color which [LAUGHTER] I have that is electric blue. I can add it because this
one is a shimmering color. It's like this, but
once it will get dry, it will give some
shimmering effect. Here it is. Then some violet. I have color which is
called rose of Ultramarine. This is beautiful
like Quinacridone. I think it's Quinacridone
Rose mixed with ultramarine. Here is the color that I
will use it for this area. But I will paint this one. I will use some this
shimmering color, electric blue, so
here for the tail. Again, I will add some Reddit. Or it's possible
also green gold. The colors, choose the
ones which you have because everyone for sure
will have different colors. I will show you the
ones which I will use. But in your case, have a look at the
reference photo and take the ones
which you like. By the way here this
one near the eye. This is beautiful, so color. We can use, for example, I think this Rose of Ultramarine mixed with ultramarine blue. Here, it may give quite
beautiful this shade. Even we can add some phthalo
blue. That could be nice. Or I have [LAUGHTER]
one more color, it's because I really
have many colors. [NOISE] This one could
be really beautiful. This one is sleeping
beauty turquoise color. You see this one really makes
the [LAUGHTER] difference. This one is really
beautiful color. For the wings, I will use
this shade like purple one, and for this probably
I will mix orange. Mine this one is
Quinacridone burnt orange, or you can use a burnt sienna
and to mix it with violet. Let's see what we will get. I think that here that is the
color what I'm looking for. Let's see. [NOISE] That is
where we going to be our wing. I would add a bit more of
violet here in this color. That is going to be my color
choice for this hummingbird. For black, I will use this
mixture which I have, that is a mixture of Payne's
gray mixed with violet. Payne's gray mixed with violet and you get
this really beautiful, it's not black, but
really dark color. That's what I usually use for. Here it is, this
really dark color. Choose your colors and finally, let's start painting. [MUSIC]
6. Loose Watercolor Background: [MUSIC] I have in front of me my sketch scheme so
that it will remind me steps to follow and also
my reference photo. I suggest you too to have [LAUGHTER] your materials
in front of you and probably first to watch the whole class then
you will know already step by step and you will be
able to paint along with me. I have a A4 size
watercolor paper that is a 300 grams and 100 percent
cotton paper called press. I will start the first day, I will add some background, I think that I will
keep on my folks here. [LAUGHTER] I'm making
a wet randomly, leaving some white areas. My composition
that here is going to be some flowers really loose style and then hummingbird
flying into that direction. That's why first let's
make the background. For background just use
those colors which you like. I will use my sworn brush
because it gives us some unpredictability
in brushstrokes and I really love it. I will start with opera
pink for here are some nice standard
colors, so far here. This could too
strong but anyway, I think it's nice light it
won't be so strong color. Next one is going to
be quinacridone rose. That one I will dilute a bit. Take those colors which you
love and play with them just placing here and there
also making some splitters. That is the joy of painting [LAUGHTER] the only thing
if there is something really important you
have nearby just use paper towel to
remove these splitters. The ones which you don't
like also you just remove them with paper towel. I will add another
pink color which I have that is the neat genuine. Just also several
dots and I will add another a bit darker shades
that is going to be like my rows of ultramarine
more violet color that I like to create a shape that is more like you see that really
loose and abstract. But the idea to transmit, in my case is that
this folks here, I remember how they are, the colors and a bit more
of a violet in some of them and that's what I'm trying to transmit when my
painting really loose one. I will add some olive green. I really like this
brush for brushstrokes that they're very unpredictable. Then you don't spend
so much time making something very detailed, that part has got already dry. I will add a bit more water. Here we will add a bit more, I think here this way
so that to bleed a bit. That is going to be gorgeous. Then I will add a
bit darker green. In my case, that one is called apatite genuine in some areas. I think that some splitters
of green here and there. This one's I have got them just on the flowers
you can remove. Just with paper towel while it is still wet you can remove. Also if you want we can
add some highlights while our flowers are wet. Just always clean brush you remove extra moisture
and add some. But I think that I really
like this because I really like the they are. For here I'm missing something darker so
that to balance, this is really bright and
this one I think that I will place just somewhere over here. This is rows of ultramarine
a bit of normal violet that somehow to reflect that top part with
this lower one. I'm missing some green
area so I will use that shady which I will use
later in the bird. I will use it also here
in the background. Here we have our background. If you wish you can use some salt to create
some textures. Just making wet and
making bleeding. I think that looks nice. We can also add some
splatters of yellow then I think it will
make it more live. This is nickel AZO yellow like this and here I will add
a bit more of olive green. I think like this now
I'm happy with colors. Create that background
to which you feel like. That is all you're
feeling playing with colors, with
water bleeding. With the background
don't worry and don't overthink just
play with colors. Now, let's move
to our main here, that is our hummingbird [MUSIC]
7. Watercolor Hummingbird Body: [MUSIC]. While my background
is getting dry, I also will place some salt
to create some pattern. This one I leave the way it is. I really like how it is. Let's start with
our hummingbird. I have in front of me
the reference photo. It's quite important to keep it small because if you
will have it really big, then you will tend here also to transmit that
size really big. That's why I don't
worry if you don't see really well how it's the shape of eye or whatever
that keep it small. Then here also, you won't fail into adding
too many details. We will start first with eye, then we will move this
part of the head. We will add beak, and then we will keep
on adding the body. I will take my smaller brush. This is number 4, and I will use also water brush. In considering that my bird
is going to be somewhere, I think that it's going
to be somewhere over here that I will place it this way. It's going to be here, an eye, the body, and here is going
to be the wing. Let's prepare our color
mixture that is going to be Payne's gray mixed with violet. Here I have some
really dark shade. That is like, let's say black with violet shape
or a violet shade. So here I have and
you cannot see, but I have made wet
this area and I will start to create the
shape of an eye. I will start adding. That is a beauty how from just one tiny dots starts
to appear as a bird. Here is my eye. At the moment I'm
going to leave it t, and I will use more
Payne's gray diluted. I will start to make
Z area around eye, so is on some dots
and said generally it has eye going
into that direction. Don't worry because my
eye has got really big. Later, we will correct it. That's why I don't
worry about this part. But leave for wider areas. In my case is that it has bled and has disappeared
at the highlight. I will remove some paint
with a paper towel. I make like these really tiny and remove it
with paper towel. For my colors, I will use
this bird, this colors, because I really likes them, and the shape from another bird. Here it's really important to
keep the shape of the head. First, I'm using
that reference photo with the body which
we have sketched. I'm making with water
the shape of the head. First I'm making it with water. Then once I'm happy with
the shape which I have got, then I will start
to add the color. For here, the beak would be into that direction
and then it goes this way. I will start adding those color, which we were talking, and that it's going to
be cool shade of yellow. [inaudible] yellow
light. This way. For here also, somewhere. Next one, you can add olive
green or I have green gold, that is also beautiful color. Let's add some green. Play with your greens and check the ones which gives
you beautiful shades. For here, I'm placing
these beautiful green. This one is shaded genuine. Actually I don't use
really a lot this color, but for painting hummingbirds
it's just an amazing color. Really, really beautiful. Next one, let's add here
some turquoise blue. Like this. This one is nice color
and some Phthalo blue , a bit stronger. Over here. You can see that
now I can correct the shape. Then I will add
some darker color. That is going to be the mixture of Phthalo blue with
ultramarine blue. For here, I just
will add this color. Let's keep on painting the body. But do you remember this
area where it was starting, that here it was like, this finishing the
heads and there was some area of the back. Here it was really
straight line. Again, also check this area between the head
and doing this shape. It also will help you to
paint correctly there to get correct shape of the wing
and of the body as well. Here I have the wing
and this one is really, really long and this
is that with water. I'm correcting the shape. For here, then it
starts to be like this just a bit and
goes this direction. I hope that you can see
how it's like this. You can see, that with water, I'm making the
shape of the body. That for here and then
goes here to the tail. Now let's place quickly the colors while
everything is still wet. Here is going to be
my cobalt turquoise. Here, it is. Some [inaudible]
genuine for here. Then I will add also some
ultramarine turquoise, like everything will
take of from here, no. For here, a bit darker color. You can mix them
with a bit of violet and [inaudible] so that
this shade would be darker. I have taken this violet, which is also of ultramarine, I think it looks more beautiful. Here is a shape of body. Use those blues which you have, those ones which inspire you. [NOISE]. More blue. My electric blue, that this will give me
some shimmering effects. Then I will place a
bit of yellow here, and then a bit of
green, radiate green. It gives really, really beautiful,
this bright color. You can place also this
yellow a bit over here so that also to create this
really shiny color. My paper is still wet that's
why I still can do this. Again, a bit more of
this, which I did. Feather like dots, how I'm placing because
you can see that actually the shape of
feathers goes this way. Also with some Phthalo blue. I will add here this
shape of feathers. Just I need those and
change colors then my turquoise and in the lower part, that here is it really green. Then here it starts to be a
really beautiful at tail. I'm making it wet for my tail. It's going to be here. This top area is
really beautiful. This shade of blue. I will use this, my
Sleeping Beauty. Let's see which shade
it will give me. I think that I will
use also my electric blue because it will give really beautiful
shimmering effect. That is this color, like this. Somewhere over here a bit more. It looks beautiful this bird. The next part here, I will add some dark shade. I think that is going to be rows of ultramarine with some brown. In my case, this is
piomatic genuine. Or it could be burnt sienna to make warm shade of
brown with violet shade. Here I place this color. Here there is a shadow. Like this. My bird, probably it's a bit too
long. I don't know. Let's see. Because here also I see some other
shade, maybe blue, Phthalo blue mixed with some
orange it will give green with orange then gray color. For here, some or it could
be also some Payne's gray. You can place over there. But I will make it blue so that the movement and it won't be possible
to see it so well, so, yeah, like this. With some other brushstrokes, this is going to be cobalt
turquoise and like this, so that it's like flying, but you won't see it
really properly is a bird. I have one color. I think that it will
go really well with a tail that is a lunar blue. I think that's what
I'm looking for. [MUSIC].
8. Adding Wing, Eye and Beak to Hummingbird: [MUSIC] Perfect. Let's add the wing
and then we will be back to our eye and beak. [LAUGHTER] Here I will place also some
yellow in this area. You can see it and a bit of this jadeite or the [inaudible]. This colors, place
in over there. Then I can see that here
is really a dark shade. I will use that
mixture of rows of ultramarine with it
could be burnt sienna. Here I have this color
and I will use it for this dark shade of violet. Here is a mixture of violet, always [inaudible] burnt orange, in order to get some
beautiful shade of brown. Here I have some
chocolate brown. That is my aim and here I'm
checking already really, well my reference photo with
the position of the bird, that it goes like this. This is really important now, because we will have
to make really quick. [LAUGHTER] Very
quick brushstrokes. Here I have my color like this
and this one, it goes up. Just play with brushstrokes and then we will
make lighter ones. I think that I will
add more violet and more watery paint. Yeah, more watery paint. These ones, I will make
them, these brushstrokes. They are really loose. Yeah, and here I think that
to make it a bit darker, probably I will
place it directly some violet in this area. Here is that, while
it's still wet. Here is my wing and let's
come back to our eye. That here I have really
dark shade mixture of, Payne's gray with violet. This time it should be
really concentrated paint. We don't want it, bleed so that it will
keep really well the shape and I start
making the shape of eye. Do you remember
about highlights? Later we will add with white
gouache, lighter area. That's why. Don't worry. Here is eye more or less, I see this shape. The only thing
that I think that, I have placed it too close
to the back of the back. Let's make these
lines, leading lines. It's like dots. I'm
placing more dots. Here, I will start the beak. You can see that in
my case, this area, I have made it really
white. You can correct. In case you have
really good paper, you can correct this. Clean water and flood brush. Then you start
lifting this color. I'm making it wet and
start lifting it. [NOISE] But being blue, it is going to be
quite complicated. But anyway, we will try
to remove some parts. [NOISE] I'm removing some part of paint and then I will
make another shape. That is how you can
correct the shape once you aren't happy
with your shape. Another thing we can do
while it is still wet here, to add some lines. Just use a flat, synthetic brush
lifting some color. Now, this part I
will let it dry. Because this part I will let
it dry so that it won't. Here I will correct also a bit. It would be like
I will blend it. You can see like this. We're like, actually we're like sculpting the shapes now. Here is really important. Now, the beak. It's going to be. You can see that it's more goes on the top part of the eye. The beak is going to be
more or less this way. [NOISE] It's really long, so I will make it like this. Like some interrupted. Here, I will leave it, so it could be some
light falling. Here is my beak. If you aren't happy
with the shape, you can remove it with brush. Just lifting the color. At this stage, you have
already your bird and you can move already
correcting the shapes. For example, the shape of head. We can correct, there's some dark areas. It will give the contrast, just like with dots, which remind us of the feathers. It will give them the
contrast. Here, this. Then let's add, here we can blend a bit. This area, we will need
some darker color, like yellow blue with ultramarine blue with
a bit of violet, this kind of shades. Here, that is the
important part. [LAUGHTER] We will
start to correct. That I make with dots, area around the eye and now the line so that to correct
the general line of body. I'm moving here there with my brush and then end the area. Here it goes really, straight. Then in the area of the wing, it will start to separate. The same color I'm
adding to the wing, so that to join it a bit. Then it turns into there or
there's feet. There is feet. Legs. This I will leave the
way it is without blending. I will add more contrast with
my jadeite yellow for here. That also it will be more
like under their wing, that it would be darker. Like this, some areas you
can blend away, this way. Then I will add more
contrast to my tail. I will use electric blue
with the Phthalo blue. Here in the lower
area, like this. I will need to darken this area, so I will use violet, mixture of violet with my [inaudible] Or you
can use some brown, any brown which you
have and the violet. Here it also will blend. Here we have our hummingbird, we are missing to add some legs. That is going to be, I will use the same mixture, that is, I think violet mixed
with burnt sienna. With this mixture, I'm
just adding really slight, so that it will look like
[LAUGHTER] the three legs. Yeah. Also if you
aren't really happy, you can blend them away, then it would be
lighter like this. This way. Actually we almost
have our bird ready. We can. Let's wait again, till it will get dry, this area. What we will need to add, that is some several brush marks to create the illusion
of the flowers. Here to make a darker
shade of the body. At the moment, I will let it dry completely
to my hummingbird. [MUSIC]
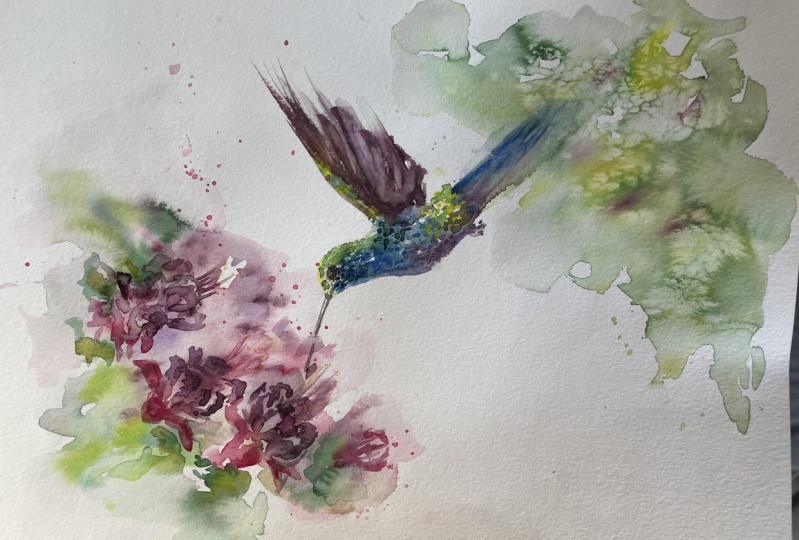
9. Adding Watercolor Fuchsia Flowers: [MUSIC] My hummingbird
has got already dry, and now we can add several details to our fuchsia
so that they won't be so abstract and to add some
definition so that it would be clearly [LAUGHTER]
that is fuchsia flowers. In the class resources section, you will be able to find the reference photo which
will help you with shapes. I will use more or
less different shades of pink and purple. I'm using my brush Number 8. Here I have some
mixture of opera rose, rhodonite genuine, so
different shades of pink. To get some beautiful
shade of violet, you can mix it just
with ultramarine blue and here we have some
beautiful shade of violet. Use a negative edge to add
several lines so that they will imitate the
shape of the flower. Here, just always some
simple brushstrokes. I'm checking all
the time the shape, which I have it in front of me but I do not really keep it very realistic one because
my aim actually is that. Our focus point will
be on our hummingbird. Here this part of the flower I'm bending my brush in
different directions so that to make different
brushstrokes and generally so
that the shape of my flower would look quite
pleasing and natural. I'm mixing again, opera rose
with ultramarine blue to get some violet and in some
areas I add this violet. Also just check the
photo reference or up to you because there are actually many different
shades of fuchsias. Here I have. Add probably
a bit more of quinacridone rose so that to get different
shades of this color. This one is really
beautiful color and here. Later out of this flower
center there would be some petals so I will try to
make this area a bit darker. Even can drop a
bit of violet here in the center with a bit of, this is quinacridone
rose and to add a bit of violet or use ultramarine
blue to get darker shade. Add for here, so that in some areas it would
be a bit darker, then it will be
beautiful contrast. Let's add this outer petal. They're a bit different shades. We will have to mix
quinacridone rose with a bit of red color
or orange or yellow. In this case, I'm adding a
bit of a pyrrol scarlet, and here I have the color
which is quite gloss. I start to add the shape. Here I have my water brush to dilute it and in some areas
to add stronger color. Usually it's closer here
where it's connected the color is stronger
and that can mix a bit more of this shade. That is a mixture of pink
with red. Here it is. Then I can make even
first with water, you can correct the shape. Here is more or less the shape and I just drop the
color and from this side. Let's add here from the flower because these
ones are really big. Actually, while it's still wet and I have here the color, I can take out this just with water to
take out these petals. They have on the deep
some light yellow color. Here we have and also I will add a bit of the same color
which I have used here. Here I drop in several so
then they would be connected. This color and this color and the flower will
look more harmonious. Like first this one
because is a bird, actually is more interested into these fuchsias and
this one we will leave it a bit at the back, so it will be further from us. Let's make the skirt. [LAUGHTER] For me, this shape looks really
like a skirt [LAUGHTER]. Beautiful one. Let's mix some pink color with
ultramarine blue, that was quinacridone rose. Let's create the shape. A bit more of pink color, that is opera rose. I'm making it a bit
bigger so that it will correspond a bit the size of
the flower with the bird. [LAUGHTER] But actually
the bird is quite tiny and like this. To the flower, let's add
some darker shade of violet. For this I will mix
quinacridone rose with ultramarine blue in more
concentrated color. Here it is and in
those areas here which are a bit darker, I will add and also some violet. [NOISE]. For here we have, again, pink mixed with some red , and the same. It will make interesting shapes. First I make it with water, and then I just add the color. Add from this side. Here are some they will
blend one with another. More intense red
color in some areas, I think that would be nice. For here, for example, and here I think
also could be nice. Here we have second flower and I will need to do the same
just to take out different, use water, different pistils. At the end, I will add
this Hansa yellow light. In some areas, I'm using
quinacridone gold. That they won't be
almost invisible. That's why some of them, I make them visible. This flower, I will
do it just with several brush
strokes. The shape, this way, here, exists so that it would
be really subtle. The same with water, I will take out their pistils. To some of them, I
will add yellow, that is quinacridone gold. Add somewhere. Not all
of them, just several. Color in some areas and
here where it's a bit darker also we can
introduce another color. Here we have our folks yes, at the moment they aren't really incorporated in our background, so that what we can do is to
add several brushstrokes. I will make wet, this area around folks, yes. Especially these ones. In some places we will
add more contrast. I will use olive green, add somewhere over
here because they have also some probably
a bit cool shade. I can add a bit of Tello blue. Yeah, to get this
cooler shade of green. I will use that strong green granulating
one which is called apatite genuine in some areas. I think it would be nice, somewhere to add the bird. I assume that for example, for here, I will add the
bird, it could be nice. I will mix this the
same color, that shade. That is quinacridone rose with
a bit of a spiral scarlet. Here we see that
it's more or less, this is in dense color. I think it should be more pink. In some areas, it's going to be like this. I see that my flower is really intense in color so I
just can remove some. Don't be so strong, I just remove it
with some water. Finishing up like this. Yes, seems really nice. We can add a bit
stronger green in some areas it depends
on your painting. Maybe you don't need to
add any green already. Here's some leaves. I think like this, it looks really beautiful. In this area, we can
add some splatters. I would add some of the same color so that
to show at the back, there are some more
of these bulbs. Here I have my splitters, if there are some splitters
so which you are unhappy, you can remove it, but you
need to act quite quickly. Let's solve this part of the painting which is
really loose and abstract. I won't do anything, I will leave it the
way it is because it's like feathers on our
bird and our focus is the bird and [inaudible] Our painting is ready and thank you very much
for painting with me. In the next lesson, I will
show you how it's possible to fix something
with watercolors, which you cannot remove
well with water. [MUSIC]
10. Watercolor Problem Solving with a Magic Sponge: Hello, welcome back. This I would say
like bonus lesson. I will show you how it's
possible to correct to some level, certain
level watercolors. Once you cannot remove
it already with water. For this, there will be
several conditions needed. First one is that you're painting because that area which you are going to correct, it should be completely dry. In my case, I'm talking about this area so that when I
was correcting the shape, but because the blue color
is quite staining one, it's really difficult
to lift it. Let's try if we will manage
to lift and to correct the shape by using
some external tool. In this case, is that is this magic sponge
which helps you to remove the paintings of
your children from the walls. That is you need to
look for this sponge. Then you can cut that area
was that part which you need. Be careful because if you
haven't used it when it's dry, you can break it easily so
that's why be quite careful. We will need some water also before touching
your painting, it's better to use on
some separate piece of paper so that to see how
it works and to dry. Again the conditions
that this should be dry. Then you take this
sponge because usually, it's quite resistant and hard. The ones you will
place it in water, then it starts to be already, you can see quite soft. This part is still resisting. Let's see whether
we will manage. Usually, I don't do this step, but sometimes you need
to correct [LAUGHTER]. Let's see what we
will manage to do. You can see that here it removes like it lifts as that color
which is in that area. You can see that actually
here and bit by bit, we're removing that line. Squeeze quite well
water from your sponge. Here is my final painting after I have corrected
that shape a bit. Generally, I usually don't do it because while correcting actually some watercolor
marks as they are beautiful so that
nothing is perfect. Our watercolors also
aren't perfect, but they are alive
because they transmit that flow of watercolors. Once you have manipulated this, also it depends on
your papers that is really important as a
quality of your paper. If this one is 100 percent
cotton paper and it will survive this sponge. But in case if you are
using a cellulose paper, what you can face is that
it will start to get some small Bolsa of paper rolls. Then it tells us that, that quality of paper
isn't really good and is not suitable
for this trick. Once you have corrected and you are happy
with your shape, I hope that you are happy
without the usage of this sponge you
will have to live it till to get completely dry. I'm looking forward to
see your creations in the class project
section [MUSIC]
11. Final Thoughts: Thank you for joining
me in this class. I do hope that you have enjoyed the process and also you are
happy with your results. If not, just try again, choose the reference
image here which inspires you and paint
is the way you feel, trying to apply the technique
showed in this class. I encourage you to
share your creations and possible difficulties
which you have faced in the class project
page and I will do my best to encourage you and support you in your art journey. I will be thankful if you could find several moments to leave a class review since
this inspires me to create new classes
and improve them. I'm super excited to see
what you have created. If you're going to share
your artwork on Instagram, please do not hesitate
to tag me and to use this hashtag so that I
won't miss your artwork. If you feel like,
keep on exploring loose style of painting
without pencil sketch. here on my channel,
you will find a big collection of
watercolor classes. Just [LAUGHTER] dive deeper and enjoy your
watercolor practice. See you in my next class. Bye.
 Nina Nyusikart Watercolor, Artist| Art Therapist | Loose Watercolor