Transcripts
1. About that class: If you have the inner
desire to jump from beginner level to
advanced, welcome. This available class is
divided into three blocks. Modeling, texturing, and
particle system explanation. Now allow me to tell you why this class is worth your time. Firstly, we're going to delve
into the world of modeling, where beginner friendly
techniques will help us to turn the blender default
cube into a delve tug. Section number two is
all about simplicity. Here we are going to brief life into our project via text. Of course, you can expect more than adding simple flat colors. You'll learn some no chains
for deeper materials. After section number three, you'll feel like you've
taken on a new level. Because here we'll
figure it out. The particle system settings, if their complexity
scared you before, not after that class. Be sure of that with examples. I'll explain them in details and you understand it better. We'll create realistic four and an Afro hair style for him. The most pleasant
party that will apply your knowledge
in practice, be creating that cool doc that you can come
up with a name for. I encourage you to share your work after
finishing that class, to inspire others and remove their hesitations
about trying three D, for whom this class requires minimum knowledge and
experience and blender. But if you never touch
it, don't worry. A stubborn attitude
a little more time and you'll get it to
at the end of the day. What if not solving difficult
tasks will help us to grow? That is the type of result you can expect to
have at the end. In conclusion, let's have fun through learning and
improving our skills. Get your great mood. Coffee,
your tea, and let's start.
2. 1.1 Head, Eyes and Cheeks: Hello everyone and welcome. This class is going to be
divided on three blocks, Modeling Materials
and Particle System. Right now, we are in the block number one, lesson number one. Under this class, you
can found a Z file with some references and
please download it. Also, everything
that they press, you can see in the left corner. In case if you have
any questions, just take a look right here. One more thing before
I want to say that I really try my best to make
this class very useful. And especially if
you're a beginner, I'm looking forward to see
what you've done at the end. But right now let's start. Choose everything and deleted. Then we go to the one in pat
and shift a image reference. Choose the folder with where you downloaded the
references under this quest. Okay, let's go with
the F body number one. Don't change the scale
of the everything else, just go to the data properties. And here, switch
on front, front, check in only x is
aligned. What is that? If you're going to be check off, we can see our image at
the different angles. But if I'm going to keep
this one with check in, I'm going to see only when I
bring myself from the front. You then let's go
to the opacity. Let's go with 0.4, Let's go the shift A image. Let's choose the second one. We're going to do the same
thing only before we go with the 90 front front check
in check 0.4 Great. Now we can see we
have both references. Let's save our file before
we're going to move on, which means control
choose the folder. I'm going to call this one,
do I already have this one? I'm going to keep this one of
dope to save blender file. Great, let's start with
our modeling shift. A mesh and choose round cube. You probably try
the same thing and you found that you don't
have a round cube. You think that I lied to
you, but don't worry. Let's go to the Edit
Preferences ads. Be sure that you don't have
any check in. Right here. Press in the search
tab extra and bring a check in on
the mesh extra object. Now let's go one
more time together. Shift a mesh and round cube, Go here in, the properties increase the radius toward one. Good out, let's call this
one D. Underline head, great, right click,
shade, smooth, co control to bring the
subdivision surface modifier. And let's go up with a G T. Let's go to the edit mode now. Let's bring the
check in right here. Take a look at the object, at the difference check in check of the difference is when
you turn on this function, it will show you the result. If the modifier will be applied, we can apply the modifier, or we can just turn on
this function and we will see the result if the modifier
is going to be applied. I hope I explain this one
clear H, choose everything, and we go with the x and make
it thicker on the X side. Let me move a little
bit above X like that. Then we go 300 P. Let's go with the I a little
bit inside like that. What are we going to
do next? We're going to apply the symmetry
on the X one, Which means if I'm
going to move, for example the vertices, this one will move also. I am right here. What we have
as our purpose right now. We're going to choose these vertices that
are on the border and we're going to feed
them under our reference. Probably will put some music on the background but
there is nothing card. Just choose the vertices, move this one toward the line. Let's go with this
one right here. Let's go here because of
the chicks we can see, but don't worry, just somewhere
right now will be great. Then you go to the
transparent mode, which is at who are you
choose these vertices, we go with the Z and a
little bit higher like that. Okay, let me go with this one a little bit up 300 and
P for the side view. And let's do the same
thing right here, G, Good. I hope you're doing well. Let's choose this one and move a little bit higher
what we have here. I'm going to choose both of them and go a little bit
behind the same, right here, probably right here. Let me check,
everything is on point. Despite this one right
here, a little bit lower. Now they are good. One appd one more time here. Everything is good there. Everything. No, it's non good. Let's choose this one
just a little bit lower. Don't worry, we don't have
to make it like perfect. Perfect. But right now we
are under our reference. Let me check. Yes, great. We finish with our
head quick and easy, then out of the
transparent mode, which means if you don't know if this one is gray, that
means that you are out. If this one is blue, that means that you are
in gray for the out, out of the edit mode with
the object mode and let's go toward our eyes
need not ties, especially if you're a beginner, Completely completely
beginner that objects usually appear where the three
decursor is placed. Let's save a little
bit of our time. Let's go to our D
shift right click, Set the three
decursor right here. Shift a guess what? Of course, round cube, but let's go in the settings and decrease
this one toward. Then you go to the control E for the subdivision.
Surface modifier. Turn on this thing, right click, shade smooth. As for a scale, here we
are a little bit smaller. Three, Empt graded is in
the perfect position. Probably GE just no, everything just is perfect. Then then we go to the modifier. Search for mirror move this
one above of our subdivision. Surface modifier,
choose mirror object, head of our duck. Now we have two eyes
instead of one. Let's call this one ice. Great. The last thing is the cheeks of our
duck. I got my tea. Wait a second. I hope you also have
your tea or coffee. Let's bring this one a back, which is shift cursor
to world origin. Shift a mesh where
you are round cube. This time again we increase
toward 1.4 Great control. Right click, shade, smooth. Turn on this function. Let's go, first of
all for a scale, make this one a
little bit smaller. Then we go in the solo mode, which is slash and ped seven. To take a look above,
make this one thinner. I can say the exact number, choose something like that. 300 ped edit mode. And then transparent mood, which is out vertices which are this one or
one of the keyboard. And choose this one behind
X to delete vertices. Great. Then out of
the transparent moot, two to choose edges, hold Alt, left click to choose
the entire loop. What you're going to do, zero, we make it straight. Now I want to
connect this phase. You probably think to press, but how you can see our
topology. Very good. It's out, we're
going to extrude. But inside, if you don't know, you can extrude like that, or you wait a second, you can extrude
inside, which is S1s2. Let's go with one more, then at the end,
let's connect it. We press at center. Now our topology is much
better in comparison to what we have before
out of the solo mode. Let's call this one
chicks, guess what? We have to fit our cheek under the reference
for scale here. You have to play around
alone, Don't look at me. Just use for scale
and air for rotation. But I'm going to do
this one with you also, a little bit for
scale, what we can do. Let's open the
second window here. When we have two arrows, right click, vertical split, like that, three P. This one we're going to
use for the front view. This one for the
side view Greek. I think that I'm very close here for small scale. I think it looked like. Oops, what I did, It's all good. What if X? What are we going to
hide? Our reference? It seems like I did it. I hope you did it also. Everything is on
point, my cheek. What if that in case
if you didn't know, you think that we have three Xs, but actually there are six because if you're going to
press one time as that, we're going to choose
the default one. But if you're going
to go with one more, you can have an additional Xs. Usually this X appear independency of the
rotation of your object. Don't repeat, just take a look. For example, I'm going to
rotate like that and press Set. How you can see the
Xs now is different. Just remember this thing away. Make it a little bit bigger. A little bit like that. Okay, I got it. I
hope you got it too. Let me hide our reference. Let me go with this chick. Then we go to the
modifier, Mirror modifier. Move this one above
mirror object, our head control to save, and right click join
areas on the right. Ladies and gentlemen,
I hope you enjoy the first lesson from
our first block. Let's call this collection Duck. I decided to make
big in another one to keep these lessons
short and comprehensive. But in rest, I hope you
already learn something. If you're a complete
beginner and you struggle, don't worry, it's okay. We all move through these steps. But yeah, thank you so much and I'm going to see
you in our next lesson.
3. 1.2 Duck Beak: Hello everyone.
Lesson number two. We're going to create
big for our duck. Let's turn on our reference. Let's start for this one. We need shift a mesh and
where you are playing. Then we go for scale. Let's open again
the second window, vertical split,
go in the middle. Here we go, three on empt. Then Erik, move this one
toward our reference. Let's call the S to make it
a little bit smaller, G. Again, in that lesson we're going to have a little
bit of tedious work where we have to
model that y, z down. Don't expect to repeat
everything straight after me just to have the reference and however I'm going
to be here to help you. Then we go in the edit mode, transparent mode one
for the vertices. Choose this one and
go with the E, Greek. Move them a little bit more
closer to choose everything. And then we go with the E
and move it up like that. Great, this is what we have
at the moment right now. Then let's go out
of the edit mode. Let's go with the x a
little bit smaller. Back to the edit
mode control error to add an additional
loop here in the middle. One time left click, second time transparent moot. Choose these vertices, actually choose this
one in the middle, we go with the T up. Let's go with this one down, then choose this one X
and delete vertices. Then out of the object mode, out of the transparent moot, go to the Ed modifier mirror
and clipping, check in. Great. Then we go to
the control U for the subdivision surface modifier and turn on this function
for the editing mode. Then we back to the added mode, this one in the middle with
the transparent mood on t. Let's go here that, let's go on the side view
and let's add to loops. One on the right,
one on the left, control one time left click, drag this one on the
right like that. One more time control, left click on the left, second left click. Let's start. Sometimes we're going to have our transparent mode on
or off in some case. Remember blue gray
mean of let's start, get out on the object mode, bring this empty. Let's
go to the properties. I want to make it like zero, even a little bit more like
0025 back to the plane. Let's call this one big
under line up, edit mode. Let's start, first of all, choose this one behind
and move it up like that. Let's go with this one.
Actually, we need that. We go because we can
have here two borders. Or this one above
or this one inside. Let's go toward, on
that exterior line. Then we choose all of them. Bring them here for scale. This one right there, a little bit more in front. This one right here
that we're going to move up a little bit. Good, This one is too far, I think more closer. And let's choose this point. Let's keep it up to have
this diagonal line, then this one again. Let's check what we have out object mode reference of
right click, shade smooth. Okay, we have to play a
little bit on the front side. Turn on our reference
back to the edit mode. How you can see the shape
here is pretty around. We're going to add one more
additional loop control, err, left click, bring this one
toward the right side. Then we are in the bring
the transparent mode on. Choose all of them, and then G. Move up. Okay, we have to play. Let's choose this one
and bring them here. Yeah, a little bit messy with all these vertices
in transparent mood, but I'm sure you're going to get it then. Let's choose this
one. Let's bring them more close to the border. This one a little
bit more higher, I think where you are. And this 11 empt, let's go a little bit
higher like that. Choose this one behind only
from the right corner. And move it on the
right side like that. This one you can move it lower toward that line, exterior line. And the same thing right here. No, keep it up where it was, down a little bit on the right. I think we have to choose
this one also like that. What about this vertices below? Right here? This one I think is on the
right position here. A little bit aback. It looks like we did it. No, we have to move this one
a little bit above this one, a little bit lower. Yeah, when I model something
like that, very tedious. I bring some podcast on the background or
some type of music, but usually are podcasts
a little bit inside. Great, let me check reference
of out object mode. I think we did it. One
more thing that we can do at additional iteration
on the subdivision. Service modifier on
here and one here, but I think that we mess with something on the borders here have to be a
little bit lower. Let's back choose this one
and move them more lower. This one a little
bit more higher. Good. Now let me check reference
where you are. Okay. Okay, 1300. And let me check off this one. We did it, we did it look great. Let's go with the
second one. Big lower. The same thing my friends shift control to
say, don't forget. And then shift a plane. Let's call this one below. I think below one, but I'm a scale. This one going to be a
little bit more easy. As for scale, again,
where you are, I don't see you, Erik, move this one in
front like that. Let's go to the edit mode. Let's drag transparent mode in my case is on,
choose this one. Move them Greek, a
little bit lower. This one, I think they're good. Out in the object mode. Edit mode A, you
choose everything and extrude up out the
same thing right here. Added mode control loop, left click, left click. Then we go to the object mode control for the subdivision
surface modifier. Turn on this function. Let's go forward, which means we have to add additional
loop on the right, additional loop on
the left control. Bring one here, bring one here. Now let's play around this one. I think going to be more easier. Let me increase the opacity
out in the object mode. Choose our empty, go to
the data properties, let me increase toward, okay, toward that one. You can see line here, back to our big below. Which means this edge, they have to be right there. First of all,
transparent, moved lower. Let me choose this two. Let me direct this
one right here. Great about you two. We go up like that. I think we have to choose
this one aback and move them a little bit
more, more higher. Well. Yes, my friends,
we have to play. We have to play. But I hope
it's enjoyable for you. Because if you don't have
fun when you do something, there is no point
sometimes to do that one. Sometimes you have
to do that because adult life mean that. But at the moment right
now, please have fun. Let's choose all of them. Move it up like that. What about front view? Again, these two, they
have to be more insights. For scale, I'm going to make
them little bit smaller. What we have object mode, check off transparent mode, right click, shade smooth. I don't like it, this one have to be higher. What we have to do is
let's go in the edit mode. Let's choose this one. Let's
just move it up like that. It feels like they aren't
mirrored my friends, I'm so sorry, but
there is no problem. Sometimes you commit
mistakes like that. Well, we all are humans. Okay, go to the edit mode. Out choose all of them
x and delete vertices. Then let's go two
for the H mode. Out left click to choose that loop S x zero To
make it like that. Then we go out in the object mode modifier
mirror modifier clipping. Move this one above
and move this, Merge that. Now let's get out. Okay, now I see now is better. It is what it is, my
friends, it is what it is. Let's go back to
our empty on added. Let me choose these
two vertices. And this one for a small scale. Let's go, oops, I say
this one go lower. This one as lower, this one a little bit above. What about this two? I think we can drag them
hoops on that side, on that side,
choose all of them. I'm going to make for scale
just a little bit bigger. Let me get out empty,
shade, smooth. One more iteration
on the subdivision. Surface modifier. This is what we have at the moment right now from the side. It look good. Yes, but not like, I'm not a perfectionist,
honestly. But I like to make my
work looking good. Three, it a little bit lower, a little bit behind you in front, and that's what we have. Okay, now I'm good. Control, safe. Great. Our
duck is done in case. If you ask what it is line,
this is our reference. But this is how our duck. Look at the moment right now. And probably I'm going to make it is for me out a
little bit higher. Yes, we have it. I think this lesson was a
little bit more tedious. Not probably so fun, but at the end of
the day, this is the part of our routine. Thank you so much, my friends, and let's go forward where
we're going to create the glasses of our Top
Duck. See you there.
4. 1.3 His Glasses: Welcome back my friends. In that lesson, we're
going to create glasses for our duck. Hide this collection. Right click New Collection. Let's call this one
glass, then shift A. Let's actually hide our duck
references, both of them. Let's come back to
the glass collection. Shift A, where is
our image reference? Choose the glasses. Okay, let's make them a little
bit more smaller, free on the Mp one. Let's start in order
to create the glasses first we're going
to divide it on the inner side and
exterior side. For that one we need
plane shift a mesh plane. Then we go the S to
make it smaller, x 90. Move it up three empt
move this one in front, let me hide this one. Join area on the right side, make it smaller, then
a little bit thicker. Go to the edit mode control. Let's add three loops. Left click, second left click. Come back to the object mode, bring this one right here, make a rotation like that. What we're going to
do, we're going to extrude word this one. Let's go to, again, it's some type of solo work, but I'm going to do
this one with you also. Edit mode, Transparent mode. Let me go with this
and this right here. Now, this one right, this one right here. Bring them to the
exterior border and word each of these lines. Let's go for the next one. Hoops here, This one have to be. Let's go to this one right here. This one right there here. Let's go to the mode, choose this one to extrude
here for rotation. As for scale one for the
vertices, choose that, choose this one, choose both of them and extrude a frotation. Before we're going
to go forward, let's apply the subdivision
surface modifier back to the object
mode control two here, check in, back to the edit
mode and let's do it properly. Right now we bring the general shape and now it's going to be
more easier for us to fit under our
reference above, above. We'll go this one extrude
and let's go with one more extrude and one
more extrude rotation. Now let's bring them
on the proper place. Right here, Right there, here. I think it's because of
this. To K A for 300 and P, everything is flat,
great for scale. One more time. Don't
worry like that. Good, right, Jack? This one and this one. When we are here, what
we're going to do, we're going to choose
these vertices and this one we go to the at center, and then choose this
one and this one at C. Now let's fit this right
here, right there. I think we have to add
an additional loop, antral air like that. Bring this one here, this one, keep it here to that point, and this one to that
point, my glasses are. Right, they are straight
where they have to be. This one a little bit lower. This one, This one a little bit. Everything is great on my side. Control. To save our next
step, let me just show you. We go to the modifier mirror. But how we can see something
didn't work really well. White in the shape when
it have to mirror. Right here, the thing is we make some changes
in our scale location, rotation always when
you make something bigger or smaller in order
to get a proper result, like for example
with mirror modifier or materials and many more. We have to apply our
transformations for that one control a and
apply all transforms. And then go to the modifier, search for a mirror
and how you can see. Right now, everything
work properly. Move this one above, check in on clipping
and merge like that, create a go to the mode. Let me drag this one lower. And this one, let me drag right
here, hide our reference. And this is what we got. Then we're going to apply
our mirror modifier here. Apply right click, Set
origin origin to geometry. As for a scale, I think like that going
to be top 300 met. Let's move this one a little
bit more close to our eyes. One, even a little
bit more like that. A little bit above,
good control safe. I don't really like this one. I think I'm going to make them just a little bit more thicker. Edit mode A chases
everything 300 M to extrude on the
right side like that. Then we go to the right click, shade smooth, back
to the edit mode. One loop we're going to add on the right one loop
we're going to add on the left like that out
a little bit more thinner. Let me check,
everything is great in order to create our
glasses which are inside. First of, let's call
this one glass outside. Now we go to the edit mode. Bring one loop right here
we go with the control, left click, left click. Then we go with the
shift D to duplicate. Left click for the selection. Now we divided that loop
from our main glasses. Let's call this
one glass inside. Now select glass inside. Go to the edit mode, choose everything and press
F. One thing we can do, let's go to the solo mode. H, choose everything
and make them just a little bit more
thicker like that. One more loop on the right. One more loop on the left. Out here we are, just a little bit. Oops. Right click, Set a regional region
geometry as for a scale, make it a little
bit more bigger. Right click, shade, smooth, everything is on point. What if we don't need additional iteration
and add modifier? Search for mirror modifier. But again, the same thing
that I told you before. Go to the control A, apply all transforms and now one more time modifier mirror, now it is on the proper place. We even don't need to
select a mirror object. Move this one above of
our subdivision modifier. Are they good? They're
good. Do you like it? I hope you like it.
Thank you so much. I hope you enjoy this lesson. Also, I'm going to see the next one where we're going
to create the earphones. And we're going to finish with the block number
one of modeling. Then we're going to bring
some materials and lighting. Thank you. I'm going
to see the next one.
5. 1.4 Earphones and Ring modeling: Lesson number four and the
last one from the block number one where we're going to create the earphones for our duck. Let's go with
another collection. Let's call this one earphones. Let's get out shift a image where we are reference
and to the last one. I found this one interest. I think they're simple and cool and we'll not do the same. But we're going to be inspired
with these earphones. Let me go first of
all with that part. Shift a mesh and this time
we go with the cylinder. Right click, shade smooth, coach the properties data. Go to the normals, auto smooth, check in 90, and then
we go with the scale. Move up, smooth is
one on the side. Let's go with our reference.
A little bit aback. Great. Then again, we're
going to play around. Don't do completely like me, Just take a look. Time to time x, make this one a little bit
more thinner on the side. Probably more thicker. A little bit more smaller. That great. What if we're going to bring a little bit of pebble
around this edge? Go to the edit mode.
Choose this loop, holding out left click. And we go with the control and drag this one a little bit
on the right side like that. The shape n now is
more proper auto, smooth, and everything is good. Let's go with that inner side. What we can do, just
shift left click, make it smaller x and a
little bit on the right. Let's go with that
part. We can call them but I don't know how. Let's go with the phone basic. Let's go with the phone
under line, small. Let's go with this shift a
mesh and go toward the torus. But I need to make some changes. If I'm going to move myself up, we can see this one because
of our duck hide the duck. Go to the torus here, make this one in the
major radius a little bit more thicker to 075. And then left click,
shade smooth one, ped x 90, 90, make it smaller. And bring it right here. Let's check control two
for the subdivision. Surface modifier check in. Let's bring this one more
toward our earphone. Basic. A little bit smaller. Keep a small
distance right here, Y because we're going
to have particle system and it's going to
be on that long, that's why we need
a small space here. Let me check from the site GE, good. Let me show you how we can
make this one even more per, than it is, because at the moment right now
it's too smooth. But let's go go to that modifier and search
here for displaced modifier. Then we go here with 0.1
Then let's add texture. Let's call this one earphone. Let's go right here in
the texture properties. Instead of image and
movie choose clouds. Now I think you can see
the difference and move the display above of
subdivision surface modifier. Then back to the
texture properties. Let's play here instead
of Blender Regional. Let's go with the
improved per line. Now it's not so perfect. I think it's cool because
usually the earphone pillows are soft. Why? Here we go. With 0.35 hoops, we can back
to the display modifier, try to increase
but not too much. Why? If I'm going to keep like 1.2 if I'm going to move this
one under subdivision, how you can see too much, but if you're going to
keep this one above, this is a small change
that make our work better in comparison
to what it was before and what we have
at the moment right now. Great control S too safe. Now let's go to that part. I don't know how
to call this one, but before our Taus
is going to be ear phone under
line below, okay? Okay, Shift a mesh and
plane, make it smaller. G X on the right side. Move this, 190. Let's install this
one right here. We don't need a
reference anymore. Hide it back to our plane. Let's call this one phone R, Okay, then 300 pat,
make it thinner. Also, move this one inside a little bit inside.
What are we going to do? We're going to actually bring this one a little bit
more inside, like that. Small rotation, small
movement inside. Go to the edit mode. Choose this H extrude 1234, Let's keep this one close
to our line like that. Unfortunately, at the
moment, right now we can see nothing because
it's very thin. First thing first we
go with the control a and apply all transforms. Then we go to the modifier and search for
solidify modifier. Let's go in the negative one. In the negative
value toward 006. Then we go with the control two, apply subdivision
surface modifier. The last one that we have to add is of course
mirror modifier. Go to the mirror and move the mirror above of
our subdivision, but below where you are
below our solidify, then clipping, check in and
drag the merge more close. I think like 03
going to be enough. Great here. Here, turn the function on
the mirror, we don't need it. Then let's go toward edit mode. Let's add additional
loop on the right, additional loop on
the left, like that. One more, I'm sorry, let's go to the
transparent mode. Let's go one more here. Drag this one down. The shape now is much
better than it was. What if we're going
to make it toward 05, like a little bit more thicker? I don't know how big
the space is because probably we're going to align this one when we're
going to add the fuer. Okay. My friends
and the last one, we're going to mirror that part. Let's start with our pillow. We go to the Ed modifier. Search for mirror modifier. Move above of our subdivision, here in the mirror object, choose the head of our duck. The same thing right here. Mirror, the same
thing right here. Mirror and duck vola. Control safe. I think we can move this one just a little bit
inside like that. There is one more thing.
There is one more thing, that I forgot a ring. They're going to be very
easy and fast to do, shift a search for mesh. Thus let's go to the Tus. Bring this one back toward
the one right click shade, smooth conchal Cho
for the subdivision. Surface modifier X 90. Make this one smaller,
300 Pt Greek. Let's go let's go on the site, Let's make this one small. I don't know here. Or what if I'm going to
bring this one more, Maybe a little bit more. Let's call this one ring. Let me bring this one
lower control. As you say. Now we are done.
Our duck already. Look very dope. The
block number one is finished. I hope
you did enjoy. I hope you'll learn
a lot of new things, especially if you're a beginner. Let's go forward to
where the next block. Guess what? We're going
to bring the material, Sun Lighting. See you there.
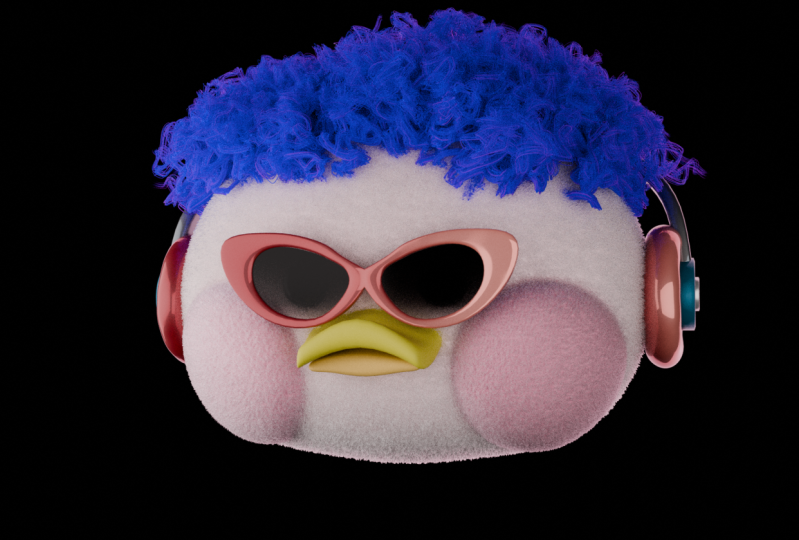
6. 2.1 Lights and materials: Hello my friends
and welcome block number two, lesson number one, where we're going to
establish the lighting and also bring some
materials on our duck. Let's open the second window. Right click, vertical split. Bring it here, Create. Then let's start with our duck. Go to third one, viewboard
shading, press on our duck. Go to the material step,
which is this one. Press new, let's call this one duck underlying base
here in the base color in the X at 777 which is the same
color as white. Then we go toward chicks, press chicks in the base color. We go with 88192, great. Then we go toward our beak. Let's call this one
beak in the base color. We're going to add B
for 60, A the same. We go with this one below, just here, search for beak,
and that's what we have. Then one more thing that
we have to do is our ice, even if you don't see them,
that's not a problem. Ice roughness towards 02, base color going to
be toward black. Great. Now we can establish
our lighting. Let's go to the render viewport,
which is the last one. Let's go to the render
engine and switch on cycles. Let's bring ourselves
here in the world. Let's decrease the strength
toward 01 to make it black. Even here, the color
decrease toward black. Okay, then let's start with
our first sources of light. Right click, New collection. Let's call this one studio here. Shift a light area,
then 300 Pet. Move it up, move it back a rotate toward our duck, I think a little bit lower. Let's go toward our
lighting properties, which is this one. Let's turn off our overlay to make it more toward what we're going to
see in the final render. First of all, the power
going to be 200 because this light which
is behind going to create this outline
for our dock. We're going to establish
a little bit of location, but let's go toward the color. And here press B D five to
make it more like that. Then we're going to
change the shape from squared to rectangle size. X going to be 4.1
size Greg going to be 4.3 You can clearly see that it's much
bigger than it was before. Now let's move this one
a little bit lower, a little bit aback that even a little bit lower. Great. The outline is here. Let's move this one a little
bit more a back like that. Control to save. Now we have an outline. Then before we're
going to go forward, we have to switch here the transform pivot point from
the individual original to the three cursor
because we're going to duplicate our area
shift left click. And then we go with the turn, this one on the left
side like that, 300 ped. Then let's go to the
settings here where the color press 55, it's going to be more white. The power going to be 300, then size x is going to be 3.6 Meanwhile size going to be
seven. That's what we have. I think we can like that a
little bit on the X, great. Then one more time, shifty as move this one on the
right like that. The settings are
completely the same. Quantrals save, let's
recall this one. Which area behind left, right. One more thing, let's go
to the render properties. Here, go down, and
the color management. Let's increase the
look toward medium. High contrast actually can
play around high contrast, but I usually love to keep
myself on something medium. I hope this lesson was useful
for you. How you can see. This lesson was pretty
quick and easy. In the next one, we're going
to create the material for our earphones because there
we have to play around more. But I promise you there will be some useful
information for you also. Thank you so much, my friends, and I'm going to see
you in our next lesson.
7. 2.2 Earphones and Ring materials: I hope you have fun. Let's go forward with our
materials lesson. I'm going to switch here
on the render mood here. I'm going to go toward
the shader editor. I'm going to close
the folder folder, move yourself closer
toward our earphone. Then turn off our overlay part. Drag this one a little
bit on the left. This one height,
my recommendation. Watch one time, it will be
easier for you to comprehend. Then we're going to
do this one together. Let's start with
our earphone base. Go to the material
step, ear phone base. Move yourself closer
here in the base color. We're going to introduce 1679. Great. The next part, I'm going to increase
the metallic toward 0.2 for a small,
smaller reflection. Then let's make it a little
bit more interesting because one flat color ain't for
what we're looking for. Shift a noise texture, then control to control for texture, corroginate
and mapping. If you don't have it, go to the edged references ads and here search for
a node Wrangler, check in, come back control and you're going
to have the same thing. Then we're going to
go toward the rump, then we go toward the bump. Let's connect everything. Color with a factor here,
color with roughness. Then we go color toward
height, normal, okay? Okay, not what we actually want. Check in on invert, decrease to toward 0.4 then we go
toward the scale and here increase toward 45
distortion 4.5 Great. Now we have the small
dots which make our material a little bit more closer to the
realistic one. Then let's direct the color, the black one more
toward the middle. This is going to influence
on the shiny part, great. But there is one thing
that you probably notice, that we have the lines. It isn't so smooth and I
personally don't like it. We need quality or we
need to do something. I think quality, even
if this was unexpected. Let's work a little bit
on our earphone base. Get out on the solid mode. Turn the overlay part. Let's go in the solo mode. If I'm going to apply
the control tube for the subdivision
surface modifier, how you can see that apology, the entire shape is bed. You know what, I'm happy that we have this one because
it's important to show not the perfect process of creating something
in blender, but actually because
we all commit mistakes and you have to know how to solve these problems. My friends, let's leer watch and then we're going
to do this one together. Then I'll go toward
the edit mode. I'm going to choose this
phase, delete this one. Also delete for the faces, probably because when we work in the previous
lesson with lighting, you will have here a
pivot point around the three cursor change toward
the individual origins. Great. Then Cho for the edge, Alt, left click to
choose the entire loop. We go with the inside
inside one more time. Inside at the center. The same thing right here. Oops, inside, inside
at the center. Now if I'm going to
press the quantrol to the shape is
better than it was, the topology is better. Right click, shade smooth. Then we go toward the
modifier here, series four, bevel, move the bevel
above of our subdivision. The settings here
are going to be one additional zero there. Vla, our shape is done and
now it's way more smooth. We don't have the rough lines, rough rectangles that we
have before get out from the solo mode back toward the render part to worn overlay. Here we are. Here we are. Great. Let's come back
toward our materials. I think we've done everything
for our earphone base. This is how it was before. Just one flat color. And this is what we have
at the moment right now. One thing that if
you want to do is to increase the
strength. What if 05? I think 05 is enough because
at the end of the day, we don't need something
very emphasized. That is good. Let's go
toward this small part. Materials earphone Small. There is only two things. Metallic 06 and roughness 03. Then the color problem going to decrease just a little bit. Toward just a little
bit control, save one. Let's go toward the pillow part below earphone
underline pillow here. Take a look. The
metallic going to be 03. Then I want to make
two colors here. Like a small gradient. How shift a gradient
one color rump to connect color toward the base color and then
color toward the factor, great linear switch on the spherical linear
switch toward the spline. Move the black one
more toward white. Here, take a look. This, that
color going to be 11679. That color C two. What we have to do
next is just to play around with the gradient. I think more of that. I want that blue to have more influence and just
a small part to be emphasized with this
lighter blue play around. Okay, I'm going to
keep it on that level, but again, it's
still very boring. Don't worry my friend,
I have a solution. Shift a text, one control here. Switch from the
general hold control, left click and switch
on the object. Then we go with another
color ramp, bring it here. Let's connect color toward
the roughness here. Color toward the factor, okay? Okay, something interesting, but not what we are looking for. Let's change, first of all, F one toward smooth F one. Now we have, I can
call this one a dirty, but you can see the small
areas which make it, again, more close to what
we see in real life. And not just a small flat color. Let's increase the scale toward 9.2 The only one thing that I did for
the Voronoi texture, then here we have
to play that part. If it's black, it's shiny. If it's white, it's not
shiny when it's black, it reflects more light
when it's white. It don't reflect
lighting at all. How you can see that, why I'm going to keep
it not completely on the black one but
more toward gray. I'm going to bring
this one here and this one here, the white one. Answer for this dirty parts. I honestly don't like it. I don't want to
be so emphasized. I want to make this
one more toward white. I don't want to have
it very reflective. This one, this one,
we can decrease. Or actually I'm going to
keep it on the same here. We have to play around,
do something that we're going to
satisfy your own eye. I'm going to keep it
right under this arrow. That's what I personally have. But still we can do better. How? I'm going to
show you this one on the right s for
glossy texture SDF. Then we go with a mixed shader
to connect both of them, connected the SDF connect
toward this one end. The roughness is going to be 00.45 In case if you don't know how this
mixed shader work, I'm going to tell you when we're going to drag
this one on the left, the shader above going to influence more than
the shader below. The vice versa, when you
drag this one on the right, the shader below have more influence than
the shader above. Our factor value
going to be 0.12 so we'll have just a
small glossy influence which going to be
more than enough. Again, this is what we have at the end in case if you want
to see all of my notes. I hope it was useful. I hope you found a lot
of useful information. Because there are things
that you can apply, this knowledge you can apply for your personal
work in future. Let me review if you
found this one useful. But we didn't finish
because we have that metallic part
not like metallic. What I'm going to do,
I'm going to choose the earphone pillow
duplicate and let's call this one earphone here. I'm going to increase
the metallic toward 08. I want to switch the color, this strong blue to 637179. Then we go toward
the mix shader. And here 0.25 we
have here the dots, the color, the metallic. I think it's
correct, my friends. Okay. The ring, let's
go toward your phone. Arc duplicate, call
this one ring. Let's increase the factor toward 35 and then here
the metallic to 95. Then let me decrease
the color more toward black to make it more
reflective control to save. I think it's looked up. Let's turn our duck on. I hope you're satisfied
with your result. I hope this class meet your
expectations and probably even more because
I try my best to share the best one thing, the big I like the roughness to be 0.25 to make it
more reflective. Now I like it, thank you
so much, my friends, glasses going to be in the next lesson to make
it more comprehensive. Again, remember we
got the mistake here. Not like the mistake, just
a small thing. It's okay. There is no necessity
to think that you need a perfect workflow. No, it's okay to
commit mistakes, but more important to
know how to solve them. I hope you enjoy it, and I'm going to see
you in our next lesson.
8. 2.3 Glasses Materials: Our body is already done. But there is one
thing is glasses. Even despite that he
looked dope like that, I think he look cute. But if you're going to add
glasses, he look dope. This is the name of our class. We're going to create a
dope duck, not a cute duck. Direct this one on the left. Let's start with a glass border. What I'm going to do,
I'm going to choose the earphone pillow duplicate. And I'm going to cut this
one glass underlying border. Then on the color
where the color Ump. Yes, I'm going to switch, I'm going to switch the
dark blue on 916 for one, Then right here I'm going
to choose something toward pink also here I'm going
to switch on diagonal. Then it's time to
play with the colors. I think I'm going
to drag more here. This one more on
the same position. Not a big change
but a small thing. Then I go toward the metallic. I'm going to increase
this 106 to 035 enough then let's go toward
our orinar texture here. Let's make it a little bit more reflective which means
to decrease this one more toward black in rest here. I'm going to switch on
12 quantal to save, to add the small dirty things. I don't think it's
dirty, just this small. I'm not very much with the
colors. Wait a second. More metallic. I think I'm going to decrease
the metallic toward 02 because it's too much
in real life there. They are not metallic for sure. The inner part.
Let's go with the, let's call this one
glass inner and here take a look gradient first. Then we call the control,
let's base color. We're going to do them
completely black. There then is going to be 0.09 to make it more
reflective but it's too dark. Yes. Color rump here. We connect color
with the factor and color with alpha, okay? Okay, then we go
to the rotation. Switch this one on 90 degree. Let's switch here on the spline and drag white more
toward the black. Black, a little bit closer. White, a little bit closer. In that case, we don't
have a flat black color. How we can see the small
reflection is around our border. This is exactly what
I was looking for. I think I'm going to drag
white a little bit more black, more toward the left corner. To make it even more better, we're going to add
an additional color. Drag this one on the right, and increase this one to wide. Now we even can see a little bit of our eye and there
is the reflection, which means it work much
better with the lighting. We can see it right here. What if I'm going to make
it that one from the right? I'm going to make
it a little bit more great control safe. We can see our border
smooth perfectly. Go to the subdivision surface
modifier and increase the value toward three on
the Viewpoard and render. Let me interreg this
one on the right here. Control safe. Here we are, my friends. Here we are. What is the rendering
gene going to be here in the color management film? Medium high contrast control. S. You I still don't like very much the color of my
glasses. I don't know why. I don't know why. Okay.
Now I'm better now. I hope you all are better. We finished with the block
number two materials. Do lighting done,
new information, do you can see the outline
from the area behind? I personally like
it. I like our duck. It's actually already
ready to be rendered, but when you're going
to add the fuel, it's going to be
even more doper. So thank you so much
for your attention. I'm looking forward to
see your final result. I encourage you to
be brave, to share, to inspire others, And let's go to the
block number three.
9. 3.1 Particle System: from beginner to Pro: Welcome block number
three where we're going to delve under
that hair topic. I really recommend you
to have a notebook or some notion where you can roll down some
type of conclusions. Because there are going
to be a lot of things. I really prepare myself in order to provide
something available, something very important
that's going to really elevate your
three D skills. Trust me, we're going to
cover a lot of things today. That was the thing number one. The thing number two, um, here going to be more
theory and explanation. That's why you can
play around with me. But simultaneously, I'd like to ask you more to
watch, to analyze. And then we're going to
practice on our duck. I prepare a collection, you don't have to do this one with plane where we're going to analyze most of the settings
from the particle system. Let me draw this
one on the right. Okay, I hope you're ready. Let's start. Let's
start to watch. I'm going to explain.
You watch physics. Plus, let's call me this one hair test,
underline explanation. In order to create hair F, we have to switch the tap. That was the thing
number one, emission. Let's start emission. Or in other words we can call this one as the
parents parents hair. The number going to show you the total amount of hair
that you're going to have. In our case, just for the
purpose of explanation, I'm going to keep
this one on ten. This is some sort of randomizer. It's just going to random all of these ten hairs that we have. But at the moment right now, there is no necessity to
focus too much on the set. I'm going to keep
this one on zero. The length, I think
you understand that means the
length of our hair, the lower, the bigger, I'm going to keep
this one on 1 meter, which is more than enough. The segments, each of the hair have some frames, some segments. The more segments you have, the more smooth going
to be your final form. And of course the vice
versa, the lower, the more sharp, unrealistic
it's going to be. But we're going to
keep this one on five. Let me switch myself on
the viewport shading here. We have to watch. Okay, the golden rule. This is very important because that's what I didn't
saw in many tutorials. We create usually materials. Yes, let's create material
for our plane. Great. Usually what they go, they go to the particle system
here in the material, got the same material, but for each fu, for each hair, you have to
create a material apart. Take a look, we go here. Plus N plane explanation. The default one is principle
BSDF, what we usually have. But take a look.
There is one more like principle hair BDF. It was created here
for the reason, that reason I've already
told you principle BDF. In that case we have more
settings related to how our final fewer hair going to
look like in comparison to. If I'm going to keep this
one on principle BDF, it will look less, again, realistic, more boring, and that definitely not the result
that we are looking for. Golden rule for each
particle system, create a material apart, go to the surface, and
choose principled hair SDF. Now let's analyze
some settings here. The color going to
show you the color of the fuel that we're going
to have you ask why. If here is some brown here, we see white because
we have to go to the particle system and switch plane to the plan
hair explanation. Now we can see that we
can change the color, roughness, the roughness
everywhere mean the same. The less is value, the more shiny it is, the more lighting reflection
we're going to see on them. And the more restored one, then it will not reflect
the light completely. The radial roughness
going to show the length of the shiny bleak. The code if we're
going to increase. We can see right now because we don't have a lot of particle, let me increase a
little bit the number. But again the code will make them more
brilliantly meanwhile, or in other words more shiny. And when we decrease this one
towards zero, less shiny. But it's not about being shiny, it's more about being brilliantly
like the diamond one. When you're going to apply
all of that on practice, you're going to see
how each one of them actually influence the. Or setting my explanation from my own experience
or in other words, to make it more easier
to comprehend it. Show the saturation of
your hair, for example, if I'm going to keep
this one on ten, how you can see our color. Let me make it very red. For some reason it
have to be red. But it isn't because the
OR have a higher value, which means it makes the
hair less saturated. The vice versa, if I'm going
to keep this one on one, it's even more than
just red. That's why. Or show the common saturation or let me increase
the amount of hair. In that case it will be easier. See the difference
high is more white, is less saturated and, OR more toward, like one, more toward 1.5 In that case, the hair going to be
saturated with our color. Great Randomized roughness is going to influence on
the first two settings, which means it's going to make the shiny part randomized
around the hair. Okay, let's go forward. I going
to be 1.45 And the color, I'm going to keep this one on. White saturation on zero. Let's go to the settings
of our particle system. The number, I'm going to
decrease back toward ten. Let's go down the hair dynamic. Will not use this one because these settings are used
for the animation. We don't have any animation, so we don't need it spline when you have here a check off. In that case you are looking for straight and smooth hair, but if you want
to make some ful, something more chaotic,
something more randomized, in that case, bring the check
in on your spline steps. Again, the amount of segments that it's going to
be in between of each hair. The more steps you
have, the more smooth going to be
your final transition. The less steps, the more sharp and ugly
they're going to be. Also we can go to the
viewpot display and here we have the same
thing with our steps. It's represent the amount of frames that we're going
to see in our viewpoard. Let me increase right
now toward four, you don't see any difference. But a little bit
later when we're going to go to other settings, I'm going to come
back to the steps and you'll see the
difference on practice. Let's go forward
to the children. This is a very important tap, but I want to skip
it for purpose. Don't worry, I'm
going to explain it a little bit later because first of all I want to
explain the hair shape. It's very important. Fair thing. First, the changes that
you're going to do here. If we're going to do in
a simple Viewpoart in the solid mode, do you
see any difference? No. You drag value on the right, on the left and there
is no difference. But you can see the
changes only in the render viewpoort
if I'm going to make it thicker, thinner. Now you can see, let
me explain, please. Diameter root, that value. Show you how thick or thin going to be the
root of our hair. If I'm going to drag
this one on the right, you can see the root is more
thicker, the vice versa. If I'm going to dig this
one more toward zero, it's going to be more thinner. Back to, let's go
for example with two or actually
even more thicker. The tip is the same only
for the end of our hair. If I'm going to make it bigger, it's going to be very thick. If I'm going to make
it towards zero, it's going to be very thin. You noticed that
even if I'm going to make the end of our hair thick, the end is still sharp. The corners here, If
you want to avoid that or you want some other
form of shape, check off. And now they are flat. Check in. The final angle
is sharp strength shape. It shows the
transition in between thickness from the root
toward the end of our hair. Which means if I drag
more toward minus, it's going to be more thinner. If I'm going to drag,
let me decrease here the settings and in
that case it's going to be more better to see the
difference one more time. If I'm going to drag here
toward the minus one, we can see that from the root till the end
everything is thick. And the same thing vice versa, if I want to make the common, the general shape more thinner from the
end till the root, I'm going to bring that
from the positive value. I'm going to keep this one
on zero diameter scale. If root influence
on the thickness of the root tip on the
end diameter scale, influence on the entire hair. In general, it keep
the same form, only it can make it
bigger or less bigger. We already have here a lot
of things that we did. I'm going to keep
this 1.3 this one on 09 great or actually
in diameter scale. A little bit bigger like that. Again, these settings are
only in purpose to explain, to show you the difference. Now let's go forward
toward the children Tap. Remember when we went
here on the mission and I told you that the number
represent the number of parents. These are the parents here. But children have two types of Taps, simple
and interpolated. First of all, they show
you the amount of children hairs that going to be
around for each parent hair. If I'm going to keep
this one on three, that means one from that value going to
be for the parent and two going to be for the kids if we're
going to count them. I don't want to
count because it's a little bit a lot of time. But there are 30 here, not 40 because there are ten. For each one, we
have two children. Great. Now let me
explain the difference in between of simple
and interpolated. Let's go with simple. Let's
say this is our mesh, our plane here is
the parent hair. When we choose the simple, the children is going to be
created around the parent. Here, here, here. They're
going to be plus, minus on the same
distance, same location. Their purpose is to be
more toward the parent. Meanwhile, when we
chose interpolated, let's say this is our plan. Our parent hair and I
choose interpolated, in that case, as they are
created around the parent. But simultaneously they try
to cover the entire mesh. Simple kids are more around
the parent, interpolated are, and around the parent, but simultaneously they try to cover around the
shape like that. I hope it does make sense. I hope now you start to understand all of
these scary settings. I hope these settings
aren't scary anymore. Let me delete it.
Let me delete it, and let's go forward toward
the explanation here. Let me, for example,
choose the interpolated. Here we have the
length. How we can see the value is already on one. The final length is that one that we set
here in the hair length. For example, if I'm
going to decrease and if I'm going to increase the final length is this one. If I'm going to make
it like 3 meters, the value here going
to be the final one, going to be 3 meters. Just remember that hair length is the final value right here. I don't want to have three, I need to have one then. I hate this word, Don't judge me for
my pronunciation. The threshold show
you the amount of hair that will be not
influenced be the length. For example, I decrease this
one toward 02, but I don't. I want like 20% from the entire amount of hairs
to not be influenced. In that case I said 02, which mean 80 percents are influenced and
20 percents aren't. Or let me for example,
increase toward 06. I hope you see the difference
and I hope you understood. If I'm going to bring
this one toward one, that means that 100%
or in other words all the hairs will be not influenced be the
length value changes. Just remember that.
Let's go toward one, let's go here toward zero control to save
clumping a little bit later. And then we go toward
roughness here. The things are getting a
little bit more interesting. Let's start with
the explanation. Also, you can not tie
that in between of them. There is a small gap
like here and here. The size influence
over uniform shape, influence over the end
point settings and size and threehold going to influence over the
random right here. Let's start with each
one in particular. Uniform will bring
some distortion of our hair in general. For example, I'm going to
keep this one on 05, You see? Yes, you see the size, The lower value, the more chaotic the more
distortion is going to bring. The higher value, the less influence the
uniform going to have. Let me show you toward zero, you see the type of shape
the distortion is very big. If for example, I'm
going to increase this one toward five smooth. Even despite that I
increase the value here, it doesn't matter because I can control the influence of uniform with the size
and the vice versa. I can go toward one and the
final shape is very chaotic. Now, let me on zero,
for example six. Remember I told
you that I want to explain about the
steps. Take a look. If I'm going to decrease
the steps toward one, they are smooth, they're
sharp, not so cool. If I'm going to
increase this one toward the maximum we have. Frames in between of each hair. Which mean the final shape
can look more detailed, more cooler, more
realistic, more doper. Call it in the way how you want. I'm going to keep
this one on four because it was more than
enough that about uniform. Let me increase this
one toward zero. Let me decrease toward two
because there is a lot of hairs endpoint represent influence on the
direction of the widen again of each final
shape of the hair. Let me little, take a look. If I'm going to
increase the value, the roots stay in
the same place, but the end of the
hair is moving on the right or on the left. If you talk about shape, if I'm going to increase the value that the more value
you bring here, that means on the end points
will change their direction. Meanwhile if I'm going to decrease toward the
number lower than one, it will go straight
from the roots. The entire hair is going
toward different directions. Again, if I'm going to
increase how you can see, a big part from our hair
is staying the same place. On the end of our hair
is moving on the right. On the left. Let me delete. Great, let's go forward. 0.1 The random part of the random settings that value
influence over each hair. In particular, if with uniform, we change the shape of our hair style random change
the shape of each hair. In particular, let
me delete the size, have the same meaning
as the size of uniform. The lower is value, the more chaotic the more
randomized it's going to be. The bigger is value, the more smooth
it's going to be. Threshold, going to
show the amount of hairs that will not be
influenced be the random. For example, if I want health of these hairs
to be straight, I keep this one on
the value of 05, which you can see some
of them are completely straight and some of them
are completely randomized. If I'm going to increase
this one toward 09, that means that
only ten percents are going to be randomized. Where they are somewhere, they are 90 percents
going to be straight. And it doesn't matter what
type of value I put here, they aren't influenced
who we went very far. And I hope you did enjoy. I actually didn't
finish because I want to explain
the clumping also, but I hope my explanation, I don't know how good it is. I try to explain everything
simple in the type of humble words without
any hard terminology. So I hope you
understand everything. If you have some
sort of questions, you can open the discussion
or you can message me. There is no problem
with a big pleasure. I'm going to answer
on everything but till the moment right now, I hope you feel the
difference in between your knowledge
before that lesson and your knowledge
after that lesson. Let's go toward the clumping, Let me just show you bigger lower when you're going to
clump on the positive value, you're going to connect
the end of the shapes of parent hair and children's
hair, the vice versa, When you keep the clump
on the minus one, the end of each hair is
in the same direction, is in the same position, but
the roots are connected. It's very cool because this
is exactly what we need for our fuel that we're going
to create for our duck. We're going to keep it clumping. Going to be an
important setting. But how you can see
that setting in heard, it just create groups of
hair and the connection or, or steam from the roots or
steam from the endpoint. Do I have something
else to explain? I think I explain more
than enough though. The golden rules, the
roughness, the hair shape. Of course, there are
some other settings, but we don't need them at
the moment right now and we actually not need them in our future producte the main important things
already explained for you. Thank you so much, my friends. In order to not make it very
complicated, very long, I decided that lesson
just to explain the particle system with all of this knowledge we're going
to apply in our next lesson, where we're going to create
the fuel for our duck. My friends, thank you so
much. Leave me review. I'm wondering, what do
you think about that? Let's go toward the next one.
10. 3.2 Duck Fur settings: Hello. Considering
everything that we learned from our
previous lesson, we finally can apply our
knowledge on practice. Because here we're going
to create the duck. I hope you're excited. I hope again,
you'll learn a lot. I already prepared the
value for our setting, so I don't think that
this lesson going to be more than eight
or 10 minutes. Let me hide our plane. Let me open the duck folder. We don't, we don't need
anything else. Click on Duck. Do you remember what
was the golden rule, of course, to create
a new material? So let's go first
of all, base color, copy this one and then plus new call this one
underline for principal BDF, change to principal hair, BDF color control V
for the white one. We're going to change
here some settings, but not right now. Let's go to the particle system. Where you are, here you
are, plus, let's start. The number going to be 5,000 I have to say to mention one
thing in case, let me hide it. In case if you scale your duck or you did any changes
because I personally didn't. But if you did, remember
control A and apply all transforms because otherwise our results may be
very different. And I don't want to see
you being disappointed. If you make some changes, apply the transformation, great. The length going to be
0.07 Then we go lower and the material choose duck for check in on the spline because we don't
need a perfect hair, we need cool hair. Viewpoint displaced
strength steps going to be for children. We're going to
choose interpolated the display amount and render amount going to be
40.40 go lower. We're going to work
with our clumping, we're going to work
with our hair shape. But let's start, actually, let's go to the render and let's see what we have at
the moment. Right now. Of course, I have
to mention that when you work with
particle system, strong PC going to be a
very great benefit for you. In my case, it's good, but my PC is a little bit sick, so that's why I can see best. But I can see plus minus that we have to
work a little bit more. Let's go back to our
particle system settings. Let's start with the hair shape. Do you remember Demeter root? It means to make the roots
of our hair thick or thin. I want to make them
thicker toward 3 meters. Our tip going to be 03 tip, which mean the end of our hair. Then we go toward
the roughness here. Our setting is going to
be 0.01 for the uniform. Then we go to the end point
and we're going to have 0.007 We go toward
the random here, we're going to play with 0.04 There are already some changes
controlled as to save. The last thing that I'd
like to t is clamping. We're going to
increase toward 0.1 in order to create small
groups in between of them. Let's go now toward our render and let's
see what we have. First of all, I think we have to move our ice a little bit more forward because they delve
under the under that four. I don't say that they look bad, but I'd like to bring them
a little bit more forward. Rest our four look very cute. We don't need some
big changes again, because this is a
creative class. If you want to experiment doing something on your own
choice, no problem. I did want just small changes that are going to
fulfill our duck, but nothing splashy or something that's going
to be very emphasized. That all for our lesson, but before our eyes, let's choose this one. E a little bit forward
like that. Thank you. It was easy, I think. In comparison, she was
believed in the previous one. Yes, probably. I'm going to do the
same with our cheeks. A little bit forward. Create control, safe.
In the next lesson, we're going to create
fuel for our cheeks. See you there. Ah my friends. Let's go toward
our hair material. And here the roughness.
We're going to decrease toward 03 IOA. We're going to increase
toward 1.55 Control safe. And now we are done
with our work. Thank you so much
and I'm going to see you in our next lesson.
11. 3.3 Cheeks fur: In that short lesson, we're going to create
four for our chicks, how you see everything
comes easier and easier. We go to the chicks,
what is the golden rule, Of course, to create
new material. I already did it, but let's do this one with you together. Again, base color
control C copy, and then we go to the plus, let's call this one Chicks for surface change
on principle hair, SDF, color control V. Let's go to the
particle system here. There's one thing
that we have to do, back to our duck hair. Let's call this one
duck and then we go to the chicks bring plus and
then choose the duck fur. But we're going to
duplicate it like that, we're going to call
this one chicks. For some reasons our results ain't something that's going to satisfy us because we have to
apply our mirror modifier. Let's hide our particle system. Be sure that this is the
particle is below subdivision. In the middle mirror above
we go toward the mirror. Apply. Now open the
particle system and vola, everything is great.
Then come back. Let's decrease the number toward 2000 because we don't
need so many of them. In the rest we keep
the same settings, only 30.30, for our children. Then we can go
toward the uniform and increase here toward three. Back to the random increase
here toward seven deep. We're going to increase
toward four clumping, we're going to increase
toward 0.1 30. Control save, and
let's check what we have in order to get a
little bit better result. We can go toward our materials. Let's increase the
roughness toward 0808. I keep on 1.45 which means if we're going to decrease the value,
going to be more shiny. We're going to
increase less shiny. Because what we are looking for, you can see the difference. I personally like a lot,
especially that part. It look very interesting and I hope you're satisfied
with your results. Also, how I say
there's nothing had, everything is pretty
easy when you understand the meaning
of many of them. It's okay if you don't remember all of them from once
because of course, all of this knowledge
you have to impregnate them
via your practice. But I hope you feel much better, much comfortable with all those
particle system settings. But we didn't finish
because we have to create the Afro hair style. And also I'm going to explain
about weight painting, my friends, the
value of that class. And I'm going to see
you in our next lesson.
12. 3.4 Weight Paint Explanation: And that useful lesson I'm
going to explain you about weight painting that can look like something
very complicated, but actually it is in that all but before let's
enjoy a little bit. The result that we got, our duck, is already
looking very good. But a few more lessons and
you're going to make it dope. Let's go my friends, the
lesson I'm going to explain. In the next lesson, we're
going to apply our knowledge. Again, take a notebook or notion to roll down the conclusions.
And let's start. I'm going to create a created already a collection
weight paint and I'm going to
add a sphere mesh. Give sphere, right click, shade, smooth control to for the
subdivision surface modifier. What at the point
of weight paint to emphasize a specific zone. For example, our hair is growing not around
entire head, Yes. But only upward on that
upward part of our head. Before every weight paint, you have to create
a vertex group. We go right here. Vertex groups. Let's call this
one weight paint. Under line X planation or
explanation, I don't remember. Then we go toward
the particle system. You don't have to
repeat again, it's all. But if you want, you can repeat. Of course, plus weight, weight paint like that. Then I want to change on hair, let me decrease toward 500, toward is 0.5 Then we go to, let's go interpolated 30. It doesn't matter at
the moment right now. Great control as you
say, just for myself. And then we go toward
weight paint right here, how you can see
everything is blue. There are two colors,
blue and red. Let me hide our particle
system. We have here brush. If you want to make
that brush bigger, press F and bring your mouse, wheel your mouse or on
the right or on the left. If you want to make the strength or your brush
stronger or less stronger, you hold shift and
make it bigger or not. Then also we can apply the symmetry like on
the x one, for example. If I'm going to turn on, I
can paint on both sides. I will not apply that
because I don't need it. Then let me draw
something like that. Another thing that we
have to understand, how you can see that
border ain't very smooth. Why? Because our give sphere don't have a lot of polygons. The more subdivided it is more smoother going
to be the border. But from the point
of experiment, we don't need to bother about this one right now.
Now take a look. I'm going to turn on my
particle system and you think like there is no changes of course because we have
to move ourselves down. There are vertex groups
where we can establish for what purpose we need
to bring our vertex group. For example, for the density, I'm going to choose our
weight pain explanation, how you can see right
now our hair appear only where that red
color was painted. That how you can bring
your own hair style. Let me go back, let me turn
off our particle system on symmetry and let's draw above where usually
our hair grow. Also you know about 100 empt, 300 empt and 700 empt, if you want to get
the vice versa angle, you hold control
one for the view of a back control seven for
the view under control, three for the view from the left side because 300
empt is on the right side. Control one, let me draw
a little bit right here. Also back to the
particle system. Let's turn on and then let
me choose density to be, that's how my friends, you can bring your hair in the specific zone
that you can draw. If I'm going to add here, here we have the same
thing with length, the same thing with
many more of them. But usually there
is no necessity. There is a necessity because there was created for purpose. But density and
length are probably two of the most
important and most used. That is for the weight pain. There is a thing like you
can invert, for example, like that, but we don't need it and that is for our lesson. I hope it was clear. I hope, I don't know. Probably you thought it
is very complicated. But how you can see it
isn't. One more conclusion. We go to the vertex group, create groups which will show the area that we
want to emphasize. Then you bring yourself
to the weight paint, then you color the
zone that you want. And then you go to
the particle system. Go down and in the
vertex groups, density, choose our vertex group
that we created already. That all. Thank you so much, my friends and let's go to the next lesson where
we're going to create the Afro hair style
for our dope duck.
13. 3.5 Afro Hairstyle : Hello and welcome our Less, less and where we're
going to create the Afro hair style for our
duck in order to finish him. Finally, first of all, let's hide our particle
system here and here. Then we go toward our duck and we go toward our
particle system. Bring, plus let's call this one Afro underline
hash, which means hairstyle. Then we go toward the hair. I'm going to keep it 1,000
but the length going to be 0.5 Control S to save, it's time for us to apply the knowledge from
our previous lesson. We go to the vertex group plus, let's call this one
Afra underline then. I forgot about our golden rule. I'm sorry. Let's create also
a new material plus new, Let's call this one a hush. Then you go to the
surface principle hairs, DF, the color is 120903. Great, Let's go toward
our weight paint. But there is one thing that
I would like to emphasize, let me hide this
particle system from the Afro hair style,
how you can see. Because we have a small
amount of polygons, the painting will be not so
smooth. My recommendation. Let's come back. Let me hide it. Let me duplicate with shift our head just for
our own insurance. Let's hide it. Then we
go toward the duck. I'm going to increase
the subdivision toward three and I'm
going to apply them. Then come back to
the weight paint. Now our drawing going
to be more smooth in comparison to what we have with our previous amount
of polygons controls. Let's go toward the
solo mode via slash on an empt turn on the symmetry. Here, let me show you. I'm looking forward to create
something here like that. That is our common area where we're going
to draw our hair. There are some type of brushes. Let's go here and choose Draw. Let's start to draw our hair
style. Let's go like that. In case if you miss with
your color somewhere here, just hold control and redo your action control
for a positional color. Okay, let me draw seven pat, let me go like that. Great. Good. I think I'm going to keep it a
little bit more like that. Let me look from the side
control one on the Nepa. Let me add a little bit here. Very far. Let me keep
it closer. One P. Okay, I think I'm done
with my own vertex group. Let's go to the particle system. Let's turn on the second one, which is for the Afro. Go down in the vertex
group for the density, choose a hair back
to the object mode. That's what we have at
the moment right now. Then we go up and
let's start with our settings material from
the dark base, Choose. We also can get out
from our solo mode, then go for the display
and check in and steps, we're going to increase toward six in the viewpoint display, we're going to increase them
toward our maximum of seven. Then from the children
we're going to choose simple is less chaotic. It will be very helpful, especially if you're
looking forward to create more type of human hair. Simple is a better choice. Let's go down for
the display amount. We're going to
keep it on. I have my settings, wait a second. Where they are 15.15 then
we go toward the radius. Radius mean how far the children hair is going
to be from our parents. So they can be very far or
they can be very close. In our case, the value
is 0.02 Good control, save then let's go
lower and clump, we're going to
increase toward one. Meanwhile the shape, we're
going to increase toward 0.5 then we go toward another. Tap that for purpose is some settings that
will contribute for our You can choose a hair style because our hair is different. Someone have more smooth, someone have more curly. How you can see curl in our
radial wave, bad and spiral. Let me go with the curl because I want to explain you something. Take a look once and then we're going to do this one together. Let me quickly show you and explain you the setting we go. For example, for the
curl that we're going to use amplitude show the
common distortion. Let me show you on the
left or on the right. Let me also to increase our viewpoint steps towards
seven to make it more smooth. Spline toward four, great, Then I'm going lower. Clumping is related
to the clump. Honestly I don't
have the necessity to use this one right here.
Let's go with the amplitude. For example, 04, The
flatness meaning provided our name flatness on flatness frequency is
something very interesting. Frequency will increase the
amount of turns of our hair. Take a look if I'm going
to increase toward 20 because of the
amplitude is too much. But you see if for example, with we got a smooth small
form example with 35, we have a lot of these small
turns that what we're going to use for our Afro hair style. The shape mean would
you like to see more of the spirals toward the
tip or toward the root? For example, if I'm going
to increase higher, our hair mostly is smooth and only at the end we got all of the spiral forms, vice versa, you can make
the end more smooth, more of the spirals at
the start from the root. I hope my explanation was clear. Let me hide this one. Let's
come back to our duck. Let's come back to our duck. Choose it. We are in the Afro, yes, Afro hair style and
then we go toward the Carl. Our setting is going
to be amplitude. We're going to keep it on 0.02 our frequency we're going to
increase toward 20 grade. Let's check what we have. It's already looked
very interesting, but simple and boring that I don't want you to
have this type of results. I want you to see better
results. Let's come back. What will help us to make it better is of course hair shape. Let's go toward
the diameter root. Keep it on 0.7 meanwhile going
to be 0.07 control safe. Then we move ourselves up
to the roughness where the main magic going
to be uniform. We're going to keep it on 0.08 Then we go toward the size, which remember the
lower is value, the more distortion
we will bring. Then we go toward the random, here we go to the 0.03 the size going to be 0.1 Control to save. Let's check what
we have. I think now it's more realistic. It's not so smooth,
it's not so perfect. Sometimes perfection look better than the perfection great. But if you think that we
are done, no, my friends, we can make it even more
better. You ask me how? I'm going to tell
you that we go to the materials and we're going to increase the roughness toward
0.8 and 0.8 Then we're, remember the coat
which will make our hair more brilliantly. We increase this one. Let me show you for
example, we're going to have one how it
going to look like, but we will keep this one on 0.5 Then we go toward the random
roughness which is lower, which will help us to make the bliks that they
reflect more randomized. And we're going to
keep this one on one, Just take a look how our
hair get more diverse, more interesting in comparison
to what we got before. Let me come back. Great. But my friends, we still
didn't finish back to the solid mode
because there is another thing we can
control our hair. Let me go here and we
have a particle added. There is one very
important thing to say, that how you can see emission turn into
some sort of gray. Which means if you're
going to edit your hair, you'll not have a
chance after to change the number of parents
and the hair length. Be sure that you've
got the right settings and then only play with
your particle editing because otherwise
you or to delete your editing or to get your numbers correct
from the start. There is a few
functions like comp, I think you already
understand what it is. Smooth. To make them
smooth or legs smooth, add to add more hairs or vice. Avery such a decrease,
then we have the length. Like to make them longer or not. Puff is something that
can make it more fluffy. Cut. Of course to cut. I honestly don't
use that weight, so we don't need it at
the moment right now. Let's go with the comp. Let me make it a little
bit more bigger. Let's start just small
things like on the left. On the right here is
your creative part where you can play around 300 Mpa. Let me bring it more
toward the center like that control 100 pat. Then where this length, we can make them grow or
we can make them lower. In our case, we're going
to switch on the shrink. Let's make some
small things here, just random touches on the
left and on the right. And then I go with a grow. I'm going to choose this
one in the center to grow a little bit more, 300 pet. Then back to the comp. I want to increase
this one like that, that one at an empty. What I would like
to do is also to cut a little bit
of our hair here. I'm going to that because
there is too much. Then I got the puff to make them a little bit more
fluffy like bring it just some small touches
on the upward part. Great. Let's go toward
our solid object mode. Render control safe. I personally don't Three
D M Pet control 11. Now let's turn everything on. Let's bring our glass earphones. Super. And then we
go toward our duck. Let's turn on our
first particle system and then we go
toward our cheeks. And let's turn the second one. Let me check what we have. Well, this is our result. I hope you're very satisfied your result and I
hope you learn a lot. I really try my best to
provide something available. There is a lot of things,
but we did a great job. Our duck is more
than I expected. The one thing that I personally don't like is
the color of our glass. Probably I'm going
to play around and choose another one, but rest. Take a look at this Afra style and digitize. There
is nothing hard. I mean, sometimes just
you have to figure it out some settings and
then to play with them. So I hope I was able to explain
everything clear and in case if you have any question
of course you can ask me. And with a blet
pleasure, I'm going to answer one more lesson
where we're going to render the beautiful guy and then we are done.
Thank you so much.
14. Final Render: Are you ready for
our final lesson where we're going
to render our duck? Now we can say
everything is done, and the only one thing,
I changed the color. I make this a little bit more toward the red of our classes, but in Rest, take a look. I like him. I like him a lot, and I hope you're satisfied
with your result. Also, my render settings
are very easy, very simple. Gingerly, right
side, solid mode. Let's establish our camera, which we didn't before. You can of course, shift a go toward the
camera and bring it there or you can bring the combination of
control out zero. That's how you can establish your camera from wherever point. Do you want an point? Let me go a little bit
behind like that, great. Then you go toward the
end of the side menu, go toward the camera view. You can see the border
right now get red, and that allow us to control the camera inside of our camera. Let me move him like here, a little bit lower. Good. Then we go over
the camera here, focal length, I'm
going to change on 85. Then once again, camera to view, I'm going to move him
behind like that. But I would like, however, to decrease that distance here. Vertical split three P. I'm going to choose my camera, let me and move it like that. Then a little bit higher
you can hold shift in case. If you want to move it more
slowly then let me check. Yes, this is what I need. Then make sure you see that
we have here and I and the camera I answer for what we see in
the viewport camera, for what we have in the render, Make sure that they
both are or on, or off. Like for example, our plane. We don't see the test plane that I did for you
in our viewport, but we'll see that
in the final render, because the camera is on off, let's go of of here, glass, turn of the
reference ear phones here. Studio, great weight paint, like that, control save. Then we go to the
render properties. Here is the important thing, render samples, the
more samples you have, the more better
quality going to be. But of course, it would take
more time, the less quality. For example, even 256, which you can think is a
low number, it's okay. It's a decent quality
that what I'll call, don't forget that we have here
a lot of particle systems. That's why it can be very
heavy and took some time. My recommendation, you
know what, for the test, keep it ten, We'll just render just to see if
everything is on point. If we have everything and there is nothing that we
missed from here. And then when you're
like, okay, it's good, you can come back
and to increase, I personally would like
to keep it on 1024. Then we go toward the
color management. Here. I have filming and
medium high contrast. What if, let's try to bring
the high contrast but okay, I'm good with the high contrast
that all render Noise, open image Noise, all be a normal accurate like
the default settings. Then how I say, let's do some small
test with ten. Let's control to save, let's render this one. We go to the render render image and let's
see what we have. My render is done, The
quality is terrible, of course, but that
wasn't our purpose. I did want to see that, yes, we got everything, we
hide everything on. One thing that I want
to add is to increase the subdivision surface modifier with one value here and here. Let me go to the
slot number two. Hide this one, then go
toward the earphone basic. Go to the subdivision and
increase toward three. Let's go the same with
our arc toward three. Control save back to the render, increase this one toward the
whatever value you want. I'm going to keep
this one on 1024 render image and
I'm going to see my friend after my final
render going to be done. My render is done.
My recommendation right now is to bring
it somewhere in the Photoshop or some
other Photo Ting to bring a little bit
of color correction, noise and everything else. But for now it's done. I hope you're satisfied
with your final result. I hope you're satisfied with the knowledge that you
receive through that class. And I hope you are satisfied with the way
how I explain things. I'll be ha see your review, I'll be see your questions. Thank you. Thank
you and goodbye, but I'm going to see you
in my other classes.
15. Final Project and goodbye: My friends, thank you so much for joining me on that class. I hope and I believe that
you'll receive a lot of useful information here that
make you feel as a pro, don't hesitate to share your project here
under that class. At the end of the
day, we build here not only our skill,
but the community. Also, it will inspire others
to try it. A few more words. I'll be very thankful to receive your review because I
really try my best to explain it in an
entertaining way and hope that you'll
get not only value, but also you'll have
some great time. Follow my page where
you also can found other useful classes that definitely will contribute
to your professional growth. Thank you so much and I'm
going to see you soon.
 Sasha Luvr, Work in third dimension