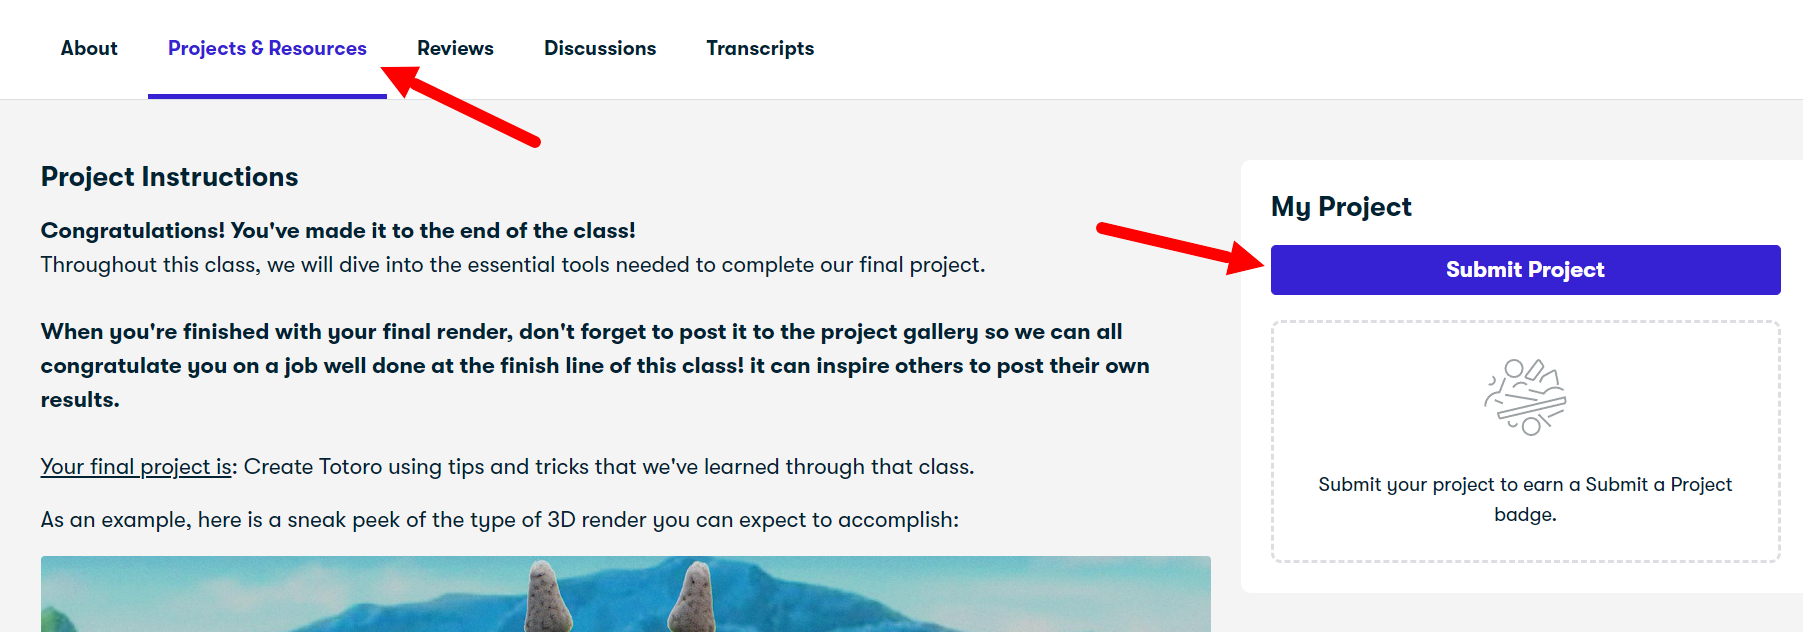
Transcripts
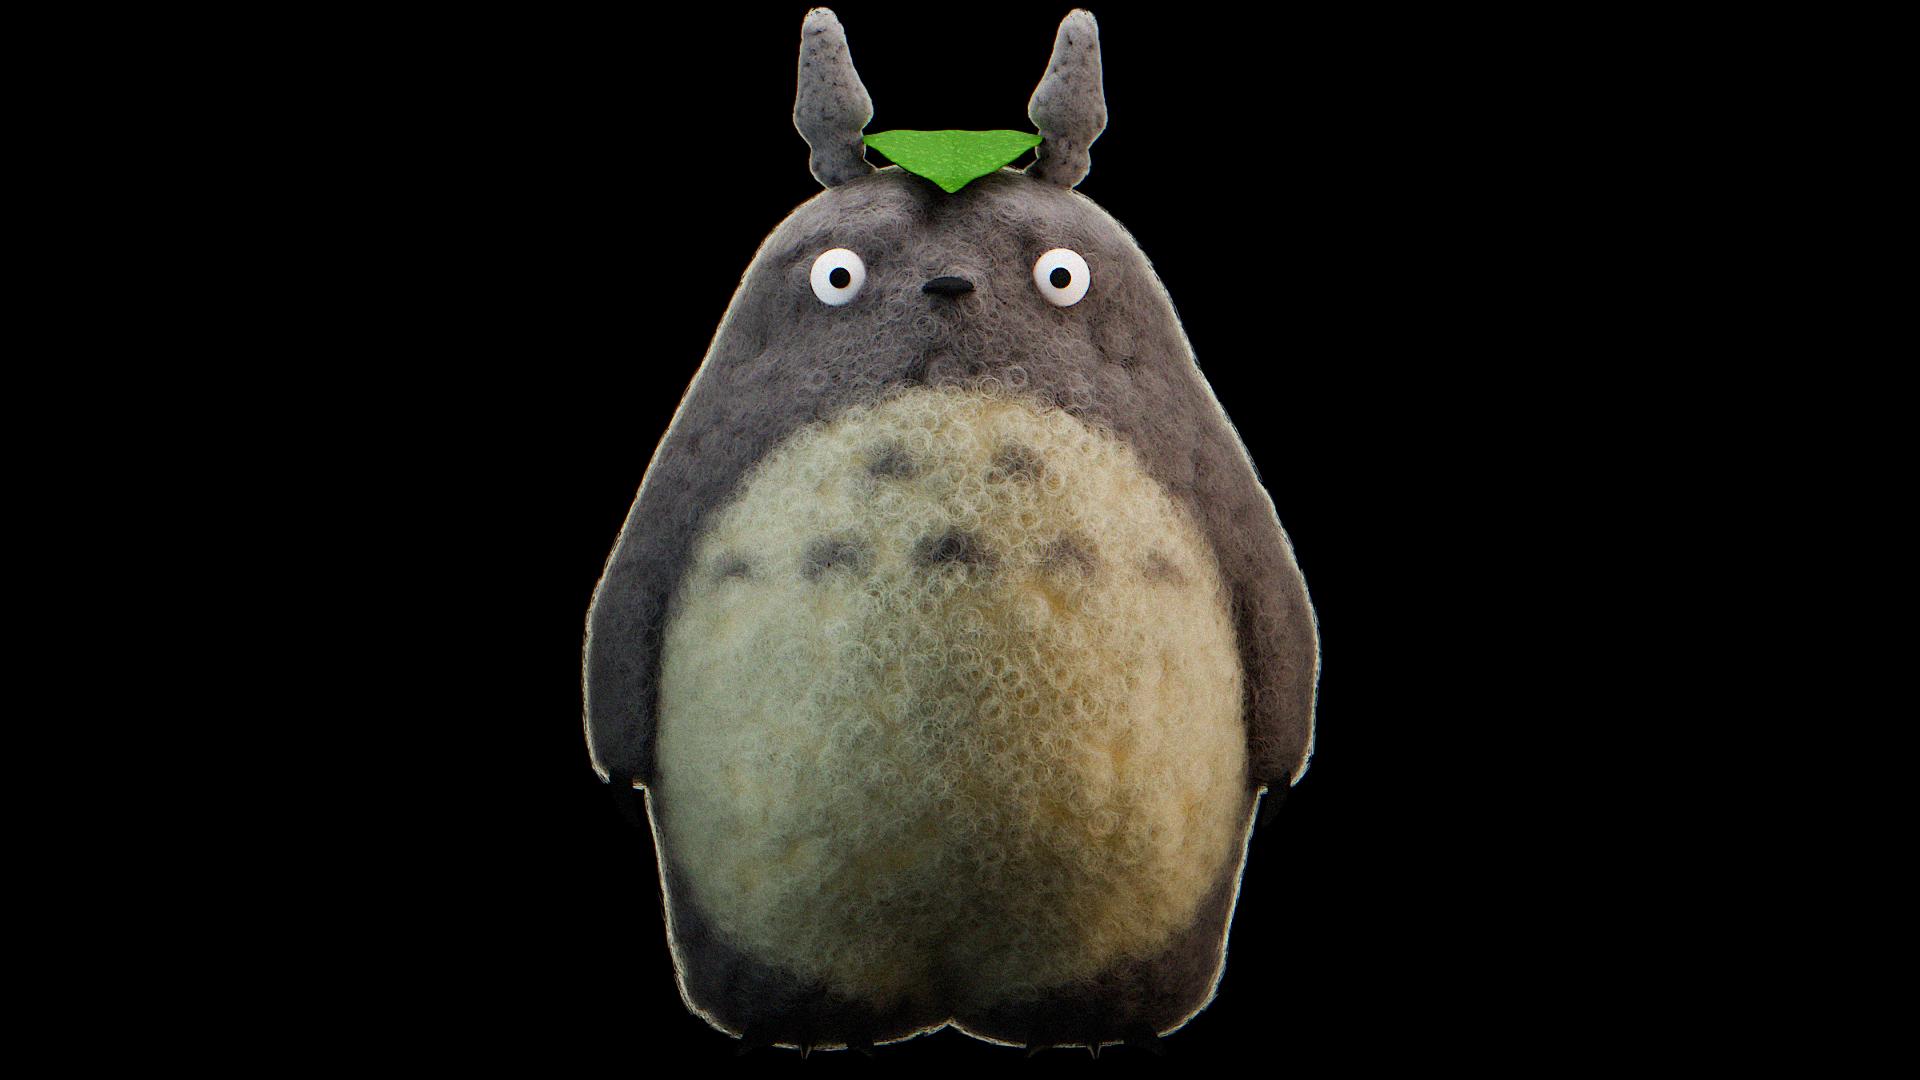
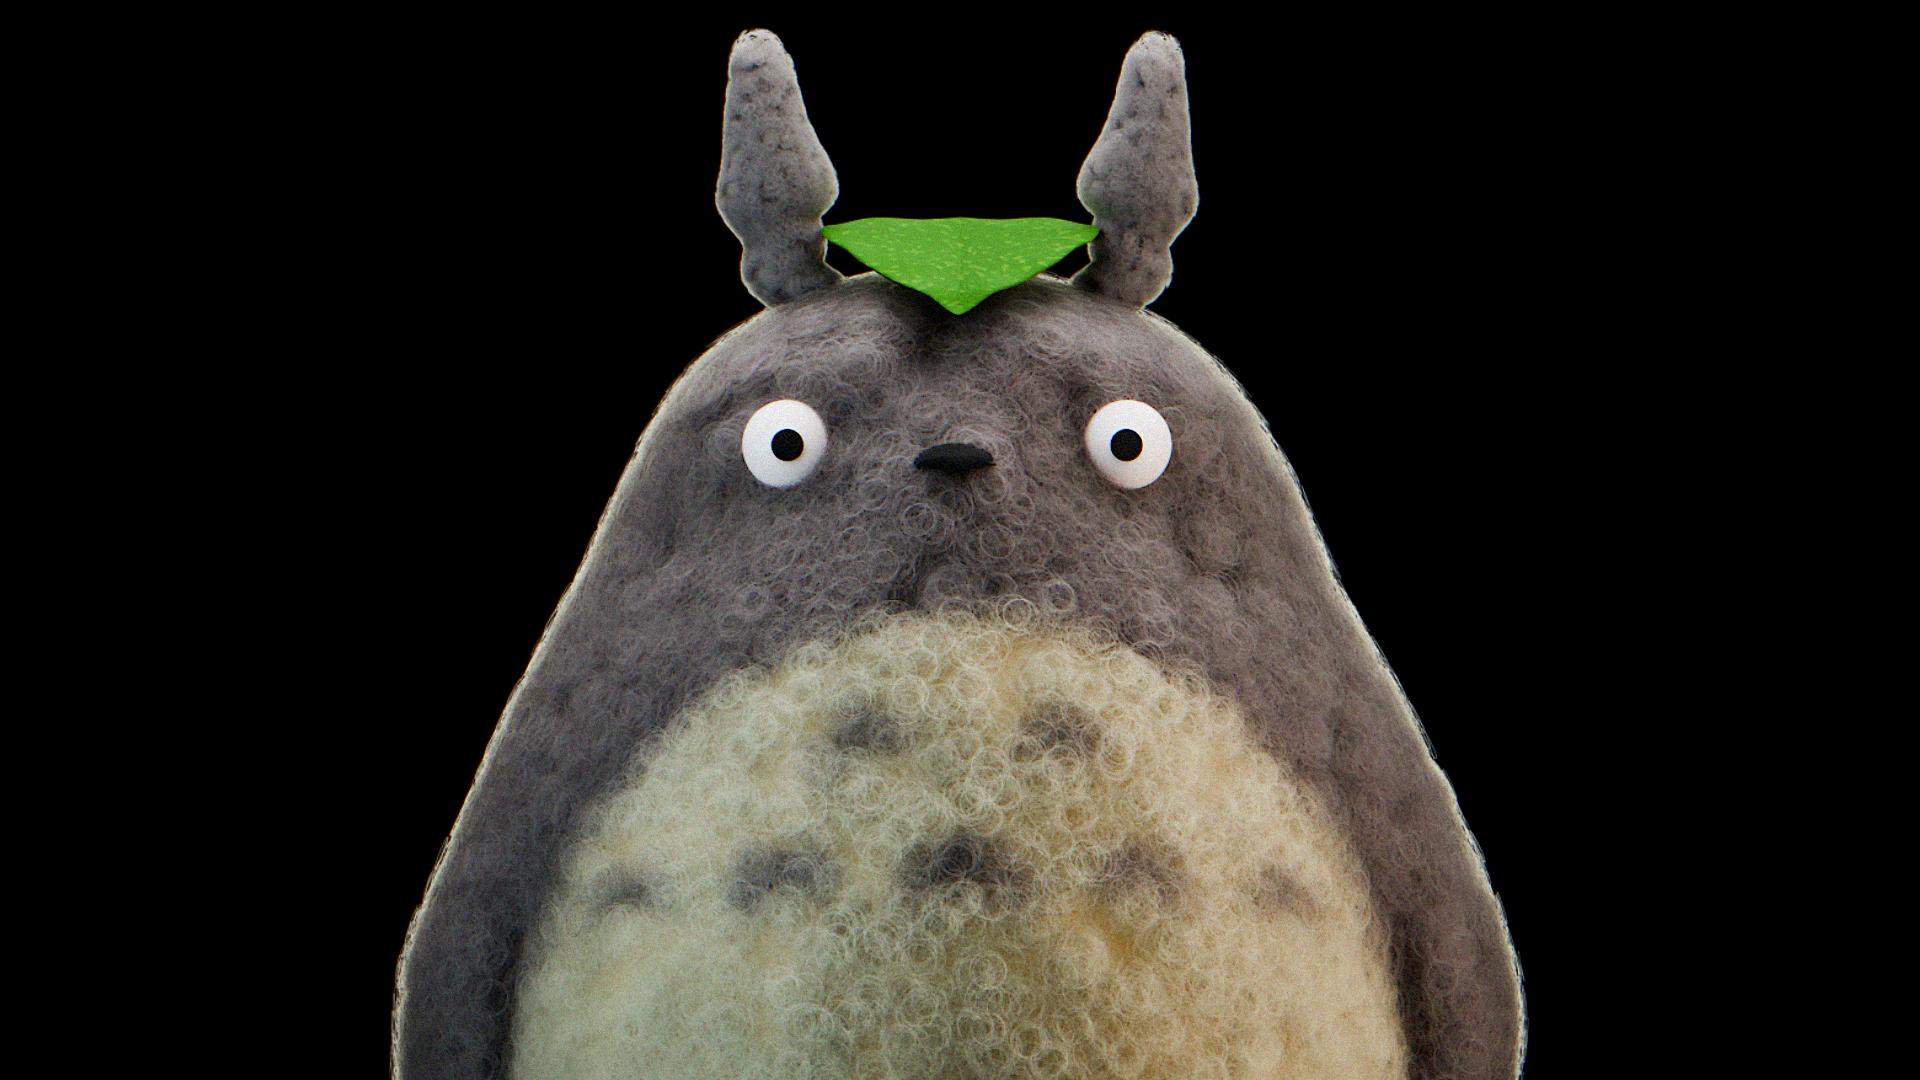
1. About that class: A. If you ever wanted to be a
part of a gbi Studio movie, well, here's your chance. I want this class
to not only provide available skills applicable to your personal three D projects, but also to immerse us in the
beautiful world of blender, where we can turn
every ID into reality. Three D can be much more than just an enjoyable hobby
in your spare time, and this class could be your
stepping stone on that path. Here we cover four blocks. The first one, of course,
is modeling our Totoro using basic tips and tricks,
addons, and sculpting. In the second block,
we'll emphasize our scene by establishing
the lighting. Texture painting is what awaits you in the
block number three. And now, you don't need any
painting skills for that. Be uncovering that
cidal blender, you'll lock a new useful skill
for your future renders. Part f is my favorite
one particle systems, which create a big
before and after. I'll explain the basics that will make you confident sure in your future desire to create
realistic fur or hair. And of course, we'll
render it and do a little bit of
compositing at the end. The most pleasant
party that will apply our knowledge and practice be creating my neighbor Totoro, I encourage you to share
your work after you finish that class to
inspire others and remove their hesitations
about trying three D. This class requires
minimum knowledge and experience and blender. But if you've never
touch it, don't worry. With a stubborn attitude and a little bit more time,
you'll get it too. At the end of the
day, what if not solving difficult tasks
will help us to grow? So if you're ready to have an enjoyable time while
improving your skills, I'll be waiting for you
at our first lesson.
2. 1. Totoro body: Hello, everyone and welcome, and I'm very excited to
finally start this class where we're going to create
our neighbor Totoro. So The first thing first, we're going to delete our
cube and our lighting. The second one
we're going to add. We're going to
turn on to addons, go and edit preferences, addons, search here for
extra mesh objects, turn on, and then we
go in the loop tools, and also turn on. Also, if you have
some questions, take a look in the left corner. Here you can see everything
that I press interest, bring your co authority, and let's start with
a part number one where we're going to
model and sculpt him. But before, but before, we have references which you can download under this class. In that folder, we go with
the Shift A, image reference, search for them in the folder, and bring the Totoro
reference one. Then we go the Art g x 91 and pD to take a
look from that angle. Then we go the GE. Go beside like that grade. And then we go the Shift A, bring the second
one Totoro site. We go the 90. Unfortunately, I didn't
found the best references, so we're going to use
them for our inspiration. Just for our inspiration. We go the G x on the left. Grade three S, make it a little
bit bigger G, like that. Let's go forward. We go with the one p we go
the Shift A mesh, and here for around cube. This is from the first
do that we turn on, which is extra
object around cube. Go here in the settings and radius one arc have to be four. Then we go with the control tube for the Sabon surface modifier, right click shade smooth. Go right here and turn on this
function. What does it do? We go in the edit mode, and how you can see the border is sharp in comparison
to our mesh. We're going to turn this one on. Now it's smooth. Great. From here, as for scale, move it up, good
transparent mode, which is, and delete
this vertices, x and delete vertices get back. Tap then we go with the edge. Then we press two
for the edges out left click to choose
this entire loop. Let's make it flat,
which is zero. The same thing right here, choose it as zero, nice, and then choose this loop
below and we go with the S for scale Then we go with
this one S for a scale, this one, also a
little bit like that. A chooses everything
transparent mode. Let's go a little bit on the excuse me, on
the right like that. Great. Then choose
the verses above. Go with control plus on the PD to choose
one more additional, write the faces,
and go the G and go a little bit lower like that. Great. Let's go forward,
choose the sloop, and we go with the g
extrude down for a scale. But this is our, not our heads. Let's go toward this border. Then we go one more time
is down, one more time is. And one more time.
Somewhere here, let's say, for a scale
from here press F. The topology is better, but don't worry at
the moment right now. Don't worry. One of the
advertises to this one. We got the control seven. If seven is to look above, Control seven is vice versa, and then shift
click on this one, and press G. O and M.
Let's take a look. Nice. Let's call this one F two, Toroat From here, we're
going in the edit mode. Choose the vertices. Yes, and then we go to the x, and delete them, then come back. Search for mirror. Mode is one above. For some reason, we have
a small gap right here, but don't worry, turn on the
clipping and then merge. Well, good. What if
I'm going to keep this 1203 button two, nice. Back in the edit mode, choose this phase and we go with two times like that grade. Then we go to the
x delete phases. Then choose this loop, and
we are going with it down But how you can see,
it's merged here. Control and let's turn off clipping for a few actions,
then one more time. Now they have the space. From here, we are going
with right click, loop two, and circle, then one more time S.
If they are merged, that means that you didn't
turn off your clipping. So as for a scale, one, G, G, sorry, S x, G as for a scale. From here, from here, choose the sloop, x,
and dissolve edges. Now it's more smooth and
now it's more better. Then come back to
this one, choose it. Instead of F, which will
create some sort of g, watch the gone when we have a phase with more
than four vertices, which we don't need it because
Blender will not like it. What we can do for
better topology, S E S, sinter, now it's much
better then come back, choose this one and
go these vertices. Turn on the
proportional editing. Press g. Move the circle here. This is the area of influence. The bigger it have, the
more vertices will cover, but we don't need so many. We are going like that. Just
a little bit like that. Even if it's not completely as our reference, I
don't see a problem. Then transparent mood,
choose the vertices, turn off the proportional
ditingG and go a little bit lower like
that. What we have. This is what we have at
the moment right now. I still want to get this
one a little bit lower. I'm choosing control plus
and the PG like that. Let's save our file, which is control Choose folder. Let's call this one my underline and Totoro, safe vender file. Great to two. Let's go toward his hands. I hope everything is clear
till the moment right now, and if you are ready,
let's move forward. So in order to create his hands, we need to add additional
loop right here, Control, add this one. Then let's make this one
a little bit more bigger. Choose a little bit. You saw that gap because we need to turn on the clipping again, and then we go to S.
And now it's all good. The same thing
here, a little bit smaller And let me
choose this one, set, a little bit above. Great. No, it's not great, why it's like that for a scale. A little bit later, we'll
move on into the sculpting, there is no problem
with that right now. Choose the four phases, and then we go with the
x and delete phases, then choose this entire loop, right click, loop
to circle, great. Let's start. We go
with the x like that. A ftationc that. Great. Then we go with the like. Just go go down like that for air
fotation for scale, and one more time, lower
airftation one more time. Lower Good. But his hand is thin. We go with the control
plus m one, two, three, and then we go the S E and
make it bigger like that. Great from here, choose this
loop below and we go the ES. A little bit ops
and one more time, S M at cinder That we have
at the moment right now, and I know it's come. Come back and let's
line this one. First thing first, let's
dissolve this edge, choose it. Great, x, dissolve it. Good. Then choose this vertices. One ped proportional ding on
G on the right like that. Great, then we go with
this one and G x, move this one, and
leave it on the right. And what if we're going to
add right now one more time, one more loop like that,
create left click. Let's go toward the lower part, choose the vertices,
Control plus, control plus S gre
like that, S x, choose this one, proportional
dating of x, it's good. Let me take a look. I choose
this loop, move it above, small rotation, S x, a little bit bigger
like that, if if, no. Okay, go with this one
a little bit lower, air fotation probably the
same thing right here. One more time to choose it. I know this process
is kind of tedious, which is C. It's not
always about having fun. But there's no problem. At the end of the
day, we are here to learn choose this
one and this one. And we go with the G x, a little bit like that. Great. ContralF to save. Now, let's go toward his nose. I'll for the transparent mode, make this reference bigger and
try to align it under him, a little bit more
bigger, like that. And let's go toward
our Totoro dit mode. Let's choose these vertices,
which is in front. Well, let's go with the
proportional dating and G, make it bigger gre and
move this one in front. The same thing right here with
this two like ri in front. Same thing here in
front in front, but not really like that. Choose these two vertices, and then we go three PDG, make it smaller, and move
this one behind like that. Then choose this one
and move this one up, this one, ab this one above. Let's go the GE.
Move it in front. Choose this one, GE, this one, G Greek, a little bit more inside. Once again, move this
one a little bit higher. Even if it's not
completely as in the reference because this
reference ain't the best one, I choose this one, just
for an inspiration. But let's go with
that and that three, and move this one a little
bit a back like that. This one, a little bit in front. Great. I like that part. It's in the way how
we have to look. And one more time, a
little bit inside, a little bit above. I don't think that we
need scopting anymore. Or actually, that part is bad. So let me choose
this one, seven GE. Go like that. Great Great. Here going to be his eyes. And at the moment right now. It's looking. Let's go
into the sculpting. Why not? Let's make it a
little bit more better in case if you never touched
the section of blender. Firstly, let's apply our
mirror, and secondly, let's apply our subdivision
surface modifier. This is our topology at
the moment right now. Go in the scot mode right here, and F to make the brush
bigger or smaller and Shift F to make the strength of the
brush bigger or smaller, or you have here for the strength here for
the radius of our brush. Make it smaller. Then we
have symmetry which we need. Which will which will
save for us time. Let's go toward the
inflate brush, that one, let's go toward our
hands on the right, and just make it a
little bit more bigger. The strength is in the middle. Just inflated a little bit
with a small movements. Then if you want to smooth
it, you go with a shift F, make the intensity lower
and hold shift left click. Still too much in my opinion, I'm going to shift F, even more. With this macromvements,
shift right click. Smooth it here, smooth
it there. Great. Grab, which is this one. Let's grab his hand and move it a little bit on
the right like that. Good one and p He's a little bit
more bigger than our reference, but no problem. Move it. Move it here, move it like that.
Toward each other. Let's move this part
in the middle shift left quick, just a little bit. G O actually, let's go and make his belly a little bit more
bigger like that great. Here, drop it inside
the head like that. Then from here, a
little bit lower, a little bit in front and the nose part a
little bit higher. This one in small
smooth one pets drop this one a
little bit lower. This one like that. Smooth, the nose part. Nice. Come back in the object mode. That is for the
lesson number one, I hope it was very easy. I know I know at the
moment right now, it's always at the start, you always aren't satisfied. But trust me, the
more far we'll go, the more better will
be your final render. So let's go forward
in our next lesson.
3. 1.2 Eyes and Nose : Lesson number two, where
we're going to create eyes and nose for our Totoro. We're going with
shift right click in order to move the three
D course right here, or even more in the right
right here, create. Probably Shift A, mesh, sphere, x 90, right click, shade smooth and control two. Then we go the S, make
it smaller like that. Despite that our
reference look like that, I'd like to move this one a
little bit more on the left. However, a little bit later, we will be capable to align. But right now, I'd like just a little bit
more on the left. Then we go in the edit mode, choose the vertices, and we go with the control
plus control plus, and then we go three on an PD, and then we go to extrude
this part, Gric like that. What if we're going to add an additional loop
right here with control in order to
make this one better, let's delete this one, the x, delete vertices, and then choose this loop one more time ES and
one more time sinter. Now the topology is better then let's call this one
F two, two point. Then we go ther modifier
mirror modifier, move above of
subdivision surface, mirror object, Totoro,
to do a bit smaller, a little bit toward each other. Yes. Yes. Then we go
to create his nose, shift right click right here, mesh cube control
two S for a scale, right click shape smooth, turn on this function, and then we go with the S S Then we go and
choose this phase, we go with the x like that. Turn off this function, S, make it smaller. Then let's go toward that one and we go with
the e for the x trot. Move this one g a
little bit a back, and for a scale like that. Three, and go lower, choose this loop, move this one, a little bit in front. Choose this one, and
then we go the S x. Great. Great, but we'll make it better because we'll
go in the scoop mode. Seven, to take a look above, S cri, make it
smaller like that. Make that part a little bit S x. This phase, which is, let's go in the solo mode, which is the slash in an pd. In case if you don't
know what a solo mode is an opportunity to work
with an object a part, so Sshped now we work
only with our nose. Choose this one and then go with the Great S x come
back right here. Then let's call this one F two, three point no one mp. What I would like to do more
is one of the vertices, transparent mode, choose
this one, and shift. Let's click this one, and
then we go with the G like that choose this
phase. It's enough. Then let's apply
our subdivision, duplicate, but let's apply
one more time control two. Actually, no control that. Keep it like that.
Because when you go in the scoop mode and if we right now we'll
press control two. We have something similar to the subdivision surface
modifier, only not. Long story short, in order to scoop something
very detailed, you need to increase
the amount of polygons. But when you increase this one, it starts to be very heavy for your PC for the final render. MTur is something that
let's say imitate the bigger amount of polygons without creating a bigger
amount of polygons, which means we can create good detail and have a
low amount of polygons. I hope it does make sense
what I said right now. For example, let
me turn off, yes. Let me try to choose
the first one. Okay. Let me try to draw something not to
draw but to sculpt. C, Control, control two, and you see, it's more smooth, it's better, even if the
topology is the same. I hope now you understood
what did I want to say. Then we go in the
symmetry on the x one and then where
the scoop mode, symmetry on the x Control Let's start again. I don't
have the motors Control two. Great, turn on. Then you go in the grip I want to have some form of tri angle. F to make it bigger. Let's drop this one right here. This is some individual work. You don't need to copy me completely. We have
our reference. We have an arc right here, and here we have to move this
one a little bit higher. Meanwhile, this one,
a little bit lower, go down for the smooth
shift left click. A little bit above. I'd like to make these two
gaps because it's nose. Let's go in the object
mode. Object mode. Move this one in front to
make it more comfortable, then come back to
the scoop mode, and then you see here two gaps. Let's make them,
move up like that. From here, move this here, smooth it go lower. Okay. What to do. Okay. Probably not
the best of Toro knows, but Again, smooth. You know what we can do.
We can choose the draw, and there's two functions. If you're going to press
on the left click, it's going to move this outside, but if you're going to hold
the control left click, it's going to move it inside. So I think this one is more faster in
comparison to grab tool. Then we can choose
the grab rush and move this one lower like that one on an mp
grad then Like here, a little bit, not as x, but just drag on the x axis, a little bit of smooth, a little bit lower, and that's what we have,
my friends. Great. Great. I'm satisfied
with my own nose. Then we go in the
object mode and you can see where is our progress. It's because here in the level of viewport, we
have the value of zero. You have to increase toward two, and now we have
everything that we did. But again, take a
look at the topology, topology is the same. I hope it was useful G E and go inside a little bit
of the rotation E, grigri make this
one bigger Greg, move this one a little
bit in front like that. S, that's it. Nice control, yes, control S, and then a K for the
rotation like that. Probably a little bit in front. One. Good. Good. Again, the nose here is
a little bit higher. What if I'm going
to move my eyes lower and let's go
in the Toro body. Let's go in the scoop mode. Here, we can make the same
control tube for the multis. Now we can see it's more smooth. Let's bring with a grab brush that part a little
bit more inside. Meanwhile, here we can
draw a little bit with a first brush draw brush and just create the
intensity is too strong. We go with the shift decrease towards something close to 0.2. For a scale and draw
right here a little bit. Control, left click for the vice verse
effect, right here, one more time, left li, left cli, just draw, and then we go with what
With grab rush. Okay. Move this a little bit in front. This one, 300 ped. Move this one a little bit here. Let's go with the nose,
also a little bit higher. Great smooth. Higher inside. Let's go with the
first draw brush for the vice versa effect, control, click, to
make this get bigger. Great one p nice Grab rush. I want to make this part just a little bit
lower like that. Go on the object mode. Increase the value and voila. Was it hard? No. Do you enjoy it? I hope yes. Yes, see you soon. In the lesson number three, where we're going
to create the ears. This thing, the nails, which are dangerous nails, I think for humans. Then I don't know in
English because I don't use this word
very often moustache. See in the lesson number three.
4. 1.3 Ears, claws and moustache: Like always, hello, my
friends and welcome. Lesson number three,
we're going to create years for our Totoro, and let's start without
wasting our time seven and an shift right
click, one and pet. I miss it. Shift right click
right here, one, No problem. Shift A, mesh, cube control to always scale and
G and go it here. Then we go with scale, G right here, go
in the edit mode, then choose this phase below, and then we go with
the extrude down like That go straight right here on the diagonal
one as for scale, one more time extrude, lower as for scale, G, one more time, extrude lower on the left, and one more time extrude, lower on the right. Now take this loop and move it a little
bit more on the left. Take this loop b on the right. Take this loop as for scale. Let's go right here, as for scale Great, right click. Shade Smooth. Pop up
what we can make. We can choose this one G x. One more additional
loop right here. Great. Choose this loop
call lower. Good job. Let's go with this loop. As for scale, call
it on the right. Remember it's going to
be covered with hair, so don't worry right now. To make it perfect. Then choose this loop and a
little bit G x like that. Choose the vertices
above G x on the right. Great. Let's call this
one four point ear, then I don't know to
apply subdivision. Don't repeat. Let me
just take a look. Apply the subdivision and
bring one more subdivision. Then we go the d modifier, Sarge for mirror modifier. Move this one above, choose the Totoro nice. They are a little bit different, but his ears are actually
a little bit different, but not in our case. Then we go the right
click Set origin origin to geometry and first scale, Gelle bit toward each
other and that we have for our ears. Nails. I don't think that
this is nails, but let's call this
one nails. Why not? Shift A, like always, guess what, mesh,
and of course, cube. Then we've got the control to and let's go
in the sole mode, which is slash and MPD. Right click, shade smooth
and turn this function on. Okay sorry off.
We don't need it. Then let's make it smaller. Then let's call the
Sigri like that. Go in the phase a back and
press for the extrude create. Then let's call in the
phrase in the face which is in front for a scale like that. Add one more loop right here, G move it up like that. Choose the vertices in front, g and go down. Then choose this face as gre, and choose this loop, S x. Yes. That is what we have. I actually like what if you're going to
dissolve the edge. It will be in the hand, so we will not see this one, and I think the shape is
more appropriate create. I also think that we can apply the subdivision and one
more time control two. Out of the sole mode, and let's go right here. Let's go with the t
r to make it flat. Then we go with the 90. 90. Let's make this one smaller, of course, more smaller. 300 petri, a little bit thicker. Let's adjust one here. Rate, one, smaller
rotation, smaller. Smaller rotation, good three P G. Then we go with modifier,
Sarge for modifier. Let's move this one
above count three, and let's increase the
distance like that sorry, 1.9 in my case, Great job. Then we're going
to apply our array modifier, and then we go the search for mirror above of the
subdivision and choose Totoro. Now we have nails right here. Let's call this one
five point nails. If the name ain't nails, I'm so sorry. Choose
the right one. But I will not care
honestly so much. I will call this one nails. Then we go the Shi D
go down like that. Then here, let's
turn off the mirror. Let's go with the out.
Then we go with the G. Right here, to make it bigger, right click Set
origin to geometry, one more time, as
to make it bigger, three p, one more
time. One more time. S, like that GE, a little bit in front. No, no, I don't like it. Now, I like it. Add modifier, search for a mirror modifier
above and choose Totoro. Good. What we have is the thing. Very easy. We will use for
this one. You will guess what? I think you'll guess
shift right click Shift mesh You know what? Why not up, let's go
toward the curve, and let's choose the path one. As far scale, let's go in the
data properties right here, open the geometry, and go in the depth and make it a
little bit thicker like that. Then feel caps
because right now, how you can see here is the gap, fiel caps we don't
have the gap anymore. One Move this one right here, Air ftation a little bit lower. Then let's distort a
little bit the shape. Choose the vertices,
call a little bit lower, this one, a little
bit higher, this one, great, and then
even more thinner, I like Sx, like that. G rig and move it
somewhere here. Great. Then we go with what? We can mirror or we can array. I think the more let's
call this one authentic, going to be edit mold,
choose everything, ship duplicate and change it. Make it as greek gre, no grigri S xx, S x bigger, and then change the
shape right here, the shape right here like that, and then choose this
one and Shift D, Great. Let's go with this one
lower, this one above. That's what we have.
It's called mustache. Yes, I google it six point, but I forgot how it's
correct to say, Mustache. Then we go in the edit mode, choose these vertices and let me bring this one
a little bit in. Great. Now we can go
toward the ed modifier and let's Series for mirror
modifier. Choose Totoro. Good. Let's hide
everything except Totoro, and this is what we have
at the moment right now. I hope you're satisfied
now is much better in comparison to what we got
at the lesson number one. Yes, two more lessons,
and here we are. Leaf I forgot that
we have to create the leaf above and then we'll
start to bring lighting, texture painting, particle
system, and many more. But I hope you're satisfied by the way how the
lessons are going on. Thank you so much. I'm going to see you in the next lesson.
5. 1.4 Leaf: On number for 30 minutes in
we already went very far. Aff, and we are done
with the blocking part. Seven shift right click. Guess what? Mesh plane. You thought probably
cube, but no. Okay. Let's go in the solomon like always seven p and then
let's choose this vertices, and let's direct this one S X. Then we go here with a control. One more additional
loop, bring it here, and then you go with
the control two, and then let's adjust this one, choose both of them
as x like that. Choose this one as x like that. Choose the vertices, G gre S x, re grade and one more
additional loop right here. Then we go the one on p choose only this loop out
left click, create, and then we go the G and lower
like that three on an ped. I'd like to make a small
rotation like this. Then we go with the right
click shape smooth it. Mode, you choose everything, and then we choose faces, and then we go the
E up like that. Great. This is our shape
at the moment right now, but can we do better? I think yes. One more
additional loop right here. Move this one in the middle, and then we go with S zero, S x zero, like that. Then we go with the G
and just move this one a little bit above to make the shape a little
bit more interesting. Then choose these
vertices on the side, G, and go lower like that. Let's mirror everything
that we did before seven p. Then we go Actually, let's choose this
one, the vertices in the transparent mode, GE, move this one a little
bit in front like that. Then let's delete
everything on the left, x delete vertices, come back, go in the do modifier, search for a mirror modifier, and move this one above, clipping on and merge. Nice. Now the apology is okay. What I'd like to do is
to choose this two. And move this one more in the center for
that type of shape. Then what I'd like to do
also probably to choose this two and to move them a little bit back like
that. What do you think? I think it's nice. Then choose this one and then we go with the G ri like that. It looks more like a heart, but it is what it is,
and G right here. One path. This is
our leaf. Three. I don't like from the
side. Let's choose everything that is behind, and then we go the air. No, no, no, we go the G, lower a little bit like that. Then choose this one G and
move them a little bit up. Let me take a look. Nice.
And everything right now. Probably, probably. I'm going to choose
the vertices below three and an PD and move this one a little bit
higher like that. Great, that is the
shape of our leaf. Let's call this one F two leaf. Probably if you're going
to out of the solar mode, you have this type
of thing above. I don't know if I
want to create it. Firstly, let's make it smaller, one on an p, even more smaller. Three, move this one in front, one as for a scale create what if I'm going to move this
one lower like that, but there's an intersection. So we have another
option to make our ears a little bit more
bigger to create space, and then we can make this one G. S G. Great. G that relatable to that part. First thing first,
apply the mirror. Check. If you like everything, it's all good, then apply the mirror first, the
subdivision second. Then go seven to look
above three for the faces. Let's choose this one. Eight phases in total
x, delete them. Then we go the edge out left
click to choose this edge, and then you go to the
right click, loop two, circle and then make a s for the rotation like
that for a scale. We have to add one more additional loop
right here and one more additional right here because otherwise it
will be very bad. Out left click, one andme
g is a little bit above, and then we go the
Z for a scale. Let's go a little
bit on the side, and then one more
time, as for a scale, and then we go the E
S at center grade, and then we go the control tube and that is the
shape of our leaf. V To do, let's check
everything again. I like it. I don't know why, but lately, I like more the results of my class more than
the original one. So I think this Totoro is even better than the Totoro
I created before. I hope you are satisfied
with your Totoro, and we finished with the block number one of the modeling. In the next one, we're
going to create lighting, texture painting,
and particle system. Thank you so much, and I'm
going to see you there.
6. 2.1 Lighting: Hello, my friends and welcome
in the block number two, where we're going to
create the lighting. It's going to be very easy and it's going to be very fast. Firstly, let's hide
our reference, this one and this one. Then Shift S
Cursorch World Ogon. Then let's call this
collection Totoro. But let's create another one with right click new collection. Oops. Right click new
collection, double click Studio. Then here we go with a Shift
A plane S for a scale, this is going to be
our general lighting. Let's call this one F
two, general light. Then we go the G.
Move this one above one a little bit
for a scale, great. Let's turn on our engine
from v to the cycles, and let's call it
the materials here create Let's call this one
general underlying light. Let's go in the render mode. Right now, we don't see
anything because we have to change the
surface principle, BS DF toward the emission,
and now you can see. Then we go toward 1.3. I'd like to decrease the
lighting of the world, so we go toward that
planet, color decrease. Then we go back to the render properties
here, color management, and we go with G toward the filmic and from non to
medium high contrast. Nice. Two, three, more
sources of light, we're going to add Shift A, light area right here, three pt, and then we go the
x like that G, Eric, sorry, move the sanaba. Then we go right here,
and from the square, we go toward the rectangle. Size x is going to be 5.5, which means the
diagonal like this is the size x or actually, you know what? You know what? High the general light, and then make decrease
this one toward four, increase the gre toward
six actually toward 4.5, and then increase the
power toward 260. The lighting behind going
to create this outline. Relatable toward the color, I need something
more toward blue. Good. But I'm not
sure if I like it. Let's turn off the overlay. Let's make the world dark. Let's open the second window, which is right click,
Vertical split right here. Let me go here in the render. Nice. But here we are back toward the simple
viewport right here. Turn on the overlay, and let's play around a
little bit with our lighting. Probably GE, G A like that too much. I need outline here, here, above the head, and probably let's
make the size x toward five and size gre
toward five also. Nice, then we are going
seven to look above. Here, where the pivot point, we're going to change
on three Dcursor now having your area
emphasized shift D, a, and turn this
one on the left, nice, decrease toward 230. Color going to be
something more toward greenish yellow and white,
something like that. Then we go the shift D, a, rotate on the right, and here it's going to be more toward blue violet or
something like this. In between, choose your
own, which you like more. Let's go with a G, a
little bit on the right. This one is c, general light on, probably one and PD. I'm going to move it a
little bit higher like that, three x, Nice. Let me go with this
two, only this two, and we go with the
G a little bit lower and G grec like that. Great. That is, for our lesson. Was it hard, always know? Very quick, we created
four sources of light. We emphasized everything. We can make this one
a bit more greenish, and this one a bit
more toward this. Nice. I'm going to see you in
our next lesson where we're going to texture paint
our Toro. See you there.
7. 3.1 Texture Painting : Lesson number six, block
number three, actually, where we're going to
create and before and after because from
the white Totoro, we will go toward
the original totoro. Let me hide this one. Let's go toward the viewpoard
display overlay on. Then in order to
texture painting, in case if you never
did this one before, don't worry this
ain't hard at all. Firstly, we need to create
a material for our totoro. Second window, choose it. Then we go here in
the shader editor, drag this one on the right, calling the material
properties and press. Let's call this one
one point Toro and then turn on our reference
image, which one this one. And then duplicate
shift D on the right. From here, we go with the shift a image texture and drag
this one right here. Press let's call this one T is the image of our texture
that we're going to create. Let's call this one
totoro underline. Paint, then hold the
left mouse button and drag down like that, multiply on four in order
to increase the quality. Then for the color,
choose this one. Choose this one, picker, and press right here. Great press and connect
color toward the base color. Now let's go in the
texture paint window. Right now, turn from here, in the par shading. Let's try to draw something. We have here two colors. Take a look. I try
to draw and I can't. Why? For two reasons,
first, firstly. We have to go in the
layout. Come back. I showed this one for purpose. We have to make
an UV unwrapping, drag this one under right. Then let's go in the sole
mode with our Totoro body, tap two for the edges, and let's go somewhere in the middle and
choose one of them. For example, this
one out left click, then shift Oleft click. Okay. Control three for another
view for the left view, shift out left click. Why, what we do right now, we want to choose
one loop that is going through all
body Auto to body. Then we go the shift out click, and then we go holding shift left click left click left click left click, the same here. Left click left click, and that, now we
have one big loop. And then we go the right click and here search for Mark Sam. Now it's turn red. Then we go the A to
choose everything. Rap. Back in the object mode, out of the sole mode. Now back in the texture paint, and now you can see we have
the texture of our Totoro, is very gray, but you can
see this one right here. But there is one more thing. We need to save
our texture image. We go right there, image. Save S, choose a folder. Let's call this one
Toro paint texture. Save as image. Now let me try to draw
and now we can draw good, then where we go. Let's the second this one. Unfortunately, transparent
mood doesn't work right here. Now lets the colors. For the white, we are going to the color picker and
choose this yellow and for the black color picker and
choose again the real one. Then from the viewport shading, we are going right here in the simple one, hide
the second one. Let's go into this transparent
mood in order to see, and we will create
the belly for him. We have the color choosed, and there is one
more important thing in order to save our time. Make sure that you have
symmetry on on the x side, which means if I'm going
to dry on the right, I'm going to have
this one on the left. Also, my recommendation
is to make the brush smaller because
the more bigger it is, I know probably it's on my side, but blender start to legging. I don't want to leg that's
why make the brush smaller. Control is to save, and let's call transparent
mode in the simple viewport. Let's create the borders Okay. Mm hmm going down. I'll make this one in the
real time without speed up, which will be
probably a little bit boring to watch. But you
don't have to watch. We have to draw right
here right now. But also why I don't want to
speed up because who knows? What if I'll say
something important and you'll miss this one
and I don't want it. That why I'm drawing
right now with you. Let's go right here toward
the lex, like that. Great. Let's go above. Let's check it. Then
in the shading. Nice. Everything is nice. Now without watching
the reference, just complete, I'm going to
make it a little bit bigger. M. That is what
I'm talking about. Start to legging.
I don't want it. I'm done with our belly, great. What about here?
I don't like it. Let's solve it together like
that nice Great one and p. Then back right here
and we have the things. I don't know what
are the things. Let's switch. Now the main color
is the gray one, not the gray but this one. Then let's start to draw it. Also without me. One more important thing to say, in order to not
switch like that, for example, we have the main
color and the second color. If I'm going to press
with the left button, I draw with the main color. If I'm going to hold a
control and left button, I have the second color. Just remember this one and don't waste your time on
switching the colors. We are going right here and
let's start with the thing. Probably there is also will be cool at least for this one in the middle to
turn the symmetry off. But for this four,
we'll have symmetry on because why not why we
have to waste our time. But if you want, no problem. You can make everything
in your own style. The purpose of this quest is
just to help you to bring the guideline in order to boost your confidence
in your own skills. But the creativity part
stay on your side too. Draw Contra left click. To make this a little
bit more sharpen. Great. Then symmetry. Let's
go right here. Let's check. Let's
check. We have it. Let's go have three more, and I hope you are not boring. I hope you're satisfied the way, how I teach because
it's very important not only to stay here and
yelling or yawing. I don't say that
my English is bad, but when I have to speak life, sometimes I follow the words, but I really try my
best to improve it. I love to learn English. I really am very satisfied
when I do this one. The reason why I
tell this one to you because we are doing
right now something No, not important, but I
have to entertain you. I try to entertain you by saying that I love
to learn English. I hope you love also
or for example, to read books or to listen for the podcasts
or to meditate, which is also very great way to isolate yourself
from the garbage, from the news and
everything else. Two more. Let me check. This one is ugly. But I'll make him I'll try
to make him better Okay, I'm done with my own site. I hope you're done also. And let's go in the layout, and let's turn the render. And the question is,
where our paint. Again, I showed this one for purpose come back in
the texture paint, and here you can see the
star appear right there, which means we have to save we have to update our texture. So we go here and just
press save. Come back. I don't like the light here, too strong, more toward
the white, like that. I don't want to be
very emphasized. The same thing
here is k. Here is k. Let me turn off
the reference. The lighting behind. I also don't like it so much. 230, let me go a
little bit back. 4.84 0.8 nice. Okay, you know, to not make this
lesson very long. Let's say here we created
the texture painting, and in the next lesson
from this block, we'll create the rest of the materials for
everything else. Thank you so much
for your attention, and I'm going to see
you in our next lesson.
8. 3.2 Materials: Welcome back, my friends. We're we're going to finish
with that block of materials. This is what we
have at the moment right now, and let's go. Let's start with our ears, which will be very easy. We are going toward
new materials. Let's call this one
s Ears let's go to the base color color picker and choose the gray one voila. Let's go toward ice, and here we're going to
create two materials. We go with the
first one plus new. Let's call this one one
point ice underline white. And the roughness is
going to be toward 0.3. Then let's go in the simple
shading viewpoard edit mode. Choose the vertices, and
then we go to the control plus and the MPD till where. Emphasize this one also. Yes, only this one back
toward the render, then we go toward the plus two point P and a sign now base color black roughness,
zero three grade. That how we have we created. Out of the git mode,
let's go toward our nose and let's create new
material three point no. Let's make it of black and roughness I'm going
to keep toward 0.48. Then we go toward the nails, they think and new
four point nails. We're going to make it black, of course, and roughness is going to be
toward zero three. Then we go toward the nails
below, search for it. Then we go toward leaf. Here we're going to
play a little bit, let's hide our Toro
where is the Toro buddy. And working only with the leaf. Here in the base color
will make it a little more interesting than
simple green color. Firstly, let's choose green, let's say, like that one. Then I want small
bumps right here. That's why we are going
toward the search for bump modifier and connect the
normal toward the normal. Then we are going toward noise texture and connect
the color with height. V, we have something here. Press control t for the mapping
and texture coordinate. In case if you press
and nothing appear, go in the edit preferences
do not wrangler and make sure that
you have a check in one more time control t and you'll have the
same thing right here. Scale, we're going
to increase toward 25 Here from the generated, we are going toward the
object hold control, left click and here we are. Scale toward 2.5, 2.5, 2.5. Then here in the strength
decrease towards zero three. Detail, increase towards four. Right now we don't see too
much because it's very bright. Let's add an additional color. We go with the gradient texture control T. Move this one above, and then we go with
the color ops with the color rump Connect color with a color with a base color, and here color with a factor
add one more additional one. Let's create three
types of green. But before instead of finer, there are different ways. We can go with a spherical, which is very nice
quadratic sphere, radial. I think I'm going to
keep the spherical one, and I'm going to make
this one op black. Make it green like that. Nice. Choose this one, turn this one toward
other way of green, and here is somewhere
in between of them where it is here or there. Move this one right
here, this one switch, I'd like to switch like that, and here, But even this one, we can make it more better. Move this one above with co with the mixed color connected. From here with a second shift A, texture and search
for mass grave. Yes. Copy the color,
shift right here, connect the color
toward the second color and hide right here. We'll add some small
things around. Control T. The factor in case, if you don't know
what is the facor. If I'm going to
drag on the right, show the area of influence. If you're going to
drag on the right, we'll see on the nodes below that are
connected toward the B. If I'm going to
drag on the left, we'll see on the
gradient which are connected toward the
A from the left. So that's why how
you can play around. I'd like to keep
this one on 0.45, and let's play right here. Let me direct this
one like that. Let's increase the scale toward
15 or what if toward 35. Don't repeat, you can
choose your own settings. I just tried to found something
that will satisfy me. I think 4.5 or even 7.5. Something that I like detail. I'm going to increase toward 4.5 also and this word that I don't like because it's
hard for me to pronounce. I'm going to keep on
two. Great. Now let me mix the colors. I can make it a little
bit different like that. What about you? I'm
going to drag you more toward this type of blue and
green and relatable to you, I'm going to make it
more toward green. That is what we have also here. I'd like to emphasize for the details and strength toward zero six to make
it more emphasized. That is what we have at
the moment right now. Okay. Turn everything
like our Totoro. Nice. Let's check. The last one are
this one Mustache. We go with the new material five point here and we are choosing something
like color picker. He's gray. Only let's make this one a little
bit more darker, and then the roughness
worth zero to O rest, I don't see the
necessity to work. It's good. I like it, and I hope you're liking it
also very quick, very easy. We've created, what
we've created. In the next lesson
in the next block, we'll create the f for our
Totoro. See you there.
9. 4.1 Totoro fur - particle system: Another lesson, and we are very close for the final resute. So let me draw this
one on the right, and we're going to create
four for our Totoro. But before. Because there are people
who are very scared all of the particle system settings and they think that
this is very hard. I'll explain for
the beginners to, I have a class apart where I explain
everything in detail, but however, we're
going to cover the most important moments. The first thing first,
when I do this one, I go with the Shift A, mesh, and plane. Why do this one? I I want to create
an example to see, somewhere where I
can experiment, and then when I like it,
I just apply on my model. I think this is more
productive workflow. For someone, yes for
someone, for me, yes. Because you follow my
steps, please do the same. Then we go for the particles new and let's call this santo. Third and choose the hair. Then let's decrease
this one toward three, and let's decrease this one
toward one or actually. Let's start with our settings. The length going to be 0.13. This is the length you
can see right here. Then let's go in
the pro shading or, it's good in the pro shading. Then let's go lower, render and here check
in the Bs plane. Base plane is something
that will make your particle
system more smooth. Let's increase the
steps toward five. Let's go in the
viewpoard display, and it is very important
here to increase. So imagine that right
now this particle have only two segments,
which is rough. If I'm going to increase, it's going to be more segments, which means the particle
going to be more detailed. But remember, the more
bigger the value, the harder going
to be for your PC. Right now, we're going
to keep this one on six. The maximum value is seven, and we're going to turn seven
before our final render. Then we go toward the
children, who are children. This is the parent hairs. And children, it's going to be the hairs around of
each of our parent. I hope it does make sense. There are two ways to examples
simple and interpolated. When you choose
simple, they are more close for the parent and when
you choose interpolated, they are trying to cover
the entire object. In our case, we're going
to choose the interpolated and the value here
is going to be 4040, which means you're
going to have 40 children actually not 40. One, item from that number
is always the parent. In our case one for the parent, 39 for the children's. Then we go lower. I come back to the view part shading and then
which is the part, no, which is the clumping. Clump is something
that can group our hair or from the roots. If I'm going to decrease
toward negative one, so how we can see
the all R group, the steam from one point or If I'm going to
increase toward one, I can group them from
the end point of each particle system
of each particle. The clam going to be on the
value of 0.26. Like that. Then I'm going lower toward the roughness and this
is where the main, let's say magic it is. Uniform is something that bring distortion over a general
shape of our hair. Take a look, oops.
You understand, yes. And if I'm going to
decrease the size, it even more distorted. The uniform, we're going to keep this one on a small valuus. Uniform going to be 0.06. Small distortion, how you
can see, it's enough. End point is something
that changed the direction of the end point of each hair. On the right, far from each over or back to
the original one. Our end point going to be 0.01. And random is something
that bring distortion only for each hair in particular. If uniform distort in general, like the general shape, random, each one individual,
so we're going to keep this one on zero. 0.1. That is, then we go
lower toward the king. King is something that helps
us to choose the hairstyle. Like in the real life, we have
different hair structure, different hair styles,
women and men, like you understand, yes. So that's why he curl,
radial, braid, spiral. I'm going to choose the curl, and you choose, please
also amplitude. How you can see the amplitude
right now is kind of big. So if I'm going to,
for example, increase, decrease, I hope it does make sense and there is no
necessity to explain. This is the amplitude
of the hair style. I'm going to keep
this one on 0.08. Then we go toward the frequency. Frequency, right now,
the value is two, and how we can see this
is some sort of S shape. Frequency is something that
allow us to add more spirals. As you know this
type of curly hair, let me increase, for example, toward 22, decrease a
little bit the amplitude. So now you can see,
when I have two, this is the shape, 22, a lot of spirals like curly hair style usually have this type of
hair in particular. So I hope it does make sense. Let me back the
amplitude towards 008. And let me frequency, it's going to be 6.2 Nice. And then the shape is
something that can strengthen your hair from the steam or from the roots or from
the end point, take a look. If I'm going to increase
the shape toward one, my steam going to be straight
if I'm going to decrease. In that case, the end
point is straight, and the roots have all of
the settings right here. So We're going to keep
the shape toward 0.7, which means I want to have
something health health, health straight, health
like that with the spirals. And then what we have to
add more, the flatness. It make the hair
flat from the roots, and it also group all of
the settings in one point. I want to keep the
flatness on 0.15. That is how the shape. You see this type of spirals. I think they look
very interesting, and I hope you think
in the same way. Let's apply on our Totoro
with only a few exceptions. Firstly, we have to increase
the number toward 2,500. Then we go toward Totoro, and there is two important
things that we have to do. First of all, to check
the phase orientation. Everything have to be blue. But if in some case, it's red, you go in the edit mode, H, choose everything out
and recalculate outside. In that case, you'll
have blue also. That shows the
direction of each phase and is very important.
I have to be blue. The second one, let's
apply transform with control A and apply scale grade, and now we are ready to
add our Totoro plus, go here and choose
Totoro for alla. This is our Toro without
yes and without nose. What if it's very important to be careful
with the length? Because, for example, if I'm going to keep this
one on 1 meter, the settings will look
a little bit different. The hair length is
very important. Let's decrese this one
toward zero one. Like that. Now let's choose everything
in our case, and nose, three G gre Let's move
e. What about the nose? I'm going to move this one
a little bit more in front, a little bit like that one and ple bit more far
from each other. A little bit in Constle bit
out actually, like that. The nose a little bit higher. Nice. And the leaf and the ears, also, let's call it the Z ears, a little bit on the right. That is, for years, we're going to create
fur in our next lesson. But we didn't finish, actually. We have a few more things to do. Let's go in the
render view port. Let's hide our plane and be prepared because it can
be a little bit slow. Right now, you can see it look very boring,
like very boring. For a few reasons. First thing, first,
the golden rule, we have to create a
material apart for our fur. Let me show you, come back, and then we go on the materials. Here, we are going toward plus. One point too few then
open the second window. Let's go in the shader editor. Instead of principle SDF, choose word principle SDF, choose principle hair SDF, and that was created for purpose and you'll
see the difference. From here, going in
the Totoro materials, choose the Totoro
paint, control C, go in the Totoro
four and control V, connect color toward the color. Now go in the particle settings, and here in the material, leave the totora I just want
to show you the difference. Our before, yes, you see, now let's go toward Totoro four. We have the difference, and you probably don't like it so much. But we will play around
with our settings. But the difference is that
principal he BDF, take a look. We have the outline right now. This type of principal he BDF have the interaction
with the lighting. Meanwhile, when we
have the simple fur, which we have before,
like the simple material, everything is just flat, there's no interaction
with the light. We don't need it because in
that case, it's very boring. Let's come back to the Totoro, and then let's go
in our settings. Right here. Let's decrease the roughness
towards zero three. Let's increase the dom
roughness toward one. Iowa is something that saturate
the color of your hair. For example, if I'm going
to keep this one and one, the colors are more emphasized. Unfortunately, my PC is a little bit slow just a little
bit, so that why. But you can see the
colors right now are more emphasized the way
how they was before. I'm going to increase
the Iowa toward 1.20 or even 1.1 and two. Great. And the code is
something that can make it like you know how diamond
work with the lighting. So this is some sort
of diamond effect. I'm going to keep
this one on 0.4. A. But even here, we can make it better
because of course, I don't want to
make you feel like you're a beginner. You
aren't a beginner. When you watch my class, even
if this is your first time, you're in advanced,
you understand. I want to add one more. Bring the principal
hair BZ f on the right, and from here, make
a gap right there. We go the shift A
and here search for and saturation value and
connect it like that. And now we can play,
we can make it even more saturated via 1.1, the colors, then the value, for example, d reckons
zero, take a look. Not what we are
looking for 1.12. And the hue is something that
can randomize the colors. I'm going to keep this
one on 48, like that. Just a small randomized effect. What if I'm going
to keep this one on zero nine, zero nine, the value, I think I like in
that case a little bit more. Then we can add
another one shift A, color, brightness and contrast
and bring it right here. In case if you don't know
how these nodes work, my best advice is just
bring the highest value, for example, one,
and take a look. Now you understand. Now look like Pokemon's keep
this one on 0.1, and about brightness.
Again, one. You can see it's very
bright. We don't need it. We're going to keep
this one on 0.04. That is for our Totoro for. Actually, you think so, but no. Now let's see the
difference one again. The Totoro for, yes, and then the simple Toro
material that we got before. Should they say
something? Should I think no before and after. The difference is big. There's one more thing
that we can do actually. Let's come back toward our
plane. See for this one. Let's decrease toward five, I want to show you something. Let's go right here. And
let's go in the render. Again, how you can see
our hair is very thick. There's one more setting
right here in the hair shape. Diameter root is
the biggest value, the more thicker it's going
to be from the roots, and tip the bigger value the more thicker it going to be from the end point.
Let me just show you. Now we have one. What are
you going to keep on zero? Thin, zero one. Now you can see it is very thin. The
same thing with tip. If I'm going to
increase the value, I'm going to make it thicker. One, you can see the end
point is very thick. Our value going to be
four diameter root 0.35. Meanwhile, for the
tip, it's going to be 00.7 Control S two save. Now is better than it was. Probably I explain
everything that I wanted, and I hope it does make
sense for you right now. Let me show you on practice
the viewpoint display. Take a look right now, and if I'm going to
decrease toward two, Because there is a low
amount of segments, you'll have different result. The more segments you have, the more detailed you can make. The less the less detail. The same thing with
the sculpting. You subdivide it, you
add more polygons, and you can make
it more detailed. Back toward the six,
if I'm going to increase toward the
sevens the same, but keep it on six. Then come back toward
2005 hughig the plane. And watch the Totoro. Let's check it. If you
want to go full screen, you go with a control space bar. That's how you can
go and watch it. I don't really like the way how he look a little bit weird, I think because of the ice, and I think we need
to turn Firstly, check and then I'm going
to bring my comments. But I hope you like it. The f is looking
very interesting. Okay. I like the result. Come back. I like the
result of the few. But then let's go with our ice and let's bring them
a little bit in like that. Let's add our
reference, which one, this one, and let's bring
them more like here, the nose a little bit above. He aggressive. Very
aggressive for some reason, G X, especially on that one. Let's go the Pivot Point
individual regions, S X, the nose a
little bit like that. He looks very aggressive
I don't like it. Totoro is very cute. He's not our enemy. Let's bring the moustache
G a little bit in front. And where are our nails. We don't see them
because of the for, so let's check it. Let's check the nails
from the hands. Here they are, small
rotation, great, the same thing right here, Nice. Now, When we're going
to render our Totoro, we're going to render with
the transparent background. That's what I want to
show you right now. But before, let's go toward
our lighting behind. I want to make it smaller, 4.34 0.3 to decrease this
one toward 180, nice. Okay. It's cool. G x. How are you doing? Do you
like? Do you like it? I hope. Then we go
toward the nails. There is something
that I don't like. They are chew in front. Then go a little bit ab. G. Is that like that? A little bit air ftation
above the background, go here and the render engine, and go down for film, and here we have check
in on the transparent. That's how we're going to
render because it will save our time and
we'll be capable to set him with different backgrounds which will save us a lot of
time, how I say it. That is, for our first lesson. I hope it was available. I hope you get a
lot of information, and I hope again, you're satisfied
with your result, and if not, play around. Stay creative and believe in yourself a little
bit of motivation. Next lesson, we're going
to create fo for our ears, and then we'll render. Thank you so much,
and I'm going to see you in our next lesson.
10. 4.1 Ears fur: Probably is going to
be the final lesson before we're going to
put it on the render. Which means, we're going to
create fur for our ears. And without wasting
our time, let's start. First of all, let's hide the Totoro fur because there is no necessity is
a little bit heavy. So I'm going to
make it like that. Great. Then we go
with the same method. We go with the shift A mesh, and lane then we go with the G up g x on the sideway,
the second screens. Now we can see everything that I press in the left corner. Let's create first of all
the particle system here, and then we're going
to apply on our ears. It's going to be a
little bit different in comparison to the TtoroFu. We're going here in
the particles plus, and let's call this one
ears underline fur. The number switch on the hair, the number, let's go with three. And then the length, the first one going to be 0.07. Then we go lower display
and check in, steps six. The same thing with the
viewpoard display, steps six. Children are going
to be interpolated. The display amount 25
and the render also 25. And then go lower, let's
group our particle with 0.28. Then we go in the
roughness settings, and let's work a bit here. So the uniform or
in other words, the distortion, the common
distortion going to be 0.0 15, then the end point
going to be 0.0 16, and the random
going to be 0.0 13. Small small changes. Then you go king, curl and here, we're going to decrease the amplitude
with one more additional zero, so it's 0.02. The flatness is
going to be 0.15, frequency going to be four, Meanwhile, the shape going
to be 0.70 0.7, I say great. It's a little bit similar to
what we got in the Totoro, but also a little bit different. Let's go toward our ears. Let's apply the scale
control A scale. Let's check the
face orientation. Everything is blue, all good. Then then we have one
more thing to do. Let's go in the render,
let's go in the particles, and let's decrease the
thickness of the roots towards 0.30 and t plus increase
toward 0.1 nice. Then we go toward our
ears particle plus, and let's choose here ears for The thing is see that before we have
to apply our mirror. Let's go here and apply
our mirror modifier. Now it's C. Then we
go in the particles, and let's increase the
number of parents toward 1,200 la let's hide this one. And let's create a material
apart for our ears, do you remember? I
hope you remember. Let's go in the hex copy copy. Then we go in the
plus. New s underline. F Principle BSDF changed
to principle hair SDF, and here we are going with
this color and relatable, let's go in the particle system, render material, and choose the second
one that we created. Now, to save ourself
a little bit of time, what we can do is to
open the second window. Yes, with the shader editor, which is shader editor, yes. Then we go to the To choose
the material of the Totoro, and then copy this This
three without image, Control C. Go toward the
ears fore D this one, Control V, and connect the
Bs DF toward the surface, Vla What I'd like to do is to increase here
the situation toward 1.2 to increase toward 1.505 and the value is on 0.87. Nice brightness. I'm going to decrease
toward one and contrast toward 0.14 in rest. I like it. Or probably
hold control, right click, this one, and while we have this
color, I don't like it. Let's go one more
time, copy hex, go in the ears fhere right here, bring it and make it a little
bit more darker like that, just a little bit more than the original one and
connect one more time. What we can do also
because you can see that the color is a
little bit more brighter, so we can go toward the color
and decrease it a little bit like that or in case if
you don't like it at all, you just can hold control, right click and just
keep the original one. I'm personally going to
have them connected. Great. Let's check it more closer Control space
bar for the full screen. There is no intersection
with our leaf. Yes. The result is very nice. I like the spirals propo, I suppose is the right name, so the spirals that we have. The hair look very
interesting and fluffy. Let's check with the Toro fur. Let's turn it on. And then come back
to the space bar. So you probably notice also that the colors are a little bit different and they don't
match each other very good. So that's why I think I will come back to
the shader editor, and I'm going to delete this one holding
control where you are control and right click ops
on the ears right here. In that case, they're going
to have the same color, which I like a little bit more, and I'm going to
increase this one again. Great. One more thing that I don't like really is the ice, I still can't get them. I think a little bit more far from each other, like
in the orgional one, where the reference, where is the reference show
overlay this one. Yeah. G like that the nose also will be
great to move this one, a little bit more
higher and Yes. What if I'm going to make them
a little bit more smaller? Good, a little bit inside. Madam, let me check
once again, everything. So that is for our lesson. In the next one, we're
going to render it. Then we're going to compositing and then I will say a good.
11. Render and compositing: And it's time to
render our Totoro. I hope you're satisfied result. I personally like it, the fewer, the lighting, everything compoint
Let's set our camera. Let's render a little
bit of compositing after and we have
done. So let's start. Firstly, let's hide our
empty, where it is. And let's actually
from the start, let's hide everything that we don't need to see in the render, how we can see there
is an eye and camera, make sure that they
both are or on or off. So this one for the render, this one for the
viewpoard Turn off. Turn off. These two planes are attached
to our particle system, so we can actually delete them. If you want to experiment,
we can keep it. I personally don't
need them anymore, so I'm going to delete it. And rest, everything is
on point. The camera. The hot key is
control t zero and p that's how you can
easily establish camera from whatever
angle do you want. Let's go one on an
mp control t zero, and that's what we got. Then search for the camera
and the collection. And let's move the camera
in the studio folder. Nice. Then we go for
this camera icon, and instead of perspective, choose or photographic,
and let's shift. Let's align this one on the x like that a little bit more on the x one
now it's in the center. Original character
have the tail. But because we were render
from the front view, I didn't thought there
was a big necessity to create Totoro tail. But if you want it, you
have all of the tools. It can be like your
homework, for example, you can create the tail
going to be somewhere, you know how to create fuel,
you know how to create it. So I believe you if
you wanted no problem, I personally don't
see the necessity to create if we will not see
this one in the final render. And now let's check the
color management filmic, medium high contrast. Let's go toward the render part. So the M samples. I want to make an
important disclaimer. If your PC is weak or
something average, because of the particle system, I can take some time. For this, we don't know
what is the samples. The more samples you have, the more better quality,
it will be in the end. I'll recommend to keep
something for around 1,000, 2000, it will be great, but 1,000 can take a
few hours, for example, if you don't have some artics
or some powerful machine. That's why something like 500 will be enough
for a decent quality. Because I did the render before, I will keep this one in
my case on 560 samples. Denise check in,
open image Denise, albeit the normal curate. And actually, that is, but there's one very important trick that I do all the time. So before I render, I set the samples, for example, on three to check
if everything is on point, and then I increase the samples. So let's do the
same render image. Okay. How we can see all good. Totoro is in the right place. We don't have
nothing additional. The background is transparent. The quality is, of
course, terrible. But what you can expect
from three samples. One thing that I
want to do still, I think I'm going to ops Move my eyes a little
bit more inside like that. Okay, he's too
aggressive, like that. Why am my camera there? If my camera, very weird. And check off from the camera
to view. Now, I got it. Okay, my friends,
if you're ready, let's increase the samples. You can choose your own from
1,000 if you trust your PC, and I'm going to see you after our Miranda is going to be done. See you. Hello again. Mirnda is done. We go
toward the image. Save. Choose the folder. Let's call this one Totoro underline
render, Save image. My recommendation
here look very good, even for 500 of samples. I hope your satisfied
be your result. And now without
closing this step, let's go straight to
the compositing part. We go in the compositing, drag it down, drag
it on the right. Then use nodes check in. We already have our
scene right here, but in case, let's say. In case if you close
your render tab, what you can do is
to delete this one. We go with the image. Yes, and go with the open, search for your render, total render, and then connect create one more shift
A and search for viewer. Bring it here and connect image to the image and
image to the image. This composite for the render, this viewer to give you the opportunity to
see render right here. Then if you want to make
it smaller, you press V, if you want to make
it bigger Alt V. If you want to move this one on the right
around the left, hold Alt and mouse wheel. V to make it smaller. Let's add one more Alpha. Search for Alpha over
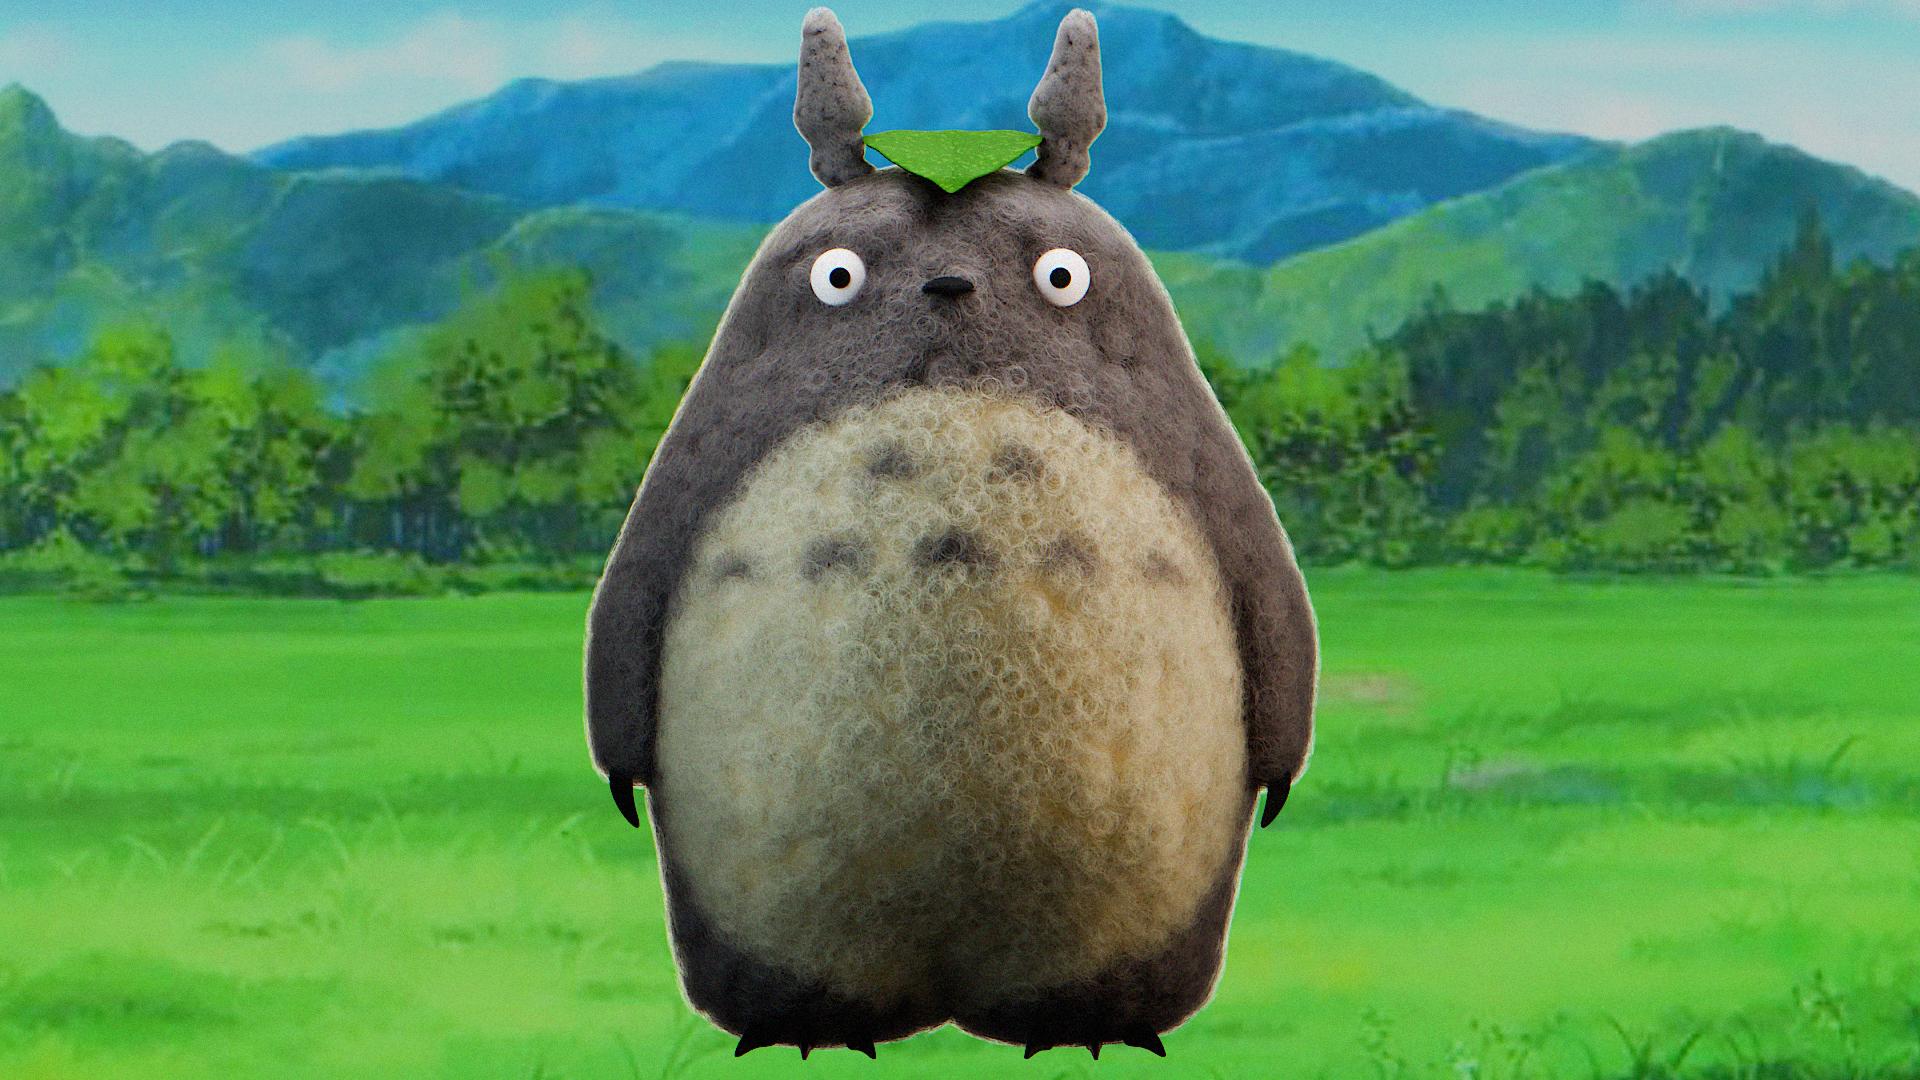
and bring it here. Move this one in this one below. Let's control right click. Image to the image. And that's how we easily can create different
backgrounds for our Totoro, which is very cool
and also check in the convert and bring
this one at the maximum. But if you're experiencing
the photoshop, you can bring it straight
to the photoshop, you can search in penters
for some animate backgrounds and combine them in order to
achieve much better result. But easy way is just search the image.
Choose the background. For example, the
blue one is cool. This, I'm going to
keep like that. Then you go toward your window, how we can see we already
have our render here. You go to the image, save S, and let's call this
one Tutor render plus G. But in case if you closed, for example, I closed, yes, you go in the rendering, like in that part. And you already can seether end the result or search
right here for the end the result
and Villa image save S. My friends,
thank you so much. One more lesson, we're
going to congratulate you, tell you about the
homework, but rest, we finish with our
class. We learn a lot. I hope you like it, and I hope I was capable to entertain you and you
have a lot of fun. Thank you so much. And goodbye.
12. Congratulation and homework: So, first of all, let
me congratulate you. You really did a great job. And in case if you're
not satisfied, be your final result, there is no rush.
There is no pressure. The most important is to
enjoy what you are doing. When you enjoy it,
the results usually are much better than
you even expected. The second one, I hope I was able as a teacher to
explain everything clear, simple, and of course, in entertaining way because
we aren't here, you know, to be bored or just like when this lesson will be
finished or wherever. So I hope I was
capable to entertain you for this 1 hour
and something. And the last one, of
course, show your work. You can upload it on the
social media or here, and I'm really looking forward
to see what you've done. You always can open a
discussion, message me, and with a big pleasure, I'll try my best to help you. If you're a beginner,
complete beginner in your, that was too much for me. Well, I can understand. Sometimes probably I wasn't very not like patient, but I mean, it wasn't for complete
complete beginners, but with a stubborn attitude, a little bit more
time and coffee, you definitely will get it. So thank you so
much, my friends. I'm looking forward to
see what you've done. I'm looking forward for
your reviews, please. It will be it will be very interesting to see what you
think about this class. And of course, I
wish you the best. See you in my next class.
 Sasha Luvr, Work in third dimension