Transcripts
1. Course Introduction : Before you fresh on design, commit to look beautiful. It's most fit for pilot. That is the reason every designers nice
upward measurements. Hi, I'm Stella,
your instructor for this easy sewing kit class on accurate measuring
for fresh on design. Each piece of clotting you will make the request
specific measurements. This course shows you in this class for
all skewed levels. You will learn the basic
of measuring the body and getting key dimensions
vertically, horizontally. In second Francis and
the protests forms, you will know how to
measure the hips, twist the posts, as well as show that to the nipple
should be width, and show that to the heap. And finally, you also measure the full length
of your trusses, which is the arsine
and also the inseam, the crutch, De Tai, the Neil and the ankle. I have found out my
pattern infarction over a ticket of ego, which I transformed from your hobbies, an
independent designer, making inferences
of cows for women should run and cylinders
worst and an African styles, make your own fresh on
is not always easy. When you truly and getting
into the work of a design, say this pressure inspiration, suppress on, in this class. I hope to share that
pressure with you in your work at the
end of this course. You also be ready to measure
for whichever side you need, the relative preference,
pressure measuring. Let's go.
2. Tape Rule Overview: What do you understand
by Chip room? Peru is a measurement
or a flexible ruler. If possible ruler
measurement that is used to measure
distance and sizes. We have varieties of
these measurements, this ruler, they
include plastic, these two and the fiber glass is also used for
the measurement, drafting parts on
measuring fabric, measuring our
curves and corners. Now let's go. This is a typical example
of one inch chip route. From year to year is one inch. And half of this
one inch would give us one over two inch. Further divide half of these. It would give us one over four. When we further divide is
one over four, it's default. 1 eighth. When you further
divide is 1 eighth, which we still give
you one over 16. And I said, when you
watch, watch very well. As it's decreasing, it's increasing w of
the previous one. When sometimes you ask, Is this have gotten, how did they get this out
of the gate at the goddess? As we can see, this
particular tip, r2 is having system bars 1234567891011121314151616 bars
here to make it one inch. Now the first one
is one over 16. It can no longer be
divided for them. That is why we left it that way. The second one is meant
to be two over 16, which is two over 16. We dynasty we have to do is sue divide it to the
smallest fraction, year one to year eight. That is how we got
this one over eight. The next one is three over 16, which can no longer be divided for them. We leave it that way. The next one is four
over 164, over 16. You see we can divide for that Swiss smaller fraction
for year one, for year four. That is how we got one-quarter. Here. You move the same way. Five over 16 is no
longer be divided. You move to the next one
which is six over cysteine. We can leave it like this. It can further be divided
to yet three to eight. That is how we got three over x. The next one is seven
over 167 of our system, which can no longer
be divided for that. Now you'll be asking,
how did we get this half year is eight over 16, which is eight over 16, we can follow up, divide
it to a smaller fraction. It here, E1 and E2. That is how we got
our half-year. The next one is nine
over nine over 16, which can no longer be
divided for the last bar, is ten over 16, which can further be divided
into smaller fraction five. Yet aids. That is how we got
five over eight. The next one is one over 16, which can no longer
be divided for them. The next bar is 12 over
cysteine swath of a cysteine, which will further be divided
to a smaller fraction. Six to ES6 aids. We can see divided to
a smaller fraction. Yet three to year four, which is through quarter,
three over four. The next one. The next one is Tati, or via Cysteine setting
of a system which can no longer be divided into
two smaller fraction. The next one is 14 over 16. We can further divide
into smaller fraction. Yes, 7287 over eight. The next one is
15 over cysteine. It can no longer be divided. Cherry Smirnoff fraction will
live with away 15 over 16.
3. Tape Rule Units: In some measurements, when
you have your measurements, you have it in decimal points. Is somebody is something that you don't have
to be confused about is still the same thing when it comes to your tip rule. You just delete them, you just for you to be familiar with, like when we are
calculating our Puebloan, it gives us in decimal points. Right now. Go one over two is the
same thing as 0.5. Kids, when you measure
and you get 0.5, just know it's the same thing as half, half of your tip rule. That is the symptom
as half an inch. You don't have to be a
freedom. How do I get this? Just know is symptomatic
from year to year. The report five want your one-quarter one-quarter
is also dissented, as is there a 0.25
that is half of this half of 0.5
would give you 0.25. When you divide one over
following two, give me 0.05. Is there a point? So five, when you divide 0.25, it will also give you
0.1 to one to five. That is half of one-quarter. Well, no. So three divided by four
would give me 0.75. In a situation whereby you
have your measurements 1.75. We don't have to be
afraid is the same thing. I want to be quarter
from yet to displace is 13 quota and it's
also the symptoms at 1.75 from yet is 1.75. If maybe a situation
whereby you have 1.25 is also the
same thing as 1.25. One more quarter. Maybe where you see 1.5 is the
same thing I went on half, which is from year to year. 1.5 is also the same as 1.50. That is how to read
your tip rule.
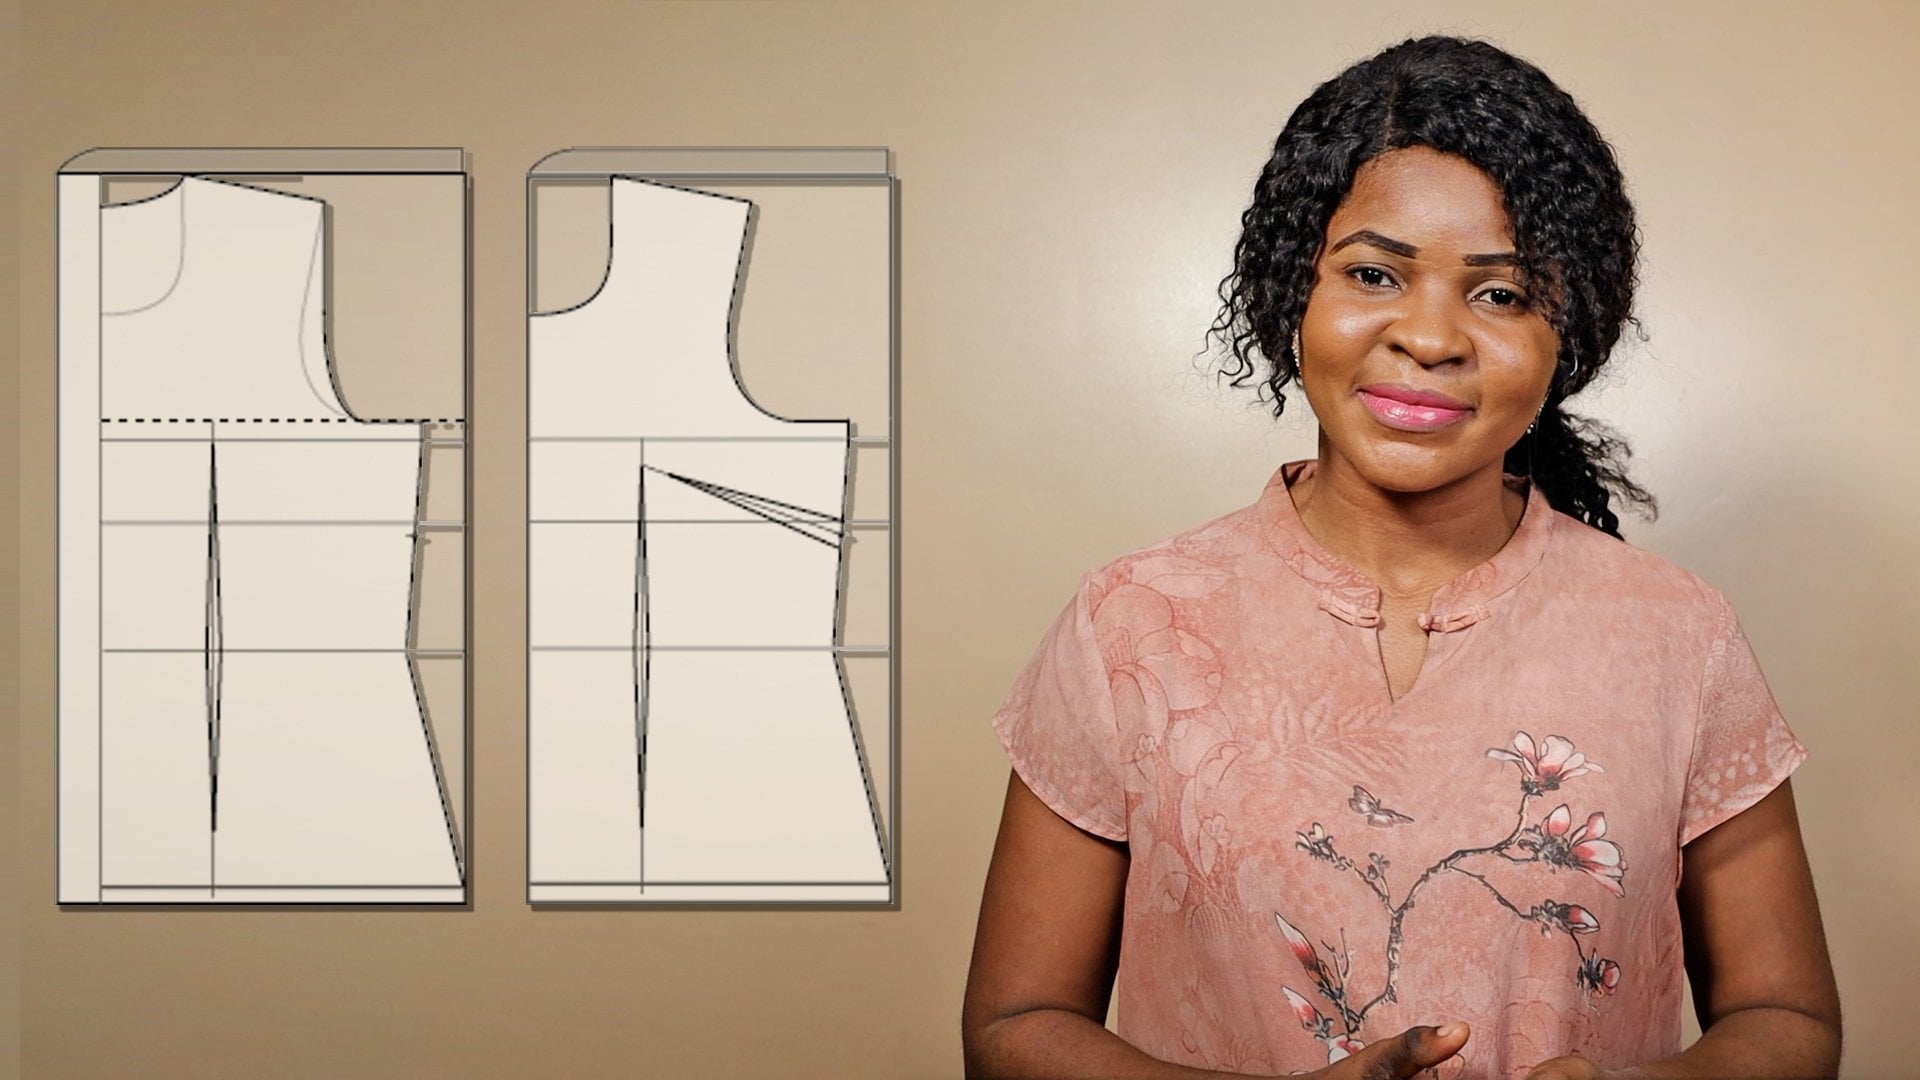
4. Chapter 1: Base Measurements: As a fashion designer, you want your clouds
to look fitted. The first thing you need to do, make sure your measurement
is accurately measured. Now we're touching you on how to have your accurate
body measurements. Let's go.
5. Horizontal and Vertical Measurements: The first thing we need to know is now we have two
types of measurement. We have the vertical
measurements and the horizontal measurement, where we are talking about
the horizontal measurement. We are talking about the
sack offerings of the width, boast and the heap. When you're talking about
the vertical measurement, we are talking about
from the shore, That's your nipple, the show that's on the board
shoulder to your width. Sure that your heap
and all of thoughts.
6. Shoulder Measurement: Now, the first thing you do, you take your
shoulder measurement. As you can see, there's a joint here
in your shoulder. So that is from one
shoe that to the ADA. When you're taking it, you
check it from this edge. From this edge, this edge. You take your shoulder
measurement this week. Okay.
7. Upper Bust Measurement: Then the next thing you do, you take your APA
boss measurements. Now we are taking our
horizontal measurements, which is our, the
so-called friends. This is the op-amp. Both measurements,
you make sure the tip is parallel to the
flow kit this week, this is your boss measurement.
8. Bust Measurement: Then the next thing you do, you go to your
boss measurements. Make sure you take the
full apart of the boasts. The practice where
your boss is fuller. You take the measurement
there and mature. At the bulb, the measurements, your tip rule is not done. When you're taking It's just want to show
you something, okay? When you got to keep
your posts measurements, make sure your tip
rule is not the sweet. Make sure it's this way. Is framed. Okay? Like this is fam trip this way. Just on this, I'm just
showing you how you make sure how you take your
boss measurements. Mukesh, your friend this way
and he's not going down. That is how to take your
boss measurement by ticking the fuller
parts of your boss, the full-up parts of your boss. This way. Make sure it's not so tight
and it's not to lose. Okay? You make sure these SIP
is parallel to the flow. That is how to take
your boss measurements.
9. Waist Circumference Measurement: Then you come down to your
width measurement, Mitchell, you take the C NOPAT or do
narrow part of your width. For you to get an accurate
West measurements, you have to tick. Maybe your elastic round
your width for you to get the accurate
measurements of cake. You wrap your tip
round, your wastes. This tweet. Can't see. Your cipro is parallel
to the floor. You check your
wisdom measurements.
10. Hip Circumference Measurement: When you're setting
your hip measurement, make sure you take
the full-up parts of your heap 1 second
the hip measurements. This way. Down to your *****,
your boots, okay. Make sure the tip rule
or cipro is not too tight and is not
to lose its frame. This step is parallel
to the flow. This way. This suite, that is
the width measurement, does a width measurement. And the distance
between the West and the heap is no more than
seven or eight inches. That is one unit to know.
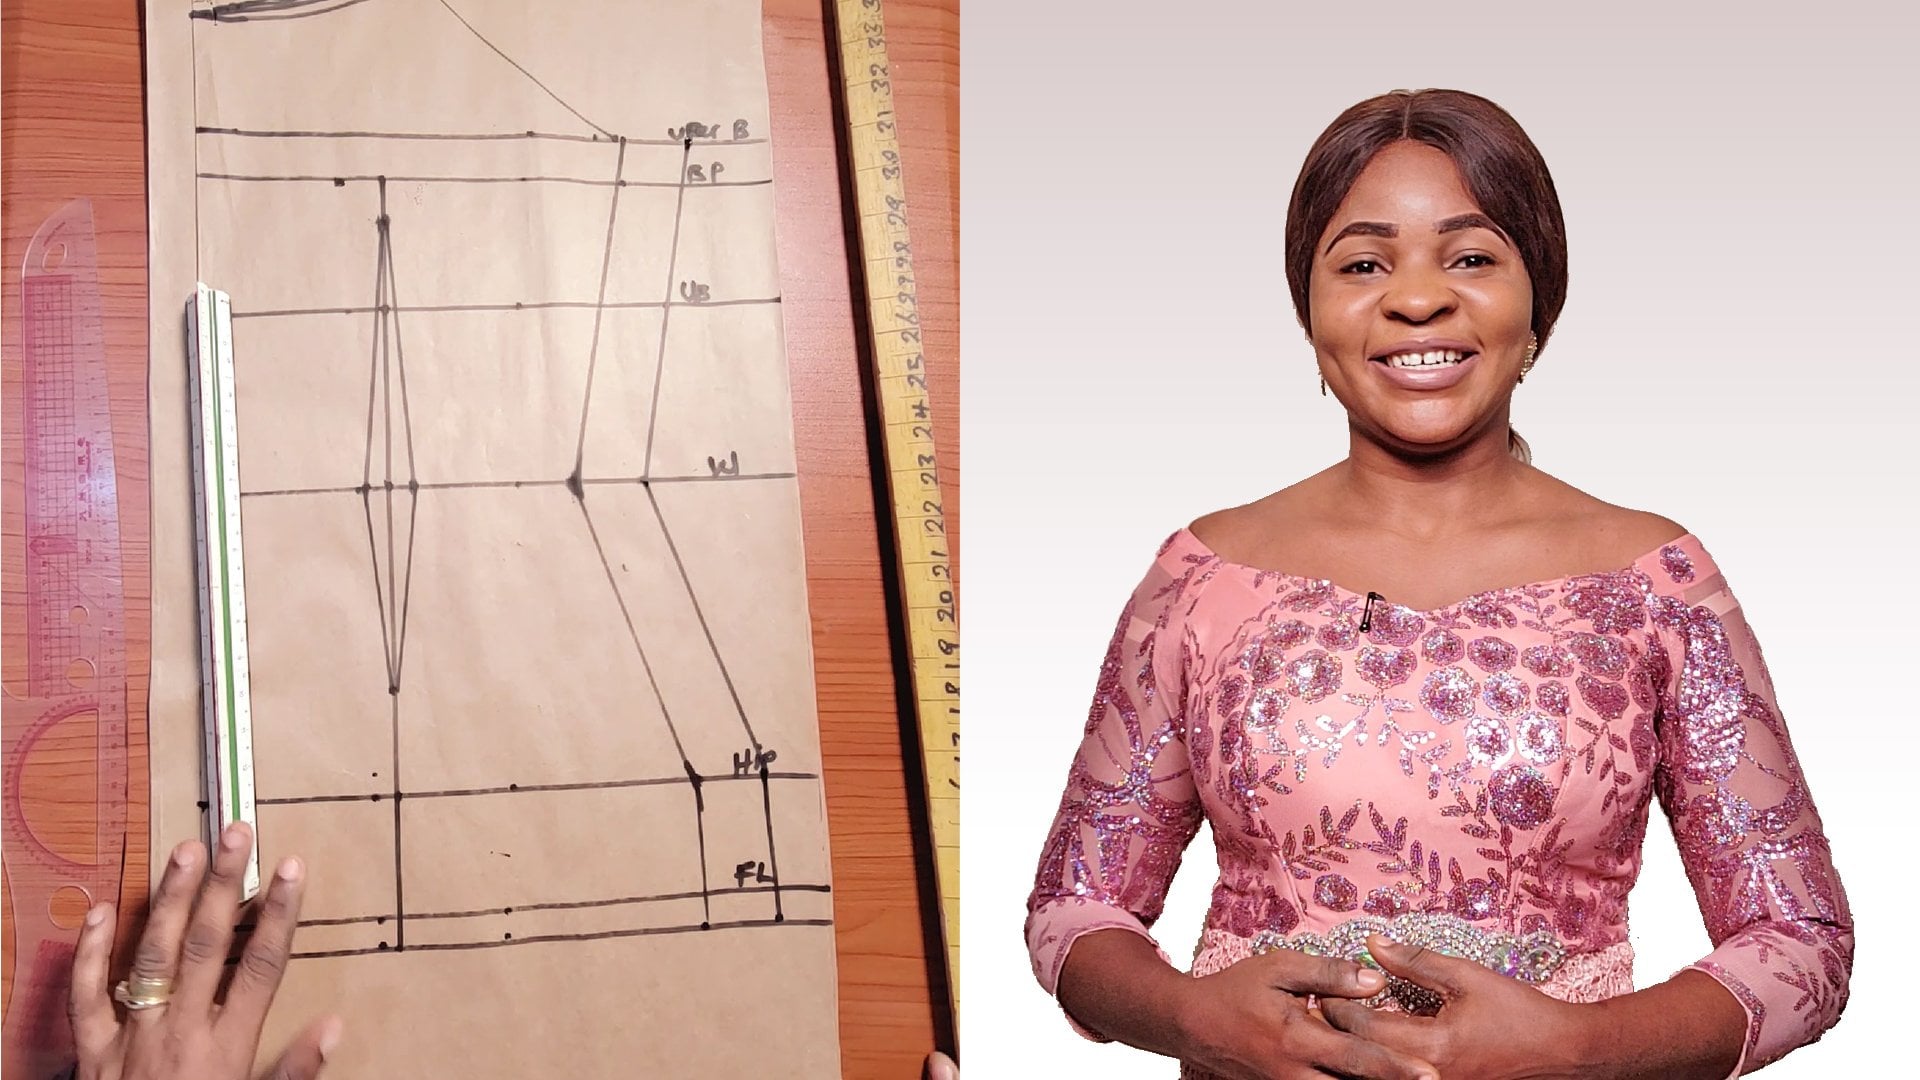
11. Preparing Vertical Measurements: Now we want to take all
our vertical measurements. When you are sick, your
vertical measurements. You can see a line here that is your shoulder from
the Tudor line, you will teach the
measurement piece or measurement there. Then take your show that
to Nipah measurement. The shoot button
nipple measurement of this door of my mod m
Here is nine inches. Okay. Then you also take your post measurement
when you're taking you on that post
measurement ticket this week. Okay, so go down to your
wisdom measurement. That is, the shoulder
width can hold, you can leave it this week. Make sure you are still
holding system and half, okay. That is how you to take your
shoulder width measurement, where you should also take the shoulder
to hip measurement. You also heard it that way. Then take the shoulder to hip measurement
mixture nodes that the distance between
your widths and the heap is no more than seven
or eight inches. That is out to take it.
12. Back Measurements: Then when you come to the
back measurement here, we wanted to take your
backlinks the measurements yet. There's always important
right on your neck. That is where you're
gonna ****, please. Your tip rule. You place it
this week and you'd sick. You'd sit your
back measurements. The suite. That is how to
take the buck measurements. And I noticed something where you are taking
the buck measurement. The front measurement is like one inch higher than
the back measurements.
13. Arm Measurement: Is how to take your measurement. When you want to take
your Hm-hm measurements, you check around your armpits. Mixture is not two types. That's when you
originally your hands, you freely raise the hands and
it shouldn't be too tight. That is why you have
to make it loose. I to be free. That is how to take your handbook measurements.
As you can see.
14. Arm, Elbow and Wrist Measurements: Hello. Today I will be
teaching you on how to take your measurements, the full length of her. Well, before we start, we need to introduce some
part of it for loop. You will see here,
yeah, he's shorter. This, you can see
this pack that I am tying is your Pi sets. This is your elbow,
easier for harm? Ya is where you want to
take the cap height. Your cap height, you know, is stashing from your shoulder. This part that is why I tidy so that you will know
where to stop that. When you look at this
joint, it like this, like the visual
hearing your hump way, you check it your seat. You can take to meet their
families and kids are tricky. You want to take
your measurements. You can see this tip, this tip there in kids,
you're taking yourself. What do you do? You place
it here in your shoulder, your shoulder measurements,
your shoulder. This point, this important here, just place it here. Nazis, when my hands as true. Reading six. By the way, you
stretch your hands. White-noise reading five. So this is how to take
the your cup heights. You have to stretch your hands. Went to Qing dispatch, this is five inches, but when you put it down, you see is around 6.5. Let's say six around the body. Fats on you have to
lift your hands up. Any measurement you
see they're easier. What your cup heights, That's how to take
your cap height. Now we are talking now want to check where you wanted to
check your dearest live. You can google ahead to do that. Same one. We wanted to tick the
roster of this part. Goes Go ahead. Okay. See you Take it up. No. You just take the
measurement there. Right now. One takeaway
you want to take, want to talk about the height, the full length, you already towards the cap height.
That was white. Stuff here. You're close it this way. Where you want to
take your book. This is how you do it. The length here. You
want to seek out, depends on how linked
you won't let, you won't, but you make sure
your hands are this week. For this week, That's how to take whichever lunch you want to take you saw
depends on board. Make sure you are bending
your heads this week. You are typically
your full length. Same thing applies. Just the kid deletes
any lunch you want. That is how you're
gonna afford it. Now what we want to
take the phaco friends, I wanted to take
the second phrase. Depends on the length of
the address you want. I'm using my right Now. You will take maybe I wanted
the length to stop here. Tickets wanted to be too tied, going to be loose, or mature. One hand is just inside. Depends where you want. This first histo so you can
sort them to the length here. Enhance your ERPO
SAT conference. You still have to
bend it this way. You have to bend it. Bend. We want to take the
airborne measurements. What I do, you have
to bend gap parts. You bend it and take
your measurements. You have to bend it this way. I take your measurements, just take your measurement
that we symptom you may want to take for
your bicep by odd ratio. I don't make my legs they don't even let me get here because but it's time your
measurements gets here. It doesn't give you free. You are not free to
raise your hands. It's dystopia makes
you uncomfortable. Is it a, you take it off by one? H. Zulu is fine. Day you take your measurement
the upper, Mr. Mitchell. You twist your hands this way. We want to take your
for your for harm. You took the bigger
part of their parts. You can see the biggest
part is so you take the measurement, Measurements symptoms. We can see two fold
your hands is we just take your measurement that we wanted to see what I'm Jane. Just take your measurement. When you come to do the risks also, check
your measurement. Take your measurements. Can see it's free nodes. You also take your measurement
here when you want to take your hand measurement here, make sure you fold
your hands this way. This one this week. You tick. It's why you're taking this, because you can't just leave it. Because if you leave it, you say you will be able to pull it off. That's why you have to take
this measurement here. Make it easier when you are pulling where you will
put your address. Because the emphysema hand you made to make sure
it's can go freely. Make sure it can go
freeway, you're measuring. It, can go freely.
15. Chapter 2: Trouser Measurements Overview: In this lesson, I'll
be teaching you on how to measure
accurate Pinterest. Before then, there's some
rules that you need to know. Once your measurement,
you need to stand firm. You don't have to twist
this way or stand. And how you need to stand firm. Its fandom. Another thing, some people don't even know where to start. So the altruism measurement we add the width should be four. For the sake of those
people that don't know where they're supposed to be. You can also new edition sweep
from your actual wastes. When we did the body measurements
from the actual width, that is the from the tiniest, be the narrowest
part of your width. From there, you can come
down by two inches, then you will know where your W2 Stan or Beta
Stu can actually client to tell you
where she normally put as kid we as cat platform. That is where it
starts your widths, that is where you take your
wisdom measurement, okay? And another thing uses some trusses when
they are drafting it. I'm gonna tell you
on that later. You will see that on my, on my drafting, how
to draft choices. Some people, we haven't
so much fabric here. That is because they did take the crutch measurement
correctly. In this case, I'm
going to teach you different ways of getting your debts of your crops or
your crotch lengths, okay?
16. Vertical and Horizontal Measurements for Trousers : Now I want to start from OEM
a vertical measurements. You feel like you're also
start from your result, a measurement that is the second phrase of your measurement. I'm talking about the
second French, what I mean, the width second phrase, the hip circle friends, design. Second frame, your
new sacral friend, then your uncool
sac and friends. I now want to start from
the vertical measurements.
17. Waist and Hip Vertical Measurements: This is our whisk, our width is starting from year. You took your measurement
from the widths. Now on step from
the West's heap, we always, there's something
we call this. The width. Distance between the
width and the heap is no more than 78
or nine inches. Range. Like for me, I use my
width on my hip is eight. For some is nine. Why some can be severed? From your width? You will check. You already knew the distance, you will know you just jotting, you should know is
the discussion of the modern, it's nine.
18. Hip, Knee and Ankle Vertical Measurements: From the width to your
new measurements, then you take it down
to your full length. Okay. There's a bone here, your comp when you
get to that bone, come down by one inch, it gets to take your
full measurement. Otherwise, maybe
your client said he wants metric, get down. That is also 4s2 out
to get it for the, for the sake of those people that after measuring
their clients, they did remember to measure
the new measurement. You can also get your
new measurement by the stand between your legs. The distance between
the crosslinked to your full length divided by two. When you divide the way
you get the midpoint, then come up by two inches. You can also get your new
measurement, Troodon Mitchell.
19. Reviewing Vertical Measurements: Now we've already taking all
our vertical measurement. I'm going to repeat it again. From your width. The hip, That's the distance between
the West and the heap. Okay, Then to your
new measurement, you check your new measurement. Then checking down to your full, the full length of your trusses.
20. Horizontal and Circumference Measurements Overview: And I want to check all
our CEC of friends. You starting from your
waist circumference.
21. Waist Circumference Measurement: Where the width of your trust, trust is cut from. That is where he was catechizing your wisdom measurements. You take your wisdom
measurement. Measurement. Make sure it's not too
tight, not too loose. When you're taking your
wisdom measurement, the width measurements
of this door. He's not true. Titan,
few actual your clients. You can see this is truancy.
22. Hip Circumference Measurement: When you're done with that, you come to do hip measurement. Make sure you tick. We're
measuring the hip measurement. Take the full
height of the heap. The full-up parts of the hip. Range it very well. I want to show you something. We're taking the
measurement sick, the book, measurement like this. As you can see. You can see it. Make sure he's like
this at the back. That's just what I
wanted to show you. That is the flat part. As you can see, how to
check the hip measurement, the full-up parts of the heap. That is where you take
the hip measurements.
23. Thigh Circumference Measurement: So when you are done with that, you come to the tie, the fuller parts of your type. That is where you take
the measurements. This way. Is a fabric day stretchy. Can just tick no mouth, don't. You don't need to
leave any allowance. Just take hits. Don't make it lose. Ticky tight because
it's a stretch of where fabric when you are checking it is when you took it that way, even though your client's
interested BTS size. But if it's a fabric
there is no stretching. Make sure after all
your measurements at one inch to eat or
half an inch for East.
24. Note: Crotch Measurement: You've taken this
product, lest I forget, I wanted to teach ASL in the crutch omit the crotch measurements
will be learned, but it's part of the
Vatican measurements. But I wanted to take my time to explain the crotch measurements, how to take the measurement.
25. Knee Circumference Measurement: Welcome to your new measurement. You also check it this way. Notes, when taking this part
is either you make it free. This way. By the time your clients is twisting the leg this way
is bending this week, it will not be too tight or bet as to when you are
taking the measurement. Just tell your client
short leg this way. You can take the
ankle measurement. Right? It turned depression July, this is not going to be
too tight in this area.
26. Ankle Circumference Measurement: When it comes to the
outcome measurement, is either you take it
this way, metric lose. You measure it this way. You do. You take it off from
this part here? You will do us if we
want to remove it. Like this way, when you
measure you like this, you take the measurements there. There's actually check
the anchor measurements.
27. Crotch Measurement: In Situ on how to take
your crotch measurement. You can take it in so many ways, whichever method that is
best for you, you use. Part of the vertical
measurement key. From here. From the width you
come this way. This is number one on how to take your crotch measurements. You can take it like this. This is number one. And the second parts. The other practicum
measure from your outside. The difference between
your team and your acing. This is what we
are talking about. The art symbol simply means that the full length
of your choices, what we're talking
about the interesting. So your Ipsum is
starting from here. You take your measurement
from, from here, then down to low
desired measurement. That is the u for
each new a crutch, u minus u minus this for him seeing
from your outsourcing, you get your crotch taxes. The second way of getting
your crutch measurement.
28. Alternate Crotch Measurement: I'm not sure there
is another one, but I don't advise the beginner
to do because you see, when you see from
here from this man, the impassive true on the head. Then also add the
width or the buck. But sometimes it's not
very much accurate. I don't use it because
it's from here to here. Yeah, he's always shorter
from you measured the bucket. Bucket is always longer. I don't advise a
beginner's true. Use this measurement.
29. Alternate Crotch 2 Measurement: The next method is sitting down on the flat
chair. This way. You take the measurement
from your W2, from the West measurements down, this way, down to the flats, to the surface of this chip. That is out to your
crotch measurements. That's another way of taking
a crutch measurements.
30. Course Conclusion: Congratulations on completing
this easily swayed killed course on second acronym
regiments in costs. We went through how to
measure the probability. You cannot comfortably make your own literally
fitting designs, conflict measurements. If you have any questions, comments in the course, and I am happy to answer. I have appreciated
by your instructor, if you enjoyed this class, please leave a review and check my profile
for more courses. This has been so tell us, see you in the next class.
 Stella JB Fashion, Fashion Designer and Patternmaker