Transcripts
1. Introduction to Basic Bodice Pattern Design: Welcome to Mike. Cause only basic
buddies patterns for Beginners. I'm Stella. I will be your instructor. Be enough to make
an upward bodies patterns in orders of course,
art quantitative designs. This what is pattern? Course, I will teach you how to make an accurate
bodies approximate. Starting with awkward
body measurements, careful drafting
and precise cutting out patterns supports
the qualitative designs. In section of my course. Overview to each area with
step-by-step actions. This course is for beginners in those wants him to
have a good foundation. In cotton bodies patterns. You will need a few
bodies soil. Who's that? I will leave you in this course. Here is my story. I am an independent fashion
designer from Legos, Nigeria. For the last few years, I asked specialized in women's
and children's glossy, meta unique and quality fashion design with contemporary
Western an African styles. I have sought new
fashion designer from my experience and perspective on quality fashion, equality, fabrics and quality soil to make dresses, blouses, trusses, cat, various art feed fascinates
us and customize my courses. I love happy young
fashion designer from basic of fashion and how
to quote perfectly well. For this course exercise, you would stick the class cuz to coach your own body's pattern. I have provided
measurement and steps to follow to successfully caught your design and trusting paper. I'll start this
course. You should be able to use those
measurements to drop out your body pattern that you can customize
your own designer fabrics. You are ready to get started. Let's go.
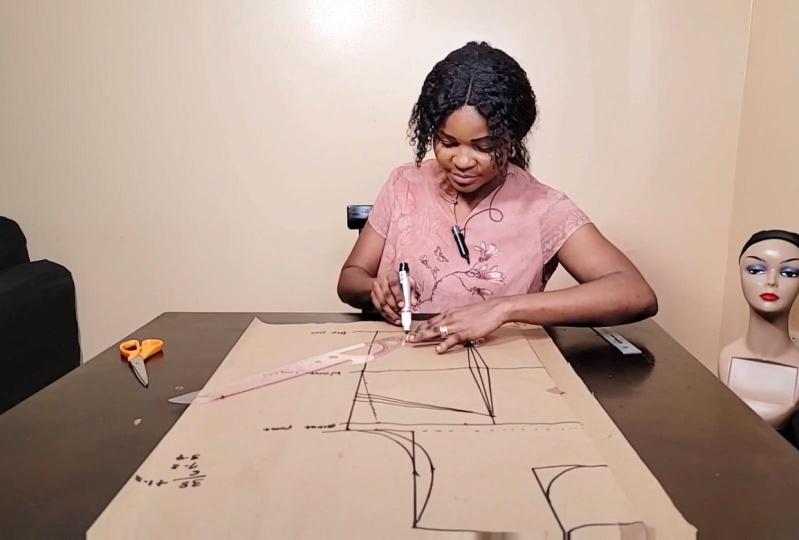
2. Chapter 1: Drafting Basics: This is your drafting
paper or your brown paper. Jello divide by four. And before you know the quantity or the
amount of fabric you use, you have to know
the BDS parts of the circumference of your
body that you are using, and also the length of
the fabric you are using. That is the length of your measurements or the length of the blood you want to use. Now the biggest pass of
this body we are using for the sake of dysuria is
the heap which is 40 inches. 40 divided by four would give us ten inches plus our one inch. That's allowing that is
the width allowance. Closed our two inches
seam allowance to make it that's in inches. Then you want to know the length of the
fabric you are using. That is from your
shoulder to the hip? The shoulder to the
hip. I'm using here 25 inches by five inches
close one inch allowance. The rest is okay. But if it's a fabric,
you have to catch it. Now, this is the front panel. Why this is the back panel. Before you cut the back panel, you have to add your
1.5 inch zip allowance. The front panel is already
touching inches wide. The back panel will
be giving us 14.5 inches plus 1.5
inch zip allowance. This is Zip allowance. Just sweep. The next thing you do once you have gotten
your zip allowance, list, the front panel, this mean, then pin it down if you want
to use paint fine. But if you also
want to use Pippa, this way, why, why
do you opinions so that your walk or the fabric or your pass on paper will
not be shifting or moving. This week. If you don't need this way, that
means you are ready. So let's go do the main work.
3. Tools Needed: The tools you'll be needing, you'll be needing your scissors. Yamaka got CIP rules. You're, you're French,
call, then your ruler. And another thing
you believed you need your accurate measurements, that is your boss measurements
showed up measurements, your waist measurement and
your hip measurements.
4. Laying Out Measurements: From the shoulder, the Napal,
Where we're using 9.5, then the waist measurement, which is 70 inches, then the hip, which
is 25 inches. Have to get it. Again so that you can rule. It can get the
correct measurements. Have to join the
points together. All you need to do, joins
the points together. Joining two points together. You go ahead to
label the points. This is the bust point. The most points for
the boys lines. This is the width line. This is a heap. Applying.
5. Drafting The Shoulder : Then let's sketch our
short-term measurements. Measurements. I'm
using a cysteine. Cysteine divided by two
will give us eight. You mark. The next thing
is to get your neck line. The neck line will
be using here. First, you have to get
the width of your neck. The width of the neck, the standard width of
the neck we are using here is three inches, then the standard
depths is seven. But for the sake
of this tutorial, we'll be using five inches. We're using five inches. So for beginners, while we
do is just get the bolus. So you can get your perfectly for you
to get the calls. Just copy this way. Your net lined. The next
thing is to get our handhold. Before our humble, we need
to get the shoulder sloped. As you all know that
our show that is not straight is what is sloppy. How do you get your
shoulder slope? Probably shorter line. You might want inch down, one inch down, one inch. Then from this point, you're joining it
to this net point. Net my points.
6. Drafting the Arm Hole Curve: So the next team is
to get your HAM. Who, how did you get your HAM? Who? First of all, you have to get the
depth of the ampoule. How do you get the depth of your handful, your
boast measurements? In this case, the bush
measurement we're using here is 38 divided by six clause. 1.5 gets him several points. You measure your 7.8 from
this point, from the slope, from the short asked
several 0.87 points, eight around this points, you imagine seven points, eight, then rule, it's done. Drawing these two
points together. We need to draw our zone data. This way. How do we
get this curve here? And before ten? We want, because the front, the front panel and the panel is not the same way you want
to get the ampoule. What's unique to do? You divide this
link here into two, divided into two from
this point to this point, divided into two will be
giving us three points. Nine. You measure three points mites. 3.93.9 is around this week. This is the midpoint of the line because we
want to measure, wants to have the front
panel from this point, measure 30k to quote
three-quarter. Get our front cover. Why do we measure
these three quota? Because by the time you raise your hand, it will
not be too tight. We have to cut out the essays so that when you
are raising your hands, it will not be too tight. So what you need to do from
this point to this point, then you coverage by
using your curve ruler. That is how to get your cough. Make sure the points are lining. This way. As you can see. You join it together. Joined the points together. This is your front arm, H2O.
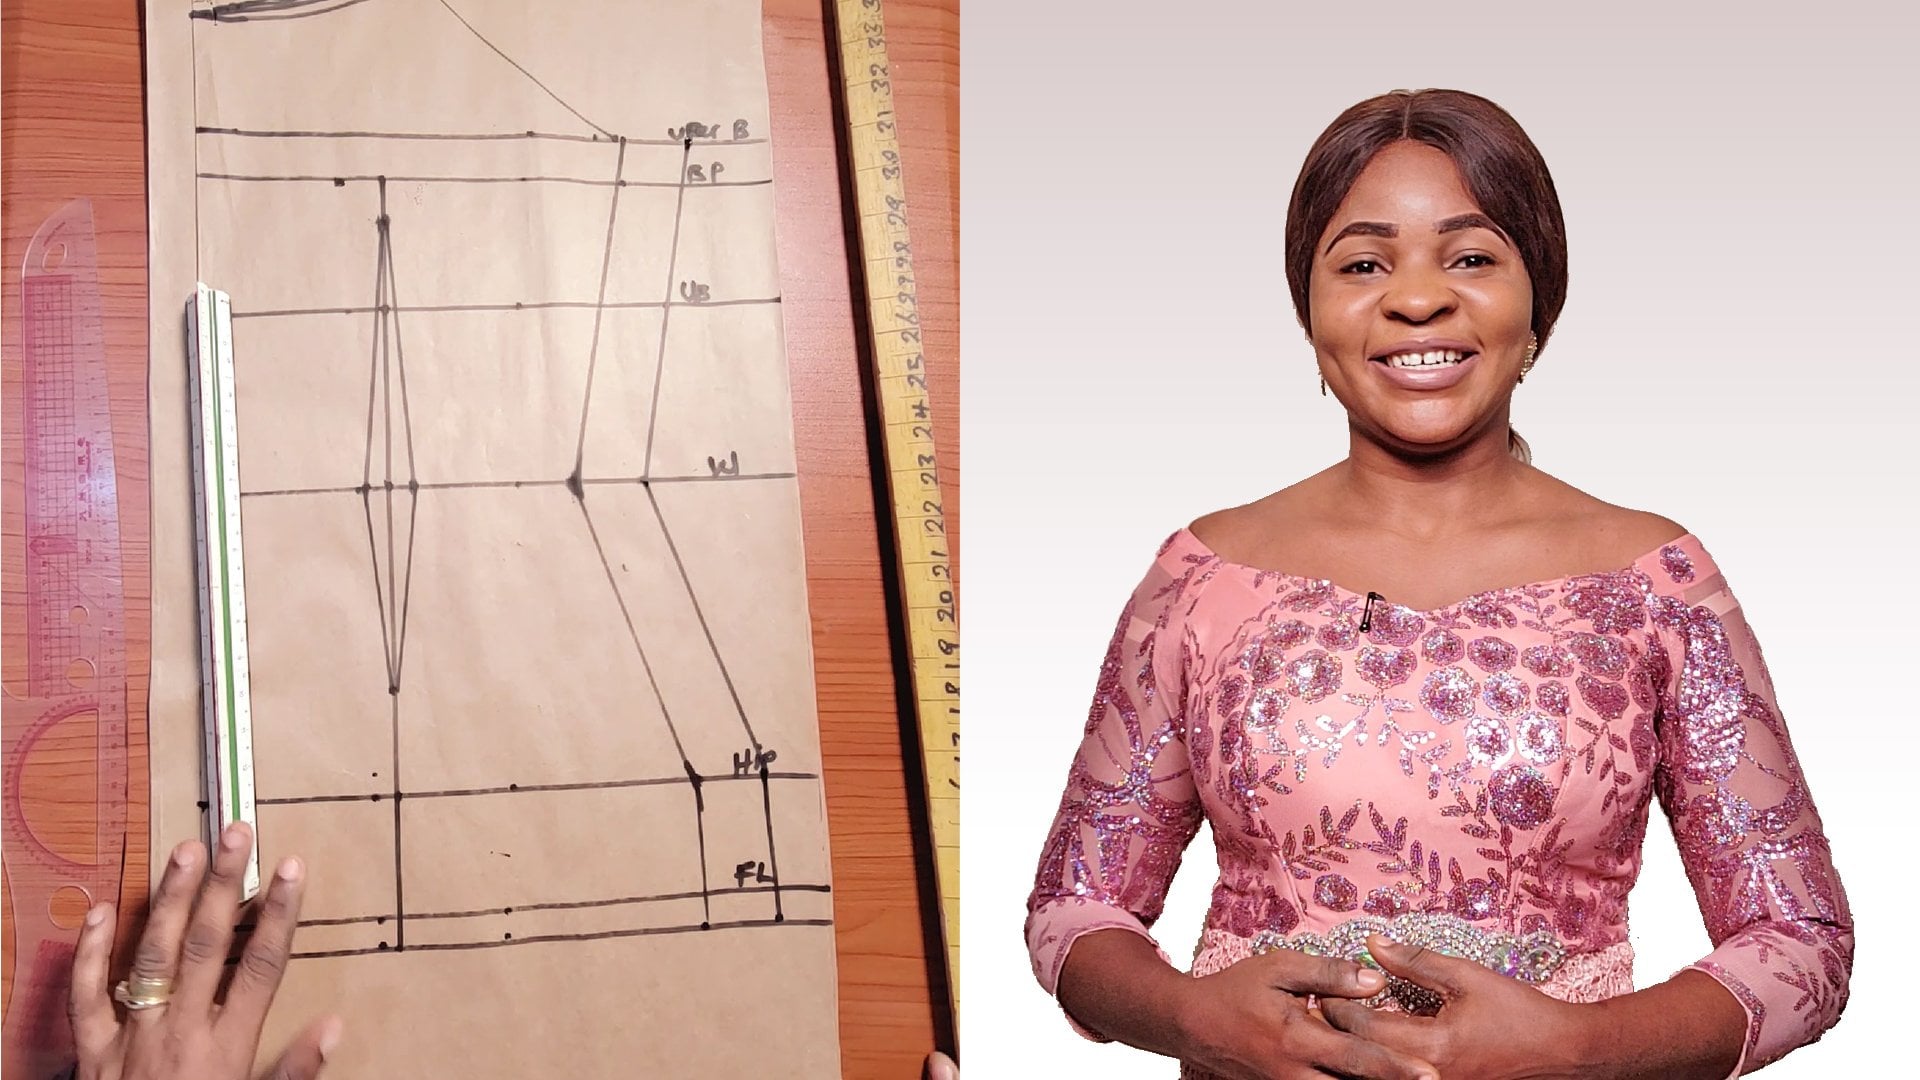
7. Calculating Bust, Waist and Hip Circumference: The next thing you need to do is to get all your circumference. You're both circumference,
your waist circumference, then your hip circumference. The circumference
we are using here, that is your boss measurements. The measurements
here I'm using here is 38 divided by four. You will have a 9.5. You
will measure your 9.5. So this is my 0.5. You, this line here, this line here stands
as your chest line. From the chest line,
you mentioned my 0.5. The same thing. Put the same number you
got in your boss points. Come to your waistline. We have the width layer
I'm using here is 3232 divided by four will
be giving you eight inches. You mark your it's inches. Mark your eight inches. This way. Your hip measurement is 4040 divided by four
will give you ten nodes. I have not added
any seam allowance.
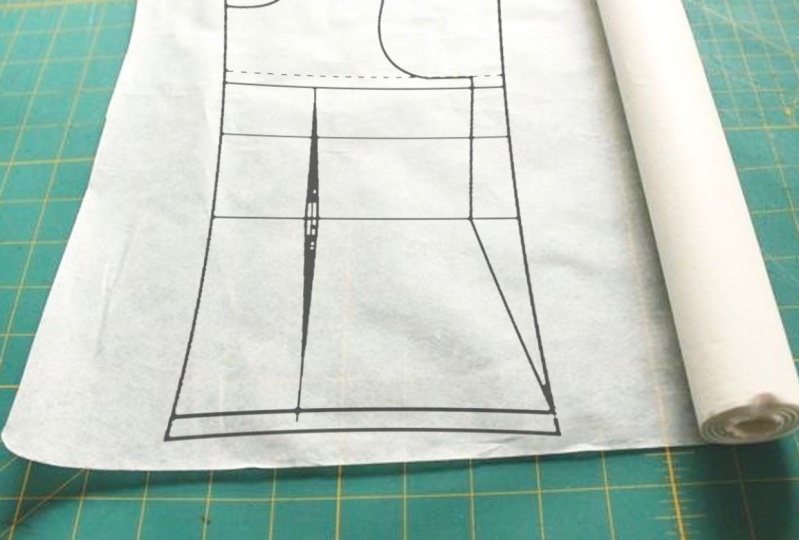
8. Drafting Darts: Now the next thing we
need to do is to get out our nipple, the
nipple measurement. Then he puts a
newborn measurements in this tutorial is it's inches divided by two
will be giving us four. Then you mark down four inches. Market down. Then joining the
points together. Make sure you join
the points together. Joining the point together. From this bonus
points come down by one inch by one inch, which is the EPA's
this point here is the EPS from the
hip points here. You come up by two inches by two inches from your waistline. Half inches in both side, inches in both sides. Then join the points together. This point joining
with these points this way, joined together. Sway. This line we got corrupted Here. They are coded
that helps to give your government nice
fitting over the board. And the heap.
9. Drafting The Back Panel: When it comes to
cutting the back panel, make sure you bring that to your z per hour, which is 1.51. Debts for the buck partner
is not the same thing. We usually use one inch. You will measure one
inch for the buck. This one we actually did
here is for the front panel. You measure one inch. Then you join it with this
point to get your cove.
10. Drafting The Arm Hole On Front Back Panel: Now, when you want to coat
the handhold for the back, there's no point
bringing out these. What you need to do. This is the length. Then what you need
to do is just to get your cough in case
you want to make it easy. You can just from this point, the measure 1.51 inches
on HE just for direction. Then you cause I need to do you just to call off the back. I don't need to bring
out these essays, this one, I don't
need to cut it out. So all I need to do
it is to just join, to just get a cold.
11. Joining Bust Waist and Hip Circumference: So when I'm caught, I'm gonna
cut for us for the back. Then before cutting
for the front notes. The difference
between the front and the back dots is that the front dots is touching
from the boss points. You come down by one inch wide. The back dots is starting from the chest points
or the chest line. You also come down by one inch. That is a suit difference. So all you need to do then
you join these points. As you can see from
this point here. I brought at one
inch for the dads. We need to add it back. This waistline. You add more extra one inch
to the waistline. One inch you added
yet I'm going to cut out from this
data. We add it back. One inch plus 1.5
inch allowance, 1.5 inch allowance,
1.5 inch allowance. You need to do is to just
join the points together. So you joined it
from this point.
12. Drafting The Bust Dart: It gives you your oxygen. How do you get your, your boasts that you need to do? You will divide this point here. You divide it into two. Divide this point, measure it, then divide into true, just get the midpoint
of this, this distance. This is, this is heat, then divide it into two. This is the midpoint. All I need to do is to just check it this
way and measure. This is the midpoint. What you do is to
bring this point, join this point and
this point together. This point and this
point together. Then from this point, sick one measure one inch. You measure one inch. This point, from this point, this middle point, sorry. This line is not there. This line is not its own. I McDonald's is not there. So this is the language going
with from this point here, you measure half an
inch in both side. Half an inch in both side. I've been chair of inches. Then you join this
point to this point, this point to this point. Do the same thing here. This is the side. That's why this is
the whisker dots.
13. Drafting A Nicer Hip Shape: You know, you can just leave this your blouse this
way you want to, you want to make sure it
has a very nice shape. From the hip. Points, you will measure
one inch upward, will measure one or
two inches upward. Let's make it two inches upward. Then you give it
give it in my shape. Just to give it in my shape. We just covered this way.
14. Drafting Review: Before we do the cutting, I believe you know how to cut the front and
the back neck line. How to get your shoulders loop? How to get the fronts
and the backhand **, how to get your side. That's how to get your W2 dots. Also how to get all
your circumference.
15. Chapter 2: Cutting Overview: I'm cutting out
front on the BACC primarily performed on the
combined paper or fabric. What I get to the umbo,
I caught the bug. Tom Wolf was not a deep
compared to the front. I do the same as the net
line cotton for the bucket. I bring up the front panel to ship the midline on the front it to trace the back panel so that you can
cause separately. You have your perfect cotton, then you practice it
on your, on your own. For me, I'm already used to eat. That is why I'm putting it
this way. I'm not separately.
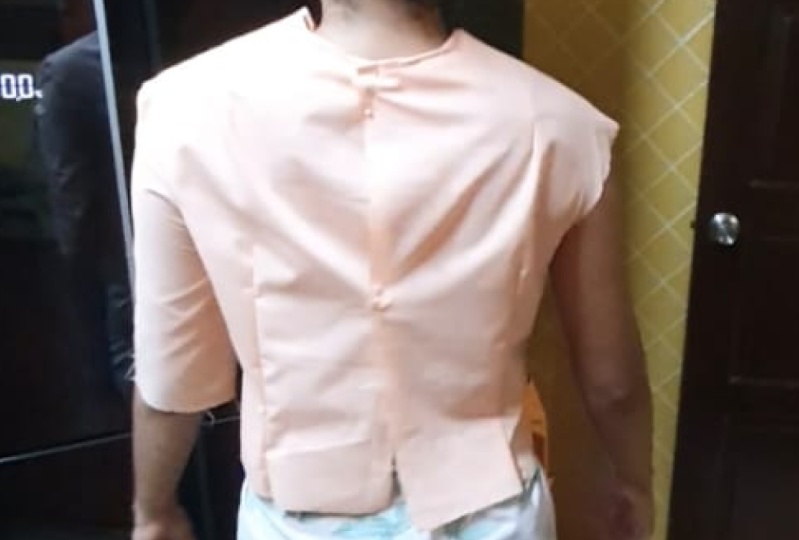
16. Reviewing The Cut Pattern: Wow, this is so lovely. This is all we have done so far. This is the front panel. You can see how Jesus
is the front panel, why this is the back panel.
17. Course Conclusion: Congratulations on
completing this course on cotton, basic
bodies patterns. In this course, we went through how to use
measurements of drugs. Possibly basic pattern in paper. I believe we can now comfortably trapped and cause a
physic bodies pattern. If you have any questions, comments in the course,
and I am happy to answer. Feel free to leave photo of your walk where you
complete your projects. I love to see your progress. I enjoy being your instructor. If you enjoyed this class, please leave a good review and check my profile for more cost. This has been stellar. See you in the next class.
18. Bonus: Tape Rule Overview: What do you understand
by Chip room? Peru is a measurement
or a flexible ruler. If possible ruler
measurement that is used to measure
distance and sizes. We have varieties of
these measurements, this ruler, they
include plastic, these two and the fiber glass is also used for
the measurement, drafting parts on
measuring fabric, measuring our
curves and corners. Now let's go. This is a typical example
of one inch chip route. From year to year is one inch. And half of this
one inch would give us one over two inch. Further divide half of these. It would give us one over four. When we further divide is
one over four, it's default. 1 eighth. When you further
divide is 1 eighth, which we still give
you one over 16. And I said, when you
watch, watch very well. As it's decreasing, it's increasing w of
the previous one. When sometimes you ask, Is this have gotten, how did they get this out
of the gate at the goddess? As we can see, this
particular tip, r2 is having system bars 1234567891011121314151616 bars
here to make it one inch. Now the first one
is one over 16. It can no longer be
divided for them. That is why we left it that way. The second one is meant
to be two over 16, which is two over 16. We dynasty we have to do is sue divide it to the
smallest fraction, year one to year eight. That is how we got
this one over eight. The next one is three over 16, which can no longer be divided for them. We leave it that way. The next one is four
over 164, over 16. You see we can divide for that Swiss smaller fraction
for year one, for year four. That is how we got one-quarter. Here. You move the same way. Five over 16 is no
longer be divided. You move to the next one
which is six over cysteine. We can leave it like this. It can further be divided
to yet three to eight. That is how we got three over x. The next one is seven
over 167 of our system, which can no longer
be divided for that. Now you'll be asking,
how did we get this half year is eight over 16, which is eight over 16, we can follow up, divide
it to a smaller fraction. It here, E1 and E2. That is how we got
our half-year. The next one is nine
over nine over 16, which can no longer be
divided for the last bar, is ten over 16, which can further be divided
into smaller fraction five. Yet aids. That is how we got
five over eight. The next one is one over 16, which can no longer
be divided for them. The next bar is 12 over
cysteine swath of a cysteine, which will further be divided
to a smaller fraction. Six to ES6 aids. We can see divided to
a smaller fraction. Yet three to year four, which is through quarter,
three over four. The next one. The next one is Tati, or via Cysteine setting
of a system which can no longer be divided into
two smaller fraction. The next one is 14 over 16. We can further divide
into smaller fraction. Yes, 7287 over eight. The next one is
15 over cysteine. It can no longer be divided. Cherry Smirnoff fraction will
live with away 15 over 16.
19. How To Use The Tape Rule: In some measurements, when
you have your measurements, you have it in decimal points. Is somebody is something that you don't have
to be confused about is still the same thing when it comes to your tip rule. You just delete them, you just for you to be familiar with, like when we are
calculating our Puebloan, it gives us in decimal points. Right now. Go one over two is the
same thing as 0.5. Kids, when you measure
and you get 0.5, just know it's the same thing as half, half of your tip rule. That is the symptom
as half an inch. You don't have to be a
freedom. How do I get this? Just know is symptomatic
from year to year. The report five want your one-quarter one-quarter
is also dissented, as is there a 0.25
that is half of this half of 0.5
would give you 0.25. When you divide one over
following two, give me 0.05. Is there a point? So five, when you divide 0.25, it will also give you
0.1 to one to five. That is half of one-quarter. Well, no. So three divided by four
would give me 0.75. In a situation whereby you
have your measurements 1.75. We don't have to be
afraid is the same thing. I want to be quarter
from yet to displace is 13 quota and it's
also the symptoms at 1.75 from yet is 1.75. If maybe a situation
whereby you have 1.25 is also the
same thing as 1.25. One more quarter. Maybe where you see 1.5 is the
same thing I went on half, which is from year to year. 1.5 is also the same as 1.50. That is how to read
your tip rule.
20. 8 Basic Pattern Making Tips To Remember: Hillary tips for those
new to pattern-making. I'm Alice and
associate of stellar, and this guide will help you get comfortable in your
new fashion journey. Tip number one,
understanding the basics. Familiarize yourself with
key terms like green line, seam allowance,
notches and dots. Tip number two, pig
precise measurements ensure accurate measurements by following a reliable
measurement guide for bust, waist, hips, and
other relevant areas. Tip number three, start
with simple patterns. Begin with basic silhouettes
like a straight skirt or a simple top to build
a strong foundation. Tip number four, create
Muslim prototypes. Use inexpensive fabric
like Muslim to create mock-ups and test
patterns before cutting into
expensive materials. Tip number five, master
pattern alterations. Learn how to adjust patterns
to fit different body types by adding or reducing
width, length or curves. Tip number six, explore
pattern-making software. Experiment with
pattern-making software like Adobe Illustrator or
specialized programs to streamline that process. Number seven, learn from online resources that
into online tutorials, blogs, and forums to
learn new techniques, troubleshoot problems, and connect with
other pattern makers. Tip number eight, practice,
practice, practice. Pattern-making is a skill
that improves with practice. Embrace mistakes as learning opportunities and keep
honing your craft. Remember, pattern-making is a creative and
rewarding process. So roll up your sleeves,
grab your tunes, and let your
imagination run wild. Happy pattern-making
 Stella JB Fashion, Fashion Designer and Patternmaker