Transcripts
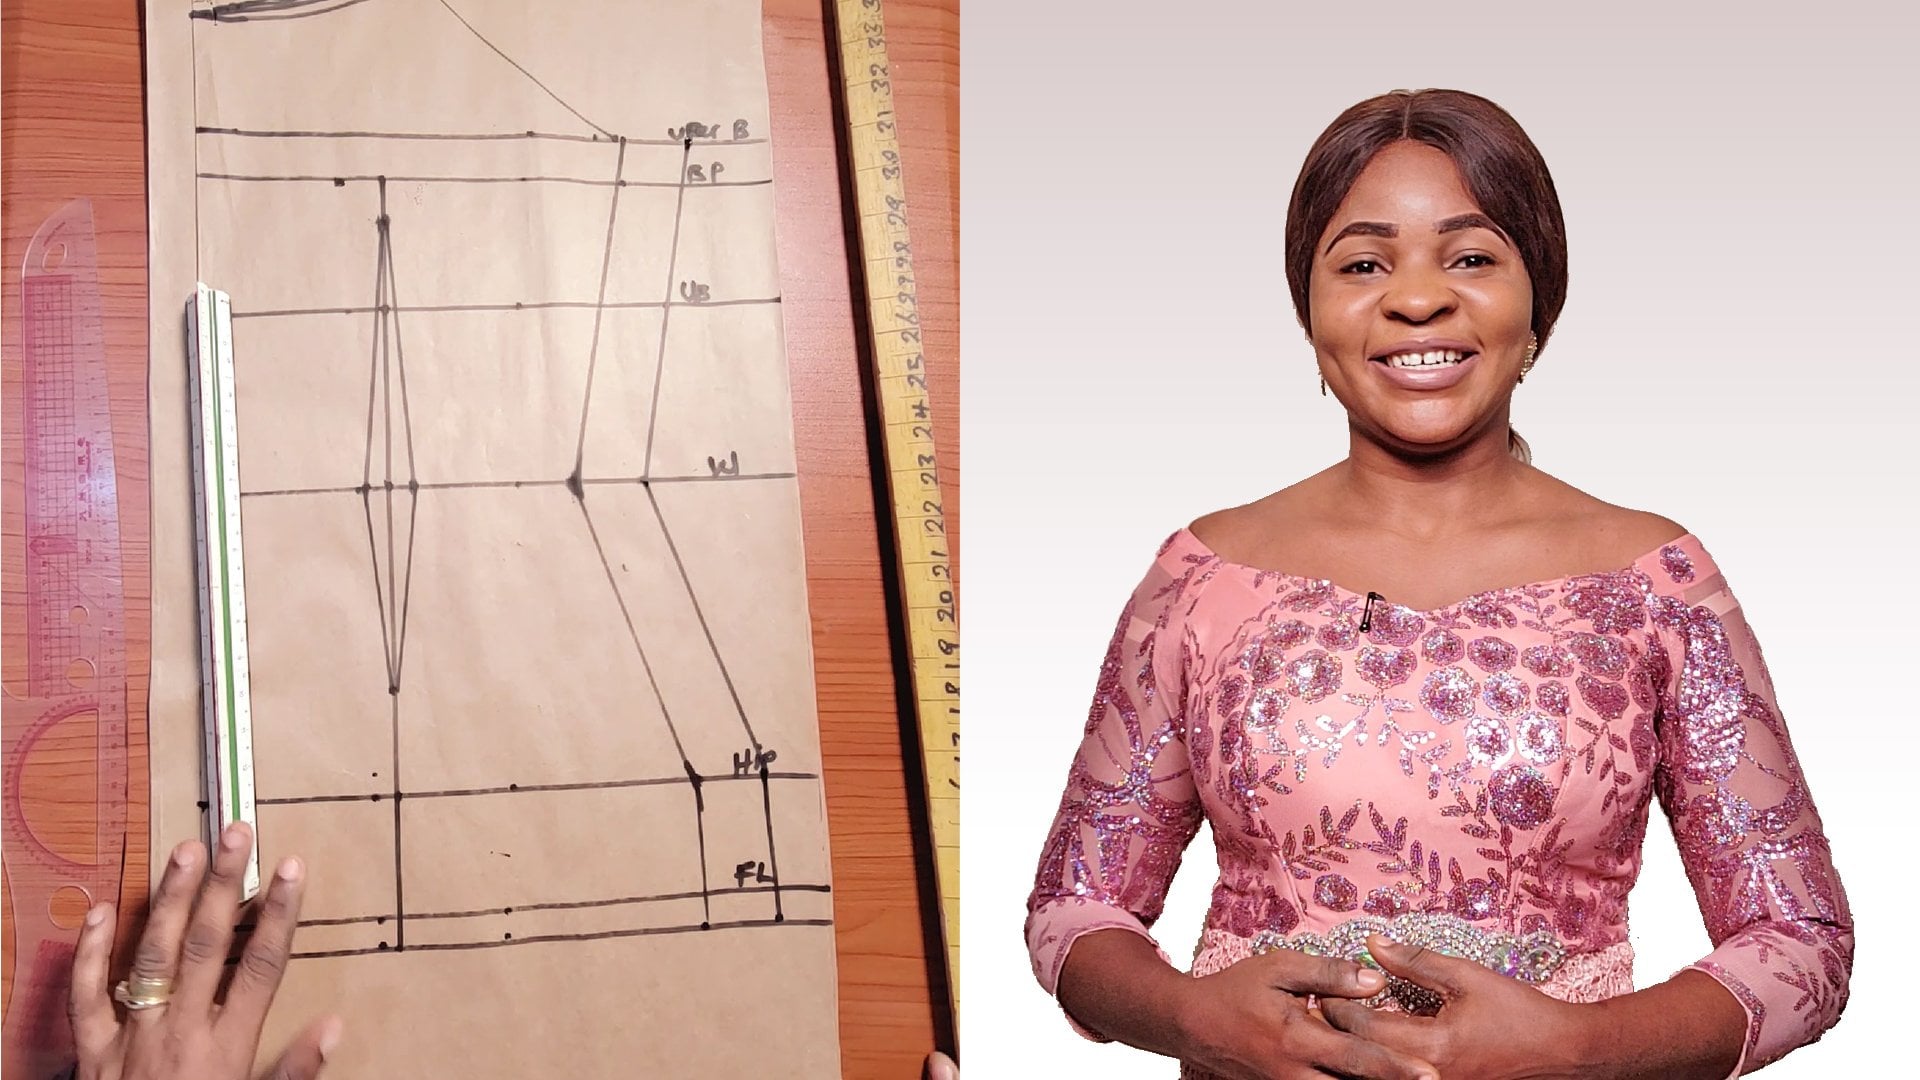
1. Chapter 1: Corset Design Kit Introduction : The beauty of the female figure is often lost in
average crossing. If there was some way to
provide adequate supports, those beautiful cause
would have standouts. That is why I made this
course at design kits. And Stella, I will be your
instructor because it is a woman's comment
that have shaped the figure and live the boast
line, It's costume course. It must be carefully
drafted by a designer. So much the desire for ego in this class
on sewing course, I will teach you the
easy way to drop suits highs of course sites
with a few simple method, so much the desired free go, we will drop both the front
and the back and caught out the final design and piece them together to get the
final products. This course is for
beginners and sewing with an understanding of
basic bodies drafting, and also those wanting to know how to design their own cosets. My basic body design
costs that is available on my Instructor page. If you haven't drawn this curve, you will need a few
basic sewing tools that I will list in the course. For the last few years, I asked specialized in women's
and children's clothing, making unique and high-quality, fresh on designs
with code surprise, Western and African styles. I have sought new
fashion designers from my experience and
perspective on quality, irrational customized clothing
for this course, SSIs, you would say the class cuz to coach your own
concept pattern. I have also provided measurements
and steps to follow to help you successfully caught your own design
interrupting per pound. After this class, you should be able to use your
measurements to drop and cause because
of programs that you can customize your
older finance public. If you are ready to get started. Let's go.
2. Course Materials: In this course, the
materials you've been needing, your SIP Pro, your ruler, you're French, call your Caesar's, your
market and your pattern paper. In addition, the Busy
Bodies pattern and measurement had been included
in the cost and load.
3. Chapter 2: 2-Piece Bust Corset Overview: In this class I'll be
teaching two different sides. Of course, there could also
be in different forms. You can now the cop can
have different panels. There's one with two panels. There's also another
one with three panels, that evil Psalm
with four panels. For in this class, I'll be teaching you the
one we took panels and also the second type
with the three panels.
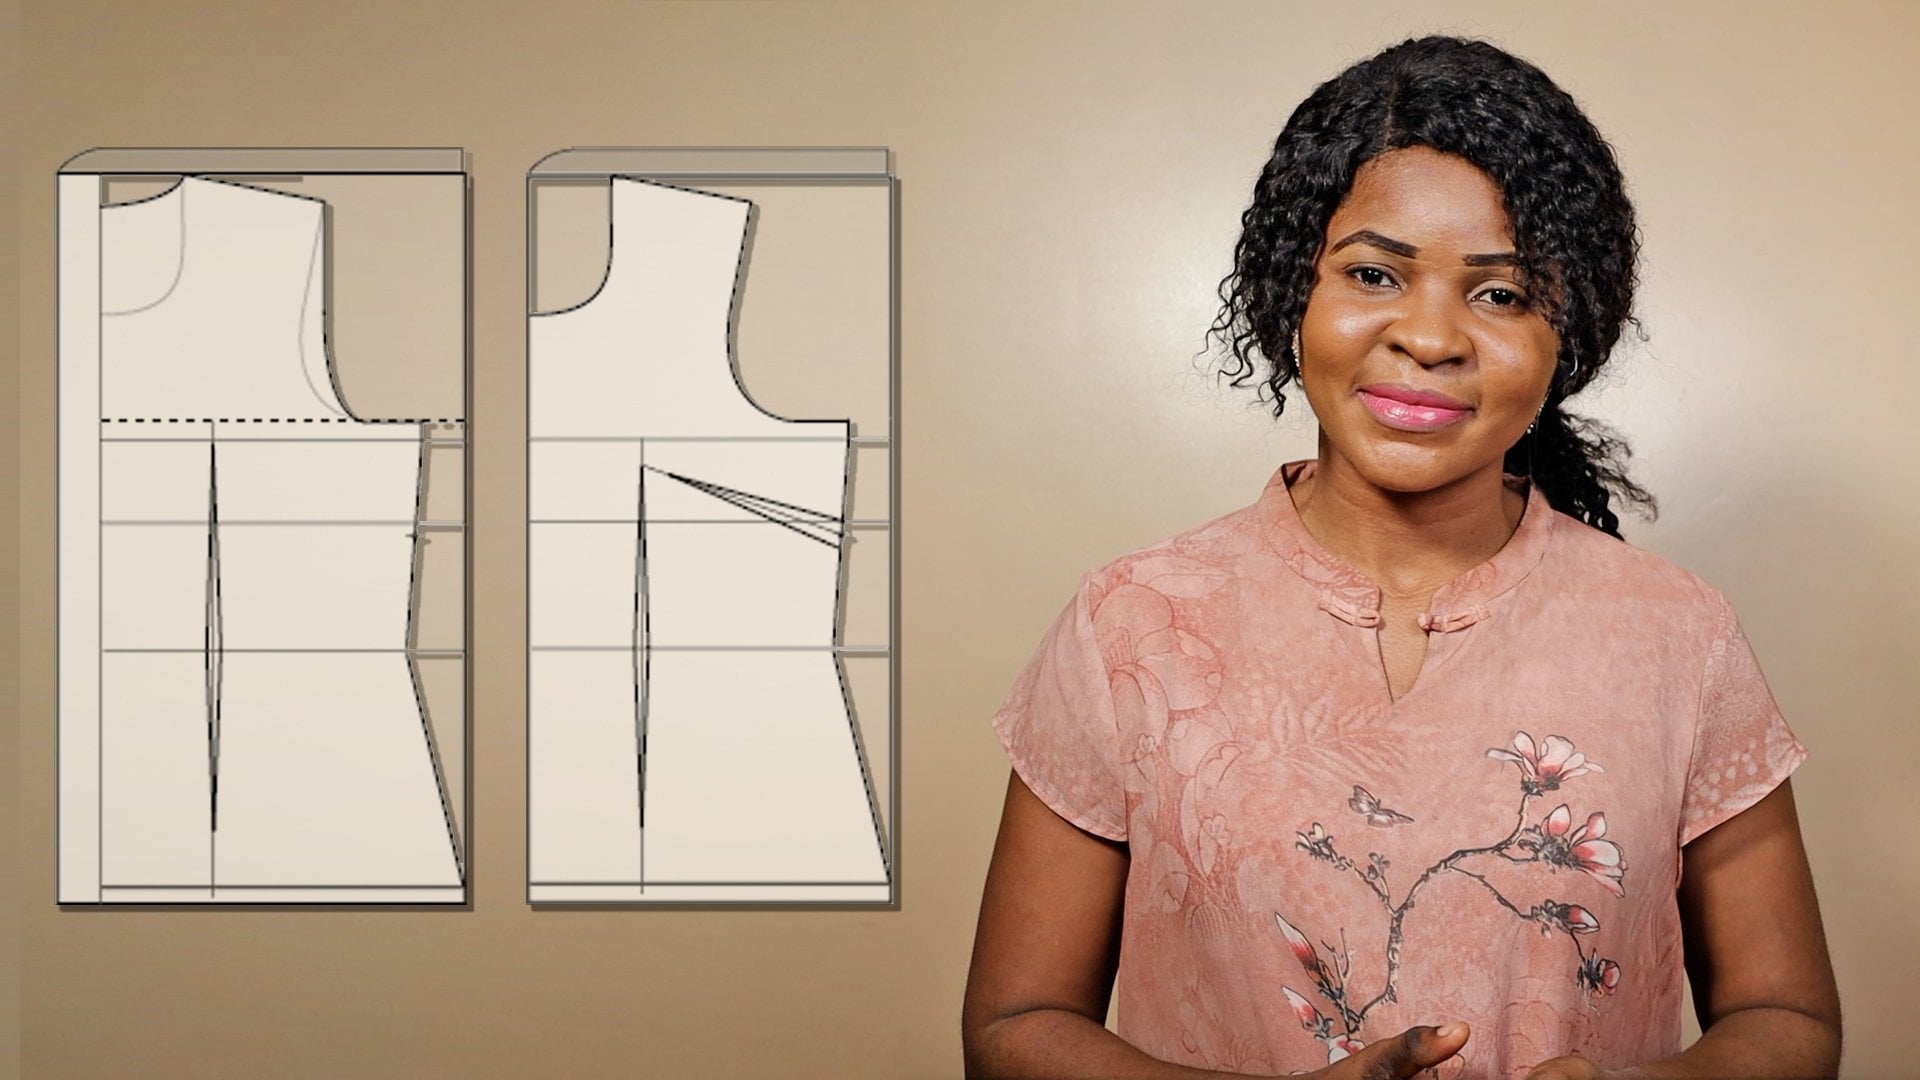
4. Drafting the 2-Piece Corset: In what we have already
don't visit body. So what we need to do in
a true look for the boss, the boss pan bar. Before we look for
this boss panelists, then take the neckline, uses 6.5 for this, for the sake of this tutorial. But if want to use
seven, That's fine. It's all depends
on what you want. If you want eight
inches is okay. For the sake of this
theorem using 600.5, they joined the point
together like so. Then go ahead to live bates, That is the neckline. This is the boss
point on the boat. Then the width line. When you are done with that, go ahead to look
for the boss span, which is eight divided
by two, which is four. That is what I'm doing. You also go to the
underbars mark for the width mark for then
joined a point together. Like so. When you are done, the
next thing you do look for the radius of the BOS, which is the distance
between the boss and the boss is 3.5. The market round. Get the radius. You can see like
the way I am doing. But if you have your compass, you can use a compass to
do that to make it faster. But for the sake of people
that don't have compares. So I have to use this method by going through
it 3.5 to make a circle. That is the radius of the bus. Does go through it round. Like I'm doing. So does God treats
make your radius? Wouldn't be any
pointed dotted line? Make sure you know
what you want to use. You just like a
guideline for rows. So this is the circle, the radius of the both. So the next thing you do, you have to look for the dots. Go under the boss, take one inch in both side, one inch in both side, then do the same thing. The waistline. One inch in both sides, one each in both sides then
joined it to point together. Some doing it does
draw the points. Make sure you draw, it's fine. Like so. So what you need
to join the point to the boss points in recovery, like I'm doing right now. Joined the points, do the
same thing in the other one. Like so. So that
is all for that. Once you are done
with this semester, you do the neckline sick
also 118 in both sides. Join it to the post points. Some doing it right
now in a curved way. Just be careful with my joining the call. Like so Sunday, so the nasty do
the bonus points, say two inches upward? It's all depends
on what you want. If you like and take on
an avid depends on how deep or high you want
your boss to be. You want it to be.
If you want to show, you can go a little bit lower. But if we wanted coffee, Cassie, go higher like 3.5. But for the sake
of this tutorial, I'm taking two or three
inches from there. You take one inch. Do same. The boss then joined
the points together. Just a guide. So that
point join me to that. Please. Join me to point together. Okay. This join it. You make one inch in both sides. By the time you are covering
it when you finish, you need is going to be
round and not sharp. So join me in the car. Join that to point together. Like so. Don't be in a hits. So make sure you get
the points correctly. Join it like so. When you are done with that, you go up from that point
joining two points. Joined the points. We have done for this part. When you go on the dot points, mark half an inch depth, unload adult parts of
both decide balls. We have fuller boss. This is why we are
creating half on each day to create more space. Joined up points. Join it together in
also in a recovery. Make it fuller. Coverage. Joined up
points together. Sam didn't right now. Joined that subpoint
together carefully. Like so. When you
are done with that, so just tick up with this line. Take it up. Take
it up, like that. So then joined the
point together. Zoom. Make sure it gets into the HAM WHO to join with the unholy. Ahead through sec. The results are measurements. That is the boss
measurement which is divided by four, give night. I also also go to the
width measurement, which is 32 divided by
four, is eight inches. This point nodes I have not
added any similar ones, have an ID at the dots. Allowance. Allowance
is added yet. Okay. I'll be adding them
white cotton fabric. You joined the two
points together. Like so.
5. Cutting Out The 2-Piece Corset: Like so you have to be
careful at this point. Know which two coats for k. Just watch me carefully
the way I'm cutting. I don't cut out the useful one. The protons want suit
coats, gradual UK. Take your time. Watch the way I'm
causing cotton out. The dots parts. Bringing out on the center, cut out the center,
the center front. Just watch the careful
white coating. Be extremely careful. Be careful at this point. That is the center front. Qazi. One of the
boats, cop cop one. So I don't get confused
when you are joining them. Nodes I have not added
n meet allowance that keeps saying is that
I don't not confused. Okay. When I'm cutting the fabric
level will add allowance. You want to do two
cubs to the front, to the sensor front. I'm using one. And that
is for the joining. I'm going to use f and 840 joining when adding
the allowance. Okay? Just be careful white
coats in courts gradually. Some cotton right now. Be careful. Just take your time. Like so. They caught this side. This side of your costs sets gradually as there are
some cotton right now, gots and gradually you
just caught project. I've already cut them out. That design is gonna look like. But don't forget to
label your data one, which is to liberate, to go ahead to tip it for it to show you
how he's going to look like.
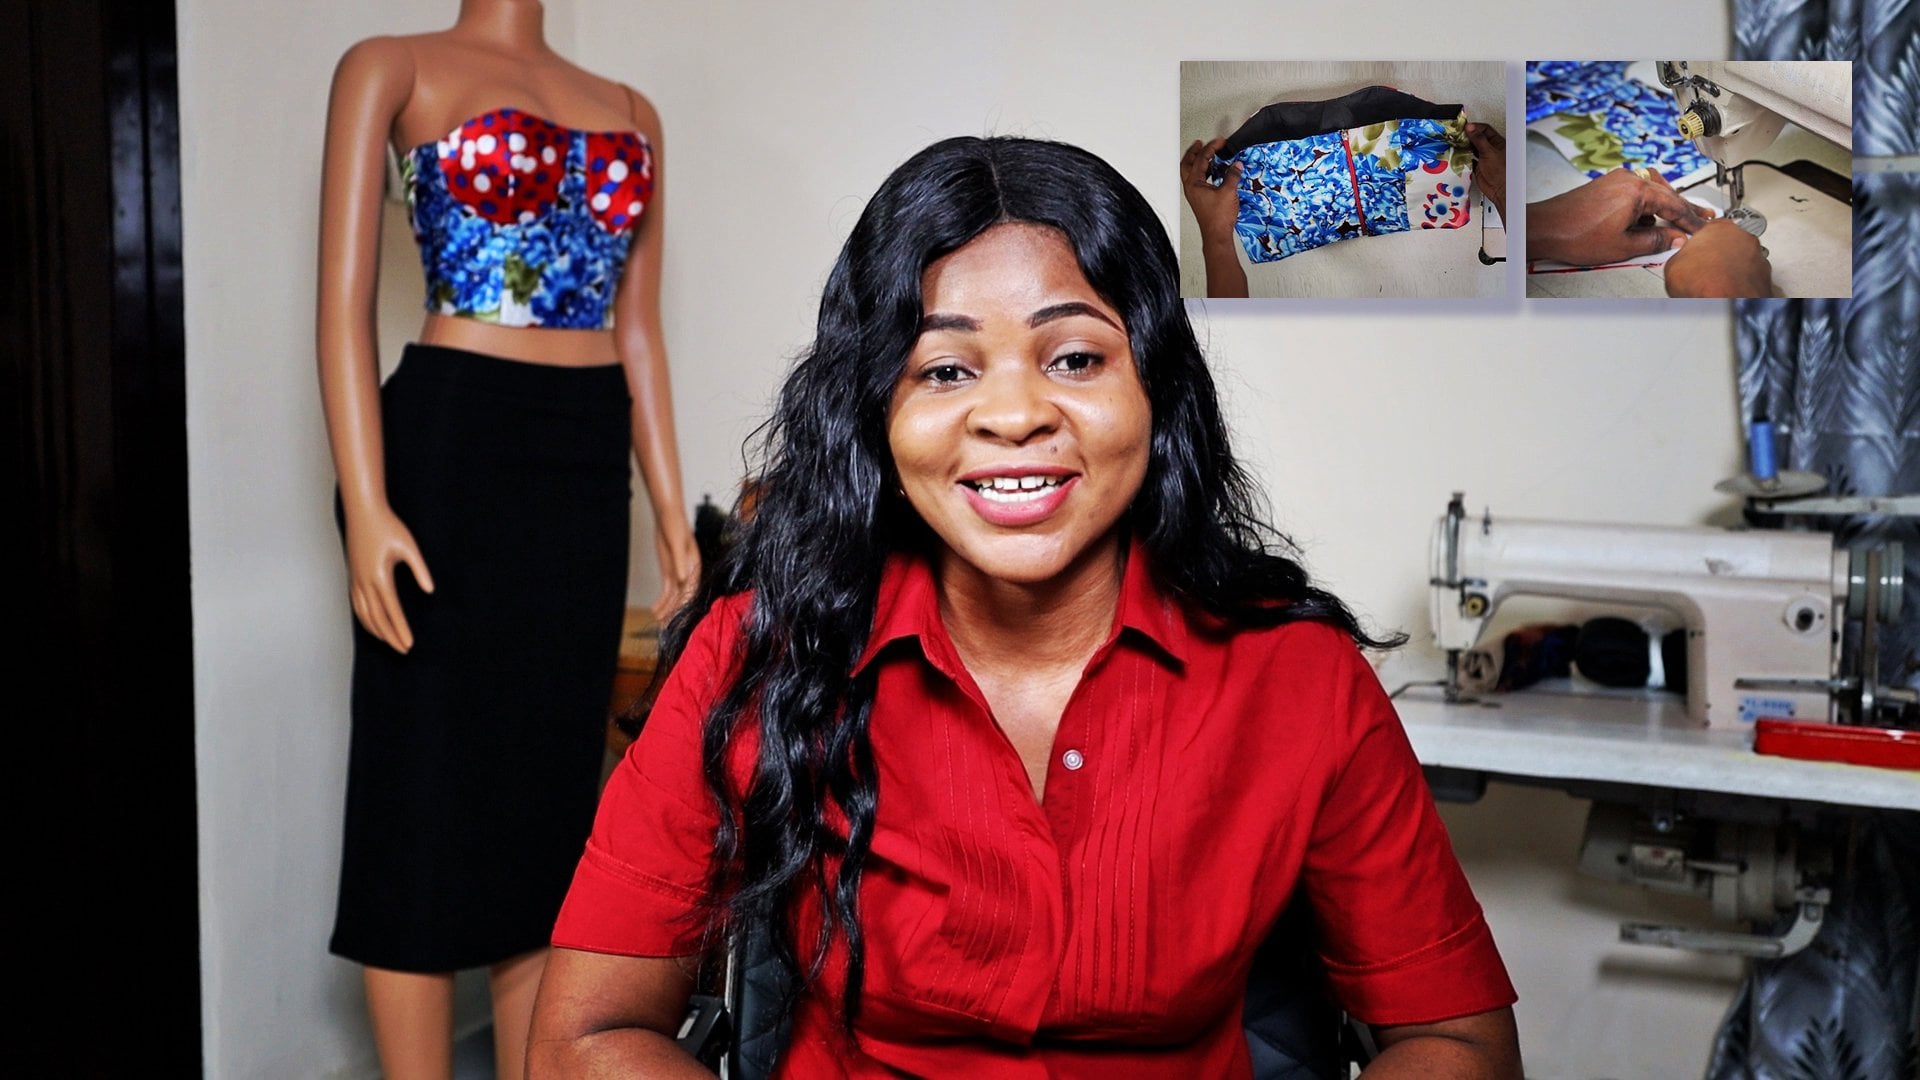
6. Assembling The 2-Piece Corset: I've gone ahead to join them
know, to couple it together. That is exactly how it's
going to look like. Okay? So that is the sensor
paths of the cost sets. That is DCS, the
other parts of its on why this part is departs where
our boss is more fuller. Why this is the wave
of the cost sets. This is exactly how it's
going to look like. So beautiful, you can't see. So let's go ahead and do the second part
of the cost sets.
7. Chapter 3: 3-Piece Bust Corset Overview: Now we'll be focusing
on the second cost. We just finished
the first concept, which we know we have seen
in the first course sets that we made use of the
width dots and the net dads. Well, in this conduct, in this second course, it will be focusing on the width dads and also
at the boast dots.
8. Drafting the 3-Piece Corset: This is a comparison
of the cost sex. So what we'll do you
just for the BOS pan, the cane H divided by
two, which is four. So this same thing all round, then join the point, the same thing we did
in the first one. The force that seems
tape taken, okay. Just like different
joined the points together. The dots false. Okay. They can want age
at the waistline. The under both, thick
one inch or so. Then joined the points together. Join the two points
together. Like so. Then go ahead to
join them as points. Just the same way we
did the first one. Like so. Let's try to look for
the distance between that. I want to do the radius
distance between the posts and just take the radius or round dotted point. Just take it round. K ticket, round 3.5 inches. That is what I'm
using right now. Just exactly what I did
in the first one. Line. Those points, those dots, a point on the line. Okay. Constituting the radius. The radius points. I've not done much anything. That's just 19. Okay. Let me just release so
that we don't get confused. Okay. That is all
what she needs to do. You go to the boss points, the coastline, take
two inches upward. From there, take off
an H horizontally, inward, same down, then join
the two points together. Just a guideline. Joined up points. Often h takeoff on each day
in both side, half an inch. Indent joined. The points assigned
due right now. Be careful. You can do saying joined up
points taken off on age also. Join the points. Some do right now. Be careful upon we don't
need it ducts the right. Just take it up. Thus ticket. That point's just pick off the it depends if you
wanted to make it higher. This point, I just wanted
to make it higher so that my cleavage will cover illegal. I'm taking a little bit
higher above the neck line. Okay. If you still want to
just maintain the net lie, You can see maintained the
lightened neck, ma'am, right? Like Xue. From this, you see what
I'm doing right now? We want to take your site dots sticking outside That's
just take up an inch. In both sides. Both points tick off an inch and boast line. Alpha1, alpha2, alpha1 into K. Don't
need to do both points. Are the points like so. A daughter side. Half an inch. Half an inch. Once you are done. Bill, 13. As you can see, I've
lived it just for you so that you don't get confused. But I just wanted to make
it a little bit wider. I will just want
to increase that. Parents want to increase
it a little. Okay. I've not done much thing just
increasingly linked to know the first line that is
offered that you go ahead, take your horizontal
measurements. The boss measurement is
six divided by four, which is nine inches. Nine inches. Okay. The waistline that is two
divided by four inches. At this point I'm RD
my dots for the for some people that might be
confusing the first time ID at that point I
I'm adding the dots. Okay. It does joined it
to point together. Notes, I have not added
any seam allowance. Joined points together. The post points on
the wastes join it.
9. Cutting Out The 3-Piece Corset: When I'm causing the fabric, I'll add all these
points together. Okay, so now go ahead to courts. Have not added any
seam allowance. When I am caught in my fabric. Add seam allowance
to number one. That is half an inch. That's what I'm going to add. The center part to join
it is alpha an inch? I'm going to add four
and I'm quoting, be careful what? I'm cutting. Okay. That is the sensor. Be careful. Way across and up parts
of K that is sent up firm's costs the
path, of course. You can see what I'm saying. Disjunction, you
have to be careful. Cuts the top one go and
I'm quoting, That's going to cause the men
in the side products. Go ahead to join
the all the panels. Okay. So now I will
show you how it looks like after coat and this
is how it looks like. We'll go ahead to join them.
10. Assembling the 3-Piece Corset: Allow this exactly heights. It looks like it's really
came on very beautiful. C is so lovely. So that's it for the second
and the third panel located. Not added any allowance
to any of them. Okay. So when you're
cutting your fabric, you add half an
inch for joining. We will join. You add a fun aging
the Nobel one panel. Have an inch that won't happen into K compared
to adult one age. That is for your joining. This is the lovely
cost-savings, okay? If you have gotten
to this point, just know you are
really donuts Phi
11. Chapter 4: Corset Back Panel Overview : Now we are done with the first
and the second cost sets will be focusing on the
buck panel of the causes.
12. Drafting the Corset Back Panel: Let's draft back panel. I just need to do is to transfer all these points on this points to go ahead to transfer
the lines, okay. That is the neckline. Transfer those points, the
boss point, then the wastes. Then go ahead to rule it. This part is the Zip allowance, which is one and for k, When a half inches, if you want to use one
is 51 are used to both. I'm using, I want to
liberate the neckline, the boss points on the board. Then the wastes, okay. Then the boss pan, which is a divided by two, give us for for the for the line for E Cheese
as well as Nick. Okay. Join the points together. Take a half an inch input side and joined the point net. The wastes. Like
so lights though. Same thing here. Jordi points that width. Tick audio results
are measurements. The boss measurement,
them using yeast that six that is
divided by four, which is nine inches. Okay. So do save the same thing
at the neck to same number. Go to the width light that
it's z2 divided by four, which is eight inches. Okay, before then take the dot, the dot, the measure, what is the then you add it, that is the dots that
we are removing. Then the waistline. One inch. That is the dots. Cosa be caught in, it's out. What do you want to do? Because we want to
ship me though, we wanted to debulk
to look nice. So I removed two inches, then I want to scratch it. Sites will have a
very nice ship or the but I want to make
it in recovery. I'm going to join. It's like so just like that. Anyhow you want to
make any shape, you want to give it, give it. That is all for that. So I
go ahead to do the cutscene.
13. Cutting Out The Corset Back Panel: I'm taken off the dots. I'm gonna take off the dots because I wanted you to
give me very nice shape. I'm cutting the cutting
it's at right now. Cotton not the dots. Be careful. If you want, you can
without cutting it's out. But I want to of course
these outs okay, to give me a nice shape that
is uncoating, it's out. Careful when you are careful. That's his guts. That is the back panel. Like that. I'll go ahead to bring all
the panels together, both the front and the back.
14. Chapter 5: Reviewing The Final Corset Pattern: This is the final part
of it, the first panel, the first type of cost sets, and we also have the
second type of cost. So in this closet
we have two panel. Okay. So this is the side. This is a composites
which have three panel. You see it? Okay, So we have not
added any similar. And that is the sense
of fruits of the panel. While that is decide
frontal cape of the panel, that is this one right now
is the back of the cost set.
15. Chapter 6: Adding Allowances: During the disease
they have fabric. What all I need to do
right now is to add, allow us to do this. This is the one-week course
and I want to add allow us to the fabric right now. All you need is half inch up an inch, down an inch. This all I want is for joining. What I would do is to
just join me to care. When you use your tip. Rounded juicy is exactly half an inch
is because I'm already used to know out
exactly half an inch. One inch you see isochore from
the nest and I do courts. I'm going to look like this. The padded of ASU. You do the same thing you
did but I didn't half an inch to an inch. Every one inch. You measure an inch. Inch to everything. You measure it. Using ice to get you. Please measure as a new student. To do measure to give you
accurate measurement of the coachee. Same thing.
16. Assembling Pieces with Allowances: This is the final products. What are we displaying? Since this is the warned in
the form r one, similar ones. So this is the one with
the seam allowance, half half inch allowance. This is the center front. There's a fourth pattern
nailed the second panel. This is also decided. Decide froms. Why does this seem decisive? Allow, and you can
see this is 1.5 or if you like and use one inch, whichever one you want to care. Why this is the work the
initial maternity allowance. And you know, we are truly say cotton out that I didn't
have HLS for joining. This is a zipper loss or
weight. This is the side. That is all for
these parents on how to add your seam
allowance to eat. Once you are done with this, go to your fabric just by dissolved allowance to
your fabric directly, the wheat season it in
order to allow us to this.
17. Course Conclusion: Congratulations on
completing this course on basic concept design. In the class, we went through
how to drop a course. So ties with cosets cannot comfortably trucks and
caught a basic cosets. If you have any questions, comments in the course, and I am happy to answer. If we free to leave photos of your walk when you
complete the project. I see you, I love to
see your progress. I enjoyed being your instructor. If you enjoyed this class, please leave a review
and check my profile or more causing this
has been stellar. See you in the next class.
18. Things To Remember for Corset Drafting: Now they are done with
all your drafting. Lots of pins you
need to remember at the data level that
is on by your posts, you should come up by half an inch so that when you are where
you are joining it, it will not bring a
sharp edge is gonna be. So roan, also, another
thing you need to remember. But when you are drafting
for the sidebars, remember to add half
an inch or one inch or three-quarter
because this side of the bars is bigger than the
center part of the posts. Also, after causing the panels. Also remember,
that's no allowance was added when you are
transferring to your fabric. Remember to add those
half inches allowance to before you coats or before
you have your final panel.
 Stella JB Fashion, Fashion Designer and Patternmaker