Transcripts
1. Easy Sewing Kit Introduction: Swinging your own freshman
who bring you so much joy, the ability to imagine
and find it dream outfits and successfully so eat
into a fitting design. However, requests summit
patient and efforts. Most new designers give up. That is why I made the
easiest sewing kids. It resource for spring. Fashion designers. The violet into several courses covering vulnerable
threshold design, topics that help you make
towards your dream outfits. High afterload. There's charts are
for this class also in a basic concept. In this class, we'll
look at Putin form or fashion sewing materials from the offset pattern into a beautiful and
unique governments. We've taught by using a simple
cost set precedent to cut out a night shift call
the fit in your broth. We then cause a very
beautiful center front and a side fraud and all
for a complete shape, finishing with its
center products and the synthesized PAN-OS. We saw the inner and
outer fabric panels because I'm finished with a neat Sepah to close
the completed cost said. In this class, you will perfect
your sois cues by using real fabric and
following along with the video through each part
of the costs and design, I will claim making
the cost that step-by-step through
the finance piece. This course is for beginners we didn't
knowledge or swaying. And you will lend the bed by watching and then
taking the cost tabs, which your own materials and x2 can see more on my
beginner level courses. On my Instructor page, I find out my fashion
and fashion or why they can't go in which I transform from the hobbies to an independent designer making new variety of styles
for women and children. I'm seeing a lot in
Western and Africans out. Mickey, your own fashion. It's not always easy. But where you truly are getting into the work of InDesign, there is expression,
inspiration to press on. In this course. I hope to share that
passion with to your work. At the end of this course, you will have major on cosets. Be more competent to add to own creative fabric selection
and taste to your design. If you are ready to pass it beautiful concepts, then let go.
2. Course Materials: These are the materials you
will need it for this course. The fabric of your choice. You're lining fabric pots, any strong non stretchy, moving cotton fabric equipment. Nice. Your SIP. And you're gonna still now
your tools of sewing machine. Of course, your trade, your scissors, and
your tip group.
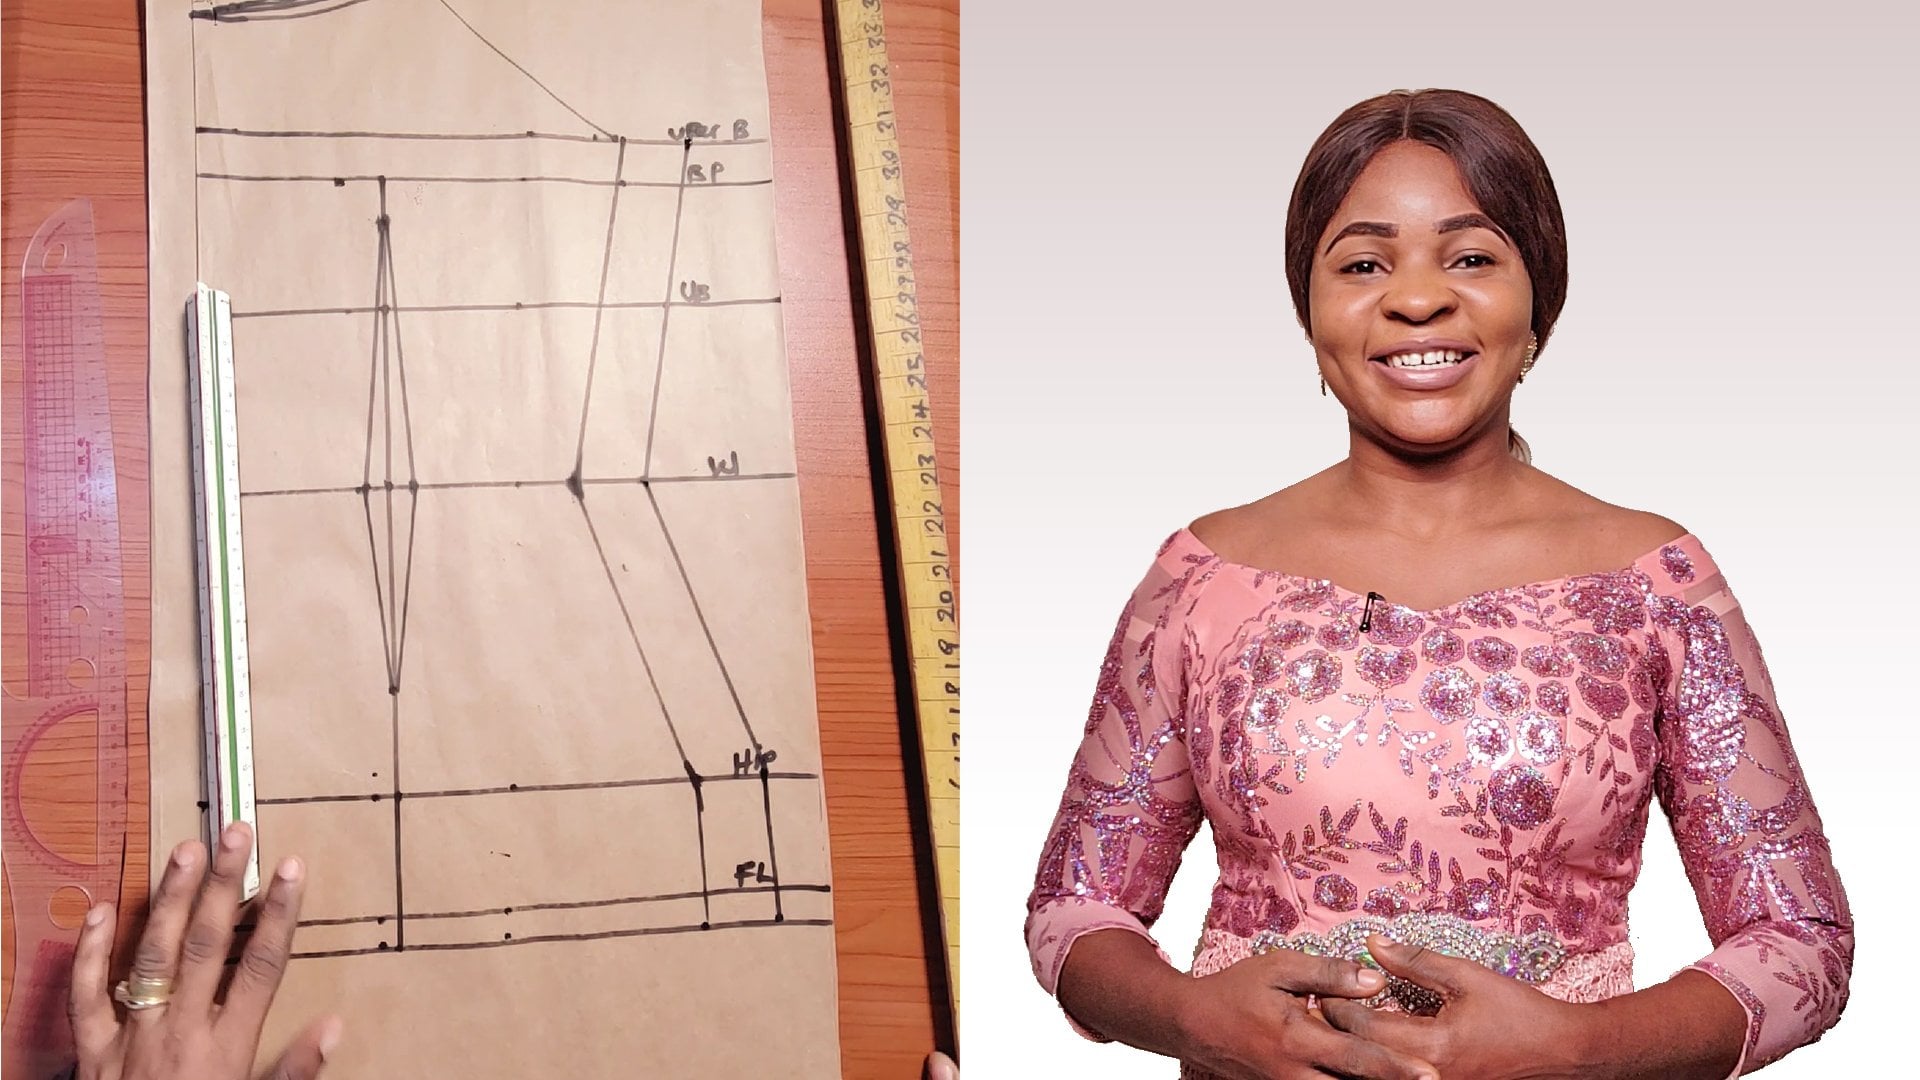
3. Chapter 1: Preparing and Cutting Fabric: This is introduction. So the coating of the
costs of pattern that we have already drafted
above is the courts. The one that has been costs. Why we low is one with
F and H allowance. Now I'm transferring
it to the fabric. White numbers added up an inch. The previous video I showed you below was half an inch added. So I'm doing the same thing
to the fabric right now. I'm transferring
it to the fabric. But adding a half an
inch to eat may have to pin down your fabric when transferring your your pattern
paper so that it does not shift not all necessary tree
lines for your easy joining. Those same to all the PCs, but add enough on
each tweet them. Doing right now. Alpha an inch. For trans. Finally, make sure
your fabric is well pressed or well-earned. Tick off any ring code. I'm just doing
this. I didn't have an H transferring
it to my fabric. That's the side front. Just pulling it down to
hold on your fabric. I didn't half an inch. Each section, every part to the cop side. Gradually courts
don't have to bend. Just not chain unnecessary
lines for joining. So that way or joining, you will know where to join
so that you don't miss it. Q&a, when we assume you understand what
I'm talking about, this is the center back. You have to be careful. This particular material
is very slight. Way of putting this kind of material needs to be
extremely careful. That's the materials don't
shift and you don't get wrong caught in the center. That is zip salary up to
open its own separate. It's that is what I did. That is the sidebar that
I'm caught in right now. Just had enough on H3, It's all does need to be careful because it's
my Syria is very light. That is why I keep shifting. Advice when you are using, you have to be careful of
the materials you use. Okay? As a beginner, you use a very firm materials
that has width. So that's your work. Don't ships. Courts as any essays. Make sure it's half inch. I'm just doing coordinates. The SS just did that side. I'm just cutting out the
dots because I'm joining, I'm gonna be joining
the dots together. That is why it causes out.
4. Reviewing Cuts: This is the tutorial of the cost set adjust drafted in case if you are new
to this channel, you go to my previous tutorial to checkout on how I
drafted the cost sets. Now I want to show you on
how to use the center front, center front of the COP, the side front of the COP, the center front also
of the cost set. Uid here is the back. This simply you did two. This part is also what
do you do also due to the line because we are
applying lining sweets. The first thing you do is
to pick up these forests, isn't to PCs, Okay?
We'll pick it up. What we drew. You pick it up. When you are doing, make
sure you launch this line, make sure you add it here. That is why you can see
I launched everything. You pick it up. Make sure is aligning. You take it this way. You got your machine. You go and show it this way. Do the same thing
to the other parts. To this center products. This is how it looks like. You open it this week. What you need to do, just go to your machine, join these parts together. This way. For an inch to join it. You also join it like this. Assuming I've Chinese. You also do the same thing
to this part's fun age. You also join it at the end of which to look like this,
something like this. Okay. The other one I
just explained to you, you will go and show it. Show it this way. Show you the lining
is show it around. Just slow the cop. Come back and show
you how I join it. Do the same thing. Also do the same thing
whereby you do to this part, the front parts also
due to the lining. Let's go. I'll teach you on how to
make this step-by-step.
5. Chapter 2: Sewing Center and Side Front Panels: There's an industrial machine chooses Electric and
we also have manner, for those of you that don't have the industrial Michigan also
use the manner machine. Okay. What do you do? Sticking
the center front and the side front joining me. What's half an inch? What you do is stitching
that it did not not units. It makes sure we don't
lose that as well. You have to stitch
the beginning. They move to fabric
controller wire hangs by shifting it froms by saying be
careful with your hands. It goes, if your hands is
too close to the needle, is can hold your hands down. That's similar problem. You need to be
extremely careful, which are heads, that
is debt for that. You take the other path
Dora side of the cost sets, join it to the ADA center front. Make sure you align needs. Do same. Stitch it. Teaching. Then control the tutor hangs, align it very well. To duplicate it. The mixture you caught
the trade for Nita wall. Make sure after
sowing always ion. Your allowance now hopefully needs when you open
it, you ionic. Give your walker very
neat and unique shape.
6. Sewing Center and Side Bust: The next thing you do, you pick the center and the
side front of the cop. You join them together. There's a notch,
the youngest notch. Make sure the two notch joined together is like your guideline. You align it very
well properly by using half an inch
in joining needs. Half an inch. That is what you use to join it. Trying to physis. Use half an inch to join. You do the same thing
to the order of which can be second proud
of it because it's true. What I'm doing right
now, just cotton outs, tread Detroit,
that anomaly data. Just to make your
work look neater. You pick the other one. Same with what you
did to the first one. Line meets, join it together using half an inch up an inch. Stitch it by pushing it
using your hand to control it. That's just what I did. Then you stitch cuts
out the thread.
7. Sewing Lining Center and Side Front Panel: Well, we did with the fabric, you also do seem to be
declining, but it's very, very necessary for you
to label your corpse. And I don't get
confused with Kip. You get the center front of
a cost sets on the side. Front of the cost
sets joining me. We did to the front,
to the fabric. That is what we are doing
also to the lining. Exactly what should do to the fabric you also
do to the lining. But what I joining
we'd have an age also, be careful with your hands. Your hands don't guess. Don't have an age. Stitching. You call the tread
make your work needs, taking the audit paths
but a front side join. It's also linked to the fabric. There's no new thing. The same thing you take
to the fabric here, also applying past safe thing to aligning essentially
up your coats with your fabric that
is also watched. You are so caught
in your lining. Just half an hour
each day is teach. You can use these to do this
teaching as you see me, I used false to one. I can also use, I can
use it for the fronts wanted to state I can also use
the Baptist teach is also, does the same work.
8. Sewing Lining Center and Side Bust: You will replicate the center and the side fruits
of the corpse. It is always necessary
to debate why are they put to
differentiate one it is, I use the the drafting paper already been removed
from the drafting paper. So I was able to node
we want do on days one. For a beginner, you need to
leave a Eats, gives, right? Don't get confused. The bearing is very,
very important. Joining together,
stitching by half an inch. You see the notch,
notch align together, making sure to launch. The odds. Get a line so that you get
your walk perfectly well. You stitch by alpha and H by controlling
which your hands. Moving. Then cuts. Trade. I will check your work to
make sure their needs. You also do the same
thing with the autocrats. Data path of the obvious cone. Always be conscious
of the notching, making sure the align institutes by half an inch, teaching by half an inch. Holy family. Fun night, That's drug
trade and caught.
9. Sewing Center Back Panel: What we're doing right now
is coupling the back panel. We are done with
the front panel. This is the setup
back of the fabric. You'll be joining needs also, we do side back of the fabric. Make sure you leave a lipid. That is why I able to
differentiate them. Right now I'm joining the dots, allow us by half an inch. I cut off the debts. So cutting it off
and I'm joining the buck by half an
inch. Allowance. Stitch. They control your fabric. This off allowance to join. That's just what I'm
telling you right now. Generally we have internal ones. They use to teach. You do same thing to the
other parts of the tunnel. Mixture. You iron after
stitching, very, very potent. Open D similar once
you ionize very well. What I'm doing right now is also using the other products. Joining the order
parts of the panel. Joining the dots allow us. Stitch. Fabric is very
soft fabric is tricky. If you're not
careful it's split. You have to take your time
to align it very well. You join by half on each. Aligning very well. Controlled with your hands. You have to teach.
That is all for that.
10. Sewing Center Back Lining: You are done with that. You do the same thing exactly
what you did to the back. You also do to the fabric, to the main fabric, you
also do to the lining. Joining needs. We are now, right now are joining D, the data center back Sitebulb. We are joining the
dots together. You'd have an inch. The careful on what your hand stitch caught the tread to give you a neat job. Make sure if there's
any pin, we remove it. As you are sweeping, make sure you expressed your clothes to give
you a very neat walk.
11. Sewing Back Waist Darts: So we are saying the
black dots just joined. We're joining the dots together. Just all we're doing right now. That's together. Contribute to a hand
stitch at the end. Cuts the tread. Give you a nice walk.
12. Sewing Back Lining Waist Darts: This is another step, uses swinging the buck lining, the ducts of the backlighting. Just facing the trade incident, which is half an inch. Make sure you label
your panels so I don't confuse wave
troughs, elites lipid down. Also you're sued Liberty fabric, putting them together, you know, whichever one you call the tread to get to what
needs iron after Swing.
13. Sewing Panels and Bust Cups: So what you do in bringing the cops to joining
to the front panel, you can see, as I'm saying, you will make sure the
lines align together. The center line align, center line of the code and language center
panel of the front. Assembly needs. You use paint to pin it down. Hold it down with Pina, can see Michelle, It's align
with the one on the top. Your pin it down. You also hold it the
edge to the edge. Because there is also a notch, they're aligned within notch. Make sure they're
aligned together, that you face your wrists. You do the same thing
to the other products. Fit in and saying
sweets, just hold it. Need not gonna give
you a problem. That is why it's
always good to launch. Not cheat to see. All going to align. You, pin it down. Make it easy for you. Like so hold it. I can do. When you or did you
take it to the machine? Around? Be careful. Sometimes the pins
are not sharp. Make sure they are aligned. You stitch the surrounds. So you think you're
gonna be a little bit, you feel is not going
to align very well. You cannot watch the
main fabric difference. One, just take notch, it's port for this part. When you cut a perfectly
ways on the fits. And I'm not going to
give you a problem. Just make sure it's
aligned together. Be careful with the pins. Just trying to align it
together with half an inch. Just show it that way. Joining roots alpha an inch. Assessing you're
taking off your pin. Open it flats. Assumptive symptom
that front or the top. Make sure they align. Very important to
make a walk needs. You have an edge. Then have to be in a
hist. Take your time. Like so. Make sure you align. Does have an inch. Have to be careful. The tread. Detroit, make your work needs to just check all replaces if there's any way to cultural make sure you call the trig, which are warp nucleus. What you have done here, you also do it in practice. Have to be very
careful of the line. The key showed they're
linked together. Pin it down exactly what
you did to do that one. Patch here. Not Jim did notch make
sure they match pin pin each round to
hold it sewing, assuming it to be
very easy for you. Also look, it's the organ notch. That's why it's good to notch. To make your work easy. You print it down. I'm doing ticket to your machine to show half an inch also. Not you. You have to stitch just half an inch. Alignment dance. So half an inch mixture, not a marching around
half an inch of shoe. Take your time to make sure
you align with where we will. Make sure the two lines, points touching each other. Open up this seminar classes. Watch your hand carefully. Assign though it, or to
get to the other side. Make sure you took
off the paints. Hold it down, then
you'll teach at end. Always make sure you teach the trick to make your work needs. Always make sure you iron
your clothes after stitching. It's mixed for work needs.
14. Sewing Panels and Bust Cups Lining: I'm doing the same
thing on the lining. What you do to the fabric, you also do dissenting
to declining. Make sure the two
lines together, the central lines,
the line together, we deep center line of the cop. Make your work look
neat and perfect. Mixture. The launch, not cheese, they're touching each other. You can pin down. Just sets your lining variable F and H. To be careful. Going to have to be in a
hurry ticket gradually. Check off your pain. Just searching notch carefully agenda inch stitch. Just sent it to the path of the quantitative traits
to give you a walk in. The tread. Trudy, neutral came this past nature
denature symptom matrix, call it a trend. Can see the lines as straight. It would send it to recall. Measure deadlines. The central lines align
with the front panel, center line of the
co-op that align with the front panel of the fabric, does the lining it that way, make sure it's aligned around as she did
to the first cop. Let's say Why you do
to the fabric you also due to declining. Have to be careful. What's your hand carefully? Teach how fun age. Cough so you don't need to be
in a hiss. Take your time. Make sure you have to be careful
where you get. So the liner, the center, you watch careful to
make sure it's online. Slow carefully. Some doing it right now. You've got a trade. If there's any pain,
you take it off. I've just what I
did that is offered that you have to IU and after Swing is very Puerto to
make your work needs. And you check if there's
any tread anyway, you cut it off for
your work to be needs. That is the lining for the fabric they are going
to use to turn the fabric, the main fabric we got and iron.
15. Chapter 3: Laying Out Lining And Fabric: So now this is the main
fabric and the lining, the wrong side of the fabric and the wrong
side of the lining. We don't coupling. Now putting the
cops together with the front and the
side of the concepts. Now, what we are doing
now is, right now, I am showing you
how the front of the fabric looks like on
the front of the line, it looks like that is the
backpack of the lining. Why do that one is the
backpack of the fabric. The necessary whats
do is just to couple the fabric
underline me together. Before we do that. Before we do that,
we have to add the drawing this back side
to the front side. The cost sets.
16. Sewing Corset Front and Back Together: Cutoff any SS. So that is what I'm seeing. If there's any acess, you cut it out. Now I'm joining the
backside to the front side, which half an inch? The back side of the
fabric and the front side, which often you measure
two inches or 1.5. So it depends on what your
allowance you bring up. Some majorly 1.5
inch seam allowance. Okay. So that is what you
use 1.5 inch allowance for your sweet foods. The mushy mixture of the
fruits of the machine. For a beginner, you
have to chalk kits. Should I? You know, you see you want to know
what your stitching. That's just what I'm
feeling right now. Mocking the one on the joining. What we do right now is bringing the front panel of the course
set and the back panel. Want to couple it together by using one an inch allowance. Join, 1.5 inch seam allowance. That is just for right now. Make sure you teach at the end. Have to be careful
with your hands. Any trade you do the symptom to the
other side of it or so, what you do is also do the same thing that you need to the other side using a 1.5 inch seam allowance to join both the front and
the back panel. Just what I'm doing
for beginner, you have to measure your 1.5
walk rates measurements. We should take it
to the machine and soil down straight line. That's what I'm doing right now, is show you, teach your kids. Watch what your
symmetry is, treats me. I just use 1.5 inch. So in allowance institutes, the mixture you caught the trade for knits walk
arbitrarily, just coats. That is all for that.
17. Sewing Corset Front and Back Lining Together: There's some things
like that. She might be sweet and the tread CTO, just take your time to Feizi
path if Trudy needs to hold. Now the next thing is
bringing the lining. Do the same thing what you did to the main fabric
to the lining. Just just what MJ right now. What should do 1.5 inch
allowance, seam allowance. We also do lining. Exactly what you
did to the fabric. You also do to the
lining that he just what I'm doing. Like that. 1.5 inch you saw it down. Follow the straight
line as teach. Cut the thread for neatness. We check if this
introduced caught. You do the same thing
to the other side of the fabric of the lining? 1.5 inch. Do the same. Haven't
done anything much? What I do after
you make sure you iron or your seem to make
your walk very needs. As you can see, the
thread has caught. You need to face a buck. Exactly what I'm
doing right now. Just to visit trade, use teach they saw following
the strict line number. So courts make sure you facets then follow the
line that you measured the 1.5 inch seam allowance for you that you follow
the line stitch. That is all for that. In drug trade and courts through it and
remove all paints. Every pain that is dead.
18. Joining Fabric and Lining For Sewing: White. Now what we are doing now is
so the lining to the fabric, because we are covering it
switched to read a line me. What you do, just make sure
you align it as empty and make sure you also pin it
down so that you don't see. It goes not shifts. Can see as thick
as I'm doing it, taking my time to do it. That is also how you do it. Well, I'm want to do
when you do that, you wholly down by half an inch. That is what I'm
doing right now. I'm just trying
to make sure it's aligned or the lines
are joined together. Each lines are joined together. Which other lines? That just what I'm doing. So the moment you see is like that while you do
your show round. But before you run
as a beginner, you need to use your
pin to hold the town. They will sit. Gonna do
your Sway to be done in case you want to add any fabric to the hip, to the wastes. You, you just leave the down, not showing the down. If you know, you want
to add something like if like a pep loan or scared or something, the down paths you leave it,
you don't need to show it. For the sake of this tutorial, we are ruining everything. We are swinging
everything round, live in just half and
each inch Sony in and out of the fabric to bring out the right side
of the fabric.
19. Sewing Fabric and Lining Together: Right now what we're doing
is adding the fabric, the fabric and
aligning together, together, which have an 8
second as you see me doing. Just use have an age, have to be careful. You open up the similar ones. Be careful where
you're training. Using just a half an
inch, including the top. That's just what
energy right now. He's enough on age. Join it. Should your lines are
aligned together. You open up the
same way, swaying. It's making sure the lines there are language aligning. The line in the fabric
aligns with the one lining. Just take your time. Show your range it very well. You will see it round. And when we get to a point, your live like half an inch, they used to group your tone in, out, in and out. That is what you do. That's just what I'm
doing right now. Using half an inch, too close, it's off. Closing the lining
fabric together. You just keep swinging. Right now I'm just swaying
side parts of each, one each. Now, this is the
bottom half an inch. Closing, closing the
loop. Be careful. Seven each night you
just bought somewhere. You open up the
allowance, open it flats. Your Punnett flour
mixture designs lining together for the
fabric line or not. So one of the lines, the lines are together, just the down swing. Can see how I'm opening needs. That is also how
you open its way. You're swinging your check if they're properly,
we'll arrange. You keep going until
you get to the end. What I'm telling you right now, I just keep sewing it. What I'm doing just
to make sure I align needs and is properly
well arranged. You move to the other side. Validation of the foods
Swain disorder side. Also have a niche? Just the daughter would I
just did I I stopped there. Also stack from the other edge. Leave half an inch or one
H to turn it in and out. As you can see what I'm doing, I just let one
each day I jumped, jumped by leaving one inch. So I'm going to show this
to the end right now. Three to the n, The opening, the remaining open that is
where I'm going to pass it out to bring it out to
the right side. Out. If there's any tread you can coach to make
your work needs. To be true. What I'm just doing, he just caught in
the trade making sure there's no truer down. Walk. Not to look nice.
20. Flipping The Sewn Corset: So right now I'm
finished sewing. The one inch. Left is from there. We're going to flip it to the
right side of this fabric. You can see me doing right now. I lift one inch. That is what I am
doing the in and outs. I'm just doing the in
and out to bring down the right side of this fabric. One inch, the ellipse. Wisely. Gonna take a long time, waffle blue Gina, you can
decide to use two inches, so I assume be difficult
for you to make the walk is the in and out. That is just what we're
doing right now with those brought the wrong side. The right side is what
we just brought out now. The right side of the lining and the right side
of the fabric. You bring it out,
make it neatly. Check all the edges and make
sure the upper palate out. If there are no
outer, You can lose Pin needed to bring it out. Bring about drugs. Will
you clear some drain? Do the same thing in the four
corners of the material. Those bring them out, make sure they're
properly routes to make your work needs. We have done dots. You take it to your pressing
ion to give it a nice ionic. Nice praise. Right now I'm done. Before the employee ticket to your name, you have to chop. As you can see me, you see
I'm going to stop seat, but I just want to make sure
everything is out properly. And if there's any
paint, as you can see, there's a paint the signs to look for a way
of bringing it out. It was what I'm saying. So what you do right now, you just have to keep
checking if there's any pain. So if there is no pin, you can go to top
stitch for right now, just want to make sure
everything is aligned. I'm just checking
it, bringing it out, checking everything to make sure because it is properly fists. After sowing. Just for AIM, Jane, to make sure it's nice.
21. Topstitching The Corset: The next thing is top stitching. Each round. I'm starting from the side. Just stops teach
quarter of an inch. As you can see me
tossed all round. Can use on I can't see. Just to keep you turn to
flip it to the other. As you can see, me to submit a walk to meet her faith
of Stitch Fix your walk, look neater gradually, properly to make
sure the line me and the fabric aligned
on the same line. You have to careful
in doing that. When we get to these concepts, you have to be very careful. When you get to the copies. Your second assumption needs
to be extremely careful. You stitch it's carefully. Sam, do you I know. When you get to this call, we have to be careful you
follow because of the way T's. Now to decide. To be careful. Also. Take it to this side. You can see the one inch I left. That is what I'm trying
to close right now. You fold it a mixture, it's a line stitch
to the bottom. I close the ports on because I am not adding anything to it. You want to add like
a pep long tweets. The down part of free
tool will not close it.
22. Chapter 4: Adding A Zip To The Corset: Well, let's 1.5
inch for the zip. That is just what
I'm doing right now. Using paint to pin
it down, to hold it. Using the paint to
hold a half an inch. There is no size for
this size of this zip. What I'm going to do after
drink after facility that assuming it's going to cut
the excess out then folded. You'll see me. How good
a treat for right now. I'm only pulling it
down the half an inch from the bottom. You use the velocity can
see what I'm saying. Okay. You hold it with the pin also to descend into the other parts. Also did since you see
the way I'm doing it, that is how you can pin it down. Make your work easier. Pin it down with AVA an inch.
23. Sewing Zip To The Fabric: Right now, I'm sewing
the zip right now, taking it to the machine. As you can see me, you have to be very careful
when you're trying to eat sweet to make it look nicer. Mickey, gradually be Mickey costs on how you packed off this
machines that are, you know, the uses of weeks. Right now I'm saying
you other parts of it are going to introduce patch of the machine
and their uses. Ai can be familiar with any kind of
machine you are using. And what's the are
useful to remove the pins in case you have to be careful
when he gets it. Please read is pin. Let's take off the
paint before sewing. So I didn't even destroy. You need to just saw it though. When you get there,
you stitch it's just teach it's what I do is just to cut out the
excess of the zip. Now I am folding needs
the remaining one. You hold it down. You can see puts it down this stitching stitch. You said to the other
parts called the tread. Also do seem to
just fold it down. I'm just putting it straight. You also afforded
the way I'm putting its just make it look neater. I'm going to approach
them just bringing it down down the yeses. I know I am done just
cuts out the trade. So this is the finer parts fits.
24. Chapter 5: Final Corset: That's the finished talk. This is the rock side
of the costs sets. As you can see how
beautiful and needs cities it came out very nice. Please Our likely
to also make the same and leave your walk
so that I can assess it. So this is right, Nadia is the, the right side of it. See how beautiful
and nice it is. Very beautiful. Cost that is ready to
read our particular to the Monaco to put it on
there so I can see how it is.
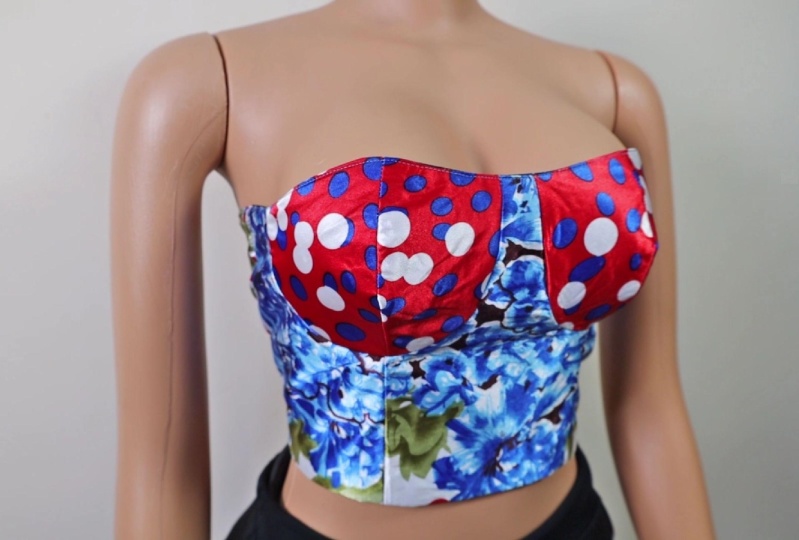
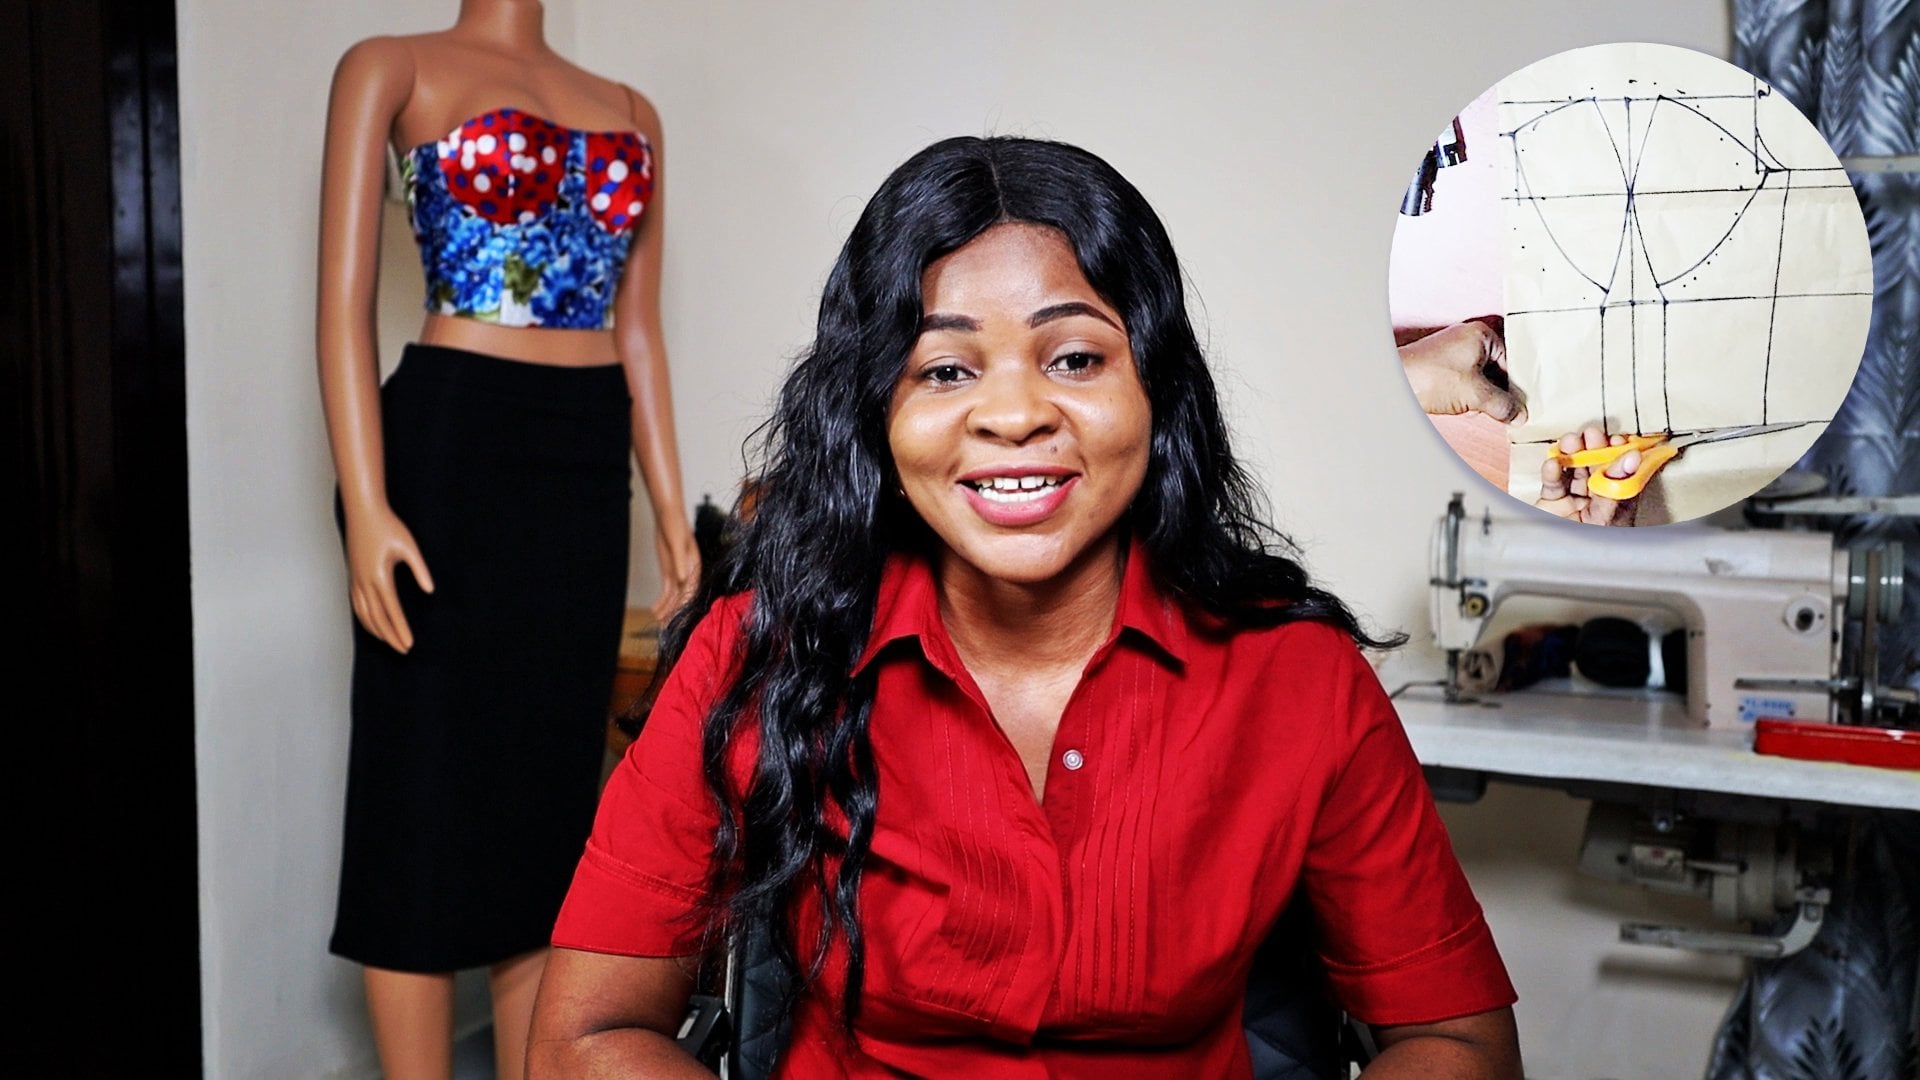
25. Corset On Model: This is the final piece. They finally finished
walk, so beautiful. This is the front
of the cost sets, is so beautiful he
came out very nice. You can also try it and see
how each one to come out. Because I love to see
students doing their work. So beautiful. Lovely. This is the back.
As you can see, the bucket also came out fine. Very beautiful. The finished torque is
suddenly some beautiful.
26. Chapter 6: Course Conclusion: Congratulations on
completing this course on so in a simple concepts
in the class, went through how to call it and saw it beautiful
fitting cost center. You cannot comfortably make
your own palette. Cost said. If you have any questions, comments in the course, and I am happy to answer. Feel free to leave photos of your work when you
complete your projects. I love to see your progress. I have a push it up
being your instructor. If you enjoyed this class, please leave a review
and check my professors. More costly. This has been scaled up
to you in the next class.
27. Things To Remember: It is you will remember at
the end of this course, you should remember how to cope who you're cops together there. Make sure you put them, you fit them perfectly
well on the fronts and the sensor France panels
and the ciphered PAN-OS. The other thing is you should
be able to remember that. Remember how your
zipper perfectly well.
 Stella JB Fashion, Fashion Designer and Patternmaker