Transcripts
1. 1. Intro: For Are you new to Guash painting or
simply have dabbled in it, but don't really know how to progress and do further with it. Don't know where to
start? Well, this lesson is the right place for you. Today, we're going to
do a complete beginners guide to wash painting. And in particular,
we're going to be painting some plants. My name is Sharon, and I'm
an artist from Canada. I've been painting with Acrylih for well
over ten years now, and I've learned a few
things along the way, and I'd love to share
it with you about some tips and tricks
that I wish I had known. If you've played around with
watercolor in the past, chances are you probably have seen or heard of
Guash at some point. And really, it's not
that intimidating. So for this lesson,
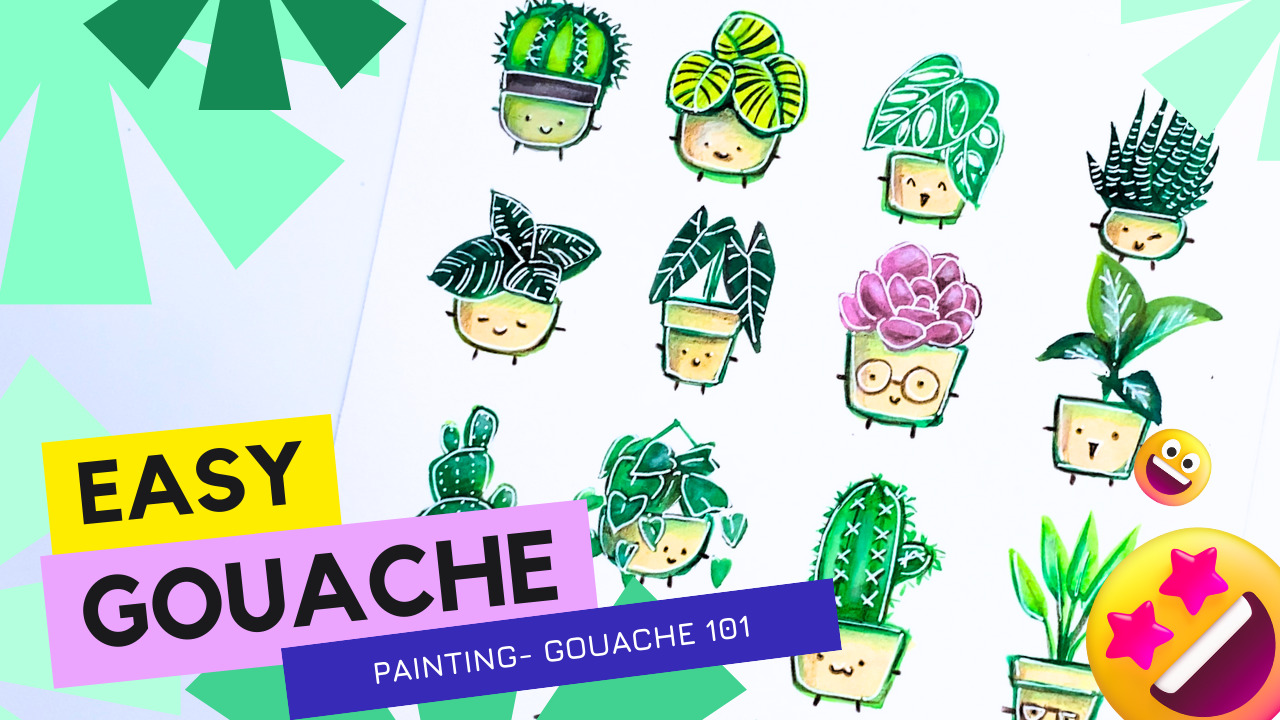
I want to show you how easy it is to come out some really cute drawings using this unique medium name Guash. So for this lesson, I'm going to be teaching
you how to draw these really cute potted plants of all these
different varieties, and it's super simple. So my goal is for you to have a project like
this piece here that can easily paint step by step and post it in
your living space. Are you excited? 'Cause I am I'm really excited to be doing
this lesson with you. So, let's get started.
2. 2. Materials: Materials. Let's start off by figuring out what materials
we need for this lesson. Here, I'm going to start off
with some watercolor paper. This is a watercolor block. It is a hot press block, which means that this type of watercolor paper is very smooth. Whereas, if you look for
cold press water paper, it's going to have a
little bit more texture. For me, I personally
love smooth white paper. I decide to go with this
hot press watercolor paper. But personally, I
think you can choose any watercolor paper that you have just to try
and start off with. Don't feel like you
necessarily have to get the exact same paper
that I'm using here. So here's my watercolor block. So that's the first
item you need. The second item you
need is a paint brush. So for me, actually don't
need that many paint brushes. I usually just use
one paint brush, and it kind of does all
the different things. So for this one is
a round tip brush. You can see this one
is a size eight, but I think anything
smaller would be good as well if you're
working on a lot of details. So I'm just going to use one brush for this
particular lesson. The next thing you
need is a jelly roll or some kind of white
opaque ink pen. This is one from secure brand, but you can use certainly many different brands available. I picked it up at Amazon, but they also have it at the local art store or stationary stores like
staples and such. Here's how it looks like. It dries very quickly, and it comes out as a white ink. I'll use this for
my highlight later. Next, I'm going to,
of course, use guash. So I'm actually
using acrylic wash, and this one is by holbin. There are traditional watches, which definitely it's great. It can reactivate when you
add water even when it dries. I'm using acrylic wash
because I really like the fibrincy but I don't want it to reactivate
with water. It kind dries like
acrylic permanently. I'm also going to use
some oil pencils and pencil crayons to add some
gradient to my artwork. So a couple of mixed
media are very helpful for Guash
because for Guash, it does dry mat, so it's helpful to use different mediums
and have fun with it. It's also helpful to
have a water container. It doesn't need to be fancy. I'm just using a
yogurt container here, but you can use any water
container that you would like. Those are essentially the
main materials that you need. You can see that there
aren't too many items, and some are probably items that you've
collected along the way, if you tried different types
of artwork along the way, because I know most
artists like to try different materials
just to see what works. These are the
essential materials, and we're about to get started. I find it really helpful
to turn on some music in the background of music that I like and paint along the way, makes it so much more relaxing. That is just small tip
that I would suggest. If you're starting off
and you want to relax, turn on some music,
have a pot of tea or coffee of you as you're
painting along the way. One more item I think I should mention is like some
kind of plate for you to mix the ink in
or, like, washing. So here I'm just using a lid. It could be a yogurt lid, or it could be a pasta jar lid. It could be any item that you can use to
get a mix patent. So those are all your
essential items. So I'm pretty excited. So let's get started on
this plant collection dry.
3. 3. Choosing a Color Palette: Choosing a palette. For this particular wash
piece that we're doing, I think it's really
helpful to decide on what color palettes you
would use in the beginning. It doesn't need to
be a lot of colors. You can see here for this
particular painting, I'll be teaching you. There's only four
colors that I'm using. Four colors, and even
the darker shade, you can probably mix it with some lighter colors and
get the lighter shade, but these are the four colors. One is a rose violet,
there's a green, a leaf green and also this
flesh apricot color as well. Of course, you can choose to use different shades
of green as well. You don't necessarily need to choose the greens
that I've chosen. And then you can use some
olive green if you like. Just different gradients of
green I find it is really helpful to create depth
for your painting. Here you can see for the guash. I usually just squeeze out a tiny pellet of
paint because one, the drawing that I'm
painting is not very big. I feel like less paint
is definitely less intimidating and I can always squeeze more
out of the tube. A little does go a long way for uh because I find that
I could dilute it with a little bit of water
and I'll turn almost like a water color consistency and that can spread
really well as well. Here you can see, I'm just doing a small p size for a lot of
the paint that I'm using. So it doesn't feel
as intimidating. And also, like I mentioned, you can always add more later. So that's the lesson on
choosing your palette. The last tip I would add is out of the gradient
that you have, it's always nice to have a dark shade for your shadows and a light shade
for highlights. So always make sure you
have a dark and light so that they're not like
all neutral colors. So it'll make the
painting create more death and more
interesting in general. So that's it for this lesson
on choosing a palette.
4. 4. Styles of Plants: Styles of plants. There are many styles of plants, and I draw a lot of my
inspiration from nature. So for this part of the lesson, I invite you to either
go on Pinterest and just look at various
different types of plants and kind of take plants that you like or just
take a walk outside, have a look at your garden, or it could be on the walkway to a park and just have a look
and absorb in the natures, and maybe take notes, take a notebook with you and maybe a pen or a pencil
and just jot down different shapes that
you like or even potentially take some
samples back as inspiration. Keep in mind, it
doesn't need to look exactly like what
it is in real life, but I draw a lot of
my experience from my artwork from outdoors
and nature itself. At the same time, I feel like
getting some fresh air and just absorbing in the nature
does help me feel inspired. So here are some videos of plants that I've
taken for videos. Hopefully it will be
inspiration for you. But let's say if the weather
is not nice and there's no really vegetation
or foliage near you. Pinterest is a great
option to have a look at for inspiration for
different types of plants. Other than that, you
can also choose to follow along in
the plans that I'm drawing to start off before you go and forage around four
plans that you like. Overall, you will have
a plan collection of maybe three or four or
up to 12 like I have here. Don't feel intimidated
that you have to do all 12 plans that I have
here as an example. You can choose to start off with maybe two or three or four. And then just solely
work your way through. Keep in mind that
things don't have to be perfect the first time
it does take practice, and I have practiced quite
a bit before starting. So give yourself space and
be kind to yourself and take this opportunity and brainstorm for style of plants you
might enjoy painting.
5. 5. Plant Painting - Part 1: Painting plants. Now we're going to start off
with painting some plants as we already have
our color palettes with two types of green. I'm going to start by
doing some outline using my darker green such as this cactus that I'm
working on here. I will zoom in for you so you can have a better look
at what I'm doing. But I am speeding
it a little bit faster so that you don't have to wait for me to paint slowly. Keep in mind that you can
paint at different speed. Don't feel like there's
a need to rush. You can also slow down this
video if you would like to go at a regular speed to
see how it's actually like. But here, I'm just
drawing almost like a watermelon shape for my plant. But just doing half of it, so it's like a semicircle. And then I'm mixing in a
little bit of that rose red to create the
planter on the bottom. For this video, I'll do several different
plants to show you the different styles and
how I go about painting it. I will start off with
acrylic wash and then solely work towards
other mixed mediums such as the oil pencils, as well as the
archival ink gel pen that I had shown you
in the beginning when I went through
the materials. For the potted plants, for the pot itself,
like the planter. I'm using this flesh or
apricot color to color it in. Of course, if you would like a different color
planter you can use red or blue or other
color mediums as well. I'm restricting myself in
the number of colors I have for this color palette
because I thought it would be easier and
less intimidating, especially if you're starting off and you don't want to pick up too many colors for Aquilcqh. So if you like, you can follow along and use
the colors that I have or try to improvise and use what colors you
have available to you. You see, I'm mixing
in quite a bit of water with my acrylich so I can spread the
water a little bit more almost like a water
color consistency. The great thing about Acrylich is that it does dry opaque, so that means that you
can layer on colors on top of each other if you don't like what you
have to begin with. Another tip, I should let you
know that for acrylic wash. The darker colors
do dry a little bit lighter and the lighter colors
dry a little bit darker. So you may not know
the true color of how it looks like
in the beginning, especially if you're starting off with your paint
for the first time. But as you get more
experience with it, you'll notice what the color would dry out ultimately
when it's done. Here, you can see, I'm
just using my round brush. I'm just using the tip of it to do the outline of
this plant here. Using just the point
of the brown brush, I can actually get
a lot of details. Therefore, I don't need
too many brush variation. Whereas if you do a wide brush, something that is flat, it's harder to get
some of those details. I feel like this is a
great all in one brush, if you have to pick only
one brush to paint with. As I mentioned earlier
in the lesson, if you feel intimidated to be painting so many
different plans, just focus on one or two of the ones that I'm
giving you examples for. For guash, you will notice that the colors tend to blend
together if it is not dry. One of the tips I want to
let you know is that be patient and let the paint dry before adding
on the next layer, and that way you
can see clearly how the details will show up,
such as this one here. I've let the leafy green
color dry on the bottom, before adding on
the darker colors for outlines and details. That's an important
tip to consider. Don't rush in this painting
process, enjoy the process. So here, I'm just going to
join in some of the details on the leaves inspire from some of the photos and videos
that I took in Nature. So this is part one of
painting the plants. I'm just going over some basics. In the next part of painting
plants for part two. I'm going to go over
how I illustrate the different styles
of plants that I've chosen to paint along. So feel free to join
me in the next video, if you want to follow along
in plants that I'm painting, but feel free to
skip over it if you already have an idea of what
plants you want to paint. And we will talk a little bit about creating
outlines and shadows.
6. 6. Plant Painting - Part 2: Painting plants part two. So now that we've gone over some of the basics
to painting plants, I'm now going to do a speed up version of the
different styles of plants. I've decided to paint for
this plant collection. Here, I'm speeding it up, but if you feel it's a
little intimidating, feel free to slow it down. But I just want to
show you the process of how I paint some of
these various plants. You can skip over the videos, two plans that you were aiming to paint or
you can follow along this full video to check out the process of how I paint
each of the plants here. You can see I'm not using
many different colors, just starting out with the
green color, the darker shade. Just usually drawing
out a rough outline, followed by painting the
filling in the inside. Now, if you feel a
little intimidated by just putting paint to paper. The other option is to use like maybe a pencil or a
water color pencil to do the outline of the
various plants and planters that you want to do before just
painting right in. Here you can see the colors
are quite saturated. But if you like, like
a lighter color, you can always blend it with
a little bit of water to get a more diluted,
a lighter effect. Here, I'm actually
painting a succulent. It looks very blobby right now, but in the coming lesson, I'll be talking about how to add outline using archival ink, and the details will definitely
stand out a lot more. Right now, it's in
this in between stage where it
doesn't look amazing, but trust me, trust in the
process, it will get better. Here you can see, I'm
just adding in a cactus, doing a lot of small ovals and just leaving room
for the planters. Another option to
ensure that the plants are evenly spaced out is to maybe use a pencil to create a grid for
your piece of paper, and then just draw
within the grid. For me, I'm just
roughly eyeballing it, but I think if you
want to be exact, that is a great way to go, just grab a ruler and measure the dimensions of
your piece and then divide it up to figure out how many grids or how many plants you would like to draw
in your collection. Here, I'm just drawing an outline for each
of the planter pots. I do plan on coloring in the pots later in
a different color. But like I mentioned
in the last lesson, it's very important to be
patient with your guash. It's important for the
previous layer to let time for it to dry before adding on the next
layer or else, it's very easy for
it to get very messy because your new color will blend in with
the previous color. Remember to be patient, wait for the previous
layer to dry before adding on the next color. Here, I'm going to continue to draw the shapes of
the different planters, and I think that's
something that you can get very creative with. The planters don't
all have to be the same shape, the same size. I think that gives the plants, each of the plants
more character. Some can have very long
cylindrical shape planters. So could be really
wide on the bottom. The shape of the
planter will also give character to
each of the plants as we add facial expression to the piece later
on down the road. I can also imagine if you would like to do a plant
collection that's a little bit more colorful
with more flowers and different types of
tulip roses, daisy. That is totally an option. The reason I've chosen
to do more greenery, foolish plants because I thought it would be
a little bit less intimidating to have a smaller
palette to choose from. From here, I'm just
going to let you listen to some
relaxing music and review some of the plants
that I'm painting and decide which one you would like to
follow along and go with. And then we'll move
on to the next lesson on using different types
of mixed media along with your guash to
create more depth and shadows and highlights
for each of your plans. From here, I'm pretty much finished painting all the
different plant styles. I'm just going to start
coloring the planters with this flesh
or apricot color. Keep in mind, it doesn't
need to be the same color. You can choose different colors
for each of the planters. It could be like
red, blue, yellow, or you can have a
specific color scheme or perhaps if you're planning on having this framed
in your personal space. You may choose to
put the planters in a color scheme that
matches of your vibe. Let's say, if you have a more neutral and, like, arfy vibe, you can try to use planters
that are more like brown, neutral colors, various
shades of sand. Those are all some great
ideas for you to consider. A, I do find that lighter color
planters are a little bit nicer because it will make the plant stand
out a little bit more, as well as the facial
expressions that we'll be adding on in the coming lessons. So here just making
sure I color in all the space and make sure that I don't leave any
gaps in between. I think it looks
pretty good right now. Thanks for joining me on this lesson on painting
the various plans. Let's move on to
the next lesson.
7. 7. Adding Mix Media: Adding mixed media. Now I'm going to pull
up my color pencils that I have readily available, and I think that as
most artists that we dabbled in different
types of art supplies, you're bound to have
some oil pencils or various lead
pencils available. I find these very helpful
when you're trying to create gradient for some
of your guash painting. Please excuse these
stickers on my hand. I just realize after fuming it because my kids are just
sticking stickers everywhere, at least they're at this age, excuse the stickers on my hand. I do find that this is the
most relaxing and also one of my most rewarding parts when I'm painting with quash
and mixed media, and that's using these color
pencils to create gradient. I love how it's very portable. I can finish my quash
painting once it dries. I can bring it to a
coffee shop and bring some color pencil
and just slowly shade away in areas that I think born shadows
and more depth, particularly on the sides of the planters and
underneath the plants. And I just really enjoy it. Turning on some nice five, nice music and just slowly
chipping it away at it because when you use mixed
medias like this on guash, the great thing is
guash dries mat. The mixed media does
go on very easily. One tip I would suggest
if you're using color pencils is to slowly
blend in the colors. Don't push on the lead to create those depth
and darker shades. I actually makes a
big difference if you just slowly add in the gradient itself by slowly shading it in a layer by layer, it will look fantastic. Trust me. Something I've learned
over the years is not about pushing hard, but just going gently at
it one layer at a time. Here you can see, I'm using a darker shade of a oil
pencil to create some of the outlines such as the outlines for the
cactus and the leaves. This is something you can
do with guash itself, but I love the effect and
the softness when you use color pencils to go in and
shade in those shadows. Here, I'm using this
darker umber brown to create more gradient
for the various plants. Later on the video, I'll
show you clearly how it looks like closer up front, I just looks really
beautiful and very soft. Personally, I prefer to use a burnt umber like
a brown color to do gradients as opposed to
black because I find that black creates
very hard edges, and I was aiming for a piece
that's a little bit softer. So that's my thought process
on why I decided to use this brown color to create
more of like shadows. Next I'm going to use
this white color pencil, which previously, I didn't know the purpose of having a white
color pencil until now. It's great for adding
highlights for guash. Just make sure not to push
hard on the color pencil, but to slowly shade in
and blend in the colors. I find that oil pencils work personally a
little bit better for me and they blend a
little bit easier. You can see actually use a
lot of my white color pencil. That's why I still just
like a stub of it left. It is one of the
very handy tools that I've learned along
the way as I'm using. To create more dimensions
for my uh painting. Of course, you can do this
with acrylic wash as well, but I love how the colors are a little bit
more soft and it's easier to control if you were to use color pencils to
create highlights and shadows as opposed to a
water medium for guash. I think wash does require a little bit more
experience for you to control it exactly the
way you wanted to, but anyone can pick up color pencil and start slowly
adding in these highlights. So I'm going to let you see how the rest of the piece goes. Then for my next lesson, I'm going to focus
a little bit on adding outlines in
particular with the white ink that I showed you in the
beginning for materials. You're going to be so
surprised by how big of a difference that white outlines
can make for your piece. I am so excited to be showing
you this next lesson on how to add that little bit of detail for this plan
collection piece. For now, I'll let you see
how I do the details and highlights for the rest of this piece using
my color pencils. And then we'll move on
to the next lesson. Enjoy.
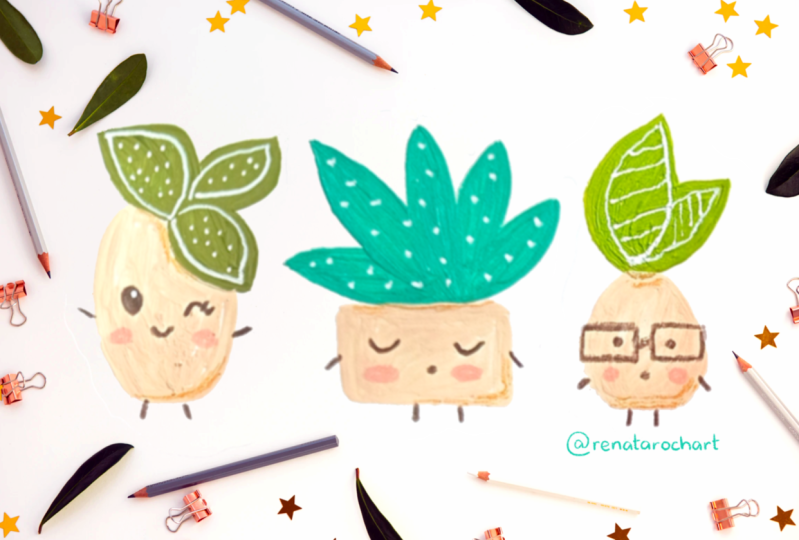
8. 8. Adding Facial Expressions: Facial expressions. Now that we've drawn the outline and all the
different planters. Now it's a time to
have fun and add on some facial expression
for each of our planters. Now if you feel
like you wanted to be a little bit
more realistic and don't want the facial expression on your planters,
that's completely fine. You can skip over this lesson and move on to the next lesson. But for now, I'm
going to show you how I'll be adding a little arms and legs and also
facial expression for each of these plants. Let me zoom in first. So here you can see that I'm
just using my color pencil, just like this brown color. If you want, you
could use black. But as you've heard
in my last lesson, I prefer not to use really extreme colors like
black because I want to convey a more natural and
more warm and earthy vibe with my drawing here. So here just adding on
little arms and legs. I imagine if you want
to be more creative, you can add on little
shoes for your planters, for each of the plants. I think it's helpful to
think about what kind of expression do you want
them to convey happiness, sadness, joy, maybe surprise. Maybe the expression will match with the client,
that is specifically. I think there's so many ways to be creative and
have fun with it. If you're out of ideas for how to put different
expressions on your planters, you could look it up on, like pin trust for moodboards, for different
facial expressions. So here I have a
really happy one, but I'll just go along and show you all the different
expressions that I'll have, and hopefully it will be
a good place for you to start and figure out
what expressions you want for your planters. So that about wraps up the section on adding
facial expressions. You can see I added
in some accessories such as glasses for
some of my planters, and I think it just looks so
cute and gives them more of, like, an attitude and
character that way. So next I'm going to
teach you how to add some white outlines that are really going to change
your piece and make it.
9. 9. Adding Outlines: Adding outlines. Now, for this part
of the lesson, you'll need your ink pen. For me, I'm using a
secure brand jelly roll in the color white. It comes out pegue. I must say that you don't necessarily need
to use this brand. It's completely optional. I just find this brand is quite accessible in that
I can find it on Amazon or my local stationary
or art supply store. So here you can see that once the wash and everything dries, when I use this white
archival ink pen, it creates these really
beautiful highlights that, like, just make the
piece pop so much more. So I'm outlining my planters, as well as details related to each of my plans starting
with this cactus here. I find this process really
therapeutic as well because I can be really
portable with this. I can bring it to a coffee shop and just sit down and just do some outlining and I already have an idea of what I want
my piece to look like. So it's not a lot of
planning in place, and I can just have a
nice cup of coffee or tea and just sit there
and outline my plants. Here you can see
outlining the leaves. Here, I just want to give you a closer look at
how it looks like. You can see how the plant just pop so much more after
adding in the white outline. Now, be sure to give time for
the ink to fool dry before touching it because it does mudg and it can come off
easily initially, especially when it's wet. Give it at least a
few more minutes depending on how
much ink you add on. Here's a closer look at
these planters, so cute. Here, I'm just going to speed
things up and show you how it looks like as I add
outline to each of my piece. With a white ink pen, it's very easy to
add textures and, like, little details
opposed to guash. So this is like a
really easy skill for you to adapt and
just have fun with it. I think it's like a lot more controllable
when you're using a ink pen because all of us are used to using a
pen as opposed to, like, grabbing a paint brush
and painting with guash. So this is something I think a lot of people
employed or try to do, especially when
you're using guash, because guash is a medium that lends itself very well
for you to add on other types of mediums such as the oil pencils that
I showed you earlier and now the archival ink pen. I think this is just
looking really cute. I love adding the little
details for each of the leaves. So I'll let you
enjoy the rest of this lesson as I slowly add details of this
white archival ink to each of the plan pieces. So that just about
wraps up the piece, you can see a closer
look how it looks like after you add on
the white outline. The piece definitely
pops so much more. I'm really loving this so far. So don't feel intimidated. If your piece
doesn't look exactly like mine, keep in mind. Painting does need practice, so be kind to yourself
and enjoy the process. Now, let me just
wrap up by going over final thoughts and
summary for this lesson.
10. 10. Final Thoughts: Thank you so much
for joining me on this lesson on doing
this plant collection. I hope you thoroughly enjoyed
it because I certainly did. I hopefully was able
to convey to you, how you can just use a very
limited color palette of just four different colors to do some easy guash painting, and also showed you
how you can use different mediums such as
oil pencils and, like, ink pens to create highlights and also
outlines for your piece. Guash doesn't have
to be intimidating, and I don't think
there's necessarily a wrong way to paint it. The main thing is just
to enjoy the process. Don't feel pressure, it needs to be perfect the first
time you do it, as you know, most art mediums
practice makes perfect. I hope you do enjoy this
process and hopefully, I will get to see some of
your projects coming up being posted on various
plant collections because I would love to see what plans inspire you and what kind facial expression
and funny characters you develop along the way. At the end of this lesson
at this part of the piece, I'm just going to add
in a little bit of a note on the bottom,
the plant collection, or I'm going to write that in, and then also make sure to sign your piece and
date it so that if you were to really do this project like a year
or two years from now, and you can see how
much you've progressed. So thank you so much for
joining me on this lesson, I would love to hear from you
if there's other feedback you'd like to provide and how I can improve my lessons
in the future, or if there's other guash paintings you'd
like me to teach. Hopefully, this is
a good introduction for beginners who are just trying out guash for the first time and don't
know where to start. I think I've highlighted
some helpful tips on how the paint dries and some tips on making sure the previous layer dries before
adding on the next layer. If you're interested in more
guash, Painting lessons. I have more on the
Skill Share website. Thank you so much for
joining me in this lesson on painting Plant collection, Gas one oh one for beginners. Hopefully, I will see
you in future lessons. Take care, everyone and
make sure to stay creative. Bye for now, and I look forward to seeing
your future projects.
 Sharon Leung, Life is serious, so have fun with art!