Transcripts
1. A little bit about me!: Hi everyone. My name is Dan and I've been a creative since
I was a little girl. As a team, I took art classes privately
as well as in school. But being the oldest of
four daughters growing up on a sheep and dairy
farm on Vancouver Island, aren't really took a backseat to Barn chores and farmwork. It wasn't until I was
in my late 20s that I really started to feed
my artistic needs. I created costuming prompts and sets for local
theater productions, and even turned my hand
at theatre and special effects up when my
daughters were old enough, I opened a small arts and
crafts instruction studio for homeschool rz, where we would puddle in
dabbled to our heart's content. This is where I realized that
I really love teaching art. I truly believe that with
the right instruction, a bit of patience and a lot of encouragement that
everyone can be an artist. I opened foxglove hollow
studio in 2016 in this small studio and open
the doors to adults as well. Since then, I have shared the joy of painting with
thousands of students, teaching babies step-by
baby step, encouraging, coaxing and yes, sometimes badgering my students
into creating. It's something they never
thought they could do. Something they are proud of. So many people come to me with low expectations
of their talents. I even once had a
student tell me that she came to prove me wrong on her way out the door with
a green stretched across her face and her prize tucked
under her arm. I asked her. Now, what else did you
think he couldn't do?
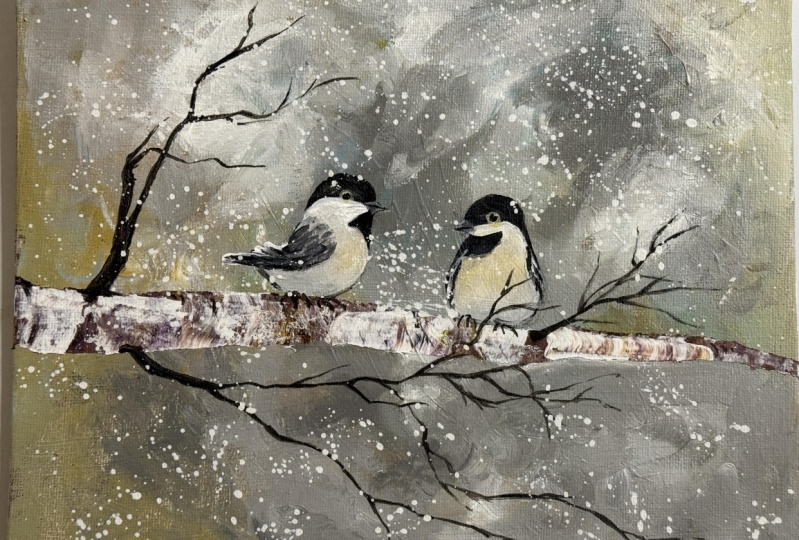
2. Introducing the chicks: Hi everybody. Today we're going to paint these
gorgeous little chickadees. Are they sweep? They are really very simple. I'll teach you how to draw them. I'll teach you how
to thank them. I'll teach you It's some
really neat techniques on getting a nice
textured branch. See you in the next lesson.
3. Getting started : I have my Canvas taped off. This was an 11 by 14. What we're going to do first is we're going to put
a background on, and I like to use
for my backgrounds, I like to use some white. And I like to use some black. There we go. We can always put more
on if we need it. And also, I like
to use this blue. This is a mixture. This blue, this white and black just made a
sort of a gray blue. The other color I like to
use on this is this sort of sandy sandy beige color. I've mixed just brown and white with a bit of yellow
into this and you get a sort of Sandy beige. These are all just colors. You can mix up yourself. These two or you can
mix up yourself. It doesn't have to
be exact at all. These are all going
to be different. We're working with paint that's usually from
the dollar store. And it's whatever really,
whatever you can find. So if you can get
a sort of a beige, sandy color and you can get a server blue de
Grey, your great. If you can't, just
use white and blue. Super-duper, easy. Now staying in theme
with the Dollar Store, we're going to use
these fees are just a six pack of sponges
you can get for $0.99. I think. They're fine. And I use them all the
time for backgrounds. They're wonderful. I just take them and
I usually cut them up into little chunks like this, like six from a sponge. The first thing I've
taped this down, you don't have to tape it down. I like to tape this
down because it makes it looks like
it has a frame. When we pull the tape off, I'm just going to
dip into the white and a little bit of the blue. And I'm going to just put
it really a really sort of kind of a light base coat on it so you don't need to
have a lot of paint on it. What I'm trying to do too is kind of steel tape
down along the edges. If you do this, if you do this, you can get a really
nice clean line. Whoops, see a nice, a
nice straight line. We've got some brown in
there, but that's okay. That's okay because well, stuff happens when
you're painting. You just have to go with it. There we go. This is all just
sort of underneath. We won't have a brown
sky, Don't worry. Okay, I'm just gonna do that. And then I'm going to
give it a quick blow dry because we've just
got this for a base coat.
4. Chickadee background: That should be dry. I'll just cut myself and another piece of
Clean sponge here. There we go. Good enough. I'll put
that one to the side. Now I'm going to dip right
back into my white again. This is so technical, I'm just gonna do this. So just smoosh it
here and smoosh it. They're really, that's
all you're doing. Now I'm going to
dip into the blue same sponge, just like that. Anybody can put in
there and here, and I love this
combination is such a lovely 11 of my favorites
for backgrounds. Just going to take
a sponge again, same sponge in the sandy color and put it here in
there in-between. The idea here is to
keep it kind of cloudy. I'll put this to the side. Roll up my sleeves. I'm gonna take a cloth here. And a point to just
take a lot of the paint off the sponge because
there'll be loads in there. Now I'm going to do is see this little patches that
don't have paint on them. I'm just gonna make
sure those are covered. So I'm just going to
make really light little circular motions here. Really light in-between the
colors joining them all up, joining up any patches that might not have got
paint on them. Do that first. This, first, this is
acrylic paint and the first thing you
need to know is that you can blend it when it's wet, but you cannot go
into when it's dry. So you want to make
sure you have paint on here so don't be stingy with your paint.
It needs to be wet. Otherwise, should we be
trying to blend paint, it isn't wet enough to blend. So I've got those patches
all kind of joined up. Now I'm just kind of very, very gently going to
blend these together. And I'm using a
very light stroke, just round in circular motion very lightly and
counterclockwise and clockwise. A pinch my sponge
together like this, so it takes away
those flat edges. And I'm just very lightly, not back-and-forth because
then you'll get like it, It'll all blend together. But if I go in different areas and in little
circular motions here, I'll end up with a
really pretty Cloud, cloudy, soft blend. Maybe a bit more blue here. It's wet. I can still blend it. There. See isn't that lovely? Just sort of cloudy, soft there. So we're just taking off
all the harsh edges. Little bit more white
here and there. Just take that edge off. You can leave some brighter
areas which is lovely. Don't be tempted to
wind your sponge. You'll end up with kind
of like a rosettes shape. Then it'll turn into a pattern. I can still blend
this, it's still wet. But if it was dry, I would be out of
luck and I will just have to blow dry it
and start again. Just put another layer
on Almost there. Little bit more white here. Totally up to you.
Stop when you look at just getting rid of
any little harsh spot, certain lines that are left nice and fluffy and
blended softly. You throw your
sponge in the water. You'll be able to keep
it for next time. There we go. It's looking quite cloudy and pretty I think that will do. I'm just going to pop my sponge
into the water over here. And now we'll put this to the side and learn how to
draw our little chickadee.
5. Drawing our chickadees: We're going to need
a piece of paper. Just a plain old piece of
paper, nothing special. I'm going to use this big so
you can see what I'm doing. But you'll probably want
to make your chickadee may be on piece of
paper, half the size. I'll do two different
versions of them. And then you can do to, to birds on if you
want or you can do for birds are solid to you. I'm going to start off with
a nice circle like this. And then I'm going
to take that circle and cut it into four pieces. Then I'm going to cut this
top measurement here in half. This measurement here. I'm going to put it up here. And then I'm going to stick circle right in-between
those two lines. By doing that, I
know that the circle is half the size of
the bottom circle. Now what we're going
to do is we're going to stick line down this way. Cutting this in roughly thirds. And then we're gonna
come down here. Take off that little
corner there. Come down here already here. This is just tale dishes wing. Then we can cut
his head in half, which will be roughly there. This is where his eyes going. If I turn my page this way
and I follow this line here, stick out a little bit more. I can make his beak
with a little arrow. And then it come back down here again and make an arrow
pointing the other way. This one's just a
little shorter. Now we've got a beak. We'll turn it up this way. And I'm going to put a little line right
there above his beak. And then I'm going to flatten that out his little noggin like this because we don't
want a huge head on him. There we go. There's the head
of our chickadee. If we follow this line through his eye and then down the
back of his neck here. Just like that, that
gives us his black cap. Then if we come under
his beak here and we take off that little corner, that'll give us whereas chin
goes right here, right? Whereas beak meets, we can make his little bib and
it comes down like this. Then we'll just follow
the circle down. If you've got a great big tummy on them and you don't want to that fat, just slimmer down. Then we're critical
for me this year. Echo this line
here, over to here. Got to chop this. Tell me off a little
bit. It's really fat. There though. We have our little chickadee. Just as simple as that. There is chickadee number one. If you want to make this
chickadee backwards facing the other direction and you
don't want to redraw him. You can take your carbon paper
and put it black side up. You're going to be
carpeting on the back of your back of your paper. Just trace him like that. Just quickly follow this
around to show you. If we turn it over. We've got our bird
facing in the direction. That's really nice.
Oops, I missed apart. I moved him, but
it doesn't matter because on the
back of the paper, now I've got my little bird
facing the other direction. Now this guy is huge. We won't need to bird this two huge. Let's, let's draw one more. I'll put them in this
corner here. Same thing. I'm going to start with
the same, same circle. If you start with the
same size circle, you'll end up with
the same size bird. Cut it in half and
then half again. Same thing we did before. Stick his head on top. But this time we're
going to go here. We're going to go here. Take those two
little angles out. Come down here like that. I'm gonna come down
here like that. This little bird is
going to be looking off this direction. Same idea. Just come over here, draw his little beacon with their little diamond shape.
You've got your beak. Come up here a little bit, flattened his head out. Just a tad. Stickers IN. Follow this down
here on this side. I'm, I'll color that
in so you can see it. There's just bib under there. Then along here you
can make just a little little scoop up in the center like that annual
half-year little bird. And there's just little toes. They're the same idea. If you want to facing the other
direction, say my digits, just put the carbon carbon
paper underneath it again, black slide up, trace over him at and the heel facing
the other direction. One other thing I wanted to
show you the bird's faces, and this is a great way to make adjustments just on the head. So he's looking at her looking
at different direction. We can cut it in half this
way and a half this way. Still cutting
quarters. If we put a sign center whose I will
always be in the center, stick this line up this way. He'll be looking up. If we do it like this, cut in half that
stick design there, you'd be looking straight out. And if we do like that
and turn it like x, Almost speaking here,
he'll be looking down. This is a great way to get more mileage out
of just one bird. Because he could very
well be looking this way. I'm going to put it in properly. And he'd be looking up. If you want to make lots
birds like this, That's a great way to do it. Without having to, without having to draw
them all separately.
6. Branching out: This masking tape is great. It's absolutely wonderful
because it's so wide. We're just going to
decide where we're going to put our branch. And I think I'm
going to put mine right across here, can
move it afterwards. I'm just going to
stick it there. Then I'm going to
turn it this way. And starting at the center, I'm going to rip it in half. This is the real trick here. I'm trying to keep it so
it's going not perfect. There we go. We've got some ups and downs. We're gonna put it
right about there. Satellite that I'll look this one up again
and adjust this. My branches going
to be right there. There we go. That'll do just fine. This part here in-between that showing this is our branch. By tearing the tape, we've masked off
all the stuff on the outside and given ourselves
a real organic shape. I've got this stuck down. Remember, always the
trunk will be here, it'll always be wider
here than it is here. I'm just going to
give this a bit of a zap with a blow dryer. And that's going to heat it
up and make the tape a little bit more sticky so it's
really stuck down. It just kind of reactivates
the glue mixture, blow dries on good and hot, should stick down
quite a lot better. There we go. Just squish it down with my
fingernail little bit more. Now this next step, we're going to use air
miles card or well, it doesn't have to
be near males card. Just a plastic card. What we're gonna do is
put a little bit of brown right here in our palette just a bit.
You don't need a lot. I've got this sort of green
color mixed up already. It's sort of a mossy color. It's black and yellow
mixed together. You can put any colors you want. It doesn't matter really. It's always going to look
like a tree or a tree branch. I'm going to do
is I'm just going to pick up some of these colors, a little bit of here, a little bit of there, a little bit of, little
bit of everything. There we go. I'm going to go in a
C-shape like that. I'm using quite a
bit of paint on it to pick up some more. Just going to go up our branch
will leave lots of paint behind and keep it in a C-shaped because it's going
to make it look rounder. The heavier the paint is. More texture, you're
going to get. Nothing fancy. There we go. Nice and thick. That C-shape. See how the card is
making all these sort of stripes in it. Make this nice and textured. Here we go. We'll pick some of that up and keeping my
round shaped going, there's some black worried. I'm not worried.
I'll just pick up some more paint laid on top. There we go. Go right over the edges
of your masking tape. Now, I think I'm going to
flip it this way as well. Sort of work my way back again. Like I'm flattering toast and I really,
really like butter. There we go. More of the brown
down here and sort of distributed the colors
up and down that branch. Up here a bit. The end up kind of just
leaving a lot of paint behind. You're also leaving
paint on top of paint. As this dries. We'll give it a SAP
with a blow dryer. It will start to crack a bit. Just give that quick
so you can just see that little bit of
crap going on already. It's time to put that sort of iconic birch bark on
it. Do the same thing. Just pick up some white, tap it off a bit over here. And I'm going to keep doing that same sort of see
motion really gently, like really lightly just
sort of it's going to stick onto patches like a
high patches in that branch. Very gently. I'm not scraping it. Just letting it sort of touching just touching
the top heavy pieces of that underneath paint. You can always keep
layering if you accidentally make the
whole thing white, just layer it up. But more on. Look at all that paint. There's a lot on there now. But more there. Be careful you
don't run over the outside edges and get a new sky. Don't scrape it. There we go. Now
think what I'll do. So I'm going to take
a bit of that black, give myself some
little little touches. Black here as well. That's looking good. Yeah. Break that little blob up a bit. There we go. Maybe a little
bit more white on there. Now when the paint is
super thick like this, looks like an a just a touch more touch more white in there. When the paint is
super thick like this, when you hit it
with a blow dryer, it's going to dry at
different speeds. So the thicker the paint, the more it will crackle
when you blow dried. It's really cool if you
can get that crackle. I can see right here
it's really thick here. And one here too. Those are going to probably
all crack quite well. So I'm gonna hit this
with blow dryer. On high heat. You can really see the crackles
starting to form there. Look at that. It's quite a good
crack right here. Some adhere and some
over here and here. This won't be
completely dry yet. But I will take the tape off and then I'll
give it another blow dry because it will definitely be wet
along the very edges. Just going to peel it carefully. I'm going to peel it towards me. Towards the branch. You can see that lovely, lovely organic line we're
getting from the tape. Peel it towards
the branch so you don't making marks in your sky. Look at that. We have a beautiful,
beautiful textured branch. Let's give it another
blast of the blow dryer so we don't smear anything and drag it all over our canvas.
7. Seating our chicks: Now we're going to
take our little birds. Gonna take my note from here, if you've got scissors, go ahead and cut them out, but I just tear mine out. Got my little bird
sitting this way and he is facing that direction. So he's going to sit. I can still feel that wet
in there a little bit. Be careful with that. He's gonna be sitting
right on that branch. They're sold term right
along his bottom here. Make them so he sitting
right about there. Then I'll anchor him down
with a piece of tape. Just like that. This little guy here, we're going to rip him out. He's gonna be sitting somewhere. Let's say maybe he's
standing a bit. He's going to stand
like he's talking to that guy. That'll do us. Good enough. Now I've
got my birds planted. I'm going to take
my carbon paper, and this time we're going
to put the carbon paper down on our painting. Darks, I doubt so.
The shiny side down custody wanted to
transfer onto our Canvas. Looking for my pencil again. There it is. There. Okay, so let's get that
transferred over quantity. Just draw over all
of those lines. Tie down the back of his head and this little
wing and his body. This carbon paper will erase. Don't draw too, too hard, but it will erase
off your Canvas. Oops, missed a little
bit on his head. That spot right there. Now we've got one little guy sitting there and I
can take him off. I think I might
actually move him over a little bit to be a bit
more social and all, tilt them slightly so you
can read the chat lip, this carbon paper
underneath like that. And we're going to
do the same thing and transferred
this one on here. Do that part. I don't
reply to that part. Will check. Hope you did missed
all this though. Just by taping just the top down instead of
taping the carbon, I can lift it up and check and make sure
it's okay underneath there. So don't take everything down. I think that's got
it. Yes, it does. Their two lovely little
social chickadees sitting on a branch. Now what we're going to
do is paint them in.
8. Painting our chicks: Always, always turn your Canvas. It's the easiest
for you to reach. You don't have to be
painting on an easel. Painting up and down. And it
can be painting this way. It doesn't matter
just as long as you are comfortable and it makes it easy for you to reach. Now, the first thing
I'm going to do is I'm gonna paint
his Little Tummy in. And I'm just going to use like a light skim coat of white. This doesn't have to be thick. In fact, don't make it thick. You don't need a
thick for just kind of neutralizing that
gray in the background. I'm just going to
scrub it in here. Be a little bit aware
of your outside edges. They don't have to be sharp. Little cheek like that there. And then I'm going to do
the same thing over here on this other little guy in here. These are super quick to do. In all honesty,
it probably takes longer to dry it than
it does to paint it. This takes a fair
bit of time to dry. It's quite cold steel. That means it's wet. Just going to have to
be really careful. Don't want to miss that part up by dragging
my hand through it. Super fast little birds
to paint. There we go. Okay, Now they've both
got this base coat on. We'll give them a little dry so we don't lose the base coat. I painted about 50 of these
this year on ornaments. Now I'm going to jump
right back into my white, but I'm also going
to give myself a little bit of a gray color, maybe a little bit
darker than that. I'm gonna be mixing
my white and my gray. I'm going to put the gray on the bottom of his tummy here. This is where we
got to be careful. Put some of that dark color. We're going to be
mixing on our Canvas. So make sure you've got
lots of paint on there. Maybe make it a bit
darker than that. There we go. There goes my
dark color on the bottom. This is when we
start to give them a little bit of dimension. So he has nice
little round tummy. There we go. That's good. I'm just going to
take my cloth and put it up here and
wipe my brush off, not washing it, just wiping it. Dip into my white right
on his tummy here. Like that. And then write one here. I'm just gonna do this.
I'm going to tap it. And then I'll wipe my brush
off and just tap them. And what we're trying to do
is lose that harsh edge, the harsh transition line. We still want them
dark at the bottom. We still want them gradually getting
lighter as it goes up. Add a little bit more white
to dark, just add a bit more. Sure, that's a nice soft edge. Keep that dark at the bottom. There. We've got light going into dark. And I'm going to dip
back into that sad color right across here like that. And the same thing, tap into that white transition it there's no harsh
line, just like that. The edges. Maybe a tad more. Little bit of time wipe
your brush off there. And then right back
into the white again. Right across in his cheek. Like that. Same thing. Tap it into that TAM. Don't worry if you go over his eye because we can
always find that again. Just want to make sure you
don't have any harsh lines. A little bit more Tam
right there. There we go. That looks quite good. Little touch brighter,
brighter here. Blend. Trick is in the blending. I'm going to move over
and this little guy, I'll turn them on this way so that it's easier
for me to reach. Then mixed myself up. That little puddle of gray. Might be a bit too
dark. There we go. I'm gonna need a bit more white. There we go, a little
bit more white in there. Same thing just down on his bottom edge, right
along his tummy. Make that gray. Then write a little bit under his wing there too can be gray. Just like that. Wipe that off, dip into the white. And we're going to
go right along here. Blend that out. You paint at your own speed. You can always pause, rewind it to get lost. Paint at your own speed. Because that is perfect for you. Want to dip into
that sandy color and I'm going to put a
writing about here. I don't know how many of
these I've painted now. But it's got to be at
least into the hundreds. Just remember, keep it blended. Then back into the white. Bring that white in its little cheek into
that into that tan color. That adjunct. Little taps. Wipe my brush off
when you need to. That is what we need for
a little chickadees. Now what I'm going to
do is blow dry that.
9. Fancy feathers: This has a little bit of a technique for
loading your brush. What we're going to do is
dip into the Black Sea, how I'm loading it
front and back. I'm gonna go over to
my puddle of white, a nice clean Pavlov white. And I'm going to dip
just that corner, just a corner into the paint. And I'm going to
flip it like this. The whites on the top. I'm
going to put this down on the paper so that all of these bristles are
flat on the paper. Then I'm going to
pull it towards me. And as I pull it towards me, I'm going to put
pressure on my brush. And then I'm going to lift up. And you'll get these little
stripes through your paint. Which is how we're gonna
make our feathers. Now we're gonna do that again. Every time you reload the brush, makes sure you wipe
the brush off. There's another all
the bristles down. Pull it towards you and give
it a little bit of pressure, and lift it back up again. Practice that on your
paper a few times. We're gonna go over here now. And I'm going to
show you how to do this on your birds.
These are fun. I'm gonna, just like
we've been practicing. Scoop a little bit
up on the end here, just that little tip, that little triad triangle chip, that corner of your brush. I'm gonna put that
white at the top, put it down at the
end of my tail, and I'm going to drag
it in. Just like that. That's all I'm looking for. Wipe it off. We're gonna
reload. Same thing. Just dip the corner in. I'm going to start my
wings somewhere in here, right about, let's say
right about there. And then I'm going to
drag it to about there. Wipe it off, load up. Gonna do this again,
right beside it. Like that. Wipe it off again,
load it up again. Might have quite a bit of white on there, but that's okay. You're going to end up
depositing a lot of paint on this on the ends of these wings. Don't worry about it. It's just fine. Now,
we're going to do is, well, we've got a tail
in three feathers. You might end up with a
tail on for feathers, but I've got three
here. That's fine. I'm going to take a bit of
black and a bit of white. And I'm going to mix myself up. Nice gray. Just like that. I'm going to wipe that off again because there's a lot of paint in it. I'm going to paint in the same
way without the ticked it. So all I'm going to start
about halfway down his wing. And I'm gonna put
a mark like that. And I'm just pressing my brush
down and pulling it back. Strokes are shorter. We're just building some
other feathers on here. This is probably not anatomically
correct for this bird, but we're not
looking for realism. We're just looking
for a nice bird. Will add a bit more
white to that now, because I want some definition
between those feathers. There we go. Now it's a
little bit lighter gray. We're just going to
lay some more feathers on them in here like this. Like that. Then I'm going to go right into the white
loading it the same way. Just wipe my brush off,
I didn't watch it. Then I'm just going to
come up here like this. Pick up some of that
black that was fine. There we go. And that's really
all we want to do there. Got some nice feathers
on the little bird. I'm going to flip
it around this way. Load up with some of that white with that
little fine brush. And starting in the
body part of the bird, I'm just going to pull
some lines down into here, just like little feathers. And you'll pick up
different colors of your feathers in there. And I'm just going to keep
pulling them down in here. So there's a nice transition between the feathers
and the body. There we go. I'm just going
to go back in here until I end up with a nice transition. There we go. That's looking good. Still got a bit of that gray showing their source
springs from down in here. There we are. Little bit right here. Like that, and that
should give us a super nice little chickadee
cheek and feathers. Let's do our other
little guy who isn't nearly as complicated as that. Shown them up. This way. We're still going to load our
feathers out the same way. Same brush. Dry that brush off really well. Water gets built up in that metal piece and you won't know when you are
holding your brush like this, but when you turn
your brush like this, it'll all rundown in the bristles and you get a
big blob and it's not fun. Just going to load up here, same way we did before. Dip into the white. And just at the point
here on his wing, I'm just going to put
it there like that. Began on the other side. Down. Drag it up. There we go. Now we've got two. Oops,
it's a little lopsided. Put a bit more on little bit
further down there we go. There now he's got his wings. Maybe I'll put a little
bit on the other side because it looks a
little different. Now it looks
lopsided more there. That'll that'll do I always say there and stop
and then I just do it again. Stop when you want to
stop. There you go. Let's try this so we don't run our hands through it and
smear wings and cry. Alright, there we go.
These little guys are really close to being done. We just need to paint in
there little black heads. Find a paint brush
that's going to fit the areas that
you'll be painting. Adjust accordingly. We'll start with this
little guy will take some of this black
carefully fill in. Yet don't worry
about panic over xy. We can find that again carefully
fill in his head here. This is when they really
started to look like chickadees because you get
that little little cap. There's our little guys cap. There we go. Right
into the wing. Miss that little spot. Then we can go right
here under his chin. Like that little spot. Going to bring that
up just a little bit more. Looks good. Let's paint this one in as well. This is just a
little round brush. I'm using a little cap. Him his little bib here. There's this bit.
Just like that. We have to really sweet
little chickadees.
10. Beaks and eyes: Now what we're going
to do here is we know that that i is the
center of his head. So that's where
the eye is going. Taking a Q-tip dividend, that sand color, gonna put the eye right there,
right about there. Press it down until it gets
as big as I want that to be. Actually a little bit
bigger than what I want that to be because the sand color is actually
the outside of his eye, like the little eyelid. And it's very important because when we fill
that up with black will have that little tiny rim of sand color for
the skin of his eye. So much easier than painting a thin line around his eyelid. There we go. Now, let's come over here
and I'm going to take some black paint and a
little bit of white, so it's not super dark. Always start at the
tip of the peak. And then I always draw the line first and then drag it
in towards the head. This is the bottom
half of that triangle, and here comes the top
half of the triangle. There we go. So don't just end it right at the
edge of his head. Take it all the
way in like that. Then I'm going to dip into
a little bit of white, just a tiny bit of white here. And I'm going to put it on the top half of his
beak. Like that. They're just kind of blend it in a little bit into the gray
color we've got underneath. So we've got one beak
and we'll flip it over. And we're going to do the
same thing on the other side. Starting on the outside, going in that dark
gray like that. Got a bit of a paint brush here. Well, a little bit of white on the top part of
his beak like that. Give it a little blend. That's gonna give
us that sort of definition between the top half of his beak and the bottom. And then we can dip
in the tiny, tiny, tiny little bit of black and put a mark there and a
nose hole right there. Notice the little birds
with those holes. Let's give that a blow dry. Now we're gonna fill in his eye. And the easiest way to do
this is to use pencil. I'm just going to dip my
pencil into the black. Put a little bit of black in the center
and then I'm going to draw with my pencil
to the outside edge, but not all the way out. You want to leave
that little fin thin little line
of that ten colors still all the way round his eye. Super, super thin. Now if you miss that off, it's not a big deal because you can always just paint
that sand color in again. Take your time. Make sure especially make sure that the tan color is
still showing up against the black because that's
what's going to define your eye from
his head. There we go. Let's give them a bit of life. This is my very favorite part. We're going to use just a tiny, tiny dot right there, almost on the edge of his
eye and another over here. And it totally
brings them to life. I just loved that part.
11. Knees and toes: Now I'm going to go down here
and I'm just going to put some little toes and they'll
curl over that branch. And over here, they're
not little tiny toes, they're white,
substantial toes to hold that burden.
There's his toes. Then going to come from here just inside his body like this. And then make this one
add a bit of an angle. I'm just going to bring some
toes out from that side. And then the front, and then it kind of wraps
around a little bit. They're standing on
top of that branch. That'll be good enough. Let's make a little
top leg on him. I just mixed up a
little bit of a gray. Try not to drag my
hand through anything. I'll pop ahead in here and
just bring this down slightly. The top of his leg. There we go. I'll spin them around. Then blend it into his body. A little bit more white. Get it blended nicely. That was dangerously close. I just put my hand in that
wet branch, be careful. Or white. Just keep blending until he's got a little bit of a talk to his leg on
that side. Here we go. Now he's standing there. It looks alright.
That is almost done.
12. Twigs: Alright, let's make ourselves
some twigs and branches. I'm going to put my branches in here with a little
puddle of water. I'm going to take some of
that black and mix it into that puddle like that because I'm going to
want to be painting some nice fine lines. Let's mix some brown
in there too. Why not? The way we're going to get
a nice fine line is Bye, putting a bit of
water in our paint. Now, all we have to
remember is that just like this branch is thicker here because this is
where the tree is. The little branches that
come off this branch will be thicker where they
join onto the big branch. That blob there. Sometimes table leave
a little bit of a, of a sticky glue spot and you can just pick it up
with your eraser. Just get rid of any of that. If it got left behind. Be careful if your
paint is still wet. You don't want to erase it
if your paint is still wet, but mine is nice
and dry now. Okay. Little bit right there. There we go already. So I'm going to
turn my canvas this way because I want to be drinking by
branches down out here. I always find it easier to paint fine lines by pulling
them towards me. So I'll start right here
in the branch itself. And then I'm just going to
start painting this branch. Thicker at one end. Gets thinner and
thinner as we get to the tip of the branch. Here, I can bring
another branch off here. I can bring another
little one up here, gets a little thick up
with that other end. So I'll have to
thicken it down here. Make it make sense. And of course I'll have to
think on it down here as well. There we go. If you do end up accidentally giving yourself a bit
of a thicker branch, just make sure that the farther down closer
to the big branch, thicken it up as it goes
closer to that main branch. Always, always anchor
my hand on my canvas. I'm resting my hand
right on the canvas. Because you have no hope of actually getting a
nice thin, fine line. If your hand is bouncing and
film and fighting gravity. Go up here. Just make your branches wandering
where they want to. This one's actually
going to cross this little guy right here. Why not? There we go. That's nice. Thick enough a
little bit down at the beginning of the branch. There we go. Just going to keep adding to your branches and you make as
many as you like. And just make sure
they're getting thinner and thinner
as you get down to the very end. Here we go. That looks good. Careful you don't drag your hand through
the smear. Your branches. Will cry. If you do get a mess
on your Canvas. If you've got a
blog, very often, you can pick it up with a Q-tip that's just
a little bit wet. But only if it's still only
the paint is still a bit wet. I'm gonna show you
something here. Sometimes you'll
end up with what I call the dreaded chicken foot. This is what the dreaded
chicken foot is. We've got a branch
with one coming off. But if we put a branch
coming off here, you're going to
end up with this, which I call the
dreaded chicken foot, which I tried to
avoid at all costs. It just, it's just not
as visually pleasing. I like it better
when they're sort of all spread out like that. I think I'll put a branch up here. And I could go up here. This one's gonna go off
the page a little bit. Why not? There we go. Let's go and put
one more right about here. There'll be quite a bit fatter because it is
closer to the tree. Launder it up in this way. Oops, I just dropped
something in the sky. Big blob of black. What am I going to do about it? There we go, govern it up. The only people will ever
know these, you and I. There we go. Branch off that. You'll be able to do
this very easily, but you must, must put
water in your paint. There we go a
little bit up here. Maybe a little bit off there. Super-easy. There we go. Drop
one right there. See that black dot? I don't want that. Okay, Here's some good
good demonstration of it. There we do. I just lifted it off
with a little Q-tip. Truth be told to just
put it in my mouth. Used a bit of split
to get it off. But if you think that's gross, you can just do with water. But it probably doesn't work
as well as spirit though.
13. Snowfall: Before the snow flies, let's take a little
piece of masking tape. Just a little
piece, tear it off, and stick it on your
chickadees face. So it doesn't get any
snow splattered on its head because you know that it's going to
go right in its I don't want to mess that up. There we go. Just a
couple of pieces of tape. Give it a good stick down. Now we're going to take some white paint that
has water mixed into it. Mix it up really well. I can tap this
against my pencil. Like that knocked
lots of paint out, get a good feel of
what that feels like. And then starting at the
bottom of your painting where it's not as important, get some snow going into
the equation to hold your paint brush at the end and bounce it quite
firmly off that pencil. Always tap off over your plate first just to make sure because it does hold a lot of
paint in there and there could be some
big blobs flying. You put on as much
snow as you like. This is a great
unifying technique for the whole painting. The snow somehow seems to
tie everything together. Look at that. That would have gone right in his eye. So
it's a good thing. We covered it up. Here we go. That's looking pretty good. Little bit more there, a little bit more there. There we go. Our snowstorm. Let's give it a try.
14. Finishing up: All right, There we go. Now we can take
these things off. What we can do with that
now is we're going to take our pencil and see how we've got a definite area that
doesn't have any snow in it. Now we're just gonna go in with our pencil dipped in
a bit of white and put a few well-placed splatters. Just so it doesn't look
so obviously masked off. Maybe a couple in here. In here. We can avoid his eye
by doing it this way. There we go. That's done. And now I'm going
to blast it with a blow dryer one more time so I don't drag my hand
through those dots.
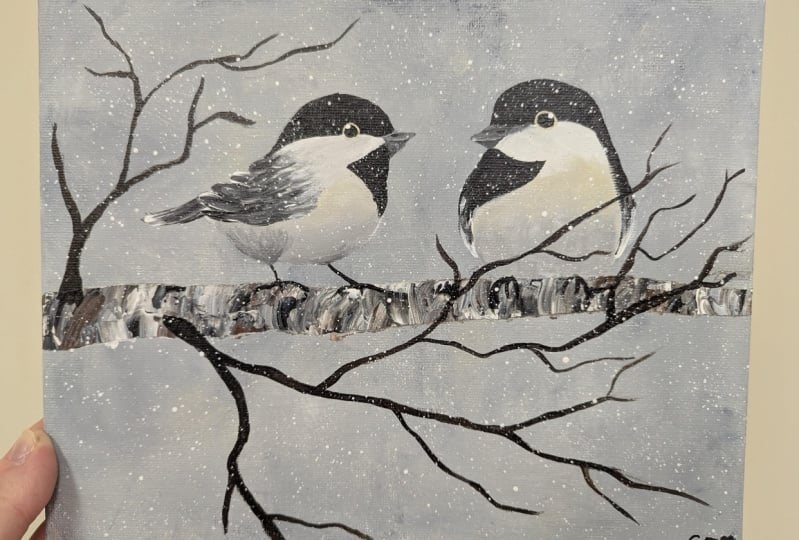
15. The grand reveal: You want to make sure you
do is when this really dry, leave it a couple of
hours just to make sure you'll have little
bit of pencil left, pop in there and erase
that afterwards. But when it's dry, then give it a really
good coat of varnish. I'm just going to start
peeling this tape off and see how well
we did with our masking rule. Not too bad. This is what I really like
about taping off the edges. It gives us this
beautiful frame. It looks so professional. Even if you don't
have much experience. There we go. Little chickadees on a branch or the adorable. Just one thing left to do that. Sign our names to them there. Thanks for painting with me.
 Anne Clarkson, Inspiring the reluctant artist