Transcripts
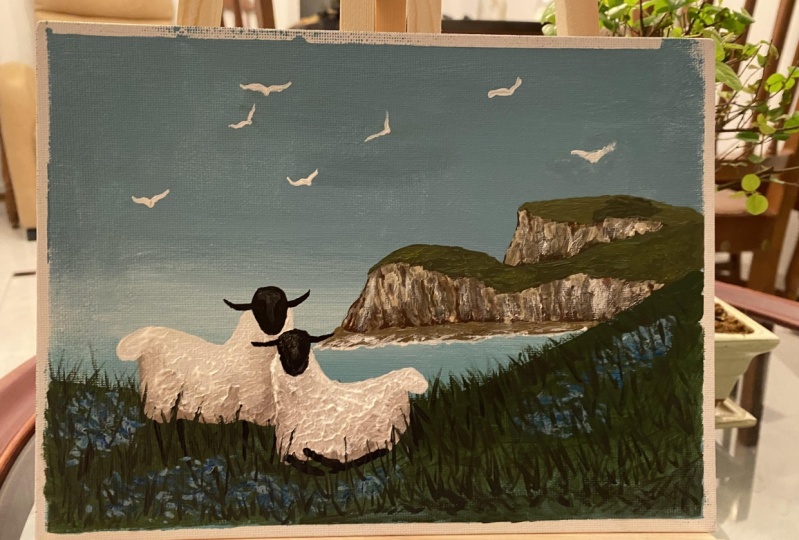
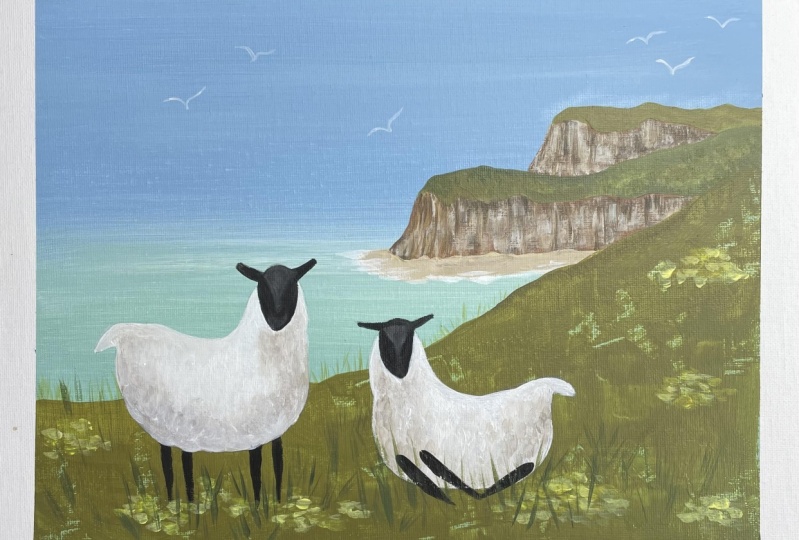
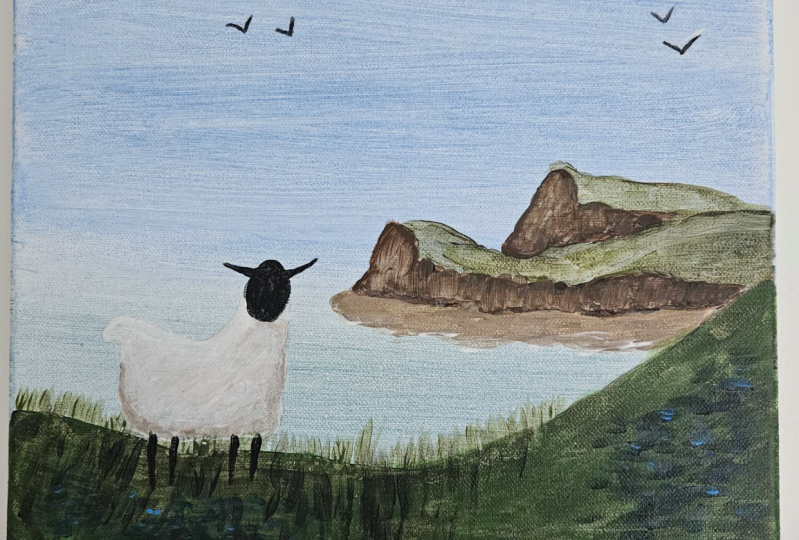
1. Dorset Coast Intro and materials list: Welcome to Fox blood
hollows, the Dorset coast. For this project,
you will need black, white, brown, blue and
yellow acrylic paint. Kitchen sponge, small
round liner brush, small flat brush, a
medium flat brush, masking tape, a pencil,
paper, carbon paper, blow dryer, clean water, palette, paint
rag, and a canvas. For this painting, I've
used an 11 by 14 Canvas, but you can easily adapt
this to any size you like. With these humble supplies, I will teach you how to paint this lovely pastoral
scene from England, Jurassic Coast, with clear
step-by-step instructions. This painting has been specially designed for the very
newest of painters. What could be more
peaceful than sheep grazing in a green
metal over the policy? Well, what are we waiting for? Let's get painting.
2. Sea and sky: Well, let's try this again. This is my second time
recording this painting. I forgot to press
record the first time. This is a painting
called the Dorset coast. I've started out by taping the outside of my canvas
off in a nice little frame. That's the masking tape. And then that
painted over it with some white paint and given
it a good coat and dried it, the paint will make
it so that the Tate, when you peel the
tape off, you have a very nice clean edge. Or 99% of the time you're
going to get a clean edge. You don't have to tape it
off if you don't want to. I usually do because
I like the effect. Let's get going here. Now. The background usually
we have to put down. There we go. Usually we have to do the
background in two posts. It's all going to depend on
the paint that you're using. The paint that I use is
just Dollar Store paint. It's nothing fancy. I've just got it. Mastered squeezes because it's just easier to store that way. I'm going to give myself
a good Pablo white. Good puddle of blue. This isn't expensive
paint at all. You don't need expensive
paint to make something nice. I'm going to need
some yellow as well. And we'll give
ourselves some yellow. And we're also going to
need a bit of black. Just a little bit. I think I'm going to mix two plates because this one is quite small and
I want some room. Couple of puddles of white. I'm going to take one
of these puddles and I'm going to add
some blue to it. Need a fair amount of it. Be my sky color. Now you can make a
semi sky if you like, or you can make you can make
a bit of a gray or sky. That's what I'm gonna do. I'm just going to add
a bit of black to it. I've got a small plate here, and so it doesn't
all fit on one. So I've got two
plates going at once. There we go. A little bit grayer. I think. We go sort
of a blue-gray sky. That's what I'm looking
for right there. Give it a good mix. Into this puddle. I'm going to add some more blue. What I'm looking for is a kind
of a Mediterranean green. I'm going to add some
of that yellow to it. Let's see what happens. Let's turn a sort of a sort of a Robin's
egg, blue, I guess. That'll do sort of
a blue-green there. Now we've got kind of
like a cloudy sky. Cloudy, cloudy blue sky
and an ocean or the sea. First thing we're gonna do is you're gonna put all this to the side because We're
running out of room already. I'm going to turn
my canvas this way. Now this is nice and dry. Just going to take a sponge. This is one of those kitchen sponges from the dollar store. They are wonderful to use. They're super cheap. Super cheap. There's like six and a bag. I cut them into six pieces each, and I use them for
all sorts of things. The first thing we're
gonna do is I'm gonna take a good scoop of that
white paint, Lots of it. I'm going to put it
right down the middle. Right down the middle
of my canvas here. Fair amount on
there to like that. About a third of it, right smack in the middle. Then I'm going to take
my other tray of paint, this one here, and I'll
start with my sky. So I'm just going to
dip into my sky color. I'm going to put that up here. Make sure you use lots. Because we're going to be
mixing right on the canvas. The only way it's going
to blend is if it's wet, so you'll need lots on there. There we go. So we've gone right up to my
white and then when I get to my white little streak
of lap, mix that in, get right up to
the white and into they're going to go back and
forth and back and forth, turn that around because
I've got some black in it. Until you don't
have any line left. Any difference between the blue of the sky and the
white in the middle, the white South
does stay white by any means because it's
mixing with that blue. But it's always going
to be a bit lighter. Gold width the top. Way back down into
the white again, that nice bright white center. It's white at the
horizon or lighter in the horizon. Come back up. Just back and forth. Very easy. Now we're going to have to
put two coats on this because mine is cheap, cheap paint. Don't need anything
expensive for this anyway. It won't cover, at least mine
won't cover as well as, uh, to paint will always end up
putting on a couple of coats, which I don't mind doing there. Now we've got this
dark going into light. Now we need it on
the other side. I will start with we
go, where's my feet? Okay, here's my nice green that I'm going
to use for my C. It's gonna go down
here like that. Don't forget to use lots because we want this
to be able to mix on my canvas right up into that white and what he gets up into
that white right into it. Just keep going right
back and forth across it. Turn around and come
back down through it again like that. Then you can go right
back up through it again. You don't have any harsh lines. You've just got that
lovely break horizon. Don't bounce around during this. Just go through it. Bottom. Then come back up to
the middle again. Alright. Let's flip that a little
bit and see what we've got. I think I'm going to
put two coats on here. There we go. We've got this lovely blue into this brighter section
and then into that sort of see green. So let's give a dry and then
we'll put our second codon. As a dried, you can see some
of these streaks show up. And that's just fine
because we're going to cover that up with
a second coat. Just like we started. Flip this around because
I find it easier to keep my stroke straight if I'm
up and down like this, right through the
middle with our white, don't forget to use lots. Going to go about a third. I think that's just
about right where we go. This mean lovely hazy
Horizon going here. That's exactly what
we're looking for. We're going to blow dry this and then we'll move
on to our cliffs.
3. Jurassic cliffs: There we go. We're going to have, I'm gonna take this
down here somewhere. I'm gonna do my on that. You're going to have
a hill that comes in somewhere like this. Sheep are going to
sit right about here. Then we'll have a bit of iconic Dorset cliffs
coming in like this. It'll go round here like that. Then let's put one more. Back here. Cliffs or chalk. There's a coastal path, footpath that goes up around them all the way along
these edges here. And it's always caving in this little line
I'm putting here. That'll be where are our fields? Or maybe this
field's a little bit lower, somewhere in there. I think maybe this
hillshade come down, maybe more like that. There we go. That'll be good. We're
gonna need a little bit of a little bit of a sandy
shore down along here. Probably doesn't
look like it makes a whole bunch of
sense right now. But when we start
filling this in, it will gonna be totally up to you how big
you've made your cliff, how tall you've made your cliff, on what size brush
you're going to use. Use one that fits easily. Mirror some nice
little one for me. I'm just going to use
this little brush here. It's a little flat one. What number is it? I
can't even read it. It's too much paint
on the handle. Seven notes paint. I don't know what size that
is, but it's not very big. Not a very big one. But I'm only using
that size because that'll be a good
size for my painting. You might need a smaller one, you might need a bigger one. Whatever paintbrush
works for you, stick a little bit
of brown there. And then I'm going to take
a wee bit of brown put over here like that. And I'm going to add a little
tiny bit of yellow to it. I'm going to add a little
bit of white to it. I'm just looking for
like a deep brown color, maybe a little bit
of black in it. I added a bit of white because this brown paint very
often is quite see-through. So if I add white, it makes it not
see-through anymore. It lightens it up, but it's at least it's not see-through. So I'm just going to use this as my mid tone on my
hills back here. And I'm going to paint in right down here along this part here. That don't be too
fussy about it. Don't need to be. There we go, something back
there, just fill it in. Then I'm gonna put this
one here in as well. Now, if you go over a
line, it doesn't matter. We're doing this out of
our imaginations anyway. Nobody's going to
tell you it's wrong. There we go. That's the cliff base
coat about done. That and a little bit more. There we go. Something about like that. Not particularly fancy. We're going to need
a little bit of contrast in there,
so it was good. So I'm sort of shadows going, just going to mix a little
bit of black into that brown. We're just going to kind of
put some lines on our cliffs, especially up from the bottom. Just looking for blotches
and blobs of color here. The more blotchy and
blobby, the better. Put some back here to remember
these are in the distance, so nothing fancy going on. It's not one solid color. All right, so we've got
a bit of that going on. Let's take a little
bit of this white, mix it into that brown
that we had mixed up. Let's add a little tiny
bit of yellow to it. Turn sort of a sandy color. Mixing inter sand
color right now. Maybe a little bit lighter even. We can use that same
way on our cliffs. It's don't put it
all over the place. Just here and there. More variation in color you've
got on this, the better. Let me come down along
the bottom here. This is like that little bit of sand at the bottom
of her cliffs. Probably take a couple
of coats on that. Pencil marks on here that
you need to get rid of. Very easy to do once it's dry. If you're using stretched
canvas like I've got here. You can put a book or something underneath it and
just give it a good erase. I'm just drawing some of the
sand up Cliff a little bit. Just here and there,
not all over the place. Sort of breaking
up that hard edge where the cliff meets the sand. That's looking just about right. Let that dry for
just a little bit. And then come back in and add a little bit more
brightness in there. Take some of that
sand color again, mix some white into it so
this can be quite light. Still, still not
completely white. You can see it there next to
the white light, not white. I'm just going to bring some of this kind of dry brushing it on, just dragging it straight down, straight up from the bottom. Don't have a whole bunch
of paint on this brush. Letting it catch here and there
and break here and there. Where the dark shows
up along there. Almost looks like
there's an overhang. So don't cover it all the way up. That's a little bit heavy. Chalky are in that
spot, I guess. Get some more here too. Not very much paint on
my brush at all here. I'm gonna make a
little bit lighter, even layers and layers
of different color. Different lightness is in here. Just keep getting lighter and lighter as you work your way up through your paint. Some brightness over there. I know it looks messy right now. But it look messy for long. A little bit more. There we go. Just nip along the base of here to give it a little
bit of clean up, just a little bit kind
of scrubbing this on really talking just about right. Kind of scrubbing that on, on along the bottom so it's
not completely straight.
4. Jurassic fields: There, That's pretty good. All right, now I'm
thinking it is time to put our
graphs on our hill. We'll come back in here with a little brush in a little bit. Just put some, maybe
some little caves are some cracks in there. But meanwhile, let's move
on to that back heel. We're going to make green by mixing yellow and you're
gonna think blue, but I'm going to save black. That's gonna make a really, really mossy sort
of khaki green. I love this green. I'll use it for all the
time for grass and stuff. The next some of that
brown into that green, going to mix some
white into it to we're looking for like a dull, dull green which we've
got right there. That work just fine. Let's wiper brush off. Don't need to wash it off. I'm just going to pinch it
between the cloth like that. And then we're going to
paint in that back mountain. Let's see if this is too dark. That looks about right. What kind of like a light? Light faraway
green. There we go. Something kind of like that. I'm going to take
just a little bit of this green off the side. Little smudge of yellow into it. Maybe a little bit more white. Maybe a bit more yellow. Something to sort of brighten
things up back there, bit, tap it on here and there. That'd be anything fancy. By any means. There we go, my mountain or my heel back, there's
growing a bit. It's okay. There we go. That's looking pretty
good. Maybe just a tad. But tet darker down
along this spot there. Just so it's not one solid, boring mass of green. Let's go back into
this color again. We want to do with this, darken it up a bit. So I'm going to add
some more yellow, a little bit of
black, mix that in. We'll make some
brown in there too. That's sort of a dull green. Then we're just going to
pop that on this hill, top of this cliff. Want to fill that right in the grass and the distance
is going to be a bit lighter because
it's farther away. We go. This is a little bit darker. I won't bring that
down along there. I think I might
bring this next hill up or that one
just a little bit. There we go. That's kind of fun. Now, this will take
advantage of this. Make this really quite
wiggly along cliff side. There we are. There. That's quite nice. I think about just a
little bit more meadow up in this area. Flatten that out slightly. Looking lovely. Let's give ourselves a little bit of
brightness in there too. I'm just going to
take a bit of yellow, mix it with what's
on my brush already. I'll put a bit of
that over there. I'm just tapping it in. Just a few taps here and there. Maybe a little bit long here. Leave at splotchy like that. Maybe a little bit
maybe a little bit of white in there too. Why not? Just to break up that big, solid solid pile of grass should work just about right. I'm just gonna put
that in my water. Will just visit that. Cliff a little bit. Let's put a little bit of
a bit more contrast in. They're going to get my gonna
get my pointy brush here. It's a little round brush. Mix myself with
seats dry already. I want to mix myself
up a little bit of that black key Brown. Don't want it too, too dark. The one to start. Maybe I'll map it to that
sandy color and mix it into that'll do it. I'll just come along
the bottom here. Make some middle cliffs
or cliffs, caves, I guess. The base. Just kind of finding
finding the spots in my brushstrokes that I can
make into little caves. Here's another one in there. Maybe this needs to be cracked a little bit more down here. That it just a touch of
water to this paint so that it's not quite so gloppy. I can get some of
these nice little, little lines in here. Let me just drag that cliff
down there a little bit. Some cracks in there where
it's going to cave in. Maybe a few in here. Follow your brushstrokes. You'll have
brushstrokes in there that will give you a guide. Carefully, you don't drag your hand through any wet paint. Should already dry by now, but it's good to be careful. Just follow the brushstrokes
you've already got. Find the little nooks and
crannies in that that cliff. Try not to end up with a pattern that's often quite difficult. More up in here. Remember this isn't
the background. You don't have to
have a whole bunch of detail in here by any means. One more little bit
right here, I think. That'll do. Then. Want to get a little bit of surfer ending
up on the shore. So I'm just going to
take a bit of white, washed my brush out and
make sure I don't have any blobs of water on it. And I'm just going to give
me a little bit of a, just a little bit of
wave action here. Make it really thin.
There'll be because this is the long ways away. I'm trying to keep
this fairly level. Let me because the
ocean is level. There may be I mean, it has to go back in here. The end in touch this part up because white paint
tends to dull, is it dries? Go. See how I'm keeping these
brushstrokes horizontal. There we go, That'll do it. Those are our clips
in the background. Pretty much done.
5. Sheep field: In the background,
pretty much done. Lots bring our cliff in the foreground or a
field in the foreground, then we're going to want something that's
close to that color. They're going to need
another paintbrush, a good sized one, because that's quite a big
area to cover. We're going to
bring our hill for our sheep down in
this area here. We want it pretty much the same colors that may be
a little tiny bit darker. We're going to want
quite a bit more. I'm just going to move
this yellow over here. I'm going to mix
some black into it. Well, mixed them all
together like that. There we go. I want
some brown in it too. How's that looking?
It's pretty close. I was lucky. This is a blobby. I'm going to add
some water to it. Then I'm just going to
push these cliffs into the background by bringing a
hill right in front of them. See how that pushes
those ones back. Remembering I've got
some tape down here, so this is probably
going to have to come up a little bit higher. If I want any metal for my
sheep to be standing in a tall, bring that down there. This is just basically
an undercoat. We're going to put some real, real grass on top of here. Definitely not an exact science. You'll see that this
green that I've put down here is a
little bit brighter. Going to make it look
even closer to us. I've got that in like that. Now what I'm going
to do is I'm going to take my little
plenty paintbrush, my little pointy liner
brush if I can find it. That'll do this upside
down like this. I'm going to take the edge off this cliff face here
or this field edge. Add a little bit
of water to that, that paint I used for the field. With my little brush here. I'm just going to unlink my hand right down on
top of my canvas here, reaching into my, into my field. Well, let's still a bit wet. I'm just pulling some pulling
some grass towards me. Just to break up that
solid harsh edge. It's quite nice to have that
softness along the front. And meanwhile, I'm
really trying hard not to drop any paint into my sky. Bring some more
of that this way. I've added some water
to this because it's much easier to get some nice thin grass or anything in mind when you've added water to your paint? Just pull your grass along here. Might get taller and places and shorter and others and
it'll cross each other. And it'll lean one way
and only in the other. Because grass grows in
different directions. We go and as it
comes along here, I think I'll make it
a little bit shorter. A little bit shorter. So gradually kind of
blends into just the edge. So that'll give that illusion of being a bit
farther away as well. More detail up
closer. Here we go. Come back when this is dry and
after we put our sheep on, touch up alongside of here as
well, the edge of a cliff. Flip back this way, we'll
see what we've got. You can see how this hill in the foreground has pushed our Cliff's into the background. Let's, let's put this to the side and learn
how to draw a sheep.
6. Drawing our sheep: The sheep are super easy to do. They're made up of seven blocks. I'll show you how to
draw one fairly large. Probably won't want
one of this bank won't give you a
really good idea. We want to make a rectangle, divide it into
roughly six squares. And then we will put one
more square on top of here. Like that. We've already got our shape. Well at least we've got
the base of our sheep. Take an oval, put it
right about there. Right? Or do you stick out? We're gonna do that. They would round
this off like that. And we can round that corner off and we can scoop it down. And then we can come up
and over and a tail. We can round this corner off. We can round this corner off. When we go and erase the
whole innards of that sheep. End up. Great little, oops,
erase the wrong thing. Little sheep outline will go a long way with these
little shape like this. Because he won't
stick his legs on like barriers staying in
the field looking at you, make his head just a little
bit more diamond shaped. Let's see. I'll just sort of
flattened off the sides. They're a little bit. We can have a sheep
standing up like that. Chlorine is face because
he's a Suffolk shape. Let me suffolk sheet of black faces and black
ears and black legs. Now if we wanted to
only draw one sheep, we can get a long way
with just this one sheep. Because we can make
the sheep going a totally different direction using a piece of carbon paper. Here's our carbon paper. If I take this carbon paper
and I put it shiny side up, my sheep on top of
it, just like that. Trace around my sheep and have to trace around
it particularly carefully. That's a lumpy head shape. Legs on him. When I flip this paper over, what she was looking
the other direction. One shape, two different ways. But there's even
more, more, more. You say. Yes, there is. I took these legs off
the sheep like this. I put a lake like this. And another leg like this. And the lake over
here like this, we can have our sheep lying down the same as we
did on the other side. We can put our carbon paper
underneath, trace over him. Then stick our legs on this way. There we'd have a
shape lying down. Didn't erase that part lying
down facing the other way. Out of one drawing. You can get for
different drawings. Now we just need one that's
going to fit on our painting.
7. Painting our first sheep: There we go. Make sure this is good and dry because it'll need to be
dry for you to transfer on. I'd like to if I'm using one of these the stretched canvases, I like to put something
underneath this like a book or this piece of board
I put underneath it. When I go and I
transfer the sheep on, I can have something
hard to push against. So let's do this. Here's my shape. Let's tear
this little bit out here. If you want your
sheep overlapping each other like standing one, standing in front of the other, are lying in front of the other. You're going to want to do
this, transfer them twice. So I'm just going
to put one sheep here and then I'm gonna
have one lying right here. So what I wanted to do is I know that it has legs are going to be links will be in here
somewhere like that. About right. I'll take a little
piece of tape, not hanging over my
tape anywhere here. Take a little piece
of this tape, stick it there, and then I'm going to find
my carbon paper. Here's a piece of slip my
carbon paper under him. And this time I'm gonna put it the shiny side down
just like that. And then I'm going to trace
over if my lines that I want. Here's this ears sat around his thumb there. Don't press really super hard. You don't want it
to be really dark. Makes it harder to erase when he when he come to erase this, I want to put his
legs in. There we go. I'm standing on a hill. Find yourself a brush
that's going to fit your sheep properly. Don't want it so big that you have trouble
keeping in line. So I'm just gonna first off, I'm just going to fill in the whole sheep other than his head groups already
gone out of the light. I'm going to fill this
whole sheep in with white. Just so the underneath
color here that I've got doesn't influence
color that I put on top. I'm just kinda priming it there and I'll put
that on like that. That'll cover up any of those any of the grass
that shows through the wall or any of the sky that might
show through or the seed of my
children, I should say. Careful you don't spill
your paint on anything. You don't want to spill it on. Here we go. If you want to put more
than one sheep on, I'm going to put
two, like I said. But you can put as
many honors you like. But if they're going to overlap, it's much easier to
paint them one at a time than it is to paint
around them. There we go. There's a good coat
that sheep's wool. I'm going to dry this
and then we can move on to the police. There we go. That's covered
that up quite well. Now we're just gonna
take a little bit, It's got some sponge in there. A little bit of thought
white off the side here. We're going to add a
tiny bit of black to it. It's going to make a gray color, a little bit of brown, just so it's not completely
completely gray. We go maybe a little
touch more block as well. I couldn't eat for the
other sheep anyway. Something around in there. And I'm going to go
right around his body. We're going to mix this color
and blend it on the Canvas. So make sure you've
got lots of bank going all the way
round them like that. Just on the bottom, on his bottom edge a
little bit under his chin. Kind of like to scoop it up here because then
it makes them look he's got more than
belly. Just like that. Then I'll wipe my brush off. I'm not washing it,
just wiping it. Going to take my white. And we're gonna do
the same sort of ideas what we did with a sky. Gonna take our white and put
it right up against that. That's shadowy color. We put down right up against it. Then we're just
going to tap into it so that it blends and it
doesn't have to be smooth. In fact, the less smooth it
is a nicer it is because then it looks like real wool. See, I'm just tapping it. There we go. That's
getting lighter. Then I'll wipe my
brush off again, dip back into the white, and I fill in the top
part of his fleece. So fast. You want it to be brighter where it's
higher and words stick. So if we want, just tell me to be
sticking out a bit more. I'll bring this down a little bit farther
and twist honey. I'm just tapping it and see how it was giving
this little sort of a textured flushing things. There we go. Easy as pie. Not up a bit. Just like that. Now we can just
move onto his head, which we will use another brush. I'm going to use this round
one here because that one will get into the mix and
crannies we needed into. This is when it really
starts to look like sheep. Let me get that black on white mixed in
there. That's okay. There we go. Maybe I'll give
myself cleaner Pablo block. That's better. Cleaner pedal. To give that face just a
little bit of dimension. Kinda nice to have a little
bit of dimension to it. Which can take a
little bit of white. Mixed myself up sort
of a dark gray. I'm going to put that
right across his forehead, who's maybe a little bit wider than that little bit later. We're going across his forehead, down here, down the middle
of his head like that. That's near scared me. I thought I'd spelled
Bloch paint on it, but it was his ear there. And then I can just
start at the tip of his ear and then work
towards his head. Otherwise, if you start here, very good chances ears could
end up somewhere over there. Neat test giant ears. I just bring it in like
that. Bring it in like that. Clean that up a little bit. There. There we go. Let's see
how it looks like. To be just a little
tiny touch longer. Be careful though it's
a slippery slope, trying to even out ears. Good. Then I'll start at the
top of his leg here. Push hard or harder and then lift up as
they get to the bottom. So their slimmer at the bottom
than they are at the top. Push down and lift
up, pull down. This is really kind of
a folk art painting. We go, there is one sheep
done super, super fast. I'm going to dry him. And then I'm going to
put the other shape on.
8. Painting our second sheep: All right, Here's our
other shape to go on. Remember what I was saying about painting them one at a time? One at a time. You can overlap them really easily and it always looks really
nice if you overlap. What I'm going to do
is I'm just gonna kinda little bit
closer to the sheep. Try not to tear too much of him. Still want to see
what I'm doing. There we go. This one's gonna be lying down. I want to make sure that this one's lying down
at the same height. That body. Maybe I'll tear that
off along there to make it easier
for us to see there. Maybe I'll make that one can
go down a little bit more. There we go. That one's gonna
lie across there. My covering anything
up because I do that. No, that'll be quite
interesting right there too. I'm just gonna put a little
bit of tape right there. And we can do the exact
same thing we did before. Remember shiny side down
because that's the side that's got the carbon on it. Then I'm just, I'm going to trace around this
little guy here. Put legs on this one
because this one's lying down. A little bit. Just an ear. There we go. There's our second sheet in
there and we're gonna do the exact same thing
as we did before. We're going to remember we
painted this in white first, so we had a nice base. That's what we need to do again, a little bit more on that one. We go. That's that part
then all let's get some lakes on here to my
black color there it is. I know that this
leg is coming out. Her knee will come out this way. This knee will
come out this way. Don't worry too much about
the hoof part because the grass and then that
one leg will just be on that side there. Now we've got two sheep
on a Dorset hill. They're kind of sticking
out like sore thumbs.
9. Bluebells and meadowgrass : They're kind of sticking out
like sore thumbs really. We need to settle these in. Let's give them some grass
to settle themselves into. Also going to give
them some blue bells. Because that's
very, very British. For this little Dorset hill. I'm going to find my little,
my little brush again. That one will do it. Let's put some Blue Bell is up
in this field here. So I'm going to take
some of this blue and a little bit of white to it. I've got some of
that, That's good. And we're going to take
some of that blue, gonna add some dark to it. Black like that there. So now we've got a blue and a light-blue and
quite a dark blue. I'm just going to make over
here going to make a bunch of little sideways slashing marks. Not a whole bunch in there. Little, little ones that make some in
here that are bigger. Ones can kind of stand
up a little bit more. Maybe few down in here. We'll talk these all into
the grass when we get going. There we go. Then we'll mix up,
misusing a bit more on. They're going to not even clean my brush up and
going directly into the blue. Just make a bunch of little
slash marks here and there. Just a little short ones. This is the bright blue. Maybe a little bit
more in there. Just a little bit back here, just little tiny, tiny bit. We don't want these ones
showing up a whole bunch. More. They show up
the closer they are. Thinking that this is down
around the corner slightly. Then I'm going to
dip right into this. Maybe I'll make it a
little bit lighter, even. This light blue white right there and the same thing
overlap them here and there. Some dots and dashes may come back into these ones
and add a little bit more. Just a little bit more
color here and there. I'll see what happens
when they dry. Just a few back here.
Remember not really. A whole bunch should do us for now. Looks like it needs a
bit more, actually. A little bit more in here, maybe a little lighter. There we go. Let's
get the blow dryer on that and then we can
get some grass growing. Now, just like when we pulled
this grass up along here, we turned the canvas
upside down to do it. It's really truly
the easiest way to make grass is to
turn the canvas. We want our grass to be growing.
10. Grass and gulls: Fade them out. Okay, let's get back down to
the center again. I'm going to add a little
bit more black to this. Maybe some more yellow, more black, just so
we've got some contrast. More yellow, more flock, little bit of water. That'll help things out. No till we got this. The canvas exactly if there's
enough contrast, let's see. Maybe a little bit
more, little bit more black. Should do it. Let's give ourselves a
bit more grass here. Member water in your
paint for painting grass, water is your friend. Where do you start
getting more detail too? Well, there you go. That
grass was a long haul. Gonna take a little
bit of white, put it in with some blue, just going to make that a
little bit lighter blue. Go back in and just put
a few touches in here. In our little little
Blue Bell patch. Just brighten that up
just a little bit. That's pretty good. A couple more over here. Maybe just just a touch more. We're here. Just a touch more white
on these cliffs in a couple of spots just to
really brighten them up. Quite chalky white,
That's for sure. Like that. Have
to go everywhere. Just a few little spots. Should do it somewhere
in above there. A couple of more
spots back there. I don't know because
I've noticed it but I have a blob right there. I don't generally worry about
blobs because what I do, I turn them into C goals. Let's just nip in there
and give ourselves a nice little Dorset cosecant that there. And see girls never
ever come in. Singles. We're gonna have
to make a few more there. And maybe over here somewhere. I'm just making a little
almost like a little mustache. I usually start from the start from the middle
and work my way out. Because then I end on a nice
little point right here. I'm going to put
one more, one more. Just one more over. Here. Might be pretty
close to my tape. I think it is. This is a good excuse
to show you guys how to get paint off. Still wet. I'll take this Q tip. Little bit of moisture. Just wipe it off. There we go. You can really
only do that when it's wet. When it's dry, it's
stuck for good. There we go. It's quite nice. Maybe just a little bit, little bit more of
this down here. A little bit of that
bright wave action coming upon our shore. Maybe just a little bit
more brightness long, the top of our sheet. Metal finishing touches. You will probably have
some carbon paper left, but do not be tempted
to erase that until 88. Well, good and dry, because you will run
the risk of smearing. It'll happen. There we go. I think our doorstep
coast is done.
11. The grande reveal: Take our tape off. You
don't have to do this. You don't have to tape it. This is what I always keep
my fingers crossed that I didn't get peeking
out underneath. But it really does make
a nice a nice frame. Get rid of that
system very well. Look at that and clean edge. Yes. Very satisfying. Look how clean that is. And that's only
gonna come come out that clean if you if you paint over it with that white paint like we
did at the beginning. This side. Across the top. Look at that. There's our Dorset
coast painter. All that's left to do. Stick your signature on it. I like to use these
little paint pens. We go. Very simple little
painting to do. And so affective. Thanks for painting with me.
 Anne Clarkson, Inspiring the reluctant artist