Transcripts
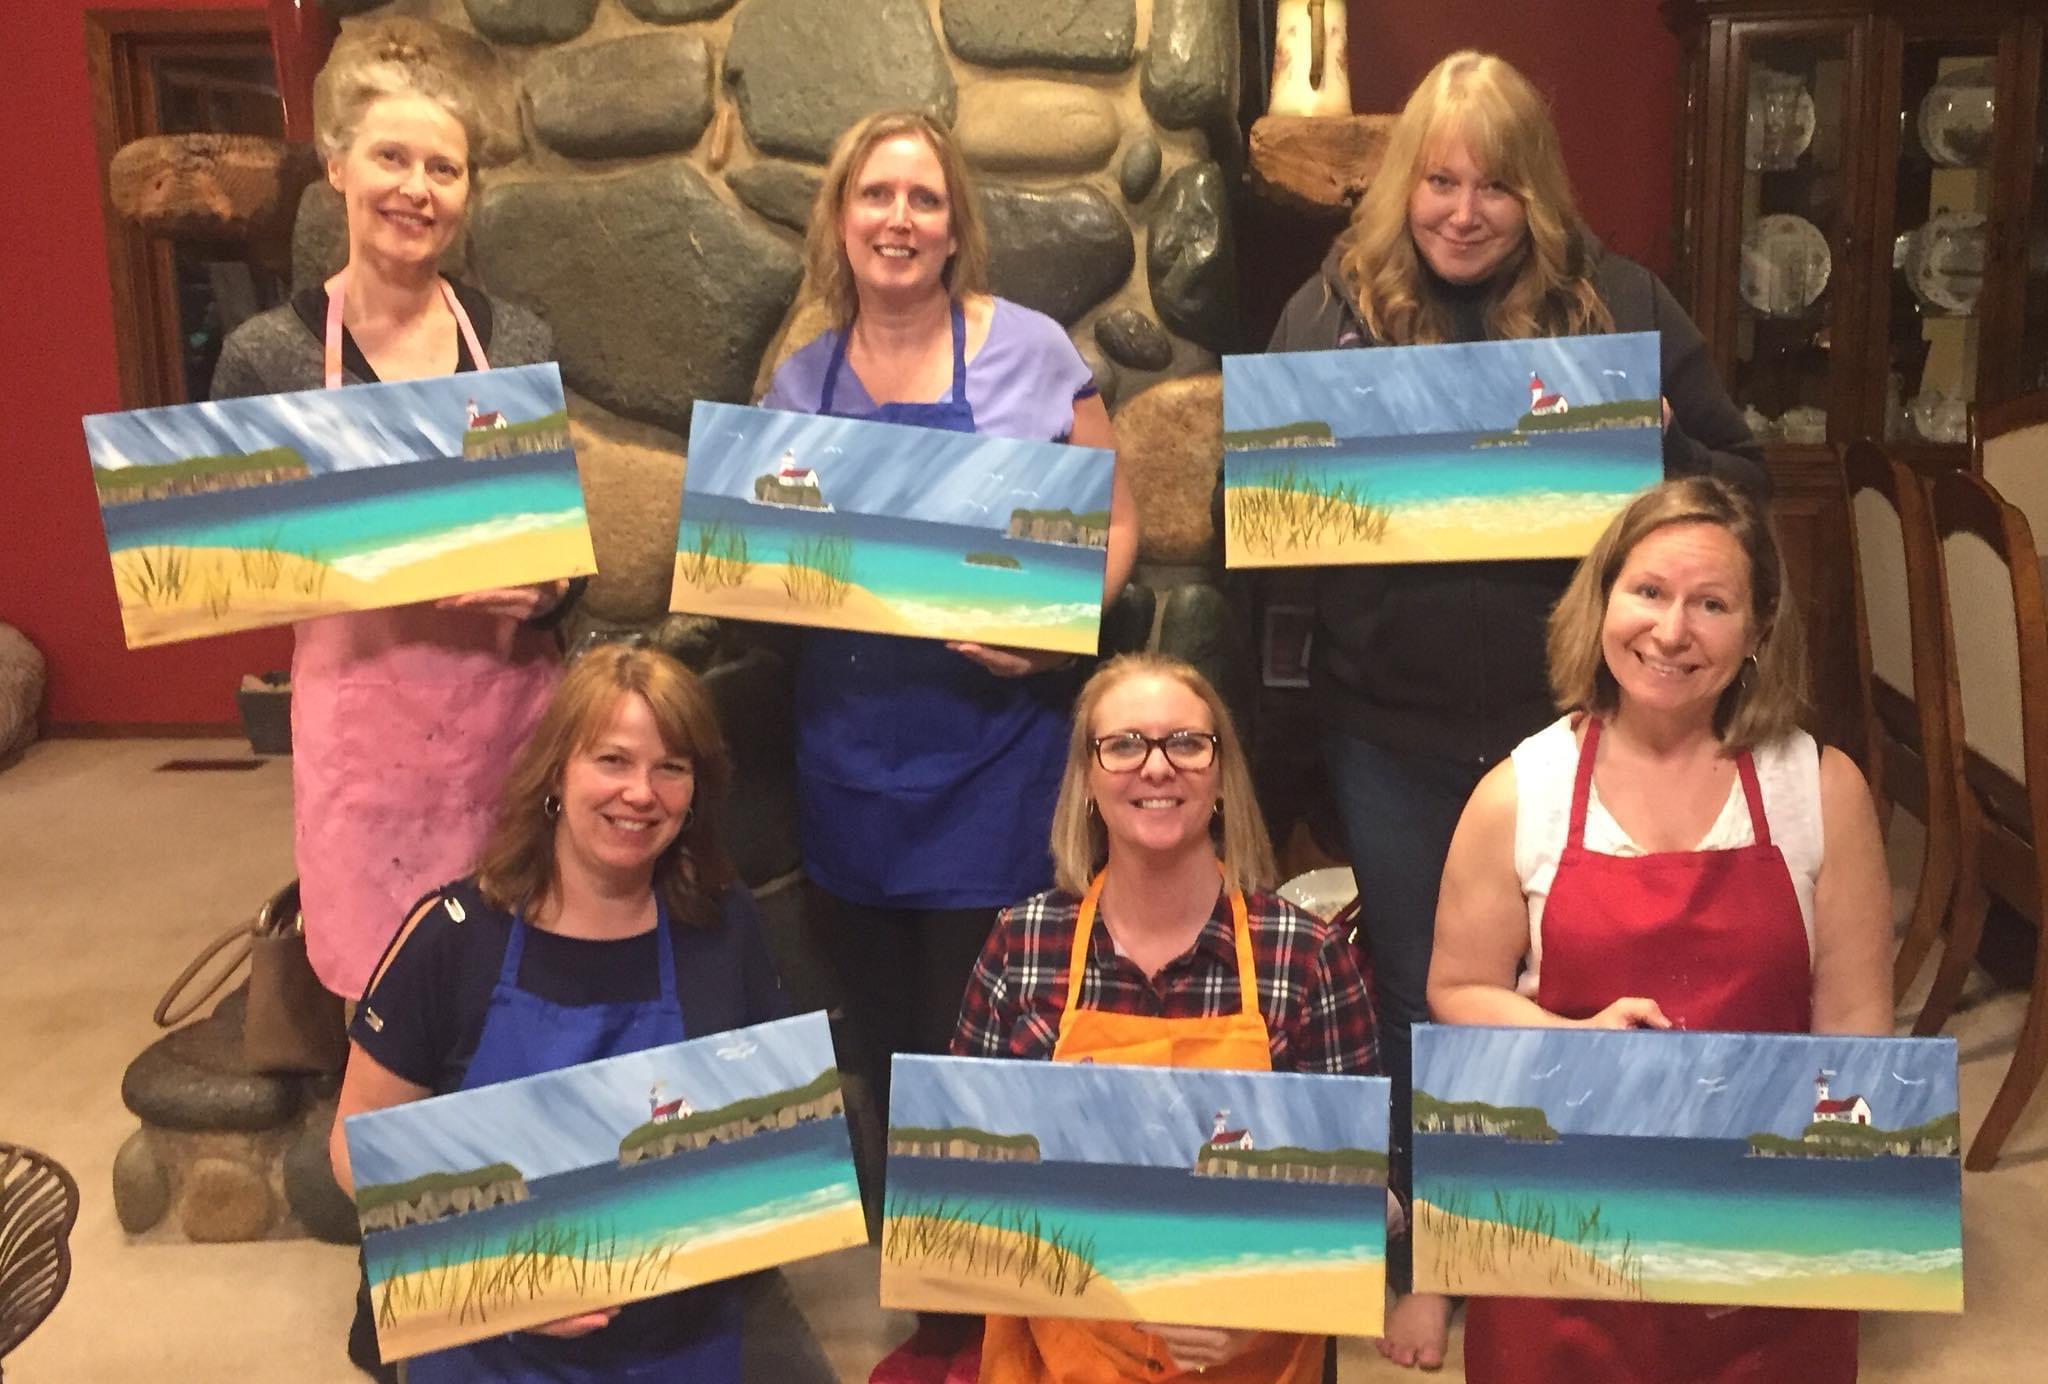
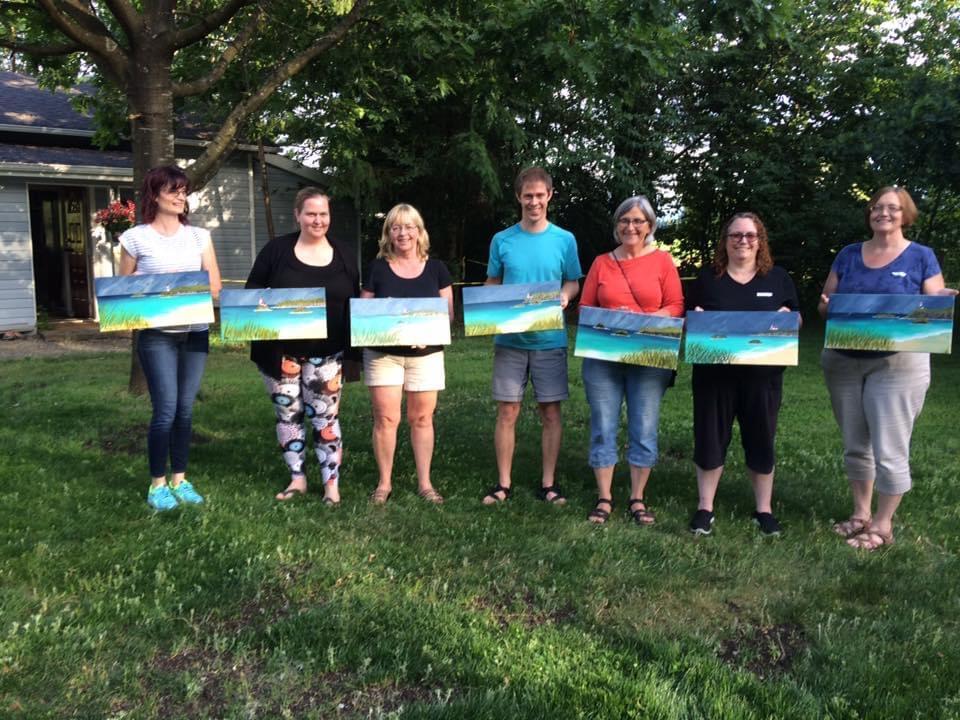
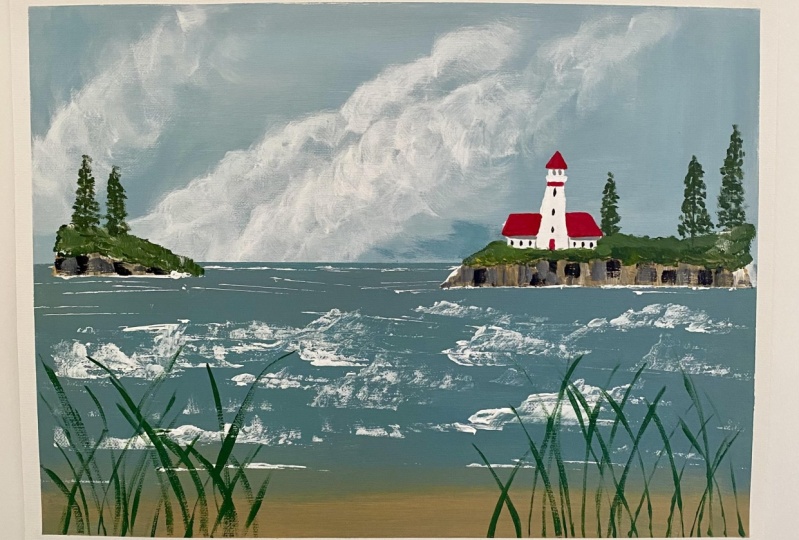
1. Camille's Light Intro: You won't believe
how simple it is to create this lovely
maritime scene. Introducing Camilo liked. I designed this
painting especially for a friend who wanted to paint
party for her birthday. Command loves lighthouses. After all, she's from
the maritime Canada, but she'd never painted before. Suffice it to say
the party because a huge success, loads of fun, food and seaside scenes, all different, all
unique and all gorgeous. I've been an artist since
I was a little girl growing up on a dairy
farm on Vancouver Island. I teach classes online
and in-person and through these video tutorials for my studio foxglove Hollow. Over the years, I've taught
thousands of new artists of all ages by breaking
the painting down into simple and
easy to follow steps. I'll guide you to a
lovely maritime scene. My classes or for those who
have always wanted to paint, but had been terrified
to lift a brush. All too often we talk
ourselves out of trying before we even start. My goal is to take down the
barriers you've put up. Give you confidence
in your talent and inspire you
to keep creating. You don't need any
fancy tools or supplies to create something
really be proud of. You will learn some
simple techniques and unusual tricks using
minimal tools and supplies. I take the fear out of
trying something new and guide you to create something
you will be proud of. There is nothing like success
to inspire confidence. Consider me the training
wheels on your first bike. I'm here to show you
where your feet go. Help you to keep
your balance and show which direction
will take you home. It won't be long until you feel confident enough to explore
and ride on your own. My name is Anne, and I'm
inspiring The Reluctant artist.
2. Preparing the canvas: Today we're going to
paint Camille light. I've taped off my canvas and then put on a coat
of white paint to seal that uptake
on so it doesn't leak out underneath my tape and
give me a messy border. You don't have to do this step if you don't want to even paint right to the very edges of your Canvas if that's
what you'd like.
3. First coat: First thing we're gonna
need is a puddle of white. We're going to need
a puddle of blue. We're going to need
just to black. I'm going to take
just an whatever. It doesn't matter, just a
paint brush to mix paint with some of my white over here. Unlike leaving some back here. Because I don't want to dip directly or mixed directly
into my clean pebble. Goes. If I do that, I won't
have any puddles enough to fix it with if I've mixed
it too light or too dark. I mean, There we go. Put a little bit
more blue in there. I'm going to make my sky
lift alone the stormy side. If you wanted just a nice sunshine afternoon at the beach. Leave it in just
the blue and white, but I'm going to add a little bit of black
just a bit at a time. To greatest down a little bit. A little bit more. There we go. Maybe just a tad more. There's a nice a
nice gray color. We're going to use this
all over our background to give us our first coat. There. Then I'm going to take just that little piece of
kitchen sponge cutoff, one of my cutoff one
at the sponges like this and this works so well. You just got to take that
and then fill it up with that blue bluey gray. I'm gonna put it right over
the back of my painting. I've got something stuck in
there already. There we go. Get rid of that
white background. Fill it up with some blue all
the way down to the bottom, make sure you get right over
the edges of that tape. Try not to push
the sponge against the tape because it
might peel out there. That's really all we need. Nothing fancy. Just going to give
that a blow dry.
4. The sky: Want this to be quite, quite well dried because
we're going to put some tape on here for
our horizon line. And if the paint is wet, the tape software to stick. I'm going to say
my horizon line. There's the edge of my taping. Go go a little bit lower. Somewhere around there. It's you're totally up to you. Make sure it's about the
same distance from the top. Let me check that. Not bad. I'm just gonna give
it a good stick down. They're wrapped around there. And then put that
same painting sponge, scoop some more up. And I'm just going to paint
the top part of this now. You'll notice that going to cover way better the
second time around. We go, There's a
lovely blue gray sky. Leave this wet. Just going to go into my white paint with
that same sponge. Just see I'm just dipping
that corner in like that. Tap it off a little bit. Then
I'm gonna make some clouds. I'm going to start down here. I'm just going to make sort
of little circle motions. I'm gonna wander them up
into that area there. Then maybe I'll take
a little bit more. Nice to have it quite
bright white areas. Making just little sort
of hopping motions. Going to take my finger here. I'm going to blend
that bottom edge into the wet paint at the sky. Maybe I'll push that
around a little bit more to just soften it a bit more. There we go. There's one cloud. Just like that. Super easy. Let's dip in again and get
a little bit more white. And I'll make another one here. Maybe this one will kind
of go over that one a little bit. Like that. Same thing. Gonna go into this edge here and I'm just going round and
round with my finger. Like that. I can push that one up over
that edge a little bit. Let's see how the light is going against the
darker background. Gives me a little bit
more dimension in there. There we go. Then I'll just kind of gently
blend it down into here. You make as many clouds
as you like in your sky. Just a little round and round
motions with my finger. Dip into a little bit
on a little bit more white on my finger and adds
them along the edge there. I sat is when you get a light
against the darker edge. Actually put a little
bit more light over here to maybe a bit more up here. You keep going until you, they've got as much
cloud as you'd like. Nice and soft. I think I might put
one up the top there. Just a little button coming into here that Linda up that bottom. As long as that paint
is wet underneath that. There'll be able
to blend that out. There we go. Another nice little
fluffy cloud. Compute your cloud's going
sideways if you wanted to. I'm just like to make
mine going diagonally. Okay, So now I think that's probably push
those around a bit more there. I think that's good. Now we'll give it a try.
5. The sea: Make sure that's
quite dry because we're going to
take this tape up. We're going to move it. I cannot stick it
here. Lift it up. Gonna move it up just so
it's hanging over that guy. We're masking off our
sky. I don't know. Can you see there's just a tiny little sliver
of the sky left here. And if we leave a little sliver that will cover that
spot with the ocean. Now we want, we want
to do is mix up. I think I'll get it for white. We want to mix up a darker blue. I'll take this over here, stick some blue in it. Even some more blue in it. That little bit of black. We're looking for a darker, darker color here for our sea. It doesn't matter what color. Whatever color you like. As long as you've
got a blue ocean, I'm gonna put a tiny touch
of yellow in it as well. Make it a little tiny bit green when it got to
be careful with it because turns super green
and I don't want to really, really green. A little bit more. Looking pretty good. Maybe
even a bit darker than that. Here we go. Something in there.
So this is kind of a dark, fluid, greeny gray. Should do me just about right. Do that. Then while I'm at it. Wash my brush out into
this puddle here. What I've got left for my white, gonna take a little bit
brown and we're gonna make a sandy color because we
need a little bit of sand. Will take some of that,
scoop it in there. Maybe a little bit more ground. Then I'm gonna take
a little bit of yellow, mix that into. It's not an exact science
fight and he needs to go. That's quite a
warm, sandy color. Might feel a little on the
little on the warm side. But I think I can I
can fill with that. I'm just gonna take
this now while it's still wet my brush, I just
want to take like that. I'm just gonna put it right
down here, the very bottom. Yourself. Lots of
paint on there. That brush all the way along. We're going to the
blending with our sponge. Good. Taking that same sponge
that we used for this guy, fill it up with that blue-gray. And we'll start right here. I'm just going to go
right across here. Use lots of paint because
we're mixing on our Canvas. Going to keep going
across and see I'm keeping this level trying to keep my sponge strokes
going horizontally, horizontally as I can. When I get down into
the sand color, I'm going to keep
going back and forth over where the sand
meets the sea. And that's going to give it
a really soft edge there. Blend the sand color
into the blue color and give you some shallows. Rico, something like that. Just keep blending
back and forth. Come down to the bottom again. There we go. That should
do it just about right. Just like that.
6. The surf: I'm going to take a
little bit of paint. Here. I am going to put some white
paint on my paper like that. Length of the card and the
top card into the paper. Loading it up with some
paint off a little bit here, so you don't have a whole
bunch of globs on it. And then right here
starting where the tape is. Just going to make some little tapping motions
all the way along here. Going to keep them
fairly close together. Because then the distance that the waves will be
closer together, I get closer to the front waves. I didn't get a little fatter. Your card. Don't join them all up.
And perfect lines though. Here we go as they
get closer in here. That wider. But always try to keep them as level as you can. As you get closer
to the shore here. They can get thicker. Pull your card up a little bit and give
it a little bit of a flick and get a little
bit of foam on your water. Keep coming to the front there. Just about right spot now
I think that will do it. Pop back here and you've
got a few more topics with my car just to
make sure I've got some sparkle back there. We have the lines of my cart or thicker are close
together here. And they get farther apart
as they get to the shore. Get closer to us.
When that's in. We can peel this tape off. And we'll actually have
little beach already. Got a lovely little sandy
shore that you could easily stick a palm tree and sailboat out there somewhere
and call it quits, but we're not gonna do that. I think. I want a
little bit more. Just a little bit more. There we go, maybe a little
bit right there too. Good enough. Good enough. Wipe that off and get rid of it before I put my elbow in it. And then we're going to
draw this really well.
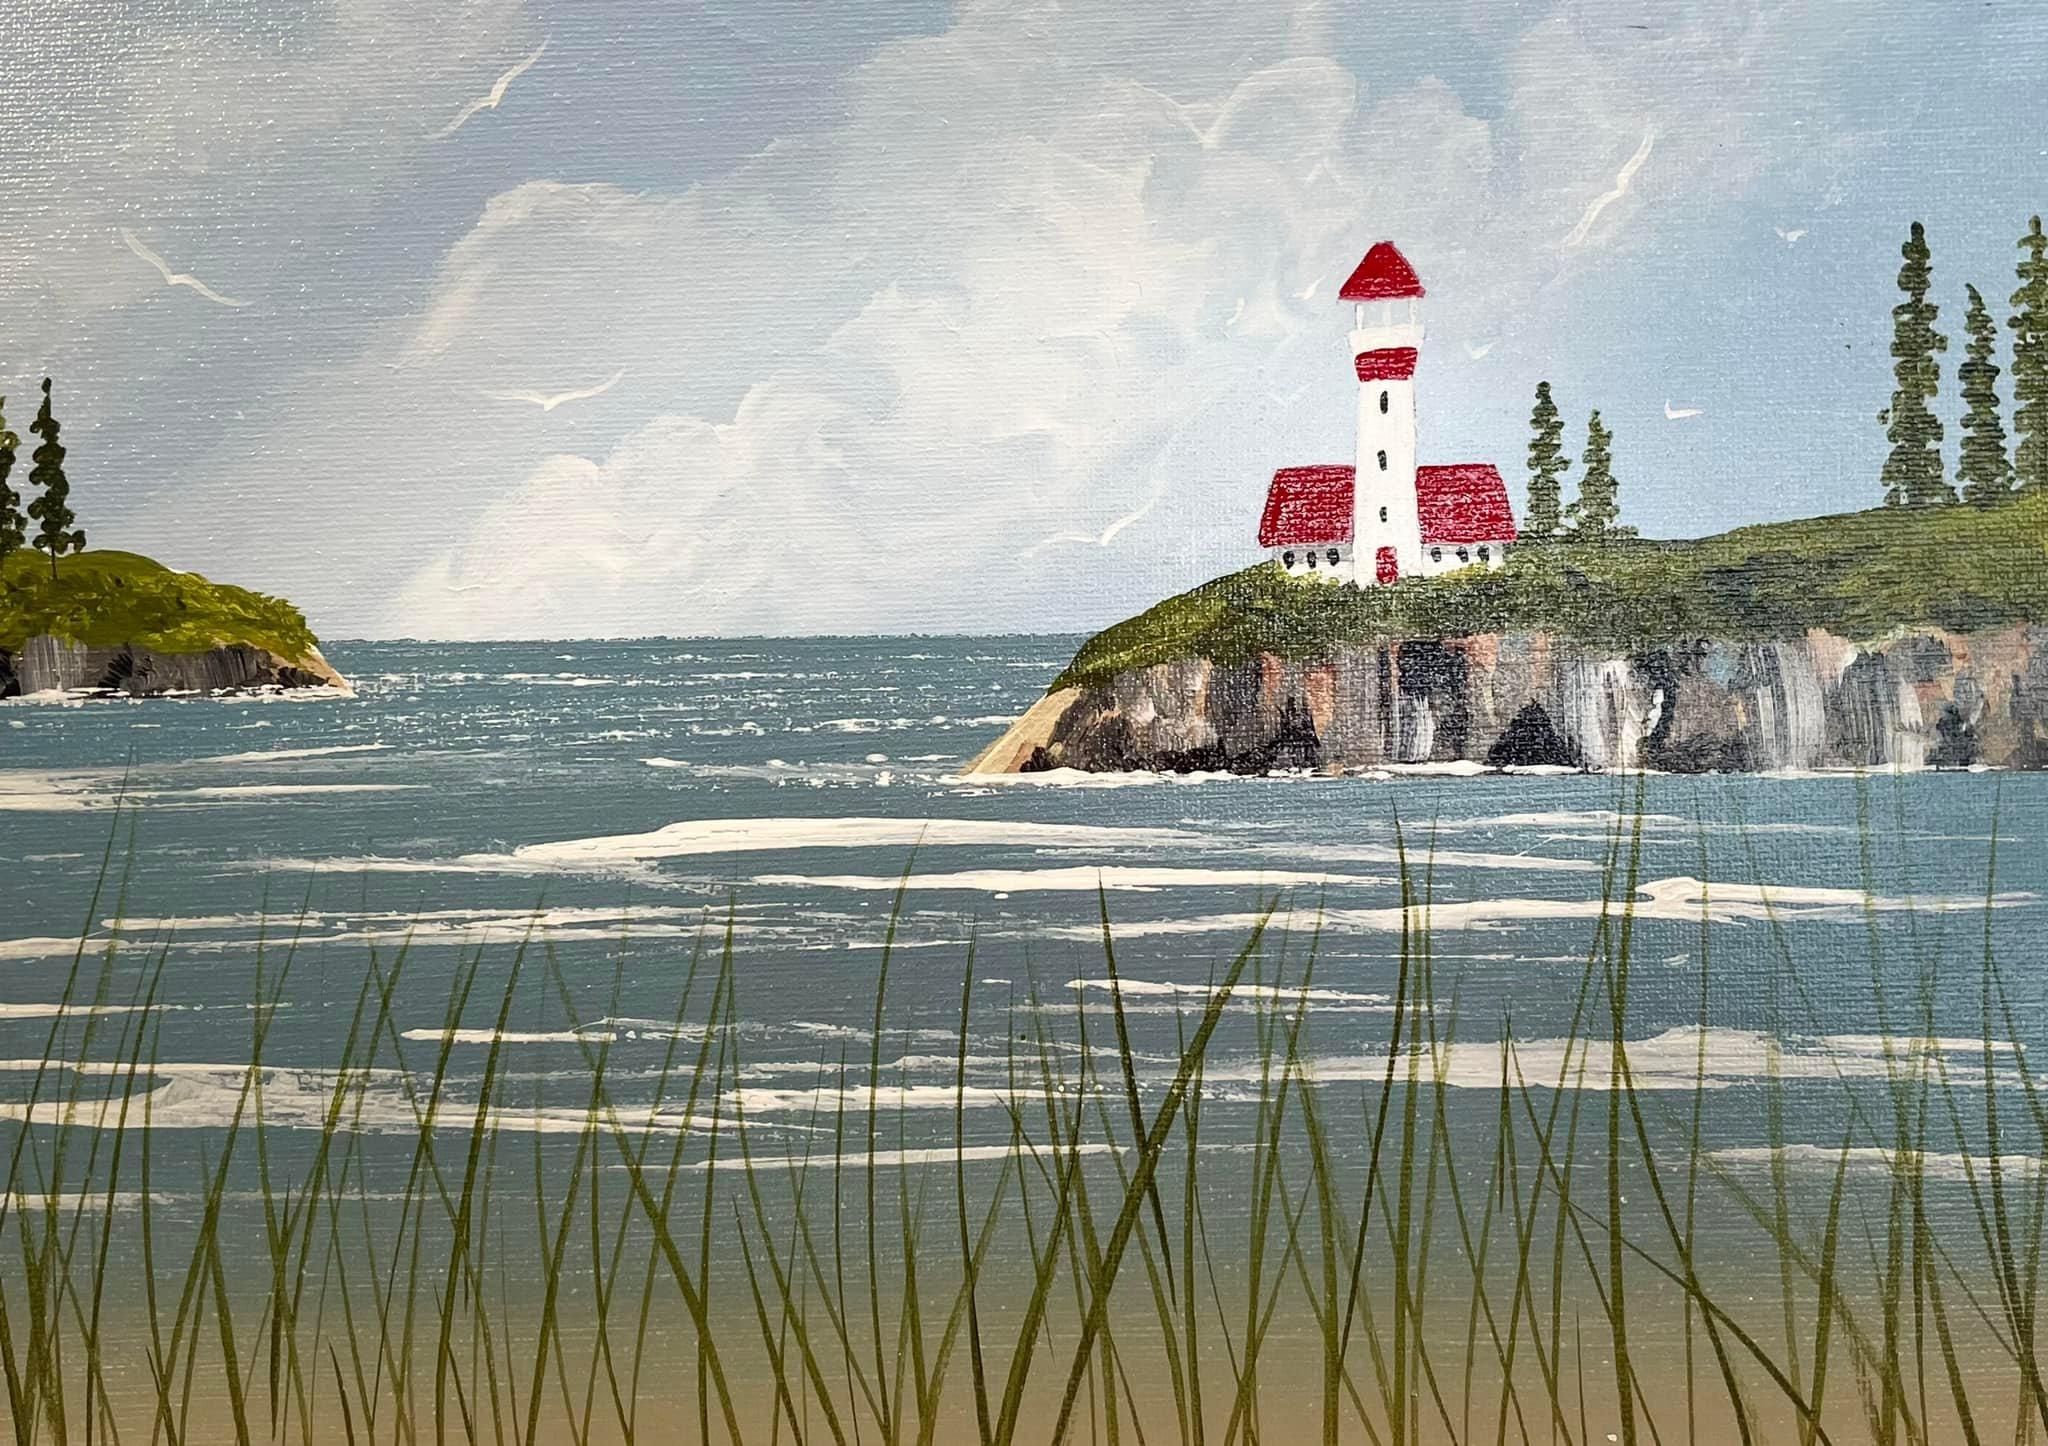
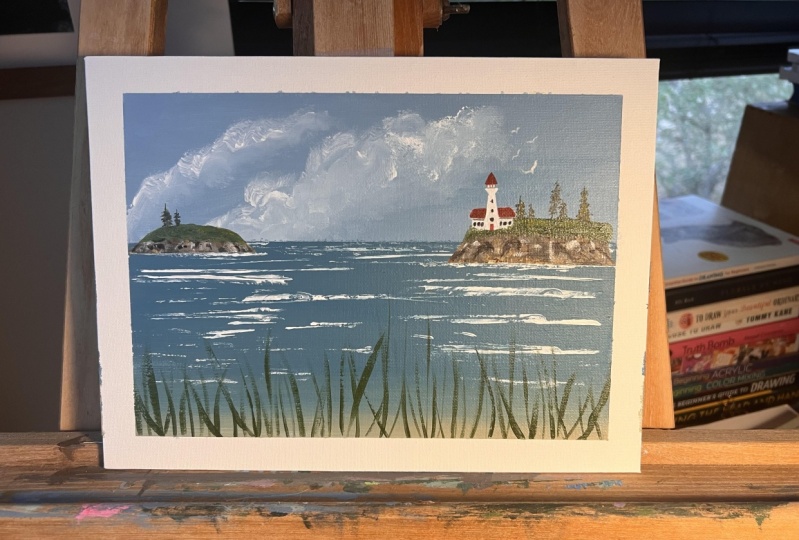
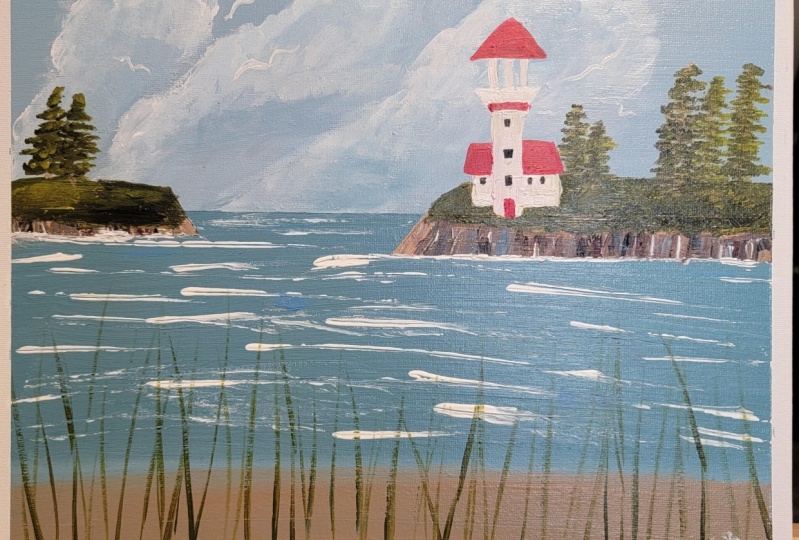
7. Finding the cliffs: All right. That
should be drying off. Take a little piece of tape. I'm gonna put this tape there. Even away from my horizon. We're gonna put our
lighthouse on a cliff here. Think I'm going to put another
little island over here. This one's gonna
be a bit higher, so it's gonna look a
little farther away. There we go, Just like that. Then I'm just gonna
take any old brush. Going to block in. My Ireland is going to
sit because we want to kind of cover up always blue behind it because we
don't need that anymore. This is going to sit I'm
thinking right in this area. Just like that. Could leave it like
that and it could be an iceberg there. We're not going
to just cover up, hold that about blue underneath. Let's give ourselves
a little one over here to come right
to the edge of your right to the edge of your Canvas here
are up over your tape. Then you know, when you
peel that tape off, you've got a painting
underneath it. Give that another quick dry.
8. Painting the cliffs: Let's give ourselves
some cliffs here. We shall start with
this sandy color. I'm just going to dab it
along the bottom here. I'm going to leave
some of that white still showing bit wet, my brush still just dabbing,
dabbing, dabbing, dabbing. Come down here with that a bit. Get some over here on this
little island as well. Leaving a little bit on the top, they're going to need
some graphs on it. I'll put some, put
some brown in there. Just dabbing it in different
different shades of brown. Different shapes. Little bit over here
as well. There we go. Let's put a little bit
of that blue in there to all sorts of different
shapes and blobs. A bit over there. Put some black in it. Let's make it a little
bit of gray, green at T2. And this time I'm just
going to make slash marks. It doesn't really matter
what you're doing here and just sort of getting a bunch of different
color in there. We take a little bit of black, put along the bottom. Just some little dogs and dabs
and lines look like caves. Doesn't look like
much. It doesn't. We peel that tape off its magic. Go some about maybe a bit, hit up there like that. I think white would be
quite nice to just street here and there we go. Just something interestingly,
she get right down over that tape or you
will not be happy. That's good. Just going to pop over
here to my yellow puddle, scoop some of that out. Take a bit of black and
mix that with the yellow. And it's gonna give me like I'm just gonna
take that green. I'm gonna give
myself top on here. As I go across the
bottom of this cliff. Not gonna keep it straight. I'm gonna wander
it up and down and around nooks and crannies and stuff will just make
it more interesting. Like that. Let that tone a little
bit higher there. I'll mix a little bit
of white into this dab, some of that in there too. For some difference,
something interesting instead of one just solid green. Looks a bit more interesting. I got a little bit more yellow here because it might be nice to put some brighter
along the top. Just here and there though. Don't don't put it everywhere. Then it'll all be the
same color again. Get some over here to still doesn't look
like much does it? We'll make a little
bit darker green here. Just pop along this
edge here a little bit. So it's not all one solid color. I think that she will
do is just fine. A few dabs over here. Good enough. All right. Let's give this a little blow dry and then we can
feel that tape off.
9. Cliff waves: All right. There we go. Got herself one little Ireland there and another
little island there. Now if we want to
make this really look like really looked like
It's settled in there. We're going to need a
little too much paint. You need a little bit
more fat credit card or gift card action here. Just putting a little
bit more white on there. I'm going to put this edge
right the bottom of my cliff. Just touch it here for you. Line it up. Here we go. We see that now we've got waves splashing up on the cliff. Little bit more on here for this height. Just a little bit. Didn't have any
paint on that one. There we go. A little bit more there. That kind of settles are little little island
into the water. There we go. Good enough. Put that sticky mess over there and we'll give
it another blow dry.
10. Drawing the lighthouse: Good enough. That should be dry. I'm gonna put that
down on the floor. I'm going to draw
ourselves a lighthouse. Take a little piece of
computer paper here, printer, paper, pencil. Probably have to do light has a few times because we don't
know how big we want this. We'll just start with sort
of a medium-sized one. I'm going to put a line, just a little line here. This is the fold. I'm
gonna bring this down. Let's get wider and wider
as it gets to the bottom. Like that. Then across. Going
to go up here. Align like that. Line like that. Then one more time
online like that. Line like that. Then I'm going to put
like an arrow on the top. Then I'll come down
here and I'll go right about here
out this direction. Lean it out a little
bit across the bottom. And that's the roof of our of our lighthouse keepers cottage. Then across the bottom. Then we're going to take
a piece of carbon paper. Are drawing on this carbon
paper will be shiny side up. Don't unfold it. And just go over all of your
lines like this. When you open this up, you'll have a lighthouse. Now, very, very strong possibility of this lighthouse is far too big for my painting. I'm going to do is I'm
just going to round it. Now I can see where I'm going
to place it on my painting. I'm looking at that and I'm thinking that's a
pretty big lighthouse. I want this smaller. Just gonna do it again.
Let's do that again. I'll keep this as
reference because I know that's the way to dig. Fold my paper again. This time, I'm going
to make it smaller. Let's do that again. Start here with just
a little narrow line down here and it's getting wider as it comes to the bottom. Out here, a little bit. Across to the fold. Up here, cross the fold cap, which is the roof or
lighthouse like that. Then above that far lighthouse
and nice long Roof. This may even be too big. Shiny side up again. Trace over all our
lines. Got them all. Yeah. Maybe I'll just cut it
out while I was here. Open it up. That might be okay for side. Let's see. Yes, that will do. I'll be happy with that. Once you've got your
lighthouse the right size for you, put it on there. Stick it down with a
piece of masking tape, make sure it's level. There we go. And then take your carbon paper. This time we're gonna
put a shiny side down, stick it under your lighthouse. Set up just a little bit. I'm gonna take I'm gonna
take a piece of board here and stick it underneath
my lighthouse. There we go. That way I have some
harder to press against. When I transfer this
over all of your lines. This is going to transfer
it right on to our Canvas. Lift that up and see
if I've thought at all other than my toe bit of roof here which I can
shade mike that there we go. One might houses sitting
on the edge of a cliff.
11. Lighthouse basecoat: We don't want any of this painting underneath
to show through. So we'll give it a bit
of white paint just to kinda prime it sounds going to take a
little bit of white. It doesn't even have to
be perfectly white minds probably going to
end up quite messy. And I'm going to go over the paintbrush for the
lighthouse carefully. This is kind of blocking out the the dark paint underneath so that when we go into our
white paint on top of it, lighter paint on top of it. We'll still have we'll have a nice true colors showing up. Whatever paintbrush
you feel fits that area the best will
all have different size. Lighthouses. There. Take a wee bit of red.
Before I do that. Miss that spot. Right there. I'm going to change brushes. We go let me just put up there. It's got a bit of blue in it. There we go. Maybe I'll put a little tiny bit more down the bottom here because that green,
pretty strong. If you wanted to put this lighthouse on the other
side of your painting. Go right ahead. All of these pieces can be
all mixed and matched. Maybe you're also always be different every single
time you paint them. Because so much of this
being mixed on the canvas, much paint is mixed on
the canvas already. I'm going to take a
little bit of white here, a little bit. And then I'm going to mix some
red into going to use this as sort of primer color
for our red roof. I know it's pink right now, but if we put a coat
of pink down first, rattle show really well. And I'll come over here
and I'll put some on this. Let us a nice bright red. I'm going to give that
another good blow dry.
12. Painting the lighthouse and trees: Let's take a little bit
of white and to black. So we've got a gray, light gray like that. And we're going to go right here along the
bottom of that roof. Same on this side. Like you can already
see how that turns into shadow from the roof. We go like that, fill in the bottom with white. Then we can just nip
carefully down or lighthouse. Nice bright white paint. Fellow that can put legs on that. Hold up that spot where
the light shines. Then we can dip
right into our red. We can fill in our roof. Simple little house
on little lighthouse. Doesn't have to be fancy, especially since
it's so far away. Let me go a nice red
roof there and one more right on the very top. Like that. You see how nice
and bright red shows up now? Just going to wash my brush off, I'm going to put a
couple of more white on the actual Tower part. If you're using read, make sure you wash your brush out well, for you to sit back
into your white because it will get into that
white and it will be pink. I think that's good enough. Now I'm going to
give it a good blow dry in little tiny
windows on it. Take a little bit of black, will take a little bit more black and mix it into this gray over here. Here we go. Just going to make it dark gray, not completely black
because the dark gray actually do it. Just put a little
narrow windows. Just little slashes,
little windows. And let's give her some
windows down here as well. That should be good. We might as well give ourselves a little stripe
on her house too. You can get this
fiddly as you want with this red door. Look nice. There we go. Nice to a red door at the
bottom firelight else. Excellent. Going to try that one more time. So we don't spread that
read anywhere else. I think we should
probably several that little
lighthouse in like it might have a bit of a garden
or something around it, or at least some bushes. Take a little bit of yellow and a little bit more of that black, make myself a green again. This is just, just a
little flat brush, little tiny flat brush. I'm just gonna put a few taps, so maybe a little bit of white in there just shows
up a bit better. There we go. That should show
up in the better. It's going to tap down here. Looks like we've got some
bushes around our lighthouse. Make that a little bit
darker here at the base, verb bushes along the bottom. This is just getting
ridiculously fiddly Now. Good enough. Shall we stick
a couple of trees on it? Mind as well? Going to
take my pointy brush, mix ourselves up
a bit more green, some black and some yellow. Want a bit of water in this. I'm gonna drive that brush
off because if I don't, water will dribble out of it, make a mark and I
don't want that. I'm just going to
make a line here. I'm just going to
tap side-to-side. All way down there. The way down to the bottom. I'm getting a little tiny
bit wider at the bottom, but not a whole bunch. Let's give ourselves
another one, a little bit shorter one
right next door to it. Just tapping. That's all I'm doing. Bouncing that tip of the bristles of the
brush off my Canvas. Maybe a little bit wider
at the bottom there. We'll put one right here too. Because it can you put your trees or if you
want to put trees and you put them wherever you
want to put them, I'll say one more
probably end up with six more light to make them so they're
all different heights. Starting to look more like
a West Coast lighthouse. Even taller either side, and I'll cross the cross
the trunk of that tree. Wider as they get to the bottom, but not whole bunch there,
that's pretty good. We will take a little
bit of yellow in there. That watery green
we've been using. And just tap a few spots
in here and there just so that it's not one solid color. That's all we need there. Unless we decide we're
going to put one over here, which I think I will
put one right here. There we go quick as that. There. Now you'll probably
notice that you've got some carbon marks still left behind
on your lighthouse. But don't worry about that
when it's good and dry, we can erase those. I'm going to blow dry this now.
13. Grass and gulls: That should be dry. We don't want to drag
our hands through this. I'm gonna flip this
upside down like this. I'm going to get my brush, my skinny pointy brush. I'm going to load some of this green paint
up for some water. Because when you're
making something long and skinny like the graphs
we're going to put on here. If you want to put grass
on, you don't have to. Do you want to do something
that's thin and fine? Much easier if you
add some water, was also much
easier if you brace your hand on your canvas. And instead of
painting like this, paint my confess
with your whole arm, I'm going to start at the
side and I'm gonna start right off on my tape here. And this is scary because while you're painting over
your ocean, aren't you? I'm just going to trade
some grass up here. Gonna make my grass wiggly and some is long
and some are short, some as fat and some is Finn. I'm going to line it all the way along the bottom of
my painting here, pulling it towards me. Raising my hand on my canvas. Raise your hand. You won't
be fighting gravity. I'm just going to
go right across all the way across
the bottom of here. During trying to
remember to make different lengths,
different thicknesses. If you find your grass isn't the paint isn't
lasting very long, like you can't draw a
long strand of grass. Add a bit more water
to your paint. My paintbrush just barely, barely, barely touching
the canvas here. Also tempting fate holding my paintbrush or my
palette over my painting. Don't do that. Always
start off on my tape here. My grass has got somewhere
that it came from. It wasn't just starting
in the middle of this. They're putting this grass in the front, going to make this middle
ground seem farther away. So this is in the foreground, are painting all these graphs. I might need grasped in
this area here, right here. Notice there was a
white spot right there. I'm just going to try to aim
some grass on top of it. Just a few more
strands down this end. Here we go. I think
that's probably enough. Probably more there. That's enough.
Let's flip it over. All right. Now it
looks like we're all messy down at the
bottom, doesn't it? Well, we're not very
close to being done here. I'm going to take a little
bit of white paint like that. I'm going to make
myself a seagull. Make my, starting
from the middle out. I don't make them
flat, lying flat. Make them tilted in the sky. They're enjoying themselves. The bigger your, your seagulls, the closer they will be to you. If I wanted to, seagulls
flying around my lighthouse, I see girls would be
really little like that. Really little ones. Just flip to kind of marks out from little v's back there
that works for those ones. They're small. They're far back. Quite small. Ones are far away. Alright, I think we're done.
14. The grand reveal!: If you've dropped
anything in your sky, is a good spot to put a seagull, peel off our tape and
see what we've got. What do you know?
Gotten Lighthouse. All you need to do now. Stick your signature on it. When it's good and dry. Take an eraser and erase any of the carbon paper you've
got still left showing. Give that a good
coat of varnish. Hang it somewhere
where you can really admire it, sets a beauty.
 Anne Clarkson, Inspiring the reluctant artist